
Improved Import / Export Magento 2 Extension Manual

In this article, we’d like to draw your attention to the Improved Import & Export Magento 2 extensions. The following blog post contains all the information about the data transfer module. Below, you will find the Improved Import & Export Extension manual that sheds light upon all the key aspects associated with the plugin. We describe its installation, configuration, and import/export transfers, teach you how to add a new import and export job, talk about import and export processes associated with different entities. You will also discover various nuances of running data transfers via CLI, automating processes, using extension customization endpoints, and performing troubleshooting. Various use cases and specific features are also described in the manual.
Improved Import and Export extension allows importing and exporting CSV/XML/JSON files with product data and product images to Magento 2. The files can be imported from a remote FTP/SFTP server, Dropbox, direct URL of a source CSV file, Google Sheets, etc. In addition, the extension offers a dedicated category import from CSV files, import of attribute values and new attributes on the fly, import job scheduling with cron jobs, and other features.
Besides, you get advanced export capabilities, including order export and export jobs, with attribute and table field mapping.

In this manual, you will find all the necessary information on how to use and operate the Improved Import and Export extension. However, including a thorough instruction on how to import each and every entity to Magento 2 would be overkill. That’s why we have composed
Magento 2 import/export guide list
In the guide list, you will find step-by-step instructions on how to import every possible entity – such as configurable products or CMS pages – to your Magento 2 store. For every entity, we have composed a dedicated blog post where you can find sample files, attribute references, and other useful information.
Table of contents
- Improved Import/Export Features
- Installation
- via Composer
- Upgrading the extension via composer
- Manual installation for both Commerce (Enterprise), Cloud and Open Source (Community)
- Installing B2B Add-On
- Installing MSI Add-On
- Getting Dropbox API
- Getting OneDrive API
- Getting Google Drive API
- Installing Imagick for PHP 7 for Magneto 2 Enterprise and Cloud using image watermark option
- Standard Magento 2 import
- Extension Configuration
- Import and Export Job grids
- Add new Import Job
- General settings
- Import settings
- Import behavior
- Import source
- Find and Replace
- Email notifications
- Email template customization
- Import prerequisites
- Import Table, requirements and where to get
- How to import products
- Important notes
- Import of product images
- Custom product type support
- Step 1: select entity, behavior and upload import table
- Step 2: map attributes
- Step 3: map categories
- Step 4: price rules
- Step 5: Custom logic for creation of configurable products
- Importing different product types
- How to import categories
- How to import product position in categories
- How to import customers
- How to import advanced pricing
- How to import CMS pages
- How to import CMS blocks/Static blocks
- How to import cart price rules
- How to import orders
- How to import product and custom attributes
- How to import Magento 2.3 MSI entities: stock sources and product qty per source
- How to import Magento 2 related products, up-sells, and cross-sells
- How to import tracking codes and shipping for orders
- How to import Magento search terms and synonyms
- How to import product position inside of a category
- How to import Magento 2 page hierarchy
- How to import Magento 2 product reviews
- How to import Magento 2 URL rewrites
- How to import Magento 2 Commerce gift cards
- How to import Magento 2 catalog price rules
- How to import Magento 2 products with the MSI warehouse reference
- Running the Job
- Job history
- Add new Export Job
- General settings
- Running export jobs on Magento 2 system events
- Export settings
- Export behavior (CSV, XML Export)
- Export source
- Map attributes
- Filters
- Run Import/Export Jobs Via CLI
- Extension customization endpoints
- Use cases and specific features
- Magento 2 and Google Drive Connection
- Magento 2 Google Sheet Import
- Magento 2 Google Sheet Export
- Tier Price import
- Categories import
- Color swatch values import
- Product attributes import – create new attributes on the fly during the product import
- Map and create insufficient attributes
- Configurable Product Import
- Import downloadable products in Magento 2
- Order Export
- Integration with Improved Configurable Products
- CSV, XML, Json, Excel file samples
- Troubleshooting
- Upcoming features
- Compatibility with third-party extensions and modules
- List of detailed import and export guides
- Services and Magento 2 customization
- Improved Import & Export FAQ
Improved Import/Export Features
Now to the extension. Complete feature list of Improved Import/Export Magento 2 Extension includes:
- Import CSV/XML/Json/XLSX/ODS files from a remote FTP/SFTP server, Dropbox, direct URL or Google Sheets, Rest and Soap APIs;
- Import product images from a remote FTP/SFTP server, Dropbox, or via a direct URL;
- Dedicated category import from different file types for selected categories (default M2 store allows importing categories only together with assigned products);
- Creation of new product attributes on the fly during import process;
- Magento 2 product attribute import and export, along with attribute sets
- Creation of new attribute values on the fly: if attribute values don’t exist in Magento 2 database, they are created during the import process;
- Magento 2 product color swatch import with image and color values;
- Two-side synchronization with Google Drive;
- Full support of Google Sheets – paste links and import directly from the sheets, import and export data files;
- Tier price import with products – imports both products and tier prices from a single file;
- Configurable products can be created on the fly – specify SKU of parent product for a simple product and configurable will be created automatically;
- Asynchronous import and export process for data-heavy tables – now you can easily import and export data-heavy tables from your browser;
- Built-in cron jobs for any kind of import (products, categories, customers, stock, attributes, etc.) – flexible and extremely powerful feature of Magento 2 Enterprise Edition is now available for Community Edition!
- Full support for configurable products: files can be placed locally or imported from a remote URL source;
- Fields mapping (in Magento 1.x style!) – you can map Magento 2 product attributes to any custom column in your file! A fully flexible and powerful way to import custom data structures to Magento!
- Support for XML, Json, XLSX, ODS file formats;
- XSLT templates for transforming XML files into appropriate format;
- Export jobs with attribute mapping functionality;
- Run import/export jobs from admin panel or using CLI;
- Extended debugging functionality with job logging;
- Order export and import with invoices, credit memos, and other docs;
- Magento 1 and Shopify presets for import jobs;
- Hard-coded / default values during mapping;
- File validation;
- Inline Edit Mode for cron in a grid;
- Attributes based export filtering;
- Sample files in the extension pack and manual;
- Direct CSV upload;
- Unzip/untar archives automatically;
- History with logs.
Improved Import Export Magento 2 Roadmap – vote for the most exciting features and we will implement them first. Leave your suggestions in the comments and we will add them to the poll.
Buy Improved Import Magento 2 Extension
Improved Import Magento 1 Extension
Firebear Import Export Extension FAQ
We provide professional installation services for our Magento 2 extensions – get your extension installed and configured right after the purchase!
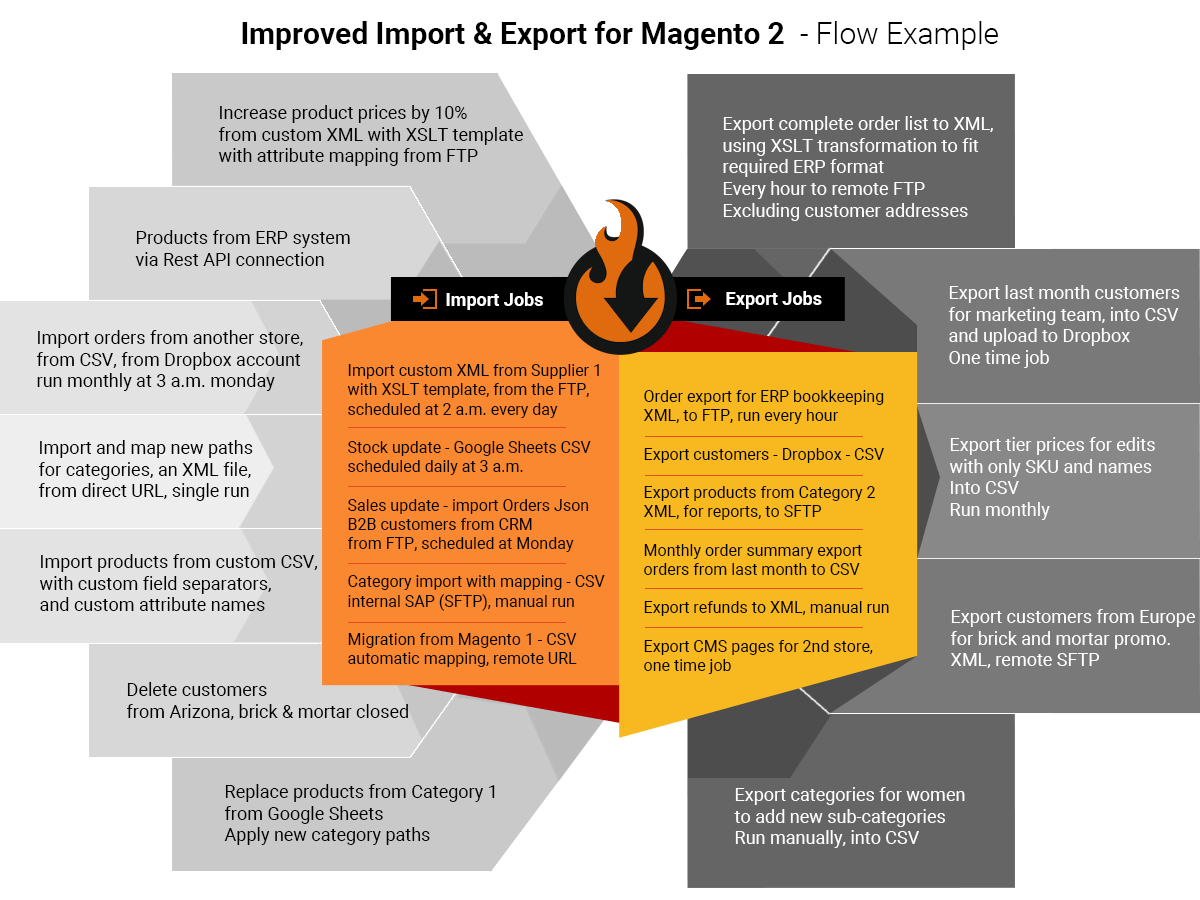
Before we begin, check a brief illustration of the extension features:
Installation
via Composer
To install the extension using composer follow these steps:
- Log into your FireBear account and proceed to My Extensions Download section.
- Scroll down to the Composer credentials block. Here you will find api keys and installation commands.
From this moment, you can follow the instructions in the Composer credentials block. - Make sure your composer username and password are generated. Otherwise click ‘Refresh api keys’ button.

- Navigate to your store root folder in the SSH console of your server:
1cd path_to_the_store_root_folder - Add FireBear composer repository to your Magento 2 by copying and running relevant command from your root directory. The commands include api keys, and require to be copied from the account dashboard.
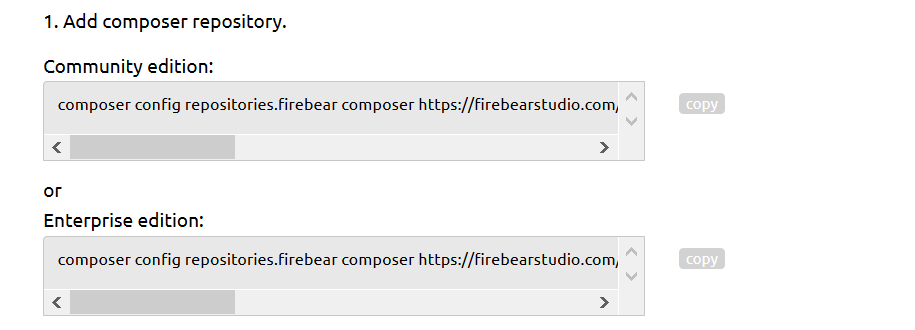 If you are using Magento 2 Cloud or Commerce – copy and run Enterprise edition command with your api credentials:
1composer config repositories.firebear composer https://firebearstudio.com/composer/download/package/type/ee/user/youruser/password/yourpassword/
If you are using Magento 2 Open Source – copy Community and run Community edition command with your api credentials:
1composer config repositories.firebear composer https://firebearstudio.com/composer/download/package/type/ce/user/youruser/password/yourpassword/ - Install the extension by running command:
1composer require firebear/importexport

- Enable the extension by running:
1php bin/magento module:enable Firebear_ImportExport
- Deploy content and flush store cache, log out from the backend and log in again. Run:
1php bin/magento setup:static-content:deploy -f
and:
1php -f bin/magento cache:clean
If you require 2.2.1 version of the extension for some reason, you can run:
1composer require firebear/importexport:2.2.1
Upgrading the extension via composer
To upgrade the extension, navigate to your store root folder just as per instructions above and run the following commands:
|
1 |
composer update firebear/importexport |
after:
|
1 |
php bin/magento setup:upgrade |
then:
|
1 |
php bin/magento setup:static-content:deploy -f |
and:
|
1 |
php bin/magento cache:clean |
The extension has been updated.
Manual installation for both Commerce (Enterprise), Cloud and Open Source (Community)
1. Backup your web directory and Magento 2 store database;
2. Download Improved Import installation package;
3. Copy the contents of the package to /app/code/Firebear/ImportExport folder. Make sure to create folders if required.
4. Navigate to your store root folder in the SSH console of your server:
|
1 |
cd path_to_the_store_root_folder |
first run:
|
1 |
php -f bin/magento module:enable Firebear_ImportExport |
proceed with installing necessary for Improved Import libraries:
|
1 2 3 4 5 6 7 8 9 |
composer require "salsify/json-streaming-parser: ~6.0" composer require "tcdent/php-restclient: ^0.1.7" composer require "tmwk/client-prestashop-api: ^1.0" composer require "bcncommerce/json-stream: ^0.4.1" composer require "box/spout: ^3.1" composer require "google/apiclient: ^2.0" composer require "microsoft/microsoft-graph: ^1.25" composer require "guzzlehttp/psr7: ^1.7" composer require "league/oauth2-client: ^2.4" |
then:
|
1 |
php -f bin/magento setup:upgrade |
and:
|
1 |
php -f bin/magento setup:static-content:deploy |
5. Flush store cache, log out from the backend and log in again.
|
1 |
php -f bin/magento cache:clean |
Installing B2B Add-On
B2B Add-on for Improved Import and Export extension is purchased separately and installed separately.
To learn more about B2B Add-On, supported entities, and how to use it – read dedicated B2B Add-On manual.
Installing MSI Add-On
MSI Add-on for Improved Import and Export extension is FREE, you can find it in your account if you purchased Improved Import and Export extension. MSI Add-On is installed separately.
To learn more about MSI Add-On, supported entities, and how to use it – read dedicated MSI Add-On manual.
Getting Dropbox API
1. Create .
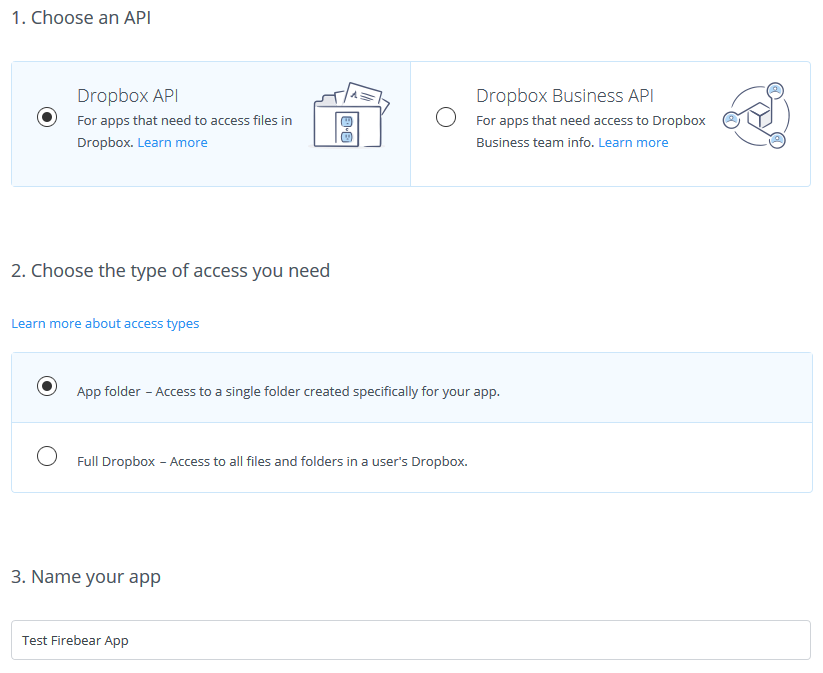
2. Navigate to screen and click ‘Create app’ button.
3. Choose ‘Dropbox API’, select the most convenient ‘Type of access’, name your app, and click ‘Create app’ button.
4. At the app screen find App key, and App secret. You will need to submit these into the appropriate fields when creating an Import Job.
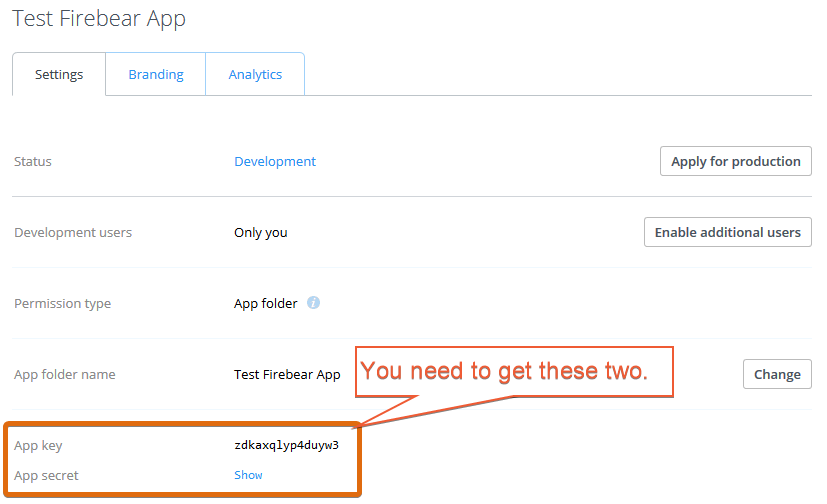
5. That’s it, now you have all the necessary credentials to import files from your Dropbox account.
Getting OneDrive API
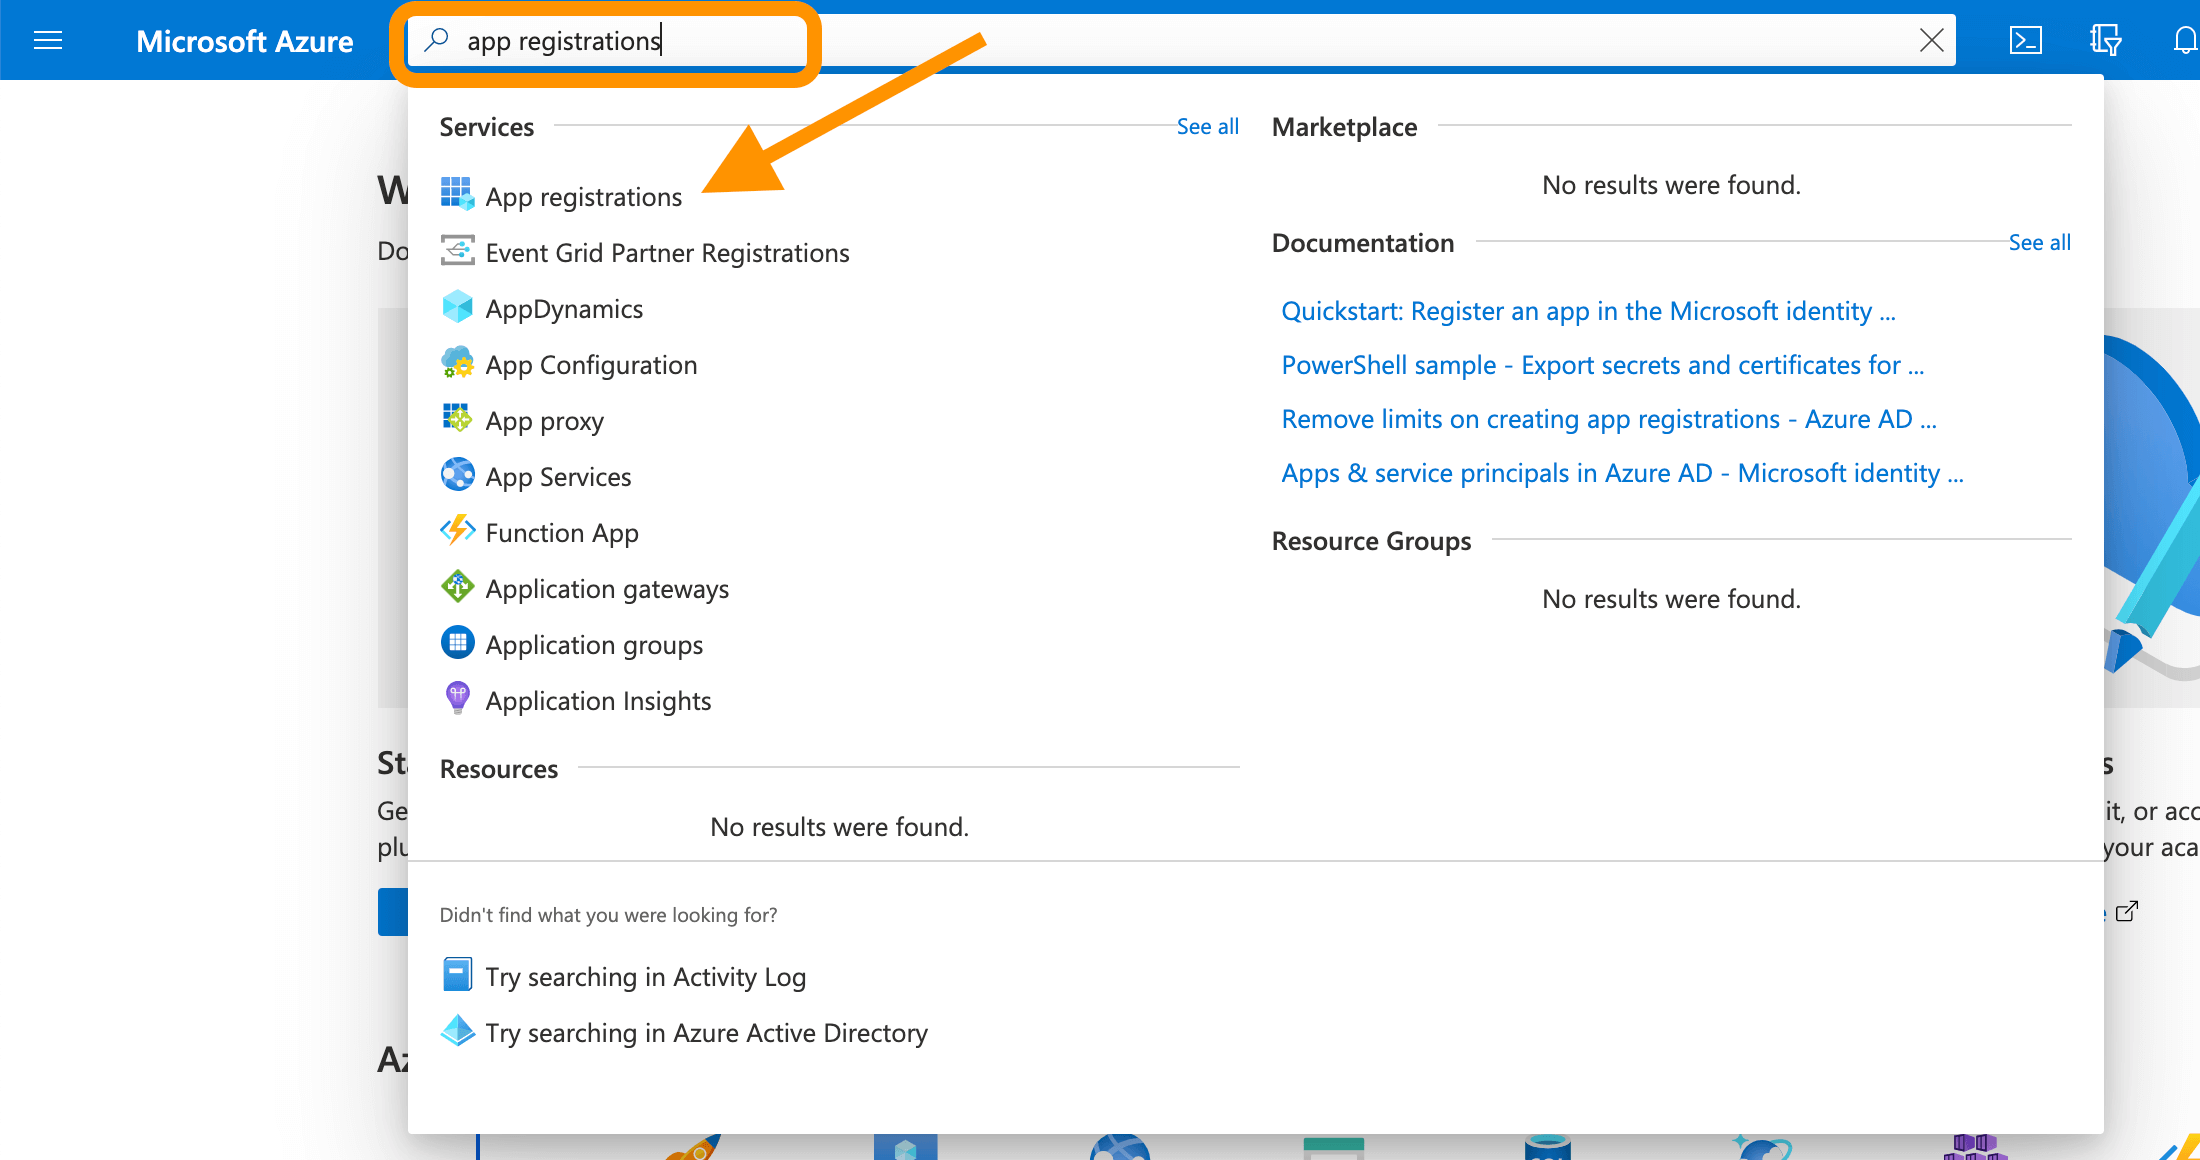
1. Navigate to and log in with your Microsoft account.
2. In the search menu type in ‘app registrations’ and proceed clicking related service
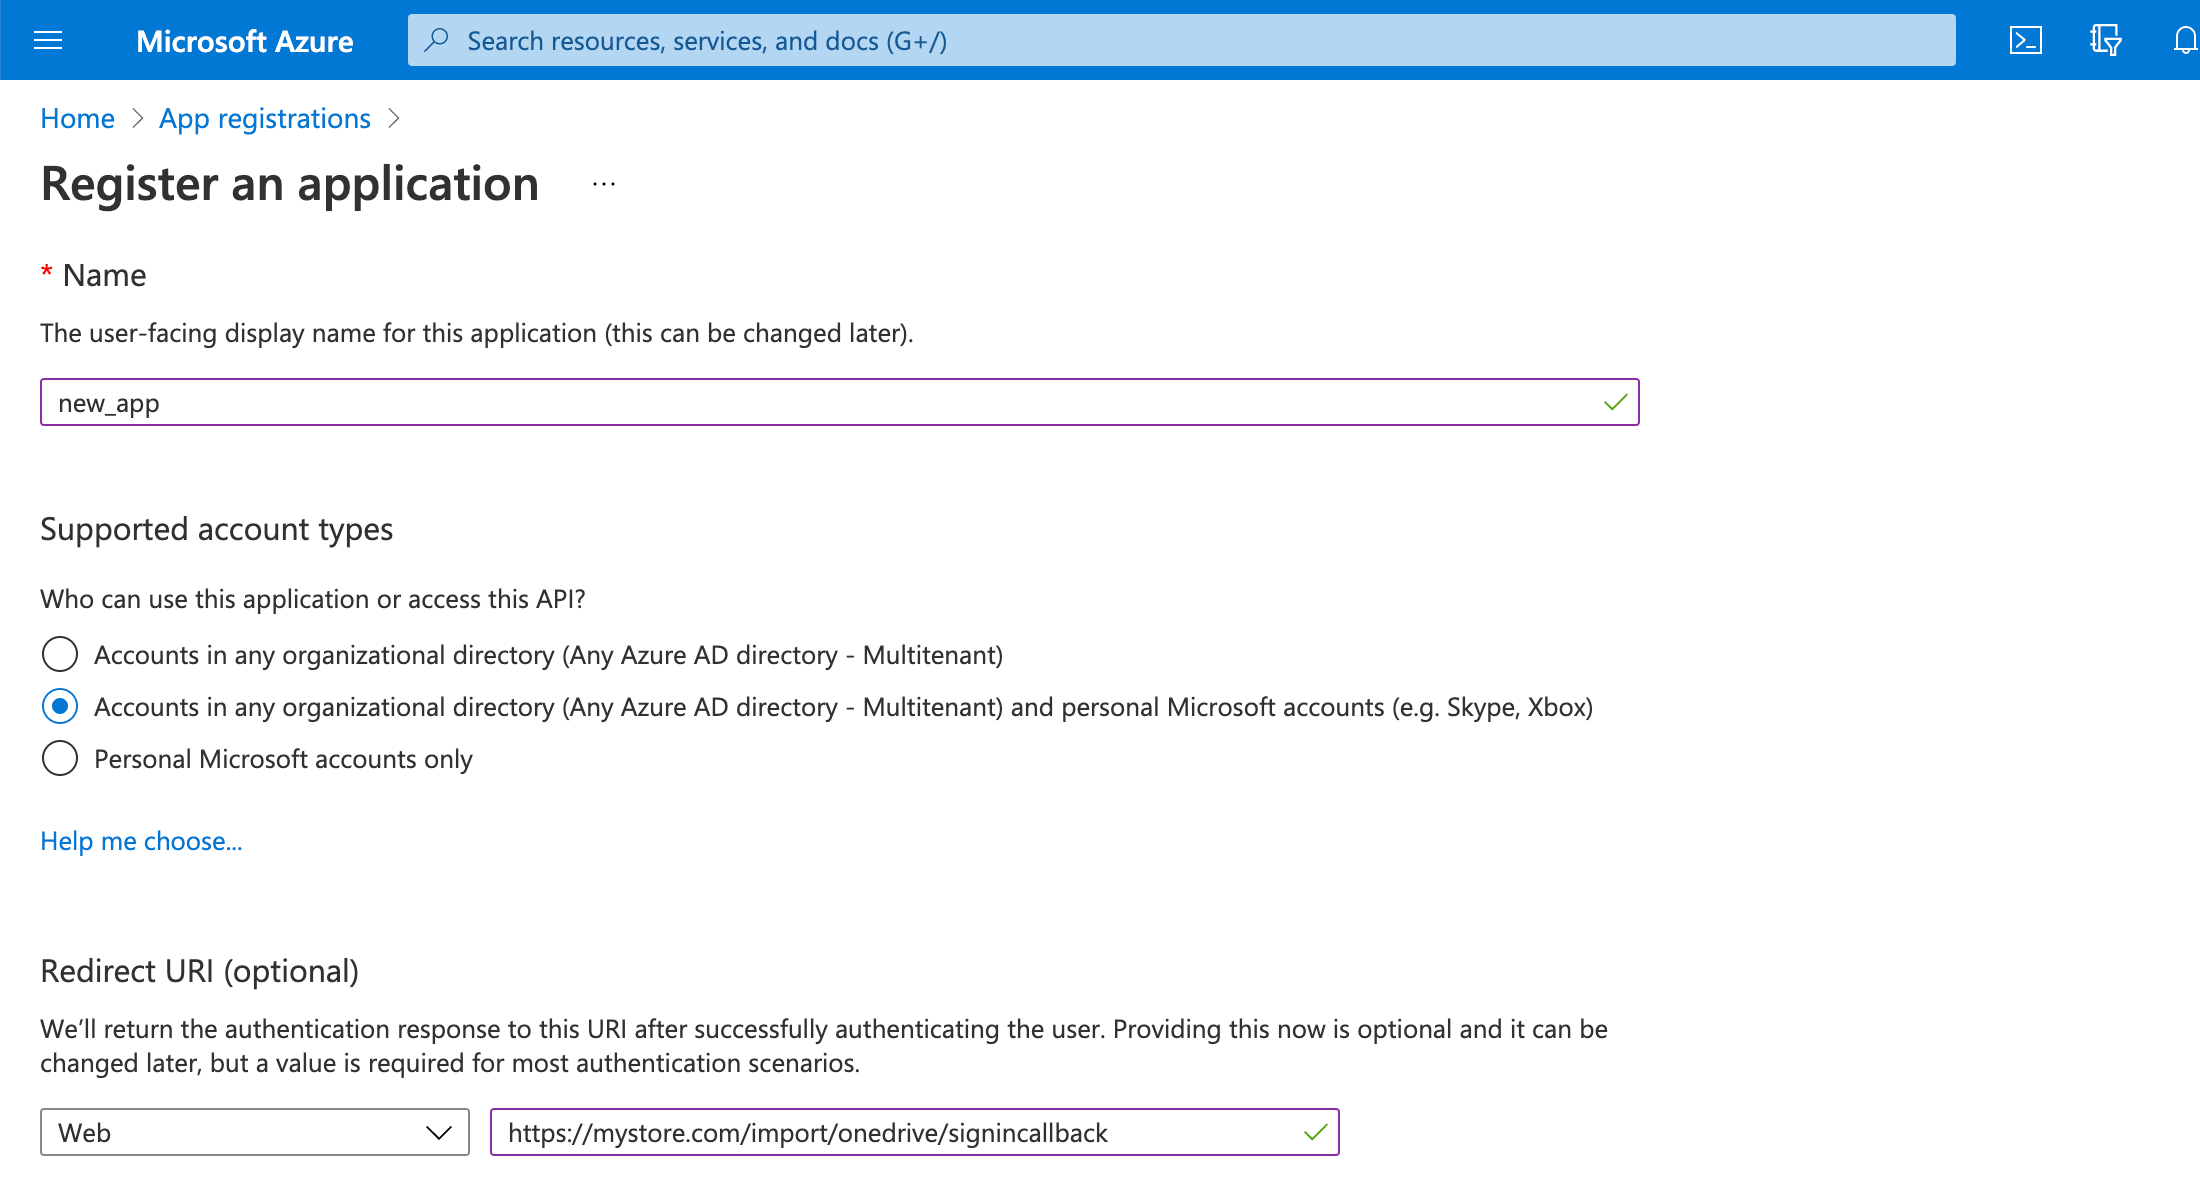
3. The the App Registrations page click ‘+ New Registration‘ button
4. Specify the Name of the app, set Supported Account Types to ‘Accounts in any organizational directory (Any Azure AD directory – Multitenant) and personal Microsoft accounts (e.g. Skype, Xbox)‘, and in the Redirect URI (optional) specify your store URL with postfix ‘/import/onedrive/signincallback‘ so it would look like mystore.com/import/onedrive/signincallback.
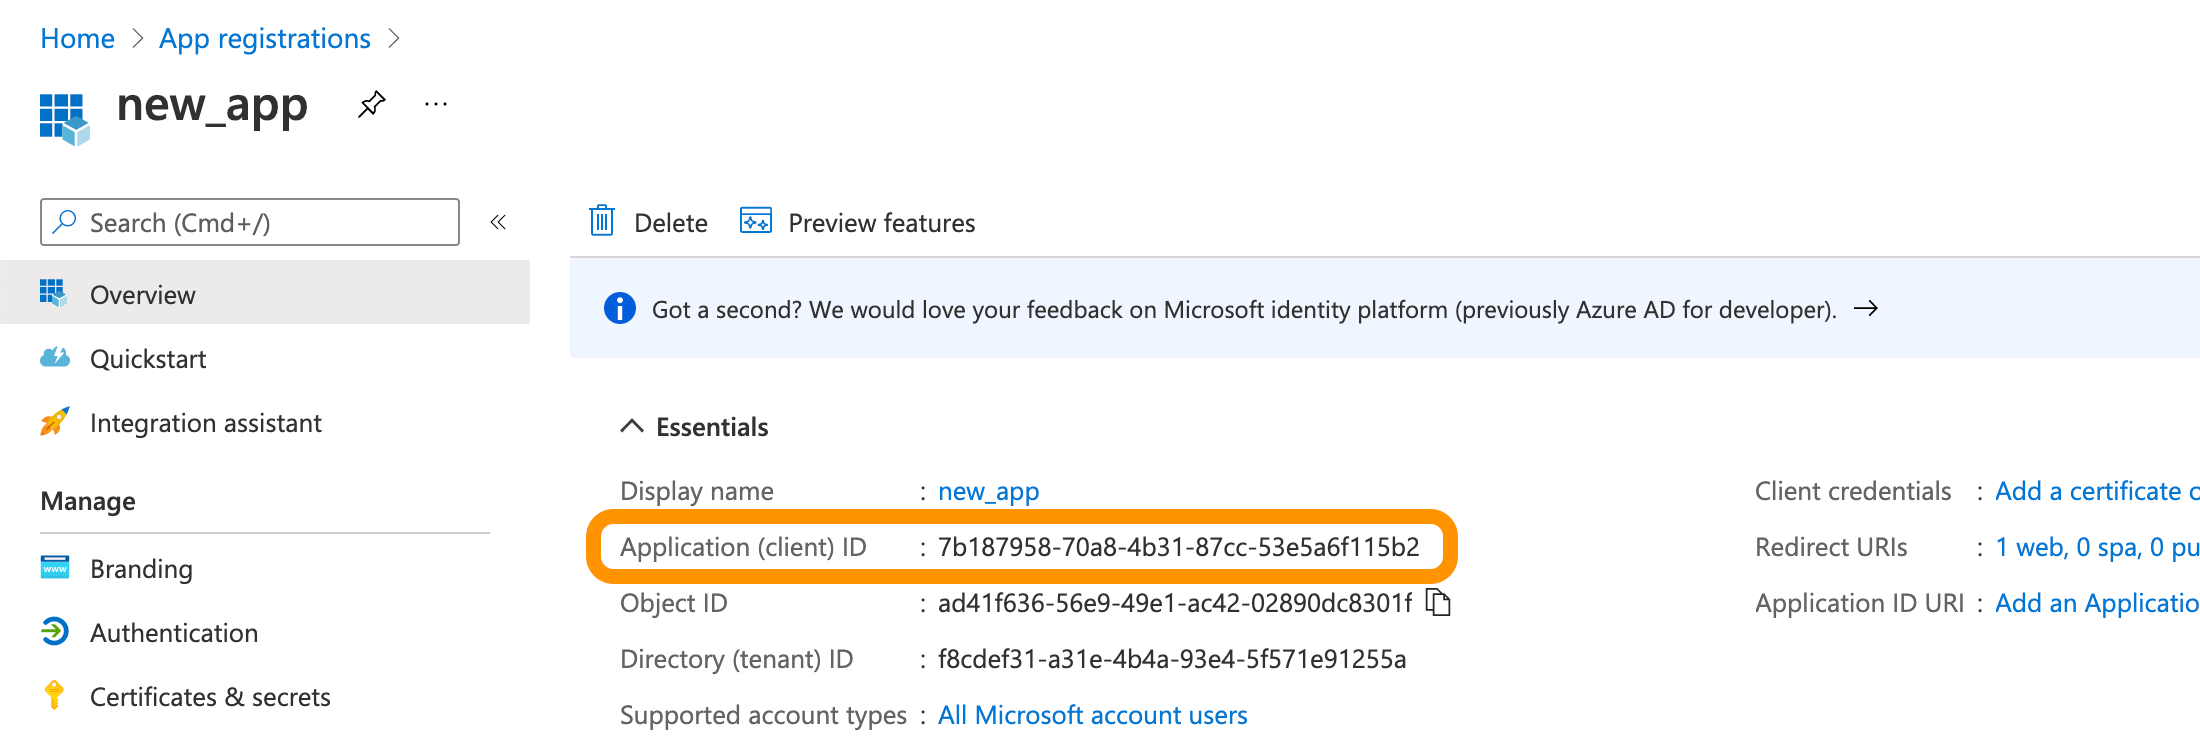
5. Click ‘Register’ button to create an app and save the Application (client) ID
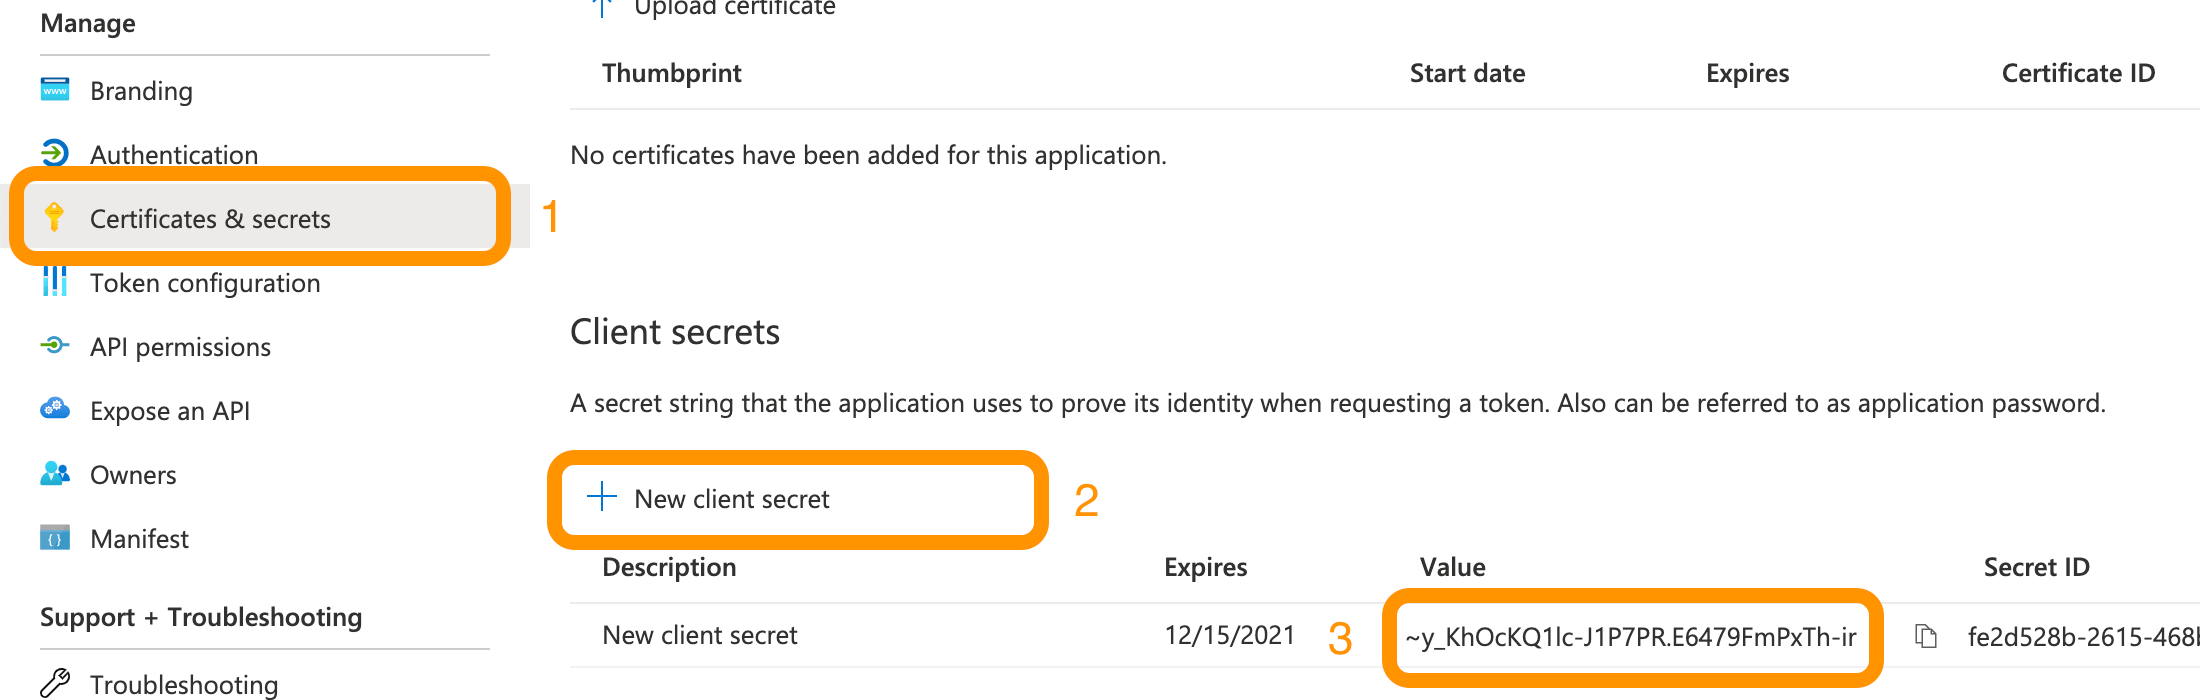
6. Navigate to Certificates & secrets section, create New client secret, and save client secret Value
7. Log into your Magento 2 administrator panel and navigate to Stores > Configuration > FIREBEAR STUDIO > Import/Export > OneDrive, and fill in Client ID and Client secret
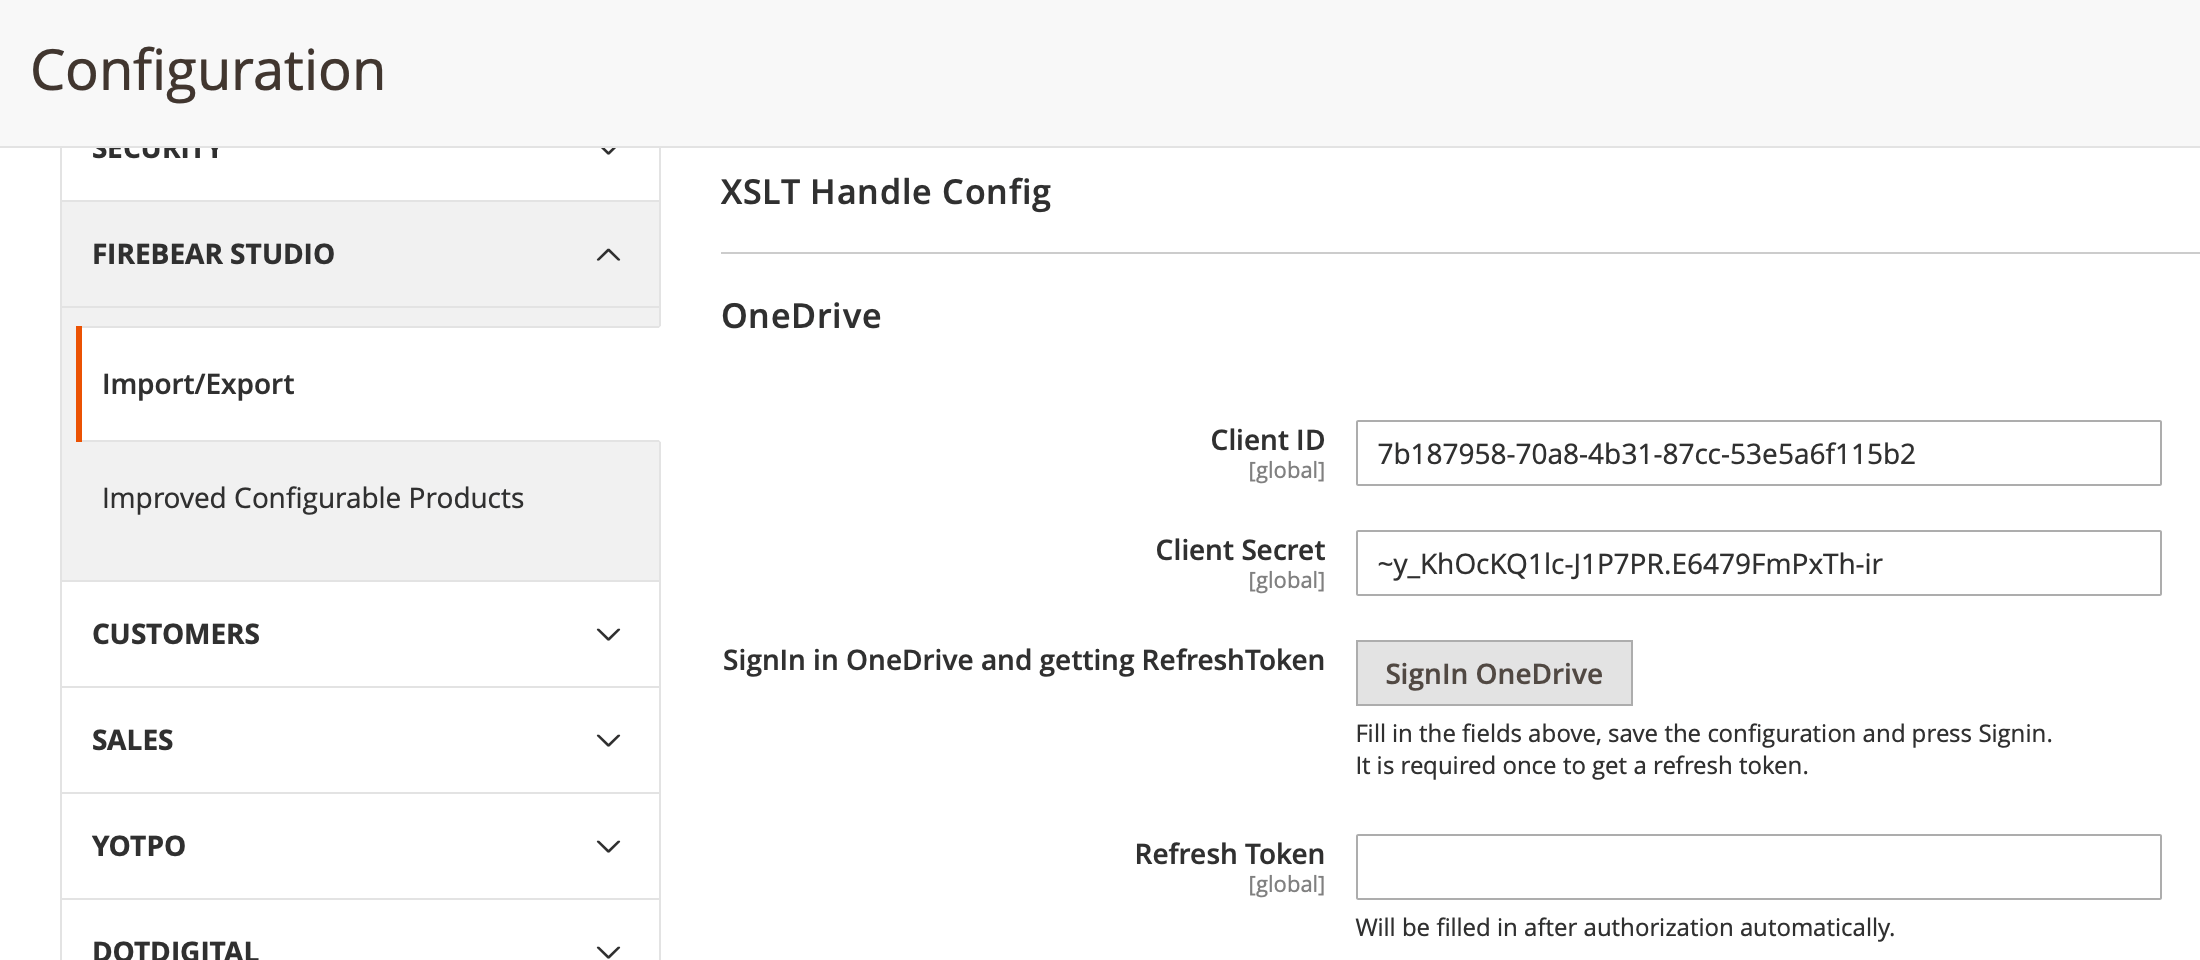
8. Click ‘Save Config‘ button to save the submitted Client ID and Client Secret
9. Click ‘SignIn OneDrive‘ button and sign into your Microsoft account to allow the newly create app access your OneDrive
10. If everything is done right, the Refresh Token field should be filled in automatically
Great! You are good to go and use OneDrive as your import and export source. For file paths you can specify paths related to your OneDrive root folder including every folder on the way.
NOTE:
Single OneDrive app can be assigned to a sing store/domain name. If it is required to use OneDrive for another domain, – create the second app. As both apps will belong to a single OneDrive the files will be shared for both stores/domains.
Getting Google Drive API
Enabling Google Drive API:
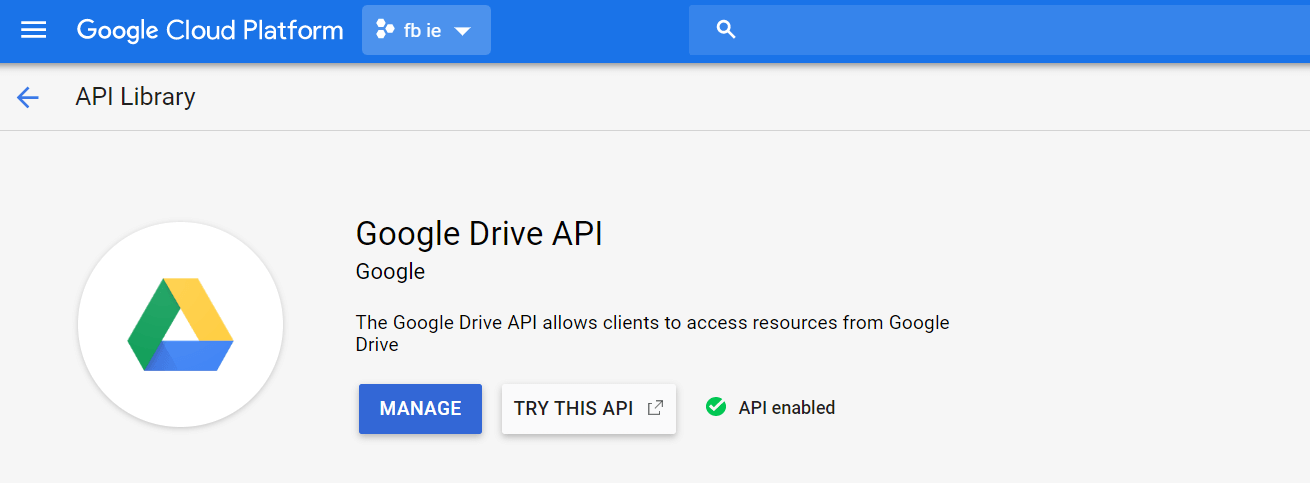
Go to the library page.
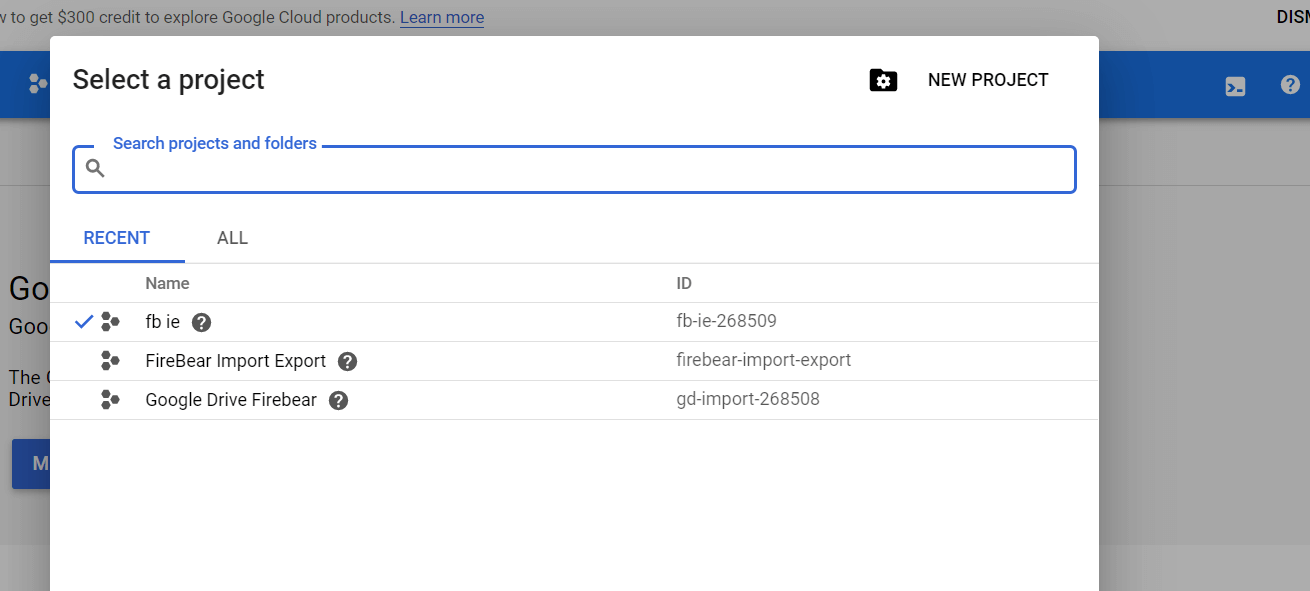
1. Create a new project or select an existing one at the blue console panel at the top of the page.
2. Click the ‘Enable’ button for API activation.
Generating a Service Account Key:
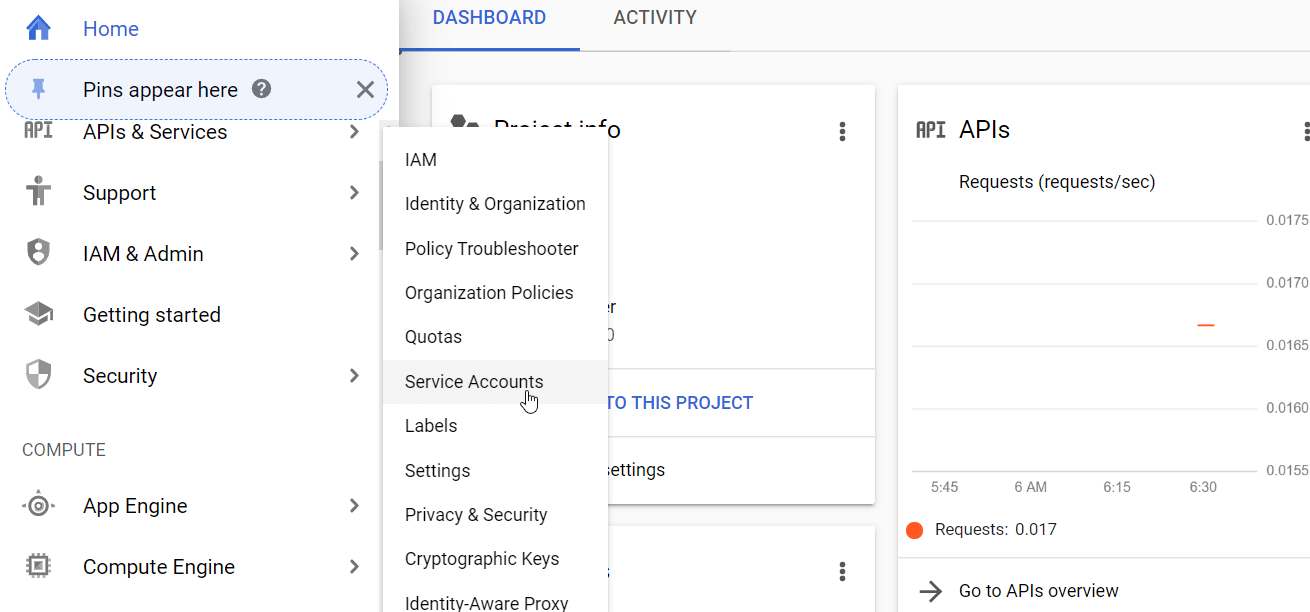
1. Open the .
2. Go to APIs & Services > Credentials.
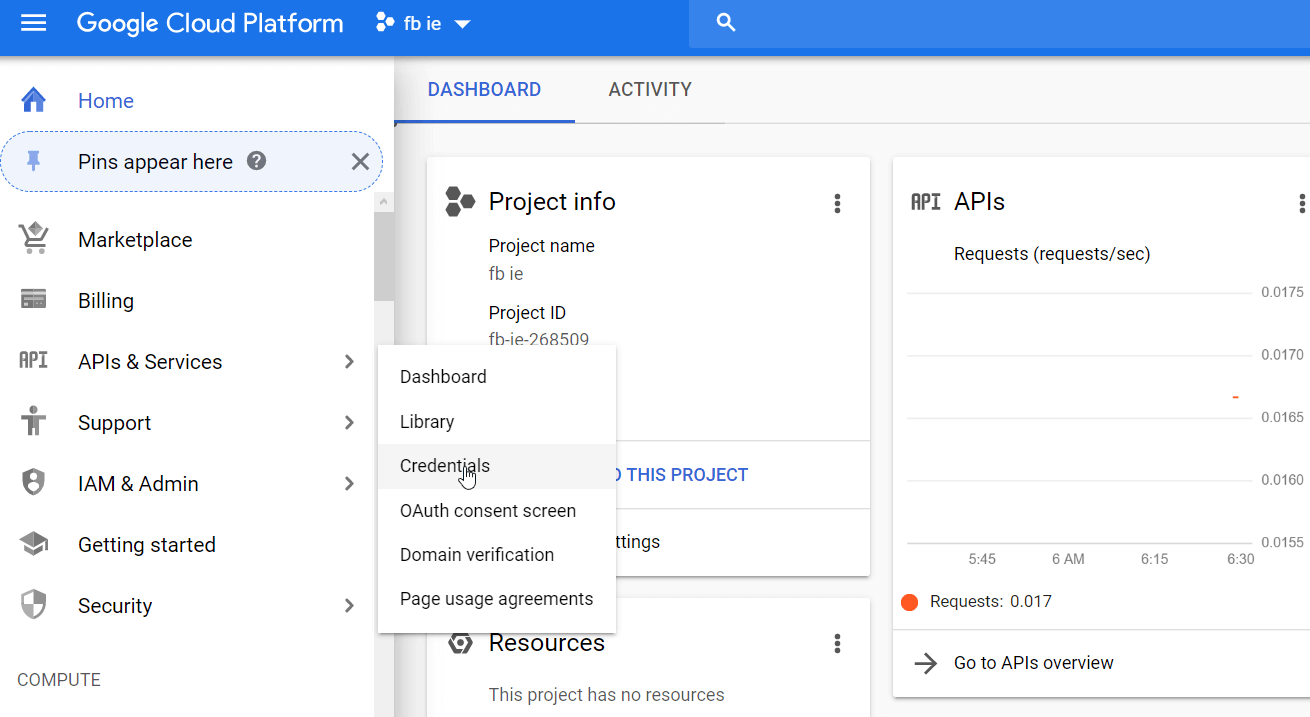
3. Select Create Credentials > Service Account Key.
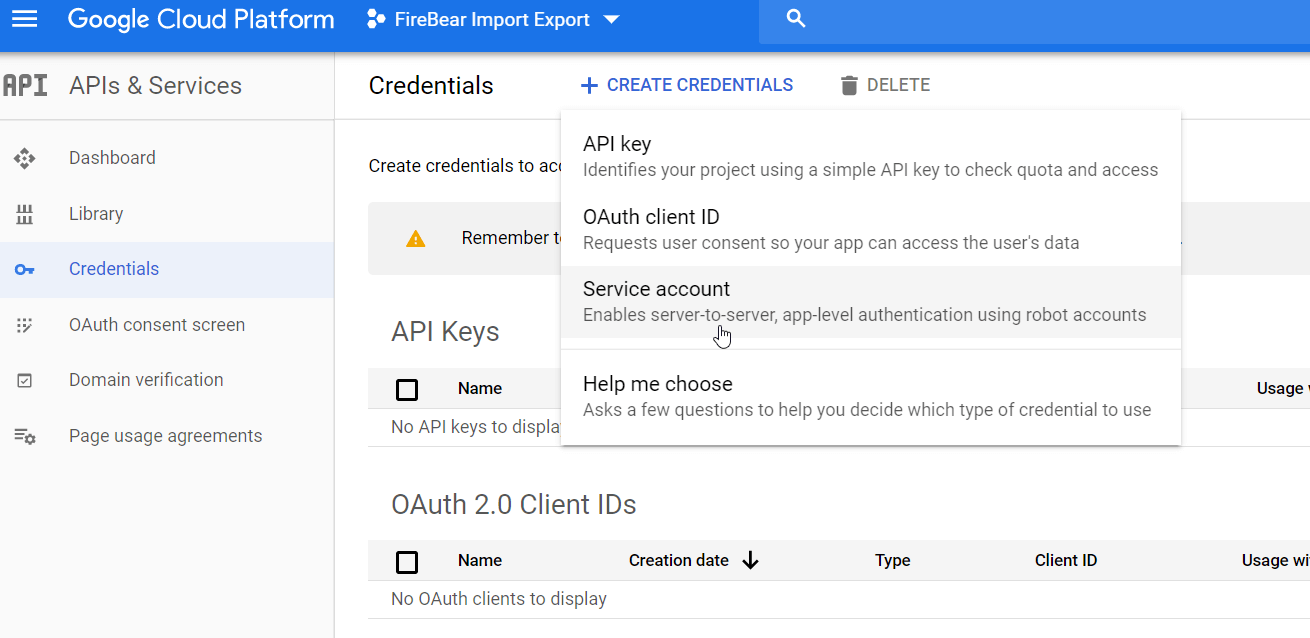
4. Define your account with a title and description.
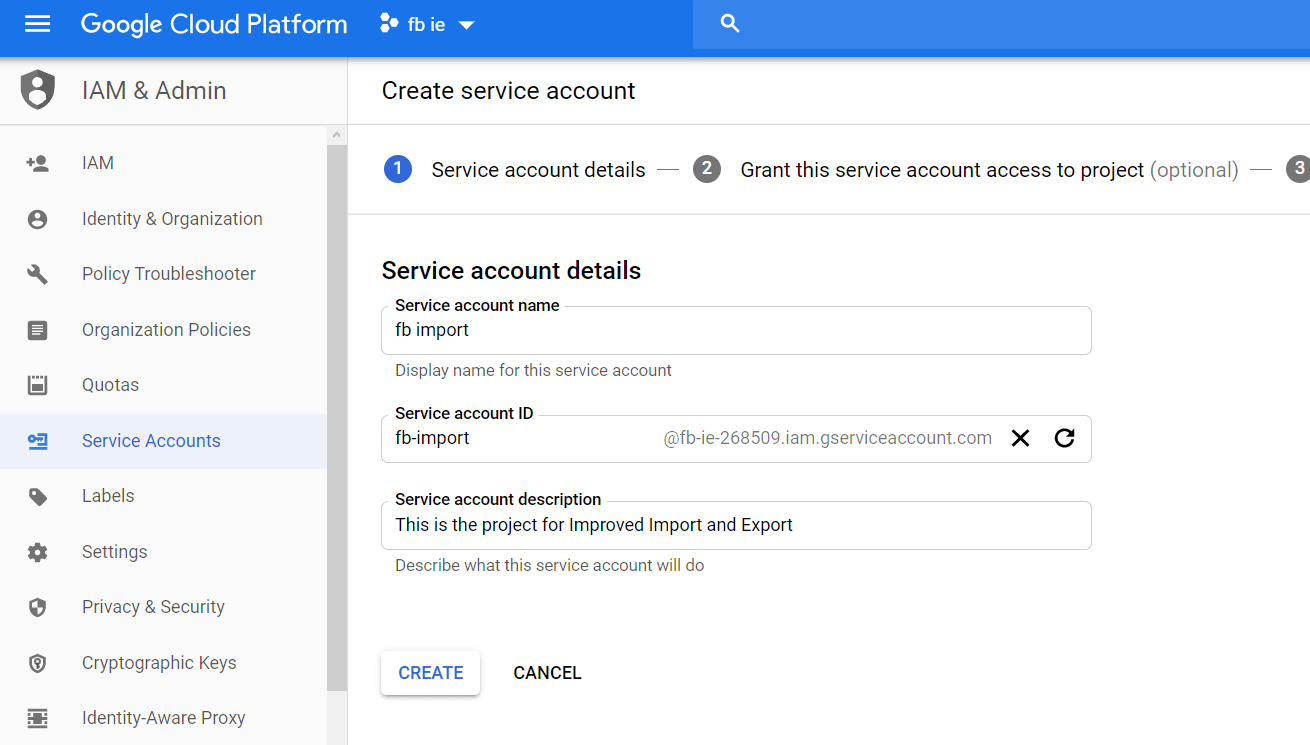
5. Skip the optional settings for account roles and go to Grant user access to this service account
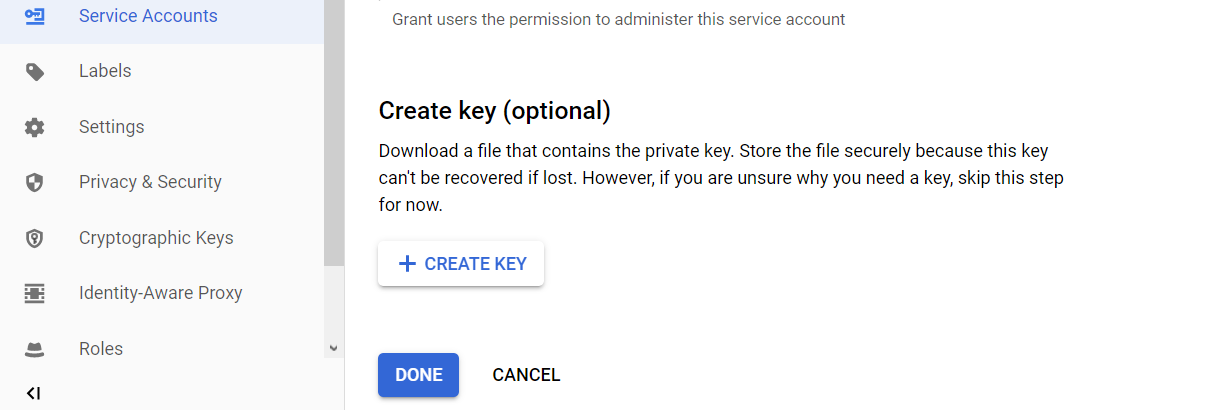
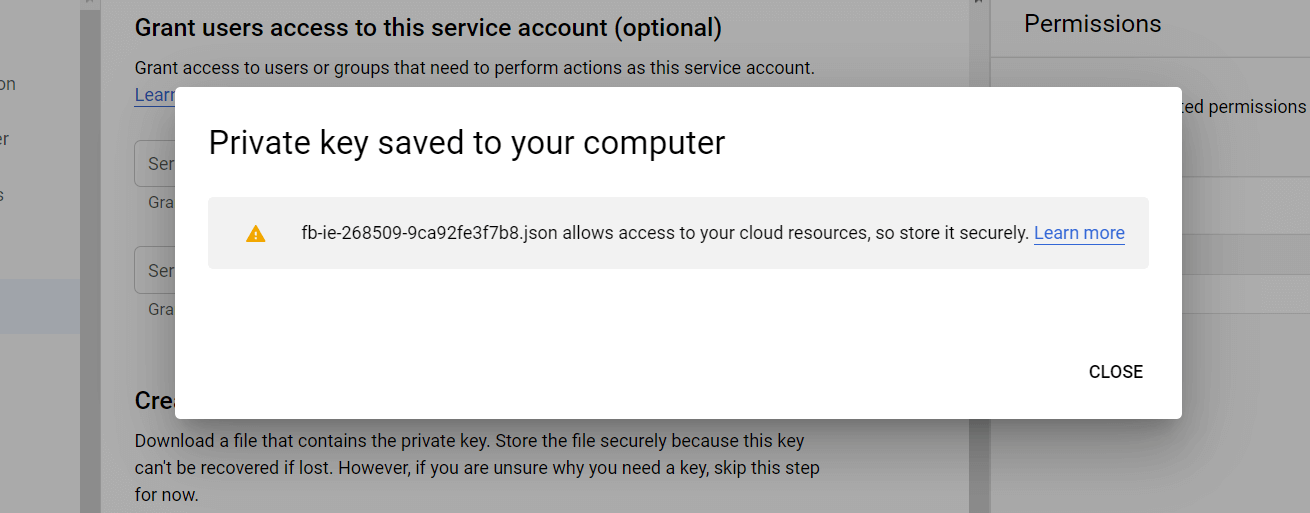
6. Create a service account key under the JSON type.
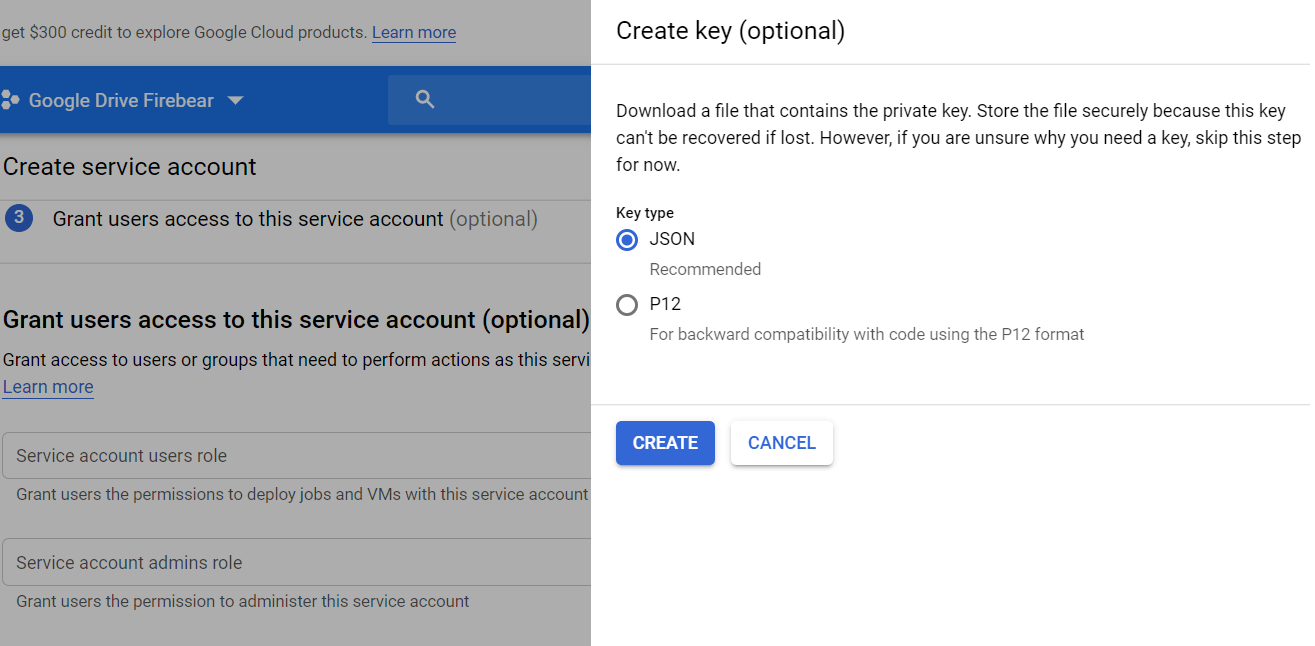
7. Click the ‘Create’ button.
7.1. The key will be downloaded to the file system automatically.
Configuring a Service Account
1. Open the
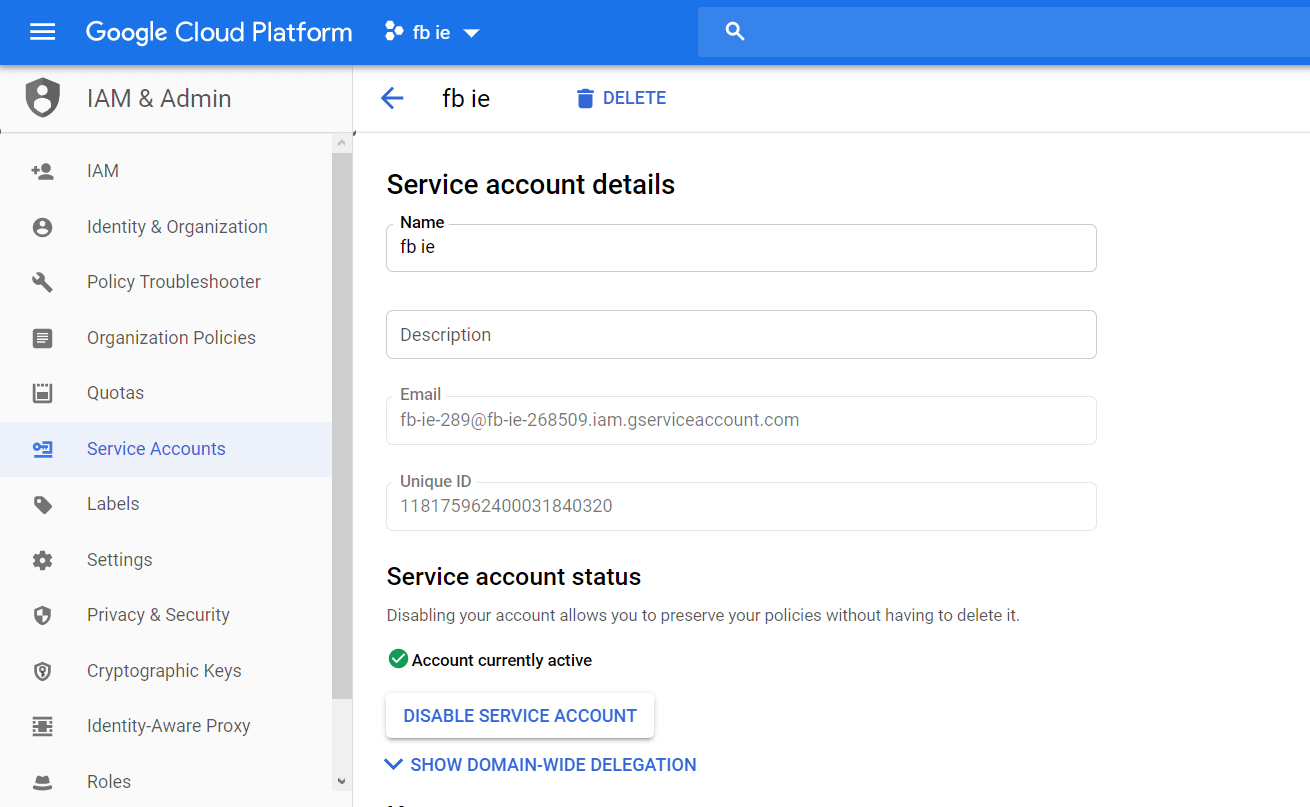
2. Go to IAM & admin > Service Accounts.
3. Click the ‘Edit’ button for a specific account to get the email address that will be used for sharing access to a Google Drive folder.

4. Copy the Service Account email.
Sharing a Google Drive Folder
1. Go to .
2. Open the ‘Share’ settings for the specific folder.
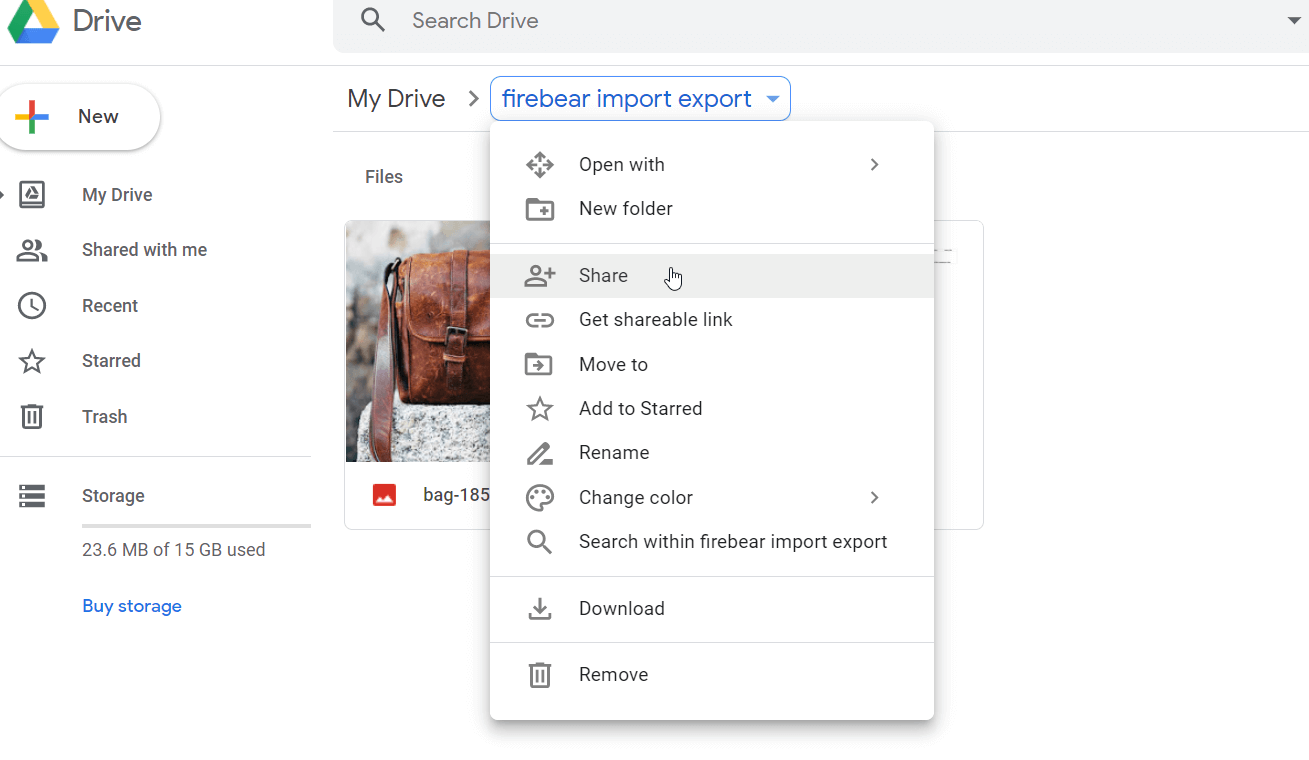
3. Click the ‘Advanced’ button.
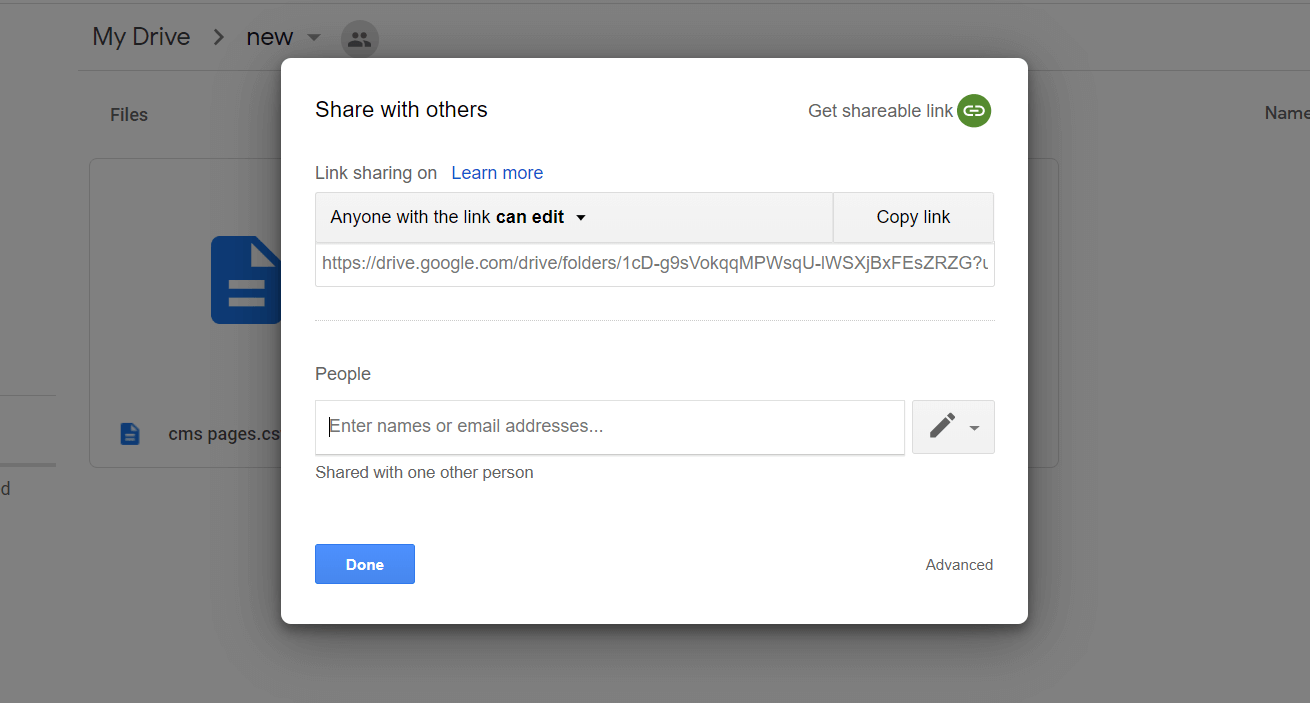
4. Enter the Service Account email you’ve previously got from the Google Console in the ‘Invite People’ input.
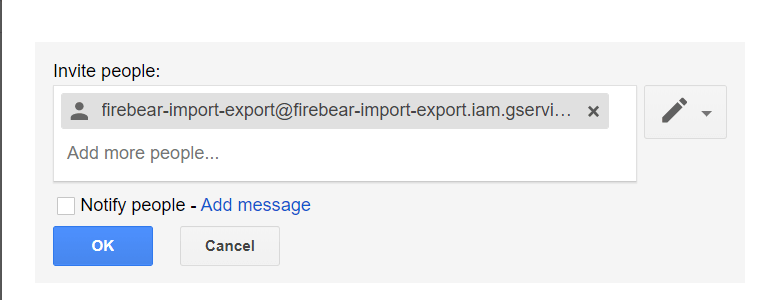
5. Uncheck the ‘Notify People’ checkbox.
6. Click the ‘OK’ button.
Installing Imagick for PHP 7 for Magneto 2 Enterprise and Cloud using image watermark option
Magento 2 Enterprise and Cloud owners using watermark option need to install additional Imagic library to properly resize product images when importing products.
This library will help compress images and add a watermark to them. Once the library is installed Improved Import & Export extension will handle the rest.
Standard Magento 2 import
Before going any further with Improved Import, make sure you have read manuals and understand what to do with the default Magento 2 import procedure!
Extension Configuration
Once installed the extension introduces its configuration section to System > Configuration > Firebear Studio > Import/Export.
The configuration section is represented with a single setting Create attribute values on the fly. The setting controls if the product attributes can be created directly from the import table.
To create new attributes one should use custom column structure that will be covered later in this guide in the Product attribute values on the fly import section.
Import and Export Job grids
Most of your time with the extension you will spend at System > Improved Import/Export > Import Jobs and Export Jobs. There you can find Import and Export Job grids, create new job and edit the existing ones.
Import and Export Job grids have the same look and functionality and for convenience purposes we will cover both grids at the same time.
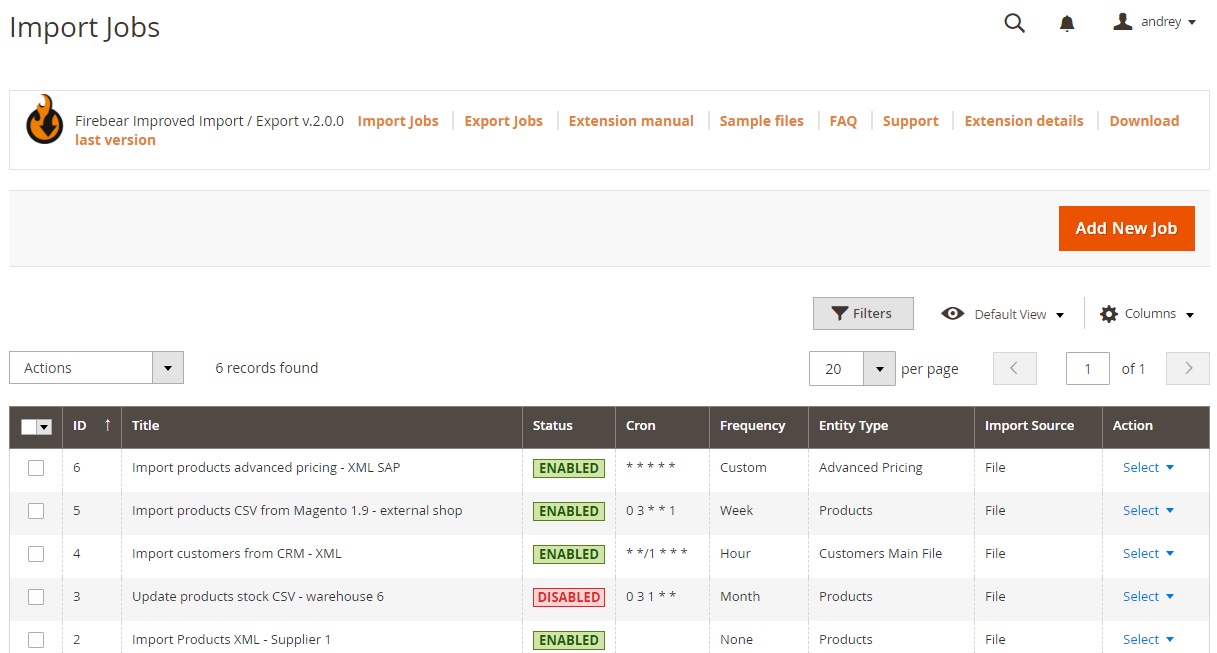
The grid displays the following information about each job:
- ID – unique ID of the job;
- Title – title of the job for internal identification purposes;
- Status – current status of the job, whether it is enabled or disabled;
- Cron – cron schedule, how often the job is launched automatically;
- Frequency – one of the predefined frequency values, if selected, how often the job is launched automatically;
- Entity Type – entity that the job imports to the store (products, advanced pricing, etc.);
- Import Source – source file with the table from which the values should be imported, can be: file, ftp, sftp, url, Google sheet.
All these columns can be adjusted using the ‘Columns’ button at the top of the screen. To save the changes you have made to the job grid – use ‘Default View’ button. If you are looking for a particular job – use ‘Filters’ button. Last is the ‘Action’ column, here you can edit and delete jobs as well as change their statuses. Alternatively, you can apply these actions to multiple jobs simultaneously.
Note, that it is also possible to edit the job right from the grid. You only need to click on the job.
This is it for the job grids. Now, let’s add a new import job to see how it’s done.
Add new Import Job
To add a new import Job click ‘Add New Job’ button at the top of the job grid. You will be redirected to the New Job screen which is split into four configuration sections:
- General Settings;
- Import Settings;
- Import Behavior;
- Import Source.
Later, as we will learn how to select the import entity, the new configuration sections, specific to the imported entity, will appear. We will cover these sections later, in the chapters dedicated to specific entity import.
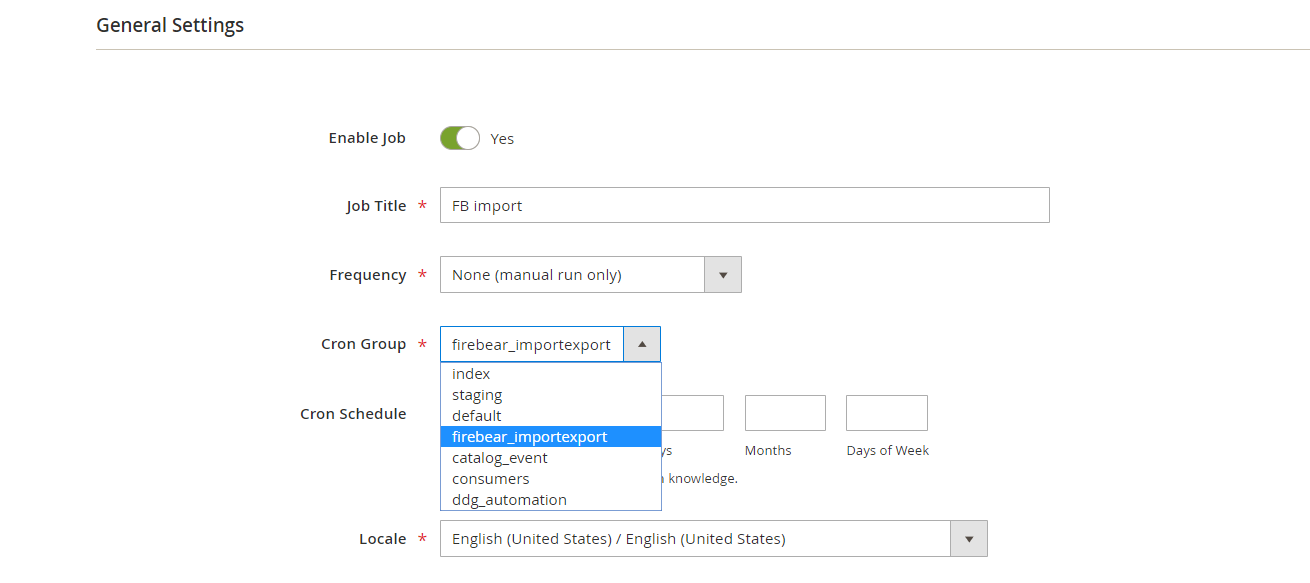
General settings
The first set of settings defines the name of the job, schedule and general job behavior.

- Start by switching Enable Job. If enabled, the job will automatically run according to the set schedule. If you are going to only run the job manually you can leave the job disabled. Note that disabled jobs can not be run with the console in any case, except for using -f argument which a force action. Enabled jobs are fully open for console management.
- Then, think about the expressive Job Title that describes the job best. It will help you find the job in the grid or understand which jobs are enabled/disabled.
- Next, it will be necessary to configure the Frequency of the import job, – how often the job should be automatically executed. You can select one of the predefined values or set up ‘Custom’ Frequency.
- Cron Schedule is where you configure ‘Custom’ frequency. It allows you to take full advantage of the cron daemon scheduling pattern. If you are not sure how to use it we will teach you how to a bit later.
- After configuring schedule you need to select the Locale of the store you are creating the job for.
- If you think that some of the imported products or categories may use the same URLs, switch Generate Unique Url if Duplicate on.
- Consider enabling Re-index after Import. Some of the stores may be indexed for performance optimization, in such cases re-indexing will be required.
- The Send email from new tracks (only for ‘Orders’ entity) option allows supporting order import with the email notification feature. The tracking numbers of shipped orders will be sent to customers after the import.
The first section of the import job configuration page is now complete. You know how to change job statuses and create cron schedules. The following GIF illustrates the aforementioned processes:
How to use cron
Cron is a daemon scheduler for UNIX systems, it is used by Magento 2 and Improved Import and Export extension for scheduling execution of different scripts. It works on the following pattern:

Below you can find a handful of useful links to understand the concepts of the cron scheduler and master it. We advise you to try configuring cron yourself. It will be a great help of the import and export job automation.
- https://en.wikipedia.org/wiki/Cron
- http://crontab-generator.org/
- http://www.cronmaker.com/
- http://stackoverflow.com/questions/18919151/crontab-day-of-the-week-syntax
- http://devdocs.magento.com/guides/v2.0/config-guide/cli/config-cli-subcommands-cron.html
- https://firebearstudio.com/blog/magento-2-cron-configuration.html
To provide flexibility in cron management, the extension allows handling multiple import and export jobs within a single cron group. The Cron Group selector contains the list of existing cron groups where a job can be assigned to.
You can configure the cron groups at Stores > Configuration > Advanced > System > Cron (Scheduled Task).
Make sure you have set proper schedule before enabling the job or create some test jobs to see how the cron works.
Import settings
Now, it is time to proceed to the second section of the New Job screen – Import Settings. Here, you select the entity that will be imported. Currently, the extension allows you to import the following entities:
- Products.
- Categories.
- Customers and Addresses (single file).
- Customers Main File.
- Customer Addresses.
- Customer Finances.
- Advanced Pricing.
- Attributes.
- URL Rewrites.
- Widgets.
- Reviews.
- Gift Cards.
- Cart Price Rules.
- Catalog Price Rules.
- Orders.
- CMS pages.
- CMS Blocks.
- Page Hierarchy.
- Search Terms.
- Search Synonyms.
- Newsletter Subscribers.
- Company.
- Company Roles.
- Shared Catalogs.
- Quotes.
- Requisition Lists.
- Import/Export Jobs.
In addition to the imported entity you decide whether you want to use Rest API as your Import Source and whether you want to clear product attribute values upon import.
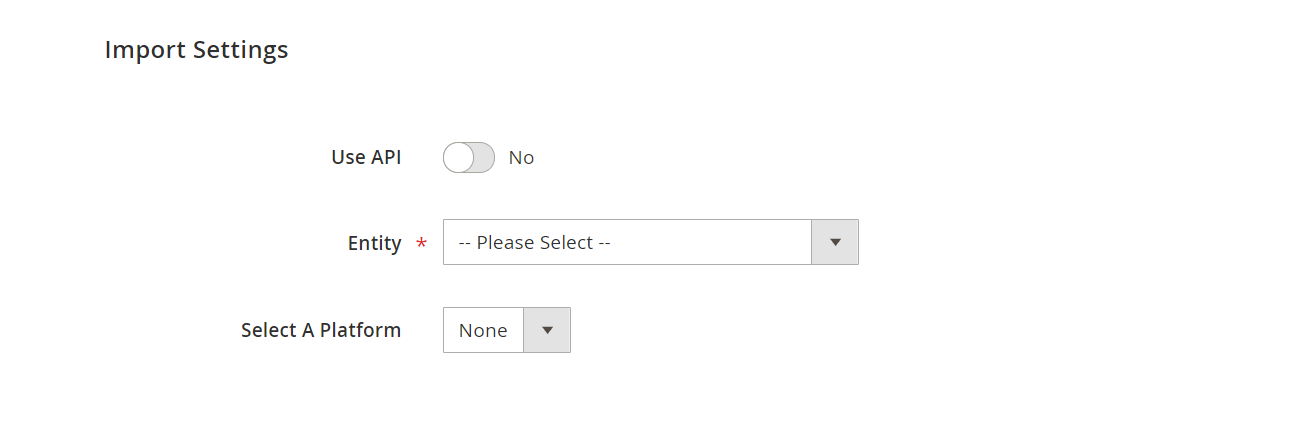
- Select a platform — if you transfer data from another platform, like Shopify or Magmi, you can enable automatic presets that will rewrite the entities to take place in the Magento 2 system without conflicts.
- Use Only Fields From Mapping lets you import only mapped fields from the Map Attributes section of your import job.
- Clear Attribute Values setting allows you to clear values for ALL optional product attributes listed in the imported file. For example. One of your products has optional attributes ‘color’ and ‘size’. If the ‘color’ attribute is in the table you are importing its value for all imported products will be reset. However, the value of the ‘size’ attribute which was not in the table will remain untouched.
- Remove Product Association settings works like the ‘replace’ behavior for Grouped Products only. If enabled, only the simple products from the currently imported table will be assigned to grouped products. All other simple products will be removed from the grouped products. For example, you have grouped product A, with simple products B, C, D. If you import grouped product A, with only simple B assigned, with Remove Product Association enabled, you will have a grouped A, with only simple B assigned. C and D simples will be removed.
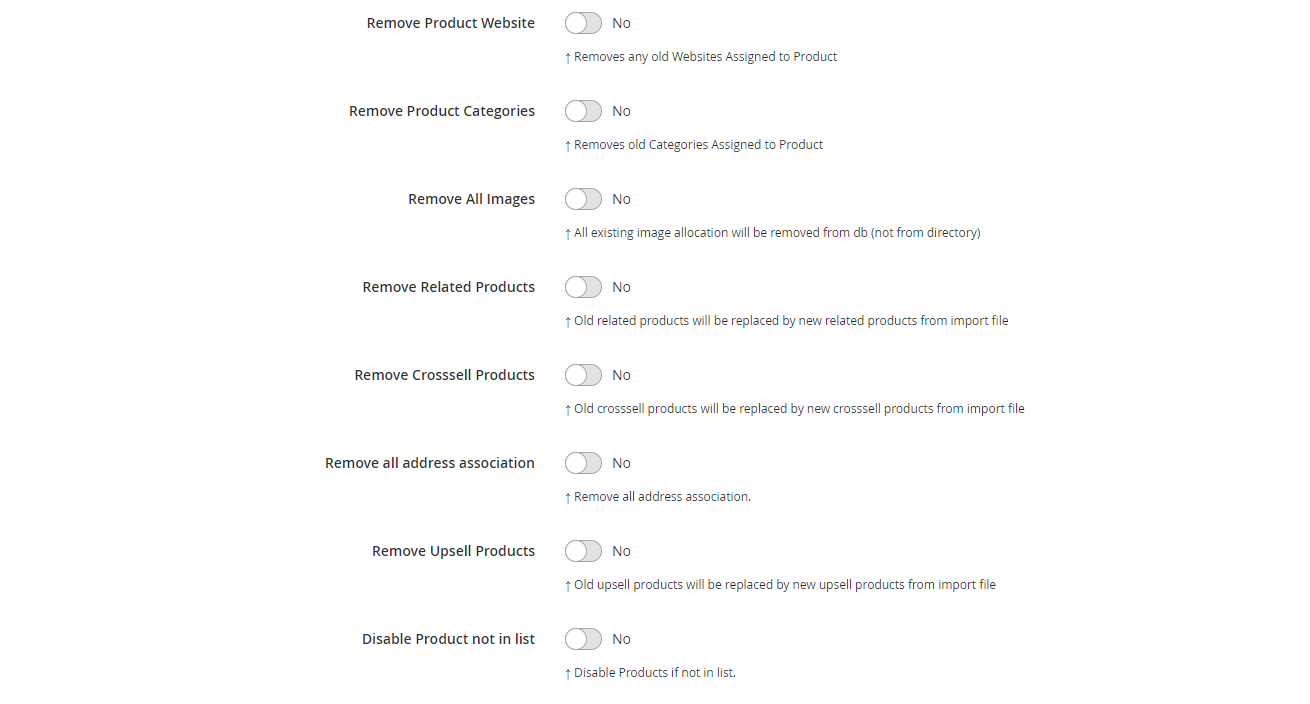
- The Remove Product Website option clears all the store view associations of products during the import. The imported data will be part of the admin store view.
- The active Remove Product Categories button implies the imported products will not belong to any category.
- The Remove All Images feature enables the process when all images related to the import products will be deleted from the database. However, you still can find them in the relevant directory.
- Remove Images from Directory clears images from the Magento 2 storage folder.
- Resize Images After Import provides the ability to resize product images in Magento 2 in just one click after you import them using the Imagick PHP plugin.
- Remove Related Products replaces previous versions of related products with the new ones from the import list.
- The Remove Crosssell Products setting replaces the existing cross-sells with the transferred ones.
- Remove all address association is available for the Customer Addresses entity only. As customer addresses do not have a unique id type, imported addresses cannot replace the existing ones. Upon implementing new customers as an entity, you’ll face up a situation where the same old customer addresses are piling up. The feature allows you to avoid data duplication when you update the database on a regular basis. If enabled, it deletes all the addresses matching to the existing ones in Magento 2 from the import table for while the functionality processes the rest.
- Remove Upsell Products pulls in new upsell products from the import file to replace the old ones.
- With the ‘Update Products that are not in the import list’ feature, you have several update options. It is possible to set their status to ‘Out of stock’ or set their quantity to 0. You can also apply these two options simultaneously. Alternatively, it is possible to disable products not mentioned in the import table.
- Add Product QTY to Existing Value adds the provided quantity value to the existing product stock at your Magento 2.
- Enabled Cache Products – enables caching for the file with products that is (will be) uploaded to this import job. The cache is implemented as a part of native Magento 2 caching system, meaning flushing cache, will also flush cache for the import jobs. It works the following way:
When importing a file Improved Import calculates the hash value for all rows in the imported product table. After the import is complete, these row hash values are cached. So on a conscutive import of the SAME file, if you have changed attribute in the particular rows, these row hash values will be different from the cached ones, and ONLY these rows will be imported. Changing the row order will also result in different hash values.
To nullify the cache for the imported file, you can flush Magento 2 cache storage or flush Cache Import Products.
NOTE: disabling Enable Cache Products setting will NOT flush the cached rows, please use one of the methods described above. - Include Option ID – if enabled, you can include opt_id and opt_row_id attributes into your customizable options of the simple products during the import, allowing updates of the customizable options. Read how to import customizable options.
- Product Url Pattern – if enabled you will be displayed with the field where you can specify the pattern of how the URLs for newly imported products should be generated.
There are two variables you can use:
[rand(numeral, numeral)] – where numerals are any numbers in between which the random number will be generated and added into the URL.
[product_attribute_code] – here you can replace ‘attribute_code‘ with the code of any attribute used in the imported product, for example ‘color‘, to fetch this attribute’s value into the final product URL. - Import base image as small and thumbnail – this feature lets you generate small and thumbnail images from base images if samm and thumbnail images are not specified in your import file.
Depending on the selected import entity you get different configuration sections. Every entity, however, has two sections in common: Import Behavior and Import Source.
Import behavior
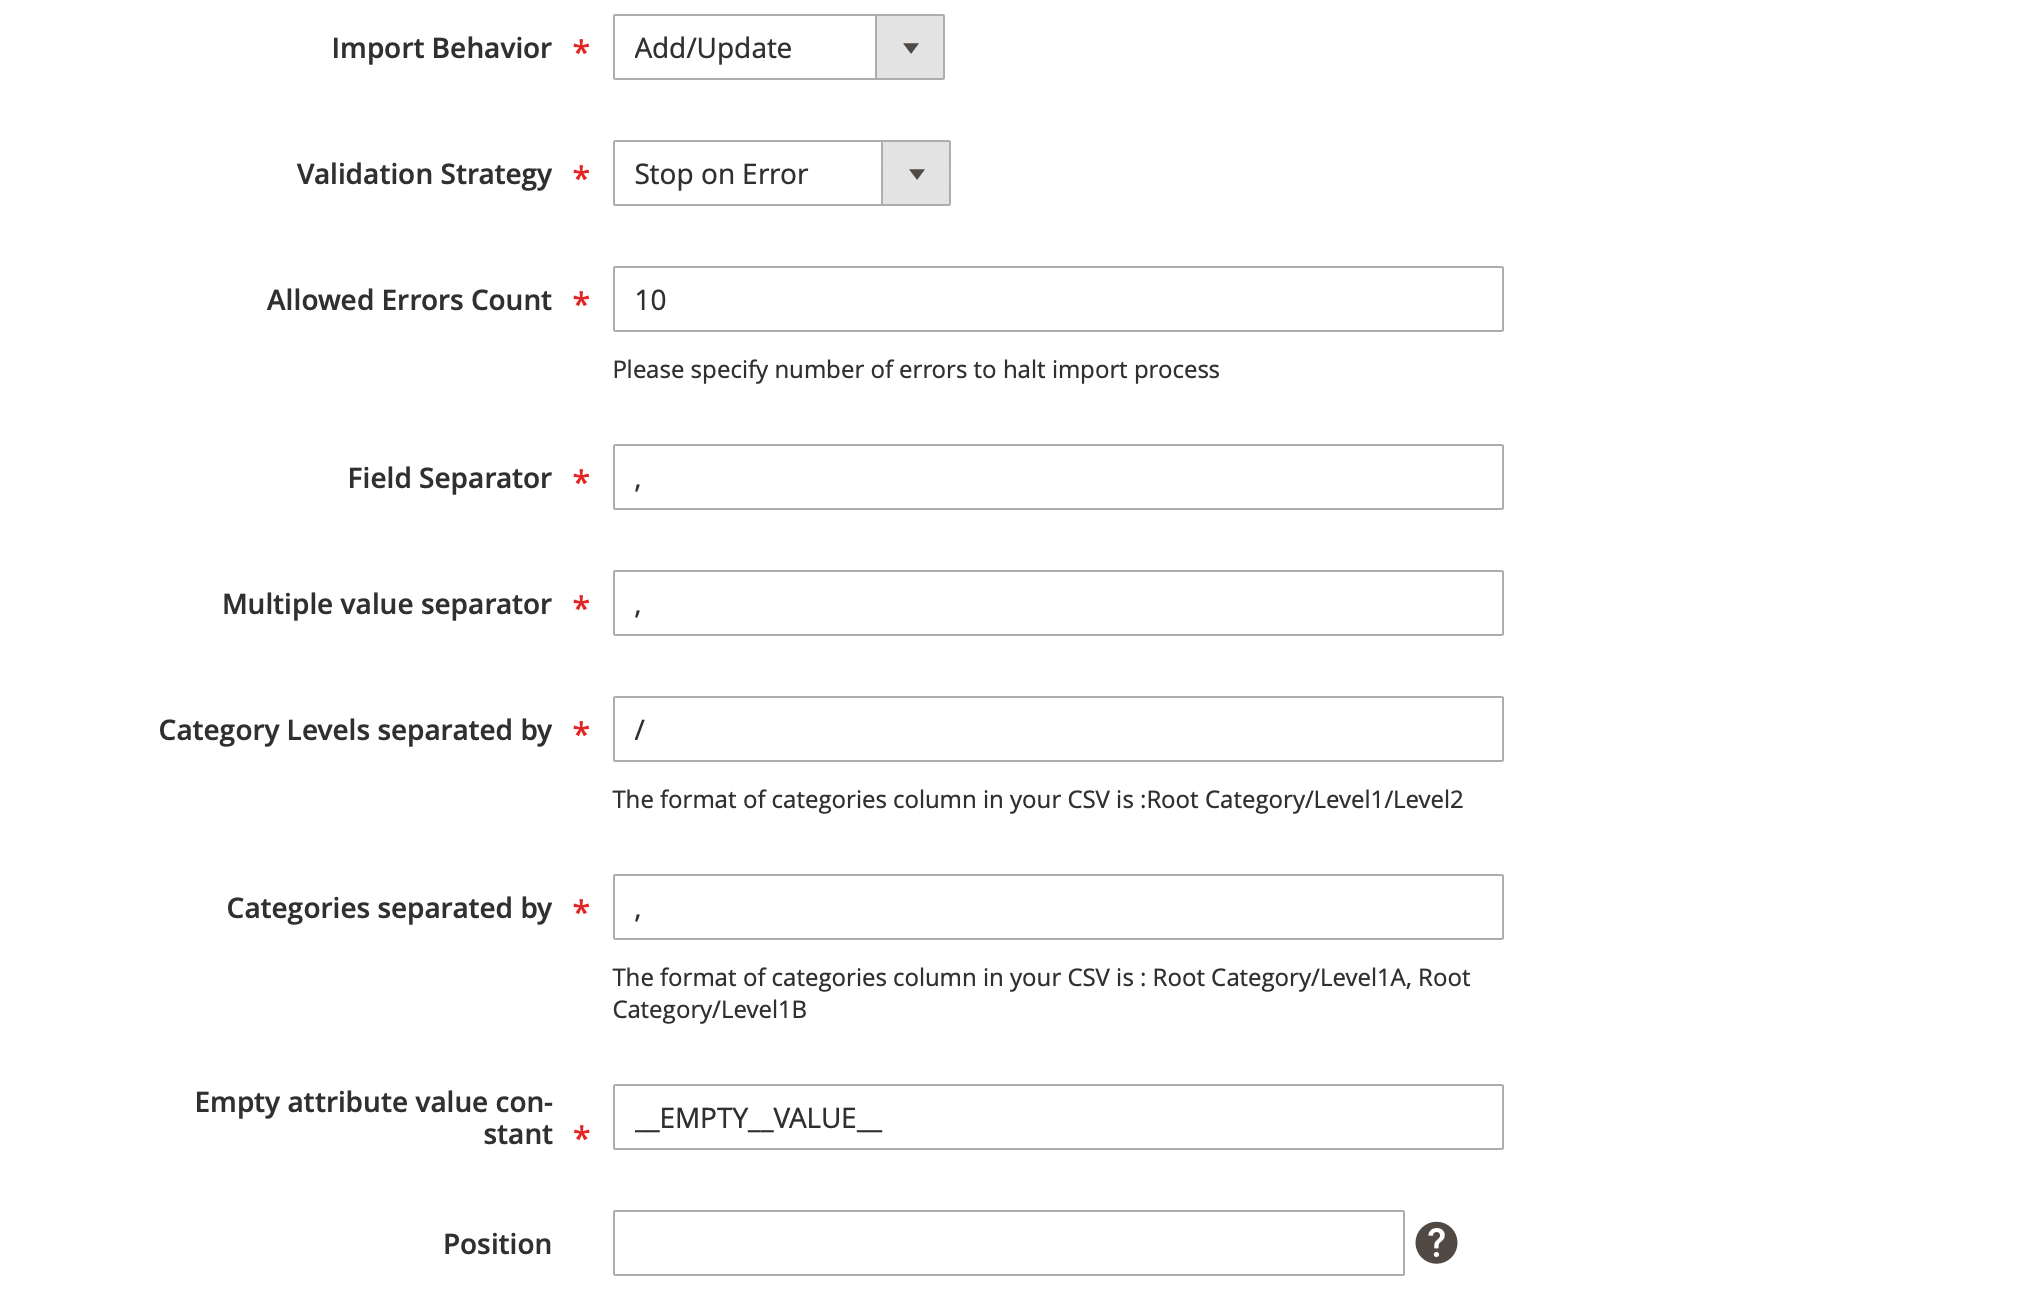
In this section, first, you are to specify the Import Behavior. There are four general behavior types:
- Add/Update – the new entities from the import table will be added to your store and existing products updated according to the values in table;
- Only add — the new entities will be added to the database without any changes in existing data;
- Only update – the new entities from the import table will NOT be added to your store, instead, only existing products will be updated according to the values in the table;
- Replace – existing entities will be replaced with the products of the same SKU from the import table;
- Delete – the entities specified in the import table will be deleted from the store.
Each value does what it reads. Choose the one that suits your needs. Some entities, however, may come with the behavior type a little different. Such unique behavior types are described individually.
Next, configure Validation Strategy. You can ‘Stop on Error’ or ‘Skip error entries’ during import process. And specify allowed error quantity, maybe a couple will do.
Then, you are suggested to choose various separators in case the file you are importing differs in formatting from the native Magento 2 CSV file. The separator values are the following:
- Field Separator;
- Multiple value separator;
- Category Levels separated by – when you are importing products, you can decide which separator you use for the categories column to separate category levels. By default / is used to separate multiple category levels. However, if you have /s in category names you may want to use a different separator for category levels.
- Categories separated by – when you are importing products, you can decide which separator you use for the categories column. By default, comma is used to separate multiple category paths. However, if you have commas in category names you may want to use a different separator for category paths.
- Empty attribute value constant – here you can specify the custom symbol or phrase you will be using in the imported file for fields that should be considered empty during import. By default __EMPTY__VALUE__ is used to identify such fields.
NOTE: Field Separator and Multiple value separator fields support ‘t’ for tab (tabulation) value and use of TSV files.
Default values of the Import Job separator fields correspond to the Magento 2 CSV file requirements, so, if you are using such CSV you shouldn’t change anything.
If you are using a new import table of which separators you are not sure of, you can open it with any editor (like MS Excel) and find what separators are used.
Import job scheduling to run one after another
The Position field inside the Import Behavior section dictates the order in which the jobs should be automatically executed. For example, if you have Job A and Job B, and want to run them consequently, you need to specify Position=1 inside Job A, and Position=2, inside Job B.
The job scheduler is pretty simple as of now, in the upcoming versions we are going to make the job scheduling a better experience.
Import source
File types
Import File Type section illustrates lots of useful improvements in comparison with the default import procedure. You can select one of the three file types (the default import allows CSV only): CSV, XML, XLSX, ODS and Json. Note that you can use XML files of the following format: . Alternatively, you can upload any other format, but it is necessary to use mapping. You can always find up-to-date sample import/export files in all formats at Firebear Github .
Json file support
The latest release of the extension 2.2.0 added support of the Json files. The first step to Rest API support and integration of the extension with all possible software.
Right now, you can import Json files. Products, categories, CMS pages, all content that can be imported with CSV and XML can be imported to Magento 2 with Json as well.
Read more about how to import Json files to Magento 2 in our dedicated blog post:
How to import Json files to Magento 2
We have also composed some sample files to help you get started with Json import. All Magento 2 sample files and Json samples can be found at the FireBear Studio GitHub:
As for customization, Improved Import and Export extension comes with the customization endpoints with can be easily accessed with the . You can start building your integration with POS, CRM or ERP systems right away with Json support for Magento 2.
Excel and OpenOffice files support
Excel XLSX files and OpenOffice ODS files can now be used to export and import entities to Magento 2. XLSX and ODS files have certain limitations when it comes to the number of rows and columns. Here is the comparison table to give you a rough idea. Please note, the numbers for ODS format are valid for OpenOffice.org Calc 3.
| File type | Rows | Columns |
| ODS Calc 3 | 1048576 | 16384 |
| XLSX | 1048576 | 1024 |
Read more about how to import XLSX and ODS files to Magento 2 in our dedicated blog post:
How to import Excel and OpenOffice files to Magento 2
We have also composed some sample files to help you get started with XLSX and ODS import. All Magento 2 sample files and XLSX and ODS samples can be found at the FireBear Studio GitHub:
Please note, ODS files downloaded from Google Sheets cannot be validated by the extension. This is an issue of the Google Sheets converter.
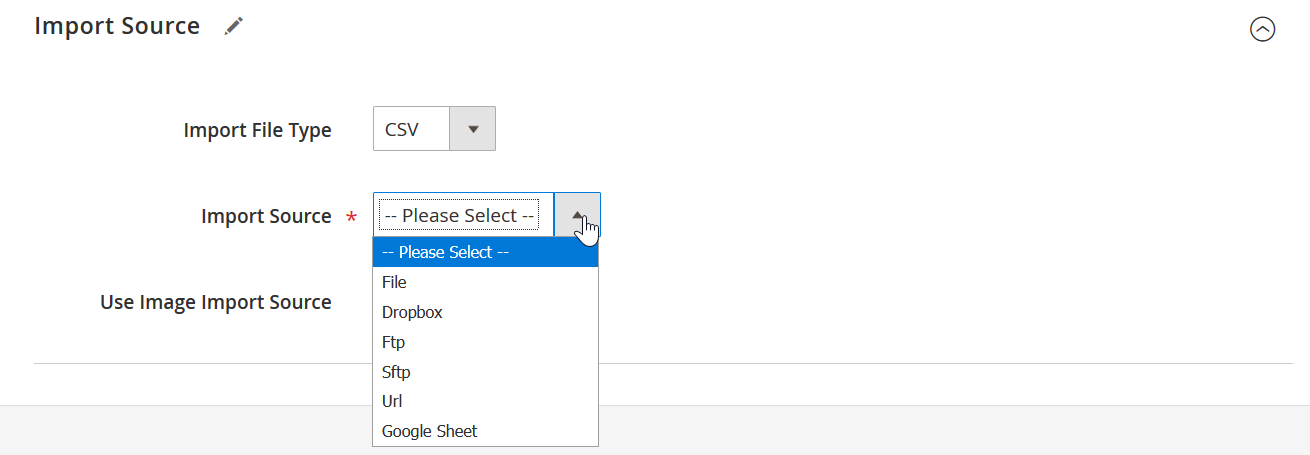
Choosing import source
Next, choose your import source. It may be:
- File;
- FTP;
- SFTP;
- URL;
- Dropbox;
- Google Drive;
- Google Sheets;
- Rest API;
- Soap API.
Yes, the Google Sheets, at last! 2.1.1 version of the extension introduced Full Support of Google Sheets. You can now, work with your colleagues on the same document, paste it and run the import jobs. Just like this.
By the way, we have composed a to provide you with a comprehensive reference to the Magento 2 import. Make sure to take full advantage of it.
Note that for each upload type, the Improved Import / Export Magento 2 extension provides file validation (a big grey button below to the left).
Use Image Import Source
Starting from version 2.1.2 the extension also comes with the Use Image Import Source switch. The switch decides how the extension will handle image paths if your source is FTP or SFTP.
- If the Use Image Import Source switch is disabled, the extension will look for the images inside your Magento 2 root catalog, according to the path specified in any image attribute columns of the import table.
- If the Use Image Import Source switch is enabled, the extension will look for the images INSIDE of the FTP/SFTP according to the path specified in any image attribute columns of the import table.
For example:
If the value for the product image in the base_image column is URL:
- with disabled Use Image Import Source switch is disabled option the extension will proceed to download the image by the URL specified;
- with enabled Use Image Import Source switch is enabled option the extension will try to find the specified URL path INSIDE of the FTP/SFTP you are importing the table from.
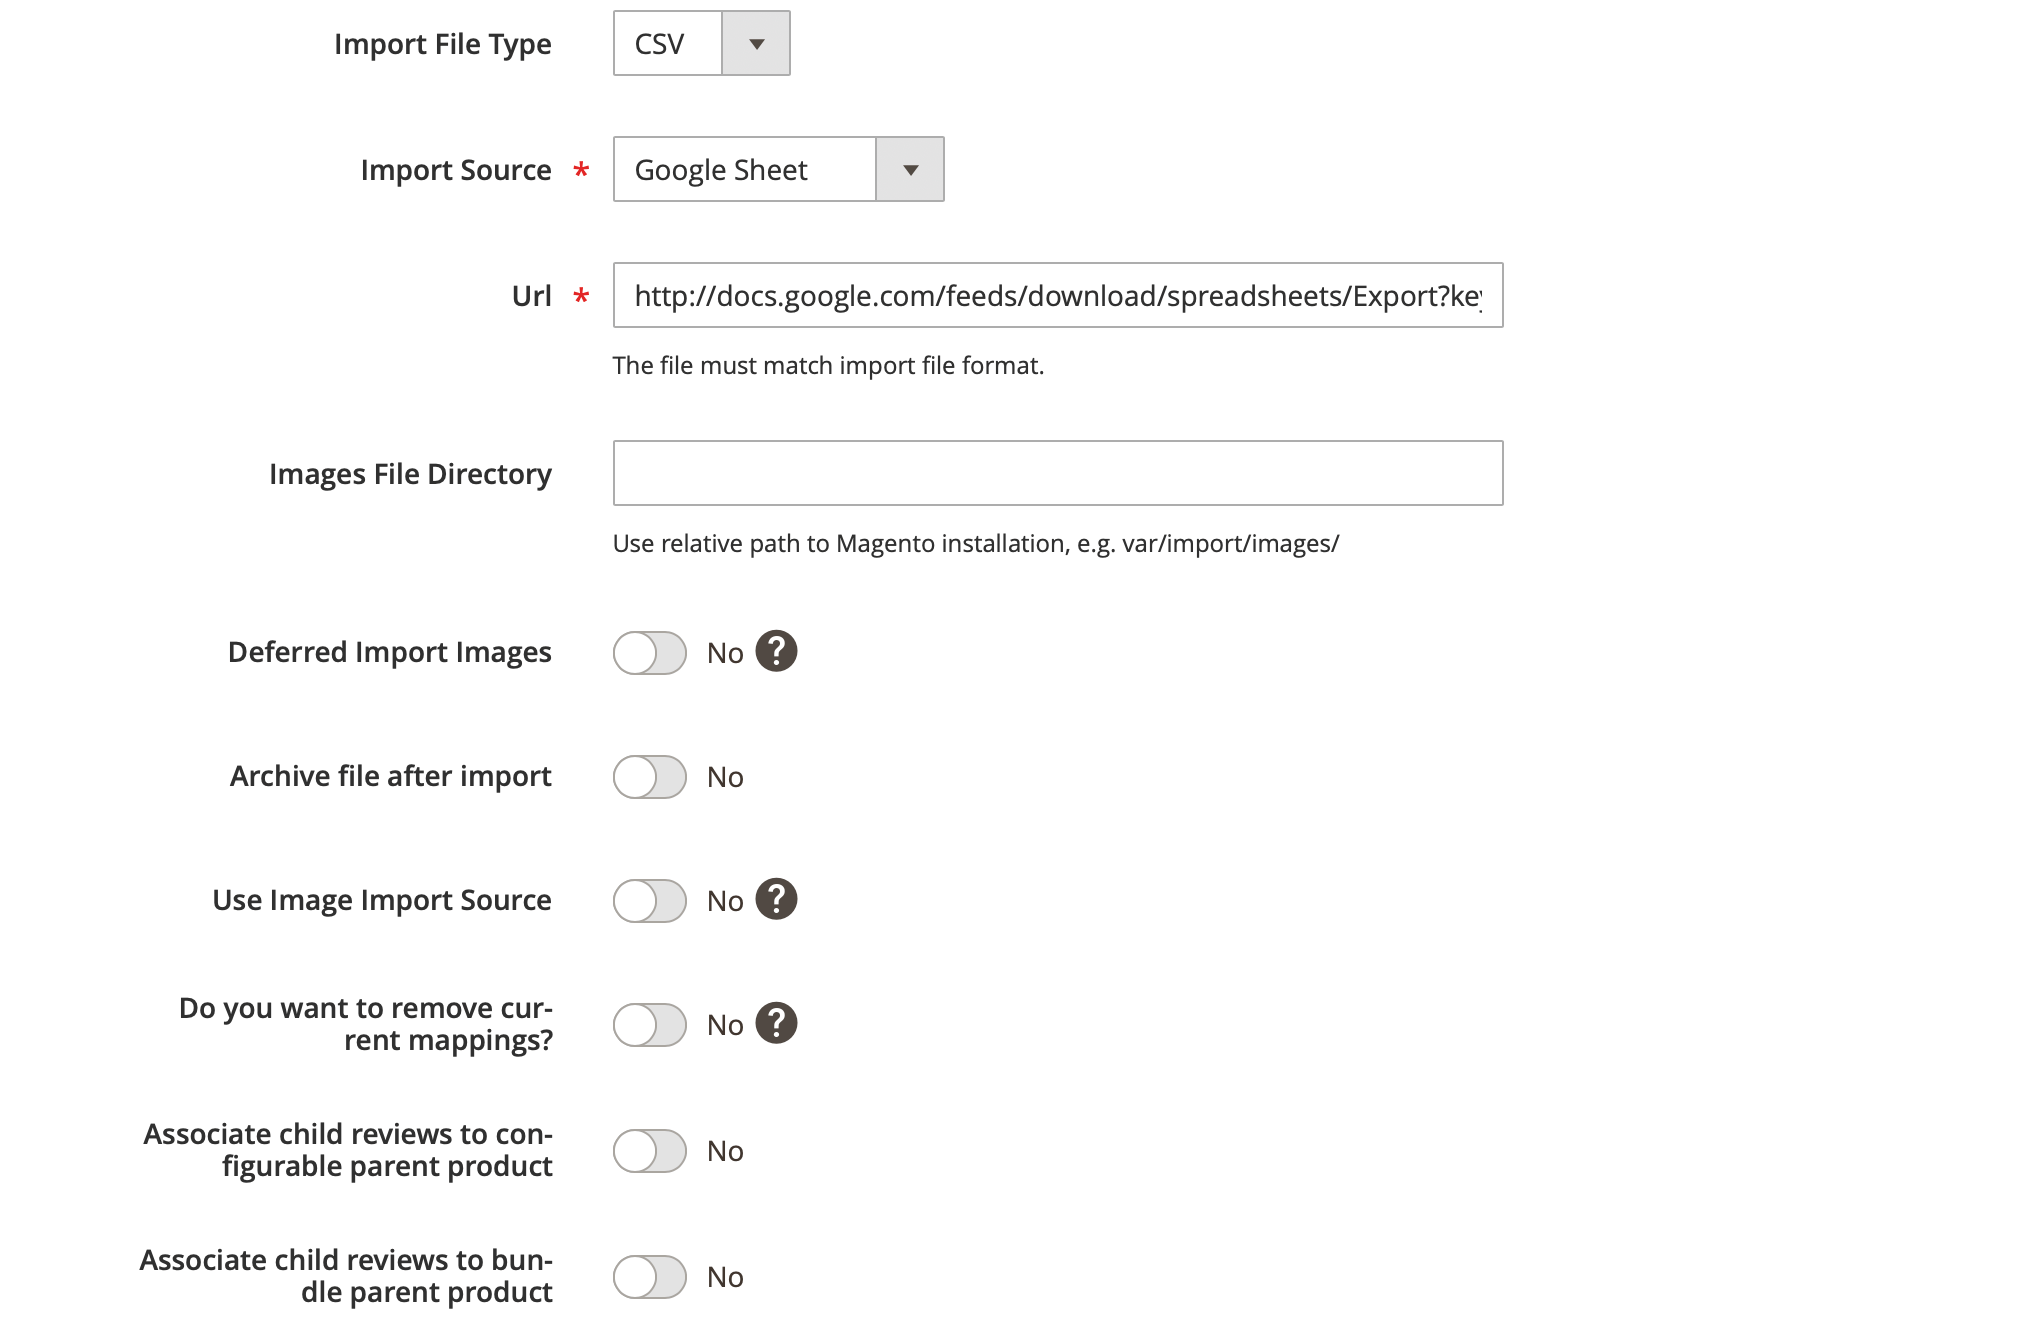
Archive file after import – when enabled, the files you have imported from FTP, SFTP, remote URL will be DELETED FROM THE SOURCE. Meaning that file from the FTP you may have imported will be deleted at the FTP location.
Do you want to remove current mappings? – when enabled all current mappings from the Map Attribute section will be disregarded for this import job.
Deferred Import Images
If enabled, allows to import product images AFTER the products have been imported to the store. Basically, it delays the image import as a RAM-hungry operation to allow faster product import.
This setting works with Magento 2 Database Queue, which is available for Magento 2.2 Commerce and Magento 2.3 Open Source and Commerce. And it also works with Rabbit MQ, if you have it installed on your server (please consult your developer if you have).
Archive file after import
If enabled, the file imported by direct file upload, from FTP or SFTP will be put into the ZIP archive after the import process completes. The feature has been introduced to save the storage space for the import heavy stores.
Do you want to remove current mappings?
All mappings you have set in this import job will be disregarded.
Associate child reviews to configurable/bundle parent product
If enabled, all reviews from the simple products associated with the configurable/bundle products you import, which are already available at your Magento 2 store, will be associated with ALL configurable/bundle products these simples are child products of.
File
In the case of ‘File’, you can use direct file upload or specify its path.
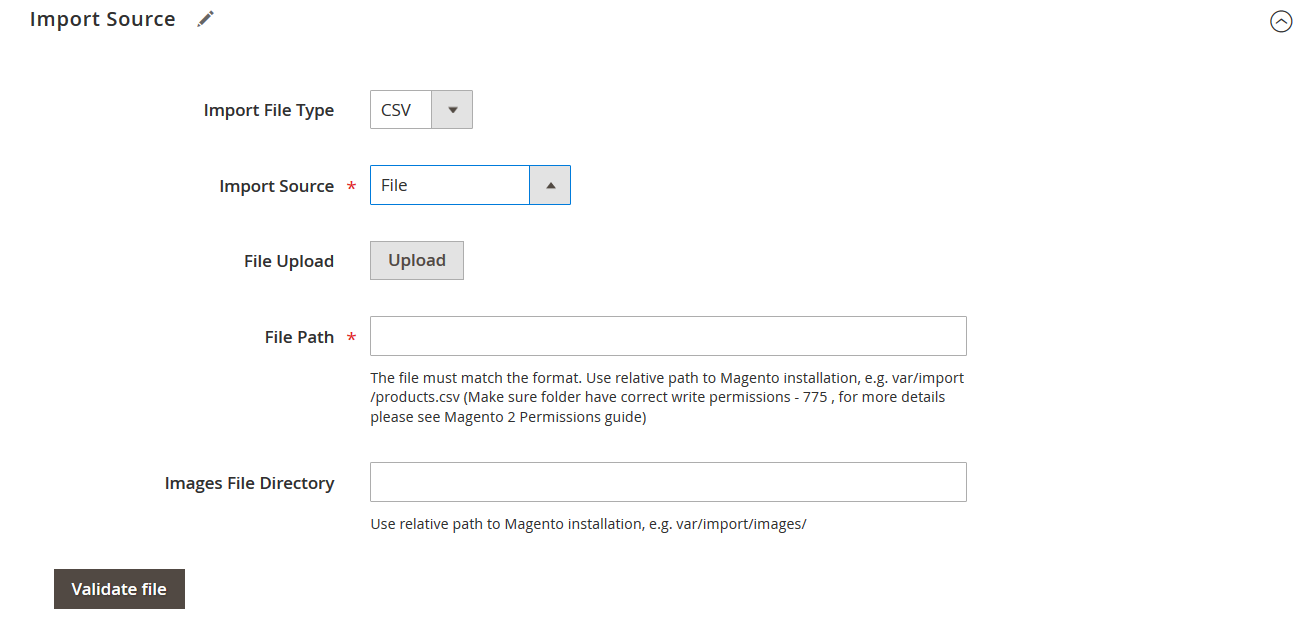
Images File Directory allows you to specify the path, relative to your Magento 2 folder, where the extension should look for images. If the Images File Directory is not specified the extension will use a default folder path relative to your Magento 2 installation: pub/media/import.
NOTE:
The actual path to the image is composed of the value you enter in the Images File Directory field + value of the image attribute.
For example:
Case 1:
- You have uploaded product images to the pub/media/import/. And set Images File Directory value to pub/media/import/.
- In this case, in the relevant image attribute you will only need to specify the name of the image file. Like: product_image_1.jpg
- So, the full path combined will be pub/media/import/product_image_1.jpg.
Case 2:
- You have uploaded product images to the pub/media/import/, and set Images File Directory value to pub/media/import.
- However, every product image is located in the dedicated folder with the product name. For example: /product_1/product_image_1.jpg
- In this case, in the relevant image attribute you will need to specify the path relative to the value you specified in the Images File Directory field: /product_1/produt_image_1.jpg
- So the full path combined will be pub/media/import/product_1/produt_image_1.jpg.
Dropbox
Dropbox upload requires the following parameters to be specified: File Path, and Access Token.
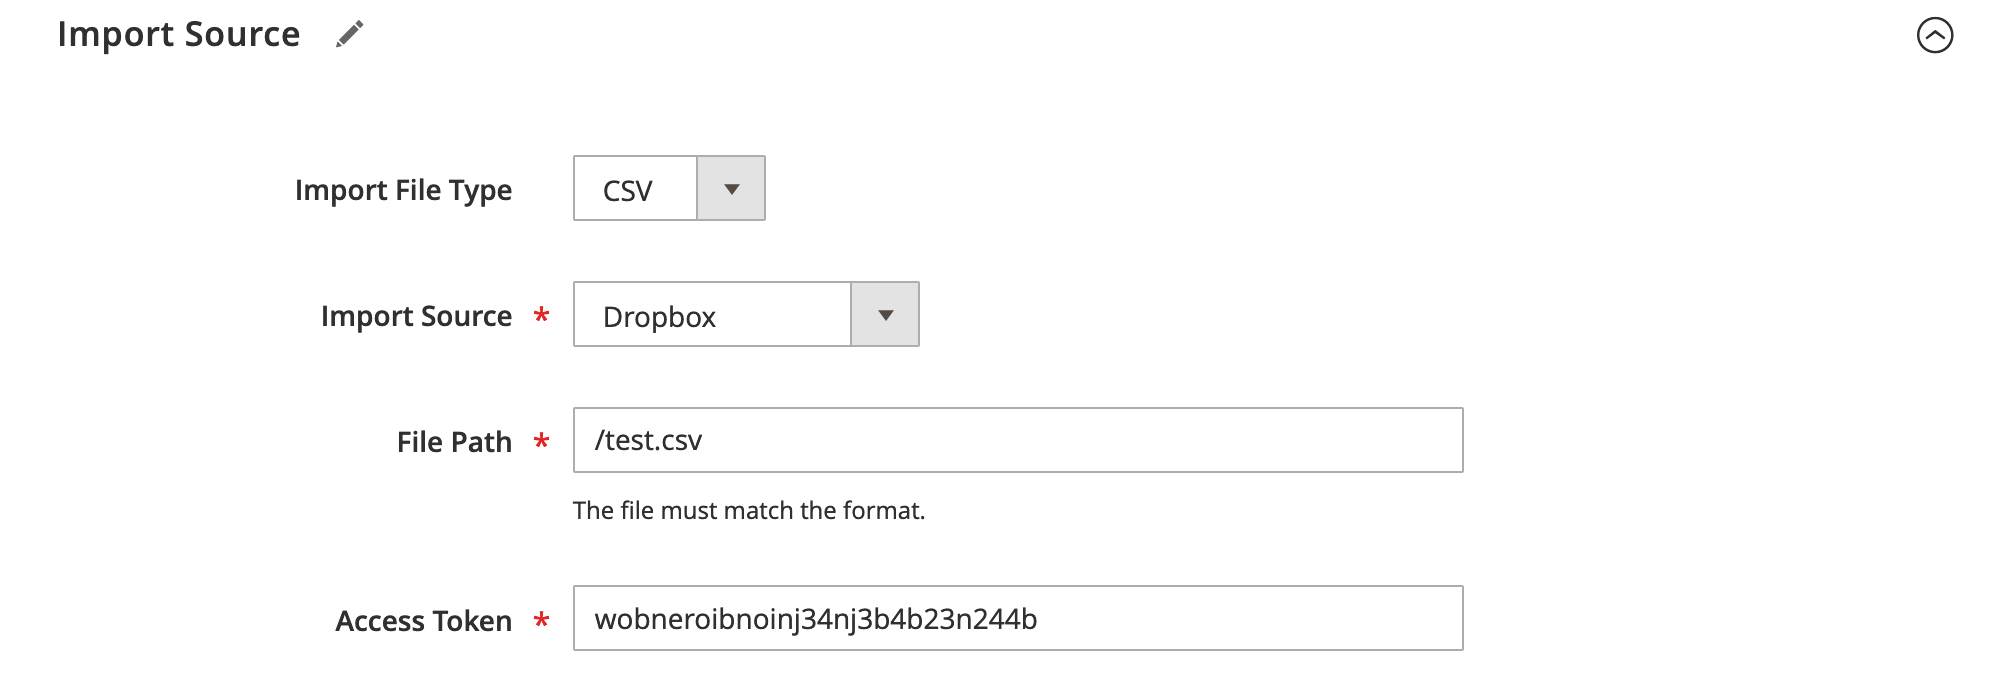
Full Dropbox configuration and instructions on how to get all required parameters can be found in the beginning of this manual.
FTP and SFTP
For FTP and SFTP, specify File Path, Host, Port, Username, and Password.
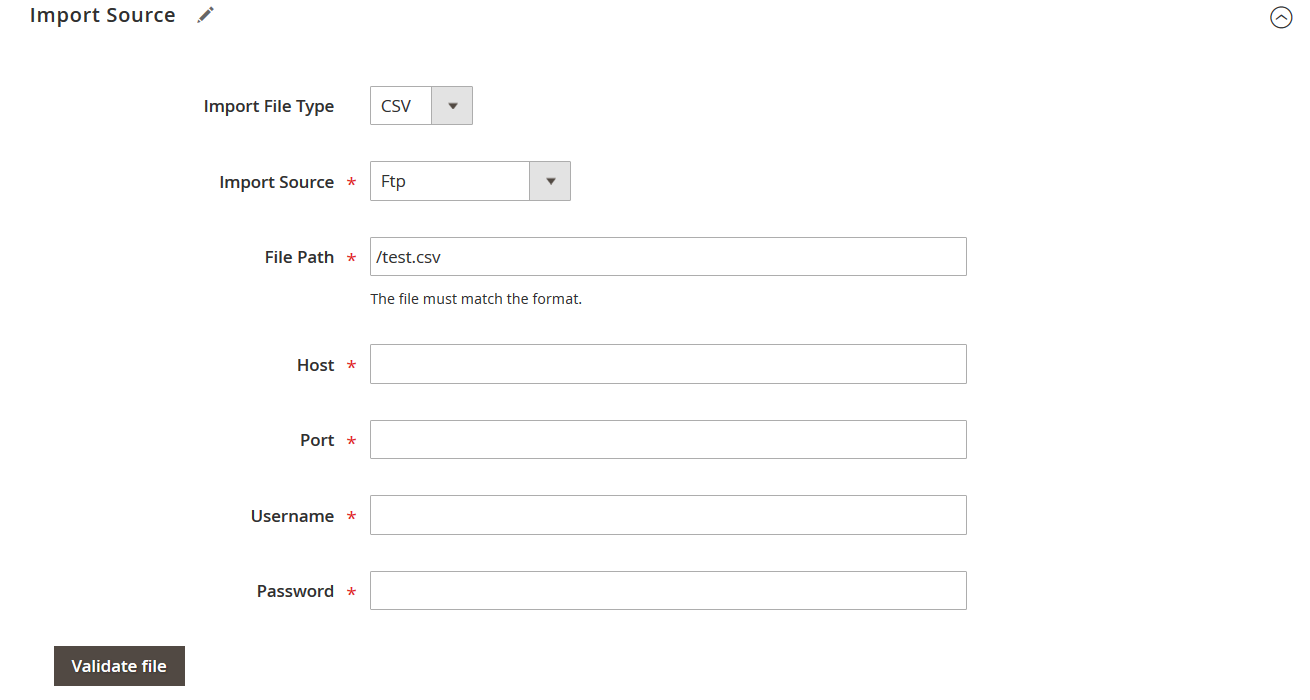
If you are not sure about the credentials – ask your FTP or SFTP provider for the correct ones.
Google Drive
The Google Drive import source requires a specified path to a file in a shared folder and a service account key to be uploaded from the Google Cloud Console.
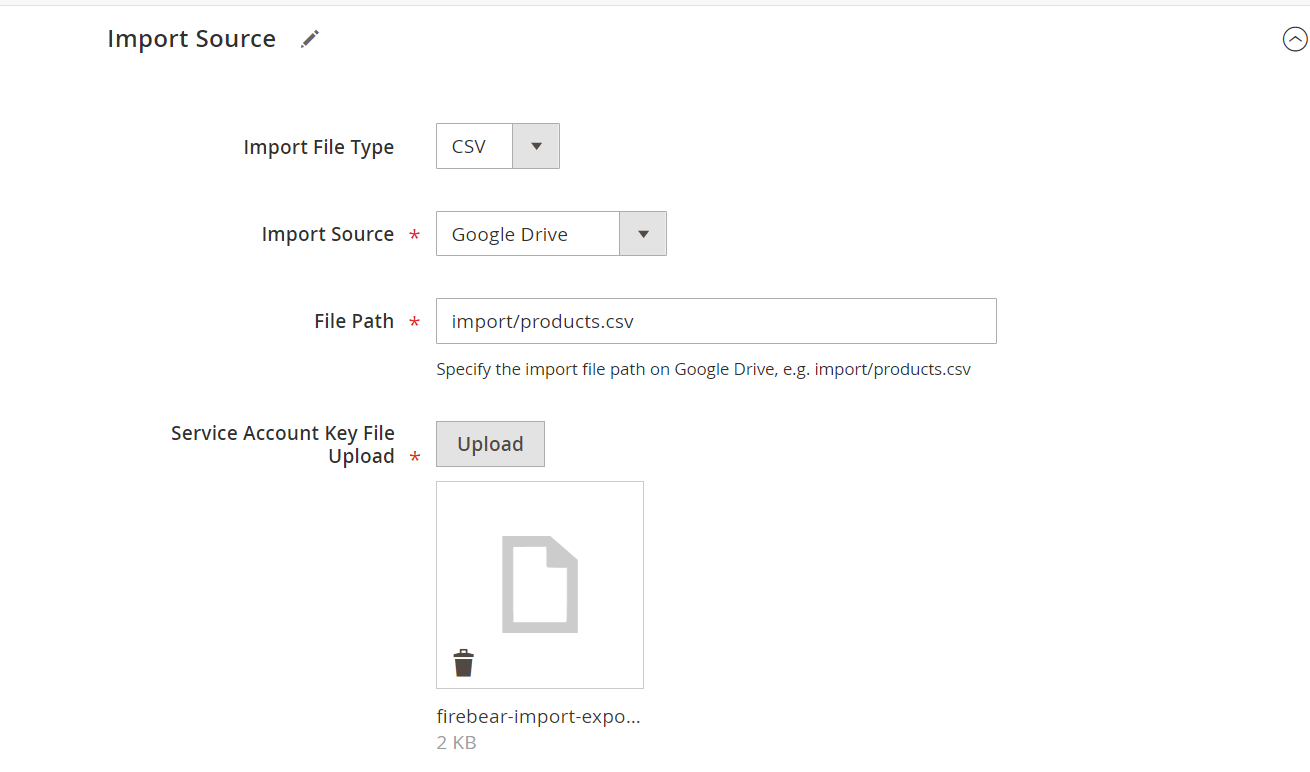
The details see in the installation guide above.
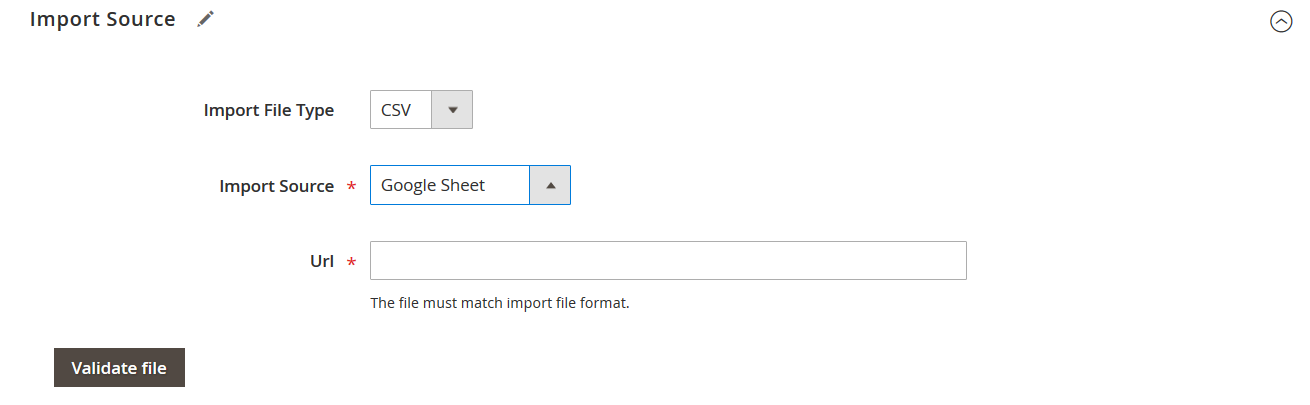
Google Sheets and direct URL
As for Google Sheets and URL upload, it is only necessary to paste the file URL in the appropriate field.
When composing a Google Sheet table you can use as many tabs as you want, the extension supports multiple tabs. To copy the Google Sheet tab URL:
- Click on the tab you want to import;
- Google Sheets will change the URL of the table to include the tab;
- Copy the URL of the tab while you at its page;
- Paste the URL to the import job.
Remember, to import a particular Google Sheet tab you only need to select it and copy the URL.
For Google Sheets you, first, need to select the actual sheet you want to import, in case you have several sheets in the import table, and only then you can copy and paste the URL.
This was as for the basic import job configuration. Now, you can click ‘Save & Run’ button to test the newly created job. If the uploaded file has a structure that differs from the default import file, then you will need to apply mapping. If it satisfies the Magento 2 requirements, you can start the import process right now.
REST and SOAP APIs
Rest and Soap APIs are enabled from the Import Settings section. Currently, it is only possible to import products using API requests.

Other Rest and Soap API settings will be available in the Import Source section.
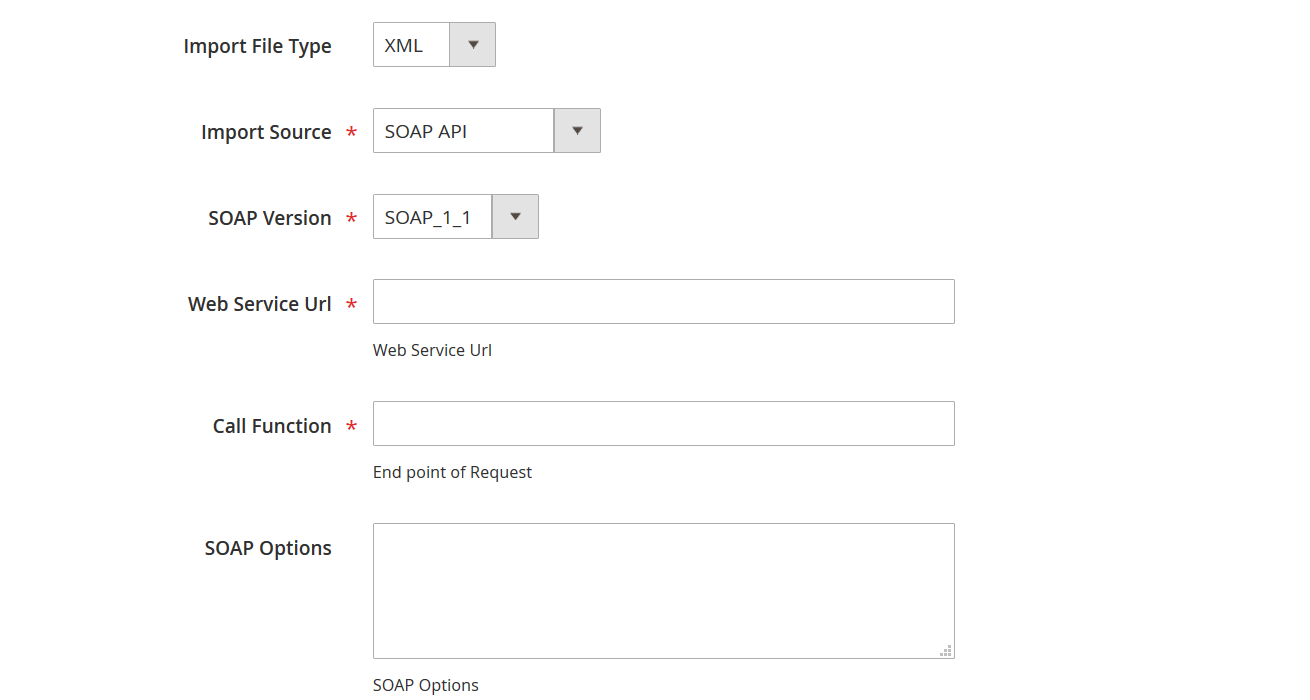
Here you decide which API version you want to use. Specify the Call Function and what do you want to get with SOAP request. If you are not sure how to use the APIs to integrate something, FireBear Studio offers its services. Contact our support team.
We will help you with Rest and Soap APIs! Drop us a line.
Guide to using REST API
To use REST API with the Firebear Import and Export extension, you need to have the following packages added if the extension is installed in app/code/Firebear:
For parsing JSON:
|
1 |
composer require salsify/json-streaming-parser:~6.0 |
For REST:
|
1 |
composer require tcdent/php-restclient:^0.1.7 |
Note! If the extension is installed via composer the libraries will be installed automatically.
API Configuration
To make the API functionality available you need to enable it in the relevant field in the import job:
- Specify the import source as one of the formats — XML/JSON. As for the Import source type, we support REST/SOAP, in our case we select REST.
- In the API call URL, you need to set the endpoint of the site where the file or content should be fetched from.
- Define API request methods. Depending on the request type the should be used via GET/POST.
- For JSON files, you need to specify the necessary parameters in the valid file body (usually it’s in the POST section).E.g., for basic authentication
|
1 2 3 4 |
{ "username": "username for endpoint", "password": "password for endpoint" } |
If no authentication is required then you can specify blank
|
1 |
{} |
More options related to the configurations can be found at .
See the sample files for the supported file formats:
For custom XML files, you can configure a relevant XSLT. See more at XSLT Documentation, .
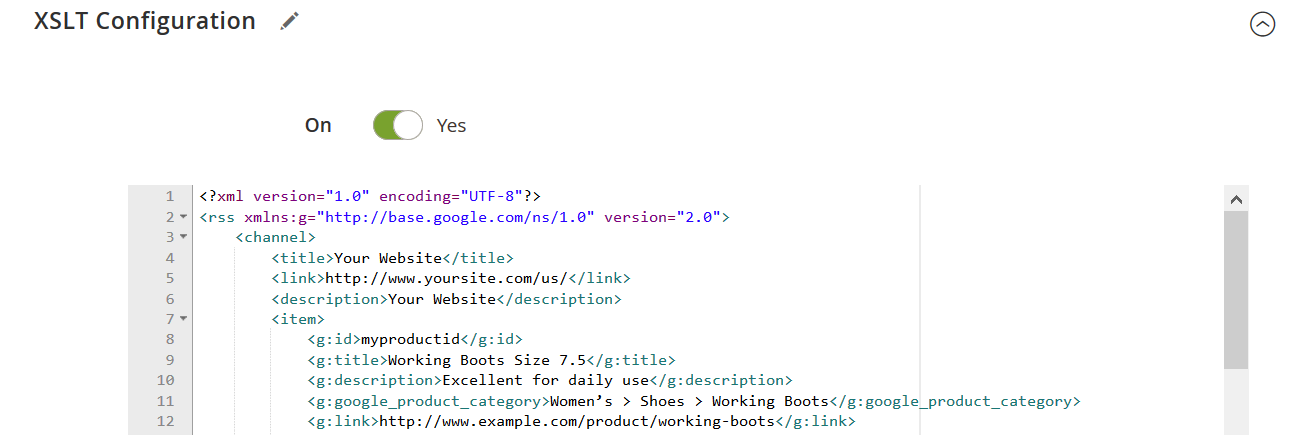
XSLT transformation for XML files
The latest release of the extension introduced XSLT transformation for XML files. What it means for the end-user? It means that now you can import XML files of ANY format with a proper XSLT code template.
Let’s start from the beginning. Improved Import and Export extension allows importing XML files, however, of a particular format:
- XML 1.0
- encoding: UTF-8
- field separator: space
- first row: column names
- top-level root name: Items
- XML record name: item
In other words, if you want to import XML file of a different format you first need to transform it. Now, with introduction of the XSLT block, you can do it directly from the Import Job screen.
XSLT is a special programming language that dictates how XML files should be read. For example, your supplier provides you with the custom XML file with the product updates. In this case, you can ask your developer to compose an XSLT template that will convert this custom XML into a format readable by the extension.
Don’t have a developer or don’t know how to use XSLT? No problem!
We will compose an XSLT template for you! Drop us a line.
We will make sure you can import any XML files to your Magento 2.
If you want to know more about what is XSLT and how can one use it – read a dedicated blog article we have composed for you:
Magento 2 import XSLT transformation – how to import any XML to Magento 2
Find and Replace
In version 3.5.1 Find and Replace section has been added into the Import Job settings. The section allows you to search through particular attribute values and replace set values with the values that you want.
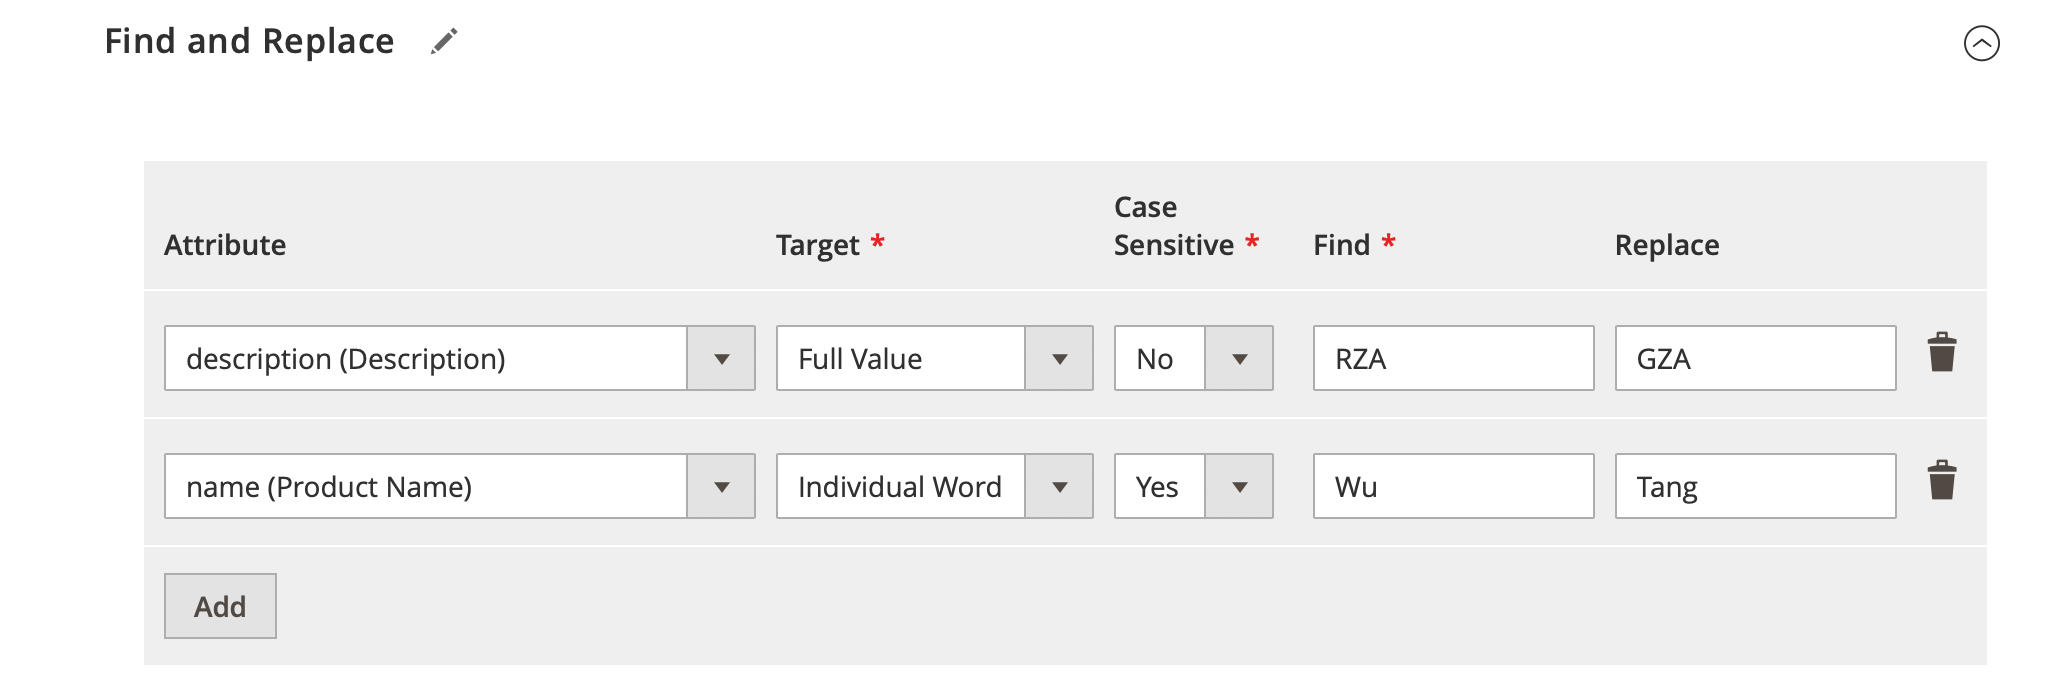
The section works on the per-line basis:
- Click ‘Add’ button to add a new line
- Select the Attribute which value you want to adjust
- Set the Target of the search
- it can be Full Value of the attribute – in this case Improved Import will search for the exact match of the FULL attribute value
- or it can be Individual Word – in this case Improved Import will search for a work in the attribute value, meaning every word that matches search will be replaced
- Decide if you want the search to be Case Sensitive
- Find the word or a phrase that should be replaced
- Type in the value with which you want to Replace the Found word or phrase
That’s pretty much it. You can add as many lines as you wish, replacing as many values as you need.
Email notifications
Improved Import and Export support the email notification functionality triggered by import and export jobs results. You can enable notifications on failed and successful job runs to stay informed about the outcomes right from your email box or disable the feature.
In the ‘Email Notification‘ section you can select one of the templates existing in the database, and specify the receiver and sender. You are able to allow the functionality to attach a job log to an email and get the full picture of how the job has been proceeded with.
Note that the job log attachment feature can process log files of no more than 10 MB in size. Keep this fact in mind when you set up a rather complex job going.
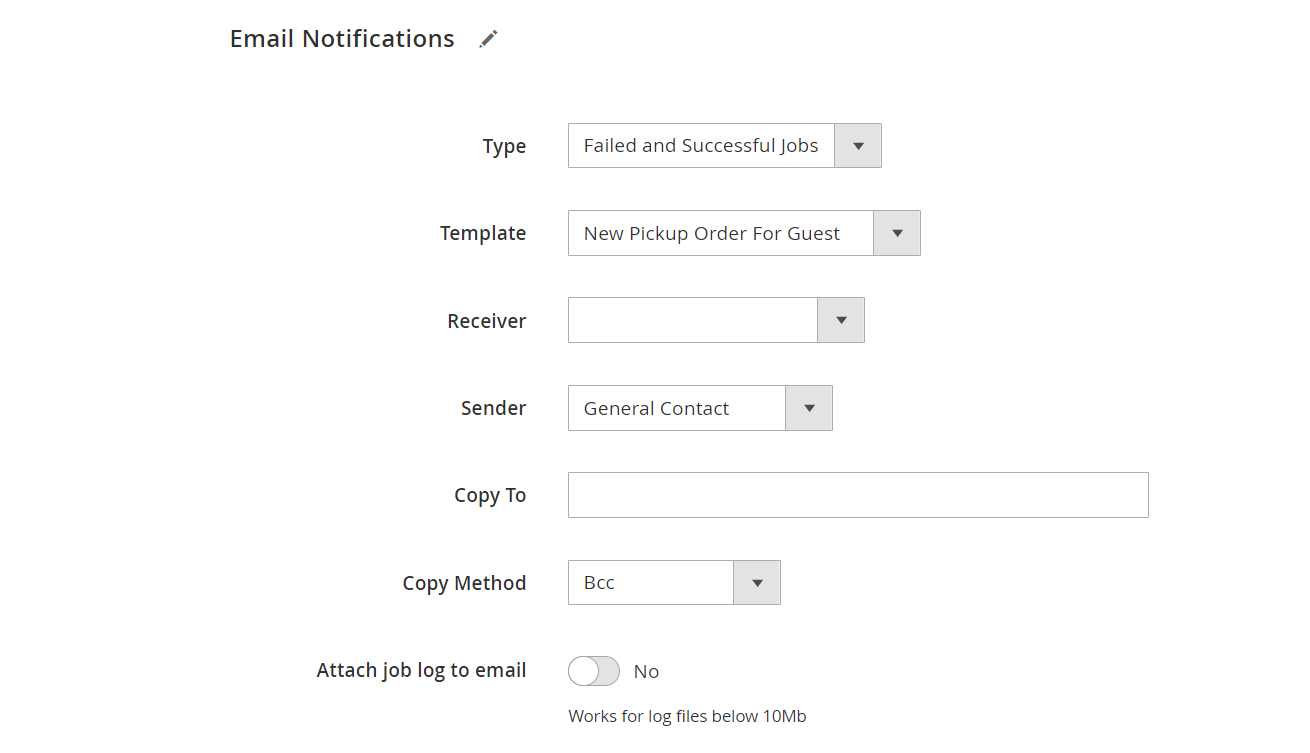
The supported copy methods include Cc and Bcc. Cc stands for carbon copy while Bcc means blind carbon copy. If you select Cc, you copy others publicly. Bcc, on the other hand, lets you do it privately: any recipients on the Bcc line are not visible to others on the email.
Email template customization
In case you want to modify the built-in notification template, you can do it at Marketing > Email Templates > Add New Template. Upon selecting and loading the Firebear_ImportExport > Import/Export Notice option you get to customize the template name, subject, and content. Job template management routine goes the same as the standard one.
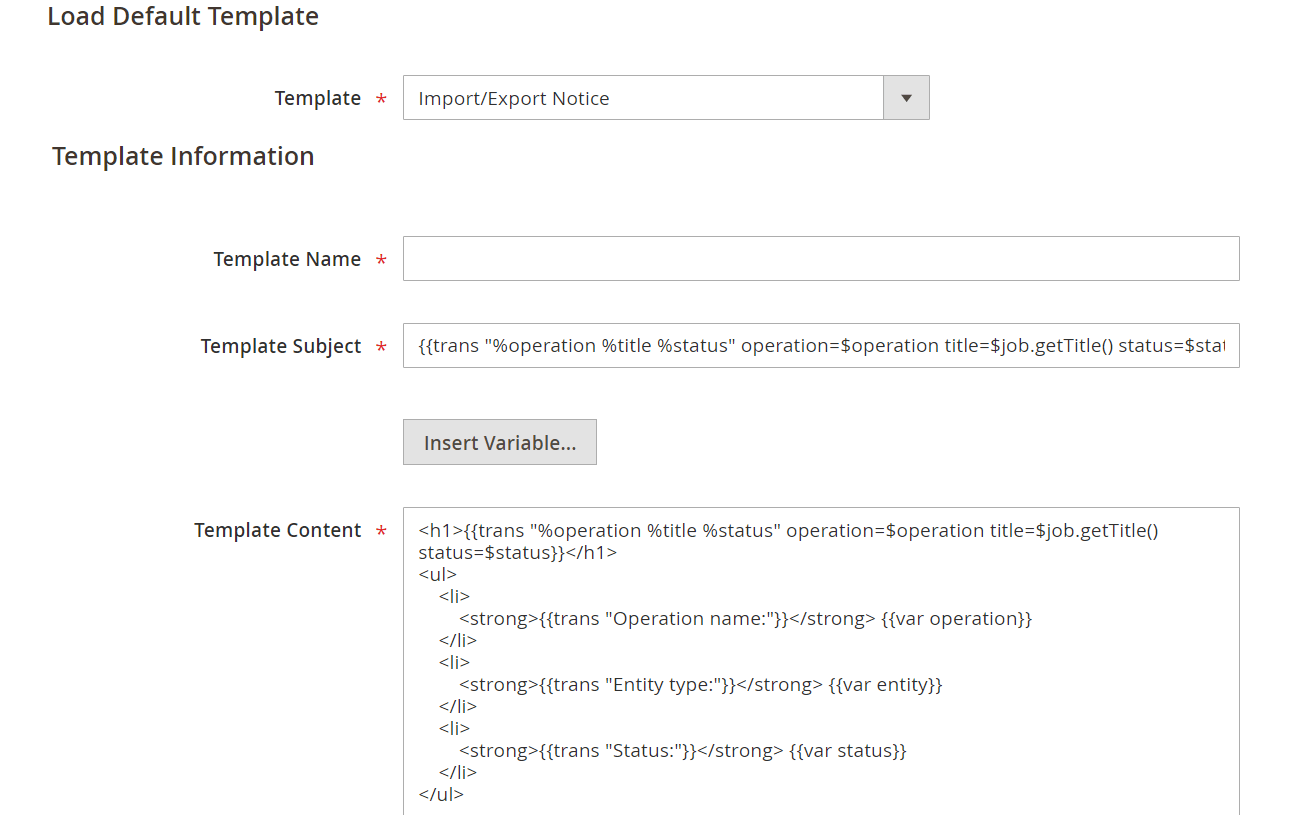
The template on successful and unsuccessful jobs supports the following variables.
$job – an objective variable that retrieves data about the current job where:
getId (job ID);
getTitle (job title);
getIsActive (job status);
getCron (cron group name);
getFrequency (cron frequency);
operation (import/export);
status (successfull/unsuccessful);
entity (entity type).
Import prerequisites
Import is not a straightforward procedure in Magento 2. Improved Import and Export extension’s aim is to make it much more user-friendly. However, there are some things that cannot be simplified, such as Magento 2 formatted CSV tables with the import entities, such as products.
So, to make sure you are prepared for the import procedure let’s revise what do you need to have before attempting a product or other entity import.
IMPORTANT!
We strongly advise you to read through the Complete Product Import Guide before referring to import procedure. This guide will help you understand the concepts behind the import procedure and how the Magento 2 addresses different import entities.
Import Table, requirements and where to get
To import anything to Magento 2 using Improved Import and Export extension you need to have a properly formatted CSV or XML table. Native Magento 2 import process only supports CSV file formats, however, with the help of FireBear extension you can also take advantage of the XML file format.
The import table should be properly formatted before attempting to import anything. There are several ways of getting a properly formatted table:
- Use FireBear team has composed for you. The table comes with the sheets covering every entity import, attribute description and expected values. Read more about Master Table.
- Download sample import files from . There you can find up-to-date import files for every entity if you prefer raw CSV file format.
- Navigate to your store backend System > Import, select an entity you want to import and click the ‘Download Sample File’ link.
In case you want to compose the table manually you need to create the following CSV file:
| Character set | Unicode (UTF-8) |
| Field separator | Comma, Tab |
| Text delimiter | ” |
Now that you have a properly formatted CSV table it is time to fill it with the import entities and learn how different entities are imported.
How to import products
Importing products and product updates is probably the most used feature of the Improved Import and Export extension. In this chapter, we will cover everything you need to know about product import step by step.
Important notes
Product import can be conventionally divided into product import and product updates. The main difference is in REQUIRED product attributes that should be in the table you are importing. You need to remember:
Product import – understands that you will be creating new products from the import file. In this case, the required columns or required attributes will be:
- sku – a unique product identifier.
- attribute_set_code – product must be assigned to an existing attribute set. The attribute set should also contain all the optional product attributes such as color, size, fabric, and their values.
- product_type – Magento 2 needs to understand what type of product it needs to create.
- name – a name of the product that will be displayed to the customers.
- price – price of the product.
Remember, these attributes are mandatory. In order to create new products you need these attributes in your CSV table. All other product attributes, such as description and image, are optional and you can add them only if you need them.
For example, in you can see that we can create a configurable product with only 12 columns representing 12 product attributes.
Product update – understands that you will be updating attributes of the product(s) that already exist in your Magento 2 catalog. In this case, the required columns will be:
- sku – a unique product identifier.
- attribute_set_code – product must be assigned to an existing attribute set. The attribute set should also contain all the optional product attributes such as color, size, fabric, and their values.
It means, that if you already have products in your Magento 2 catalog, and only want to update for example stock and price, you can compose the table with four columns: sku, attribute_set_code, price, qty. For example like in the .
Import of product images
A link or a path in the directory to a product image must be specified in the image-related attributes in the data file.
Keep in mind that Improved Import and Export allows using special characters in the image name. The following list of symbols can be processed within an image name:
- Numeral and alphabetic characters;
- Space;
- Period;
- Hyphen;
- Parenthesis.
E.g., http://www.picture.com/image/catalog/product/sal/a-b-c/Image 2018-02-02 at 09.50.47 (13).jpeg
Custom product type support
The functionality supports import and export of any custom product type.
Under ‘custom product type‘ we mean types other than default simple, configurable, grouped, virtual, downloadable, or bundle. For these types, you can generate a name, a label for the backend display, attribute set that defines custom processing logic, and price.
To transfer pre-configured product types, you’ll need to identify those as a product type within the functionality and specify them available for import.
E.g., you’ve created a product type ‘Device‘.
Modify app/code/Vendor/Packagename/etc/firebear_import.xml as follows:
|
1 2 3 4 5 |
<?xml version="1.0"?> <!-- /** * @copyright: Copyright © 2017 Firebear Studio. All rights reserved. * @author : Firebear Studio <fbeardev@gmail.com> */ --> <config xmlns:xsi="http://www.w3.org/2001/XMLSchema-instance" xsi:noNamespaceSchemaLocation="urn:magento:module:Firebear_ImportExport:etc/firebear_import.xsd"><entityType entity="catalog_product" name="[product_type_name]" model="Vendor\Packagename\Model\Import\Product\Type\Device"/> </config> |
Add the product type app/code/Vendor/Packagename/Model/Import/Product/Type/Device.php (where ‘Device’ is the name of a custom product type):
|
1 2 3 4 5 6 7 |
<?php /** * @copyright: Copyright © 2018 Firebear Studio. All rights reserved. * @author : Firebear Studio <fbeardev@gmail.com> */ namespace Vendor\Packagename\Model\Import\Product\Type; use Firebear\ImportExport\Traits\Import\Product\Type; use Magento\CatalogImportExport\Model\Import\Product\Type\AbstractType as MagentoAbstractType; class Device extends MagentoAbstractType { use Type; } |
And with that, you are ready to import and export your custom product types.
Step 1: select entity, behavior and upload import table
You should have already created a new import job as per Add new import job chapter.
First, to import products you need to:
- Set Entity=‘Products’ in the Import Settings section of the job;
- In the Import Behavior specify what the extension has to do with the imported entities: add/update, only update, replace, delete.
- And upload the import table you have composed or downloaded in the Import Source section.
Once everything is done – click ‘Validate’ button to proceed to the other job settings.
Step 2: map attributes
If the import file has a custom structure that doesn’t fit the Magento 2 requirements, you can apply mapping. If not sure, you can check the sample import files at FireBear GitHub: .
The Map Attributes section provides the ability to apply presets for the import tables to automatically map attributes from the table with the ones in your Magento 2. If you’ve previously selected a platform to import from (in the Import Settings section), the mapping presets will activate background data editing.
Once the preset is applied, the extension will automatically perform mapping for fields that don’t satisfy system requirements:
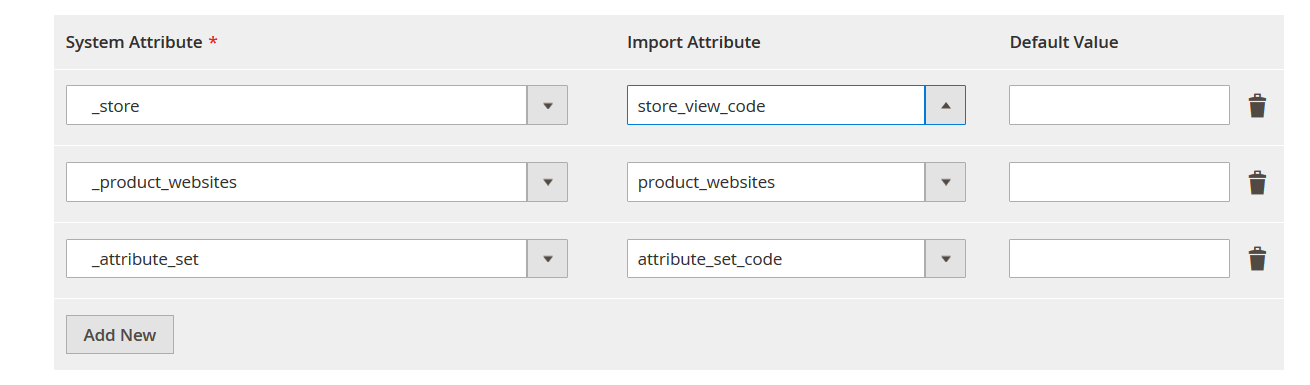
At the same time, you can still do everything manually: select a default Magento 2 attribute in the ‘System Attribute’ and specify an appropriate import attribute. Besides, you can type a default (hardcoded) value for each attribute. It will be added for each imported item in the appropriate attribute column.
To delete a mapping item, click on the black bin icon. When the mapping configuration is prepared hit the ‘Validate’ button to validate mapping. That covers the Map Attributes section.
Creating attributes with mapping
Using the Map Attributes section you can create the attributes that are missing from the import file and apply default values for such attributes.
To do this click the ‘Add New Custom’ button in the attributes grid.

The new line will be added to the attribute grid. Here you will need to specify the Magento 2 attribute that already exists, type in the name of an attribute that you want to create and specify the Default Value.
For example:
You are import products that are missing quantity attribute in the imported table. Using Map Attribute section you can:
- Click ‘Add New Custom’ button;
- Select ‘qty’ Magento 2 attribute which is responsible for storing product quantity;
- Type in the attribute you want to create. In your example, we use ‘quantity’ however you can name the new attribute whatever you like.
- In Default Value filed specify the value of the new quantity attribute. We specify ‘100’.
Result:
When the import is complete, every imported product will have ‘qty’ attribute value set to ‘100’. Because you specified that you want to use ‘qty’ attribute that already exists, and which corresponds with the ‘quantity’ attribute you have just created. In this way, the value of ‘quantity’ has been applied to ‘qty’.
Applying attribute default value
Another feature available for attribute mapping is setting Default Value for the imported attribute. And there are two ways to do it which are controlled with Set Default value setting.

- When Apply Default Values to All Rows is selected – the extension will REPLACE attribute value in ALL ROWS. E.g. you are importing 100 products, for every product you have a unique value for the ‘description’ attribute. If you enable Apply Default Value to All Rows and map the description attribute and set a default value for it. The extension will replace ALL unique values with the Default Value you have specified.
- When Apply Default Values to Empty Rows is active – the extension will ADD the Default Value only to the EMPTY ROWS. E.g. you are importing 100 products, for 50 products you have a unique value for the ‘description’ attribute, the other 50 products have an empty value.
Attribute value mapping (Only for ‘Products’ entity)
Using Map Attribute section you can also map attribute values you import.
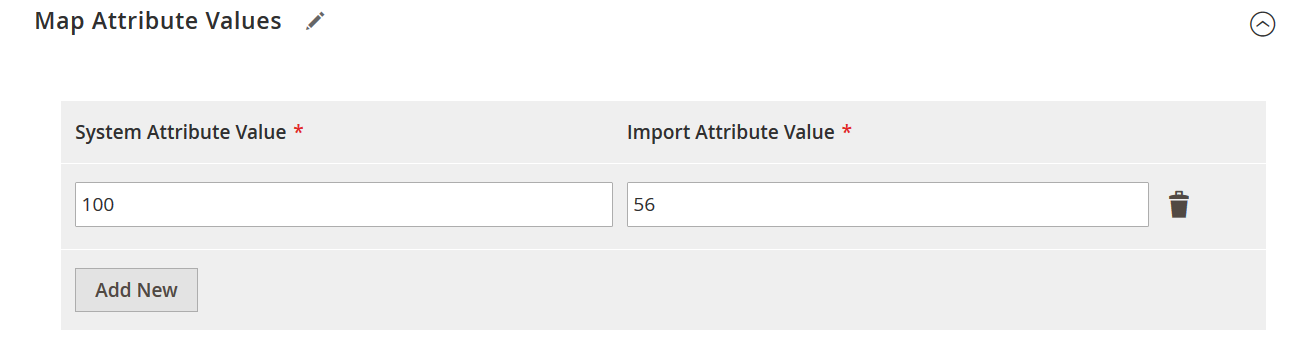
In the Import Attribute Value, you specify the value of the imported attributes. For example, if you want to adjust qty value set to ‘100’ you need to specify ‘100’ as the value you want to adjust.
In the System Attribute Value you specify the value you want to get. For example, if you want to adjust qty value from ‘100’ to ’56’ you need to specify ’56’ as the value you want to get.
NOTE: the extension will replace ALL values that match value you typed in System Attribute Value. So pay close attention if you are not sure some other attributes can have the same value.
Step 3: map categories
If you need to adjust the categories of the products from the import table you can make use of the Map Categories section.
- To start click ‘Load Categories From Import File’ button. The extension will load all values from the ‘categories’ column of the import table.
- Next, click ‘Add New’ button, to map the first category. At the ‘Import category path’ field select the category from the import table you want to map.
- At the ‘New category path’ select the category from your Magento 2 store you want the product to belong to. Now, the old category path is mapped with the category path from your store.
NOTE:
‘Default Category’ in the category path – is a sample Magento 2 root category. If you want to import a root category – make sure to specify its name first in the category path. Remember – ‘Default Category’ is not a prerequisite for category path, rather an example.
If required, you can add new categories to your store right from the import job. To do this click the ‘New Category’ button.
Setting root category
It is also possible to select a Root Category that will be used as a reference during category path import.

The Root Category you select defines the reference category for starting all category paths you import. For example:
- You are importing category path /Men/Shoes/.
- You select Root Category value /Shop/.
- When the import process is complete the result category path will be /Shop/Men/Shoes/.
This setting can be really useful when you are importing products to different store views or want to rearrange category paths.
Step 4: price rules
At the Price Rules section you can adjust product prices specified in the import table. Whether it’s a percent change or a fixed amount increase or decrease, the built-in functionality allows set up prices based on product attributes. This is particularly useful if you want to add or remove some amount for a certain manufacturer, SKU, new products in the catalog, etc. To configure new prices:
- Click ‘Add Rule’ button to start price adjustments;
- Next, in the ‘Apply’ column set whether you want to add a price or flat value to the prices of the product specified in the import table;
- Then, in the ‘Value’ column specify the value of the price adjustment;
- After, identify the products that will be a subject to the price adjustment using the ‘Conditions’.
- If required you can add other lines of price adjustments by clicking the ‘Add Rule’ button once again.
Use negative values to lower prices specified in the import file.
Remember that the conditions are only for the products from the table you are importing, not for the products currently in your Magento 2 catalog.
Rounding prices to .49 or .99
In addition to adjusting the prices of the imported products, you can also let the extension automatically round the price and special price of the products to the nearest value of .49 or 0.99.
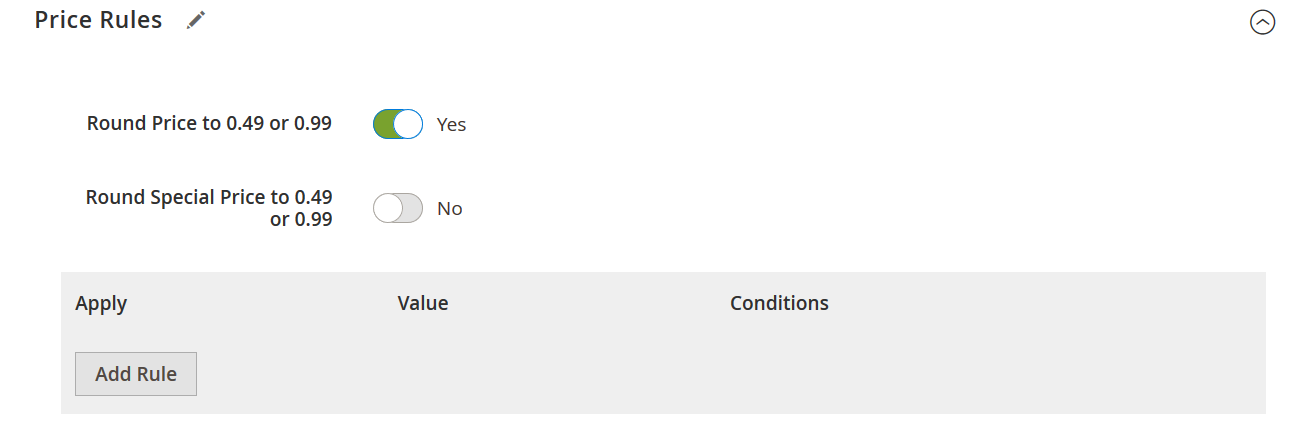
Round Price to and Round Special Price to settings if enabled tell the extension to scan the prices for decimal values, and if found, round such values to the closes .49 and .99 values.
This can help you follow the marketing recommendations on the price display and earn an extra buck without any manual price adjustments.
Step 5: Custom logic for creation of configurable products
You will need to use this section if your import table contains configurable products and you want to create them for your product catalog. You can find a detailed example of how configurable products can be imported in the dedicated chapter of this manual. You can also refer to the dedicated blog post about configurable products where we have tried to create a complete guide to this complex product type.
Improved Import and Export extension version 2.1.1 has added several fast and convenient ways of importing Configurable Products to your Magento 2 store.
To import a configurable product with a bunch of assigned simple products you only need a single attribute. Let’s break down how this section works.
In this section, we will only describe what each setting is responsible for and give a general impression. If you are looking for an in-depth guide on how to import configurable products using Improved Import and Export extension refer to the chapter ‘How to import configurable products’ of this manual.
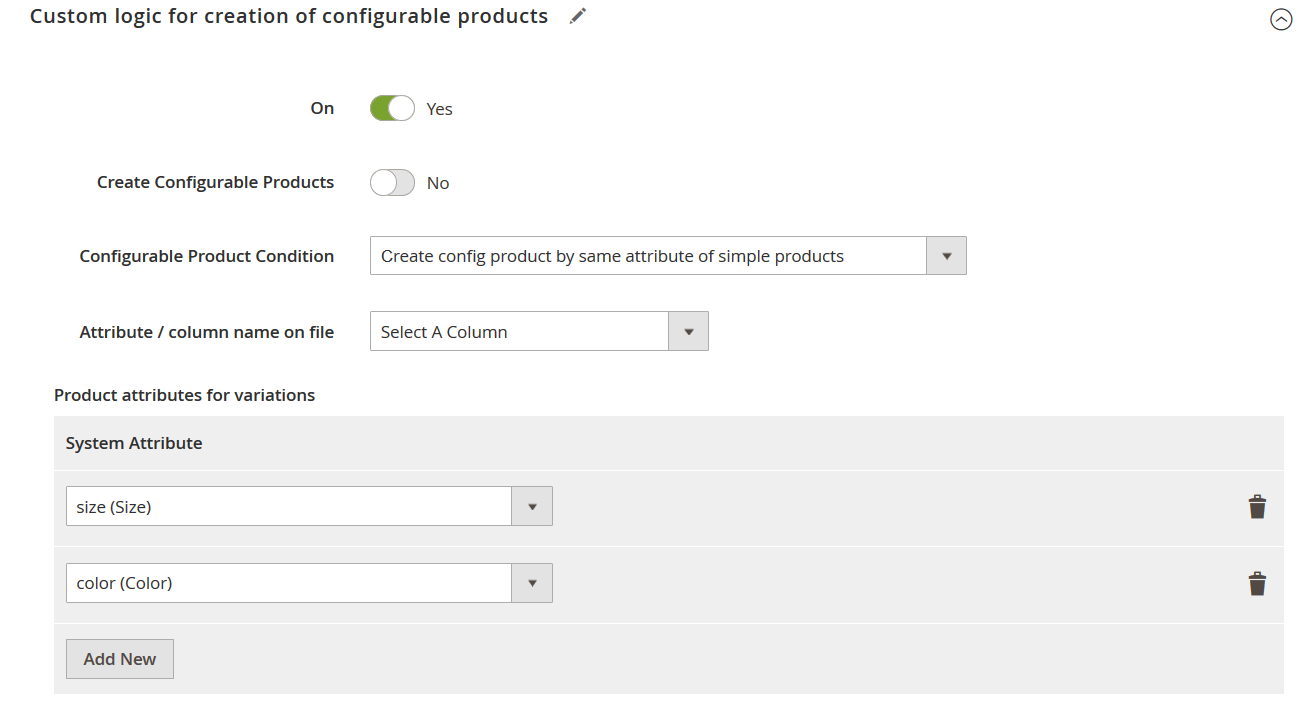
The new section for configurable product import comes with the following settings:
- On – defines whether the custom logic for creating configurable attributes is enabled;
- Create Configurables Products – defines whether NEW configurable product should be created at your Magento 2 store if simple products have a reference to it, however, the import file lacks this very product and it cannot be found at your store.
For example:
We are importing nine simple products that are referenced to a configurable product with SKU:123. However, in the table there is no configurable product with SKU:123, and there is no such product in your Magento catalog. In this case a configurable product with SKU:123 will be created automatically, providing Create Configurable Products is enabled. Note: newly created configurable product will have the name same as SKU, and no price applied. - Configurable Product Condition – defines on what conditions the configurable product should be created. There are five condition types:
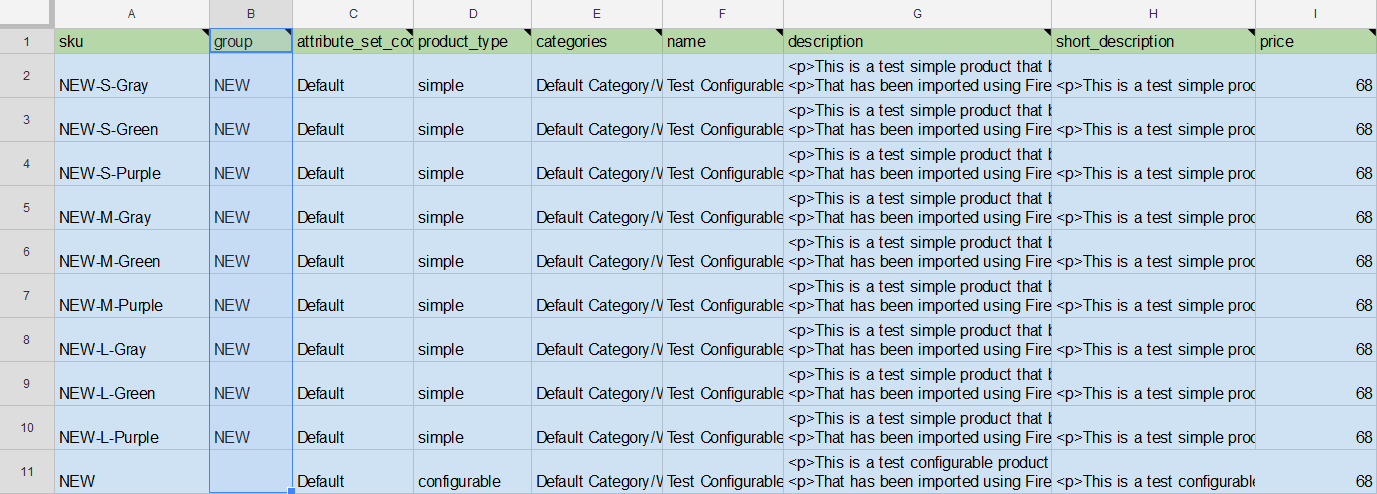
- Create config product by the same attribute of simple products – allows assigning simple products to a configurable product using dedicated column where the SKU (or any other recurring value) of the configurable product is specified.
How is it done?
In the import table, where you list all simple products that should be assigned to the configurable, you need to create a new column with a unique name. In the Master Table we use column ‘group’.
In this column, next to the simple products, you need to specify the SKU of the configurable product you want this simple assigned to.
- Create configurable products by custom rules (part of a line before delimiter) –allows assigning simple products using SKU (or any dedicated column), where the extension reads part of the value before delimiter (which is specified separately).
- Create configurable products by custom rules (part of a line after delimiter) – allows assigning simple products using SKU (or any dedicated column), where the extension reads part of the value after delimiter (which is specified separately).
- Create configurable products by custom rules (the number of characters from the beginning of the line) – allows assigning simple products using SKU (or any dedicated column), where the extension reads first N number of characters from the beginning of the line).
- Create configurable products by custom rules (the number of characters from the ending of the line) – allows assigning simple products using SKU (or any dedicated column), where the extension reads first N number of characters from the beginning of the line).
- Create config product by the same attribute of simple products – allows assigning simple products to a configurable product using dedicated column where the SKU (or any other recurring value) of the configurable product is specified.
- Attribute / column name on file – allows setting up the column, which defines Configurable Product Condition.
- Delimiter – allows specifying a delimiter value, which defines Configurable Product Condition.
- Count Symbols – allows specifying the number of symbols the extension should read considering Configurable Product Condition.
Next comes the Product attributes for variations table, where the store owner selects the product attributes, available in the import table, that the extension should also consider when assigning simple products to a configurable one.
For example:
If several simple products have the same attributes: size and color; and same Configurable Product Condition values, then a configurable product will be created. If some of the attributes differ, then some of the simple products with different attributes, will not be assigned to the configurable one.
Copying simple product attributes to configurables
When creating configurable products using custom logic you don’t have to have a separate row with the configurable products. Instead, you can only import simple products and configurable product will be created automatically according to the set settings.
However, such configurable products will only have basic (required) attributes filled in, such as attribute set, name, sku and url. In other words, such products will work however won’t have any description, images or other media. To avoid such blank and empty products you can use Product attributes to copy value grid of the custom logic.

In this grid you specify the attributes of the simple products which should be copied to the automatically created configurable product. Please note, that only the attributes of the first simple product in the file will be copied to the automatically created configurable.
For example if you are importing a table that looks like this:

The attributes of the uppermost simple product that you specify in the grid will be copied to the configurable product. This is really useful if you want to copy meta data or product description and others.
Importing different product types
When importing products to Magento 2 you should consider that different product types, such as configurable, bundle, grouped, require special attributes in the import table.
To get you acquainted with different product types and provide you with the complete set of instructions on how to compose the import table we have created a set of posts, each covering a particular product type:
- The Complete Guide to Magento 2 Product Import / Export
- The Complete Guide to Magento 2 Configurable Products, and how to import them
- The Complete Guide to Magento 2 Grouped Products, and how to import them
- The Complete Guide to Magento 2 Bundle Products, and how to import them
- The Complete Guide to Magento 2 Downloadable Products, and how to import them
- The Complete Guide to Magento 2 Virtual Products, and how to import them
Read these posts to master every product type and make sure you can handle complex import procedures.
This is the end of chapter ‘How to import products’, please follow the instructions carefully and read through additional materials provided above. Product import is a complex task, however, master it and you save a great deal of time on product management.
How to import categories
NOTE: to avoid any errors during Category import, especially when importing new or after deleting and reimporting categories to your store, – make sure to delete all ‘entity_id’ values from the file. Magento doesn’t like to place new categories atop of already existing ones.
With the help of Improved Import and Export extension, you can now import product categories in a separate file. To import categories to your Magento 2 store you will need:
- A CSV, XML, XLSX, ODS or Json table formatted to fit Magento 2 requirements. You can find a table with sample data and attribute description in the .
- Follow the instructions in the dedicated post How to Export and Import Magento 2 Categories.
The Magento 2 category import guide is pretty extensive that’s why it deserves a separate blog post.
How to import product position in categories
Improved Import and Export extension for Magento 2 allows importing product position for categories. This includes Magento 2 Commerce Visual Merchandiser functionality. To import product position in categories you will need:
- A CSV, XML, XLSX, ODS or JSON table with products complemented with custom attribute categories_position. The use of this custom attribute is explained in the articles below.
- Follow general product Firebear import procedure on product import. The instructions can be found in the dedicated How to Export and Import Magento 2 Categories post, or in How to Import & Export Magento 2 Visual Merchandiser Data post.
Remember to check Firebear Blog for updates regularly. We are enhancing the import and export procedures often.
How to import customers
The extension can also import and export customers. Actually, customers import is conveniently split into three entities:
- Customers and addresses ();
- Customers main file ();
- Customer addresses ().
To import customers to your Magento 2 you will need:
- A CSV, XML, XLSX, ODS or Json table formatted to fit Magento 2 requirements. You can find the sample files by the links ‘get sample import table’ in the item above.
- Follow the instructions in the dedicated post How to Import Customers & Customer Addresses to Magento 2.
The Magento 2 customer import guide is pretty extensive that’s why it deserves a separate blog post.
How to import advanced pricing
Advanced Pricing is the tier prices that can be applied to the products. The tier prices allow you to apply discounts depending on how many products, or product variations a customer belonging to particular group purchases.
To import advanced pricing you will need:
- A sample file with a complete table of Advanced Pricing. You can get one in the .
- Follow the instructions in the dedicated post How to import Magento 2 Advanced Pricing.
NOTE:
With Improved Import and Export extension you can import advanced pricing along with the products. To do this – add advanced pricing attributes to the import table you have composed for your products and run Import Job with Entity = Products. More information can be found in the dedicated post by the link above.
How to import CMS pages
2.1.2 version of Improved Import and Export extension brings import of the CMS pages. To import CMS pages to your Magento 2 you will need:
- A CSV, XML, XLSX, ODS or Json table formatted to fit Magento 2 requirements. You can find the sample files with all attribute descriptions and sample values at the .
- Follow the instructions in the dedicated post How to Import CMS Pages to Magento 2.
The Magento 2 CMS Pages import guide is pretty extensive that’s why it deserves a separate blog post. Note, that CMS pages composed with Magento 2 Page Builder can also be imported and exported using the extension.
How to import CMS blocks/Static blocks
CMS or static blocks can be also imported to and exported from a Magento 2 store. To import CMS blocks to your Magento 2 you will need:
- A CSV, XML, XLSX, ODS or Json table formatted to fit Magento 2 requirements. Sample files and tables can be found either in the or at .
- Follow the instructions provided in the dedicated post How to import and export CMS/Static Blocks to Magento 2
Instructions on how to import and export static blocks would extend the Improved Import and Export manual even further, that’s why we have put them into a dedicated article. Note, that CMS blocks composed with Magento 2 Page Builder can also be imported and exported using the extension.
How to import cart price rules
Starting with version 2.1.2 the extension introduces basic Magento 2 Cart Price Rules import. Now you can import coupon codes to Magento 2 store, specify a discount amount, customer groups and other Cart Price Rule settings.
To import coupons to Magento 2 you will need:
- An import table in a CSV, XML, XLSX, ODS or Json format with properly placed cart price rule values. You can find a sample table here .
- Read through the instructions in the dedicated post on how to import coupons to Magento 2.
The Magento 2 Cart Price Rule import guide is pretty extensive that’s why it deserves a separate blog post.
How to import orders
2.2.0 version of Improved Import and Export extension brings import of the orders.
To import orders to your Magento 2 you will need:
- A CSV, XML, XLSX, ODS or Json table formatted to fit Magento 2 requirements. You can find the sample files with all attribute descriptions and sample values at the .
- Follow the instructions in the dedicated post How to Import orders to Magento 2.
- Find sample at the Google Sheet, and .
Putting all information about Magento 2 order import in this guide would increase its already solid size. So take full advantage of the dedicated post whenever you need to import orders to your Magento 2 store.
How to import product and custom attributes
You can now import product and custom attributes to your Magento 2.
To import attributes you will need:
- A CSV, XML, XLSX, ODS or Json table with properly added attributes. You can find a sample table with every attribute described at the .
- Follow instructions in the dedicated post How to import Magento 2 product and custom attributes.
The manual is pretty huge to put instructions in it.
How to import Magento 2.3 MSI entities: stock sources and product qty per source
Magneto 2.3 has been released with a free MSI extension that introduces multi-source inventory functionality to your Magento 2 store. Firebear Improved Import and Export extension already supports this functionality and even more.
To import MSI entities you will need:
- A sample file/table with the stock sources/warehouses or stock source qty. You can get sample tables from the or from .
- Follow the instructions in the dedicated blog article How to import and export Magento 2 MSI and how it works. Magento 2 multi-source inventory (MSI) import guide and manual.
MSI functionality is pretty extensive and deserves a separate manual.
All related product types are imported along with products. However, for every related product type you need to use a dedicated column (product attribute).
To import related products you will need:
- A sample file/table with the products that contains related, up-sells, and cross-sells. You can get sample tables from the or from .
- Follow the instructions in the dedicated blog article The Complete Guide to Magento 2 Related Products, Up-sells, and Cross-sells, and how to import them.
Importing and exporting products may seem confusing if you are only starting to work with Magento, that’s why we have dedicated a separate guide to cover any inquiries.
How to import tracking codes and shipping for orders
All tracking codes and shipping information is imported along with orders. To import tracking codes and shipping information you will need:
- A sample file/table with the tracking codes and shipping details. You can get sample tables from the .
- Follow the instructions in the dedicated blog article How to Import Shipping Tracking Number to Magento 2.
Importing and exporting products may seem confusing if you are only starting to work with Magento, that’s why we have dedicated a separate guide to cover any inquiries.
How to import Magento search terms and synonyms
Search terms and synonyms help you to improve customer experience when it comes to searching for products at your Magento 2. To import search terms and search synonyms you will need:
- A sample file/table with the and from Google Sheet Master Table. Or get samples from Firebear GitHub.
- Follow the instructions in the dedicated blog article Magento 2 search terms and synonyms, and how to import and export them.
Importing and exporting products may seem confusing if you are only starting to work with Magento, that’s why we have dedicated a separate guide to cover any inquiries.
How to import product position inside of a category
Visual Merchandize or product position inside of a category helps you promote products or build nice category layout. To import product position you will need:
- A sample file/table with the from Google Sheet Master Table. Or get samples from .
- Follow the instructions in the dedicated blog article How to import and export position of the product in the category. Magento 2 visual merchandise.
Importing and exporting products may seem confusing if you are only starting to work with Magento, that’s why we have dedicated a separate guide to cover any inquiries.
How to import Magento 2 page hierarchy
Page hierarchy lets you compose the navigation menu for your CMS/Static Pages. To import page hierarchy you will need:
- A sample file/table with the from Google Sheet Master Table. Or get samples from .
- Follow the instructions in the dedicated blog article Magento 2 Page Hierarchy Exploration: Features, Configuration, Import & Export.
Importing and exporting page hierarchy may seem confusing if you are only starting to work with Magento, that’s why we have dedicated a separate guide to cover any inquiries.
How to import Magento 2 product reviews
Product reviews let you enhance the trustworthiness of the products by allowing customers to leave share their opinion.. To import product reviews you will need:
- A sample file/table with the from Google Sheet Master Table. Or get samples from .
- Follow the instructions in the dedicated blog article How to Import & Export Product Reviews in Magento 2.
Importing and exporting page hierarchy may seem confusing if you are only starting to work with Magento, that’s why we have dedicated a separate guide to cover any inquiries.
How to import Magento 2 URL rewrites
URL rewrites let you healthy store redirects. To import URL rewrites you will need:
- A sample file/table with the from Google Sheet Master Table. Or get samples from .
- Follow the instructions in the dedicated blog article How to Import and Export URL Rewrites in Magento 2.
Importing and exporting Magento 2 product reviews seem confusing if you are only starting to work with Magento, that’s why we have dedicated a separate guide to cover any inquiries.
How to import Magento 2 Commerce gift cards
Gift Cards, additional product type in Magento 2 Commerce, let your customer purchase gift cards for them or their friends. To import Gift Cards you will need:
- A sample file/table with the from Google Sheet Master Table. Or get samples from .
- Follow the instructions in the dedicated blog article How to Import & Export Magento 2 Commerce Gift Cards.
Importing and exporting Magento 2 gift cards seem confusing if you are only starting to work with Magento, that’s why we have dedicated a separate guide to cover any inquiries. NOTE: when importing or exporting gift cards – use ‘Products’ entity, as gift cards count as a separate product type. More information in the article.
How to import Magento 2 catalog price rules
Catalog Price Rules is yet another marketing tool that prioritizes sales growth in your store. To import catalog price rules you will need:
- A sample file/table with the from Google Sheet Master Table. Or get samples from .
- Follow the instructions in the dedicated blog article How to Import and Export Catalog Price Rules in Magento 2.
Don’t be confused working with Magento, as everything you need can be found in a separate guide to each entity.
How to import Magento 2 products with the MSI warehouse reference
With the 3.5.2 release of Improved Import & Export you can now import products and assign them to multiple warehouses if you are using Magento 2 MSI extension.
Improved Import & Export for Magento 2 allows you to specify:
- To which warehouse the product is assigned to
- Quantity of the product at a particular warehouse
- If the product can be purchased from the specific warehouse
To import products to Magento 2 with the warehouse reference you need to add three custom attributes to your product import file:
| Attribute name | Reference | Values | Value examples |
| msi_{warehouse_name} | Allows you to assign an imported product to a particular warehouse.
{warehouse_name} should be replaced by the name of the warehouse you want to assign the product. |
Possible attribute values are:
1 – product is assigned to warehouse 0 – product is not assigned to warehouse |
1 |
| msi_{warehouse_name}_qty | Allows you to specify a product quantity available at the particular warehouse.
{warehouse_name} should be replaced by the name of the warehouse you want to assign the product. |
Only numeral values are allowed | 123 |
| msi_{warehouse_name}_status | Allows you to specify if the product can be purchased from the specified warehouse.
{warehouse_name} should be replaced by the name of the warehouse you want to assign the product. |
Possible attribute values are:
1 – product can be purchased from the warehouse 0 – product cannot be purchased from the warehouse |
1 |
You can use multiple msi_{warehouse_name}, msi_{warehouse_name}_qty, msi_{warehouse_name}_status attributes to assign the product to multiple warehouses.
You can use a sample to see how these attributes can be used during the product import.
Running the Job
Now that we have covered all the Import Job settings it is high time to run the job.
To run the job from the Magento 2 admin, previously, this was possible only via CLI, hit ‘Save & Run’ button.
When the import is complete, the system will inform you whether the process went successfully or not. The detailed history log is also available on the appropriate page. In case of unsuccessful import, you will also see a detailed log with errors that are to be fixed:
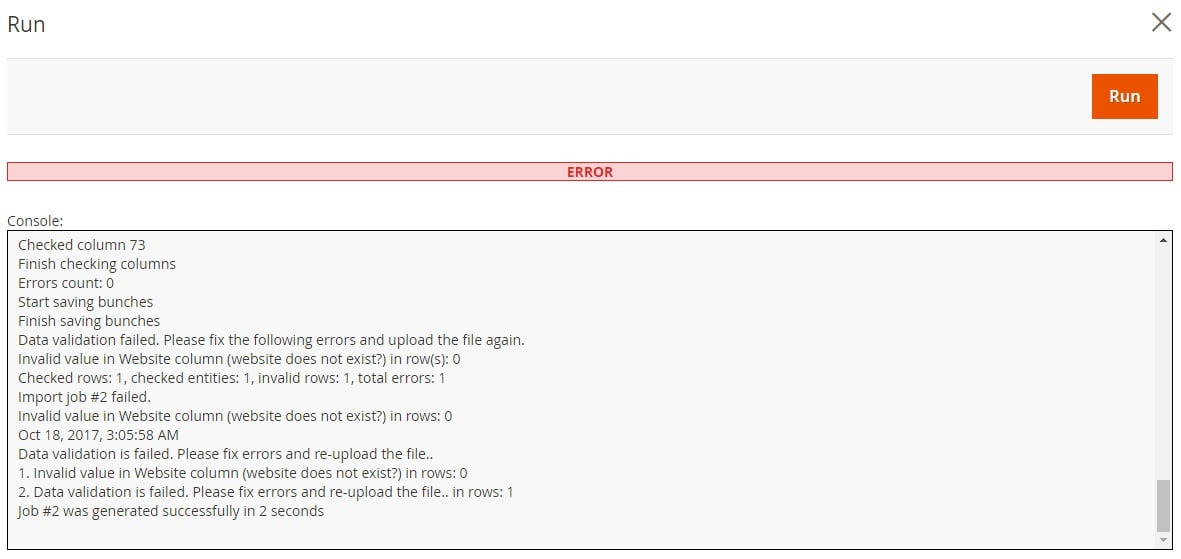 Starting from version 2.1.2 the log is also saved to var/log/firebear folder at your store FTP.
Job history
Another important aspect of the Improved Import and Export Magento 2 extension is a job history which is available for both import and export jobs. You can find it on each job screen. Open the job and click the ‘View History’ link.

A new screen will be displayed. A grid with all runs is available there. You can download a log of each run, as well as view its type and start/finish time.
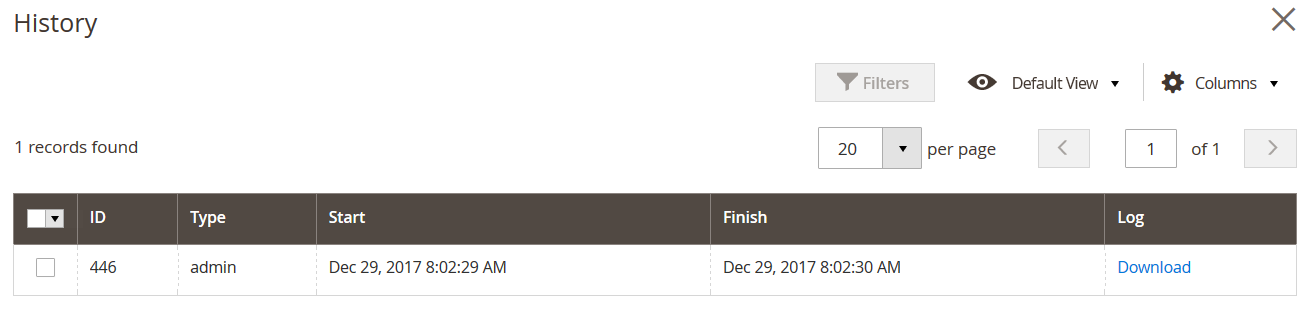
Add new Export Job
To create a new Export Job hit the big orange ‘Add New Job’ button – you will be transferred to a new screen, which is divided into 4 sections: General Settings, Export Settings, Export Behavior, and Export Source. Let’s describe each one.
General settings
Here, you can enable/disable the job. Depending on the selected option, the job status is changed from ‘Enabled’ to ‘Disabled’ or vice versa.
Next, type a job title. We recommend you to use an expressive title that describes your new job. This will help you find the job in the grid or understand what jobs are enabled/disabled.
Now, it is necessary to configure the frequency of your export job. Although you can always create a custom schedule (select the ‘Custom’ option in the ‘Frequency’ field), it is recommended to use the ‘Cron Schedule’ field (the field where you create a custom schedule) only if you understand cron well and have some previous experience in configuring this setting.
Alternatively, it is possible to select one of the predefined schedules:
- None (manual run only)
- Every minute;
- Every hour;
- Every day at 3:00am;
- Every Monday at 3:00am;
- Every 1st day of month at 3:00am;
- Custom.
In the end, you are suggested to specify whether the additional_attributes column, where Magento 2 likes to put custom attributes such as color and size, should be split by attribute using Divide Additional Attributes setting.
- If Divide Additional Attributes option is disabled – all custom attributes you have added to the product will be put in a single column of the exported file. This can be useful if you are not intended to edit these attributes.
- If Divide Additional Attributes option is enabled – all custom attributes will be placed in the dedicated columns making the attribute management much easier, however, taking some of space of the table.
The first section of the export job configuration page is now complete. You know how to change job statuses and create cron schedules.
Running export jobs on Magento 2 system events
In addition to the cron schedule the export jobs can be automatically executed on certain Magento 2 system events.

Currently, the events that can trigger the export job execution include:
- catalog_product_save_after – the job will trigger after any product in the catalog is saved;
- sales_order_save_after – the job will trigger after you add a comment to the order, send shipment or proceed with any action with the order;
- checkout_submit_after_all – the job will trigger after the order is created from either store or administrator panel.
You can select multiple events to let the jobs execute whenever you feel necessary. Don’t forget to select the relevant cron group to improve the management of automatic exports.
Export settings
Now, it is necessary to proceed to the second section of the configuration page – Export Settings. Here, you can select an entity that will be exported. Currently, the extension allows you to export the following entities:
- Products.
- Categories.
- Customers and Addresses (single file).
- Customers Main File.
- Customer Addresses.
- Customer Finances.
- Advanced Pricing.
- Attributes.
- URL Rewrites.
- Widgets.
- Reviews.
- Gift Cards.
- Cart Price Rules.
- Catalog Price Rules.
- Orders.
- CMS pages.
- CMS Blocks.
- Page Hierarchy.
- Search Terms.
- Search Synonyms.
- Newsletter Subscribers.
- Company.
- Company Roles.
- Shared Catalogs.
- Quotes.
- Requisition Lists.
As you can see, the first 4 entity types are available in the default export procedure. The Improved Import and Export Magento 2 extension adds lots of new ones. Thus, you can export various data structures automatically according to the predefined schedule. Let’s describe how to configure other export job sections on the example of the ‘Order’ entity type. Select ‘Order’ in ‘Entity’.
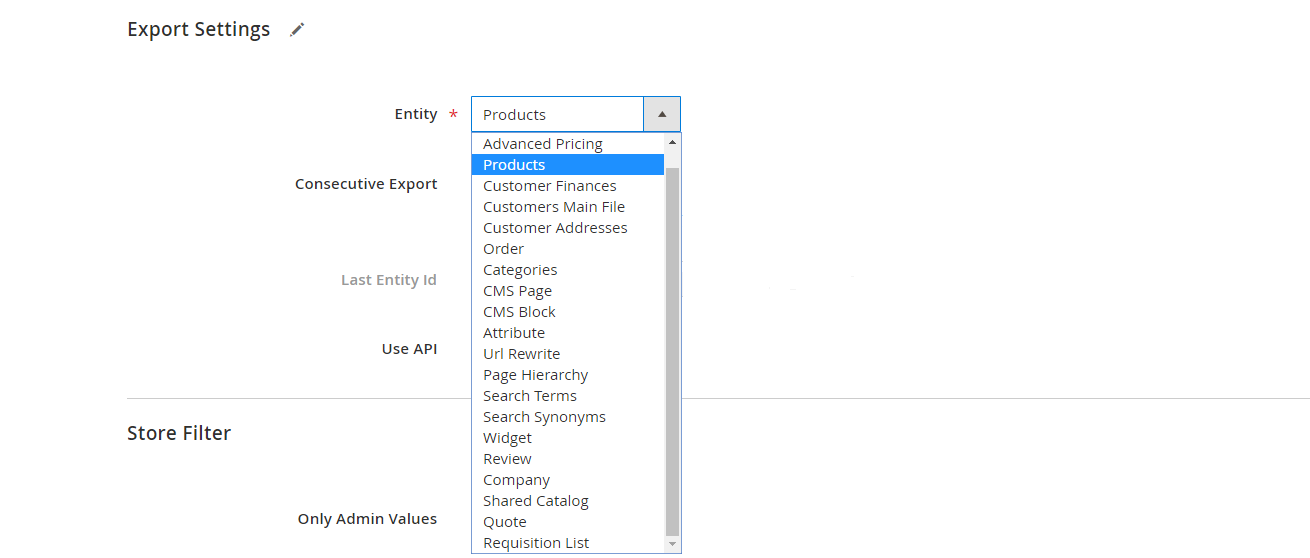
Enable Consecutive Export to extract only new data that was not present during the last entity export. The Last Entity id line will help you to check the last id that was processed so that you can control what you export.

Store Filter
The Store Filter section allows specifying which store views to export data from.
- The option Only admin values will process the data from the default store view.
- The Store View dropdown gives you the ability to select the store views of your interest.
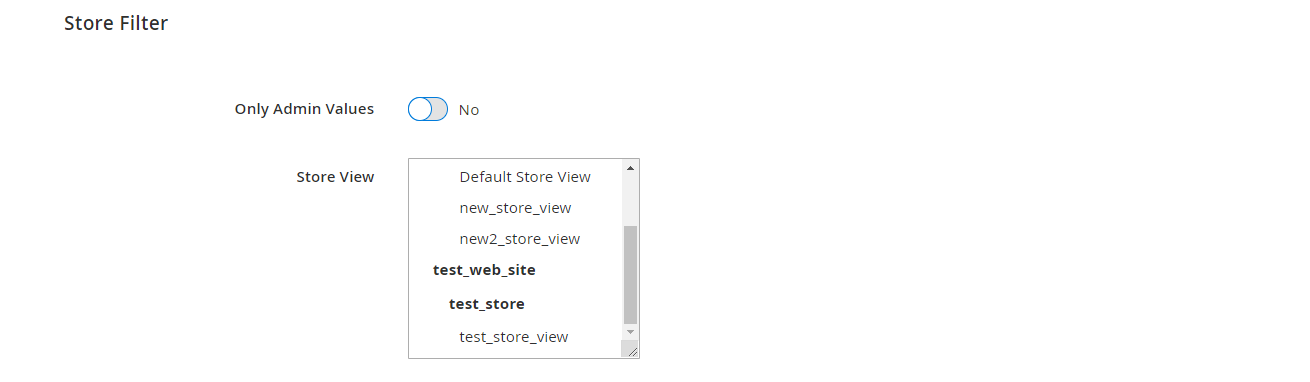
Export behavior (CSV, XML Export)
This section allows for selecting a file format. You can export orders and related data via the standard CSV format or choose XML, XLSX, Json, or ODS. Note that you can use XML files of the following format: . You can always find up-to-date sample import/export files in all formats at Firebear Github.
Next, specify field separator, multiple value separator, and field enclosure. Characters you specify there depend on system requirements of the platform you are going to export your order data to.
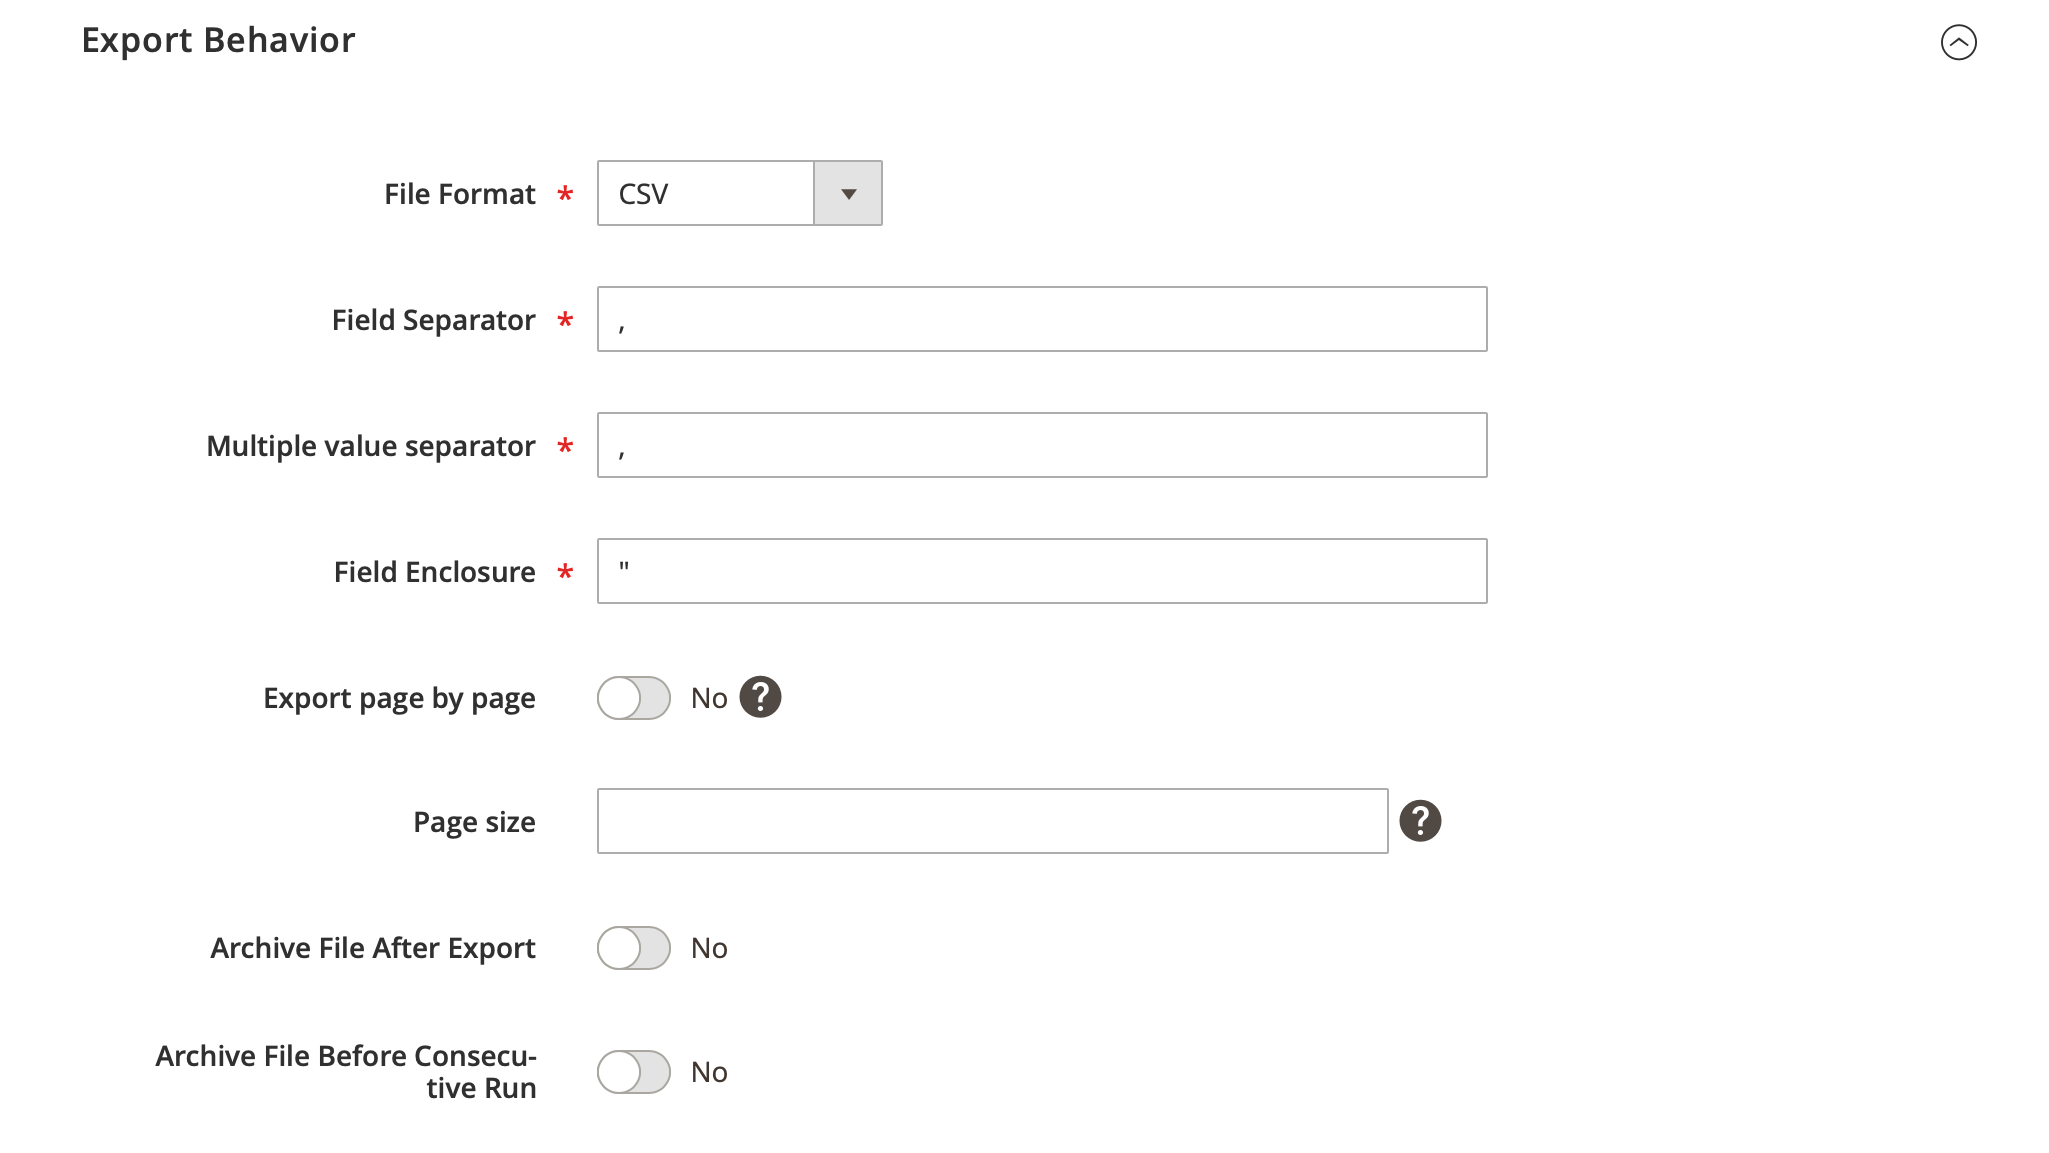
Next, choose entities that will be included in a CSV file you are going to export. As we have selected ‘Order’ we have the following entities:
- Order;
- Items of Order;
- Products of Order;
- Addresses;
- Payments;
- Payment Transactions;
- Shipments;
- Item of Shipment;
- Comment of Shipment;
- Tracks of Shipment;
- Invoices;
- Item of Invoice;
- Comment of Invoice;
- Credit Memos;
- Items of Credit Memo;
- Comment of Credit Memos;
- Status History;
- Tax;
- Tax Items.
Note that some items may not be compatible.
Keep in mind that you can split the export job if your server has a limitation on the query execution time. Enable the Export page by page function to get control over the export speed. The Page size entry will help you to control the export query size:
e.g., if the page size equals 1, the Improved Import and Export will process 1 product at a time;
if the page size increases to 10, the module will export entities in batches of 10.
Archive file after export – if enabled, the file you are exporting will be archived automatically into .zip archive. Useful when running jobs automatically.
Archive file before consecutive run – if enabled, the file you are exporting will be archived automatically BEFORE the consecutive (second and later) runs of export. This option aims to prevent archiving exported files, if you need them before the consecutive export run.
Export source
While selecting an export source, the extension offers the following variants: File, FTP, SFTP, Google Sheet, Google Drive.
Choose the first one and specify a file path – your export source configuration is complete.
Date Format – allows you to specify the date format in PHP which will be automatically added to the files you export. For example, if you submit Y-m-d-hi the date added to the file will look like 2018-31-12-1031. .
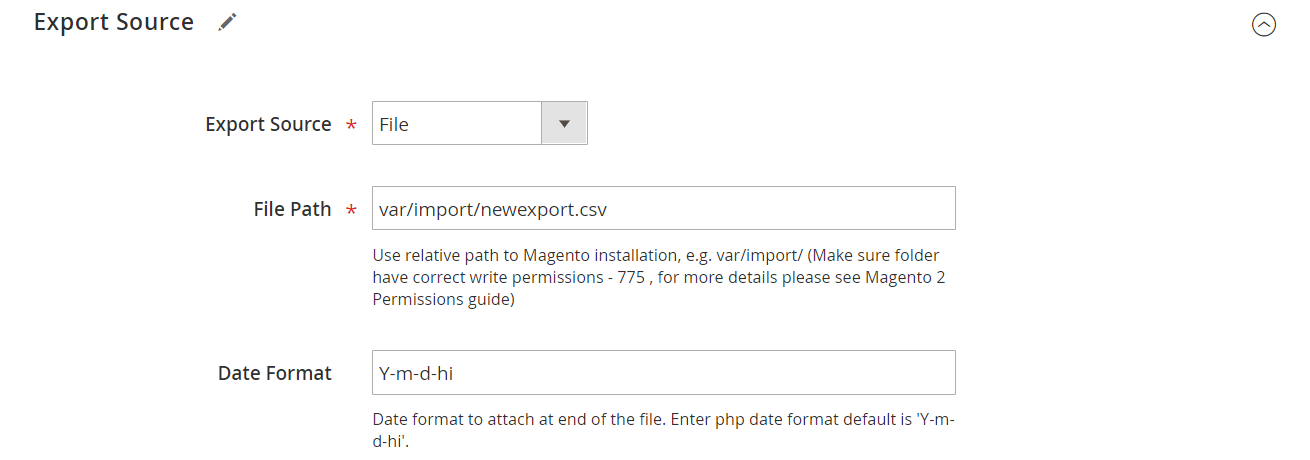
In the case of FTP or SFTP, it is also necessary to specify Host, Port, Username, and Password. You can always check whether the provided parameters are correct by clicking the ‘Check Connection’ button.
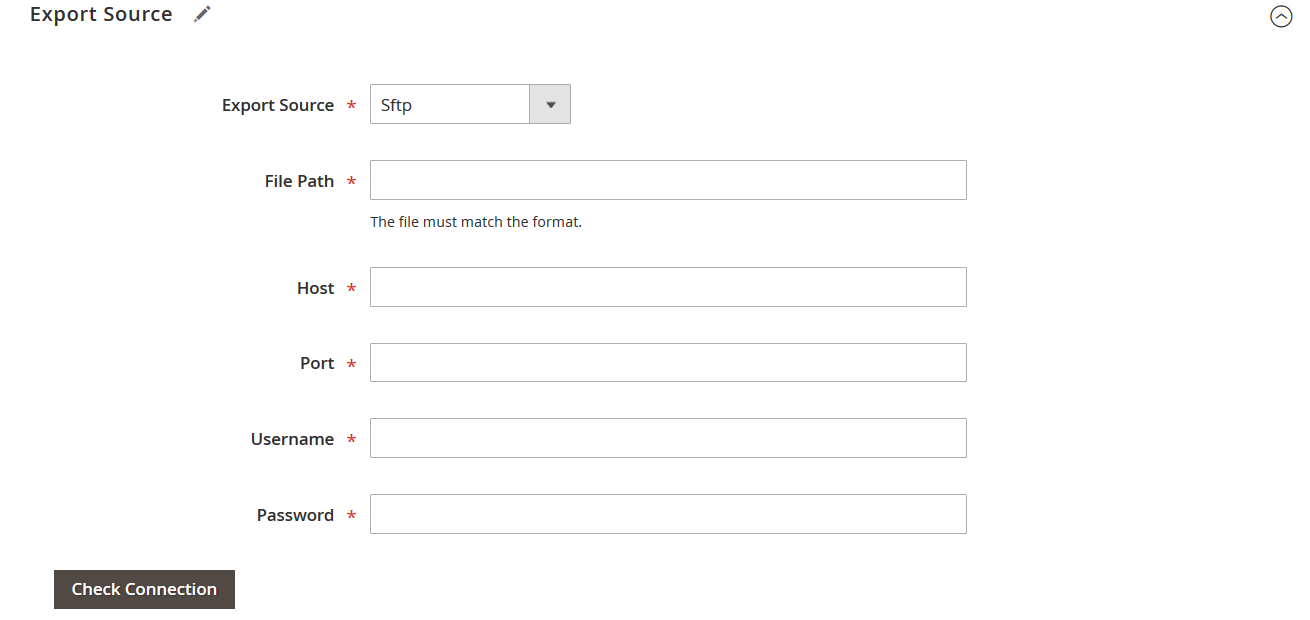
Google Sheets export allows retrieving data to an existing Google Sheets file and even to a specific sheet within it. To perform a Google Sheets export you’ll need a service account key that’ll enable the synchronization via Google API. See the details on getting Google API here.
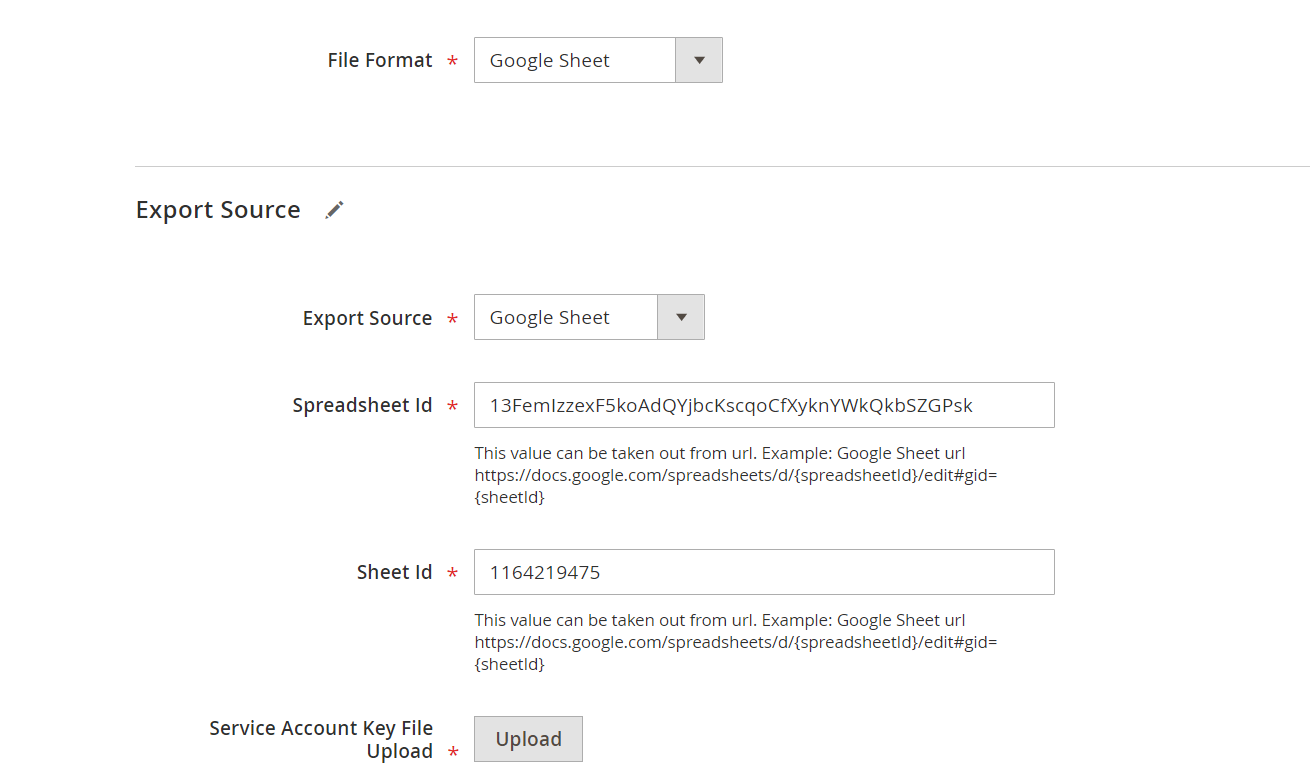
The Google Drive export functionality requires a path to a file created for export within the shared folder and the Google API credentials like those for the Google Sheets export. See the details on getting Google API here.
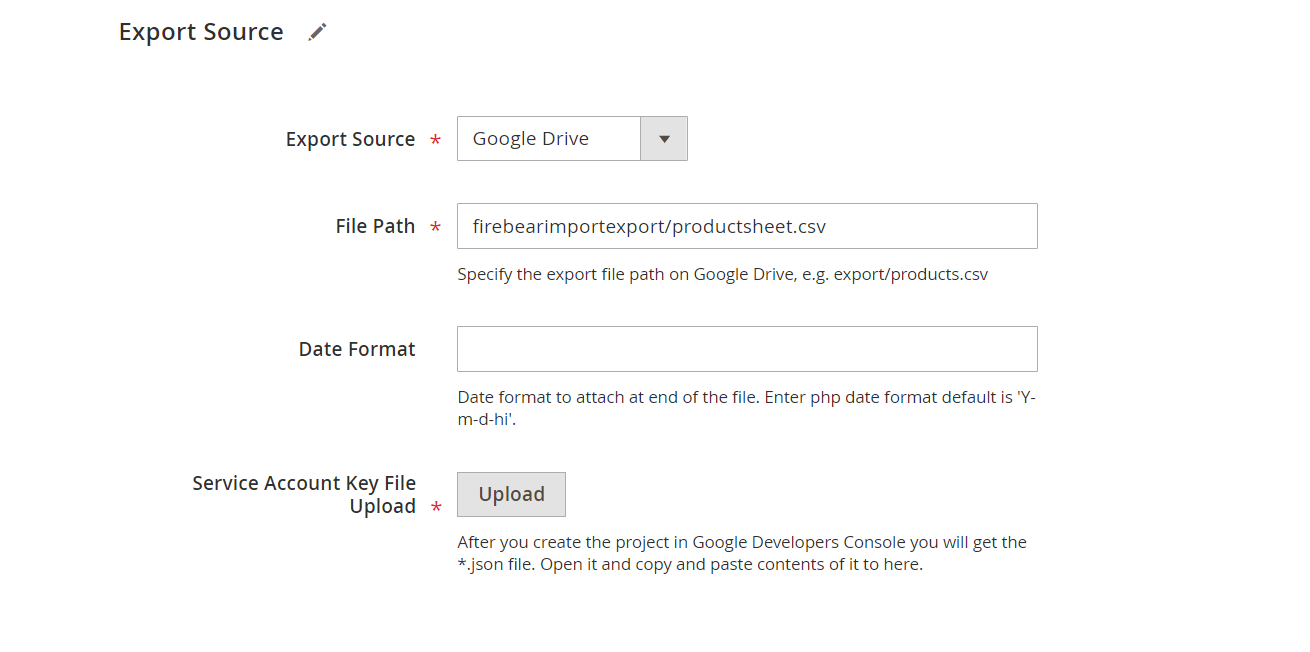
This was a basic export job configuration. Now, you can click ‘Save & Run’ to test the new job. If the exported file has a structure that differs from the default export file, then apply mapping. If it satisfies the requirements of your external system, start export right now. Below, we describe this process in a more detailed manner.
Map attributes
In this section, you can export fields specified in mapping only or all entity-related attributes. Turn the appropriate feature on to get a file with selected options only.
To do mapping, follow this step by step guide:
1) Hit the ‘Add New’ button;
2) Select an entity enabled in the ‘Export Behavior’ section (‘Entity’ column);
3) Select a system attribute that should have a custom name in the export file (‘System Attribute’ column);
4) Specify a custom name for the attribute selected in the previous step (‘Export Attribute’);
5) If necessary, specify a hardcoded or default value for the attribute (‘Default Value’ column), which will be provided to all items in the attribute column;
6) Repeat the previous steps to map more attributes.
Note that you can delete each attribute mapping by clicking the black bin icon and move rows by clicking on the left dotted area and applying drag&drop to the row.
Filters
Now when you know how to apply mapping and use hardcoded (default) values, we’d like to describe how filters work. Follow these steps to master the feature:
1) Click the ‘Add Filter’ button;
2) Select an entity enabled in the ‘Export Behavior’ section (‘Entity’ column);
3) Select a system attribute that will be used as a basis of a new filter (‘Field’ column);
4) Specify parameters that will be applied for filtering (‘Filter’ column).
5) Repeat the previous steps to create more filters.
Note that parameters applied for filtering vary, depending on the attribute chosen (field).
It is possible to delete each filter by clicking the black bin icon. To move rows, click on the left dotted area and drag&drop the row.
Now, you can save and run the new job as well as only save it. The appropriate orange buttons are available on the top of the screen.
The process of running Export Jobs is similar to that of Import Jobs described previously.
Run Import/Export Jobs Via CLI
Import cron jobs can be enabled, disabled, or started from the Magento 2 CLI interface. In the Magento 2 root folder, run the following command:
|
1 2 3 4 5 |
php -f bin/magento import:job:COMMAND JOB_ID import:job:disable Disable Firebear Import Jobs import:job:enable Enable Firebear Import Jobs import:job:run Generate Firebear Import Jobs |
NOTE:
If you run ‘import job:run‘ command without specifying the Job ID – ALL enabled jobs will be executed.
You will see the following information in the terminal:
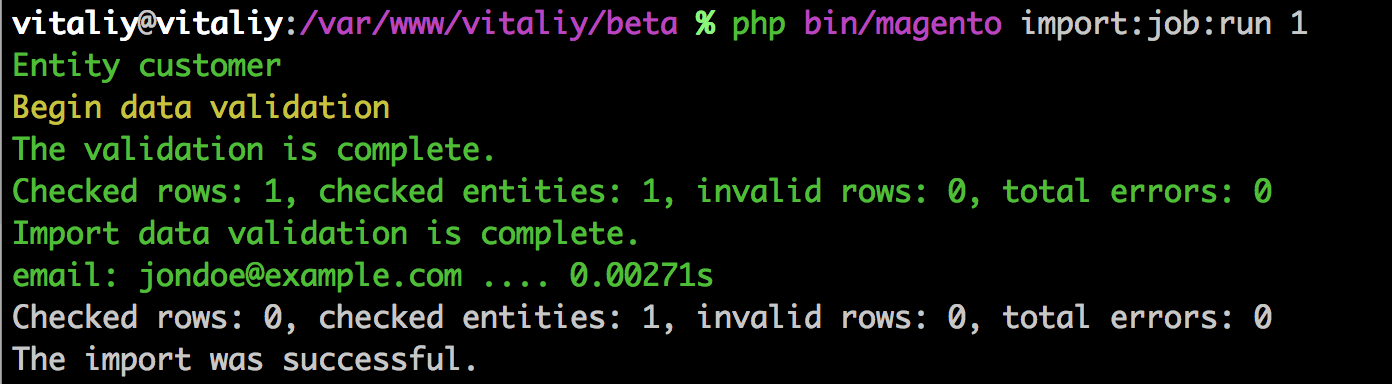
This is how everything works:
To control export jobs via CLI, use the following commands:
|
1 2 3 4 5 |
php -f bin/magento export:job:COMMAND JOB_ID export:job:disable Disable Firebear Export Jobs export:job:enable Enable Firebear Export Jobs export:job:run Start Firebear Export Jobs |
You will see the following information in the terminal:

Both import and export commands:
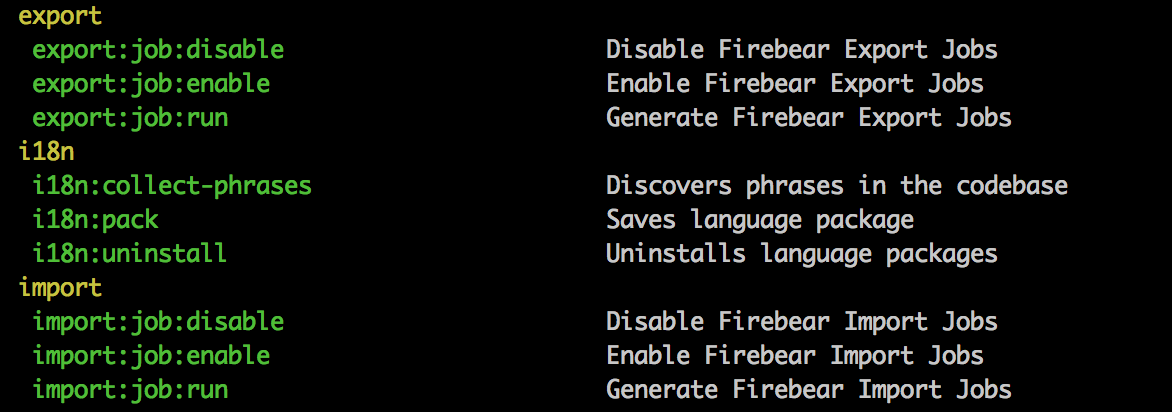
Extension customization endpoints
Improved Import and Export extension has been developed with customization possibilities in mind. That’s why we have left customization endpoints for development agencies and in-house developers. If you are not sure how to customize the extension on yourself – you may want to provide this information to the developer you are working with.
With customization module you can create plugins for Improved Import and Export functionality:
- customChangeData($data): changing data whiling saving
- customBunchesData($data): changing data whiling saving bunches
The customization module is constantly updating and gains new features. Make sure to bookmark its page and check back regularly.
Use cases and specific features
Magento 2 and Google Drive Connection
Synchronize your store with your Google Drive. Compile the folders with relevant data, share them via Google API and import or export data table and all types of multimedia files from and to Magento 2.
Read more in the guide on How to import and export Magento 2 data from and to Google Drive
Magento 2 Google Sheet Import
Improved Import and Export extension support Google Sheets, meaning you can now work in cooperation with your colleagues on a single Google Sheet, then paste its link to the Import Job and hit Run button. Pretty simple, huh?
Moreover, with the new release Firebear Studio introduces Master Import Table, where we have gathered all product types and attributes available, to get you into the import process in a quick and easy way. You can read more about the Master Table here.
Categories can be imported with different behavior – Add / Edit, Delete, and Replace which allows flexible category manipulations.
To import data from the Google Sheet File hit ‘Save and Run’ button.
Magento 2 Google Sheet Export
With the Magento 2 to Google Sheet Export feature, now you can send data to your drive. Or update a particular Google Sheets file and even specify the very sheet inside a file where you want the data to be inserted.
See the full process in the guide on How to export Magento 2 data to Google Sheets
Tier Price import
With 2.1.1 release Tier Prices can be imported along with the products in the same file. This is now possible with tier_prices column. Note, how ‘priceS’ are plural, in comparison with native Magento 2 tier_price column. In other words, if you are using native Magento 2 import, you need two separate files to import tier prices and products.

The tier_prices column is product specific and allows specifying multiple tier prices for each product. As you know, tier prices can be:
- A percent discount of the original product price;
- A flat price value.
Percent discount
For percent discount one should use the following data format in the column:
Customer Group,Qty,Price,Percent,Website|next_tier
For example, the value:
|
1 |
General,360,0,3,All|Retailer,540,0,5,All |
Will get you:
3% discount for group General when purchasing 360 items at any Website. And 5% discount for group Retailer when purchasing 540 items at any Website.
As you can see, you set the Price here to 0.
Fixed discount
For fixed discount one should use the following data format in the column:
Customer Group,Qty,Price,Percent,Website|next_tier
For example, the value:
|
1 |
General,100,10,0,All|Retailer,200,9,0,All |
Will get you
$10 price for products purchased in quantity of 100, by group General at any Website. And $9 price for products purchased in quantity of 200, by group Retailer at any Website.
As you can see, you set the Percent here to 0.
Categories import
Categories can be imported with different behavior, which allows for flexible category manipulations:
- Add/Edit;
- Delete;
- Replace.
The process behind the category import and simple and has not peculiarities, you can in the process described in the ‘Add new Import Job’ chapter of this manual.
To import categories to Magento 2 you need a file with the following structure:
Category import offers different opportunities, so you can set a category position and location:
- Import by name and full path to category (Default Category/Women/Dresses);
- Import by category name & path to category;
- Import by parent category id (parent_id).
CSV file columns:
- name – Category name;
- parent_id – existing parent category id;
- url_key – URL keys of category;
- description – category description;
- is_active – category Enabled / Disabled;
- include_in_menu – include category to main menu on frontend;
- is_anchor – Is Anchor – required for displaying layered navigation on category;
- custom_layout_update – custom XML layout update for category.
Color swatch values import
With Improved Import and Export extension you can also import values for product color swatches, such as color or product images. To import Magento 2 swatch colors you will need to use custom values for the swatch attribute. Let’s try importing colors for the attribute ‘color‘.
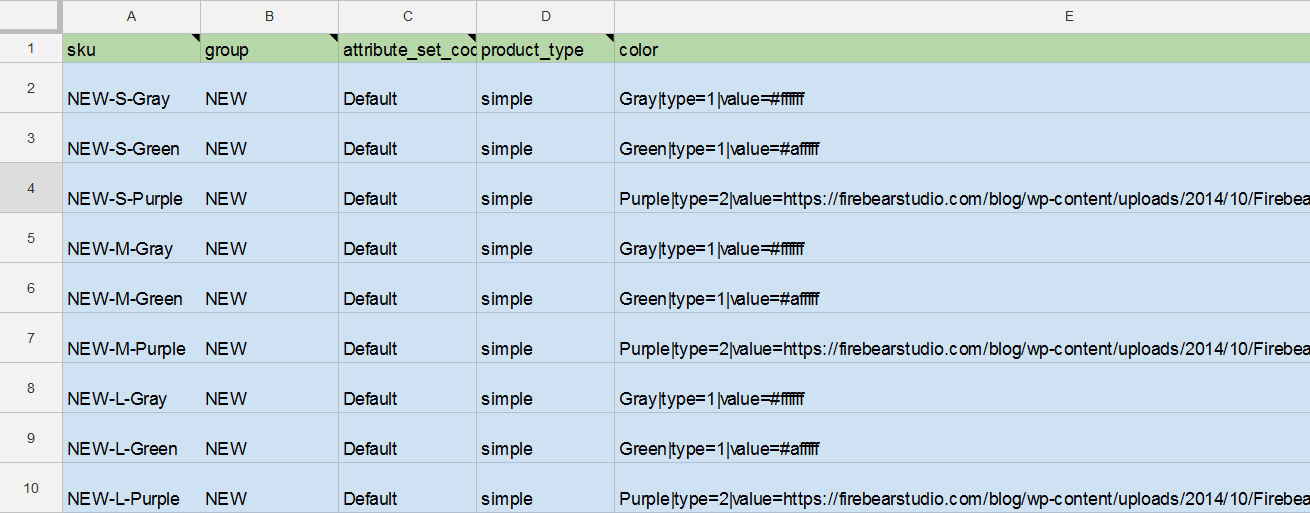
At the screenshot above you can see that we have a column with attribute ‘color’. If you are familiar with Magento 2 import procedure you may find the values for this column strange. Generally, you just type in the names of the existing attribute values, that for the ‘color’ attribute would be Gray, Green and Purple.
However, here we have an Improved Import and Export extension dedicated values, that allow you to import colors and images for swatch attribute on the fly. The format is the following:
attribute option name|type=1/2|value=hex color code/direct image link
Where:
attribute option name – is the name of the color swatch attribute value, like Gray, Green or Purple
type=1 – defines if the value for the swatch attribute is the hex color code
or
type=2 – defines if the value for the swatch attribute is the direct image link
value= – the value of the swatch attribute, can be either hex color code, or direct image link
For example, if we have a swatch attribute ‘color’ with swatches Gray, Green and Purple, the values in the import table will look lile:
Gray|type=1|value=#808080
Green|type=1|value=#00ff00
Purple|type=1|value=#551a8b
If you want to set images instead of hex colors, the import table will look like:
Gray|type=2|value=https://firebearstudio.com/blog/wp-content/uploads/2014/10/Firebear_logo_294x84_quer.png
Green|type=2|value=https://firebearstudio.com/blog/wp-content/uploads/2014/10/Firebear_logo_294x84_quer.png
Purple|type=2|value=https://firebearstudio.com/blog/wp-content/uploads/2014/10/Firebear_logo_294x84_quer.png
You can find the sample color swatch import table either at , or at .
It’s possible to import images for swatch attributes via the ‘Attribute’ entity.
Product attributes import – create new attributes on the fly during the product import
The idea behind the import of product attributes to Magento 2 on the fly during the product import is pretty simple – instead of having only attribute name on a column with attributes, we place there all data required to create an attribute.
For instance, attribute set, frontend labels, scopes, etc. You can find a structure sample and a sample CSV file below. Please follow the example carefully and import a CSV file with products first. If it works correctly, you can create a custom attribute column and add new attributes. This will reduce possible issues, debug time, and maintenance time.
The general format of an attribute creation column can be described as follows:
attribute|attribute_property_name:attribute_property_value|…
To separate values use pipe “|” symbol. Note, that the new attribute column should ALWAYS start with ‘attribute’, it allows the extension to understand that this is a new attribute.
Composing new attribute
Let’s say, we want to create an attribute for the product size. Let’s list the values of the attribute, and put required import values after the hyphen in italics next to them:
- attribute
- Attribute code will be ‘size’ – attribute_code:size
- Catalog Input Type for Store Owner will be ‘dropdown’ – frontend_input:select
- Values Required will be set to ‘No’ – is_required:0
- Scope will be set to ‘Global’ – is_global:1
- Default Value of the attribute will be size ‘XS’ – default_value_text:XS text
- Unique Value will be set to ‘No’ – is_unique:0
- Add to Column Options will be set to ‘Yes’ – is_used_in_grid:1
- Use in Filter Options will be set to ‘Yes’ – is_filterable_in_grid:1
- Use in Search will be set to ‘Yes’ – is_searchable:1
- Search Weight will be set to ‘3’ – search_weight:3
- Visible in Advanced Search will be set to ‘No’ – is_visible_in_advanced_search:0
- Comparable on Storefront will be set to ‘No’ – is_comparable:0
- Use in Layered Navigation will be set to ‘Yes’ – is_filterable:1
- Use in Search Results Layered Navigation will be set to ‘Yes’ – is_filterable_in_search:1
- Attribute position in layered navigation will be set to “2” – position:2
- Use for Promo Rule Conditions will be set to ‘No’ – is_used_for_promo_rules:0
- Allow HTML Tags on Storefront will be set to ‘Yes’ – is_html_allowed_on_front:1
- Visible on Catalog Pages on Storefront will be set to ‘Yes’ – is_visible_on_front:1
- Used in Product Listing will be set to ‘No’ – used_in_product_listing:0
- Used for Sorting in Product Listing will be set to ‘Yes’ – used_for_sort_by:1
- Default label will be ‘Size’ – frontend_label_0:Size
- Default label for store ID:1 will be ‘Size’ – frontend_label_1:Size
- Will belong to ‘Default’ attribute set – attribute_set:Default
Now we have specified all necessary values for the new attribute. We only need to copy and paste attribute values after the hyphen, and separate them with a pipe delimiter. So the column with the new attribute will be named like this:
|
1 |
attribute|attribute_code:size|frontend_input:select|is_required:0|is_global:1|default_value_text:XS text|is_unique:0|is_used_in_grid:1|is_filterable_in_grid:1|is_searchable:1|search_weight:3|is_visible_in_advanced_search:0|is_comparable:0|is_filterable:1|is_filterable_in_search:1|position:2|is_used_for_promo_rules:0|is_html_allowed_on_front:1|is_visible_on_front:1|used_in_product_listing:0|used_for_sort_by:1|frontend_label_0:Size|frontend_label_1:Size|attribute_set:Default |
Attribute value reference table
In the table below, you will find each property required for attribute creation in Magento 2 as well as appropriate possible values. As you can see, only attribute set and frontend label are required for creating a new attribute in Magento 2 during the import process. Another quite important attribute property is attribute code which actually defines the type of your attribute (text field, dropdown etc). If it is not specified, the attribute will be created with type XXX
| Code | Description | Default value | Required | type | Values |
| attribute_set_code | Attribute Set name of the product. Product can only be assigned to a single attribute set. | Yes | text | For example: Default | |
| frontend_label_0 | Default label | Yes | text | ||
| frontend_label_[n] | Default label for specified store Where [n] is the store id |
text | |||
| frontend_input | Catalog Input Type for Store Owner | select | text: Text Field textarea: Text Area date: Date boolean: Yes/No multiselect: Multiple Select select: Dropdown price: Price media_image: Media Image swatch_visual: Visual Swatch swatch_text: Text Swatch weee: Fixed Product Tax |
||
| attribute_code | Attribute Code This is used internally. Make sure you don’t use spaces or more than 30 symbols. |
text | |||
| is_required | Values Required | 0 | yes/no | 1, 0 | |
| is_global | Scope Declare attribute value saving scope |
0 | select | 0: Store View 1: Global 2: Website |
|
| default_value_text | Default Value Used for text attributes |
text | |||
| default_value_textarea | Default Value Used for textarea attributes |
text | |||
| default_value_date | Default Value Used for date attributes |
text | Format: mm/dd/YYYY (04/19/2016) | ||
| default_value_yesno | Default Value Used for yes/no attributes |
yes/no | 1,0 | ||
| is_unique | Unique Value Not shared with other products |
0 | yes/no | 1,0 | |
| frontend_class | Input Validation for Store Owner | select | validate-number validate-digits validate-email validate-url validate-alpha validate-alphanum |
||
| is_used_in_grid | Add to Column Options | 1 | yes/no | 1,0 | |
| is_filterable_in_grid | Use in Filter Options | 1 | yes/no | 1,0 | |
| is_searchable | Use in Search | 0 | yes/no | 1,0 | |
| search_weight | Search Weight | integer | |||
| is_visible_in_advanced_search | Visible in Advanced Search | 0 | yes/no | 1,0 | |
| is_comparable | Comparable on Storefront | 0 | yes/no | 1,0 | |
| is_filterable | Use in Layered Navigation | 0 | yes/no | 1,0 | |
| is_filterable_in_search | Use in Search Results Layered Navigation | 0 | yes/no | 1,0 | |
| position | Attribute position in layered navigation | integer | |||
| is_used_for_promo_rules | Use for Promo Rule Conditions | 0 | yes/no | 1,0 | |
| is_html_allowed_on_front | Allow HTML Tags on Storefront | 1 | yes/no | 1,0 | |
| is_visible_on_front | Visible on Catalog Pages on Storefront | 0 | yes/no | 1,0 | |
| used_in_product_listing | Used in Product Listing | 0 | yes/no | 1,0 | |
| used_for_sort_by | Used for Sorting in Product Listing | 0 | yes/no | 1,0 |
YouTube and Vimeo video URLs are also supported as product image attributes.
If watermarks are enabled in your store (for Magento 2 Commerce and Cloud only) you can resize images after an import. The images can be retrieved from native Magento 2 libraries. If you work with images in png, make sure to install the Imagick library beforehand.
If you need to update the attribute of the product that is already in the catalog you need to include additional attribute to the table update_attribute_set.
- If update_attribute_set=1 – the attribute set of the existing product will be updated.
- If update_attribute_set=0 or no attribute at all – the attribute set of the existing product will NOT be updated.
Map and create insufficient attributes
The attribute mapping feature of the Improved Import and Export extension is a multifunctional tool. At the moment there are two general uses:
- You can use attribute mapping to map the import table with different attribute names. Like, when instead of an SKU attribute you would have # attribute.
- You can use attribute mapping to add attributes that are not available in the table. For example, if you are importing products, and lack ‘product_type’ attribute in the table, the product won’t be created. Instead of editing the table, you can add this attribute from the Map Attributes section.
If the first use is pretty clear, we will cover how can you create new attributes and assign default values to them.
Let’s say, you need to import the product table that looks like this:

You do not have these products at your store yet. And if you look closely, this table is missing a required attribute ‘product_type‘. Without ‘product_type‘ attribute Magento 2 won’t create any products, because it will not know which product types to create. So what can be done about it?
Using Improved Import and Export feature of Map Attributes section, you can add this missing attribute ‘product_type‘ and appoint a default value to it. The only thing you need to do, is to fill the import job the way you always do, and ‘Add New Custom’ attribute in the Map Attribute section, so it would look something like this:
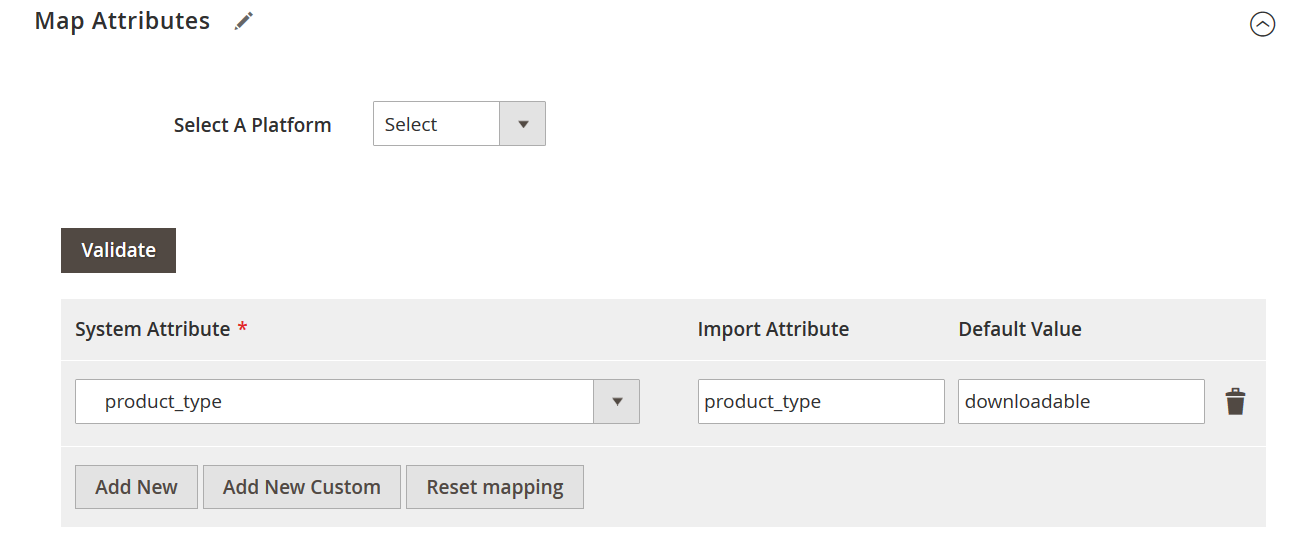
So the process is as follows:
- Click the ‘Add New Custom’ button to create a new line in the mapping table. ‘Add New Custom’ allows you to specify the missing attribute value manually.
- In the ‘System Attribute’ field select the Magento 2 attribute you are missing. I our case it is ‘product_type‘
- In the ‘Import Attribute’ field type in the name of the attribute that should be added to the table. Actually, you can think of any name, the extension will map it to system ‘product_type‘ attribute anyways.
- In the ‘Default Value’ field type in the default value of this attribute. Now, ‘product_type’ attribute supports: simple, downloadable, virtual, configurable, bundle and grouped values. We have decided to stick with downloadable to create downloadable products. NOTE, that the default value will be applied to all products.
- Run the job.
The extension will “add” a new column that you are missing to the import table. This way, you will have all the necessary attributes to create a product. In our case, we have got four downloadable products.
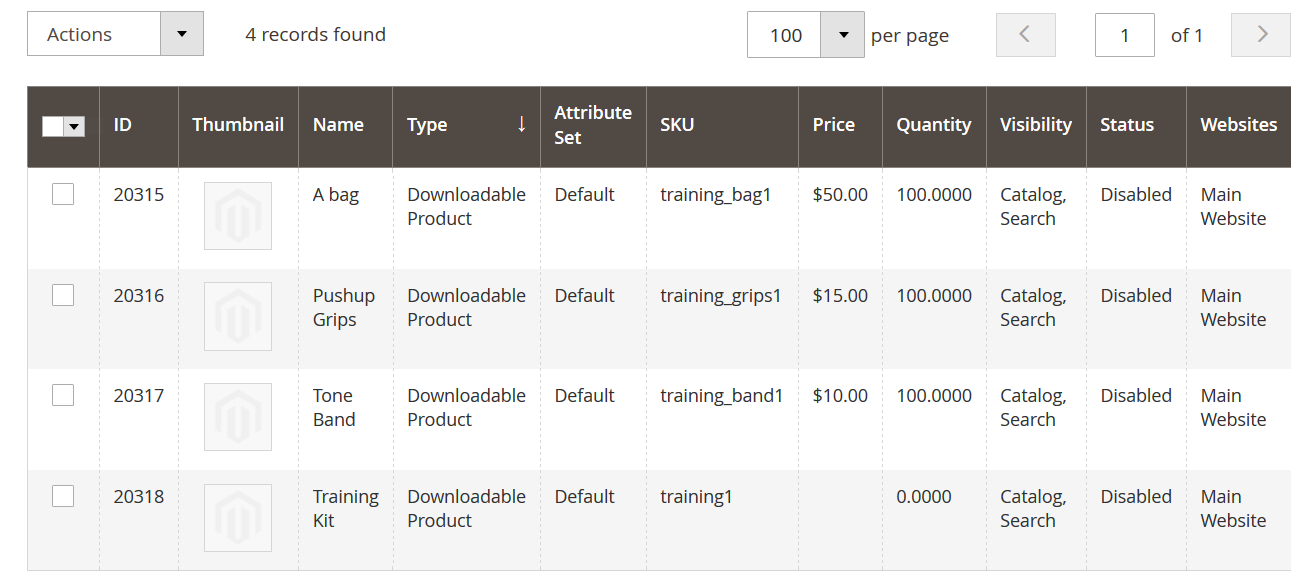
That’s it. You have just learned how to create attributes missing in the imported table using ‘Map Attributes’ section of Improved Import and Export extension.
Configurable Product Import
All the examples in this chapter are written in reference to the Master Import Table we have composed for your convenience. Before proceeding to creating configurable products during the import process, please, read carefully about the Master Table and its use.
Improved Import and Export extension offers five scenarios for Configurable Product import. These scenarios can be selected in the Configurable Product Condition field of the Import Job settings. For more information on the scenarios read Custom logic for the creation of configurable products chapter of this manual.
Create config product by the same attribute of simple products
This is the first scenario. It allows creating configurable products using the dedicated column for simple products, where the required configurable product SKU is specified.
As per the GIF image above you can see, that we have nine simple products rows 2-10. The service ‘group’ column for these products contains NEW – which is an SKU of the configurable product, these simples belong to.
Let’s configure an Import job, to import these simple products, and assign them to the newly created configurable product. We will omit the general and other settings and focus solely on Custom logic for the creation of configurable products.
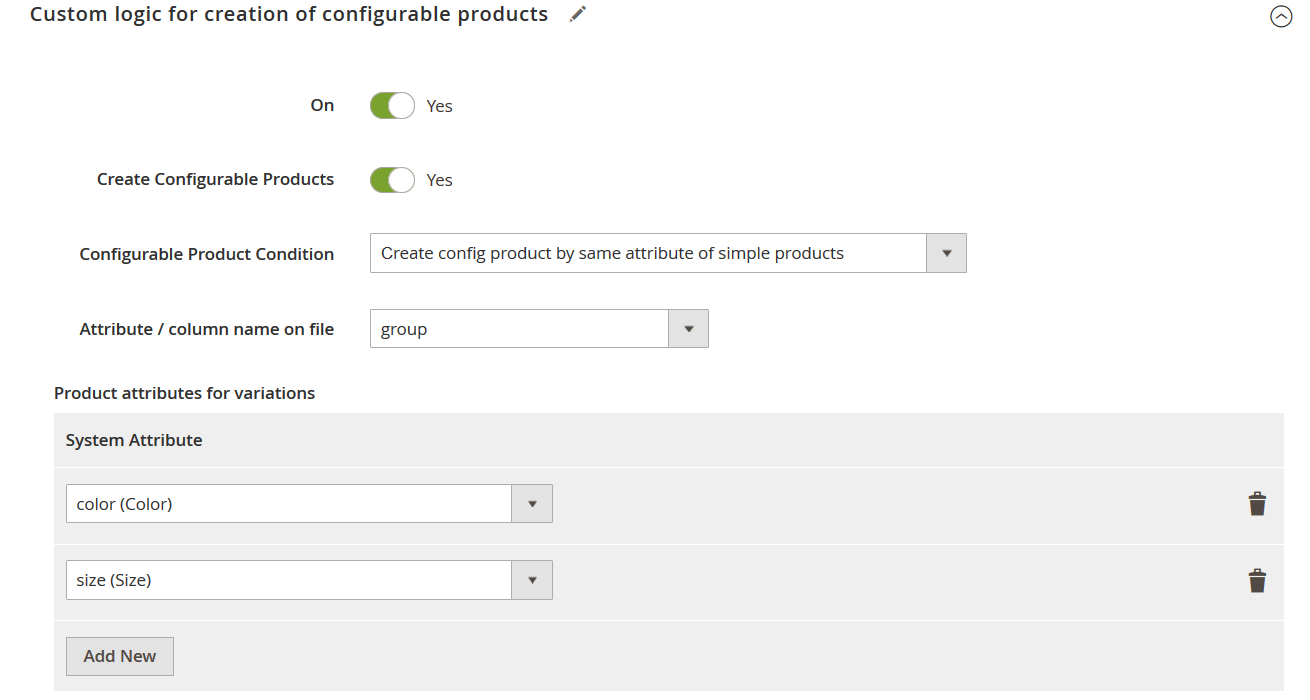
Here we have:
- Enabled custom logic for creating configurable products;
- Decided that we want to create new Configurable Products. These products never existed at Magento 2 store, and in the Import Table, however, have referenced simple products. You can disable this option if you have a configurable product with the reference attribute in your import table, or at your product catalog;
- Configurable Product Condition is set as per the chapter you are currently reading;
- In the Attribute / column name on file we have specified ‘group’ as per table GIF above. As we use this column to tie simples to configurables. You can create any other column and name it the way you want. Just make sure, to put it into the Attribute / column name of file field, when importing the products.
- In the Product attributes for variations table we have specified attributes ‘color’ and ‘size’ as our simple products have these attributes for swatches. When creating configurable products on your own, – specify the attributes of your simple products.
Now, we can run the job to import these nine simple products. When the import job is processed a new configurable product with these nine simple products assigned to it will be created in your product catalog.
Create configurable products by custom rules (part of a line before/after delimiter)
This is the second and third scenarios, that differ only in that of whether the extension should start a scan from the beginning or the end of the cell. It allows creating configurable products using the dedicated column for simple products, where the extension should look for similarities in the submitted value before the set delimiter.
As per the GIF image above you can see, that we have nine simple products rows 2-10. The ‘sku’ column for these products contains similar product SKU, which starts with NEW and then list product size and color, after a hyphen. In this case, the hyphen is a delimiter, that separates one part, from another.
Let’s configure an Import job, to import these simple products, and assign them to the newly created configurable product. We will omit the general and other settings and focus solely on Custom logic for the creation of configurable products.
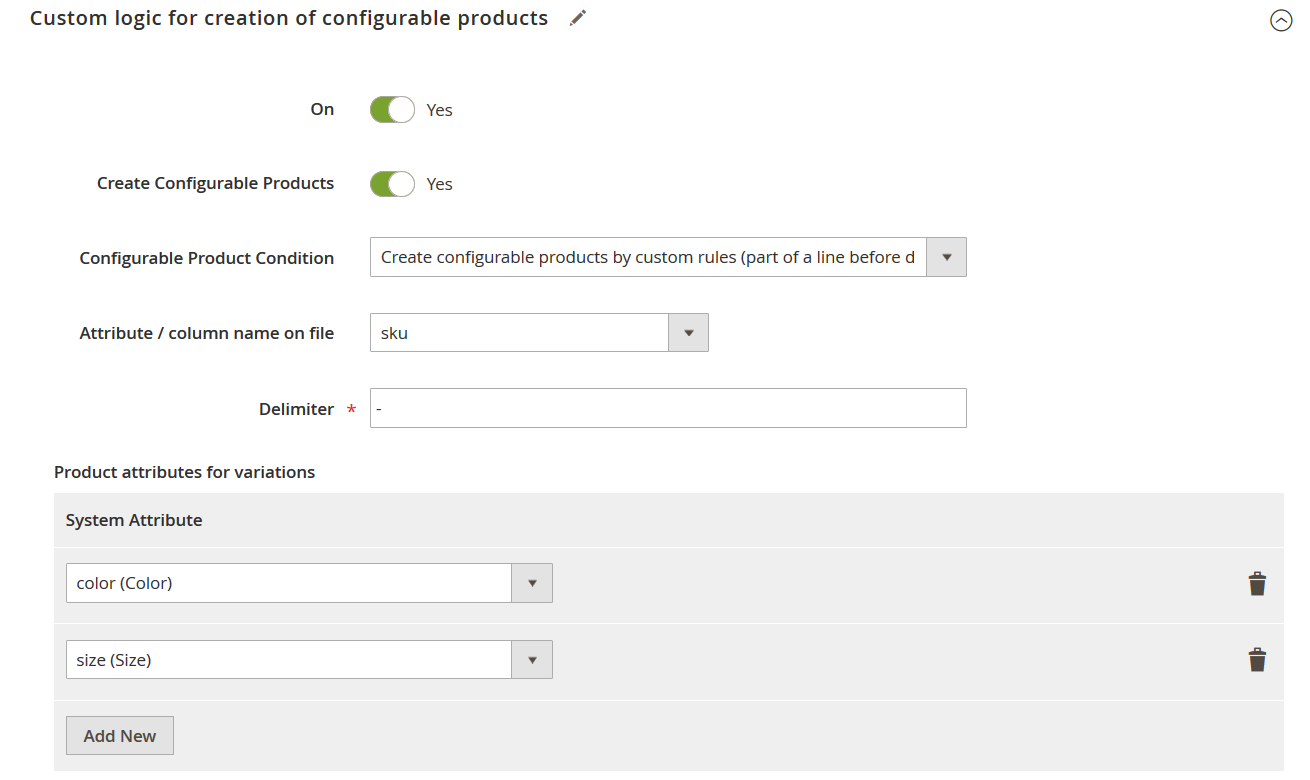
Here we have:
- Enabled custom logic for creating configurable products;
- Decided that we want to create new Configurable Products. These products never existed at Magento 2 store, and in the Import Table, however, have referenced simple products. You can disable this option if you have a configurable product with the reference attribute in your import table, or at your product catalog;
- Configurable Product Condition is set as per the chapter you are currently reading;
- In the Attribute / column name on file we have specified ‘sku’ as per table GIF above. As we use this column to tie simples to configurables. In this column, all listed simple products have the same SKU format – NEW-size-color, where ‘NEW’ is a common value, that will tie these products to configurable.
You can use any other product attribute column. For example, description, which you start or end with the name of a configurable product, these simples belong to, for example, a description that reads:
This is a Shirt: size X, color Y.
I this case, you can specify colon as a delimiter, and the extension will combine such products by the phrase “This is a Shirt”. - In the Delimiter field we enter ‘-’ a hyphen. As it is the hyphen that separates common SKU value NEW from the rest of the SKU.
- In the Product attributes for variations table we have specified attributes ‘color’ and ‘size’ as our simple products have these attributes for swatches. When creating configurable products on your own, – specify the attributes of your simple products.
Now, we can run the job to import these nine simple products. When the import job is processed a new configurable product with these nine simple products assigned to it will be created in your product catalog.
Create configurable products by custom rules (the number of characters from the beginning of the line)
This is the fourth and fifth scenarios, that differ only in that of whether the extension should start a scan from the beginning or the end of the cell. It allows creating configurable products using the dedicated column for simple products, where the extension should look for similarities in the submitted value before the set delimiter.

As per the GIF image above you can see, that we have nine simple products rows 2-10. The ‘sku’ column for these products contains similar product SKU, which start with NEW and then list product size and color, after a hyphen. In this case, only first three characters are similar in all nine products.
Let’s configure an Import job, to import these simple products, and assign them to the newly created configurable product. We will omit the general and other settings and focus solely on Custom logic for the creation of configurable products.
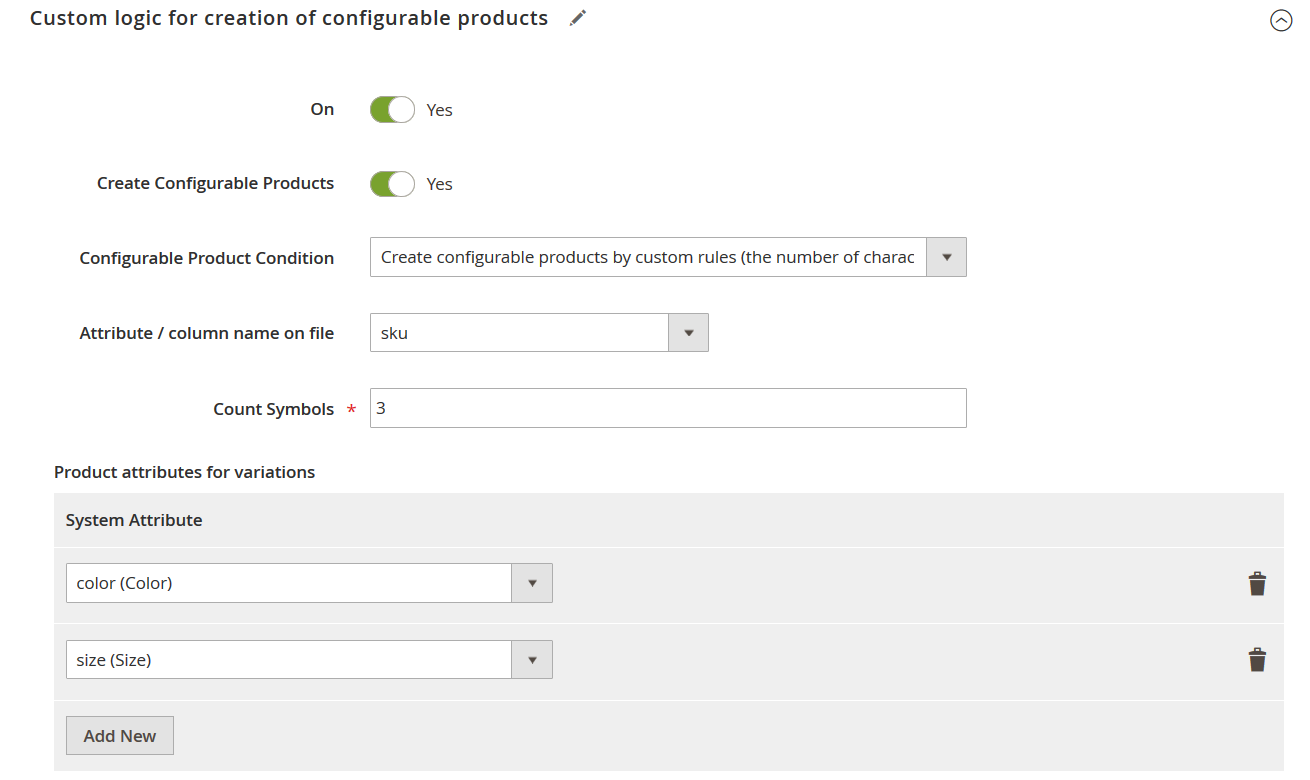
Here we have:
- Enabled custom logic for creating configurable products;
- Decided that we want to create new Configurable Products. These products never existed at Magento 2 store, and in the Import Table, however, have referenced simple products. You can disable this option if you have a configurable product with the reference attribute in your import table, or at your product catalog;
- Configurable Product Condition is set as per the chapter you are currently reading;
- In the Attribute / column name on file we have specified ‘sku’ as per table GIF above. As we use this column to tie simples to configurables. In this column, all listed simple products have the same SKU format – NEW-size-color, where ‘NEW’ is the first three characters, that will tie these products to configurable.
You can use any other product attribute column. For example, description, which you start or end with the name of a configurable product, these simples belong to, for example, a description that reads:
This is a Shirt size X, color Y.
I this case, you can specify ‘15’ in the Count Symbols option, as first 15 characters will look the same for all nine simple products. - In the Count Symbols field we enter ‘3’ a hyphen. As it is only first three characters of the ‘sku’ column that are similar in all nine products.
- In the Product attributes for variations table we have specified attributes ‘color’ and ‘size’ as our simple products have these attributes for swatches. When creating configurable products on your own, – specify the attributes of your simple products.
Now, we can run the job to import these nine simple products. When the import job is processed a new configurable product with these nine simple products assigned to it will be created in your product catalog.
Import downloadable products in Magento 2
Files for downloadable products can be imported in two ways:
- Import files from remote URL for downloadable products – you should specify a full URL address of the file and make sure the following directory exists and is writable: /pub/media/downloadable/links/files/
- To import local files, upload your files to the directory you’ve chosen on the import page (input – Images File Directory).
Order Export
The order export specifics are a large number of entities that are included in any order. During export, you must decide what entities you need in your export file and keep in mind that some of them not be compatible with each other.
However, if you need to export product data related to your orders, you export them with selecting the ‘Products of Order‘ entity.

If the entity box is checked during the export you get the file with all the order product attributes existing in your store. The list of such attributes you can find in the attributes.txt file. Keep in mind that you can not import such attributes back to your database.
All in all, such export is similar to the ‘Items of Order‘ export, except for the change in the attribute names (‘item‘ prefix transforms into ‘product‘) and the wider range of the attribute data you can get in your export file.
Integration with Improved Configurable Products
Improved Configurable Products extension for Magento 2, besides allowing dynamic updates of the product page and URL depending on the variations selected by the customers, allows specifying the configurable product variation that should be selected by default.
I.e. when a customer visits the configurable product page you can specify the variation that is pre-selected by default. For example, if this is a shirt product, you can specify that the shirt of size L and color Red should be pre-selected.
When it comes to Improved Import and Export extension, it allows you to specify which variation should be selected as default during the import process. This can be done using the configurable_variations attribute.
The configurable_variations attribute value is compound consisting of:
sku={{SKU_VALUE}},attribute1={{VALUE}},attribute2={{VALUE}},default=1/0|

Where default=1/0 defines whether the variation assigned to the configurable product should be selected as default.
- 1 – yes, the variation is default
- 0 or missing default value – the variation is not default.
Use this attribute to your advantage if your store is heavy on configurable products. You can export all configurable products, specify the default value in the configurable_variations attribute, and import this file back. Saving probably a whole day of time managing configurables manually.
CSV, XML, Json, Excel file samples
You can download Magento 2 import CSV, XML, Json, Excel file samples here:
Troubleshooting
Before submitting a ticket to the customer support team, make sure to do some basic check. Identifying problems for import/export job may help you to resolve existing issues.
1) switch your site to the developer mode
2) then
app/bootstrap.php uncommment ini_set(“display_errors”,1);
3) run the following CLI commands will help you to identify errors:
import job : php bin/magento import:job:run jobID
e.g.
|
1 |
php bin/magento import:job:run 1 |
export job : php bin/magento export:job:run jobID
e.g.
|
1 |
php bin/magento export:job:run 1 |
NOTE! If you see “No Jobs found” then enable that job with the command:
|
1 |
php bin/magento import:job:enable jobID |
4) verify your php.ini settings correspond to the following ones:
memory_limit must be at least 2GB depending on your product quantity (if you have 10K+ products 8GB recommended)
max_input_vars set to 15000
5) If you see ‘the column not found‘ error but you have that column in your import file, then it is an issue with your file format. Check data delimiter in the case.
The best way is to use Google Sheet import as it will resolve a language character set issue as well.
Upcoming features
Since we always try to improve our Improved Import Export extension following community and merchant needs, here are upcoming features that will be introduced soon.
- Performance improvements;
- New import/export presets;
- API connection for SAP, ERP, PIM, and CRM systems;
- Integration with IceCat;
- Multiple files and sources input for one job.
After purchasing the extension, you will receive free upgrades for a year and get a 50% discount for the second year upgrades! Purchase the extension right now to use current features and get free updates with advanced functionality!
Compatibility with third-party extensions and modules
FireBear Studio is working hard to make sure Improved Import and Export extension works with the extensions by other development agencies. Below you can find the list of third-party software the extension has been tested with and works without any issues:
- MageWorx Advanced Product Options
- MageStore Inventory Management
- Wyomind Advanced Inventory
- Magedilight Price per Customer
List of detailed import and export guides
The manual offers general information on how the extension operates and teaches how to use different extension features. For the full list of specialized guides on how to import and export particular entities visit
Magento 2 import and export guide list
Services and Magento 2 customization
Firebear studio offers its services at your disposal. If you want to customize the extension, perform a store migration or undertake any other custom development task – Firebear developers can assist you with it.
Our developers specialize in Magento 1 and 2, have been working on hundreds of projects for different agencies and merchants. The expertise we offer covers every store building aspect of Magento.
For further information and consultation or to request individual features use our contact form!
Buy Improved Import Magento 2 Extension
Improved Import & Export FAQ
Since people often wonder about Improved Import and Export, we’ve decided to choose the most frequently asked questions and provide answers to them here. Below, you will discover more facts about our data transfer solution.
How can Improved Import & Export help me with my daily Magento 2 duties?
The Improved Import & Export extension is designed to automate various data transfers. It can run both import and export processes in the background, automating such daily Magento 2 duties as product catalog updates, order sync with CRM and ERP systems, product information management, etc. The opportunities are endless.
What data can I import and export between Magento 2 and other systems?
The Improved Import & Export Magento 2 extension provides the ability to import and export all core entities available in your e-commerce database. Our tool can easily transfer all product types, product attributes and sets, advanced pricing, categories, customers, customer addresses, orders, tracking codes, documents, such page elements as static blocks, entire store pages, price rules for catalog and cart, product reviews, gift cards, search terms and synonyms, widgets, URL rewrites, page hierarchy, subscribers of your newsletter, MSI warehouses, and sources, various B2B entities, including companies, company roles, shared catalogs, requisition lists, and negotiable quotes. If you have an entity that is not supported at the moment, ask us for the customization – we will add the missing functionality.
What sources can I use to upload files for import?
The Improved Import & Export extension supports numerous file sources. The extension lets you import data from various platforms. It works with Google Drive, Google Sheets, OneDrive, and Dropbox. Besides, you can import data from FTP/SFTP, transfer it by a direct URL, or upload files right to your Magento 2 installation.
What file type can I import to Magento 2?
Since Magento 2 only lets you work with CSV files by default, many customers ask how different our module is. The Improved Import & Export extension not only works with various file sources but also supports numerous file types. In addition to CSV, our extension provides the ability to import data via XML, Excel XLSX, Open Office ODS, and Json. Note that all of them can be packed in ZIP or TAR archives.
Can I automate data transfers? Can Improved Import & Export run on schedule?
Our module lets you automate all data transfer processes. The Improved Import & Export plugin allows you to schedule any update. You can even configure import and export jobs to run in a particular order, creating a schedule with the help of a cron.
Can I import data from external systems and platforms if it doesn’t follow Magento 2 requirements?
Yes, you can. The Improved Import & Export Magento 2 extension provides the ability to transfer any data output into the one that is entirely suitable for Magento 2. Our extension offers the attribute mapping feature. Now, any data in a format incompatible for Magento 2 can be transferred to your e-commerce website. With the help of the mapping functionality, you “tell” Magento how to refer an attribute/column from the imported file to the corresponding Magento 2 attribute. As a result, it is possible to import data in any format from any external system.
How fast does it take to import entities to Magento 2?
On average, the Improved Import & Export Magento 2 extension transfers about 3k entities per minute. Note that the speed depends on various factors, such as a file format, server configuration, the necessity to transfer images, etc.
Do you offer any additional value along with Improved Import & Export?
Yes, we do. You will find the free Product Feeds add-on in our catalog. The tool lets you transfer products from Magento 2 to eBay, Facebook, and Amazon. Besides, you can leverage the MSI add-on for free. The solution extends support for warehouses in your Magento 2.
Are any customizations to Improved Import & Export possible?
Since the extension’s code is open, you can apply any changes to the standard functionality of the Improved Import & Export Magento 2 extension. At the same time, you can share your ideas with our specialists so that they can create the missing functionality for you.
Do you offer a refund for Improved Import & Export? What period does it cover?
We offer 30 days money-back guarantee on the Improved Import & Export Magento 2 extension. At the same time, you get great support services. If it seems that our extension doesn’t work for you, contact our specialists and we will figure out how to solve the existing issues.
Is Improved Import & Export secure?
You can trust our code and developers due to the following two facts. Firstly, Firebear gathers a team of Magento-certified specialists. It means that only top-notch developers work on our products. Secondly, our plugins are available on the Magento Marketplace. It means that they have passed lots of security checks to get there. Therefore, you can trust us.
What other services do you offer?
Along with the Improved Import & Export Magento 2 extension and numerous add-ons and modules, we also provide such services as extension customization and integration. In the first case, we help you implement any individual feature that your business requires, making our module suitable for your particular situation. As for the integrations, we help you configure Improved Import & Export to satisfy your data transfer demands. Our team can help you connect your e-commerce website with other platforms, such as CRM and ERP systems.
How to import JSON files to Magento 2?
You can import JSON files to Magento 2 with the help of Improved Import and Export but they should have a specific path in the structure. You can find the necessary fields in the import job when choosing JSON as your Import File Type. Enable the ‘Set path to the entity structure in the file’ feature and the ‘Path to the import entity structure’ field appears. You need to specify your JSON file structure here. Follow this Magento 2 JSON import guide for more information.