
Magento CMS Explained: How to Manage, Import & Export Magento 2 CMS Pages Like a Pro
If you’re looking to build a visually appealing and content-rich storefront in Magento 2, understanding how the Magento CMS works is essential. Magento 2 CMS pages power everything from your homepage and landing pages to promotional banners, legal disclaimers, and “Meet the Team” — all without writing a single line of code. Whether you’re designing static pages or building dynamic layouts with Magento 2 Page Builder, CMS pages give you full control over your store’s content and presentation.
In this guide, we’ll break down exactly what Magento 2 CMS pages are, how to create and manage them effectively, and — most importantly — how to import and export CMS pages in Magento 2 using the most reliable method. With the help of the Improved Import & Export extension, you can move beyond the limitations of the native Magento backend and automate your entire CMS workflow. From bulk migration to multistore setups, we’ll show you how to simplify CMS import export for Magento 2 like a pro.
Ready to master Magento CMS? Let’s dive in.

Table of contents
- What is Magento CMS?
- Understanding Magento 2 CMS Pages: Use Cases & Examples
- How to Create CMS Pages in Magento 2
- Why Import and Export CMS Pages in Magento 2?
- How to Import Magento 2 CMS Pages (Step-by-Step Guide)
- Exporting Magento 2 CMS Pages: Best Practices
- Troubleshooting Magento CMS Import Export Issues
- Final Words: Streamline Magento CMS Management with the Right Tools
- FAQ: Magento CMS Pages & Import Export
What is Magento CMS?
The Magento CMS (Content Management System) is the backbone of your store’s content strategy. It allows you to create, manage, and customize Magento 2 CMS pages like homepages, landing pages, promotional content, and static informational pages — all without the need for custom development.
At its core, Magento 2 CMS provides merchants with a flexible, user-friendly interface for handling rich content across the storefront. Whether you’re building a sleek homepage layout, crafting seasonal campaign pages, or maintaining legal and informational sections, the Magento 2 CMS page functionality gives you full editorial control.
For growing e-commerce businesses, the Magento CMS becomes indispensable, especially when content must be updated frequently, tailored for different customer segments, or managed across multiple storefronts. And when paired with the right import/export tools, it transforms into a scalable content hub for modern digital commerce.
Understanding Magento 2 CMS Pages: Use Cases & Examples
A Magento 2 CMS page is a customizable HTML-based page designed to display static or dynamic content on your storefront. These pages can include text, images, embedded videos, widgets, content blocks, and variables — all structured under a unique URL that’s easy to index and share. From the essential “Contact Us” and “About Us” pages to custom layouts for promotions, lookbooks, or FAQs, CMS pages are a key component of your site’s user experience.
Out of the box, Magento 2 offers a powerful set of tools within its CMS framework to help merchants craft engaging, content-driven experiences. You’re not limited to plain pages — thanks to Magento’s content blocks and widgets, you can compose intricate layouts that highlight products, customer testimonials, shipping policies, or even landing pages for marketing campaigns. All of this is editable directly in the admin panel or via drag-and-drop tools like Magento Page Builder.
Real-world examples of Magento 2 CMS pages include:
- A brand story page enriched with multimedia content and timeline widgets
- A shipping & returns page that uses custom blocks to highlight key policies
- A seasonal landing page combining banners, product sliders, and countdown timers
- A store locator page integrated via embedded Google Maps widget
From an SEO perspective, Magento 2 CMS pages are extremely valuable. Because each page has a dedicated URL, customizable meta titles, descriptions, and headings, you can optimize them individually for search engines. This improves both your organic visibility and the internal linking structure of your site.
Ultimately, Magento 2 CMS pages serve as the content foundation of your store, boosting brand storytelling, SEO performance, and user engagement all at once. Let’s see how to create them.
How to Create CMS Pages in Magento 2
Creating rich and visually engaging Magento 2 CMS pages doesn’t require advanced coding skills — Magento’s admin panel offers a streamlined way to build content using pages, blocks, and widgets. Together, these components form the core of the Magento CMS, enabling store owners to design flexible and reusable layouts with ease.
To get the most out of the Magento CMS, it’s helpful to think of page creation as a three-part process:
- Create a new CMS Page
- Add reusable CMS Blocks
- Enhance with dynamic or static CMS Widgets
Let’s walk through each step in detail.
Step 1: Creating a New Magento 2 CMS Page
To create a new CMS page in Magento 2, follow these steps:
- Navigate to Admin → Content → Pages
- Click the “Add New Page” button
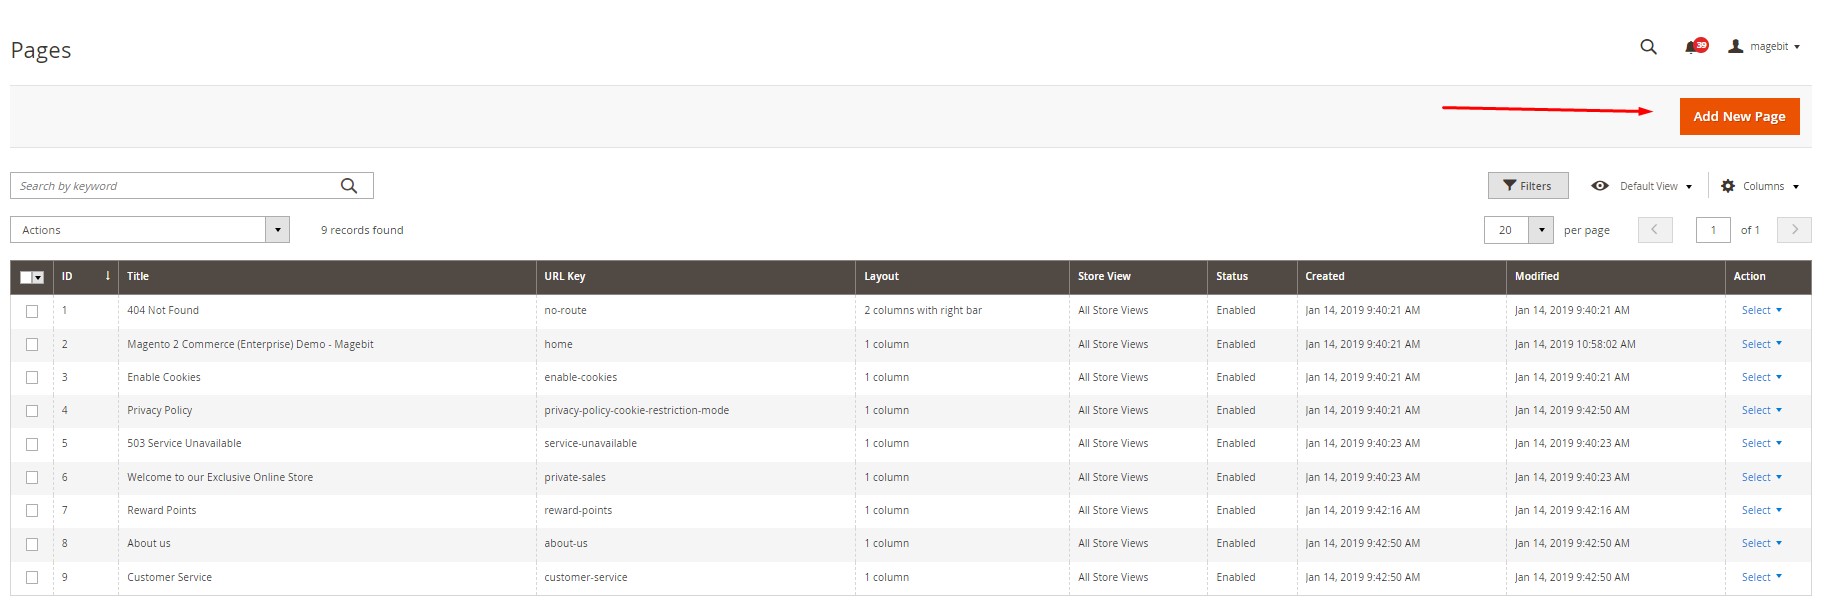
- Enable the page and give it a name (e.g., “Return Policy” or “Brand Story”)

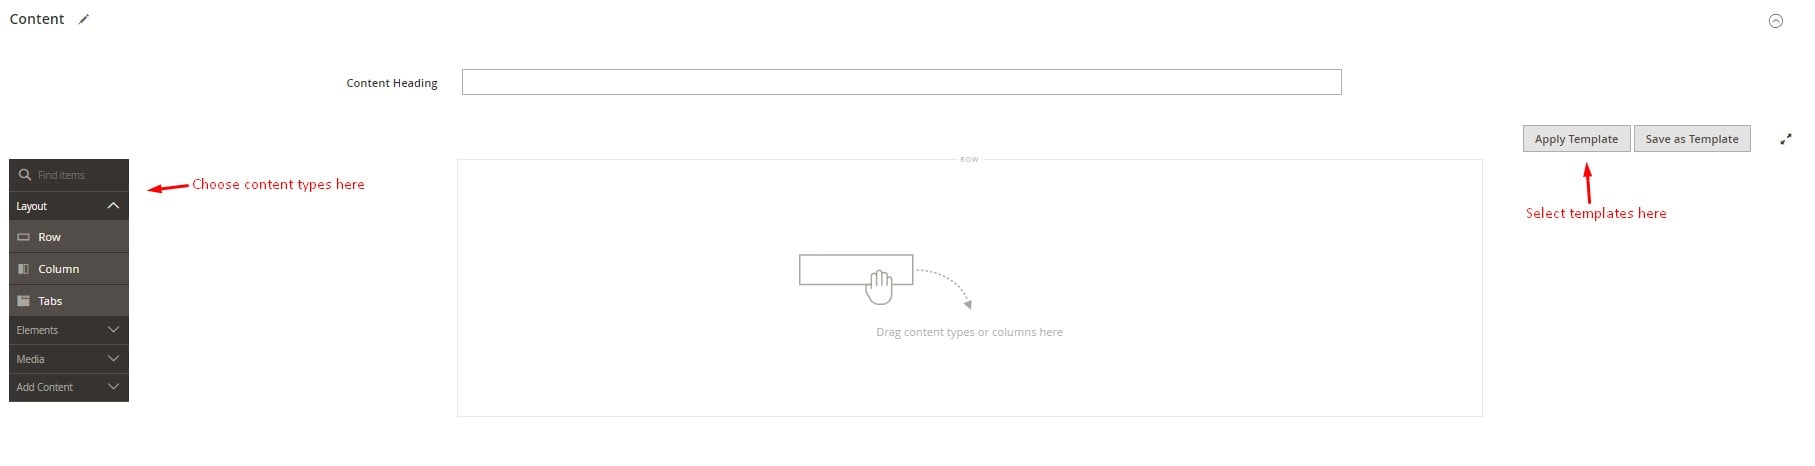
- Under the Content tab:
- Enter a Content Heading
- Add content using the WYSIWYG editor or insert layout templates
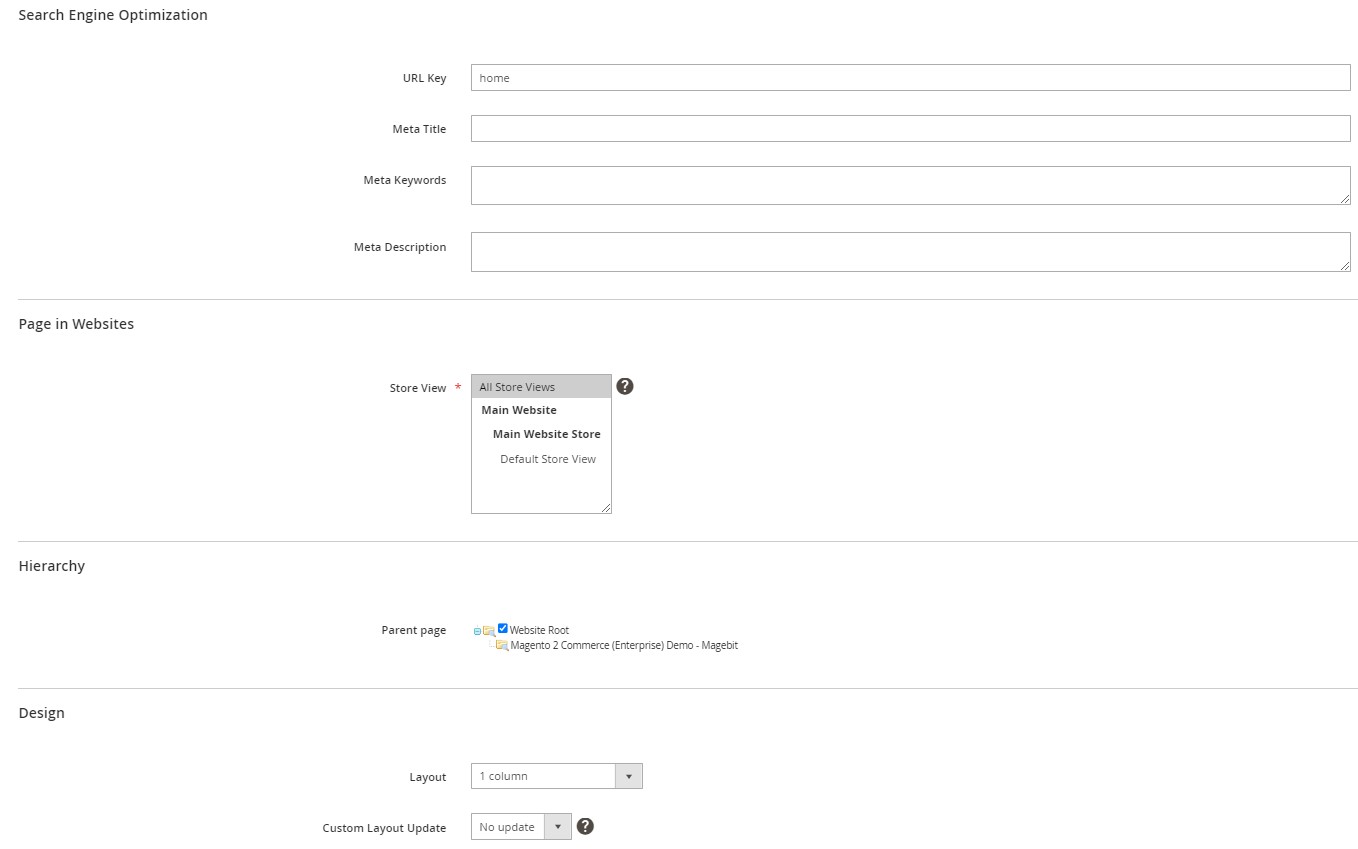
- Under the Search Engine Optimization tab:
- Specify a clean, keyword-rich URL Key
- Fill in the Meta Title, Meta Keywords, and Meta Description to improve SEO
- Under Page in Websites, choose which websites or store views this page should appear on
- Configure Page Hierarchy, Design, and Custom Layout options if needed
- Click Save when ready
Your CMS page is now live and can be added to menus, blocks, or other pages using internal links or widgets.
💡 Pro Tip: To link this new page from your homepage, go back to Admin → Content → Pages → Home Page, then:
- Edit the page
- Click on Content → Insert Widget
- Choose the CMS Page Link widget type
- Select your new page and configure the anchor text
- Save and refresh the cache
This makes your custom CMS page easily accessible from any part of the storefront.
Step 2: Adding Magento 2 CMS Blocks
CMS blocks are reusable content snippets — perfect for banners, footers, callouts, or featured content sections. These blocks can be inserted into any CMS page or widget.
To create a new CMS block in Magento 2:
- Go to Admin → Content → Blocks
- Click the “Add New Block” button
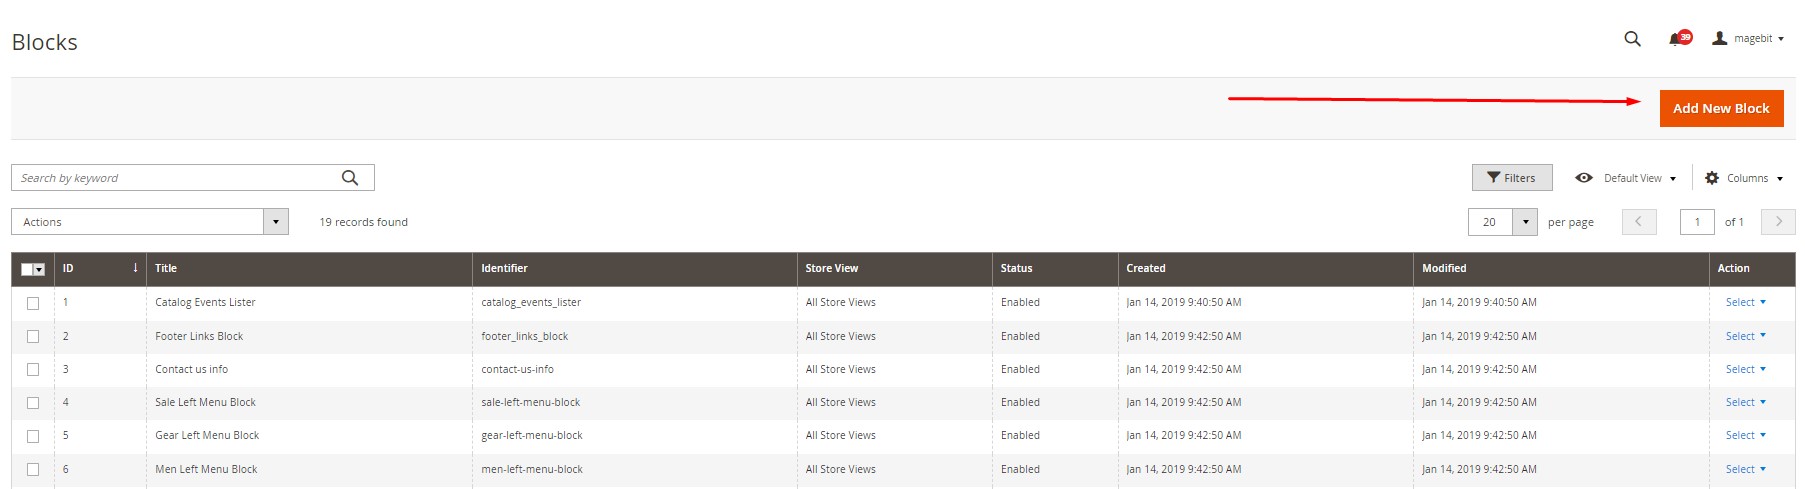
- Enable the block and give it a descriptive Block Title
- Define a unique Identifier (used to call the block in widgets/pages)
- Choose applicable Store Views
- Use the content editor to insert text, images, buttons, or templates
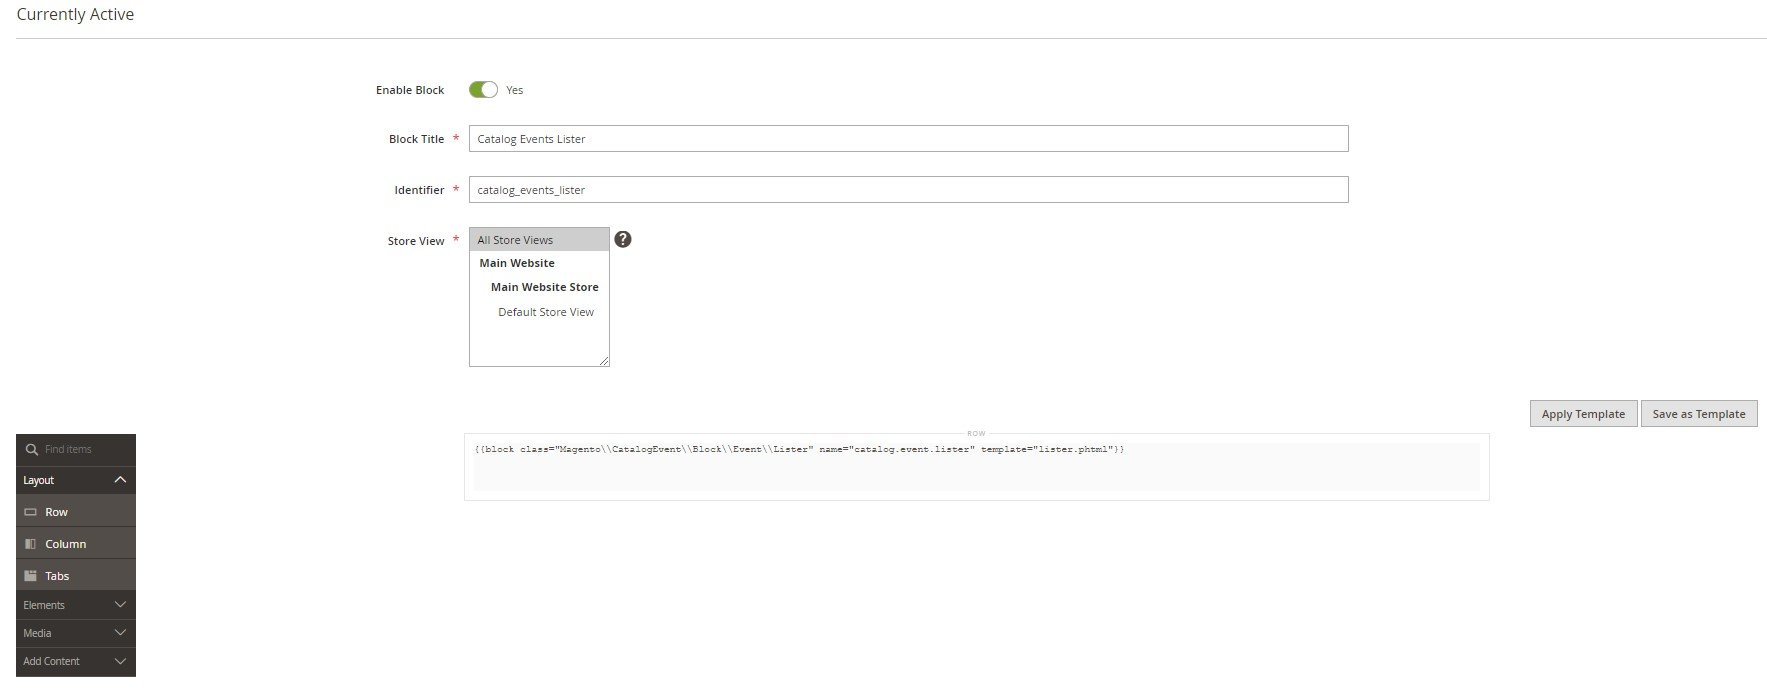
- Click Save
You can use CMS blocks to organize your homepage into sections — for example, showcasing product categories, seasonal promotions, or customer testimonials.
Step 3: Using Magento CMS Widgets
Widgets are a powerful feature in Magento 2 that allow you to insert both static and dynamic content into CMS pages or blocks — without touching theme code. Think of them as intelligent content elements that you can configure once and place anywhere.
To create a new CMS widget in Magento 2:
- Navigate to Admin → Content → Widgets
- Click “Add Widget”
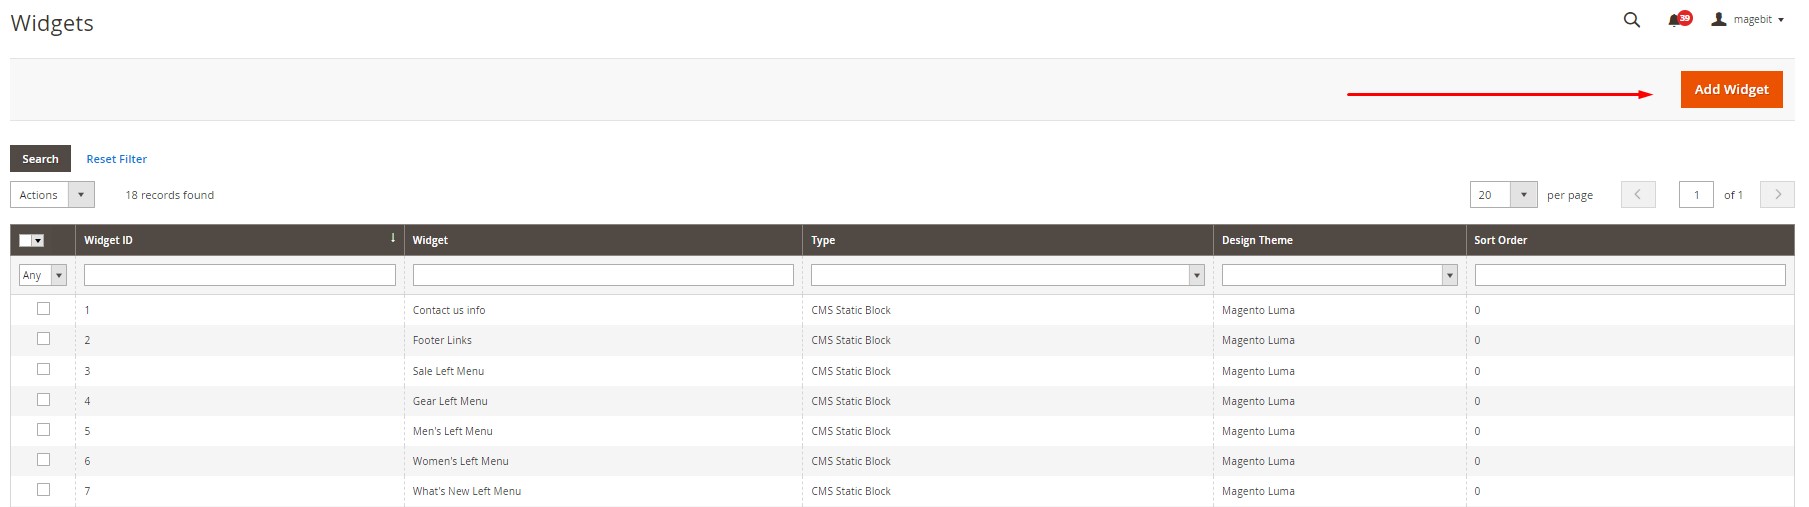
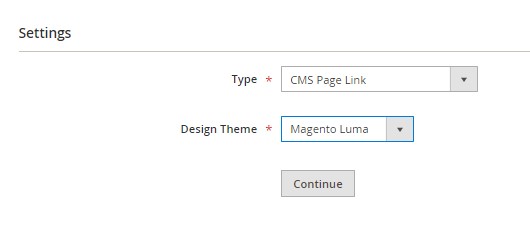
- Choose the Widget Type (e.g., CMS Page Link, Catalog Products List, etc.)
- Select your Design Theme, then click Continue
- In the Storefront Properties tab:
- Set a Widget Title
- Assign it to specific Store Views
- Set the Sort Order
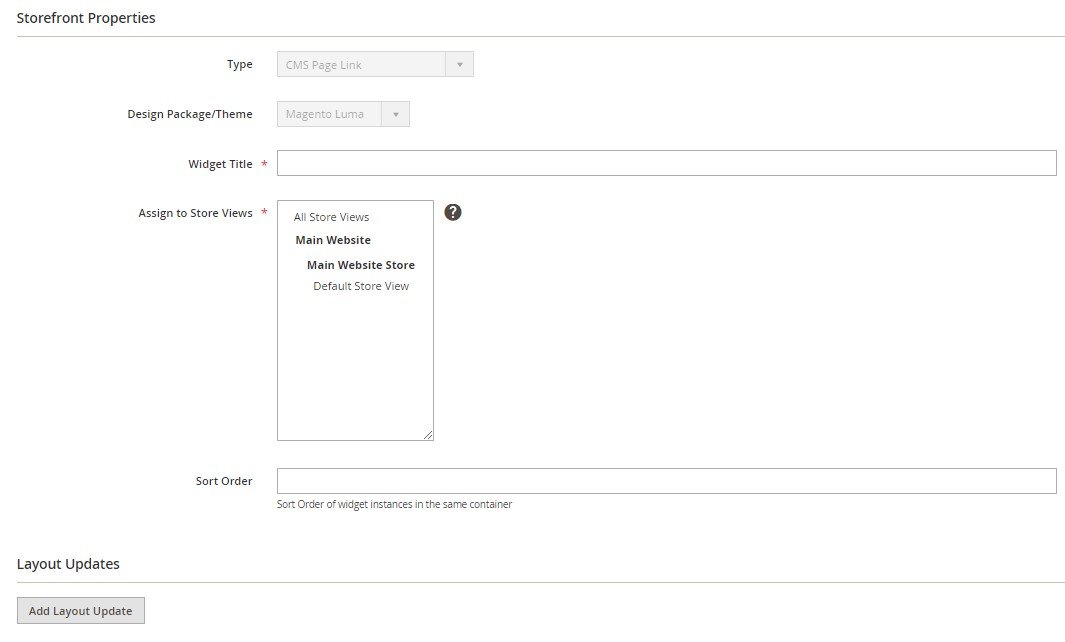
- Add Layout Updates to control where the widget will appear (e.g., specific pages or blocks)
- In Widget Options, configure:
- Anchor/custom text
- Target CMS page or block
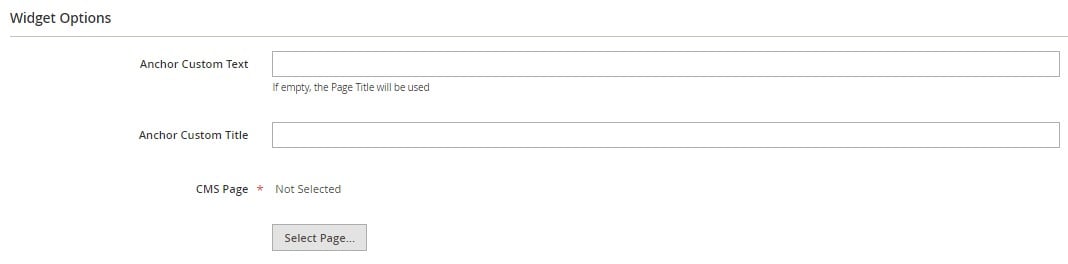
- Click Save
Once saved, your widget will automatically display in the location you’ve assigned, helping you streamline content delivery across the site.
With these tools — CMS Pages, Blocks, and Widgets — Magento 2 gives you full control over your site’s content architecture. But as your business scales, manually creating or updating multiple CMS elements becomes time-consuming. So, what if there were a faster, automated way to handle content setup?
That’s where CMS import/export extensions for Magento 2 come in. Let’s explore why to import CMS pages to your e-commerce website.
Why Import and Export CMS Pages in Magento 2?
As your business grows, so does the complexity of your content architecture. Manually recreating each Magento 2 CMS page — from layout and blocks to metadata — across multiple stores or environments is not only time-consuming but also prone to human error. That’s why having the ability to import and export CMS pages in Magento 2 is more than just a convenience — it’s a necessity.
Whether you’re launching a new store, deploying content updates from a staging environment, or cloning CMS pages across multiple websites and store views, a reliable Magento 2 import export CMS solution significantly accelerates the process.
Here are some real-world use cases where CMS import export for Magento 2 becomes essential:
- Site Migration: Moving from an old Magento version or another platform? Instead of recreating each CMS page from scratch, you can import all existing content in bulk, complete with design layouts, meta tags, and widgets, using a robust CMS import export Magento 2 extension.
- Multi-Store Rollouts: Managing several Magento storefronts? Easily export CMS pages from one store and import them into another, keeping layout, SEO data, and content perfectly synchronized.
- Staging to Production Sync: Working in a staging environment? Push updates to your live site with a few clicks, ensuring a smooth and error-free transition from draft to deployment.
- Rapid Deployment: Setting up a new store or regional site? Import pre-designed CMS templates with localized content, accelerating the go-live timeline without cutting corners.
Manual workflows introduce risk — forgotten meta tags, broken links, and missing blocks. With the help of a dedicated CMS import export extension for Magento 2, you eliminate these issues and gain speed, accuracy, and scalability. Extensions like Firebear’s Improved Import & Export even let you automate these processes via cron jobs and support multiple file formats like CSV, XML, and XLSX. So, let’s see how to manage Magento CMS data transfers with its help.
How to Import Magento 2 CMS Pages (Step-by-Step Guide)
Out of the box, Magento 2 lacks native support for CMS page import. While you can bulk import products, customers, and pricing, CMS content is unfortunately left out — unless you use a dedicated solution.
That’s where the Improved Import & Export extension by Firebear Studio becomes a game-changer. With it, you can quickly and accurately import CMS pages into Magento 2 using CSV, XML, XLSX, or even Google Sheets — streamlining your entire content deployment process.
This step-by-step guide will show you exactly how to perform a CMS import export for Magento 2 using this powerful tool.
Step 1: Prepare Your Magento 2 CMS Import Table
To start, you’ll need to create a correctly formatted CSV or XML file containing your Magento 2 CMS page data. Below are the essential attributes and formatting rules your import table must follow.
File Requirements:
- Character Set: Unicode (UTF-8)
- Field Separator: Comma or Tab
- Text Delimiter: Double quotes (“)
Required CMS Page Attributes:
Below, we explore what CMS page attributes are required in Magento 2. You can find a sample CMS page import table in our . There are separate tables for pages, blocks, and widgets.
| Attribute Name | Reference | Values | Value Example |
| creation_time | Created (in the CMS pages grid) | The date should be in the following format:
yy/mm/dd |
17/05/10 |
| title | Page Title | Any text and symbol value | Sample page title |
| identifier | URL Key | Lowercase letters and numerals, underscores and dashes allowed | sample_page_url |
| store_view_code | Store view | The codes of the store views separated by commas.
Use ‘All’ to assign a CMS page to All Store Views. You can get the code of the store view at Stores > All Stores > click the required entity in the Store Views column and find the ‘Code’ field. The value in the ‘code’ field is the store view. |
All,default |
| is_active | Enable Page | 1 – the CMS page is enabled
0 – the CMS page is disabled |
1 |
| content_heading | Content Heading | Any text and symbol value | Sample content heading |
| content | Content | Any text and symbol value. Simple HTML is allowed as when creating CMS pages. | <p>Hello, world</p> |
| page_layout | Layout | 1column – 1 column layout
2columsn-left – 2 columns with left bar layout 2columns-right – 2 columns with right bar layout 3columns – 3 columns leave empty for empty layout |
2columns-left |
| meta_title | Meta Title | Any text and symbol value | Sample page meta title |
| meta_keywords | Meta Keywords | Any text and symbol value | sample,meta,keywords,of,the,CMS,page |
| meta_description | Meta Description | Any text and symbol value | Sample page meta description |
| layout_update_xml | Layout Update XML | XML | <referenceContainer name=right”>
<action method=”unsetChild”><argument name=”alias” xsi:type=”string”>right.reports.product.viewed</argument></action> <action method=”unsetChild”><argument name=”alias” xsi:type=”string”>right.reports.product.compared</argument></action> </referenceContainer> |
| custom_theme | Custom Design Update > New Theme | The path to the theme which can be found under Content > Themes > Theme Path (in the grid) | Magento/luma
3 |
| custom_root_template | Custom Design Update > New Layout | 1column – 1 column layout
2columns-left – 2 columns with left bar layout 2columns-right – 2 columns with right bar layout 3columns – 3 columns leave empty for empty layout |
3columns |
| custom_theme_from | Custom Design Update > From | The date should be in the following format:
mm/dd/yy |
3/2/19 |
| custom_theme_to | Custom Design Update > To | The date should be in the following format:
mm/dd/yy |
3/29/19 |
📌 Note: CMS pages built with Magento 2 Page Builder use the same attribute structure. Their content is stored in the content column and is fully supported by the Firebear extension.
Step 2: Create a New Import Job in Magento 2
With your CMS page import file ready, follow these steps:
- Navigate to Admin → System → Improved Import / Export → Import Jobs
- Click “Add New Job” to open the import configuration interface
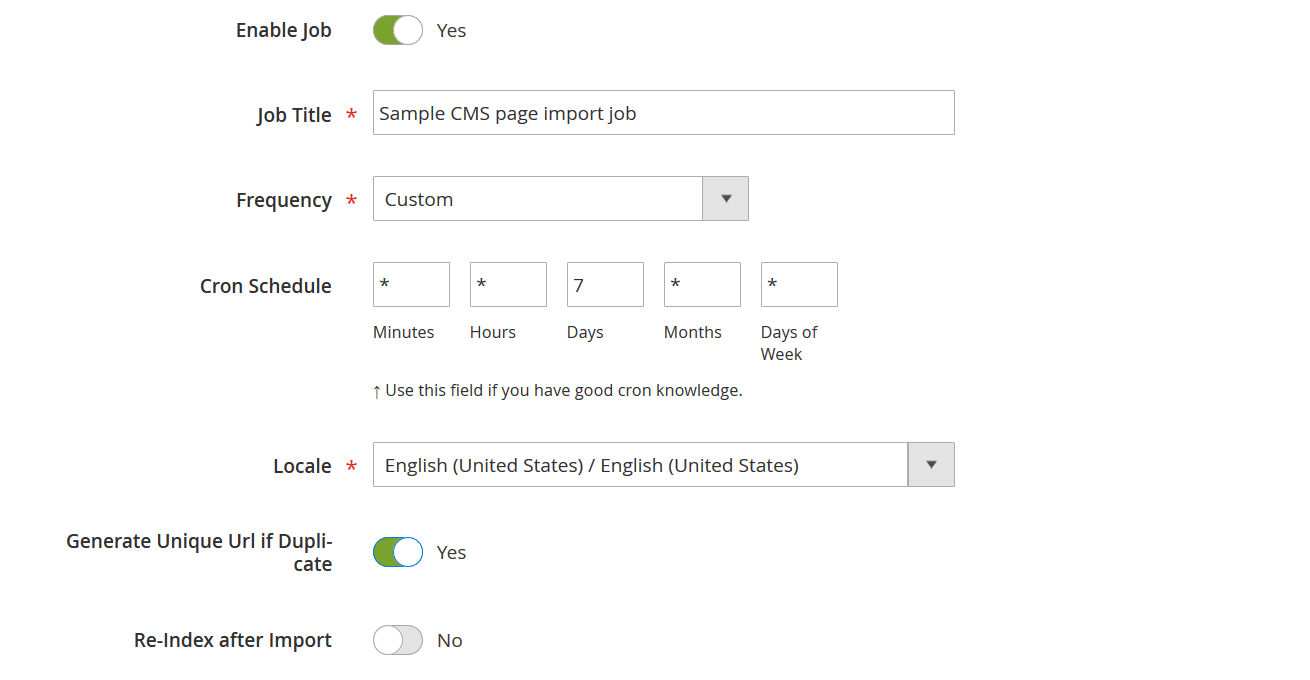
Step 3: Configure General Settings
- Give your job a descriptive title (e.g., “CMS Pages Import – Summer 2025”)
- Enable scheduling if you want to automate Magento 2 CMS page imports using cron jobs
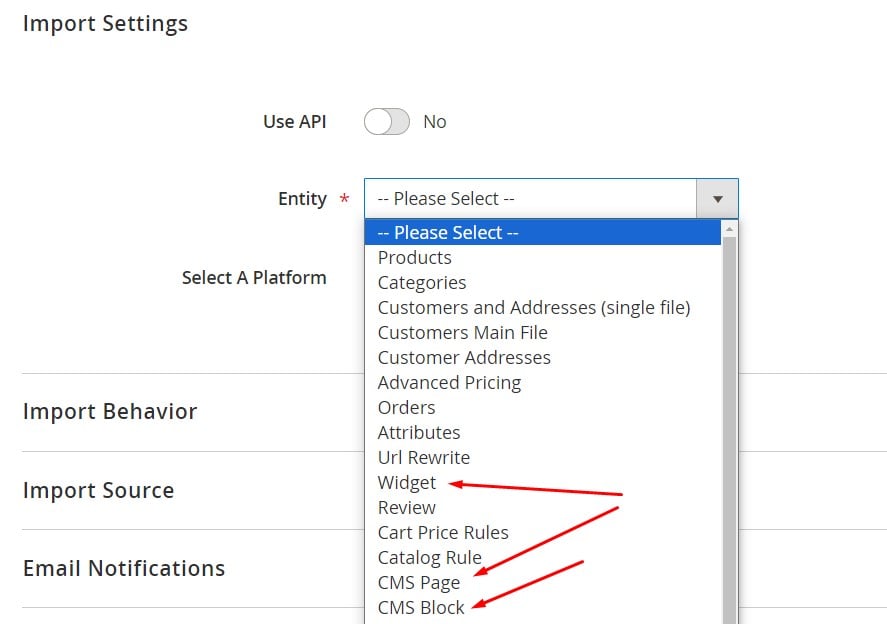
Step 4: Set Import Entity
In the Import Settings section:
- From the Entity dropdown, choose CMS Pages
- You can also import CMS Blocks and Widgets in separate jobs
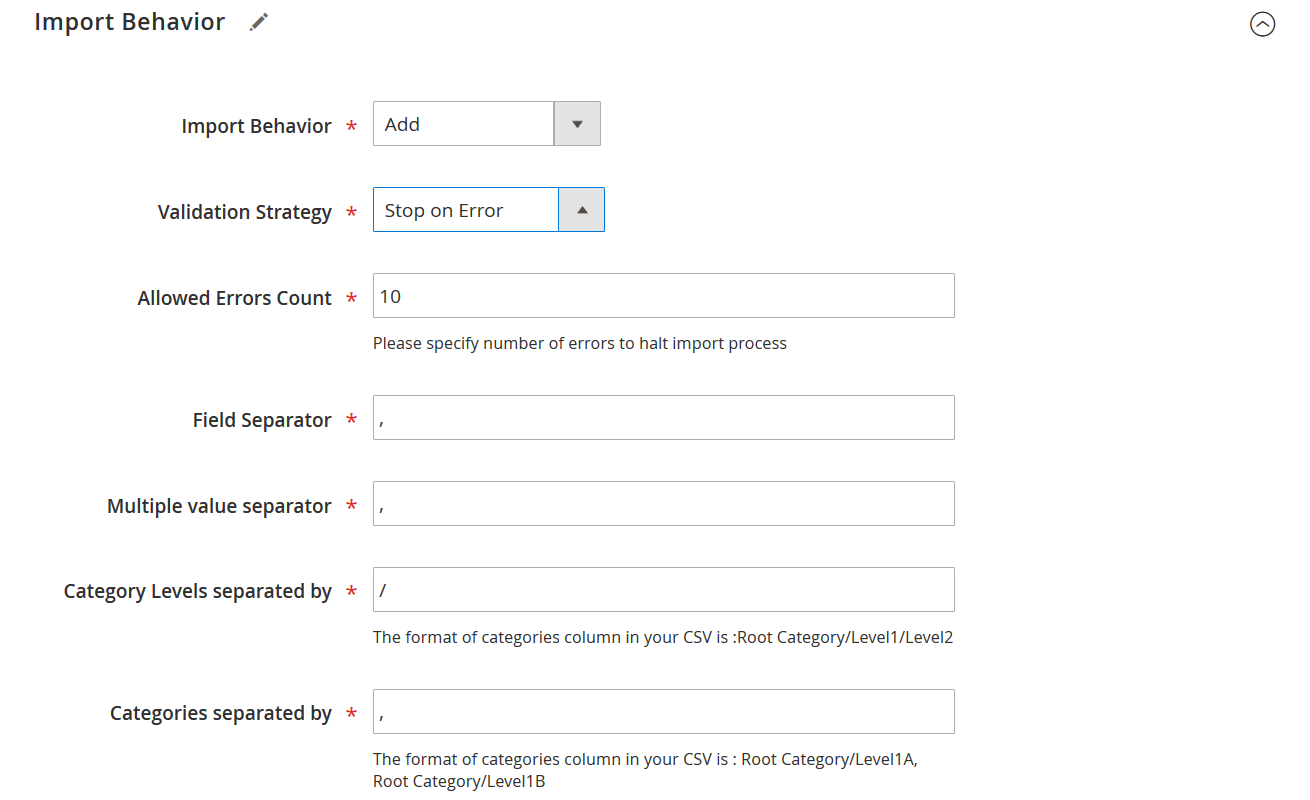
Step 5: Define Import Behavior
Under Import Behavior, specify how you want the system to handle incoming data:
- Add/Update: Adds new pages or updates existing ones
- Replace: Replaces all existing content with the new import
- Delete: Delete all records in your database that match records in the CSV
Select a Validation Strategy — e.g., Skip errors or stop on error
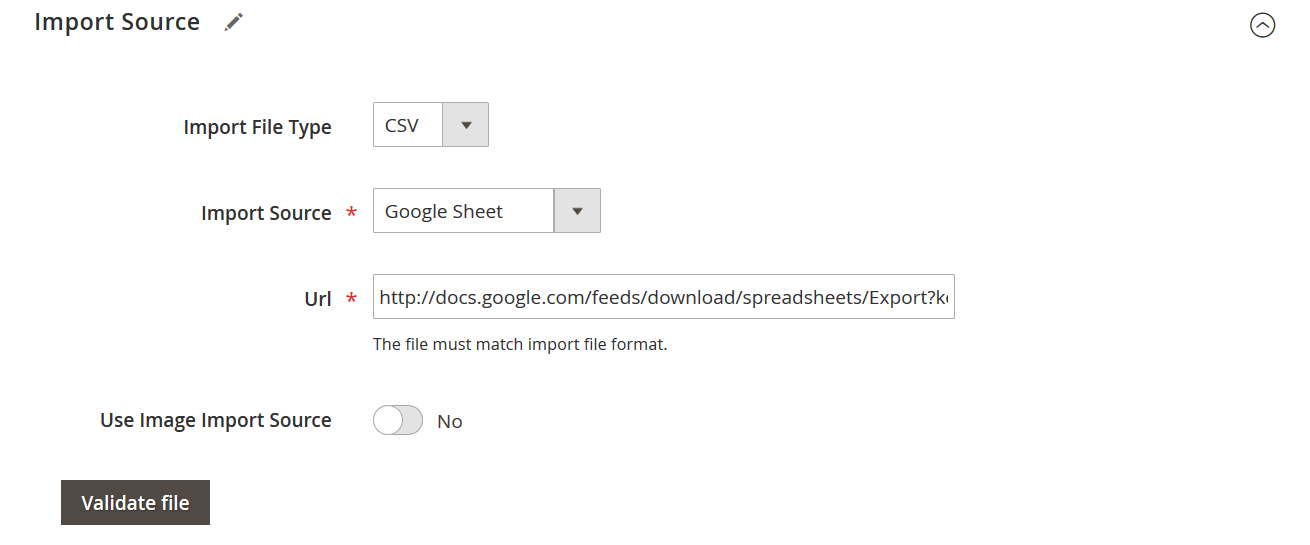
Step 6: Choose the Import Source
Now, in the Import Source section:
- Select your file format: CSV, XML, XLSX, ODS, or JSON
- Choose your data source:
- Upload manually
- FTP/SFTP
- Dropbox
- Google Sheets
- Click “Validate File” — the extension will check the structure and formatting before proceeding
Step 7: Map Attributes (Optional But Powerful)
If you’re importing CMS content from a third-party platform or legacy system, use the Map Attributes section to align your columns with Magento’s attribute system:
- Select each Magento 2 system attribute
- Assign the corresponding column from your import file
- You can also assign default values for missing fields
- Choose the source platform to auto-load attribute mappings
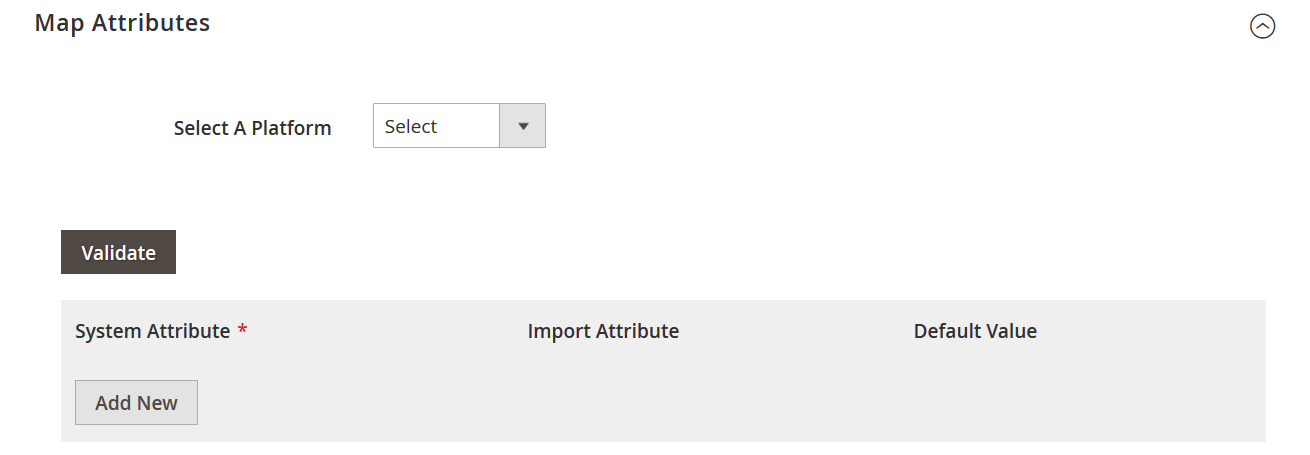
💡 The extension includes full support for Page Builder pages — no special formatting is required.
Step 8: Run the Import Job
Once everything is set:
- Click the “Save & Run” button in the top-right corner
- The extension will execute the job and import CMS pages into Magento 2 automatically
You’ll see a job log upon completion, detailing any errors or skipped rows.
With our Magento 2 CMS import export extension (Improved Import & Export), you no longer need to recreate pages by hand. You can scale content updates, speed up migrations, and keep your CMS architecture in perfect sync — whether you’re managing one store or twenty. Follow its manual for more detailed instructions. Now, let’s explore the opposite side of the process — Magento 2 CMS export.
Exporting Magento 2 CMS Pages: Best Practices
When managing a dynamic e-commerce storefront, exporting Magento 2 CMS pages can be just as important as importing them. Whether you’re creating backups, synchronizing content between staging and production environments, or cloning CMS pages across multiple stores, having a reliable export process in place ensures accuracy, speed, and peace of mind.
Unfortunately, Magento 2 offers no built-in tools for exporting CMS pages, leaving merchants to rely on manual duplication or risky SQL operations. That’s why a dedicated CMS import export extension for Magento 2 is a must-have.
With the Improved Import & Export extension by Firebear Studio, exporting CMS content becomes effortless and highly customizable. You can export any number of pages — including their layout, SEO metadata, Page Builder content, and design updates — into a structured file ready for import elsewhere.
Why Export Magento 2 CMS Pages?
Here are some of the most common use cases:
- Backup & Versioning: Maintain a local or cloud-based backup of all CMS content
- Staging-to-Production Sync: Push changes from your dev/staging site to live with 100% fidelity
- Multi-Store Rollouts: Reuse content across multiple websites, languages, or store views
- Bulk Editing: Export to CSV/XLSX, make changes offline, and re-import for quick updates
Using a robust Magento 2 import export CMS tool reduces the risk of errors, eliminates downtime, and enables a more agile content strategy.
How to Export CMS Pages with Improved Import & Export (Step-by-Step)
- Navigate to Admin → System → Improved Import / Export → Export Jobs
- Click “Add New Job” to start a new export configuration
- General Settings:
- Name your job (e.g., “CMS Export – Q2 Site Backup”)
- Schedule exports using cron if needed
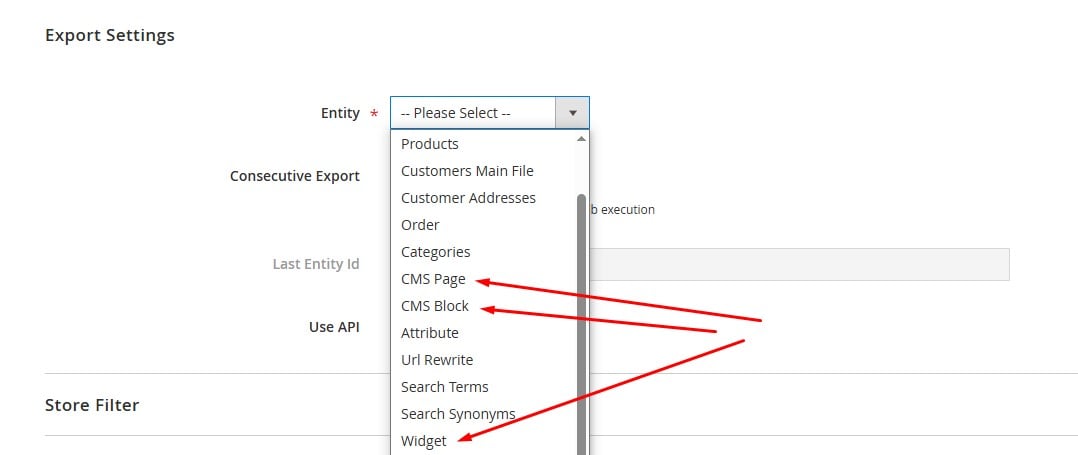
- Export Settings: From the Entity dropdown, choose CMS Pages (Widgets and Blocks are also supported)
- Export Behavior:
- Select the export format: CSV, XML, XLSX, JSON, or ODS
- Specify separators
- Choose whether you want to Archive File After Export or Archive File Before Consecutive Run
- Export Source: Define where the export file should be saved:
- Local server
- FTP/SFT
- Dropbox
- Google Drive
- Direct download
- Map Attributes (Optional): This step is especially useful when preparing CMS data for third-party systems. It lets you align Magento 2 CMS data with any custom data structure.
- Export Filters (Optional): Apply filters to narrow the export (e.g., by store view, active status, or specific page identifiers)
- Click “Save & Run”: The extension will generate the export file and place it at your chosen destination
Follow the extension manual for more detailed instructions
Extension Advantages Over Manual Methods
Unlike manual copy-pasting or database exports, the Improved Import & Export extension ensures:
- Full support for Page Builder content
- Clean, structured, and reusable export files
- Safe automation with logging and validation
- One-click import-export parity — export from staging and import to production with no format changes
- Compatibility with multi-store setups and multiple file formats
When you use the right cms import export extension for Magento 2, you turn a tedious manual process into a streamlined, scalable content workflow, giving your marketing and development teams the flexibility they need. And the Improved Import & Export is exactly what you’ve been looking for!
Troubleshooting Magento CMS Import Export Issues
While the Magento 2 CMS import export extension by Firebear Studio greatly simplifies content transfers, issues can still occur — especially when working with large data sets, third-party files, or complex layouts. Fortunately, the extension includes built-in validation, detailed logs, and flexible error-handling options that make diagnosing and fixing problems much easier.
Below are some of the most common issues users face during CMS import export for Magento 2, along with how the Improved Import & Export extension helps you resolve them.
Invalid Layout Update XML. If your CMS page includes custom layout XML and it contains syntax errors or unsupported references, Magento will block the page from rendering.
✅ Solution: Firebear’s validation tool checks the layout XML field for structural correctness before running the import. Errors are flagged so you can fix them in advance.
Encoding Errors. Improper character encoding (e.g., files not saved in UTF-8) can lead to broken content or unreadable symbols, especially in multilingual stores.
✅ Solution: The extension enforces UTF-8 encoding and notifies you of formatting issues before import/export execution.
Missing or Duplicate Identifiers. Each Magento 2 CMS page requires a unique identifier (URL key). Missing or duplicate values will cause conflicts or overwrite existing pages.
✅ Solution: During import, Firebear highlights missing or duplicate identifiers in the log and prevents overwrite unless explicitly configured.
Unrecognized Attributes. If your import table contains attribute columns not mapped to Magento system fields, the import might fail or ignore that data.
✅ Solution: The attribute mapping feature lets you link custom fields to Magento system attributes, and Firebear’s logs list any unmapped or unsupported attributes.
File Structure Errors. Incorrect column names, delimiters, or file extensions can break the import process entirely.
✅ Solution: The “Validate File” feature allows you to test your file structure before running the job, minimizing downtime and reducing trial-and-error.
Store View Mismatches. Assigning CMS pages to non-existent or misspelled store view codes will cause the import to skip affected entries.
✅ Solution: Firebear checks store view values and lists any mismatches in the job log for correction.
Import Freezes or Fails Without Output. This often happens when files are too large or server limits are hit.
✅ Solution: Firebear logs include memory usage and execution time details. You can optimize by splitting files or scheduling imports via cron.
With our Magento 2 CMS import export extension, you’re not flying blind. Every job execution generates a detailed log that shows processed rows, skipped entries, validation errors, and system responses. Combined with customizable error-handling strategies (stop on error, skip row, etc.), you get full control over the process and minimal disruption to your workflow.
By addressing these common issues head-on, you ensure a smooth and scalable content import/export strategy — no matter how complex your CMS architecture becomes.
Final Words: Streamline Magento CMS Management with the Right Tools
The Magento CMS is the foundation of a well-structured and content-rich storefront. From static pages like “About Us” and “Shipping Policies” to dynamic landing pages built with Page Builder, Magento 2 CMS pages play a vital role in delivering engaging, branded experiences for your customers.
However, as your store evolves, so does the complexity of managing that content. That’s where robust CMS import export for Magento 2 functionality becomes essential. Rather than manually recreating or updating every CMS page, block, or widget across multiple environments, you can automate the entire process using a reliable Magento 2 CMS import export extension.
The Improved Import & Export extension by Firebear Studio empowers you to do exactly that — import, export, and synchronize your CMS content with ease. It supports advanced features like attribute mapping, scheduled jobs, multi-format compatibility (CSV, XML, XLSX, JSON), and full Page Builder support.
Whether you’re migrating to a new store, syncing staging and production, or deploying content across multiple storefronts, Firebear’s solution helps you save time, eliminate human error, and scale your content operations with confidence.
💡 Want to take your content management to the next level?
👉 Get the Improved Import & Export Magento 2 Extension and start automating your CMS workflows today.
👉 Contact us now to learn more about the extension.
For more practical guides on Magento 2 data transfers, check out our Magento 2 Import/Export Tutorial List.
FAQ: Magento CMS Pages & Import Export
What is a CMS page in Magento 2?
A CMS page in Magento 2 is a content page that displays static or dynamic information, such as an About Us page, Contact page, or landing page. These pages are created and managed through the Magento CMS.
Can you import CMS pages in Magento 2 by default?
No, Magento 2 does not support CMS page import natively. You need a third-party solution like the Improved Import & Export extension to add this functionality.
How can I export CMS pages in Magento 2?
Magento 2 doesn’t provide built-in tools for exporting CMS pages. To export pages efficiently, you need a dedicated CMS import export extension for Magento 2, such as the Firebear Improved Import & Export module.
What file formats are supported for Magento 2 CMS import?
With Firebear’s extension, you can import CMS pages using CSV, XML, XLSX, ODS, and JSON files. The extension also supports imports from remote sources like FTP, Dropbox, and Google Sheets.
Does Magento 2 support importing CMS blocks and widgets?
By default, Magento 2 does not support importing CMS blocks or widgets. However, the Firebear Improved Import & Export extension allows you to import CMS pages, blocks, and widgets with full customization.
Can I automate Magento 2 CMS imports?
Yes. Using the Improved Import & Export extension, you can schedule CMS imports via cron jobs, enabling automated synchronization between staging and production environments or third-party systems.
What are common issues when importing Magento 2 CMS pages?
Common issues include invalid XML in layout updates, encoding problems, duplicate identifiers, and store view mismatches. Firebear’s extension includes validation tools and detailed logging to help troubleshoot these problems.
Does the Improved Import & Export extension support Page Builder content?
Yes. The Firebear Magento 2 CMS import export extension fully supports content created with Magento 2 Page Builder, including layout data stored in the content field.
Can I use attribute mapping when importing CMS pages?
Absolutely. Firebear’s extension allows you to map custom columns from your source file to Magento 2 system attributes, making third-party content imports seamless.
What is the best extension to import and export CMS pages in Magento 2?
The Firebear Improved Import & Export extension is one of the most advanced and flexible tools for importing and exporting CMS pages, blocks, and widgets in Magento 2. It offers automation, multi-format support, and deep customization options.
Related posts
 Magento 2 Export Customers Tutorial: Export Customer Data with Ease
 How to Block Customers on Shopify: A Complete Guide to Protect Your Store
 Magento 2 Bundle Product with Custom Options: Complete Guide to Benefits, Limits & Import
 Copy.ai Review: Is This AI Copywriting Tool Still Worth It in 2025?
 What’s Wrong with Shopify App Store: How to Spot a Scam or Low-Quality App in 2025
 How to Merge Customers in Shopify: A Step-by-Step Guide
 Shopify Inventory Management: A Comprehensive Guide to Tracking and Optimizing Your Stock
 Best Shopify Alternatives for Small Businesses and Growing Brands