
How to Import Customers & Customer Addresses to Magento 2: Complete Tutorial, CSV Samples & Tips

Importing customers into Magento 2 is a critical step when migrating from another platform, syncing CRM data, or simply managing your customer base more efficiently. Whether you’re setting up a new store or updating existing records, knowing how to import customers to Magento 2 can save you hours of manual work and prevent costly data entry errors.
In this guide, we’ll walk you through everything you need to know about the Magento import of customers. You’ll learn how to use both the default Magento 2 import tool and advanced third-party solutions to streamline customer and address data uploads. We’ll also explain how to work with the three key entities: Customers Main File, Customer Addresses, and Customers and Addresses — each offering a different way to manage customer data imports.
To get started, we’ll show you how to prepare a valid Magento 2 customer import sample CSV, explain the structure of the required columns, and cover how to map attributes correctly. Whether you’re using the built-in Magento 2 functionality or looking to boost your workflow with the Firebear Improved Import & Export extension, this article has you covered.
Let’s dive into the step-by-step process of importing customers and their addresses into Magento 2, so you can get it right the first time.

Table of contents
- Why Import Customers Into Magento 2?
- Magento 2 Customer Import Sample CSV Explained
- Magento 2 Customer Import Attributes Explained: Main File, Addresses & Combined
- How to Import Customers into Magento 2 Using the Default Import Tool
- Step-by-Step Magento 2 Customer Import with Improved Import & Export
- Why Use Firebear’s Improved Import & Export Extension Over the Default Tool?
- Common Import Errors and Fixes
- Conclusion: Simplify Magento 2 Import of Customers with the Right Tools
- FAQ: Magento 2 Import – Customers
Why Import Customers Into Magento 2?
Understanding how to import customers into Magento is essential for any merchant managing a growing or migrating store. Whether you’re switching from a different e-commerce platform, updating your database in bulk, or syncing customer data from external systems like CRMs or ERPs, the customer import feature in Magento 2 can save you significant time and reduce manual entry errors.
One of the most common use cases is migrating from another platform, such as Shopify, WooCommerce, or PrestaShop, or simply from Magento 1 to Magento 2. In such cases, manually recreating each customer profile is not only inefficient but also prone to mistakes. Instead, a properly structured import allows you to transfer large volumes of customer data with just a few clicks.
Bulk updates are another scenario where customer import shines. If you need to update email preferences, group assignments, or billing addresses across thousands of accounts, importing a CSV is much faster and more reliable than editing records one by one in the admin panel.
You might also need to sync customer lists with third-party services, like a newsletter platform or marketing automation tool, and re-import updated data back into Magento 2. In all these cases, automating the process using the Magento import functionality or advanced third-party tools ensures your customer data remains clean, up-to-date, and ready for marketing and support operations.
In short, knowing how to import customers into Magento 2 isn’t just a technical skill — it’s a powerful way to optimize your business operations, minimize downtime, and maintain data accuracy across systems.
Magento 2 Customer Import Sample CSV Explained
Before you can import customer data into Magento 2, you need a properly formatted CSV file. A Magento 2 customer import sample CSV is your starting point—it outlines the required columns, correct formatting, and acceptable values for each customer-related field. Whether you’re importing customers only or including customer addresses, using the correct sample file ensures a smooth and error-free import.
Where to Get The Magento 2 Customer Import Sample CSV
There are three trusted ways to download a valid sample CSV for importing customers into Magento 2:
- From the Magento 2 Admin Panel. Navigate to System → Data Transfer → Import, choose Customers Main File, Customer Addresses, or Customers and Addresses from the “Entity Type” dropdown, and download the sample CSV provided by Magento.

- From GitHub. Firebear Studio offers a full set of import sample files on GitHub, including customer entities. Access them here: 👉
- From the Firebear Master Google Sheet. For a detailed breakdown of available Magento 2 entities, required fields, and example values, check our official spreadsheet: 👉
These sample CSVs are essential if you’re unsure how to format your customer data before running the import.
Magento 2 Customer Import CSV Structure: Key Columns Explained
Let’s break down the most important columns in the Magento 2 customer import sample CSV:
- email – Required. The customer’s email address (must be unique).
- website – Required. Indicates the Magento website code (e.g., base). This is especially important in multi-site setups.
- group_id – Defines which customer group (General, Wholesale, etc.) the customer belongs to.
- firstname / lastname – Self-explanatory and required for all customer accounts.
- dob – Date of birth (optional, format: YYYY-MM-DD).
- gender – Optional. 1 for male, 2 for female.
- password_hash – If importing encrypted passwords from another system.
- addresses_ fields* – When using the “Customers and Addresses” entity, columns like addresses_default_billing, addresses_street, addresses_city, etc., are also required.
If you plan to import customer addresses alongside account data, your CSV must contain all mandatory address fields. These include:
- addresses_street
- addresses_city
- addresses_country_id
- addresses_telephone
- addresses_postcode
- addresses_region
Failing to provide this information will result in validation errors during the Magento 2 customer import process. We will return to a detailed column description later.
Formatting Requirements for Magento Customer Import CSV
To avoid issues with encoding and separators, make sure your CSV meets the following technical requirements:
- Character set: Unicode (UTF-8)
- Field separator: Comma or tab
- Text delimiter: Double quotes (“)
If you’re working with custom-formatted files from suppliers or other systems, don’t worry — Firebear’s Improved Import & Export for Magento 2 allows flexible field mapping. You can match external column names to Magento 2 attributes without modifying your original CSV.
Magento 2 Customer Import Attributes Explained: Main File, Addresses & Combined
When importing customer data into Magento 2, you have flexible options depending on your goals. Magento supports three distinct import entity types—each designed for a specific use case. You can either import customer accounts and their addresses separately or together in a single file using the appropriate entity type.
This flexibility means you can:
- Start by importing customers only, and add addresses later;
- Import both customers and their address data in one go;
- Update just the customer address records without affecting the account details.
Understanding these options is critical if you want to know how to import customers into Magento efficiently, especially when working with large datasets or syncing with external CRMs and ERPs.
Let’s explore the three available import entity types and the attributes associated with each:
Magento 2 Customers Main File Attributes
The Customers Main File entity is used when you only want to import account-related data, like login credentials, names, group assignments, and passwords, without address information.
You can get a full with the attribute description and sample value reference in the Master Google Table.
The ‘Customers Main File’ contains the following columns:
| Attribute Name | Reference | Values | Value Example |
| Email of the customer | Make sure to properly paste the email address with the domain | john.doe@test.com | |
| _website | Associate to Website. Defines to which website the customer belongs | To find the value for the column navigate to Stores > All Stores > Click the required Website in the Website column and find its Code | base |
| _store | The Store View customer belongs to | To find the value for the column navigate to Stores > All Stores > Click the required Store in Stores column and find its Code | default |
| confirmation | Confirmed email. Defines whether customer has confirmed their email address associated with their account | 1 – the email address has been confirmed
0 – customer needs to confirm the email address |
1 |
| created_at | Account Created. Defines the date and time the account has been created | The data format is:
yyyy/mm/dd hh:mm:ss The time format uses 24 hour clock |
2018-01-16 9:48:37 |
| created_in | Account Created in. Defines the Website the account has been created in | You need to specify the name of the store view. You can find it at Stores > All Stores > Click the required store view in the Store View column and find its Name | Default Store View |
| disable_auto_group_change | Disable Automatic Group Change Based on VAT ID | 1 – the automatic group change is disabled
0 – the automatic group change is enabled |
0 |
| dob | Date of Birth of the customer | The date should be in the following format yyyy-mm-dd | 1973-12-15 |
| failures_num | The number of incorrect login attempts. Works with Maximum Login Failures to Lockout Account setting | Any numeral value | 0 |
| first_failure | First Failure Date. The date of the first failed login attempt | The date should be in the following format yyyy-mm-dd hh:mm:ss | 2018-03-30 8:33:01 |
| firstname | First Name of the customer | Any characters allowed | John |
| gender | The gender of the customer | Male
Female leave blank if not specified |
Male |
| group_id | Id of the Customer Group the customer belongs to | The ID of the Customer Group can be found under Customers > Customer Groups. In ID column | 2 |
| lastname | Last Name of the customer | Any characters allowed | Doe |
| lock_expires | Defines the date when the account lock expires. | The date should be in the following format yyyy-mm-dd hh:mm:ss | 2018-03-30 8:33:01 |
| middlename | Middle Name/Initial of the customer | Any character value allowed | D |
| password_hash | A hash value of the customer account password | Proper hash value | testhashvalue123 |
| prefix | Name Prefix of the customer | Any character value | Mr. |
| rp_token | Reset the password token of the customer account | Proper token value | testtoken123 |
| rp_token_created_at | The date the password had been reset | The date should be in the following format yyyy-mm-dd hh:mm:ss | 2018-01-16 9:48:37 |
| store_id | ID of the store the customer belongs to | Numeric store ID | 1 |
| suffix | Name Suffix of the customer | Any character value | Jr. |
| taxvat | Tax/VAT Number of the customer | Proper VAT value | EU555555555 |
| updated_at | Date when the customer’s account was last updated | The date should be in the following format yyyy-mm-dd hh:mm:ss | 2018-02-21 13:01:41 |
| website_id | The ID of the website the customer belongs to | Numeric website ID | 1 |
| _customer_group_code | A code of the Customer Group | The group_id has higher priority than _customer_group_code. So if values are different, the import will take the value from the group_id attribute | General |
| _tax_class_name | A name of a tax class. This tax class is assigned to the Customer Group of a customer | The _tax_class_name attribute has lower priority than _tax_class_id | Retail Customer |
| _tax_class_id | An ID of a tax class. This tax class is assigned to the Customer Group of the exported customer | Numeric tax class ID | 3 |
| password | If you want to change the password to the customer’s account this is the column you type it in. | Any values supported by the password field | testpassword123 |
✅ Use this format if you’re only uploading accounts and plan to import addresses separately later
Magento 2 Customer Addresses Attributes
The Customer Addresses entity is meant for importing billing and shipping address data. Each address is linked to an existing customer account using the _email field. This format is ideal if you’ve already imported accounts or only need to update address data.
As with the Customers Main File, you can get a complete CSV sample with all the attributes described from the .
The attributes required for a successful Magento customer import include:
| Attribute Name | Reference | Values | Value Example |
| _website | Defines to which website the customer belongs | To find the value for the column navigate to Stores > All Stores > Click the required Website in the Website column and find its Code | base |
| _email | Email of the customer | Make sure to properly paste the email address with the domain | john.doe@test.com |
| _entity_id | Internal ID of the customer address used for identification purposes inside of Magento 2 | Numeral value | 1 |
| city | City of the customer | Can be any character value | Calder |
| country_id | Country of the customer | For a full list of country IDs refer to the | FireBear Studio |
| company | Company of the customer | Can be any value | DE |
| fax | Fax of the customer | Can be any numeral value | 5555555555 |
| firstname | Customer’s first name | Can be any character value | John |
| lastname | Customer’s last name | Can be any character value | Doe |
| middlename | Customer’s middle name | Can be any character value | D |
| postcode | The postcode of the customer | Can be any numeral value | 12345 |
| prefix | Customer’s name prefix | Can be any character value | Mr. |
| region | Region of the country of the customer | Refer to the for the proper region name or state code. Both can be entered in this field | BRG |
| region_id | Region ID of the country of the customer | Refer to the for proper region ID | 83 |
| street | Name of the street of the customer | Can be any character or numeric value | Test 23 |
| suffix | Customer’s name suffix | Can be any character value | Jr. |
| telephone | Customer’s telephone number | Can be any numeral value | 5555555555 |
| vat_id | Customer’s VAT | Can be any proper VAT value | EU555555555 |
| vat_is_valid | VAT number validity | 1 – the VAT number is valid
0 – the VAT number is not valid |
0 |
| vat_request_date | VAT number validation request date | The data format is:
yyyy/mm/dd |
2018-02-21 |
| vat_request_id | VAT number validation request ID | Proper validation request ID | 20 |
| vat_request_success | VAT number validation request success | 1 – success
0 – failure |
1 |
| _address_default_billing_ | Defines if the imported address of the customer is the default for Billing | 1 – the address is the default
0 – the address is not the default |
1 |
| _address_default_shipping_ | Defines if the imported address of the customer is default for Shipping | 1 – the address is the default
0 – the address is not the default |
1 |
🧩 This option is helpful when syncing or correcting address data independently from customer accounts.
Magento 2 Customers and Addresses Attributes
If you need to import both account details and address data in one go, the Customers and Addresses entity is your best choice. This is the most comprehensive option and helps reduce manual steps.
However, it’s important to note that you cannot compose this type of table by combining the attributes from the latter two. A successful Magento 2 import of customers requires proper attribute naming, as described in our .
Or you can use the table below to compose a CSV or for reference purposes.
| Attribute Name | Reference | Values | Value Example |
| increment_id | Unique customer address identifier which you can use to import multiple addresses for a single customer. Use the same value for every unique customer with different addresses. | Only numerals allowed | 12 |
| Email of the customer | Make sure to properly paste the email address with the domain | john.doe@test.com | |
| _website | Associate to Website. Defines to which website the customer belongs | To find the value for the column navigate to Stores > All Stores > Click the required Website in the Website column and find its Code | base |
| _store | The Store View customer belongs to | To find the value for the column navigate to Stores > All Stores > Click the required Store in Stores column and find its Code | default |
| confirmation | Confirmed email. Defines whether customer has confirmed their email address associated with their account | 1 – the email address has been confirmed
0 – customer needs to confirm the email address |
1 |
| created_at | Account Created. Defines the date and time the account has been created | The data format is:
yyyy/mm/dd hh:mm:ss The time format uses 24 hour clock |
2018-01-16 9:48:37 |
| created_in | Account Created in. Defines the Website the account has been created in | You need to specify the name of the store view. You can find it at Stores > All Stores > Click the required store view in the Store View column and find its Name | Default Store View |
| disable_auto_group_change | Disable Automatic Group Change Based on VAT ID | 1 – the automatic group change is disabled
0 – the automatic group change is enabled |
0 |
| dob | Date of Birth of the customer | The date should be in the following format yyyy-mm-dd | 1973-12-15 |
| firstname | First Name of the customer | Any characters allowed | John |
| gender | The gender of the customer | Male
Female leave blank if not specified |
Male |
| group_id | The ID of the Customer Group the customer belongs to | The ID of the Customer Group can be found under Customers > Customer Groups. In ID column | 2 |
| lastname | Last Name of the customer | Any characters allowed | Doe |
| middlename | Middle Name/Initial of the customer | Any character value allowed | D |
| password_hash | A hash value of the customer account password | Proper hash value | ef55cebdb2034a89 |
| prefix | Name Prefix of the customer | Any character value | Mr. |
| rp_token | Reset the password token of the customer account | Proper token value | 09ae7838f74dc08343252255d7c69bf8 |
| rp_token_created_at | The date the password had been reset | The date should be in the following format yyyy-mm-dd hh:mm:ss | 2018-01-16 9:48:37 |
| store_id | ID of the store the customer belongs to | Numeric store ID | 1 |
| suffix | Name Suffix of the customer | Any character value | Jr. |
| taxvat | Tax/VAT Number of the customer | Proper VAT value | EU555555555 |
| website_id | ID of the website the customer belongs to | Numeric website ID | 1 |
| password | If you want to change the password to the customer’s account this is the column you type it in | Any values supported by the password field | testpassword123 |
| _address_city | City of the customer | Can be any character value | Potsdam |
| _address_company | Company of the customer | Can be any value | FireBear Studio |
| _address_country_id | ID the customer’s country | For a full list of country IDs refer to the Country and State Codes sheet of this table | DE |
| _address_fax | Fax of the customer | Can be any numeral value | 5555555555 |
| _address_firstname | The customer’s first name for the address | Can be any character value | John |
| _address_lastname | The customer’s last name for the address | Can be any character value | Doe |
| _address_middlename | The customer’s middle name for the address | Can be any character value | D |
| _address_postcode | The postcode of the customer | Can be any numeral value | 12345 |
| _address_prefix | Customer’s name prefix for address | Can be any character value | Mr. |
| _address_region | Region of the country of the customer | Refer to the Country and State Codes sheet of this table for the proper region name or state code. Both can be entered in this field | BRG |
| _address_street | Name of the street of the customer | Can be any character or numeric value | 83 |
| _address_suffix | The customer’s name suffix for the address | Can be any character value | Jr. |
| _address_telephone | The customer’s telephone number | Can be any numeral value | 5555555555 |
| _address_vat_id | The customer’s VAT for the address | Can be any proper VAT value | EU555555555 |
| _address_default_billing_ | Defines if the imported address of the customer is the default for Billing | 1 – the address is the default
0 – the address is not the default |
1 |
| _address_default_shipping_ | Defines if the imported address of the customer is default for Shipping | 1 – the address is the default
0 – the address is not the default |
1 |
Choosing the correct import entity depends on whether you’re:
- Adding customers only
- Updating addresses
- Importing everything in a single CSV
The proper attribute structure is key to avoiding validation errors and ensuring your Magento 2 customer import succeeds. For enhanced compatibility and simplified mapping, use the Firebear Improved Import & Export extension, which supports all three entities with additional features like custom field mapping, Google Sheets integration, and scheduled imports. However, let’s look at the default workflow first.
How to Import Customers into Magento 2 Using the Default Import Tool
Magento 2 offers a built-in Import feature that allows store admins to upload customer data directly from the admin panel. While it lacks advanced capabilities like attribute mapping or scheduled imports, it’s still a reliable solution for basic operations, especially when working with clean CSV files and default attribute sets.
Here’s a step-by-step walkthrough of how to import customers into Magento using the default tools.
Step 1: Prepare Your Customer Import CSV
Before you begin, download the correct Magento 2 customer import sample CSV:
- Navigate to System → Data Transfer → Import
- Under Entity Type, choose:
- Customers Main File to import account data only
- Customer Addresses to import address data
- Customers and Addresses to upload both
Click the Download Sample File link to get the proper CSV structure. Make sure to fill it in carefully, following Magento’s formatting requirements (UTF-8, comma-separated, correct website/store codes, etc.).
Step 2: Access the Magento 2 Import Tool
- From the admin panel, go to System → Data Transfer → Import
- In the Entity Type dropdown, select the appropriate option based on your CSV
- Set Import Behavior:
- Add/Update Complex Data – to insert or update existing customers
- Replace Existing Complex Data – to fully replace customer records
- Delete Entities – to remove customer entries (only works with entity IDs)
Step 3: Upload the File
- Under Select File to Import, choose your prepared CSV
- Enable Field Separator and Multiple Value Separator if your file uses non-standard delimiters
- Use Validation Strategy to determine how Magento handles errors (skip vs. stop)
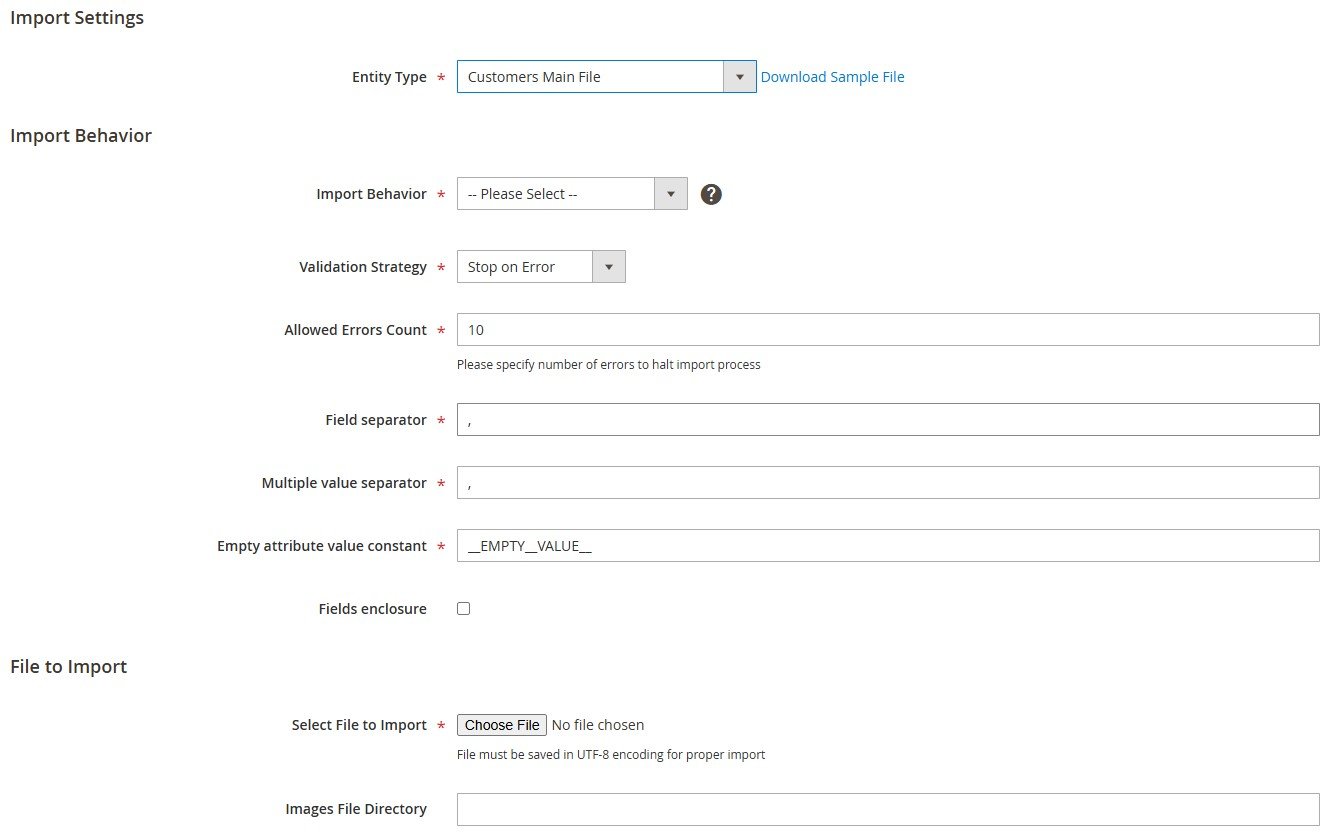
Click Check Data to validate the file. If everything is correct, Magento will show a success message.
Step 4: Run the Import
After validation:
- Click Import to begin processing your file
- Magento will queue the job and execute it based on the import size
You can monitor results in the admin panel or re-import if any rows were skipped due to formatting issues.
Limitations of the Default Magento Customer Import
While the default import feature is serviceable, it does come with some limitations:
- No support for external systems or APIs
- No visual attribute mapping
- Limited error reporting
- Manual file upload only — no support for scheduled or automated imports
- Password hashes must match Magento’s encryption methods or the import will fail
For larger or more complex customer data transfers, these limitations can become blockers. That’s where enhanced solutions like the Firebear Improved Import & Export extension provide significantly more flexibility and control.
Step-by-Step Magento 2 Customer Import with Improved Import & Export
If you’re wondering how to streamline the Magento 2 import of customers, Firebear’s Improved Import & Export extension offers a faster, more flexible, and more powerful solution than the default Magento tool. It supports multiple file types, advanced scheduling, Google Sheets integration, and automatic attribute mapping, making customer imports far easier and more scalable.
Here’s how to import customers into Magento 2 using the Improved Import & Export extension.
Step 1: Create a Customer Import Job
To start, go to your admin panel and navigate to:
System → Improved Import / Export → Import Jobs
- Click Add New Job
- Give the job a descriptive name (e.g., “Customer Import – June 2025”)
- Choose the job schedule (e.g., daily, weekly) if you want automation
- Select the appropriate store view or locale
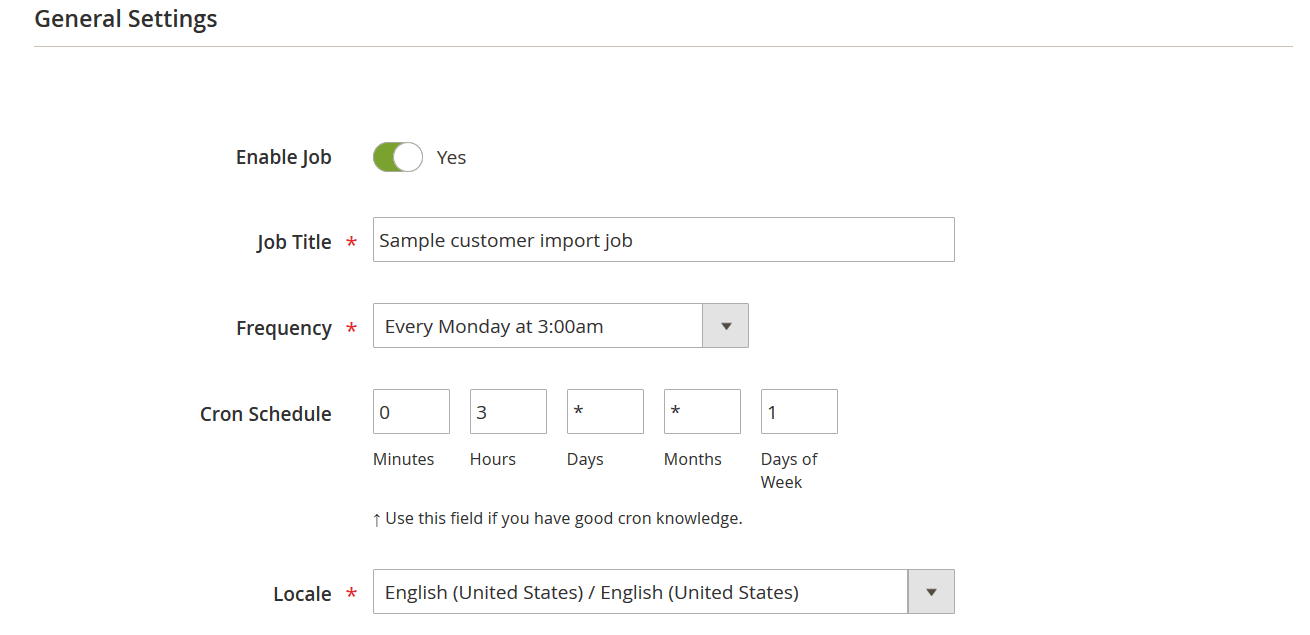
💡 Note: Magento’s native import tool does not support job scheduling — this is one of the key advantages of using the Firebear extension.
Step 2: Select Import Entity and Behavior
Choose one of the available entity types for importing customers:
- Customers Main File – for account data only
- Customer Addresses – for billing/shipping addresses
- Customers and Addresses – to import everything in a single file

Then, configure your import behavior:
- Add/Update – Adds new customers and updates existing ones
- Replace – Replaces existing records with new ones
- Delete – Removes customer records
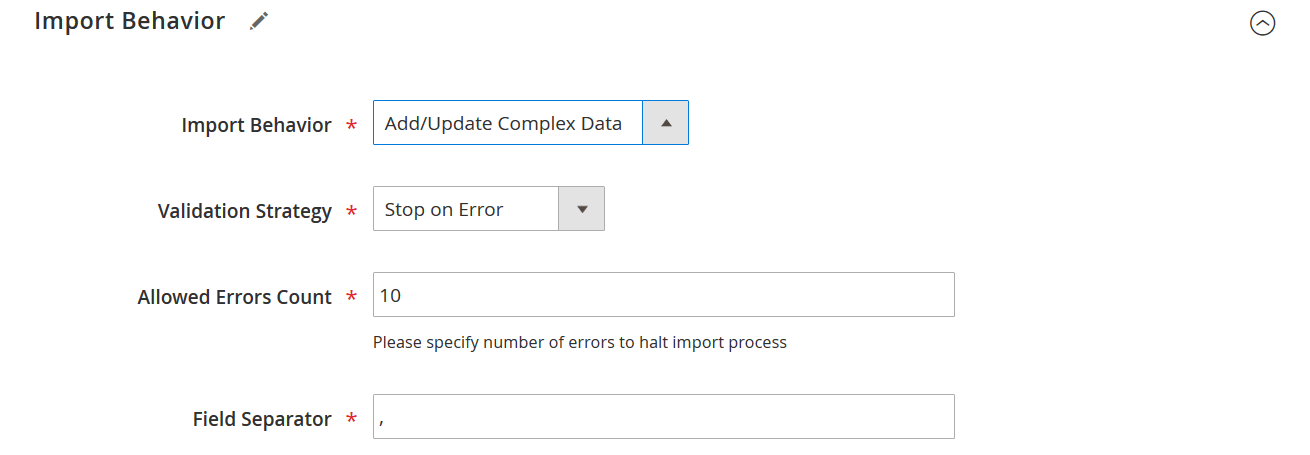
Additional options:
- Choose Stop on Error or Skip Error Entries
- Set the maximum number of errors allowed before aborting
- Define field and multi-value separators (e.g., comma, semicolon)
- Enable Field Enclosure if your CSV contains quoted text fields
This level of customization goes beyond the standard Magento import of customers.
Step 3: Choose File Type and Import Source
Unlike the native Magento importer, Firebear supports various file formats, not just CSV:
- CSV (Magento default)
- XML
- XLSX
- ODS
- JSON
You can also choose from multiple import sources:
- Manual Upload
- FTP/SFTP
- Direct URL
- Google Sheets
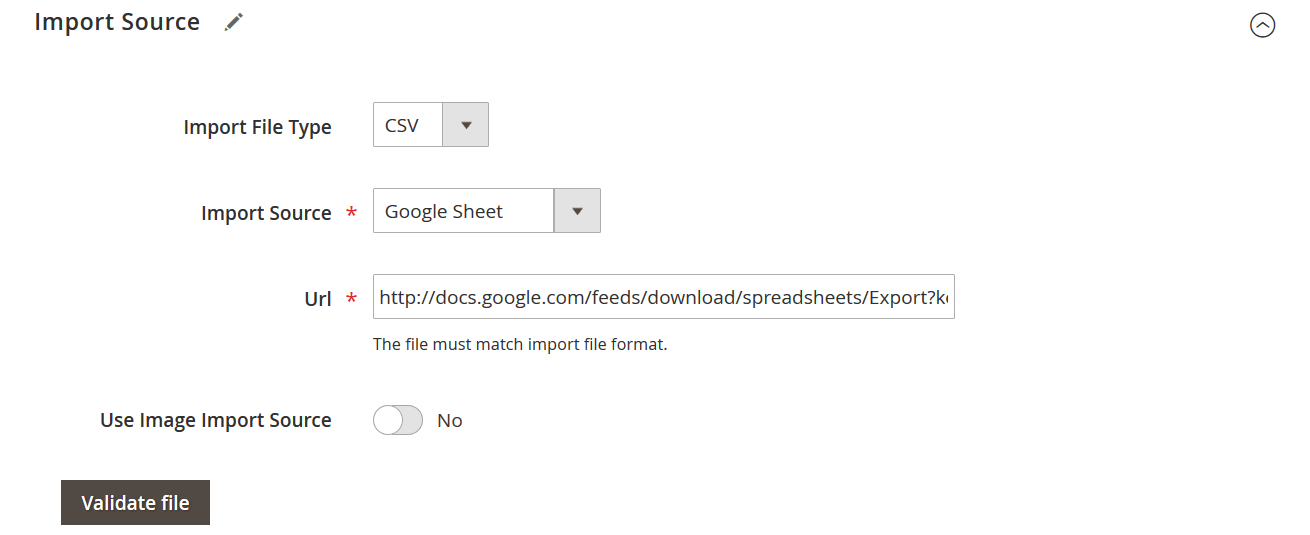
For example, if your team collaborates via a shared Google Sheet, simply paste the link and schedule automatic imports. This eliminates back-and-forth coordination and manual data updates.
After uploading your file, click Validate File to ensure everything is formatted correctly and ready for import.
Step 4: Map Attributes to Magento 2 Format
Magento requires specific attribute naming conventions. If your CSV contains third-party column names, you’ll need to map them to Magento 2-compatible ones. Fortunately, Firebear makes this easy:
- Use the Mapping Preset to auto-map based on the source system (e.g., Shopify, Salesforce)
- Or manually map:
- Magento Attribute → select from dropdown
- CSV Column → choose matching columns from your file
- Default Value → fallback for empty cells
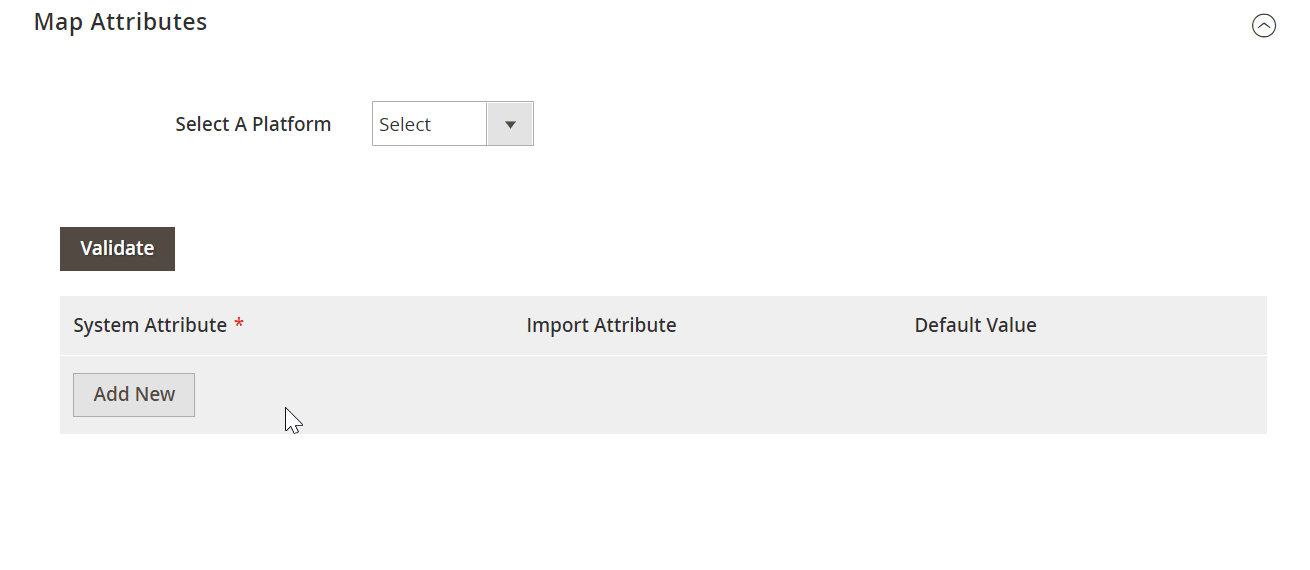
Repeat this for all necessary fields. This step is critical to ensure your “Magento import customers” CSV matches Magento’s structure.
Step 5: Run the Import
Once everything is configured:
- Click Save & Run
- Click Run on the job you just created
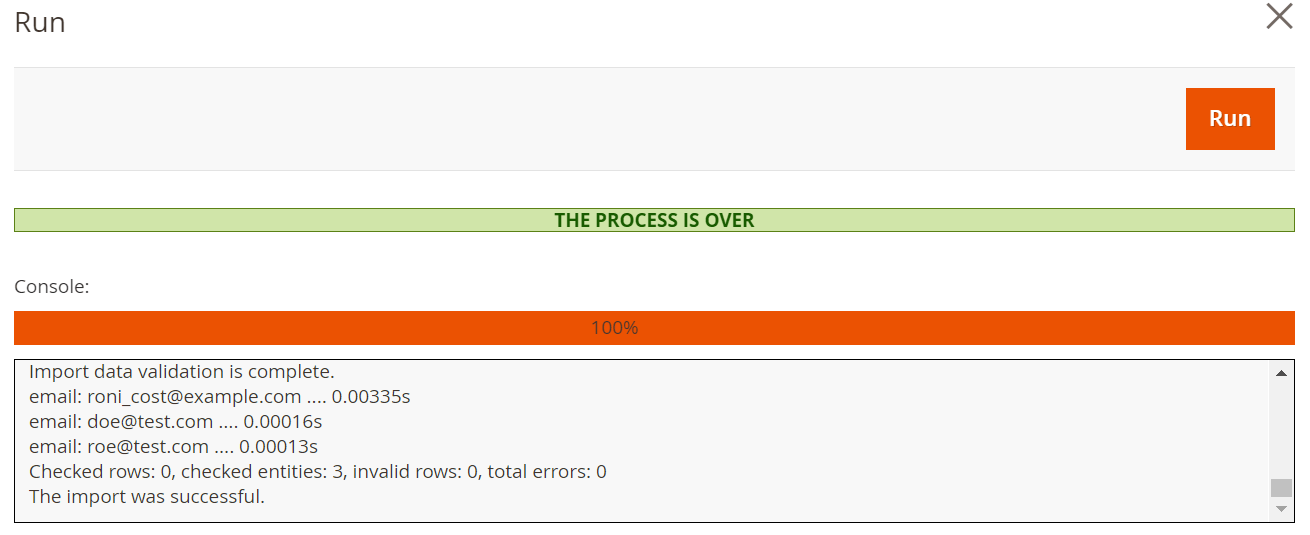
The import process will begin immediately. Once complete, the module will generate a detailed log with the results, listing successful entries and any errors encountered.
Why Use Firebear’s Improved Import & Export Extension Over the Default Tool?
While Magento 2 includes a built-in customer import tool, it’s limited in flexibility, automation, and data source support. For businesses handling large volumes of customer data or migrating from external systems, these limitations often result in extra manual work, increased error rates, and rigid workflows.
That’s where the Firebear Improved Import & Export extension transforms the experience. It’s built to handle complex data transfer needs with minimal effort, and without writing a single line of code.
Unlock Powerful Features Not Available in Magento’s Default Importer
Here’s how Firebear’s solution goes far beyond the native Magento 2 capabilities:
- Automated Customer Imports with Cron Jobs. Schedule your imports to run hourly, daily, or weekly via cron. You can even launch jobs manually from the admin panel or command line (CLI). This feature is essential for keeping customer data synced with external platforms in real time — something Magento 2 doesn’t offer by default.
- Advanced Attribute Mapping and Presets. With flexible mapping rules, you can match any third-party attribute structure to Magento’s required format. Use presets for Magento 1, Shopify, or other common platforms to reduce setup time during migrations.
- Multi-Format File Support. Unlike the default tool that only accepts CSV, Firebear supports CSV, XML, XLSX, ODS, and Google Sheets. Whether you’re exporting from a CRM or a supplier’s database, you can work with the format that suits your process best.
- Third-Party Integration and API Support. Need to import customer data from a CRM or ERP? Firebear supports API-based data sync and integration with external systems via FTP, SFTP, direct URLs, or even Dropbox. This makes syncing external customer records with Magento seamless and error-free.
- Support for Complex Data Structures. The extension allows importing not only customers and their addresses, but also products, categories, orders, invoices, and tier prices. You can even create configurable products on the fly, set static attribute values, and use filters to fine-tune your data before import.
Magento 2 Customer Import: Default Tool vs. Firebear Improved Import & Export
| Feature | Magento 2 Default Import Tool | Firebear Improved Import & Export Extension |
| Supported File Formats | CSV only | CSV, XML, XLSX, ODS, Google Sheets |
| Import Entities | Customers, Customer Addresses, Customers & Addresses | All default entities + products, orders, categories, invoices, and more |
| Import Sources | Local file upload | Local, FTP/SFTP, URL, Dropbox, Google Sheets |
| Automation (Cron Jobs) | ❌ Not supported | ✅ Flexible scheduling (cron, manual, CLI) |
| Attribute Mapping | ❌ Manual pre-formatting required | ✅ Visual mapping UI + presets for Shopify, Magento 1, etc. |
| Error Handling | Basic error output | Detailed logs, skip or stop on error, configurable thresholds |
| User Interface | Basic Magento admin panel | Enhanced UI with import/export dashboards |
| External Integrations (e.g., CRM, ERP) | ❌ Not supported | ✅ Supported via API, remote file sync, and automation |
| Multi-Language & Multi-Store Support | Limited | Full support for store views, locales, and website scope |
| Password Import Support | Hashes only (specific format) | ✅ Supports hashes + password field |
| Use Case | Simple, one-time imports | Scalable, automated, and recurring imports |
| Learning Curve | Basic setup | Beginner-friendly with rich documentation |
If you’re serious about optimizing your Magento 2 import customers process, the Firebear Improved Import & Export extension is more than just a time-saver — it’s a future-proof data management tool. Whether you’re importing thousands of customers, syncing address records, or integrating with a third-party CRM, Firebear gives you the automation, flexibility, and reliability Magento’s core import lacks.
Common Import Errors and Fixes
Importing customers into Magento 2 isn’t always smooth, especially when working with large datasets or third-party CSV formats. Below are some of the most common Magento 2 customer import errors and how to resolve them. We’ll also show how the Firebear Improved Import & Export extension can help you avoid these issues entirely.
1. Invalid Value in Column ‘website’
Cause: The value in the _website column doesn’t match any existing website codes in your Magento setup.
Fix:
- Go to Stores → All Stores
- Locate your website and use the value from the “Code” column, not the name (e.g., base, not Main Website)
Firebear Advantage: The extension auto-validates website codes during the mapping phase and lets you apply a default value if none is set.
2. Customer with the Same Email Already Exists
Cause: The import attempts to create a customer that already exists in the database with the same email.
Fix:
- Change Import Behavior to Add/Update
- Ensure the customer is assigned to the same website as the one in your import file
Firebear Advantage: The “Add/Update” mode is fully supported and can be automated to keep records current without manual cleanup.
3. Invalid Value in Column ‘group_id’
Cause: The value in the group_id field doesn’t match any existing customer group ID.
Fix:
- Go to Customers → Customer Groups
- Use the numeric ID (not the group name), which you’ll find in the ID column
Firebear Advantage: Allows mapping group_code or custom field names to the correct internal group_id dynamically.
4. Missing Required Fields
Cause: Required columns like email, firstname, or _website are missing or empty in one or more rows.
Fix:
- Double-check your CSV for empty cells in required columns
- Make sure column headers are correctly named and not misspelled
Firebear Advantage: Automatically highlights missing fields during validation and allows you to set default values for empty cells.
5. Address Import Fails Due to Region/Country Mismatch
Cause: When importing addresses, the region or region_id does not correspond to the selected country_id.
Fix:
- Refer to Magento’s list of supported country and region codes
- Ensure the region_id matches the correct state/province in the given country
Firebear Advantage: Built-in dropdowns and mapping options help align imported region values to Magento’s expected codes without manual correction.
6. Invalid Password Hash or Password Field
Cause: Password hashes from another platform are not compatible with Magento’s encryption format.
Fix:
- Use the password_hash field only with supported encryption (e.g., SHA256 for Magento 1)
- Alternatively, import plain text passwords into the password field if allowed
Firebear Advantage: Accepts either field and can apply secure hashing automatically when configured.
7. Multi-Value Fields Not Parsed Correctly
Cause: The file uses a separator (like a semicolon or pipe) that Magento doesn’t recognize by default.
Fix:
- Define the correct field separator and multi-value separator during the import setup
- Reformat the CSV if necessary
Firebear Advantage: Lets you define any separator format and supports enclosure settings for even the most non-standard files.
Conclusion: Simplify Magento 2 Import of Customers with the Right Tools
Importing customers into Magento 2 doesn’t have to be a time-consuming or error-prone process. Whether you’re working with the Customers Main File, Customer Addresses, or the combined Customers and Addresses CSV, the key to a successful import lies in understanding the structure, required attributes, and correct formatting.
While Magento’s default import tool provides basic functionality, it often falls short for more complex scenarios, especially when you’re dealing with third-party data, recurring syncs, or large customer databases.
That’s where the Improved Import & Export for Magento 2 comes in. Our extension simplifies and supercharges the Magento import customers process by allowing:
- Flexible file format support (CSV, XLSX, XML, JSON, Google Sheets)
- Visual attribute mapping
- Automated cron jobs
- Direct integrations with CRMs, ERPs, and cloud sources
You don’t need to restructure your CSVs or manually edit columns anymore. Just map your fields once and let the extension handle everything — from validation to import automation.
🔁 Ready to streamline your Magento 2 customer import workflow?
👉 Get the Firebear Improved Import & Export Extension
Take full control of your data and spend less time importing and more time growing your business. Follow our Ultimate Magento 2 Import Guide for more information.
FAQ: Magento 2 Import – Customers
What file formats are supported for Magento 2 customer import?
By default, Magento 2 supports only CSV files for customer import. However, with the Firebear Improved Import & Export extension, you can also import customers using XML, XLSX, ODS, and even Google Sheets.
Where can I download a Magento 2 customer import sample CSV?
You can download a Magento 2 customer import sample CSV from the admin panel under System → Data Transfer → Import. Alternatively, Firebear Studio offers a full library of sample CSVs and attribute references via GitHub and Google Sheets.
What are the main entity types for Magento 2 customer import?
Magento 2 supports three import entity types: Customers Main File (account data), Customer Addresses (address data), and Customers and Addresses (combined records).
How do I import customer addresses into Magento 2?
To import customer addresses, choose the “Customer Addresses” entity during import. Ensure your CSV includes required fields like _email, street, postcode, city, country_id, and telephone.
Can I import both customers and their addresses at the same time?
Yes, you can use the “Customers and Addresses” entity to import both account data and address details in a single CSV file. Make sure you follow the correct column structure unique to this entity.
What causes the “Invalid value in column ‘website’” error during import?
This error typically occurs when the _website value doesn’t match a valid website code. Always use the correct website code from Stores → All Stores (e.g., base).
How can I update existing customers during Magento 2 import?
Set the import behavior to “Add/Update” to update existing customers using their email as a unique identifier. This allows you to modify account or address details without creating duplicates.
Does Magento 2 support automated or scheduled customer imports?
Not by default. However, the Firebear Improved Import & Export extension supports cron jobs, letting you schedule Magento 2 customer import tasks automatically.
Can I import customers into Magento 2 from Google Sheets?
Yes, with Firebear’s extension, you can import customers directly from a Google Sheet by pasting the URL and mapping the columns. This is ideal for collaborative or cloud-based workflows.
How can I map third-party fields to Magento 2 attributes during import?
Magento’s default importer does not support attribute mapping. The Firebear Improved Import & Export module allows you to visually map external fields to Magento attributes and even save presets for future use.
Related posts
 Magento 2 Export Customers Tutorial: Export Customer Data with Ease
 Magento 2 Bundle Product with Custom Options: Complete Guide to Benefits, Limits & Import
 Magento Inventory Management: A Complete Guide to Stock Optimization and Efficiency
 E-Commerce Impulse Buys Guide: Boost Your Sales with Effective Strategies and Smart Tools
 How to Migrate Customers from Magento 1 to Magento 2: Complete Guide with Improved Import & Export
 How to Merge Customers in Shopify: A Step-by-Step Guide
 How to Migrate Orders from Magento 1 to Magento 2: Complete Guide with Improved Import & Export
 Magento SEO Guide 2025: Ultimate Checklist for Magento 2 Optimization