
Magento 2 Shipping Tracking Guide: How to Import & Export Order Tracking Numbers
![]()
Managing Magento shipping tracking is one of the most important parts of providing a smooth post-purchase experience. Customers expect real-time updates on their orders, and while Magento 2 makes it easy to display product details, handling Magento 2 order tracking numbers is far more complex. By default, the platform doesn’t allow you to import tracking data directly from external systems, making it difficult to automate integrations with shipping providers.
That’s where the Improved Import & Export extension changes the game. With it, you can seamlessly import and export tracking numbers in bulk, connect Magento 2 to carrier platforms, and keep order statuses updated automatically. This means no more manual data entry, fewer errors, and a faster order fulfillment process — all while enhancing Magento 2 shipment tracking for your customers.
In this guide, we’ll walk you through importing and exporting Magento order tracking information step by step. You’ll discover all the tracking-related features the extension offers, learn how to set up automation, and explore additional tools to keep your shipping operations running efficiently.

Table of contents
- What Is Magento Shipping Tracking and Why Does It Matter?
- Default Magento 2 Tracking Number Management — Limitations
- How to Import Shipping Tracking Numbers in Magento 2
- How to Export Shipping Tracking Numbers from Magento 2
- Common Issues When Working With Magento Tracking Numbers and How to Fix Them
- Magento Order Tracking Integration With Shipping Carriers
- Final Words — Simplifying Magento 2 Shipping Tracking
- FAQ: Magento 2 Shipping Tracking
What Is Magento Shipping Tracking and Why Does It Matter?
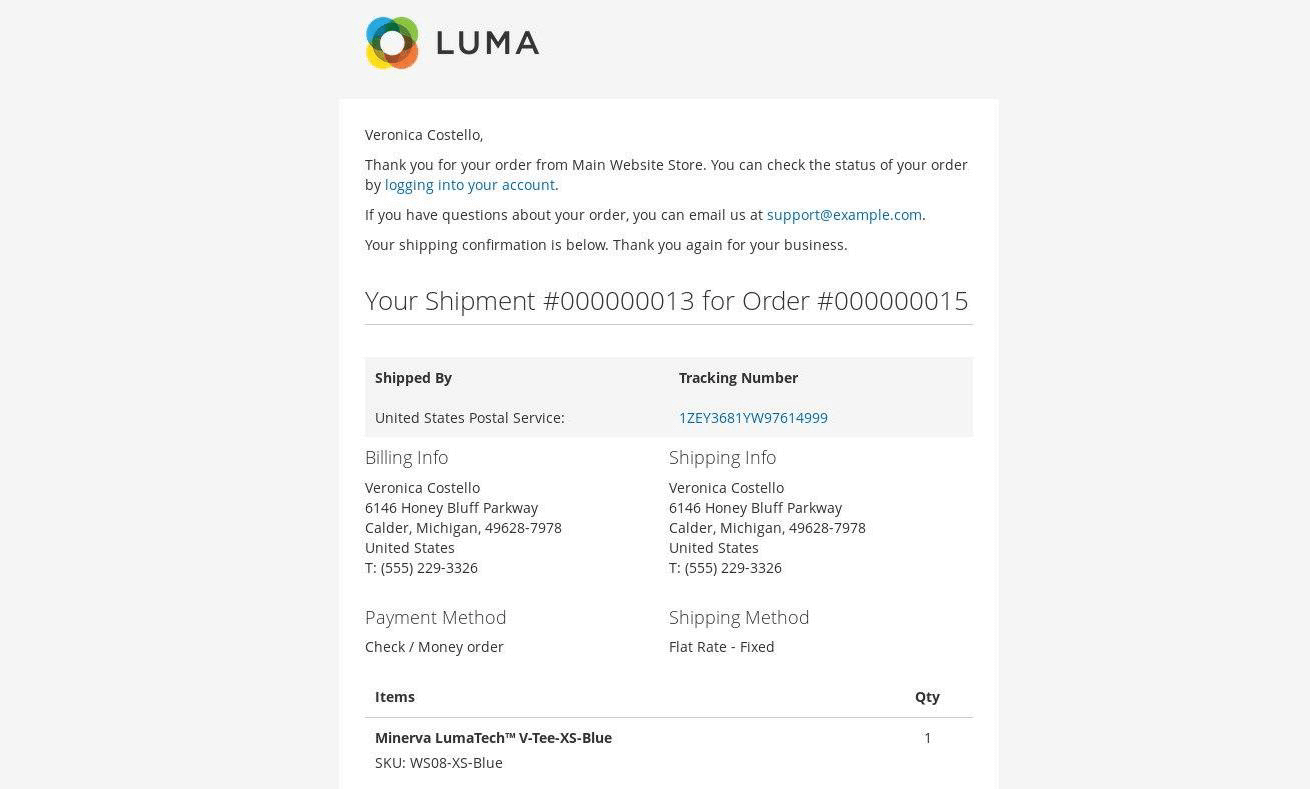
Magento shipping tracking is the process of recording and managing tracking numbers for customer orders so both store administrators and buyers can monitor the shipment’s journey. In Magento 2, tracking numbers are linked to shipments and carriers, enabling real-time order status updates through the store’s backend and customer-facing interfaces.
From the admin side, the Magento order tracking system allows store owners to assign carrier information and tracking numbers to each order. This data syncs with shipping providers, making it possible to follow the package from dispatch to delivery. For customers, Magento 2 order tracking means they can log in to their account, view their order history, and click a tracking link to see the latest shipping updates directly from the carrier.
Efficient shipping tracking plays a critical role in customer satisfaction. When buyers can easily access real-time updates, they feel informed and reassured about their purchase. This reduces the number of “Where is my order?” inquiries, lowering the strain on your customer service team. A well-implemented Magento shipping tracking process not only builds trust but also strengthens your brand’s reputation for reliability.
Default Magento 2 Tracking Number Management — Limitations
By default, Magento 2 tracking relies on a manual process tied to shipment creation. To add a tracking number, a store administrator must open an order in the backend, create a shipment, and manually enter carrier details and the tracking code. This works for single orders but becomes a bottleneck when handling dozens or hundreds of shipments per day.
Here’s how it works in the native Magento order tracking workflow:
- From the Admin panel, go to Sales → Orders, open the desired order, and click Ship (available only after payment and invoicing).
- In the shipment form, scroll to the Payment & Shipping Method section and click Add Tracking Number.
- Select the carrier from the list (e.g., DHL, FedEx, UPS, USPS, or Custom Value), enter the package title, and input the tracking number.
- Save the shipment to record the details, and optionally send an email to the customer with the tracking link.
![]()
While functional, this method has clear limitations. Magento 2 doesn’t support bulk tracking number imports out of the box, meaning you can’t upload a CSV or XML file with tracking data from your shipping provider. Instead, you must enter each tracking number one by one — a time-consuming and error-prone process that slows down fulfillment.
💡 Want to see the default process in detail? Check the on creating shipments and adding tracking numbers for step-by-step instructions.
For growing businesses, this lack of bulk processing is a serious barrier to efficiency. Without automation, Magento 2 shipment tracking updates can’t be easily synchronized with third-party systems, and real-time order status updates may be delayed. As a result, customers may not receive timely shipping notifications, and your team may spend unnecessary hours on repetitive manual tasks.
How to Import Shipping Tracking Numbers in Magento 2
The Improved Import & Export extension makes Magento shipping tracking import simple, allowing you to bulk upload tracking numbers directly into your store without manual data entry. Tracking numbers are imported as part of the “Orders” entity, which contains all order-related data, including shipment and carrier information. This means you can perform a Magento 2 import tracking number update in just a few clicks, whether you need to add tracking details for dozens or thousands of orders.
Pre-requisites for Importing Tracking Numbers
Before starting the import, make sure you meet these requirements:
- Tracking numbers can only be imported for orders that already exist in Magento 2.
- The orders must have shipments created beforehand.
- Product SKUs and quantities assigned to each shipment must be specified in your import file.
- Shipments and invoices can be created automatically during the import only if you enable the related options in the job configuration.
💡 Tip: If the “Send Email from New Tracks” option is enabled, customers will automatically receive a notification email with their tracking number once it’s imported.
Magento Shipping Tracking Attributes
The table below lists the required attributes for a Magento order tracking number upload. These map your import file to Magento 2’s order and shipment data:
| Attribute name | Reference | Values | Value example |
| increment_id | The order number used to identify the order in the tracking number that should be imported | Order number displayed under Sales > Orders | Can be any value depending on the increment pattern you use |
| shipment_track:track_number | Tracking number of the shipping | Can be any value, depending on the increment pattern you use for the orders | 4555555555 |
| shipment_track:title | Shipping service name | Can be located under Stores > Shipping > Carriers | Depends on the carrier you are using |
| shipment_track:carrier_code | Shipping service code | Can be located under Stores > Shipping > Carriers | Depends on the carrier you are using |
| shipment_track:skus | List of shipped items under the tracking code with their SKUs and quantity | Can be found within the order information at Sales > Order > Order Page | WSH09-29-Green:1;WSH09-29-White:1 |
You can download a sample tracking code import file from our .
Why Tracking Code Import Is a Game-Changer
By importing tracking codes in bulk, you can instantly attach shipment details to multiple orders at once. Combined with SKU and quantity data, this also enables the system to:
- Auto-generate invoices and shipments upon import.
- Update order statuses from “Pending” to “Shipped” in a single job run.
- Eliminate repetitive manual entry and reduce the risk of errors.
Step-by-Step: How to Import Orders with Tracking Numbers
- Prepare your CSV file — Ensure all required tracking attributes are filled in.
- Go to System → Improved Import/Export → Import Jobs in the Magento Admin panel.
- Click Add New Job to create a new import job.
- In the Entity dropdown of Import Settings, select Orders.

- Now, return to General Settings and enable automated creation of shipments and invoices. Enable the related options in the job configuration:
– Auto generating shipment by track info
– Auto generating invoice by track info

- Configure Import Behavior and Field Separators according to your file format.
- Choose the file format (CSV, Google Sheets, etc.) and import source (local file, FTP/SFTP, Google Drive, Dropbox, or URL).
- Click Validate to ensure your file formatting matches Magento requirements.
- If validation passes, click Run to start the import.
Once the job completes, Magento 2 will process your Magento shipping tracking import and update orders with the provided tracking numbers. If enabled, customers will immediately receive shipment emails with tracking links.
📌 Want to learn more about order imports and advanced automation? Check out our detailed guide: How to Import Orders to Magento 2
How to Export Shipping Tracking Numbers from Magento 2
If you need a Magento export tracking numbers workflow for reporting, logistics, or integration with ERP and shipping platforms, the Improved Import & Export extension makes it straightforward. You can create a Magento shipping tracking export that not only includes tracking numbers but also shipment details, product data, invoices, and any other order-related fields.
Step-by-Step: Magento Order Tracking Export
- Create a New Export Job. Go to System → Improved Import/Export → Export Jobs and click Add New Job.
Give your job a descriptive name and set a schedule if you want it to run automatically at regular intervals. - Configure the Export Settings. In Export Settings, select Orders as your entity. If you only need new tracking data since your last export, enable Consecutive Export — this will export only the orders created after the previous job run.
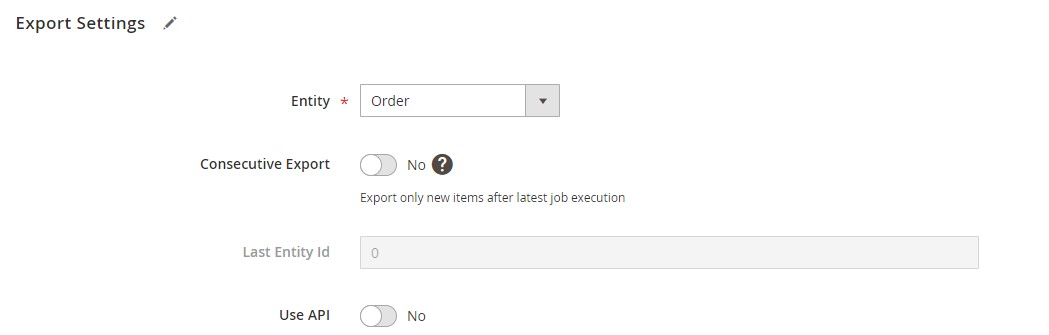
- Choose Your Format. In Export Behavior, select your preferred file format (CSV, XML, etc.) and configure separators.
- Under Export Source, choose where to send the file — local storage, FTP/SFTP, Google Sheets, Dropbox, or a direct URL for quick access.
- Include Order Product Data (Optional). If you need product-level details in your Magento order tracking export, use the Order Entities filter and check Products of Order. This includes SKU, name, price, and quantity for each shipped item.
For a simpler export, select Items of Order for a standard order summary without additional product attributes.

- Map and Filter (Optional). Use field mapping to align Magento’s data with the exact structure required by your ERP, analytics tool, or shipping platform.
Apply filters to narrow results by order status, date range, or customer group. - Run the Export. Once all settings are configured, click Run the Job. Your file will be generated and available to download from the export job screen or automatically sent to your chosen destination.
With this method, you can create a Magento order tracking export that’s rich in detail, highly customizable, and ready for use in any reporting or integration process. Unlike native Magento tools, the Improved Import & Export extension gives you complete control over the data you include and how it’s structured.
📌 More about advanced order export options: How to Export Orders in Magento 2
Common Issues When Working With Magento Tracking Numbers and How to Fix Them
Even with the right tools, Magento tracking issues can occur — from missing numbers to invalid carrier codes. Below is a list of the most frequent Magento tracking number problems, their likely causes, and how to resolve them quickly.
1. Mismatched Carrier Codes
Symptom: Tracking numbers don’t link to the carrier’s tracking page or appear as “Unknown Carrier.”
Cause: The shipment_track:carrier_code in your import file doesn’t match Magento’s predefined carrier codes.
Fix:
- Go to Stores → Shipping → Carriers in Magento Admin and verify the correct carrier codes.
- Update your CSV/XML import file to match these codes exactly.
Prevention Tip: Maintain a reference list of approved carrier codes for your logistics team.
2. Missing Tracking Numbers After Import
Symptom: The order appears shipped, but no tracking number is visible.
Cause: The shipment_track:track_number field was left blank or contained invalid characters.
Fix:
- Check your source file for empty or corrupted tracking fields.
- Re-import the corrected file using the Improved Import & Export extension.
Prevention Tip: Validate your file before import to catch empty or malformed tracking numbers.
3. Magento 2 Order Tracking Not Working for Customers
Symptom: Customers can’t see tracking info in their account or email.
Cause: The shipment wasn’t linked to the customer’s order or “Send Email from New Tracks” was disabled during import.
Fix:
- Re-import the tracking data with the email notification option enabled.
- Confirm that the tracking number is linked to the correct increment_id.
Prevention Tip: Always test one or two orders before running a bulk import.
4. CSV File Format Errors
Symptom: Import fails with “Invalid file format” or “Required field missing” errors.
Cause: Wrong column names, missing separators, or incorrect encoding.
Fix:
- Compare your file to the.
- Use UTF-8 encoding and the correct delimiter settings in the import job.
Prevention Tip: Save your CSV from a reliable editor that preserves formatting (e.g., LibreOffice, Google Sheets).
5. Duplicate Tracking Numbers
Symptom: Orders show multiple identical tracking entries.
Cause: The same tracking number was imported multiple times for the same shipment.
Fix:
- Filter your source file to remove duplicates before import.
- Enable “Replace” import behavior to overwrite existing tracking numbers instead of adding new entries.
Prevention Tip: Keep a clean export history to avoid re-importing old data.
6. Tracking Links Redirecting to Wrong Carrier
Symptom: Clicking the tracking link sends users to a different carrier’s site.
Cause: The carrier code and title are mismatched in the import file.
Fix:
- Ensure that shipment_track:carrier_code and shipment_track:title match the same carrier in Magento’s configuration.
Prevention Tip: Use a locked drop-down list in your tracking data sheet to avoid typos.
Magento Order Tracking Integration With Shipping Carriers
One of the strengths of Magento carrier tracking is its ability to integrate directly with major shipping providers such as USPS, FedEx, DHL, and UPS. When properly configured, these integrations allow tracking numbers entered in Magento 2 to sync with the carrier’s system, enabling real-time shipment updates for both store administrators and customers.
USPS Integration
With Magento 2 USPS tracking, you can connect your store to USPS Web Tools via an API key. Once linked, tracking numbers assigned to shipments automatically generate a clickable USPS link in the customer’s account and order confirmation emails. This gives buyers instant access to their package’s journey without leaving your store’s ecosystem.
FedEx Integration
For Magento 2 FedEx tracking, Magento’s shipping configuration allows you to enter your FedEx account number, meter number, and authentication keys. After setup, tracking numbers imported or entered in Magento sync with FedEx, providing precise location scans, delivery estimates, and proof-of-delivery information right from the tracking link.
DHL and UPS Integration
Similar to USPS and FedEx, DHL and UPS can be configured in Magento’s shipping settings. Carrier-specific credentials — such as API keys, account numbers, and passwords — are used to connect Magento to the carrier’s tracking system. Once set up, any tracking number linked to a shipment will automatically route to the correct DHL or UPS tracking page, showing live transit and delivery data.
How the Sync Works in Practice
When you add or import a tracking number into Magento 2, the system stores it alongside the shipment record with the corresponding carrier code. Magento then uses that carrier code to generate a tracking URL that points directly to the carrier’s tracking system. This means that any time a customer clicks the tracking link in their account dashboard or in a shipment email, they’re taken to the live carrier page, with updates pulled directly from the shipping provider.
This seamless integration reduces “Where is my order?” inquiries, speeds up customer service responses, and enhances the post-purchase experience. It also ensures your shipping process feels transparent and reliable, building trust and encouraging repeat business.
Final Words — Simplifying Magento 2 Shipping Tracking
Now you know the most efficient way to handle Magento shipping tracking — from importing tracking numbers in bulk to exporting them for reporting, logistics, or ERP integrations. While Magento 2 offers basic shipment tracking features and shipping tracking integration with major carriers, bulk tracking number import/export is not available by default.
The Improved Import & Export Magento 2 extension bridges this gap, giving you full control over order tracking data. You can import tracking numbers alongside product and shipment details, automate updates, and sync not only with USPS, FedEx, DHL, UPS, but other smaller and local carriers for real-time order status updates. This means less manual work, fewer errors, and a better post-purchase experience for your customers.
If you’re ready to streamline your Magento 2 shipment tracking workflow, explore the Improved Import & Export extension and unlock advanced automation capabilities for your store.
📌 Need assistance? Our team is here to help you set up and customize your shipping tracking process. for personalized guidance.
Not sure how to import specific data types into Magento 2? Our guide covers everything — from products and customers to CMS pages and B2B entities.
👉 Browse all Magento 2 import topics
FAQ: Magento 2 Shipping Tracking
Can I import tracking numbers into Magento 2 by default?
No. Magento 2 does not allow bulk tracking number import out of the box. You must add them manually when creating or editing shipments. To automate this process, you can use the Improved Import & Export extension to perform a Magento shipping tracking import from CSV, XML, or Google Sheets.
How do I bulk upload tracking numbers in Magento 2?
With the Improved Import & Export extension, you can prepare a CSV or XML file with order numbers, tracking numbers, carrier codes, and SKUs, then run a single import job to update multiple orders at once. This eliminates the need for manual entry.
What file format should I use to import tracking numbers?
The Improved Import & Export extension supports CSV, XML, Google Sheets, Dropbox, and FTP/SFTP as sources. CSV is most commonly used for Magento order tracking number upload because it’s simple to edit and validate.
Can Magento 2 automatically send emails when new tracking numbers are added?
Yes. If you enable the “Send Email from New Tracks” option during import, Magento will automatically notify customers by email when their tracking number is added.
How can I export tracking numbers from Magento 2 for reporting or ERP integration?
Use the Improved Import & Export extension to create a Magento order tracking export. You can include shipment details, carrier codes, and product data, and send the file to FTP, Google Sheets, Dropbox, or a direct URL.
Can I integrate Magento carrier tracking with USPS, FedEx, DHL, and UPS?
Yes. Magento 2 supports integration with major carriers when you enter the required account credentials. Once configured, tracking numbers link directly to the carrier’s tracking system for real-time updates.
Why is my Magento 2 order tracking not working for customers?
Common reasons include missing tracking numbers, incorrect carrier codes, or shipments not linked to the order. Ensure your data is correct and that the tracking number is assigned to the right increment_id during import.
Can I filter which orders to export with tracking numbers?
Yes. The Improved Import & Export extension lets you filter orders by date range, order status, or customer group before generating your Magento shipping tracking export.
What are common Magento tracking number problems during import?
Common issues include mismatched carrier codes, empty tracking fields, wrong CSV formatting, and duplicate entries. Validating your file before import and using Magento’s correct carrier codes can prevent these errors.
Can I import tracking numbers along with creating shipments in Magento 2?
Yes, if you enable the “Create Shipments” option in the import job configuration. This allows you to add tracking details and generate shipments in the same process, streamlining your order fulfillment workflow.