
Magento 2 Multi Source Inventory (MSI): Full Guide + Import & Export Explained
Magento 2 Multi Source Inventory (MSI) is a powerful feature introduced in Magento 2.3 that allows merchants to manage inventory across multiple physical locations natively within the platform. This Magento 2 MSI user guide walks you through the key functionalities of the multi-source inventory system, with a specific focus on how to import and export MSI data efficiently.
From the moment you install the Magento 2 MSI module, you gain access to flexible inventory tools that support complex warehouse setups, regional stock allocation, and streamlined product availability management. However, while Magento MSI significantly enhances default inventory management, it still falls short in areas like bulk data synchronization and automation.
That’s where third-party solutions come into play. Tools like the Improved Import & Export extension and its dedicated MSI add-on fill these gaps by enabling seamless MSI data transfers—saving time and reducing errors.
In this guide, you’ll discover what Magento 2 Multi Source Inventory is, how to configure it, and how to import and export all MSI entities, including stock sources or product quantities per source, with MSI CSV formatting rules. Whether you’re a merchant managing multiple warehouses or a developer optimizing backend operations, this Magento 2 MSI import/export guide has you covered.

Table of contents
- What Is Magento 2 Multi Source Inventory (MSI)?
- Key Features of Magento 2 MSI
- How Magento 2 Multi Source Inventory Works: Sources, Stocks & Sales Channels Explained
- When and Why to Use Multi Source Inventory in Magento
- Common Challenges With Magento MSI and How to Overcome Them
- How to Import and Export Magento 2 Multi Source Inventory Data
- Best Practices for Managing Magento MSI
- Final Words on Magento 2 Multi Source Inventory Management
- Magento 2 MSI FAQ
What Is Magento 2 Multi Source Inventory (MSI)?
Magento 2 Multi Source Inventory is a core feature introduced in Magento 2.3 that allows merchants to manage inventory across multiple physical locations, such as warehouses, retail stores, distribution centers, or drop shippers, directly from the Magento 2 admin panel. Before this update, Magento supported only a single inventory source, forcing businesses with complex logistics to rely on third-party extensions or custom code.
With Magento MSI, multi-location inventory management becomes a native capability. You can assign different quantities of a product to different sources, track inventory in real time, and dynamically allocate stock to customer orders based on predefined rules like distance, priority, or stock availability.
The goal of Magento 2 MSI is to streamline warehouse operations, reduce fulfillment delays, and improve stock visibility across channels, whether you run a global e-commerce brand or a local business with a few storage locations.
Key benefits of Magento 2 Multi Source Inventory include:
- Centralized control over all inventory sources
- Dynamic stock assignment to orders
- Improved support for backorders and reservations
- Enhanced scalability for growing businesses
Magento 2 MSI gives merchants the flexibility and control they need to scale efficiently without relying on external inventory management systems. It lays the foundation for smarter shipping, faster fulfillment, and better customer experiences.
Key Features of Magento 2 MSI
As part of the core platform, Magento Multi Source Inventory equips merchants with powerful tools to manage complex inventory operations out of the box. This section of our Magento 2 MSI user guide highlights the most important features that make MSI a game-changer for multi-location sellers.
✅ Source Management
Magento MSI lets you create and manage multiple inventory sources—such as warehouses, physical stores, or drop-ship locations—within a single Magento 2 installation. Each source can have its own address, lead time, and product quantity.
✅ Stocks and Sales Channels
MSI introduces the concept of stocks, which are collections of sources linked to one or more sales channels (like websites or store views). This allows you to define different inventory strategies per channel or region.
✅ Salable Quantity in Magento MSI
The salable quantity metric provides an accurate, real-time view of how much inventory is available for customers to purchase. It takes into account product reservations, pending shipments, and other stock deductions that may not be immediately reflected in the actual source quantity.
✅ Magento 2 Multi Source Inventory Product Reservations
MSI uses a reservation system to reserve stock for customer orders before it’s physically shipped. This ensures that Magento always has an up-to-date understanding of inventory availability, even during high-demand periods or bulk purchases.
✅ Source Priority and Algorithmic Stock Allocation
You can define source selection algorithms that automatically determine which source to use when fulfilling an order. Magento includes a default priority algorithm, and you can customize or extend it for more advanced logistics rules.
✅ Enhanced Support for Backorders
Magento Multi Source Inventory improves backorder management by allowing backorders to be configured per source. You gain more flexibility in fulfilling out-of-stock orders from alternate locations or suppliers.
✅ API Support for Inventory Operations
MSI includes full API support for inventory operations, making it easier for developers to integrate with ERP, WMS, or third-party logistics systems.
Together, these features make Magento 2 Multi Source Inventory a robust, scalable solution for managing inventory across multiple fulfillment points, without the need for external plugins. Whether you’re shipping from five warehouses or running hybrid brick-and-mortar and online operations, Magento MSI lays the groundwork for efficient stock handling and better customer service. Let’s see how these features are implemented in the backend.
How Magento 2 Multi Source Inventory Works: Sources, Stocks & Sales Channels Explained
Magento 2 Multi Source Inventory introduces a new way of thinking about inventory by breaking it down into three key components: sources, stocks, and sales channels. Understanding how these components interact is essential to unlocking the full power of Magento 2 MSI. Let’s explore each concept in detail.
📦 What Are Sources in Magento 2 MSI?
In Magento 2 MSI, a source is any physical location where products are stored. This could be a warehouse, a retail store, a third-party drop shipper, or even your garage, if you’re running a lean startup.
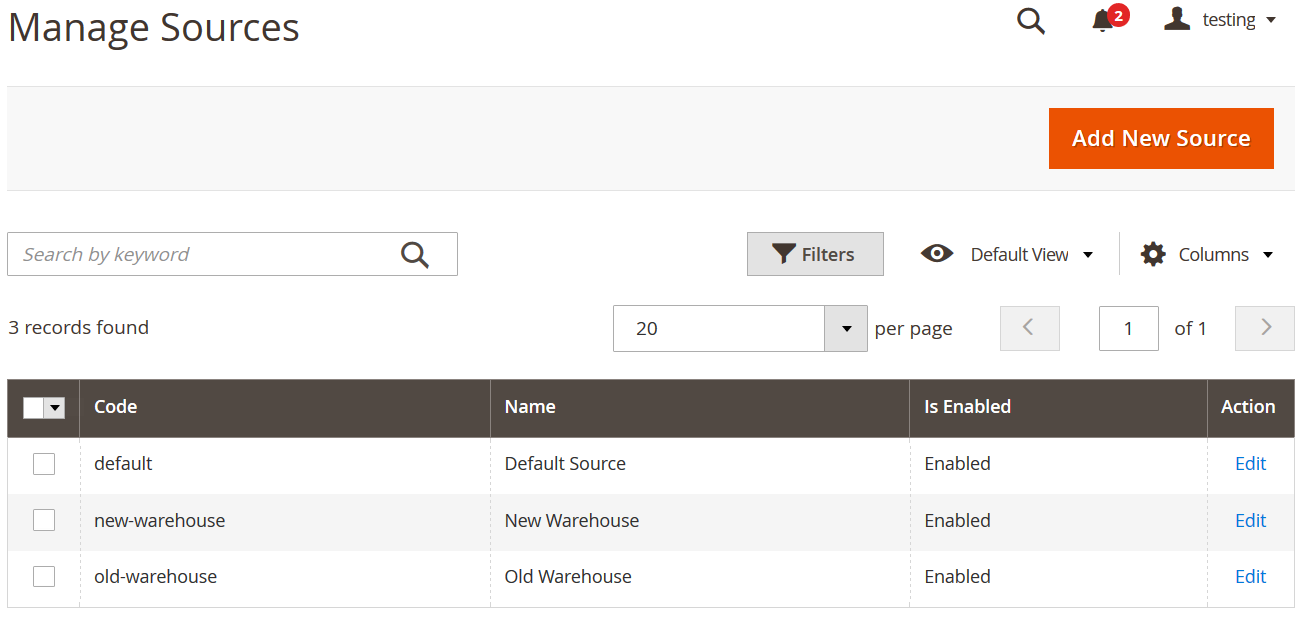
Below, you can see the illustration of the “Manage Source” screen with 4 created sources: Warehouse LA, Warehouse DE, Store NL and the Warehouse in NY:

Each source you create in Magento 2 includes basic details such as:
- Source Name
- Source Code
- Address and Contact Info
- Enabled/Disabled Status
- Geolocation (optional)
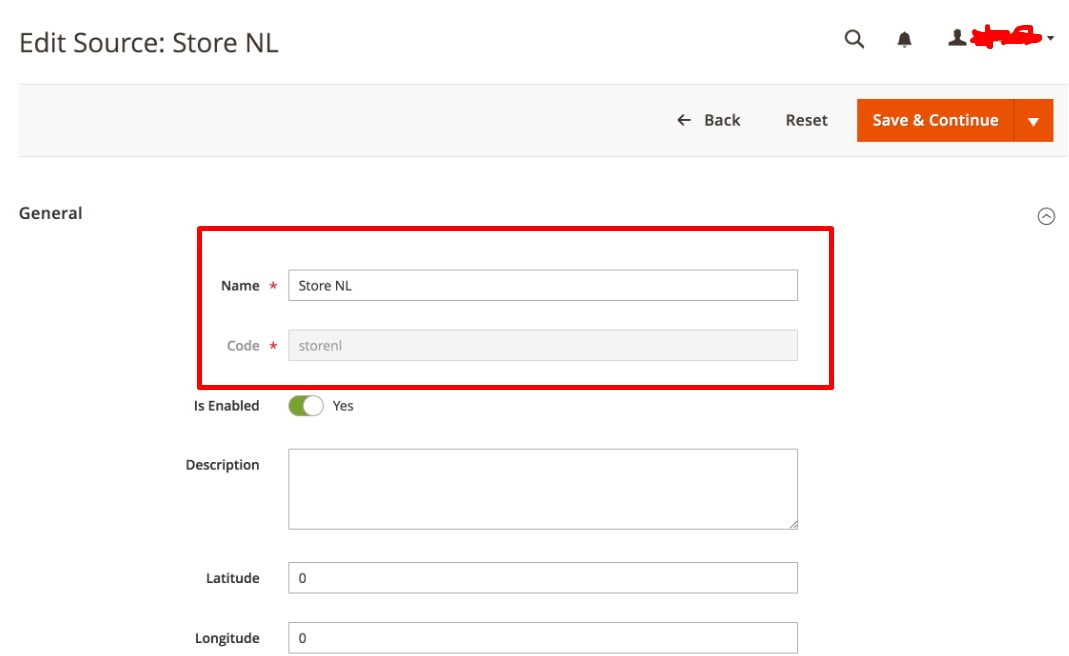
Once sources are created, you can assign products to them and define the available quantity per source directly from the product edit page. The “Manage Sources” section in the Magento admin lets you view, edit, and add new sources using a simple grid interface.
For example, you might define:
- Warehouse LA (USA)
- Warehouse DE (Germany)
- Store NL (Netherlands)
- Warehouse NY (USA)
These sources help you control where products are stored and shipped from, setting the foundation for flexible inventory management.
📊 What Are Stocks and Sales Channels of Magento Multi Source Inventory?
A stock in Magento 2 MSI is a virtual group of one or more sources. Stocks are linked to sales channels, which typically represent your Magento websites or store views.
Think of it this way:
- Sources = physical storage locations
- Stocks = virtual groupings of those locations
- Sales Channels = Magento websites/storefronts that pull inventory from the stocks
For instance, you might set up:
- “Europe Stock” linked to your European website, including Store NL and Warehouse DE
- “US Stock” linked to your U.S. site, including Warehouse LA and Warehouse NY
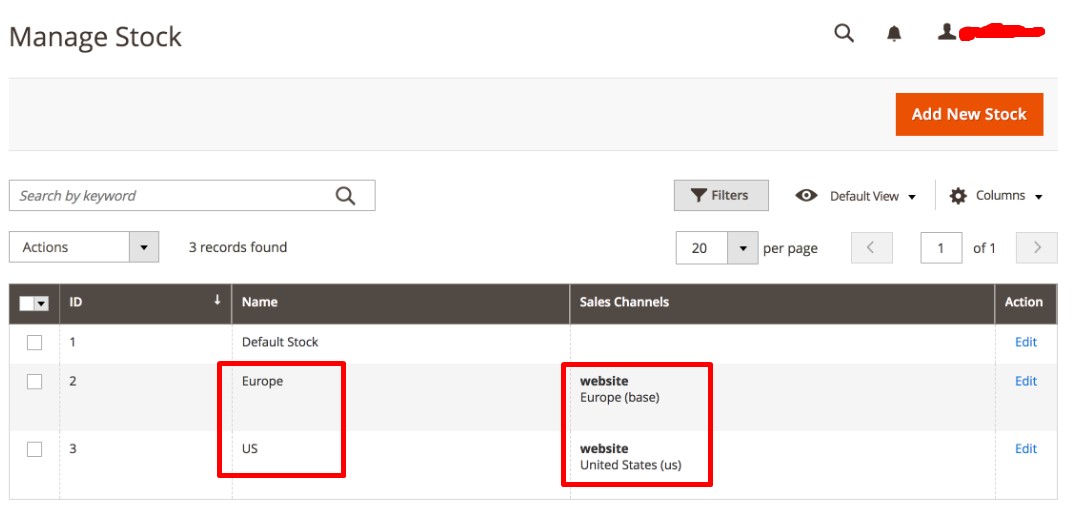
When a customer places an order on the European website, the system deducts stock from Store NL or Warehouse DE based on your chosen fulfillment rules.
The Manage Stocks screen in the admin panel provides a grid with columns like:
- Stock ID
- Name
- Sales Channels (linked websites)
- Action buttons for edit/delete
Let’s edit the Europe stock for a better understanding of what happens under the hood:
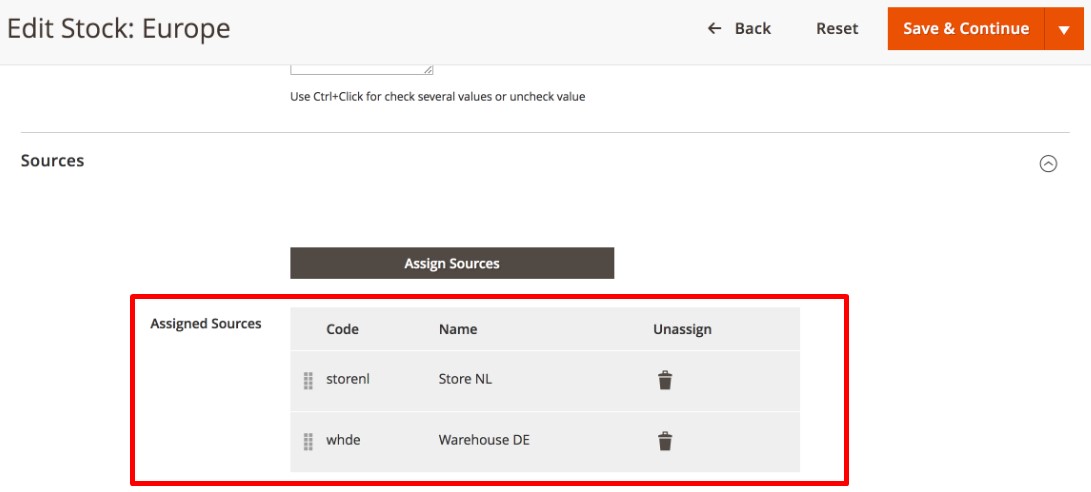
The stock is sourced from two locations: Store NL and Warehouse DE. Since it is linked to a corresponding website, all sales that take place on this website are deducted from sources that are a part of the stock. Magento 2 uses the source selection algorithm to specify one or multiple sources from which the stock is deducted.
This setup allows you to scale quickly — just add a new warehouse (source) and assign it to the relevant stock for instant multi-region support.
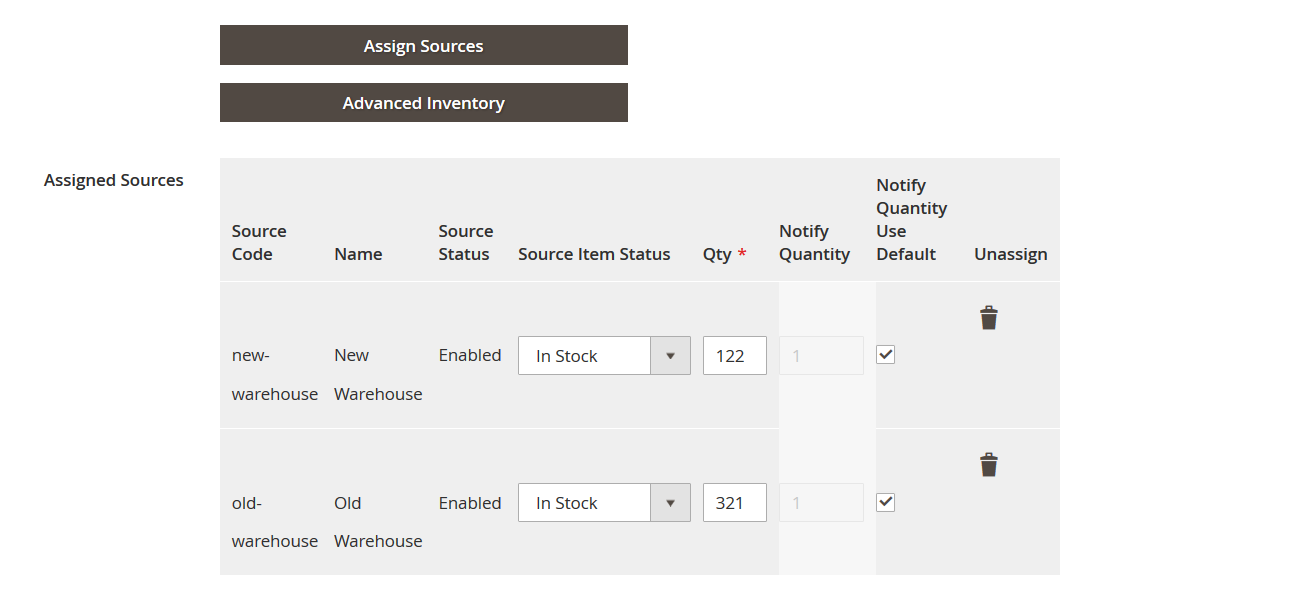
🛠 Product Configuration: Assigned Sources and Quantities
With MSI enabled, the product edit page gains a new section called “Assigned Sources.” Here you’ll see:
- Each assigned source
- Its status (enabled/disabled)
- Quantity available at each location
- Low stock notifications
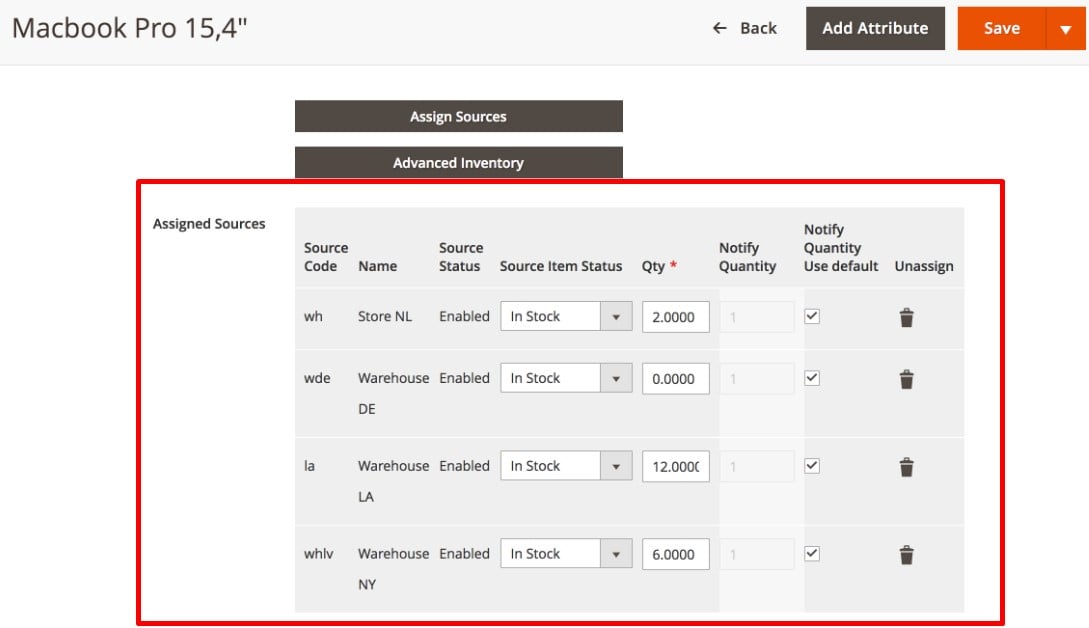
You can manually enter how many units of a product are available per source. For example:
- Warehouse LA: 12 units
- Warehouse NY: 6 units
- Store NL: 2 units
- Warehouse DE: 0 units
This data feeds directly into Magento’s new salable quantity calculation.
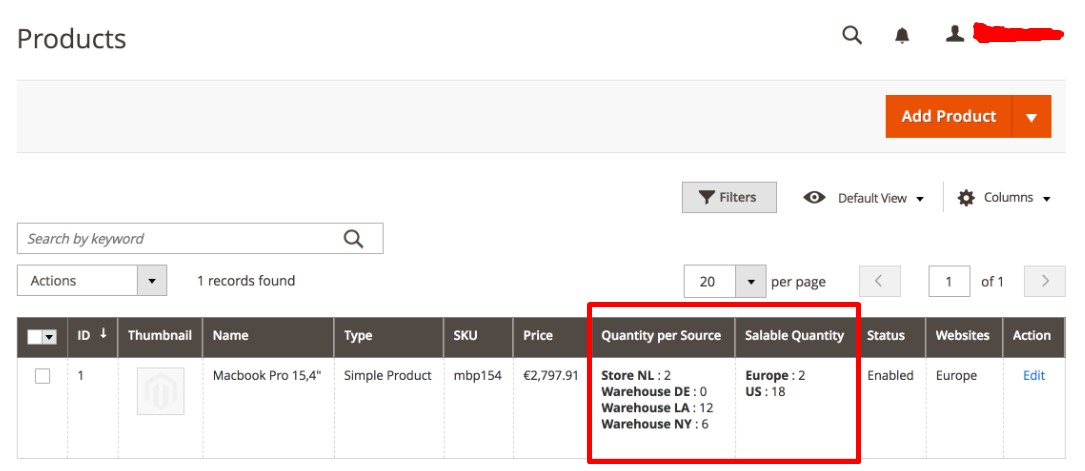
🔢 Salable Quantity in Magento 2 MSI
Salable quantity is a key concept introduced by Magento 2 MSI. It represents the amount of inventory available for customers to purchase on a given website.
Here’s how it works:
- Magento sums the quantities from all sources assigned to the stock linked to a website.
- The total becomes your salable quantity for that store view.
For instance:
- Europe Stock includes Store NL (2 units) and Warehouse DE (0 units) → Salable Quantity = 2
- US Stock includes Warehouse LA (12) and Warehouse NY (6) → Salable Quantity = 18
Magento displays this value in a new “Salable Quantity” column on the product grid, alongside “Quantity per Source.”
Why is this important? Customers see only the salable quantity available for their region, avoiding overselling and helping manage expectations. If stock reaches zero, Magento automatically:
- Marks the product as Out of Stock
- Sends low stock notifications
- Prevents checkout if a customer adds more than is available
🧠 Magento 2 Multi Source Inventory Source Selection Algorithm
When an order is shipped, Magento uses a source selection algorithm to decide from which source(s) the product should be fulfilled. This algorithm considers:
- Customer location
- Product availability per source
- Shipping address
- Source priority or custom rules
For example, if multiple sources stock the same item, Magento may:
- Choose the nearest source to the customer
- Select the source with the highest profit margin
- Split the order across multiple sources if needed
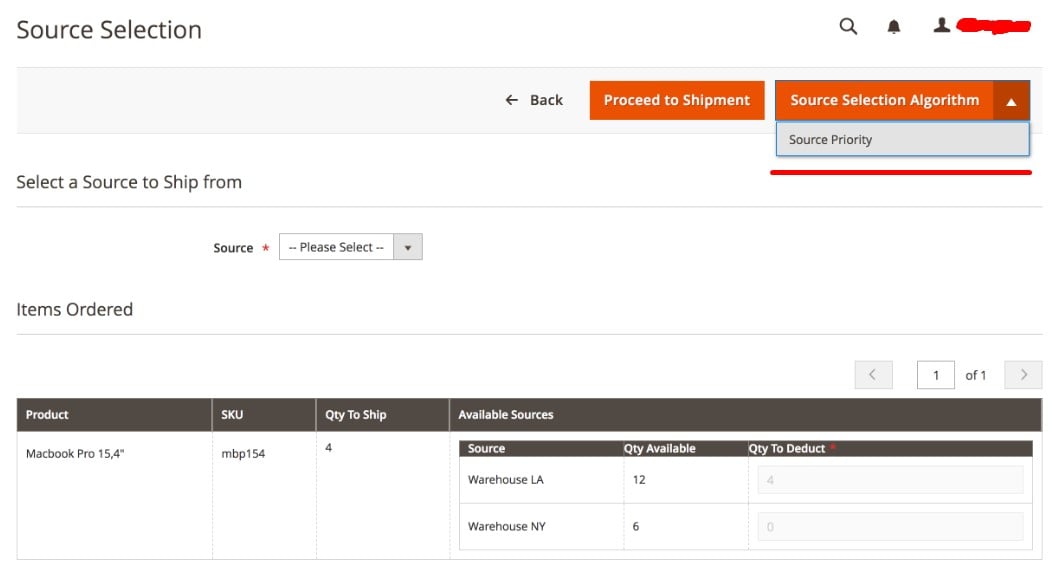
This intelligent approach ensures efficient fulfillment and reduces delivery times.
If total stock across all sources is insufficient, the shipment will not be created, preventing overselling.
Advanced users and developers can customize or extend the default source selection algorithm to support unique business needs.
✅ Why This Matters
The Magento 2 Multi Source Inventory system empowers businesses to grow without breaking their backend. With native support for regional warehouses, flexible fulfillment, and real-time inventory tracking, MSI is essential for any merchant operating across multiple locations or storefronts.
When and Why to Use Multi Source Inventory in Magento
Not every business needs a complex inventory system, but for those that do, Magento Multi Source Inventory (MSI) is a game-changer. Whether you’re scaling operations across regions or blending online and offline fulfillment, Magento MSI helps manage inventory more efficiently and intelligently.
Let’s explore some real-world use cases where Magento multi source inventory delivers real value.
🏬 Multi-Warehouse Operations
If your business manages several warehouses across different cities or countries, Magento MSI helps you:
- Assign stock to each warehouse (source)
- Prioritize warehouses for order fulfillment
- Automatically route orders to the nearest or best-performing location
Use case: A fashion retailer with warehouses in Los Angeles, Berlin, and Tokyo can manage stock separately for each location while offering localized order fulfillment to customers worldwide.
🌍 Country- or Region-Specific Stock Control
Magento MSI allows you to group sources into stocks and link them to specific websites or store views. This enables accurate regional availability and localized order processing.
Use case: An electronics company sells through a U.S. and a U.K. storefront. MSI ensures U.S. customers see stock from American warehouses, while U.K. shoppers are served from European locations, eliminating customs delays and reducing shipping costs.
📦 Drop Shipping Integration
MSI is a natural fit for merchants who rely on drop shipping. Each supplier or drop shipper can be set up as a separate source in Magento, giving you full visibility and control.
Use case: An online marketplace selling products from multiple third-party vendors can assign each vendor a source, track availability, and avoid overselling.
🛒 Hybrid Retail + Warehouse Models
Running both physical stores and online operations? Magento MSI makes it easy to unify your inventory strategy. Treat each store as a source and control how stock is shared across channels.
Use case: A home goods brand with brick-and-mortar stores in Paris and Amsterdam can fulfill local online orders directly from those locations, minimizing shipping time and clearing in-store stock more efficiently.
🚚 B2B Fulfillment by Region or Account
For B2B sellers managing large clients or distributors, MSI offers flexible control over how stock is allocated based on account type, geography, or custom business logic.
Use case: A wholesaler serving different B2B partners in Eastern and Western Europe can assign separate source priorities and shipping rules, ensuring smooth order handling per region.
Why Magento MSI Is the Smarter Choice
Here’s why Magento multi source inventory is worth adopting:
- Reduces shipping costs with location-based fulfillment
- Improves delivery times and customer experience
- Prevents overselling across channels
- Supports modern fulfillment strategies (dropshipping, multi-regional shipping, BOPIS)
- Future-proofs operations for international growth
Whether you’re just expanding to a second warehouse or managing dozens of suppliers, Magento MSI use cases scale with your business. It’s a core tool for merchants who want flexibility without sacrificing control. However, the platform’s MSI functionality is associated with several challenges.
Common Challenges With Magento MSI and How to Overcome Them
While Magento Multi Source Inventory is a powerful tool for modern e-commerce, it’s not without its flaws. Many merchants face technical and operational hurdles when implementing Magento 2 MSI, especially at scale. This section outlines the most common Magento MSI issues and provides practical ways to address them.
🐞 1. Stock Reservation Bugs and Sync Errors
One of the most frequent Magento multi source inventory problems is related to stock reservations. MSI uses a reservation system to allocate inventory before orders are fulfilled. However, glitches can occur:
- Reservations may not clear after order cancellations
- Stock levels may appear inconsistent across the admin and frontend
- Products may remain “Out of Stock” even when quantity exists
How to solve it: Periodically run reservation cleanup commands or use community patches and modules that fix known bugs. For more reliability, track both “Quantity per Source” and “Salable Quantity” when troubleshooting.
🐢 2. Performance Slowdowns in Large Catalogs
As product and source combinations grow, so does database complexity. Merchants managing tens of thousands of SKUs across multiple sources often experience:
- Slow admin panel performance
- Delays in checkout or order processing
- Crashes during high-traffic periods
How to solve it: Optimize indexes and caching regularly. Use MSI-specific performance patches and ensure proper server resources are allocated. Offloading bulk operations (like imports) to background jobs helps significantly.
⚠️ 3. Extension Conflicts
Not all third-party modules play nicely with Magento MSI—especially older extensions that assume a single-source inventory model. These conflicts can break stock visibility, disrupt checkout logic, or cause errors in product availability.
How to solve it: Use MSI-compatible modules from trusted developers and check compatibility before installing. If you’re unsure, test new extensions in a staging environment that mirrors your MSI setup.
🧩 4. Complex Manual Management Across Sources
Magento’s default UI for MSI can become cumbersome when managing large inventories across multiple sources. Updating quantities, creating new sources, or assigning products individually is time-consuming and error-prone.
How to solve it: Implement automation tools for batch updates. Using CSVs for bulk changes helps, but it introduces another problem…
🔄 5. Incomplete Import/Export Capabilities
Perhaps the most frustrating limitation is Magento’s inability to fully import and export MSI data out of the box. While you can export some product data via native tools, essential MSI entities, such as source quantities, stock assignments, and reservations, are not supported by default import/export functionality.
This gap creates serious operational bottlenecks:
- Difficulties migrating data between stores
- No easy way to update inventory per source in bulk
- No automation for syncing MSI stock with ERPs or supplier feeds
To overcome these limitations, you can use the Improved Import & Export extension with its MSI add-on. This tool extends native functionality by allowing you to:
- Import and export all Magento 2 MSI entities (sources, stock assignments, quantities)
- Automate MSI updates via cron jobs or API
- Map data fields from third-party systems directly to Magento MSI attributes
Ready to streamline your inventory workflows? In the next section, we’ll show you exactly how to import and export Magento 2 MSI data using the Firebear Improved Import & Export tool.
How to Import and Export Magento 2 Multi Source Inventory Data
Managing multi-source inventory in Magento 2 can be powerful, but only if your import and export workflows are properly set up. This guide explains how to handle Magento 2 MSI import and export using the Improved Import & Export extension with its dedicated MSI Add-On. Whether you’re working with multiple warehouses, drop shippers, or fulfillment centers, this guide will walk you through every step.
✅ Prerequisites: What You Need to Get Started
To import and export Magento 2 MSI data, you’ll need:
- Magento 2 MSI Module – the core module that enables multi-source inventory.
- Improved Import & Export extension – Firebear’s robust data management tool.
- MSI Add-On – an additional package to handle MSI entities specifically.
Step 1: Install Magento 2 MSI Module
Follow Magento’s official installation guide: .
Step 2: Enable Magento 2 MSI
- Navigate to Stores > Inventory > Stocks
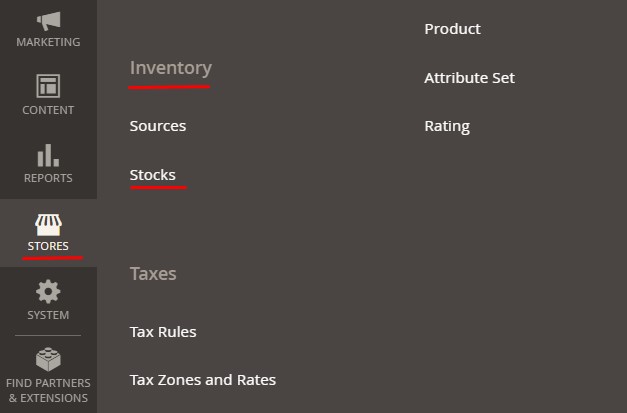
- Click Add New Stock to enable multi-source inventory mode

Step 3: Install MSI Add-On for Improved Import & Export
Ensure the main extension is installed first. Then:
- Navigate to your store root folder in the SSH console of your server:
1cd path_to_the_store_root_folder - Install the MSI Add-On by running this command:
1composer require firebear/importexport-msi - Enable MSI Add-On by running:
1php bin/magento module:enable Firebear_ImportExportMsi - Deploy content and flush the store cache, log out from the backend, and log in again. Run:
1php bin/magento setup:static-content:deploy -f
and:
1php -f bin/magento cache:clean
Congratulations, you have installed the MSI Add-On for the Improved Import and Export extension.
🧱 Magento 2 Multi Source Inventory Entities: Stock Sources & Quantities
Magento MSI handles two main data types:
1. Stock Sources
The Manage Sources screen represents physical locations (e.g., warehouses or retail stores). Fields for import include:
| Attribute Name | Reference | Values | Value Example |
| source_code | Code of the warehouse. Is used for identification purposes. | Can be up to 64 Latin characters in length, without spaces, and can contain “-“, “_”. | my_warehouse |
| name | Name of the source | Can be any value | My First Warehouse |
| enabled | Defines if the source is enabled | 1 – enabled
0 – disabled |
1 |
| description | Description of the source | Can be any value | This is my first warehouse |
| latitude | Latitude of the source location | Can only be a geographic latitude value | 123.12 |
| longitude | Longitude of the source location | Can only be a geographic longitude value | 321.32 |
| country_id | ID of the Country of the Source Address Data | Can only be the country code ID of the | AT |
| region_id | ID of the Region of the Source Address Data | Can only be the Region code ID of | 95 |
| region | Region of the Source Address Data | Can be any value – a text field. Doesn’t work with IDs. | Moscovia |
| city | City of the Source Address Data | Can be any value | New York |
| street | Street of the Source Address Data | Can be any value | Street st. |
| postcode | Postcode of the Source Address Data | Can contain only numerals | 12345 |
| contact_name | Contact Name of the source Contact Info | Can be any value | John Doe |
| Contact Email of the source Contact Info | Can be only email value | john@doe.com | |
| phone | Phone of the source Contact Info | Phone number | +123123123 |
| fax | Fax of the source Contact Info | Fax number | +123123123 |
| use_default_carrier_config | System attribute of the source with no particular use case in setting up a new source | – | – |
| carrier_links | System attribute of the source with no particular use case in setting up a new source | – | – |
NOTE: When creating Stock Sources using import jobs, make sure to provide information for the attributes: name, source_code, country_id, and postcode. These attributes are required by the Magento 2 system to create new warehouses. Without them, a warehouse cannot be created. Follow our for more info.
2. Stock Source Quantity
This one ties products (via SKU) to specific sources with quantity and stock status.
| Attribute Name | Reference | Values | Value Example |
| source_code | Code of the warehouse. Is used for identification purposes. | Make sure to specify the exact code value. The code is used to tie product stock to a source. | my_warehouse |
| sku | SKU of the product whose stock is tied to a particular source (warehouse) | Can be up to 64 Latin characters in length, without spaces, and can contain “-“, “_” | TST-01 |
| status | Source Item Status. Defines if the products in a particular source are in- or out-of-stock. | 1 – in stock
0 – out of stock |
1 |
| quantity | Quantity of products in a particular stock (warehouse) | Can only contain numerals | 123 |
NOTE: if your product belongs to several stock sources (warehouses), you need to have a dedicated row for every warehouse in the import table. For example:
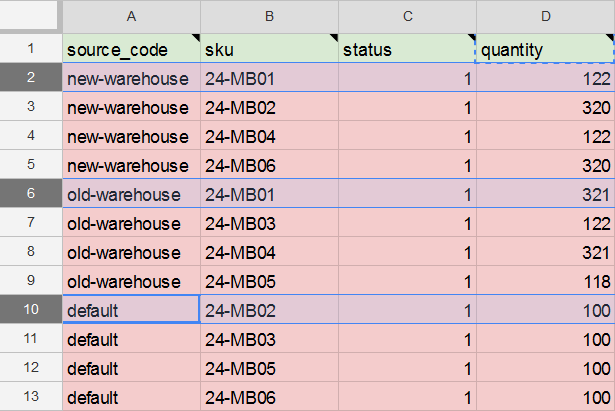
As you can see in the screenshot above, we have three warehouses:
- new-warehouse
- old-warehouse
- default
And four products:
- 24-MB01
- 24-MB02
- 24-MB04
- 24-MB06
All these products belong to all three warehouses. That’s why every product has a separate row for every warehouse. When importing such files, the product quantities per warehouse are imported in the order they appear in the file. Follow the for more info.
CSV to Import & Export Products with Multiple MSI Warehouses
With the 3.5.2 release of Improved Import & Export, you can import products and assign them to multiple warehouses with the Magento 2 MSI functionality enabled.
Improved Import & Export for Magento 2 allows you to specify:
- To which warehouse a product is assigned
- The quantity of a product at a particular warehouse
- If a product can be purchased from the specific warehouse
To import products to Magento 2 with the warehouse reference, add three custom attributes to your product import file:
| Attribute Name | Reference | Values | Value examples |
| msi_{warehouse_name} | Allows you to assign an imported product to a particular warehouse.
{warehouse_name} should be replaced by the name of the warehouse you want to assign the product. |
Possible attribute values are:
1 – the product is assigned to a warehouse 0 – the product is not assigned to a warehouse |
1 |
| msi_{warehouse_name}_qty | Allows you to specify a product quantity available at the particular warehouse.
{warehouse_name} should be replaced by the name of the warehouse you want to assign the product. |
Only numeral values are allowed | 123 |
| msi_{warehouse_name}_status | Allows you to specify if the product can be purchased from the specified warehouse.
{warehouse_name} should be replaced by the name of the warehouse you want to assign the product. |
Possible attribute values are:
1 – the product can be purchased from a warehouse 0 – the product cannot be purchased from a warehouse |
1 |
These fields allow you to fully control MSI product assignments during import. When exporting, the same fields are automatically added to the file.
You can use multiple msi_{warehouse_name}, msi_{warehouse_name}_qty, msi_{warehouse_name}_status attributes to assign a product to multiple warehouses.
Follow our sample to see how these attributes can be used during the product import.
See the extension’s manual to learn how to import products to Magento 2.
Magento 2 MSI Import & Export Workflows
Below, you will learn how to export and import the MSI data in Magento 2, including stock sources and stock source quantities.
Exporting Magento 2 Multi Source Inventory Stock Sources
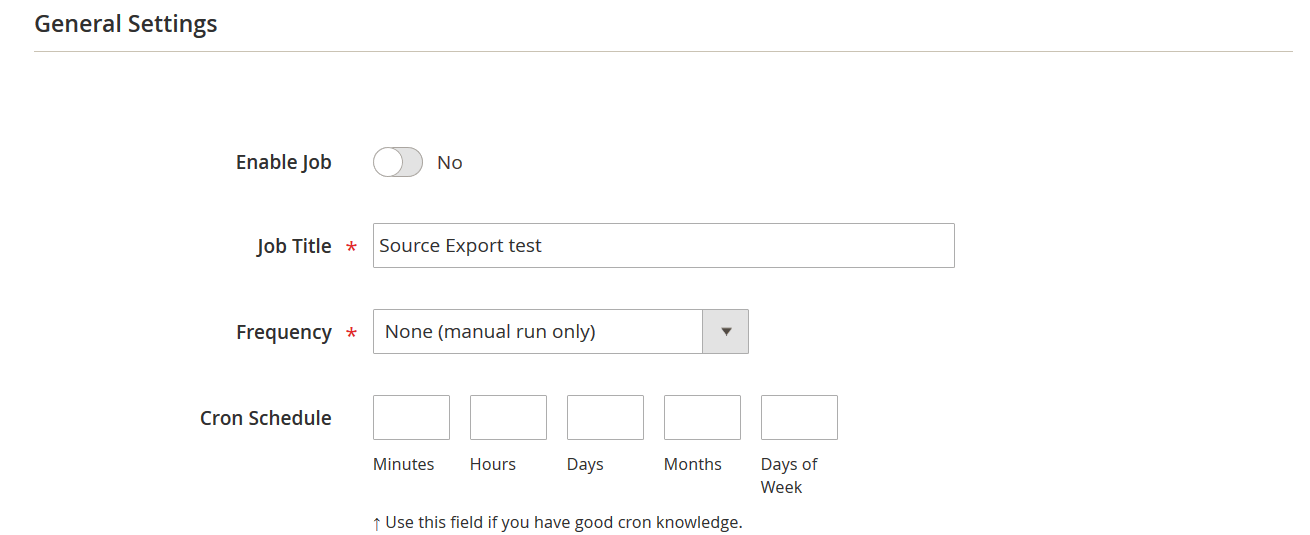
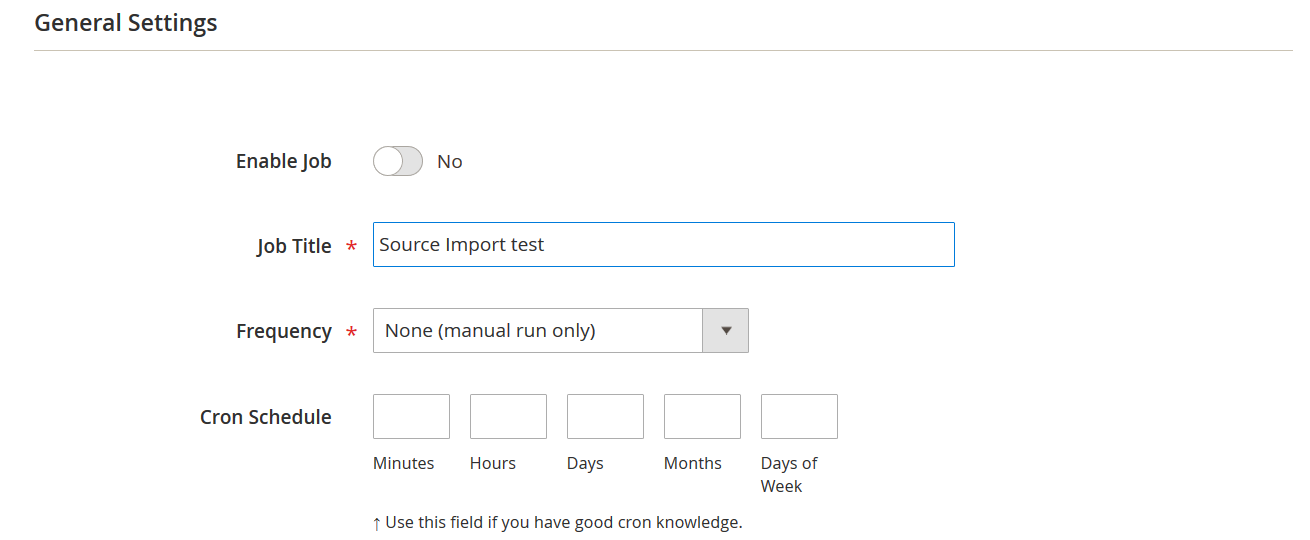
- Go to System > Improved Import/Export > Export Jobs
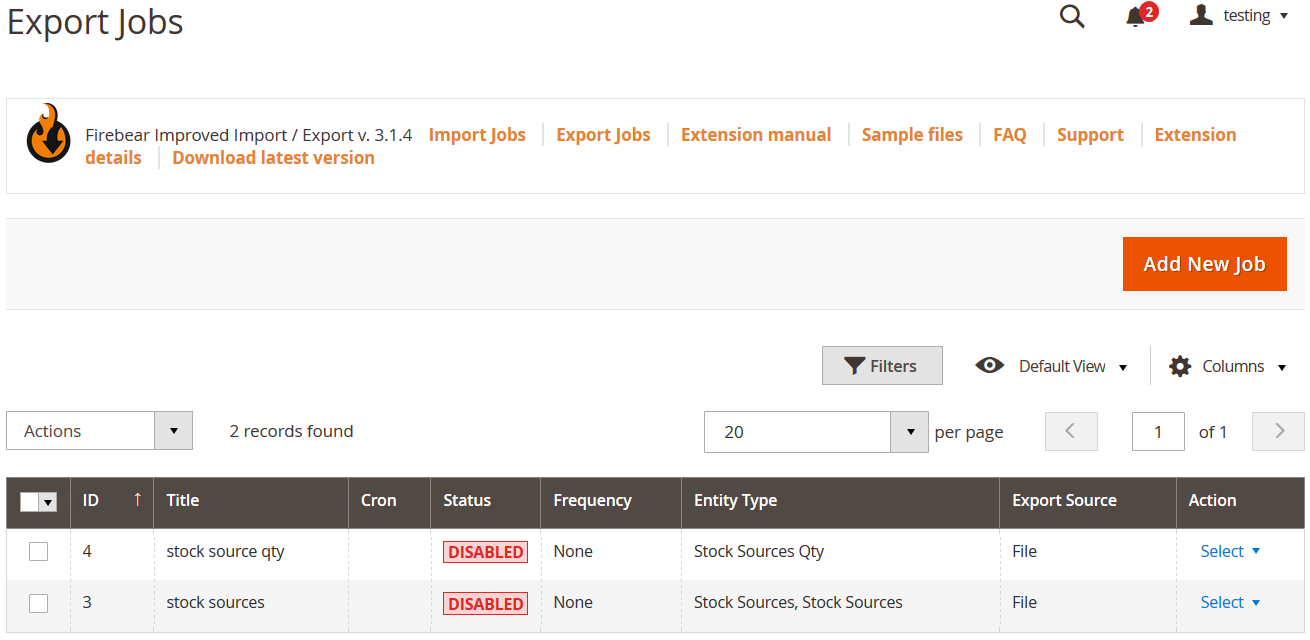
- Click Add New Job
- Name your new job and configure automation if applicable
- Under Export Settings, choose Stock Sources or Stock Source Qty as the entity
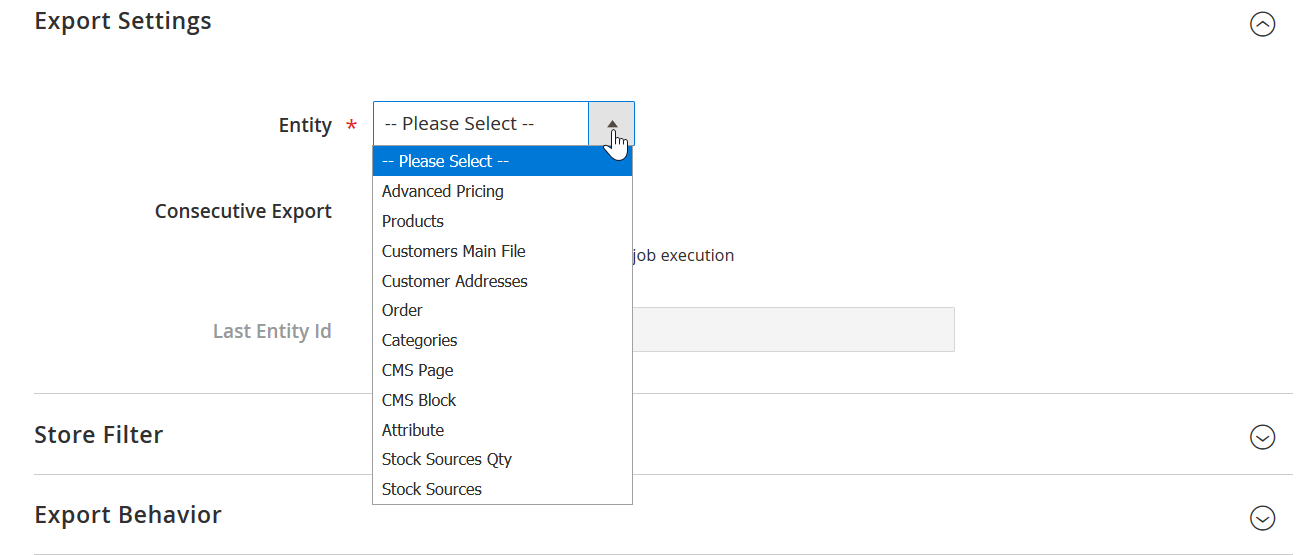
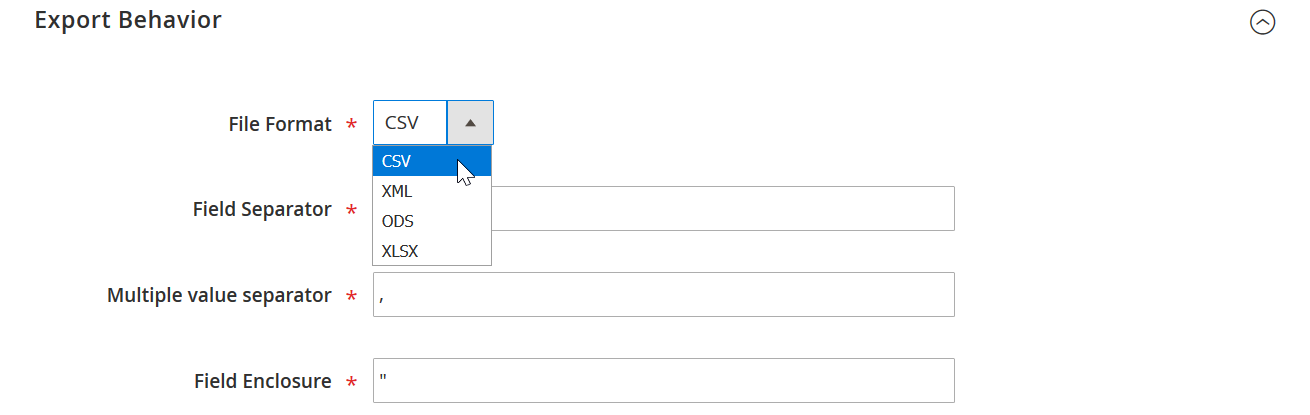
- Set file format (e.g., CSV), location, and configure other parameters.
- Click Save & Run to generate your MSI export file
Importing Magento 2 MSI Stock Sources
To import stock sources of Magento 2 Multi Source Inventory:
- Go to System > Improved Import/Export > Import Jobs
- Click Add New Job
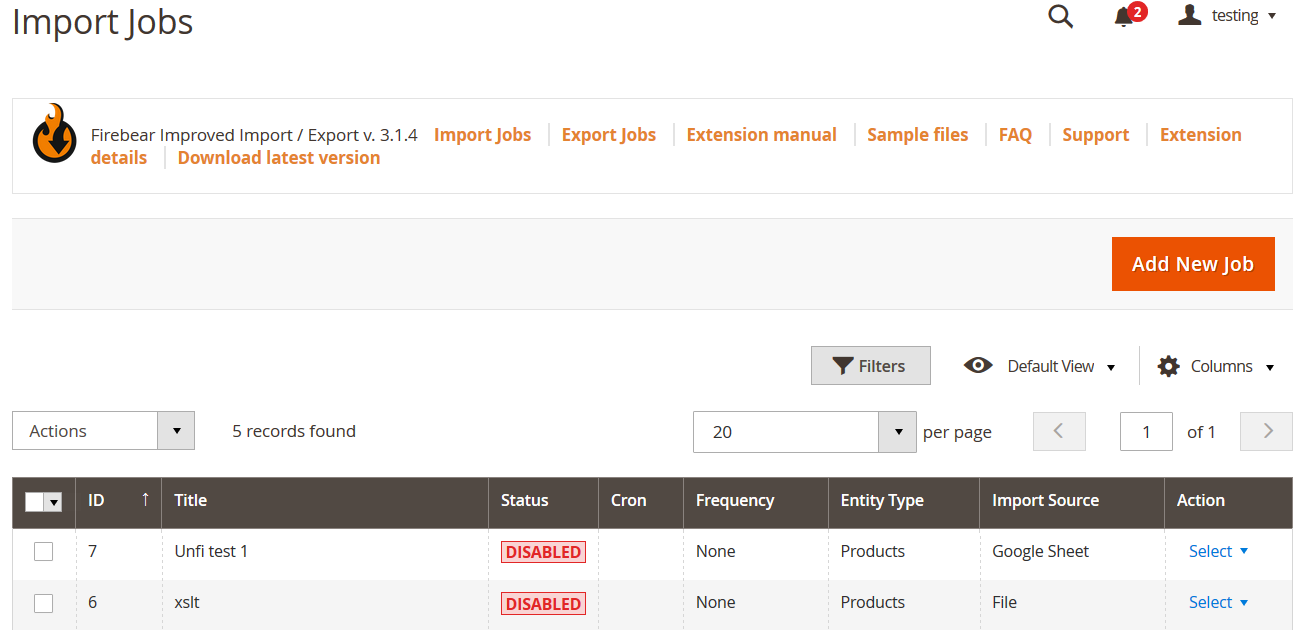
- Name your new job and configure automation if applicable
- Choose entity type: Stock Sources or Stock Source Qty. You can choose Product to import product data combined with the Magento MSI data

- Select import behavior (Add/Update, Replace, Delete)
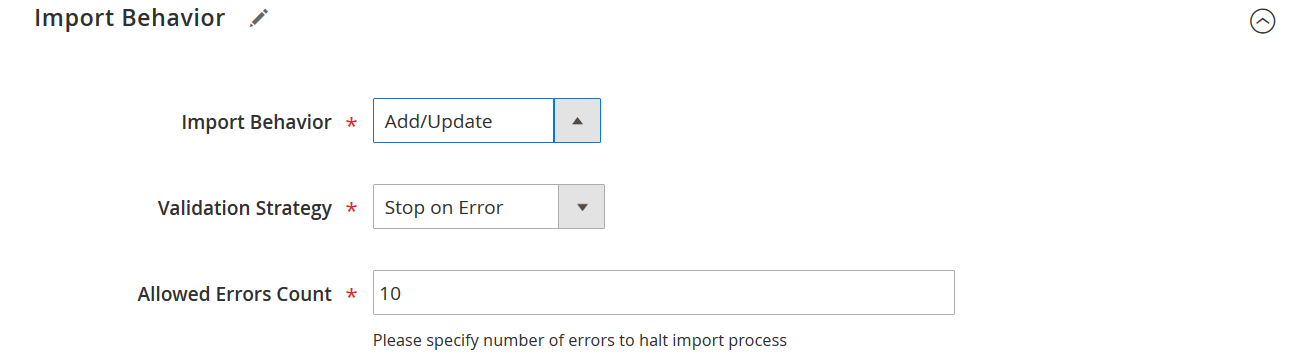
- In Import Source, paste your CSV file path or Google Sheets URL
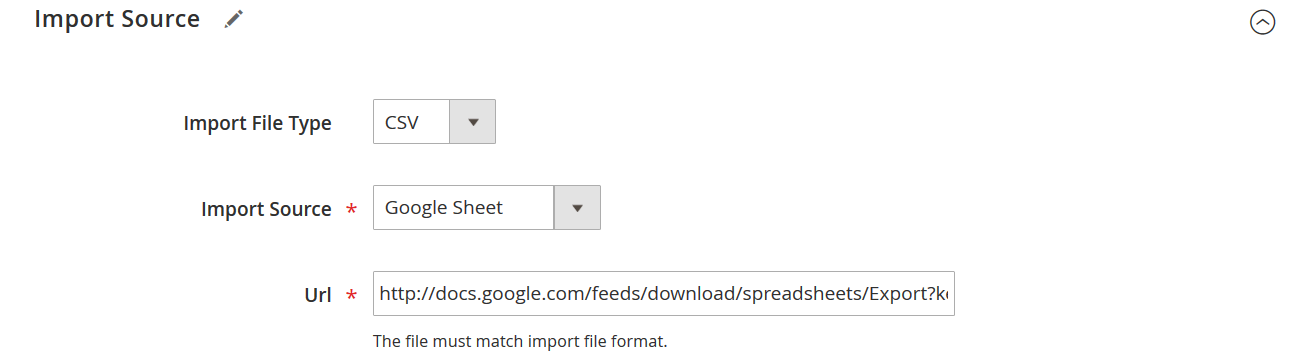
- Configure other parameters if applicable.
- Click Validate File, then Save & Run
Note that you can use Google Sheets to edit exported files safely without corrupting formatting. Please refer to the Improved Import and Export extension manual for explicit instructions on how to use every feature of the extension.
Magento 2 Multi Source Inventory Import & Export Practical Case
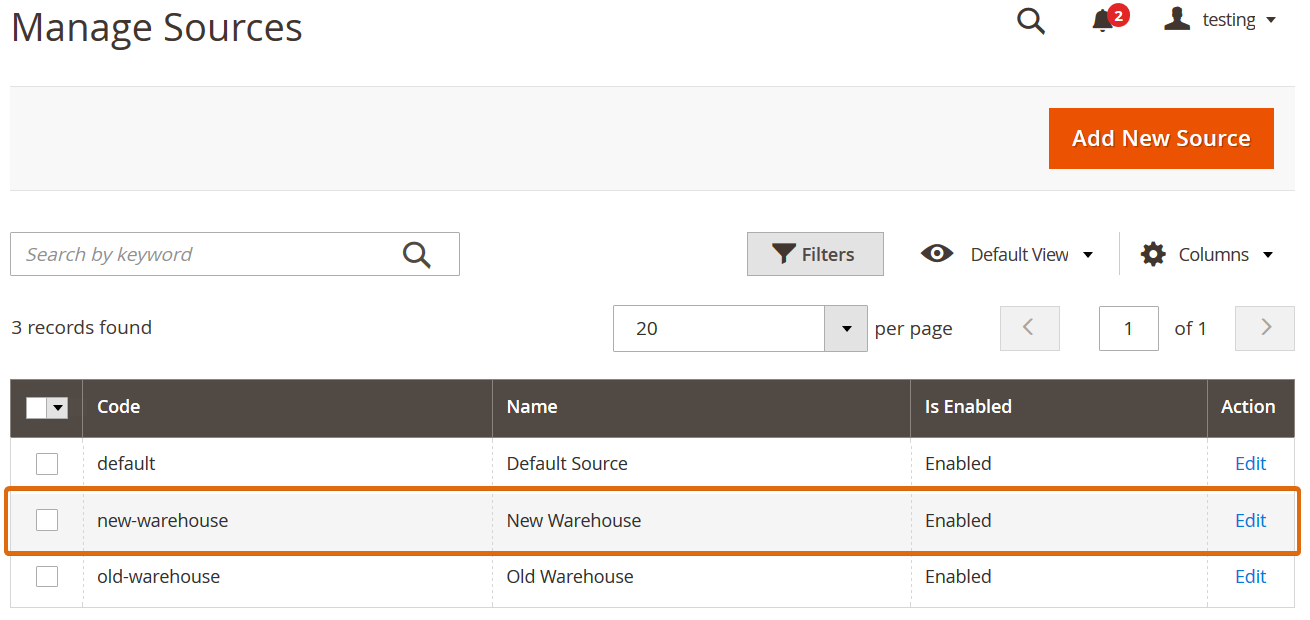
Let’s suppose your exported file with MSI stock sources looks as follows:

From the columns A source_code and B name, we can see two sources:
- Default Source with the code default
- Old Warehouse with the code old-warehouse
To specify a new source, add another row with source information. Complete row 4 with the following information:
- New Warehouse (warehouse name)
- US, Texas, postcode 12345 (address)
- The contact person is John Doe, phone +123123123, email john@doe.com (contact)
Specify other parameters so that your CSV could look as follows:

The only thing we have to come up with is the source_code attribute value for the new warehouse. Think of it the same as a product SKU: This is a unique identifier of the stock source. Now, complete the import procedure described above.
Once the import is complete, you can check your stock sources for the new source under the Manage Sources screen:
Best Practices for Managing Magento MSI
To get the most out of your Magento multi source inventory management, follow these proven tips:
🔁 Automate Inventory Syncs. Manual updates are risky and time-consuming. Use the Improved Import & Export extension to schedule MSI syncs with supplier feeds, ERPs, or warehouse systems via CSV, API, or Google Sheets.
✅ Validate Data Before Importing. Before every MSI import job, validate your file structure, required fields (e.g., source_code, sku, quantity), and source codes to prevent data conflicts or import errors.
🔍 Test Source Selection Rules. If you’re using custom source selection algorithms, simulate orders under different conditions (e.g., low stock, distance, product availability) to ensure Magento’s fulfillment logic behaves as expected.
📊 Monitor Salable Quantity vs. Source Quantity. Keep an eye on discrepancies between salable and physical stock. These mismatches often point to reservation issues, order failures, or misconfigured source assignments.
🧪 Use Staging Environments for MSI Changes. Before applying MSI changes to your live site, test imports and configuration updates in a staging environment. This minimizes the risk of errors affecting customers.
🛠 Integrate with External Systems. Use the extension’s API and automation capabilities to connect Magento 2 MSI with external WMS, POS, or inventory management platforms to maintain accurate multi-source control at scale.
By following these Magento 2 MSI best practices, you’ll ensure accurate inventory levels, reduce order fulfillment errors, and keep multi-source operations running smoothly.
Final Words on Magento 2 Multi Source Inventory Management
Managing complex inventories across multiple locations can be overwhelming, unless you have the right tools. With Magento 2 Multi Source Inventory, you already have a powerful foundation for multi-warehouse management, drop shipping, and regional stock control. But to unlock its full potential, especially for bulk updates and automation, you need enhanced import/export capabilities.
That’s where the Improved Import & Export extension for Magento 2 comes in. It bridges the gaps left by native Magento features, enabling seamless data synchronization, automated updates, and complete control over all Magento MSI entities — from stock sources to product quantities.
Whether you’re scaling your operations, integrating with ERPs, or just looking to simplify Magento multi source inventory management, Firebear’s extension makes it easier, faster, and more reliable.
🚀 Ready to simplify Magento 2 MSI import and export? Get the Improved Import & Export Extension and its free MSI add-on today.
💬 Need help with setup or have questions? Contact the Firebear team — we’re here to help you automate and scale with confidence.
Confused about native vs. enhanced import tools? We compare built-in Magento 2 options with advanced solutions.
👉 Discover the best Magento 2 import approach for your store
Magento 2 MSI FAQ
What is Magento 2 Multi Source Inventory (MSI) and why is it useful?
Magento 2 MSI is a core feature that allows merchants to manage inventory across multiple physical locations like warehouses, stores, or drop shippers. It improves fulfillment, stock accuracy, and regional availability.
How do I enable Multi Source Inventory in Magento 2?
You can enable MSI by navigating to Stores > Inventory > Stocks in the Magento 2 admin panel and creating new stock entities linked to your physical sources.
What are the main components of Magento 2 MSI?
MSI is built around three key elements: Sources (physical locations), Stocks (virtual groupings of sources), and Sales Channels (Magento websites linked to stocks).
Can I import Magento 2 MSI data like stock sources and quantities?
Yes, but not with the native Magento tools. You need a third-party solution like the Improved Import & Export extension with the MSI add-on to import stock sources and product quantities per source.
What are the required fields for importing stock sources in Magento 2?
At minimum, you must include the source name, source code, country ID, and postcode. These are required to create a valid warehouse in Magento MSI.
How do I assign a product to multiple warehouses using MSI?
You can assign a product to multiple sources using attributes like msi_{warehouse_name}, msi_{warehouse_name}_qty, and msi_{warehouse_name}_status in your import file.
What’s the difference between “Quantity per Source” and “Salable Quantity”?
“Quantity per Source” shows physical inventory at each warehouse. “Salable Quantity” is the sum of available stock from all sources linked to the website, minus reservations and pending orders.
How does the Magento 2 MSI source selection algorithm work?
Magento uses a source selection algorithm to determine which source should fulfill an order based on rules like location, stock availability, and priority.
What are the common Magento MSI issues and how can I avoid them?
Common problems include reservation bugs, slow performance with large catalogs, and lack of native import/export. Using the Firebear extension solves many of these issues by automating and streamlining MSI management.
Is it possible to automate Magento 2 MSI imports on a schedule?
Yes. The Improved Import & Export extension allows you to set up cron-based import/export jobs for MSI data, fully automating stock updates from external sources like ERP systems or supplier feeds.
Related posts
 Magento Inventory Management: A Complete Guide to Stock Optimization and Efficiency
 How to Fulfill Dropshipping Orders on Shopify When Your Supplier Has No Integration
 How to Boost Sales with Shopware 6 Cross Selling: The Ultimate 2025 Guide
 Magento 2 Export Customers Tutorial: Export Customer Data with Ease
 How to Export Metafields in Shopify: A Complete Guide
 AI Revolution in Shopify Imports: Smarter, Faster, Better
 Shopify Order Tracking: How to Configure, Automate & Optimize the Post-Purchase Experience
 Introducing New Shopware 6 Feature: Data Transformation – Script Editor for Row Modification During Import