
How To Sync Inventory In Shopify Between Two Stores Automatically
![]()
Running multiple Shopify stores can be time-consuming and exhausting unless you start automating various routine processes. For instance, you can dramatically improve your inventory management efforts. Below, we explain how to sync inventory in Shopify in a fully automated manner. The following article provides a clear scheme of Shopify product sync based on the Import & Export Tool by Firebear that requires no external supervision. You will learn how to prepare your website to turn it into an automated Shopify store. After explaining what Shopify automation is, we will carefully guide you through all stages of creating a schedule for your inventory sync in Shopify.

Table of contents
- 1 What Shopify Automation Is
- 2 Shopify Product vs. Inventory Sync
- 3 How To Sync Inventory In Shopify Between Two Stores Automatically
- 4 Final Words
What Shopify Automation Is
So, what is Shopify automation? Ander Shopify automation we assume a series of actions that can help you harness various routine processes and let them run in the background without any impact, such as Shopify sync of inventory or products between two e-commerce websites, exchange of customer data between your online storefront and a remote CRM system, or order data transfer from Shopify to a third-party ERP platform.
The main purpose of Shopify automation is to reduce the time necessary to run various repetitive processes. Instead of doing everything by yourself, you delegate your authority to an application or instrument. And because it is a comprehensive list of measures, we only focus on Shopify product synchronization and the corresponding inventory sync in this guide.
Shopify Product vs. Inventory Sync
While synchronizing a product catalog and the corresponding inventory is usually the same integral process, you may need to split it into two different procedures in some cases.
For instance, you have an existing e-commerce website but want to create another store with the same product catalog though unrelated inventory. In this case, Shopify product sync is the only thing that matters. You may exclude the inventory data from export in this situation.
Inventory sync in Shopify, on the other hand, is intended to keep the information on the current product quantity in your warehouse for all stores. Let’s explore how it happens.
How To Sync Inventory In Shopify Between Two Stores Automatically
We break the process of inventory synchronization into several intuitive chapters, each of which also provides an understanding of Shopify product sync.
Use Consistent Location Naming to Sync Shopify Inventory
First things first, you need to synchronize the names of your inventory locations. Proceed to the next step if you do not use multiple locations.
However, if your shopify websites rely on two or more warehouses, you need to keep their namings consistent. Go to Shopify Admin -> Settings -> Locations in both stores and make sure that you have the same amount of locations and their names are the same.
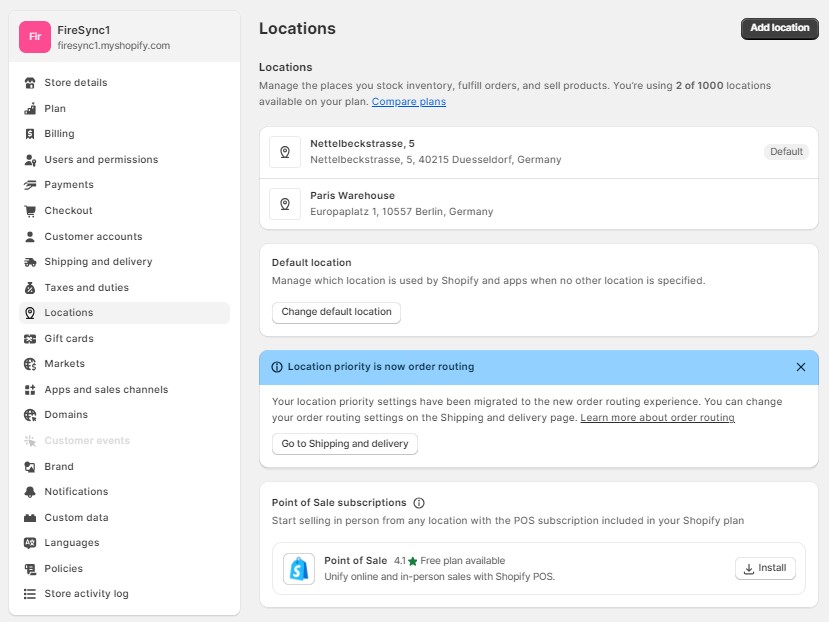
When exporting from Store A to Store B, the app will try to set Inventory Qty for each location as listed in the exported file. If your location names are different on each of your websites, it may lead to import issues.
Create Export Profile: Your Shopify Sync of Inventory Begins Here
Right now, you need to export the existing product and inventory data from Store A. You will be able to provide the export output to Store B later. Create a new export profile under your Shopify admin panel, Apps, and Firebear Import & Export Tool. Select “Export” and click on the “New Profile” button.
Step 1: Configure Export
The app takes you to the “Configure export” screen where you can set up your automated Shopify exports for product data and inventory:
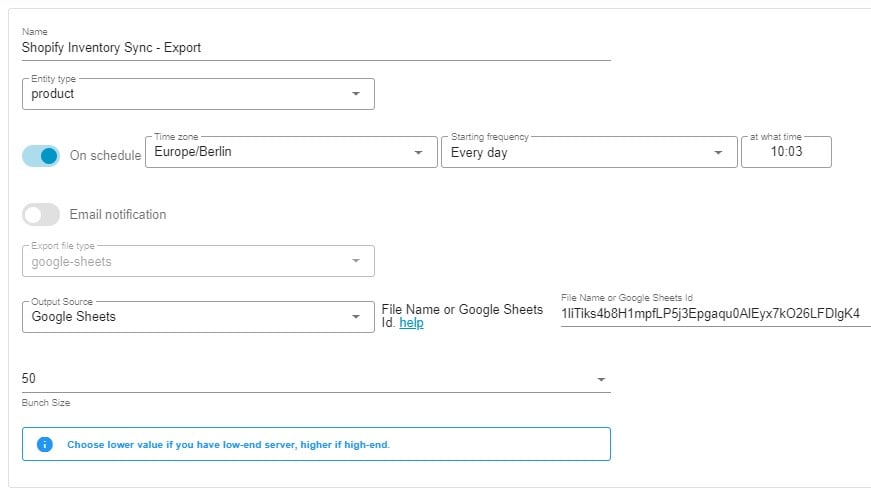
- Specify a name for your profile, for instance, Shopify inventory sync.
- Choose products as your export entity. Note that the app also lets you export customers and orders.
- Enable the On Schedule toggle. That’s how to sync inventory in Shopify automatically. Follow these steps to create a schedule for your product exports:
– Choose your time zone.
– Select the starting frequency of your inventory sync in Shopify. The app lets you run the transfer hourly, daily, weekly, or monthly;
– Hourly export. To export products every hour, choose at what minute to start your data transfer processes;
– Daily updates. To run Shopify product sync every day, choose the time of the day to run the product export;
– Weekly updates. To export products every once per week, choose the day and time to initiate the data transfer;
– Monthly exports. To export products every month, select the date and time to initiate the process. - Now, when your schedule is ready. You can configure email notifications to stay informed on the results of your automated exports. If the app cannot export products, you will be informed right after the process is failed.
- Select your preferred file format to run the automated exchange. Our app works with CSV, XML, XLSX, and Google Sheets. We recommend you use Google Sheets to avoid unnecessary file exchanges.
- Now, you need to choose your export source. Choose Google Sheets and specify an existing spreadsheet’s ID to export your product data to. Other supported sources include file downloads, FTP transfers, or Google Drive exports.
- If your server has some resource limitations, you can choose a lower bunch size to reduce the load.
- Click “Continue” to proceed to the next screen.
Step 2: Configure Mapping
Now, you can leverage the app’s mapping screen. Since you transfer data between the two Shopify websites and your location names are synced, there is no reason to worry about unsupported column names.
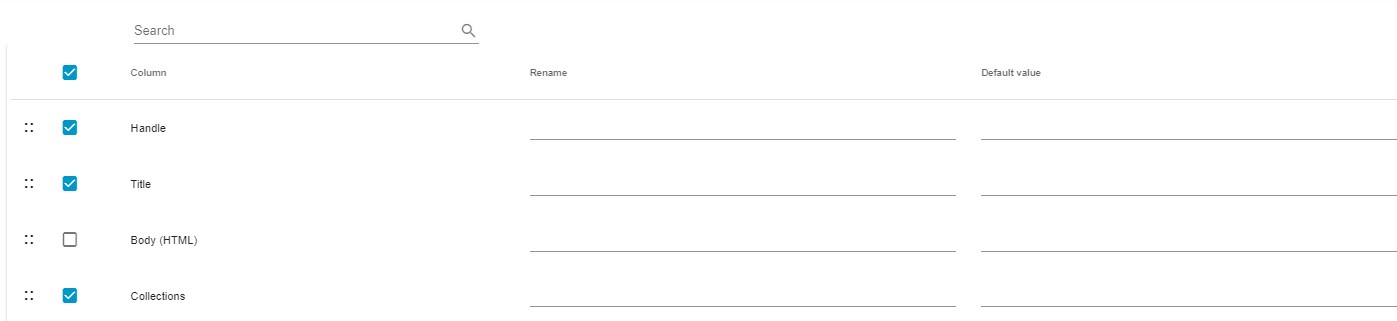
However, you may deselect any columns that should be excluded from your automated Shopify product sync. For instance, you may reduce your table to a product name, quantity, and a few more columns for inventory synchronization between two similar catalogs. At the same time, it is possible to exclude the inventory quantity at this step to sync product data only.
Step 3: Create Filters
Now, you can add filters to export only specific items, for example, only зroducts that exist only in a certain collection or those associated with a particular vendor. Creating a filter is reduced to the following intuitive steps:
- Press the “+” button;
- Select a product property – collection_id, vendor, or anything else you need;
- Specify a value.

Note that you can add more than one filter. Click the Save & Close button to save your Shopify product export profile. The app will transfer your product data from Shopify according to the specified schedule.
Create Import Profile: Continue Your Shopify Inventory Sync
Now, you need to go the Store B and configure an import profile under Apps -> Firebear Import & Export Tool -> Import. Click the “New Profile” button and let’s see how to sync inventory in Shopify during the final step.
Step 1: Select File
The “Select File” screen is a place where you specify all the basic parameters necessary for a successful Shopify product sync:

- Specify your profile name, such as Shopify Inventory Import or Shopify Product Import depending on your goals.
- Select Products from the list of import entities.
- Set up a schedule of updates to automate your inventory sync between the two Shopify stores. The procedure is similar to the one we described for export: Select a time zone and choose the starting frequency.
- Configure email notifications to get updates on failed, successful, or both types of product imports to Shopify.
- Select your file format as “google-sheets” (the app also works with CSV, XML, and XLSX files).
- Opt for Google Sheets as your import source and paste the link to your sheet. It should be the same Google Sheets table that you use for export from Store A. Alternatively, you can run FTP transfers, URL imports, or Google Drive uploads.
- Configure stock increment strategy.
When it’s turned off, you’re telling the system to replace the existing product inventory with the quantity specified in your import file. For example, if Store B currently has 100 items in stock, and your import file specifies a quantity of 53, your store’s stock level will be 53 after the update.
When the feature is enabled, you’re signaling that you want to boost your existing product inventory by the amount indicated in your file. So, if your actual product quantity is 100, and your update once again specifies a quantity of 53, your inventory after the import will be 153. - Click “Continue” to proceed to the mapping screen.
Step 2: Configure Mapping
Since you sync inventory between two Shopify stores, there is no reason to worry about unsupported column names. Click “Continue” to proceed to the next screen.

Step 4: Preview Results & Import
The app provides a preview of how your products will appear on your website after importing them from Google Sheets. So, the results of your future Shopify product sync are visible without the actual procedure being complete. Consequently, you can spot any mistakes or inconsistencies, return to the previous steps, and address them.
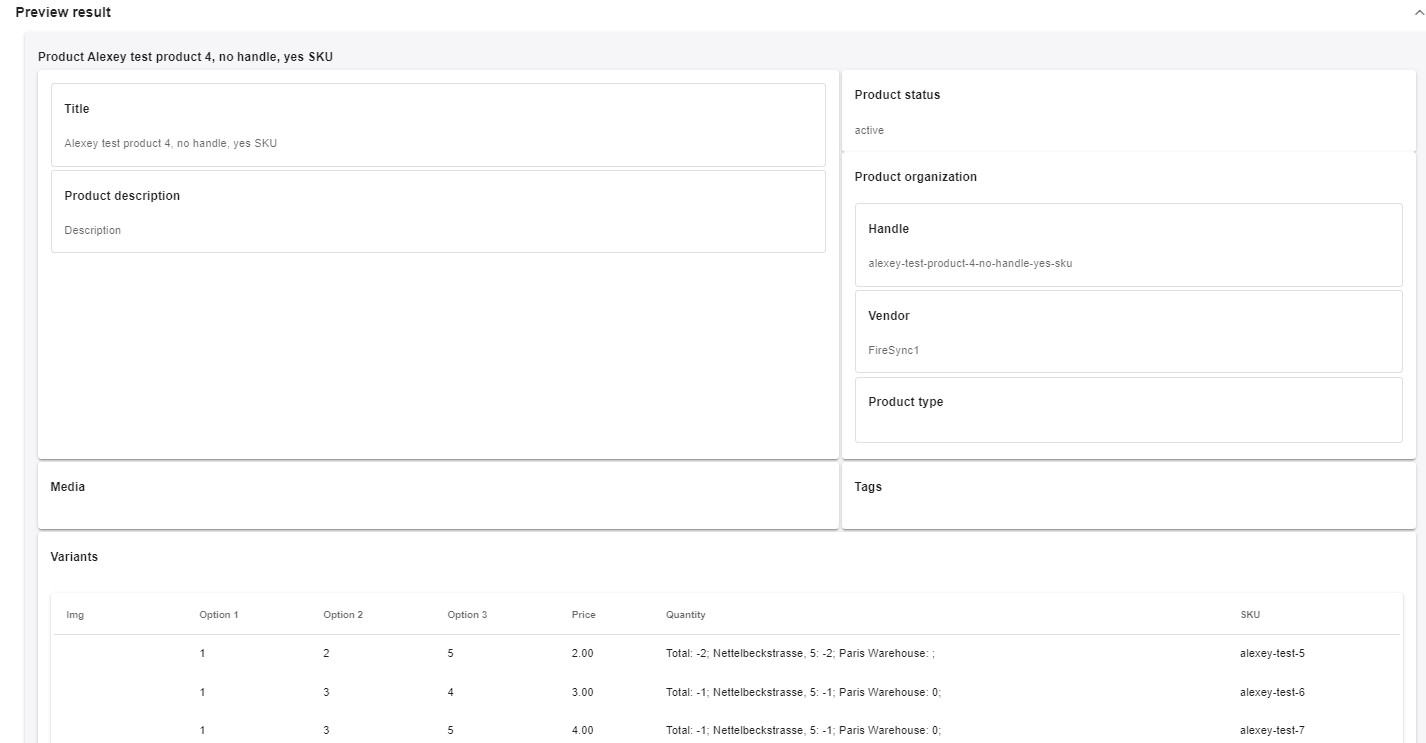
Click the “Save” button to save your Shopify product sync import profile. The app will initiate the data transfer according to your schedule.
Final Words
Now, you know how to sync inventory in Shopify. In addition to product data, you can also synchronize customers and orders using the very same mechanism described above but choosing the corresponding entity instead of products. You can set up the same product synchronization for Shopify in both directions – just set up the same logic from Store B to Store A, but keep in mind that our app lets you run only three import or export processes simultaneously. Therefore, it is recommended to specify different starting times for the corresponding import and export processes. For more detailed information on inventory sync in Shopify and other import and export enhancements, refer to our Improved Import & Export Tool Manual or contact us.