
Advanced Shopify Exports: Notifications for Failed & Successful Exports
![]()
We’ve already described how to be always up-to-date with Shopify imports, so welcome to a comprehensive guide on staying updated about Shopify export operations. While it’s not always easy to keep track of every data transfer, we’re here to introduce you to a reliable solution that offers email notifications tailored for Shopify exports. Meet the Firebear Import & Export Tool. In the upcoming article, we’ll uncover the benefits of export notifications, introduce you to various types of export alerts, and walk you through the setup process for Shopify export notifications. For more valuable insights and tips, don’t forget to explore the pages of the Shopify Cookbook.

Table of contents
The Benefits of Shopify Export Notifications
While the advantages of export notifications in Shopify may not be as conspicuous as their import counterparts, they bring forth a range of benefits. Let’s explore the following perks you can get with Shopify export notifications:
- Timely Updates: Stay in the loop with real-time updates on the status of your data exports, ensuring you are consistently informed.
- Error Identification: Receive immediate alerts regarding any issues or errors during the export process, allowing for prompt resolution.
- Third-Party Communication: Streamline communication by utilizing export notifications to inform third parties, partners, or collaborators that your data updates are ready.
- Efficient Workflow: Automate export processes with notifications, saving time and effort by eliminating the need for manual checks.
- Data Accuracy: Gain confidence in the accuracy and currency of your exported data through notifications confirming successful exports.
- Collaborative Data Management: Share notifications with team members or stakeholders, fostering a shared understanding of export activities.
- Enhanced Decision-Making: Access timely export status updates for better decision-making and improved business planning.
- Improved Customer Service: Ensure accurate and timely service to customers if your exports impact their orders or information, supported by notifications.
- Reduced Downtime: Minimize downtime by promptly addressing export issues to prevent potential disruptions to business operations.
- Seamless Integration: Integrate export notifications seamlessly with other tools or platforms to create a comprehensive data management ecosystem tailored to your needs.
Collectively, these benefits contribute to a smoother and more efficient data export process in Shopify, fostering data accuracy and enhancing overall workflow. Let’s see what types of exhort alerts are at your service.
Types of Shopify Export Notifications
The Enhanced Import & Export Tool for Shopify introduces three distinct notification types for export operations. These notifications deliver real-time updates regarding the status of your data transfers, encompassing successful exports, unsuccessful data transfers, or a combination of both. Customize your notification preferences by choosing from the following options:
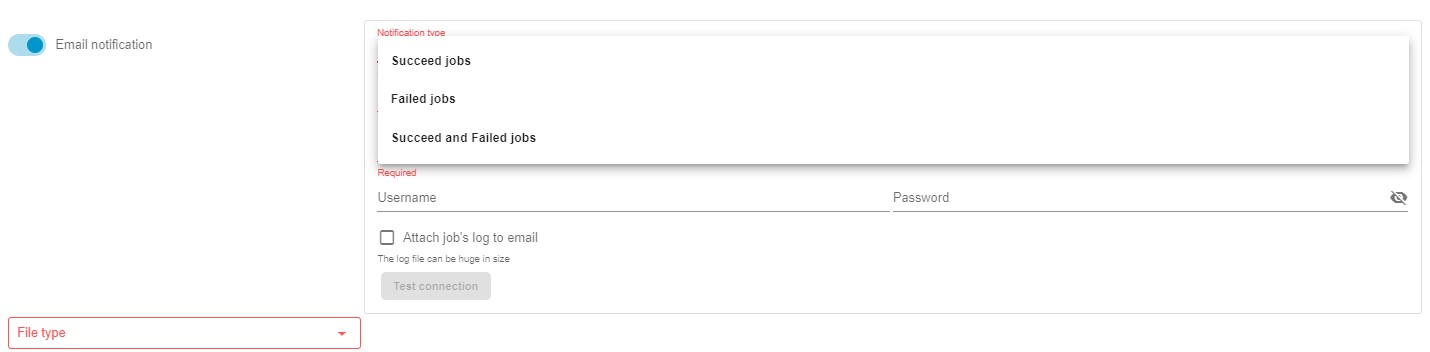
- Successful Jobs: Opt to receive notifications exclusively for successful export jobs. This preference ensures you are promptly informed when your data transfers conclude without errors.
- Failed Jobs: Choose notifications solely for failed export jobs. This option keeps you alerted to any problems or errors during your data transfers that necessitate attention.
- Successful and Failed Jobs: Select this option to receive notifications for both successful and failed jobs. Stay informed about all export job outcomes, enabling comprehensive monitoring and proactive issue resolution.
Tailor these notification settings to align with your specific needs and preferences, ensuring that you receive the most pertinent updates concerning your Shopify export processes.
How to Turn On Shopify Export Notifications
To set up Shopify export notifications using the Improved Import & Export Tool, follow these steps:
Step 1: Access the Export Profile
Create a new export profile:
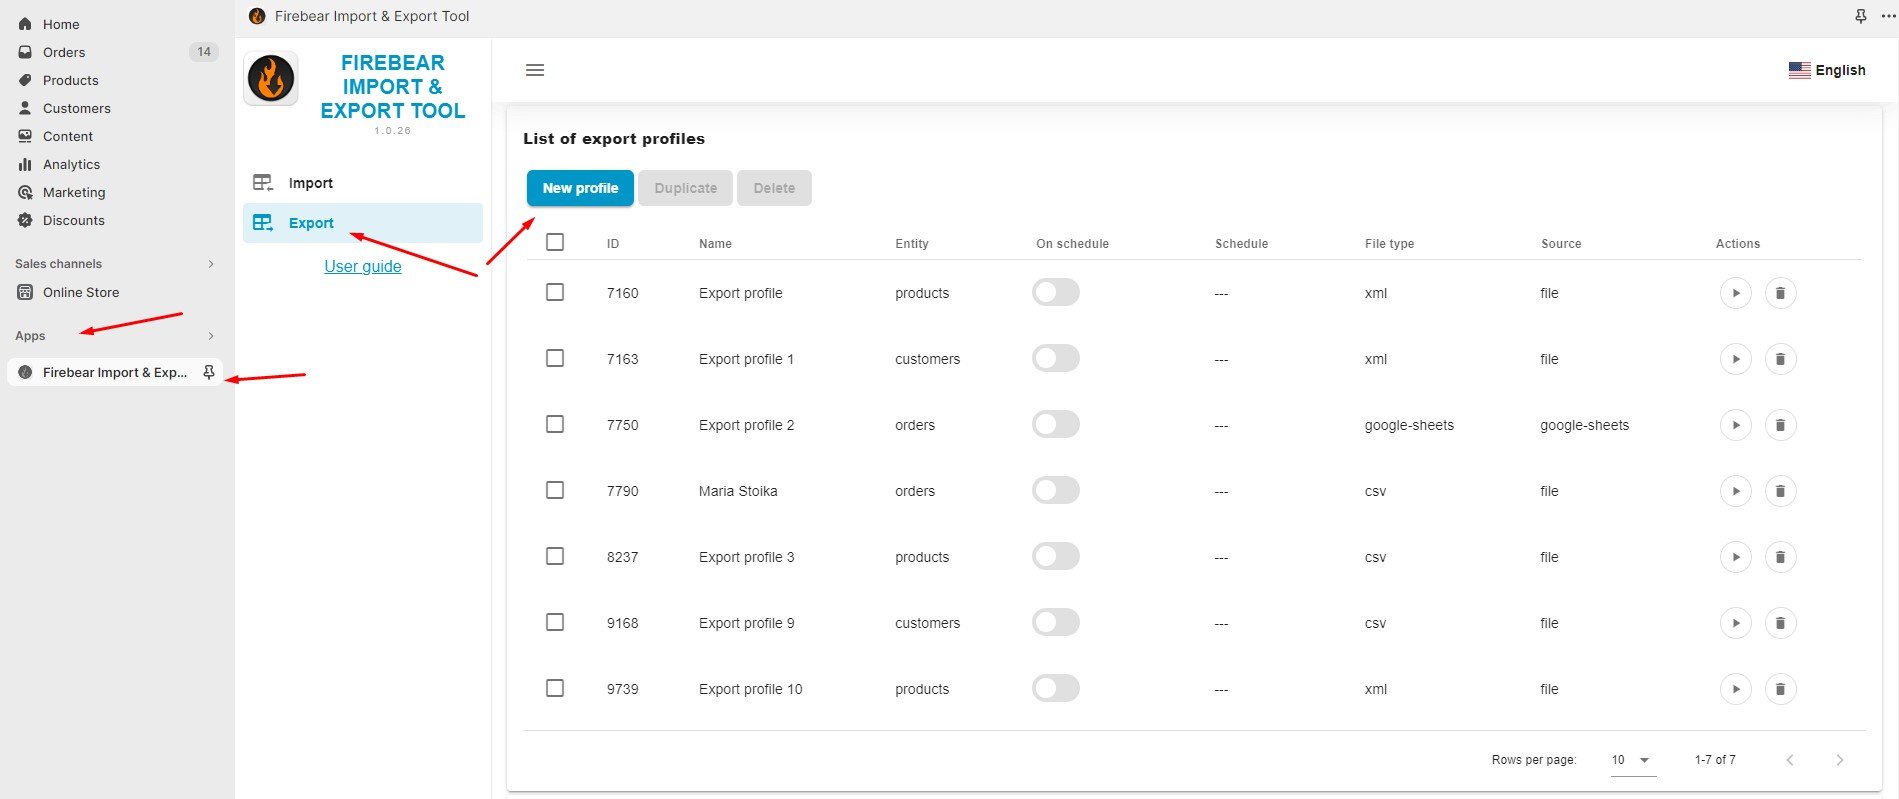
- Go to your Shopify admin panel, Apps, and Firebear Import & Export Tool.
- Select “Export” and click on the “New Profile” button.
Alternatively, you may enable notifications for already existing profiles. Choose one of them in the same Export section and follow the steps below.
Step 2: Configure Export
You are on the “Configure export” screen. Here, you can set up your automated Shopify export as follows:
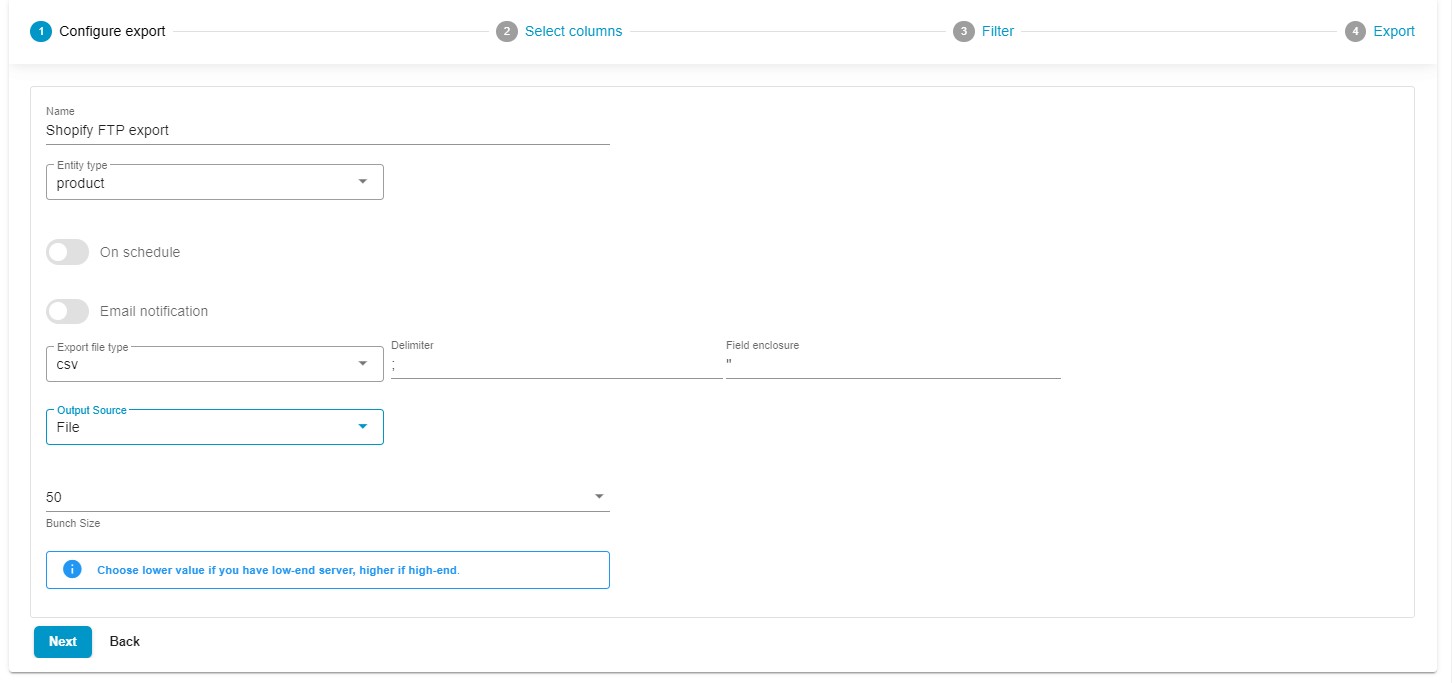
- Name your profile.
- Choose an entity to export: products, customers, or orders.
- Enable the On Schedule toggle to create a schedule of updates.
- Configure email notifications to stay informed on the results of your automated exports:
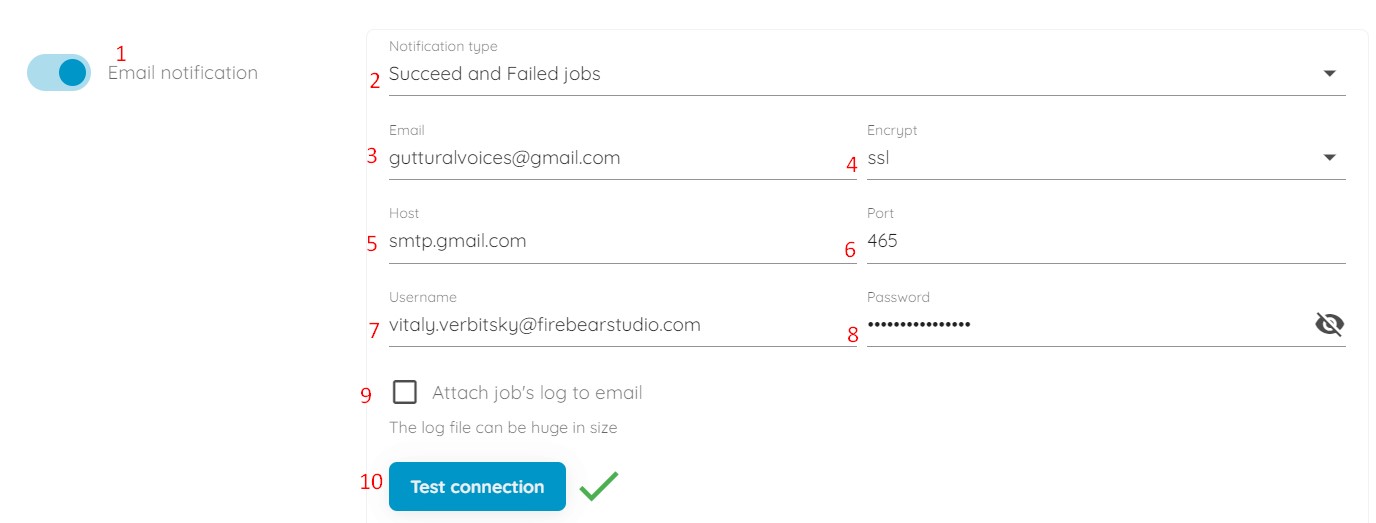 – Toggle on the notification switch.
– Сhoose the type of Shopify export notification: Succeed jobs, failed jobs, or Succeed and failed jobs.
– Provide an email address to send notifications to.
– Select the encryption type.
– Specify the host for your email address.
– Set the corresponding port.
– Enter a sender’s username (an email address).
– Add the corresponding password.
– Attach job logs to the notification emails, but be aware that they may be big in size.
– Click the “Test Connection” button. If the configuration for Shopify import notifications is successful, you will receive a notification message in the provided mailbox. - Select your preferred file format. Choose CSV, XML, XLSX, or Google Sheets.
- Choose your export source: file downloads, FTP transfers, or Google Drive exports.
- If you have a server with limited resources, you can choose a lower bunch size that suits your needs.
- Click “Continue” to proceed to the mapping screen.
Step 3: Configure Mapping
Now, you can configure mappings, replacing the default column names with the ones your partners require.
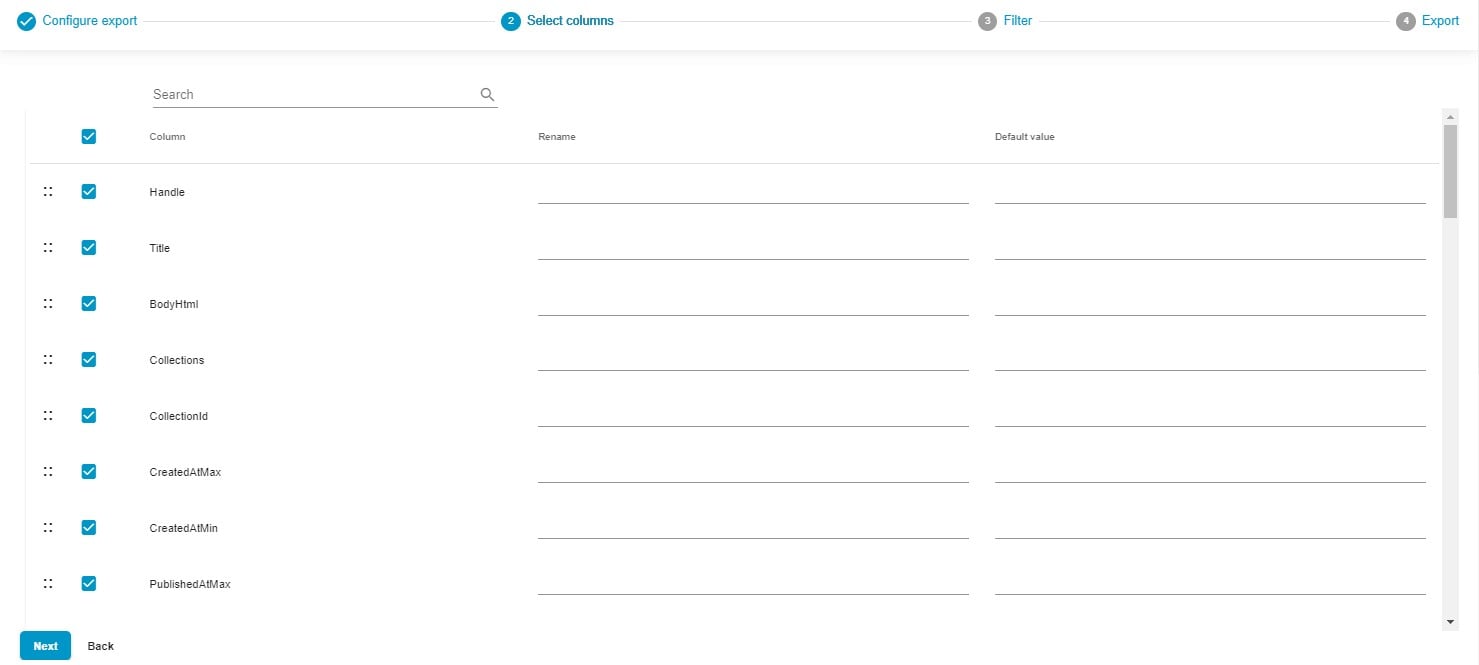
Moreover, you have the flexibility to unselect specific columns that you prefer to exclude from your Shopify exports.
Utilize a user-friendly drag-and-drop interface to arrange columns in your preferred order. Simply select the column you want to reposition, effortlessly drag it to the desired location, and drop it into place.
Enhance your export customization by incorporating default values. In instances where a particular attribute lacks a value, easily assign a default value within the relevant section. This ensures that the export file seamlessly integrates the specified default value in place of any missing data.
Here’s more good news: save these configured parameters, allowing the application to utilize them automatically for subsequent data exports. This eliminates the need for manual interventions!
Step 4: Create Filters
The next section lets you create filters to narrow down the number of export rows:

- Add a Filter: Click the “+” button to add a filter.
- Select a Product Property: Choose a product property to define the filter criteria.
- Specify a Value: Provide the value that aligns with your chosen criteria.
- Create Multiple Filters: repeat these actions if you need more filters.
Step 5: Save and Export
Click the “Save & Close” button to save your Shopify export profile. It will be launched automatically according to the predefined schedule. Or you can launch it right now by clicking the “Import” button.

For more detailed information on the enhanced Shopify export capabilities associated with the app, refer to the Improved Import & Export Tool manual.
Other Features
Shopify merchants can now leverage the Firebear Import & Export Tool to elevate their data management game. This app goes beyond the basic functionalities of the default Shopify toolkit, introducing a set of features that can significantly enhance data handling. Breaking free from the limitations of standard data transfer tools, this software brings a multitude of advantages to the table:
- Comprehensive Product Handling: Streamline the management of product data and custom properties, ensuring your catalog is always in sync.
- Customer Data Management: Simplify the import and export of customer details for more effective customer relationship management.
- Efficient Order Export: Gain valuable insights from transactions and sales analytics with the streamlined export of order data.
- Accurate Data Mapping: Define precise data relationships for seamless integration into your Shopify store.
- Flexible Scheduling Options: Set up custom import and export schedules to automate data updates according to your business requirements.
- File Format Versatility: Seamlessly work with CSV, XLSX, and XLSX files for smooth data transitions.
- Google Sheets Integration: Facilitate collaborative data management by effortlessly transferring data between Shopify and Google Sheets.
- Direct File Uploads: Simplify the import and export of data files, promoting efficient data management.
- Secure FTP/FTPS Uploads: Ensure the security of data transfers with robust support for FTP/SFTP protocols.
- Google Drive Integration: Streamline data file uploads with seamless integration with Google Drive.
To sum it up, the Firebear Import & Export Tool is the go-to solution for Shopify business owners looking to streamline data management and automate repetitive import and export operations. With its support for multiple file formats, advanced scheduling, flexible mapping, and seamless integration with Google Sheets and Google Drive, this tool empowers users to optimize their data processes while maintaining accuracy and relevance. For more detailed information about this product, please visit: