
Advanced Shopify Export: How to Export Shopify Orders to Excel
![]()
In this article, we continue our exploration of the Shopify Excel integration. This time, you will learn the nuances of the Shopify to Excel export. At the same time, we explain another important topic – the Shopify export of orders. By default, this functionality is available in your admin but it’s fairly limited. However, you can easily extend it with the help of third-party apps, such as our . We explain how to export orders in Shopify below. Note that this is only one topic covered.
When it comes to the various file types, Shopify’s preferences are rather limited: CSV or CSV. You are restricted to this format and its modification. But what if you need to store exported data in the XLSX format? Fortunately, our Import & Export Tool for Shopify introduces a more streamlined solution. In addition to the default CSV imports and exports, it also supports a variety of other file formats, including XLSX. It means that you can easily create an output with Shopify customer, product, or order data suitable for Excel.
Below, you will discover how to export Shopify orders to Excel. We describe this transfer since it illustrates the integration opportunities associated with our module. But let us delve into the nuanced disparities between CSV and XLSX first. For further information on how to enhance your e-commerce routine, follow our Shopify Cookbook. So, how do you export XLSX from Shopify? Let’s find out!

Table of contents
Shopify to Excel Export: CSV vs. XLSX
CSV, an abbreviation denoting ‘comma-separated values,’ functions as a structured repository of data that may seem intricate to real viewers but is effortlessly navigable for computational systems. The main feature of this format is that data segments within a file are precisely demarcated by commas but look like a disordered amalgamation of symbols, words, and phrases. However, this apparent disorder yields clarity for those acquainted with the meanings assigned to the stored items and the barriers between them. The inherent simplicity renders CSV a straightforward format, necessitating minimal resources for both storage and processing.
Turning our attention to XLSX, it represents the sophisticated counterpart in the digital realm, affiliated with the distinguished Microsoft Excel Spreadsheet family. These files do not arrive casually; they are presented in a zip-compressed format, enriched with the intricacies of XML. XLSX transcends the mere organization of data; it orchestrates it with the finesse of tags and other forms of technical wizardry.
How do CSV and XLSX diverge? CSV distinguishes itself through its simplicity and agility, resembling a dependable bicycle suitable for uncomplicated data journeys, devoid of technical intricacies.
Conversely, XLSX emerges as a versatile tool in the data universe. Excelling with complex, structured data, it wields the formidable spreadsheetML markup language and schema. Visualize data arranged in a grid of cells, with each cell functioning as a powerhouse capable of housing values and formulas. The exceptional capability lies in its capacity to incorporate multiple worksheets in a single workbook, thus crafting an interconnected data symphony.
Opting for XLSX over CSV is associated with the following advantages:
- Structured Data Handling: XLSX is well-suited for managing intricate and organized data that incorporates multiple worksheets, rows, and columns within a single workbook.
- Formulas and Calculations: It also supports intricate formulas and calculations, enabling mathematical operations and direct data analysis within the spreadsheet.
- Rich Formatting: This format provides an array of formatting options, including text styles, cell colors, and conditional formatting, facilitating the creation of visually appealing reports.
- Data Validation: XLSX allows the definition of data validation rules, ensuring accuracy and consistency by setting constraints on data entry.
- Cell Comments: It also supports the inclusion of cell comments for supplementary context, enhancing documentation and fostering collaboration between teams.
- Data Protection: Password protection and encryption are the features that add an extra layer of security for sensitive data.
- Data Visualization: The inclusion of charts, graphs, and images aids in conveying insights and trends more effectively.
- Compatibility with Advanced Software: XLSX is compatible with various advanced software applications, facilitating seamless data integration and analysis.
- Automation: It can be easily generated and manipulated programmatically using scripting languages like Python, making it suitable for automating data-related tasks and workflows.
- Google Sheets Integration: You can effortlessly open XLSX files in your browser, converting them into Google Sheets spreadsheets with just a few clicks.
XLSX offers superior versatility, advanced data management capabilities, and enhanced visualization options in comparison to CSV. It is the preferred choice for handling complex and data-rich scenarios, particularly in business, finance, research, and data analysis contexts.
Shopify to Excel Export & Default Tools
Exporting XLSX files directly from Shopify is impossible. Unfortunately, Shopify to Excel export is not the platform’s built-in feature. However, you can achieve it by following a multi-step process involving the use of CSV files:
Step1: Export Data as CSV
First of all, you need to export a standard CSV file from your e-commerce website:
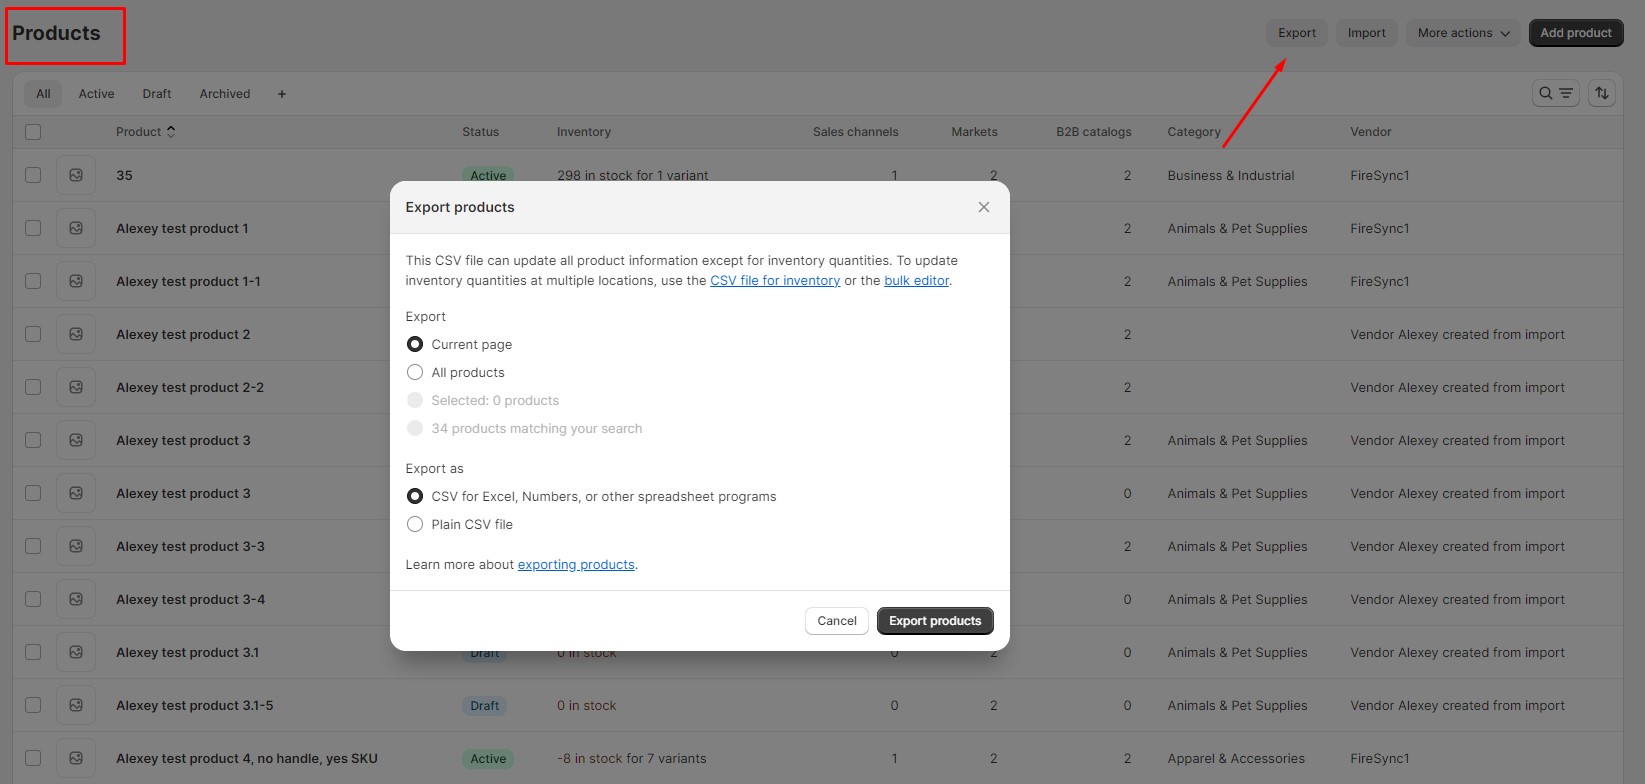
- Go to your Shopify admin and choose the relevant section, for instance, orders.
- Click on “Export.”
- Configure export parameters.
- Click “Export” to download the CSV file.
Step 2: Convert CSV to XLSX
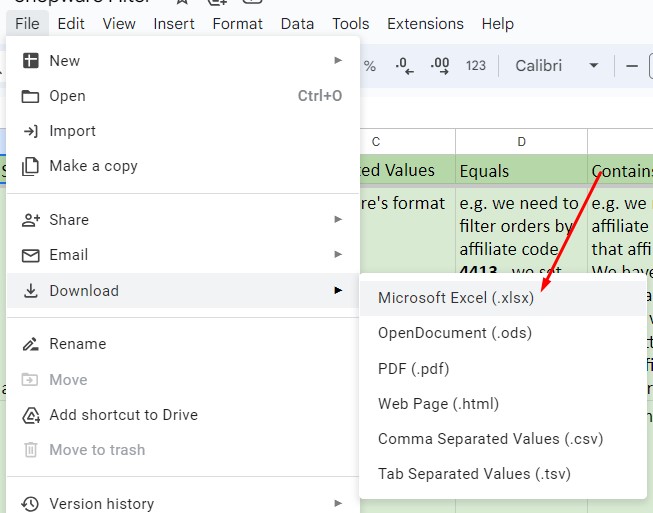
Now, you need to convert the CSV output into XLSX. Numerous free converters are available online. You can also use tools like Microsoft Excel or Google Sheets to open and save the CSV file as an XLSX file.
Upload your CSV file to Google Sheets (File -> Import-> Choose your file) and then export it as XSLX (File -> Download -> Microsoft Excel).
Step 3: Adjust XLSX Structure (if needed)
Ensure the XLSX file structure aligns with your requirements. Manually edit the XLSX file if adjustments are necessary, such as adding specific tags, rearranging data, or replacing Shopify’s column names with the titles your partner requires. Note that you can do that in Google Sheets before exporting your table as XLSX.
Step 4: Save and Use XLSX
Now, you can save the edited XLSX file to your computer or provide it to a third party. It may take much time and effort to convert your files with the help of the default tools since this process involves some manual steps. For a more streamlined approach, consider using third-party apps designed for XLSX data integration with Shopify, such as the Import & Export Tool for Shopify. It provides the ability to implement Shopify Excel export. Let’s see.
The Default Shopify Export of Orders
You can export orders from Shopify as follows:
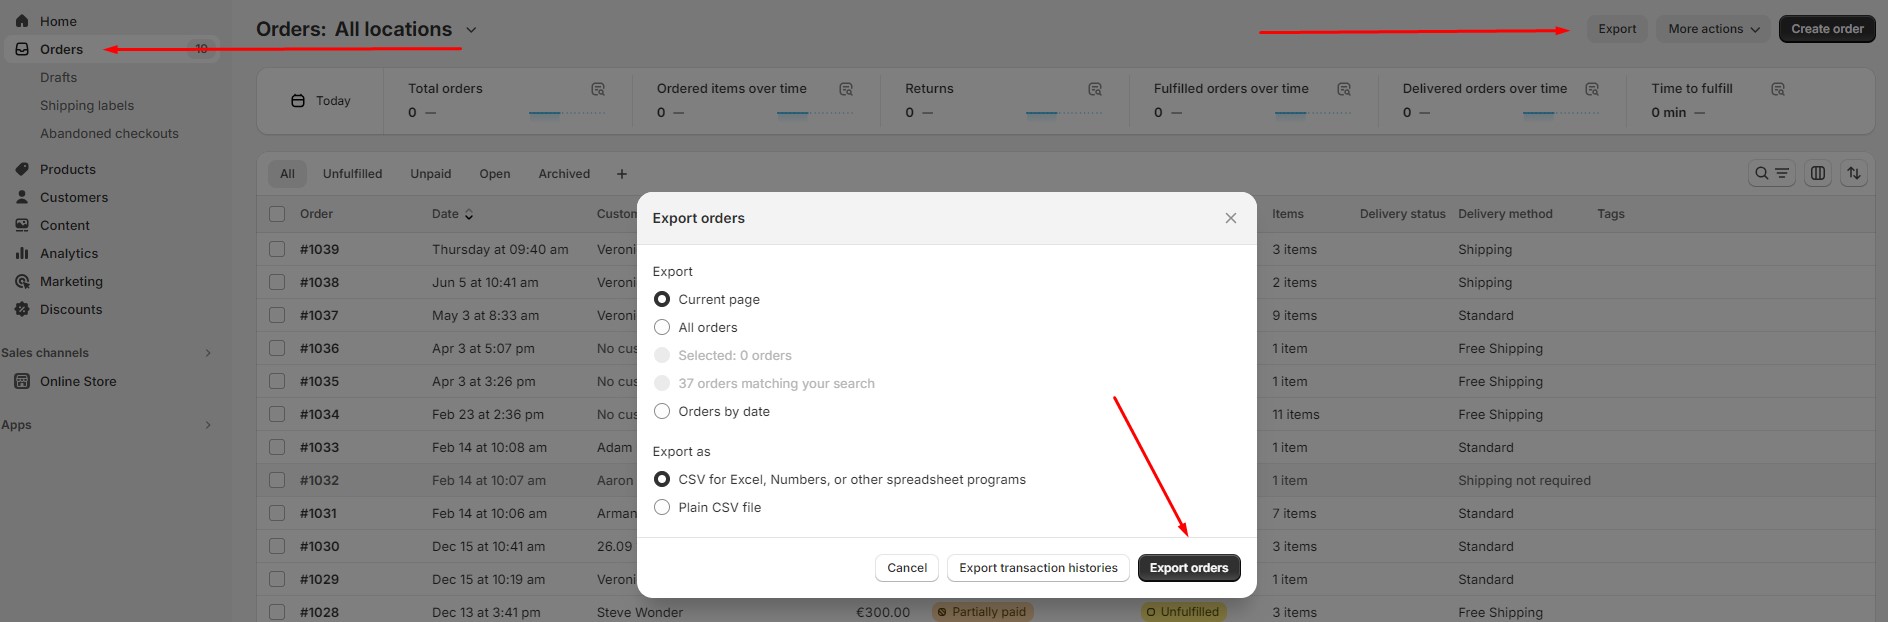
- Go to the Orders screen in your admin.
- Hit the Export button.
- Choose what orders to export: all orders, current page, selected orders, orders matching your search, or orders by date.
- Select a CSV format suitable for your export: plain CSV or CSV for spreadsheet editors.
- Hit Export orders.
Note that Shopify doesn’t let you export orders automatically, provides zero mapping options, and offers limited filtering options. Let’s see what alternative approach is available.
How to Export Shopify Orders to Excel
Our Import & Export Tool for Shopify supports XLSX in import and export processes. You can effortlessly export Shopify orders to Excel by following these steps:
Step 1: Access Your Shopify Order Export Profile
Сreate a new profile for XLSX transfer to export Shopify orders to Excel:
- Go to your Shopify admin panel.
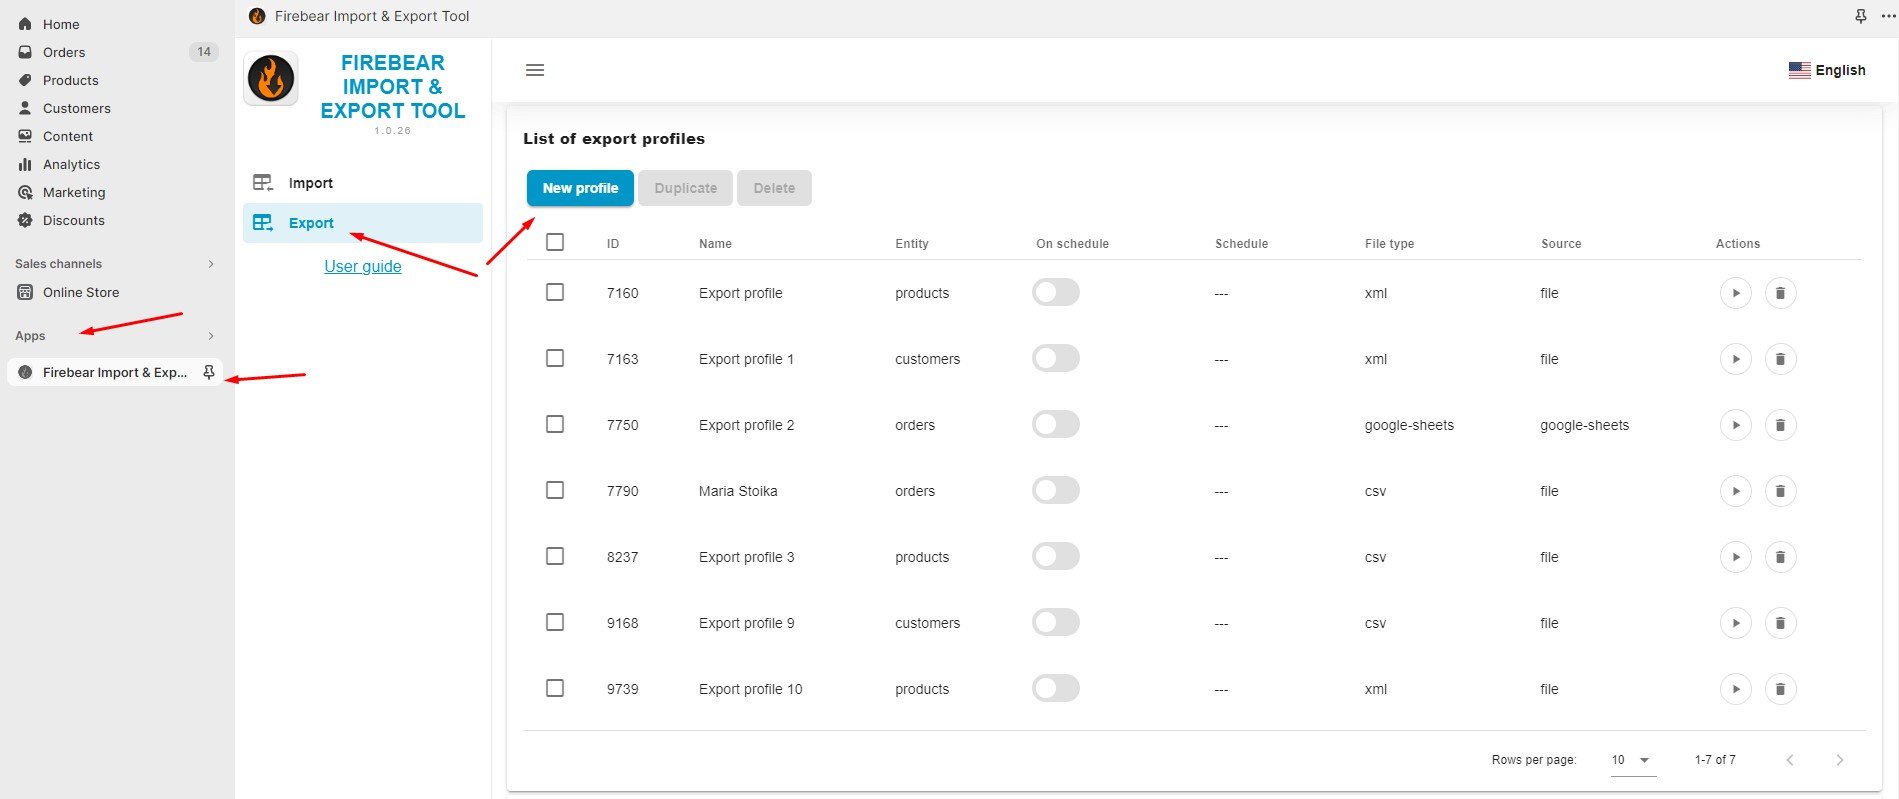
- Navigate to “Apps -> Firebear Import & Export Tool.”
- Select “Export” and click the “New Profile” button to configure a new order export profile.
Step 2: Configure Shopify to Export Export
On the “Configure export” screen, set up your Shopify order export profile:
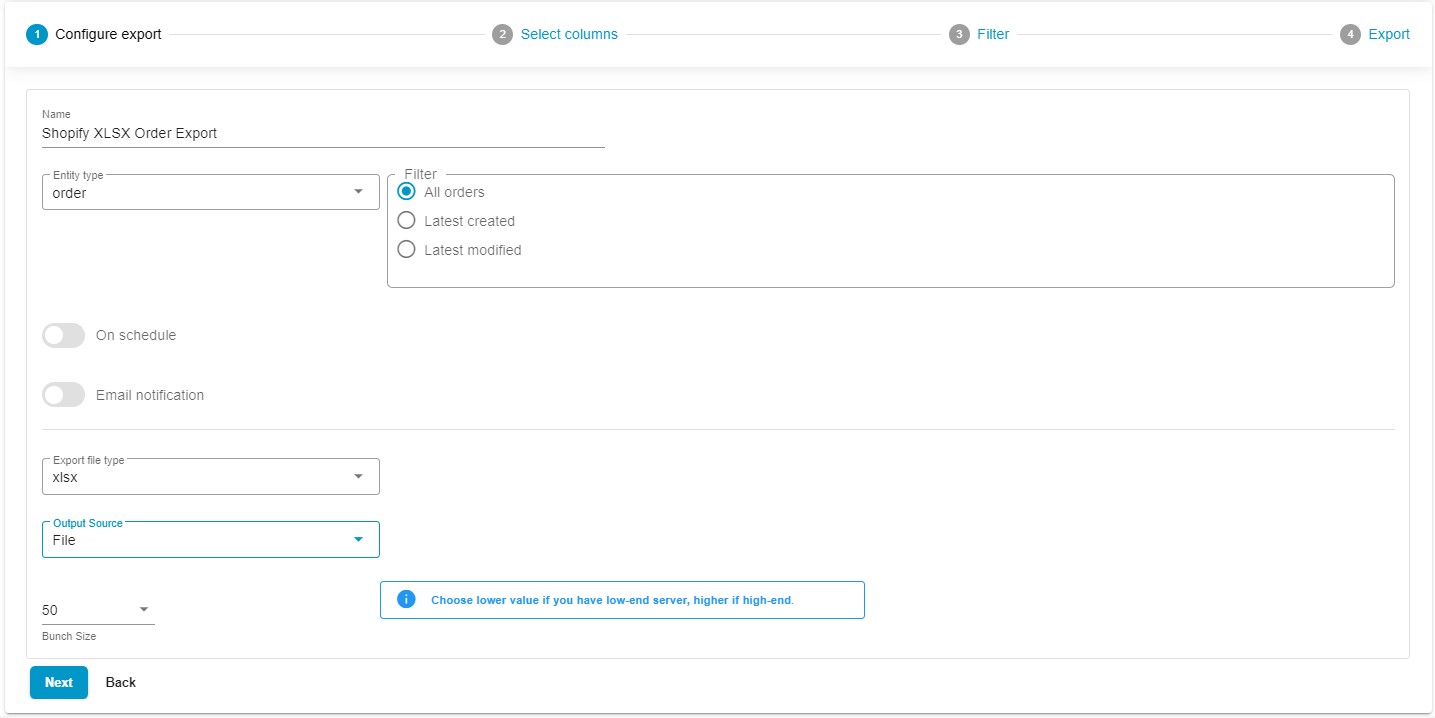
- Specify a name for your profile, e.g., “Shopify to Excel Order Export.”
- Choose Orders to export Shopify orders to Excel.
- By default, Shopify cannot export orders automatically. But you can create a schedule to automate your data transfers, including Shopify XLSX exports.
- Configure email notifications to stay informed on the results of your Shopify to Excel exports.
- Select your preferred file format – XLSX. Other options include CSV, XML, and Google Sheets spreadsheets.
- Choose your export source: standard file downloads, FTP transfers, or Google Drive exports.
- If you have a server with limited resources, you can choose a lower bunch size that suits your needs.
- Click “Continue” to proceed to the mapping screen.
Step 3: Map Shopify Order Attributes
Now, you can configure mappings: customize the default Shopify column titles to meet the specific requirements of a third party. Specify new values to replace the defaults in your admin rather than doing that in an editor after the export.
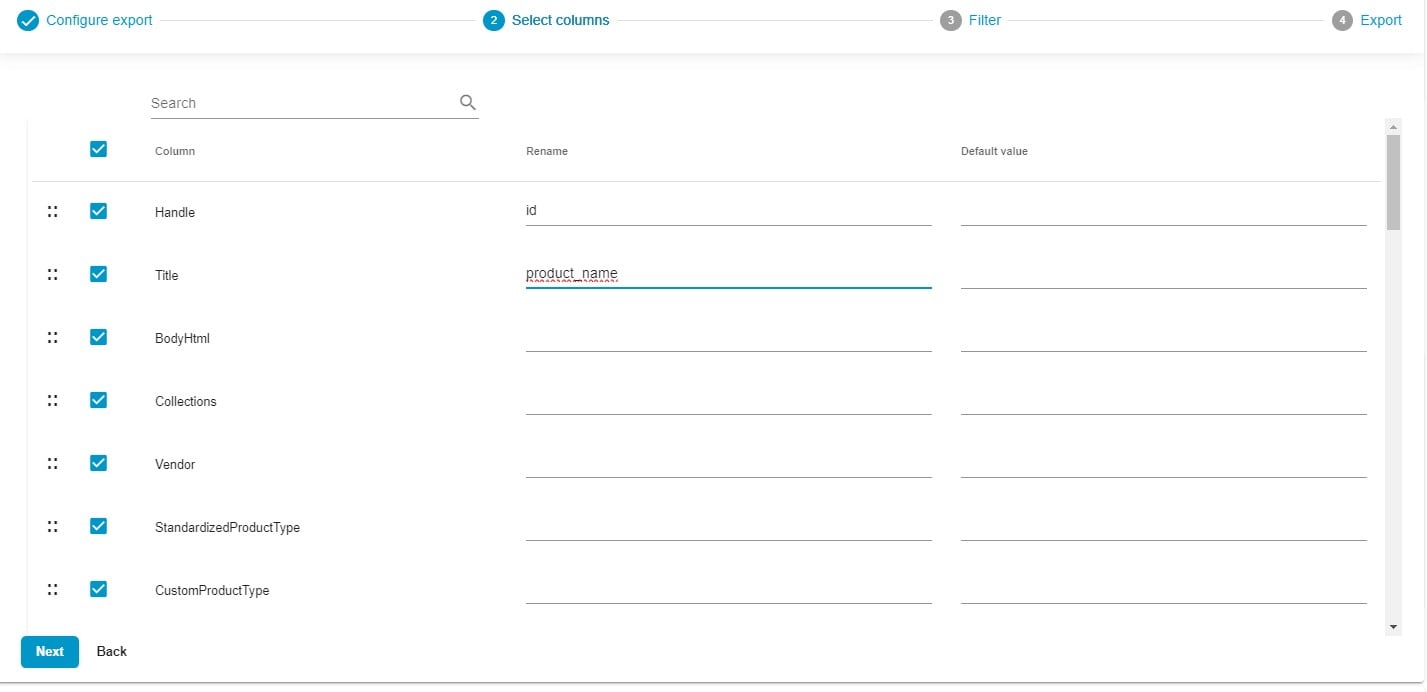
Unselect any columns to exclude them from your Shopify to Excel export.
Also, you can re-arrange columns in the desired order by using a drag-and-drop interface to present the output of your Shopify order export in any desired form.
You can even incorporate default values if necessary. If a particular attribute lacks a value, assign a default value within the relevant section. The export file will then seamlessly incorporate the specified default value instead of any absent data or the system data for this attribute and item.
Another good news is that you save these parameters and the app uses the predefined mapping configurations for further XLSX exports. It means that no manual interactions are required for the next data transfer.
Step 4: Create Filters to Narrow Down The Selection of Shopify Orders
Proceed to the next section to create filters to refine the selection of orders you export from Shopify to Excel. For instance, you can export products per vendor:

- Add a Filter: Click the “+” button to create a new filter.
- Select a Product Property: Choose a product property to define the criteria – “Vendor”.
- Specify a Value: Provide the value that aligns with your chosen criteria – your vendor’s name, such as Samsung, Peavey, Apple, etc.
- Create Multiple Filters: Apply multiple filters if necessary.
Step 5: Save and Export Shopify Orders to Excel
Click the “Save & Close” button to save your Shopify XLSX export profile for future use.

When you’re ready, click the “Export” button to launch the update, transferring your data from Shopify as an XLSX file.
For more detailed information on the enhanced Shopify export capabilities associated with the app, refer to the Import & Export Tool manual.
Default Shopify Order Export vs. Firebear
Now, let’s compare the default approach to Shopify order export with the one associated with our Import & Export Tool side-by-side:
| Feature | Standard Order Export | Improved Order Export |
| Standard File Downloads | ✔️ | ✔️ |
| Export to CSV | ✔️ | ✔️ |
| Export to Excel | ❌ | ✔️ |
| Export to Google Sheets | ❌ | ✔️ |
| Export to XML | ❌ | ✔️ |
| Export to Google Drive | ❌ | ✔️ |
| Export Automation | ❌ | ✔️ |
| Email Notifications | ❌ | ✔️ |
| Mapping | ❌ | ✔️ |
| Filters | ✔️ | ✔️ |
Final Words
The Firebear Import & Export Tool is the number one app to address multiple issues and inconveniences associated with the default Shopify import and export tools. Shopify to Excel export is only one of the benefits it offers. The app’s features provide precise control over your data, offering a comprehensive solution for efficiently managing your Shopify store and running the Shopify export of orders without headaches associated with the default approach. Please follow these links for detailed information on the product and its features:
Shopify to Excel Export FAQ
How do I export orders from Shopify?
To export orders from Shopify, follow these steps:
– Log in to your Shopify admin panel.
– Go to the “Orders” section.
– Click on the “Export” button at the top-right corner of the orders page.
– Choose the orders you want to export: all orders, current search, or selected orders.
– Select the export format (CSV for Excel, Numbers, or other spreadsheet programs).
– Click “Export orders” to download the file.
Or use the Import & Export Tool for Shopify to get such extra benefits as Google Sheets and Excel support, automation, and mapping.
How do I export a CSV file from Shopify?
To export a CSV file from Shopify, you can follow these general steps, applicable to different types of data (products, customers, orders, etc.):
– Log in to your Shopify admin panel.
– Navigate to the section containing the data you wish to export (e.g., Products, Customers, Orders).
– Click on the “Export” button typically located at the top-right corner of the page.
– Choose the data range and type (e.g., all products or selected products).
– Select the CSV format option.
– Click “Export” to generate and download the CSV file.
Can you export Shopify data to Excel?
Yes, you can export Shopify data to Excel but you cannot export XLSX or other Excel files. Shopify allows you to export data in CSV format, which is compatible with Excel. Here’s how:
– Log in to your Shopify admin panel.
– Go to the specific section (e.g., Products, Customers, Orders) that you want to export.
– Click the “Export” button.
– Choose the relevant options for the data you wish to export.
– Select the CSV format option.
– Click “Export” to download the CSV file.
– Open the downloaded CSV file in Excel to view and manage your data.
Or use the Import & Export Tool for Shopify to export Excel’s XLSX files with automation and mapping.