
Firebear Import & Export Tool for Shopify User Manual
![]()
The Firebear Import & Export Tool is a Shopify app that makes data management for your online store easy and efficient. With this tool, you can seamlessly import and export a variety of entities, including products, customers, orders, and more, ensuring smooth data flow in and out of your e-commerce website. The app lets you create schedules to automate import and export processes. You can work with various file formats, such as CSV, XML, and XLSX, simplifying the data import process. Additionally, the tool allows integration with Google Sheets and Google Drive. And it is possible to map columns from third-party files to properties within your store to incorporate custom data in your updates. These are just a few of the benefits that surpass the standard import and export tools of Shopify. Let’s see how our extension works and what features it offers.

Table of contents
- How it works
- Plans
- App features
- Installation
- Find The Extension
- How to import data
- Product metafields import
- Order Fulfillment Import
- AI-Based Quick Import
- Data Transformation (Modification) in Shopify Imports
- Detect Variant by EAN for Shopify Product Import
- Automatic Parent Product Creation
- Allow Product Handle Change
- Shopify Product Import Behavior
- How to export data
How it works
Begin your data management journey with the Import & Export Tool by creating a profile tailored to your specific needs. In this profile, select the type of data you wish to import or export (products, orders, or customers), use common file types like CSV, XML, or Excel XLSX, as well as Google Sheets spreadsheets, and leverage additional options, including schedules for automated profile execution, notifications for successful or failed runs, etc.
Once you’ve set up your profile, the next step is uploading the data file and, if needed, mapping the file’s columns. Mapping allows you to align columns from your imported file with the product, customer, or order properties in your Shopify store. This feature makes it easy to import files from suppliers or other systems without manually editing them.
With your profile and mapping in place, the Import & Export Tool handles processing the file. It interacts with your Shopify store via the Shopify API, performing tasks like creating or updating the entities you import.
Plans
| Feature | Free | Basic | Advanced |
| Price | Free forever | $20 per 30 days | $100 per 30 days |
| Parallel Jobs | 1 | 3 | 5 |
| Max Import Rows | 100 | 5000 | 100000 |
| Max Export Rows | 100 | 5000 | 100000 |
| Supported Entities | |||
| Products | + | + | + |
| Customers | + | + | + |
| Orders | + | + | + |
| Metafields Export | coming soon | coming soon | coming soon |
| Supported File Formats | |||
| CSV | + | + | + |
| XML | + | + | + |
| XLSX | + | + | + |
| Supported File Sources | |||
| Url | + | + | + |
| FTP/SFTP | – | + | + |
| Google Sheet | – | + | + |
| Google Drive | – | + | + |
| Cron Automation | – | daily | daily, hourly |
| Email Notifications | – | + | + |
| Stock Increment Strategy | – | + | + |
| Export Filters | – | + | + |
| Orders Delta Export | – | – | + |
App features
File formats
- CSV
- XML
- XLSX
- Google Sheet
Entities
- Product import and export
- Customer import and export
- Order export
Import and export sources
- Direct file upload
- FTP/FTPS
- URL
- Google Drive
- Google Sheets
Performance
- Maximum number of imported rows: 300000
- Maximum number of exported rows: 300000
- Number of import jobs that can be launched simultaneously: 3
- Number of export jobs that can be launched simultaneously: 3
- File Limit for URL & Manual Uploads: 200Mb
Installation
You can install the Import & Export Tool through the Shopify App Store as follows:
- Log in to the .
- and then click it.
- On the app listing page, click Add app.
- In your Shopify admin, to authorize the use of the app, click Install app.
After the app is installed, you can view and use it from the Apps page in your Shopify admin.
Find The Extension
You can find the application under Apps -> Firebear Import & Export Tool.
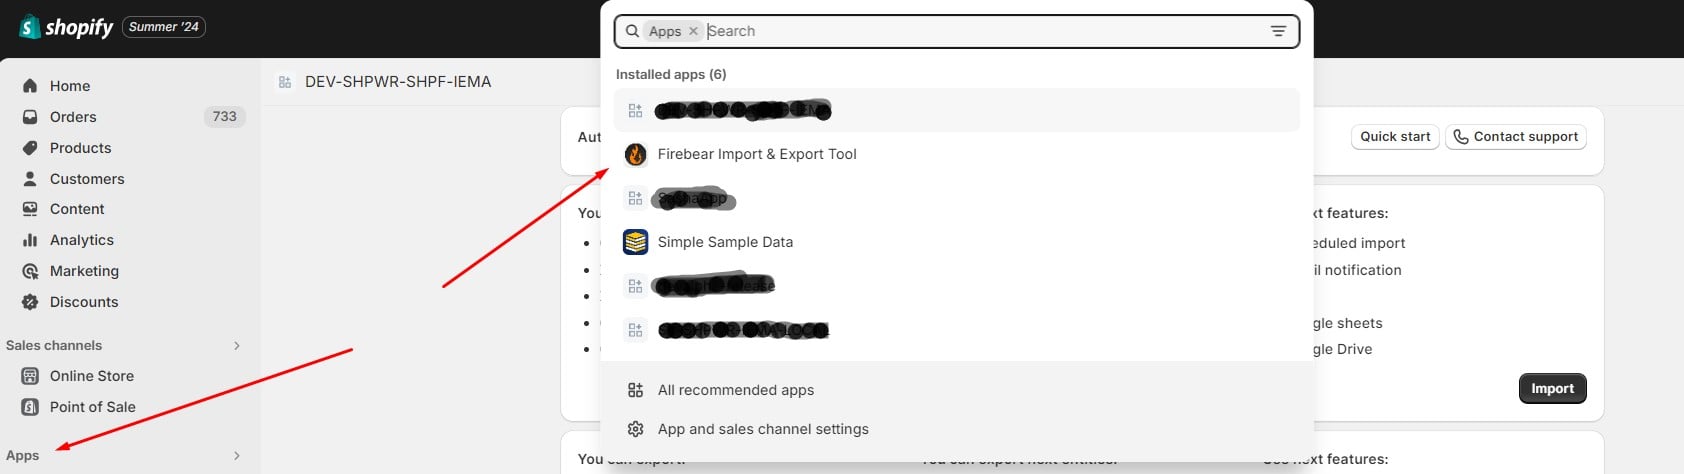
Its main screen lets you navigate to import and export profiles – separate sections – or view a combined list of import and export logs.
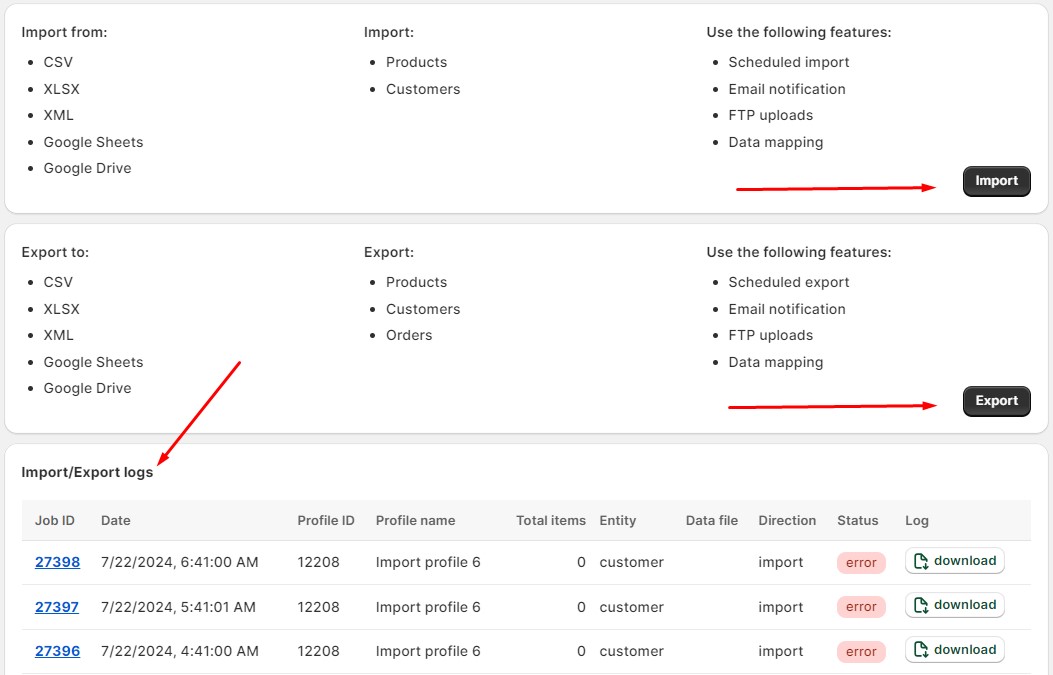
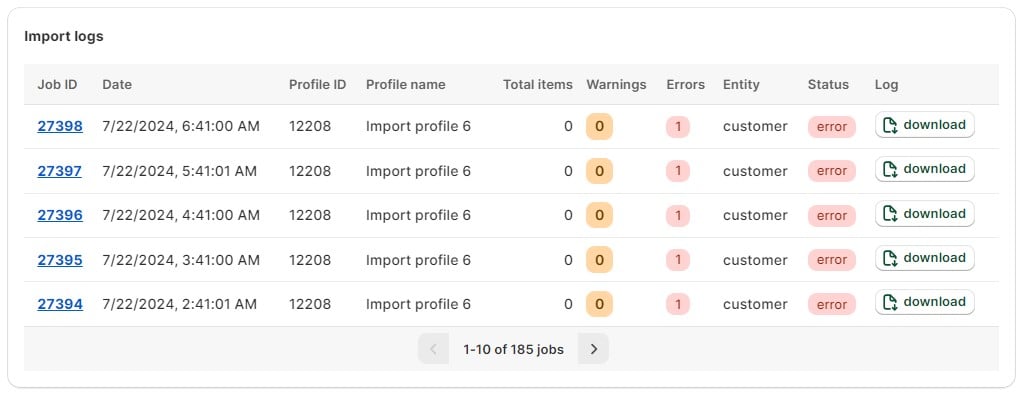
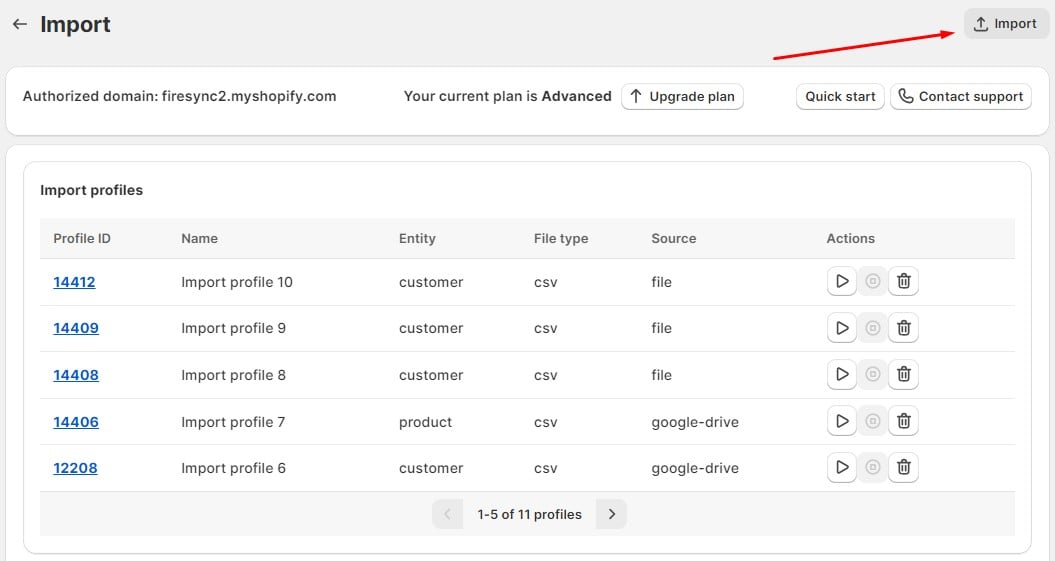
Import
The import section of the Import & Export Tool’s interface consists of two main parts: ‘Import profiles‘ and ‘Import logs.’ These sections help you manage your data imports efficiently.
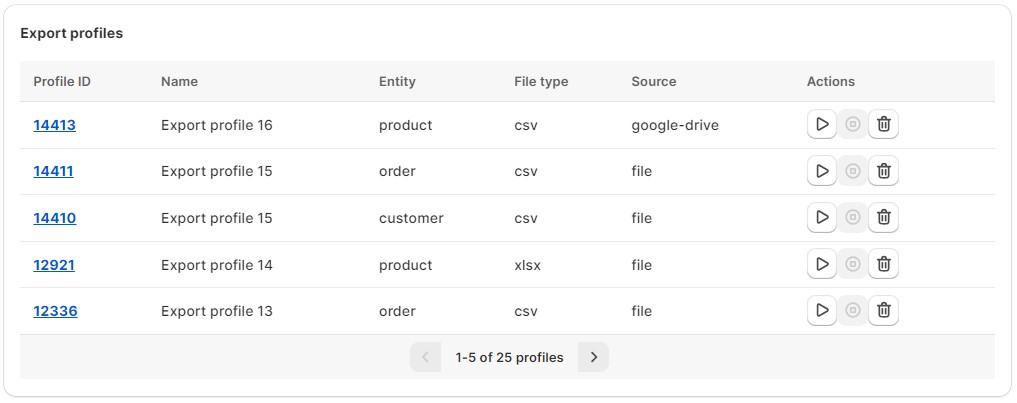
The ‘Import profiles’ section displays a list of all your import profiles. Here are the actions you can take there:
- Create New Profiles: Make new import profiles tailored to your data needs.
- Launch/Stop Existing Profiles: Turn profiles on or off.
- Delete Profiles: Get rid of profiles you no longer need.
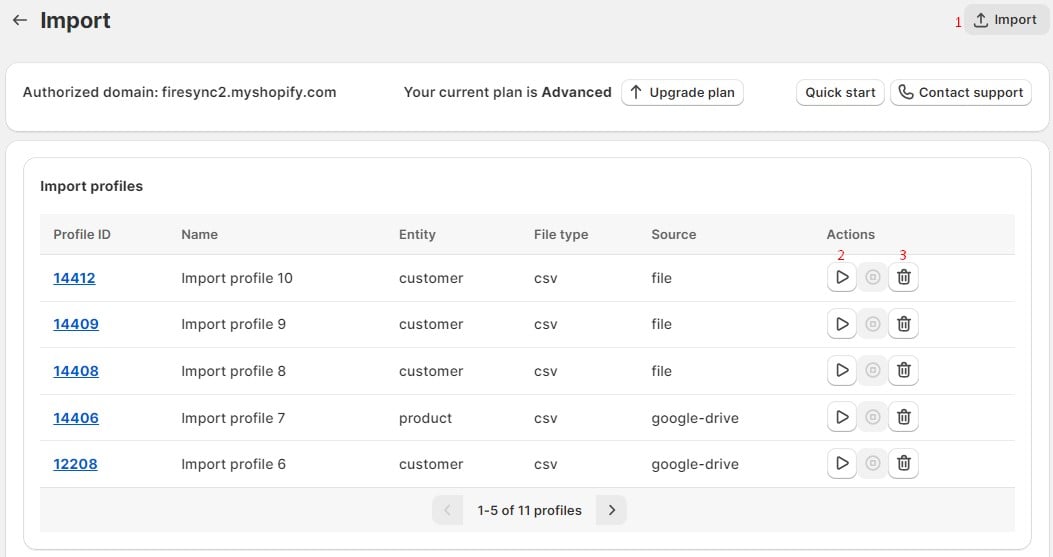
The import profile grid includes six columns:
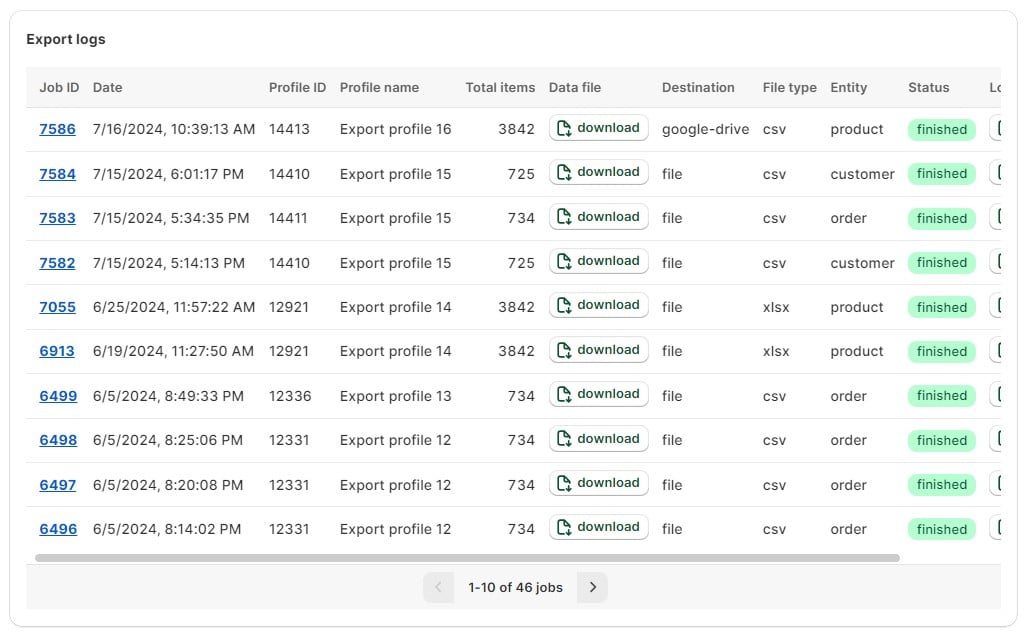
Export
The Export log is similar to the one in the import section. It provides information about your export jobs, including entity, destination, and file type:
How to import data
Here is how to import data into your Shopify store using the Firebear Import & Export Tool. A standard import job is divided into the following sections:
- General options/settings. Begin by accessing the tool’s import page, which can be found under Apps -> Firebear Import & Export Tool. Once on this page, proceed to its Import interface, and click the Ann New Profile/Import button. Now, you need to configure the profile’s general settings. We focus on this part below.
- Advanced options. Use the advanced options to automate your import processes, get notifications about import results, and set additional parameters for your data transfers.
- Mapping. Map third-party column names from the imported file to Shopify’s default names.
- Import. Once you’ve configured your import profile, launch the import process. The Firebear Import & Export Tool will handle the data transfer, ensuring that your products and customers are correctly imported.
These four steps streamline the process of importing data to your Shopify store, making it efficient and user-friendly. Let’s explore each of them in more detail.
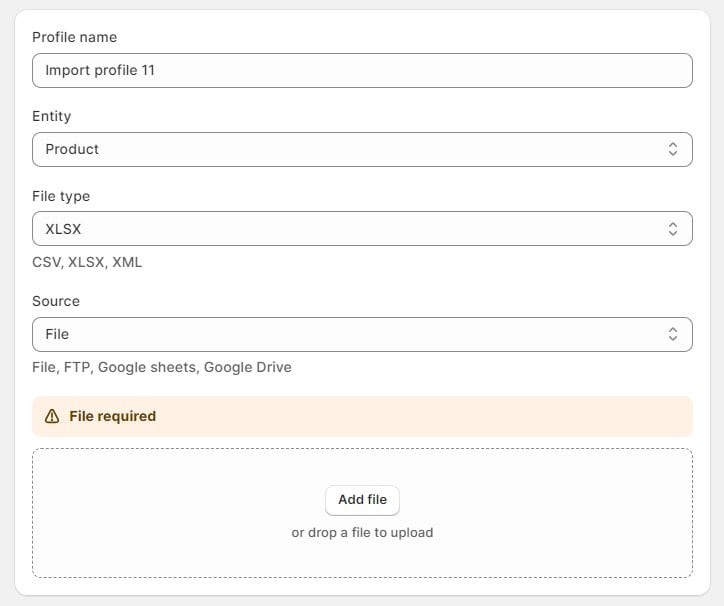
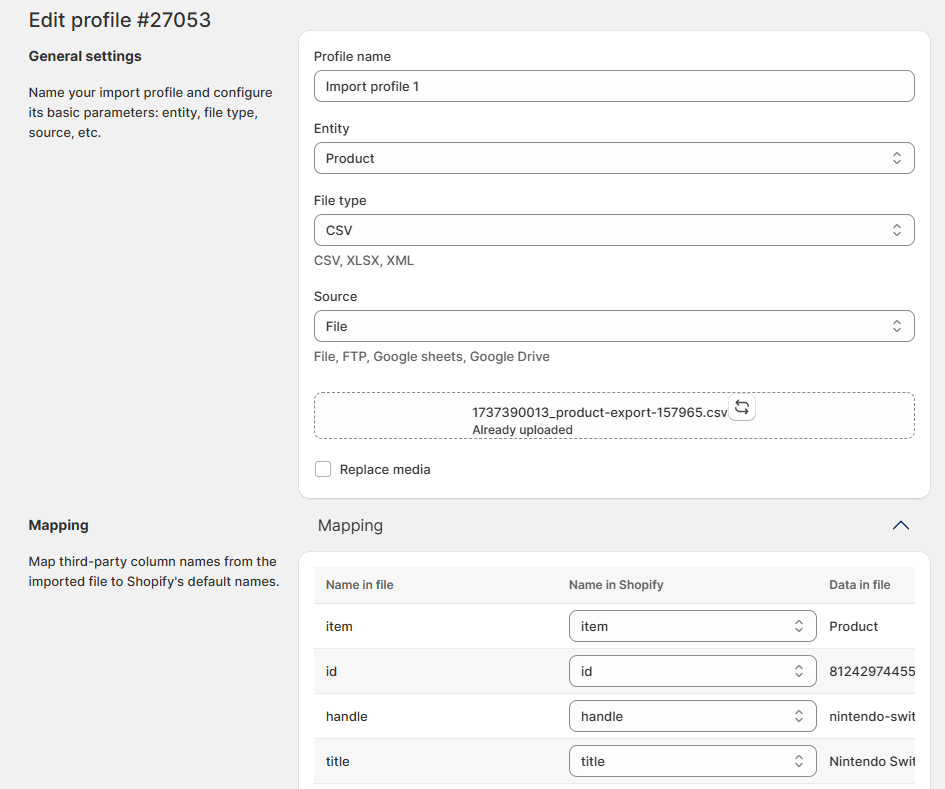
General settings
Name your import profile and configure its basic parameters:
- Choose an entity: Product or Customer;
- Select a file type: CSV, XML, XLSX, or Google Sheets;
- Choose a file source: file upload, URL upload, FTP transfer, or Google Drive import;
- Provide a file to import.
File type
Select a file type associated with your update table. The Import & Export Tool works with CSV, XML, XLSX, and Google Sheets files.
While XML, XLSX, and Google Sheets files don’t demand extra parameters, you must define the delimiter and field enclosure for CSV files.
Note that Shopify XML import requires your files to have the following structure:
|
1 2 3 4 5 6 7 8 |
<list> <item> … </item> <item> … </item> </list> |

File sources
Now, let’s see how to configure each file source.
File
The very first option our app offers is to add files manually:
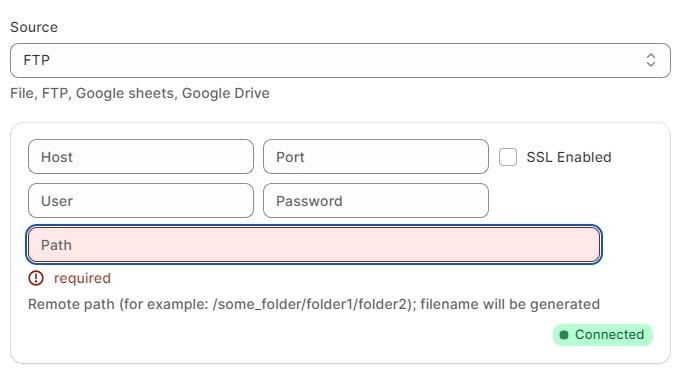
FTP
Secondly, it is possible to provide your update via FTP. Just follow these simple steps to enable Shopify FTP import:
- Specify your host;
- Enable/disable SSL;
- Specify your port;
- Provide a user email to get access to the remote file source;
- Specify the corresponding password;
- Type the remote path to your update file;
- Test the connection to make sure you’ve provided the correct credentials.
You can find more information in our Shopify FTP Import Guide.
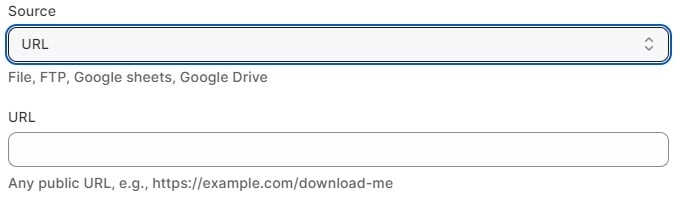
URL
Choose “URL” as your import source and specify any public URL, for example, *https://example.com/download-me* to import data from a URL.
Note that when you enter a URL for importing, the file type hidden behind this address is crucial since the app cannot import all files. For example, using an image URL for a CSV import from a URL leads to an error.
To let you avoid this issue, the app checks the file’s MIME type and doesn’t download it if the MIME type is not suitable.
A MIME type which stands for a Multipurpose Internet Mail Extension is a standard that indicates the format of a file. It is a fundamental characteristic of a digital resource that influences its ability to be accessed and used over time.
Here’s a list of MIME types that the app currently supports:
|
1 2 3 4 5 6 7 8 9 10 11 12 13 14 15 16 17 18 19 20 21 |
"csv" => [ "text/html", "text/csv", "text/comma-separated-values", "text/x-comma-separated-values", "text/tab-separated-values", "application/x-csv", "application/csv", "text/plain", "application/octet-stream" ], "xml" => [ "text/html", "application/xml", "text/xml" ], "xlsx" => [ "application/vnd.ms-excel", "application/vnd.openxmlformats-officedocument.spreadsheetml.sheet" ] |
You can find more information here: How to Import Files to Shopify from URL.
Google Drive & Sheets
If you decide to import data to your Shopify store from Google Drive, including Google Sheets spreadsheets and other supported files, select Google Drive & Sheets as your source.
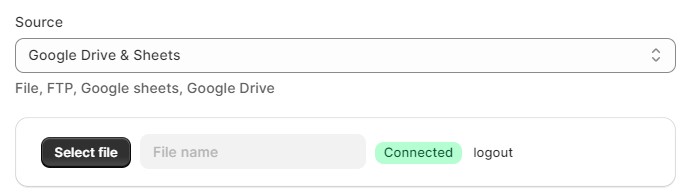
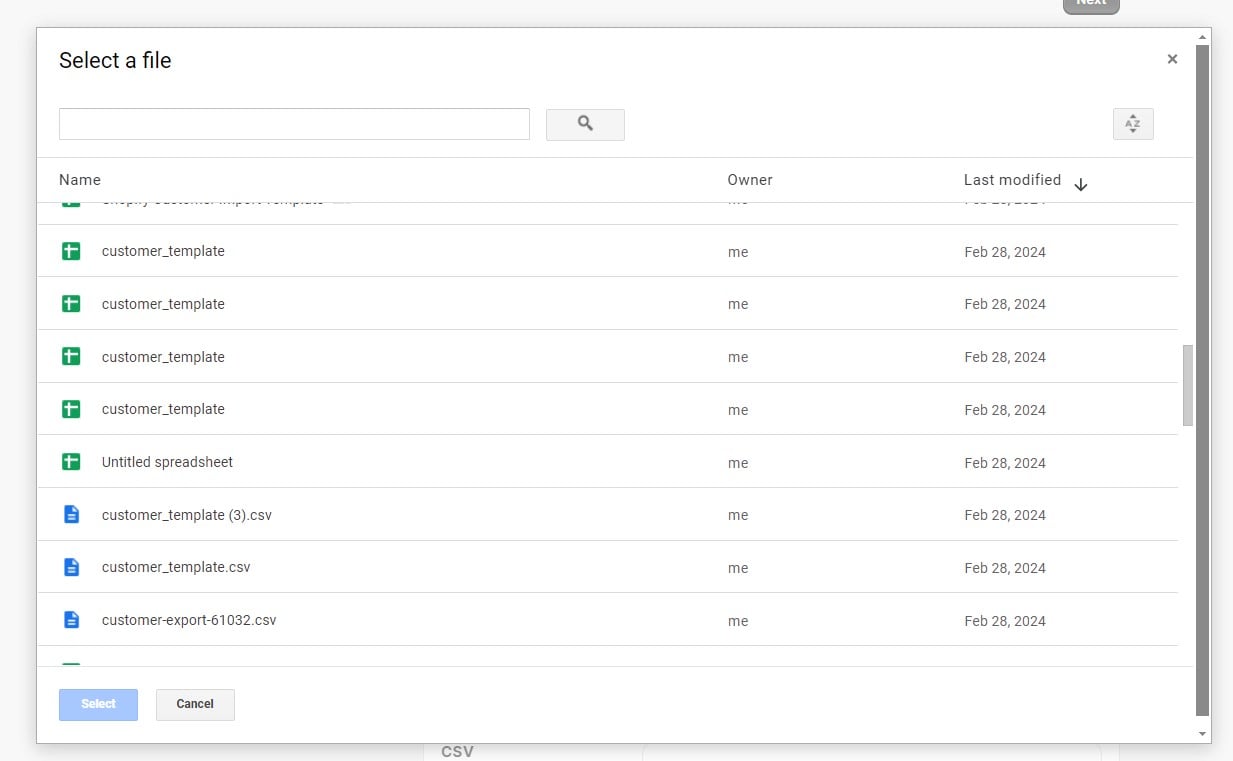
Next, click the Select file button and specify a file you want to import.
Note that it is possible to log out from your current account and then choose another one.
You can find more details in our Shopify Google Drive Import Guide.
Advanced options
Use the advanced options to automate your import processes, get notifications about import results, and set additional parameters for your data transfers.
Automation
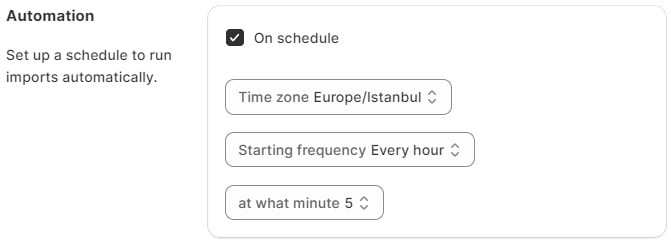
A scheduler is a feature that lets you automate your import processes by creating a schedule of updates. Enable the feature and do the following:
- choose your time zone;
- set your starting frequency: every hour, day, week, or month;
- choose the time to start.
You can read more about automated import processes in our guide to Shopify import automation.
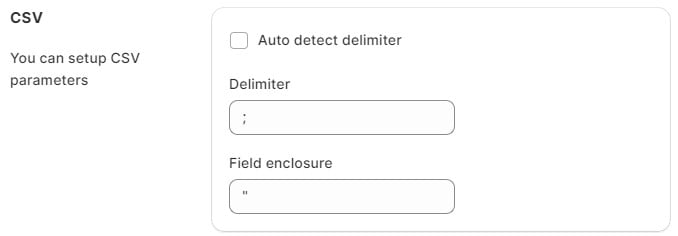
CSV
Define the delimiter and field enclosure for CSV files. You can leverage automatic delimiter detection. Check the Autodetect delimiter box in the Advanced options to enable this feature.
Email notifications
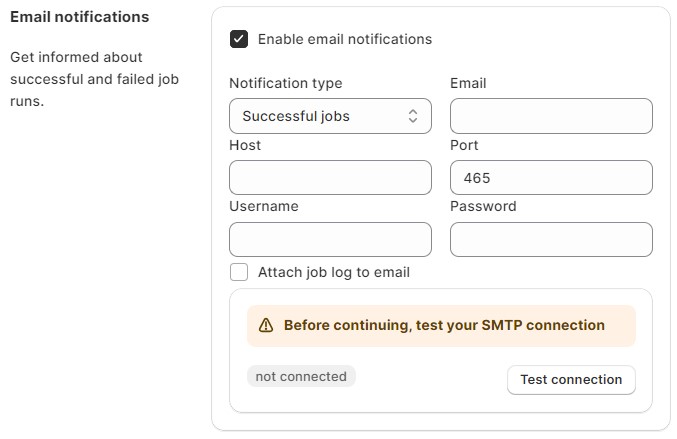
With the Improved Import & Export Tool, you can set up email notifications for successful and failed attempts separately or both types together. Here’s how to do it:
- Activate the feature.
- Choose the notification type: successful jobs, failed jobs, or both.
- Enter the email address where you want to receive the notifications.
- Specify the host for your email server.
- Enter the port number.
- Provide a sender’s username (usually an email address).
- Enter the corresponding password.
- You can also include job logs as attachments in the notification emails, but keep in mind that they might be large.
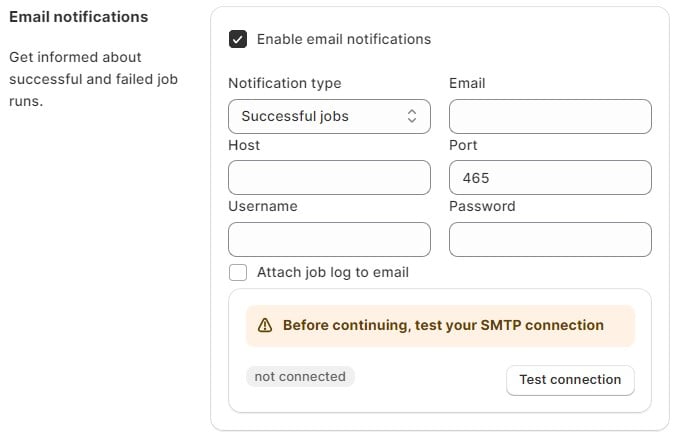
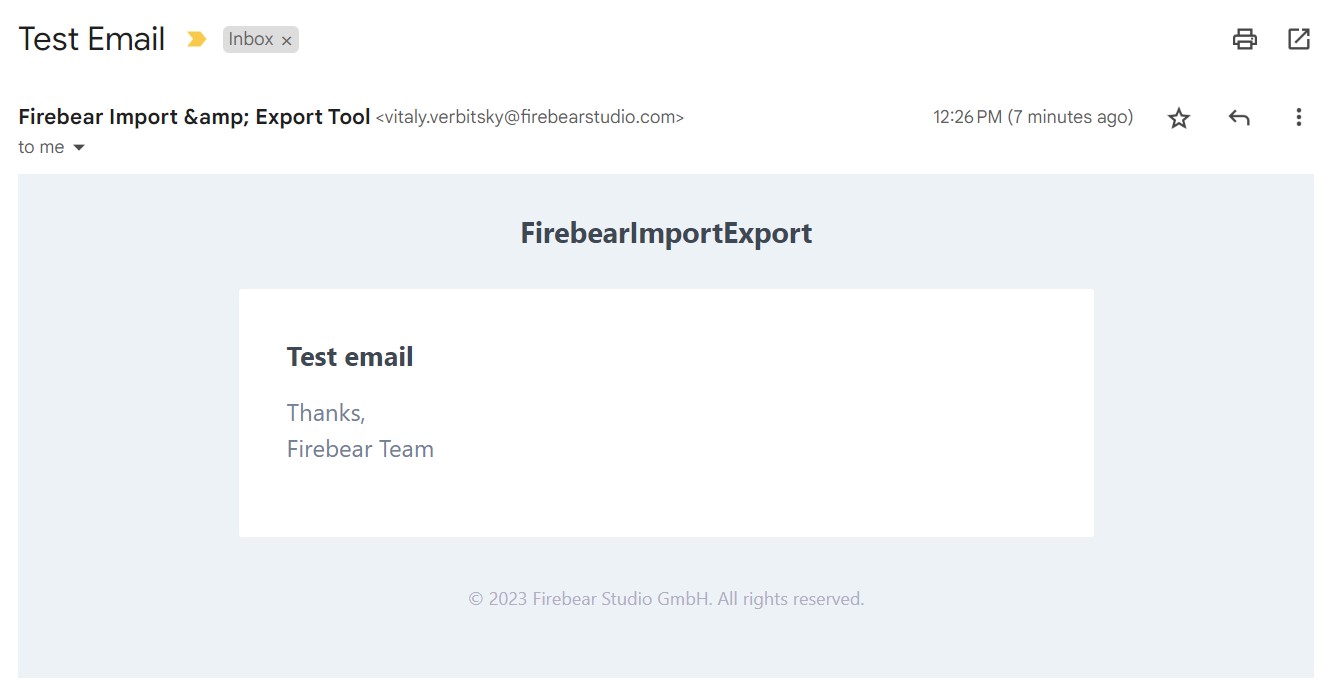
- Click the Test connection button to verify your connection. If all the provided information is correct, you will see a notification message in your mailbox.
We explore email notifications here: Shopify Import Notifications.
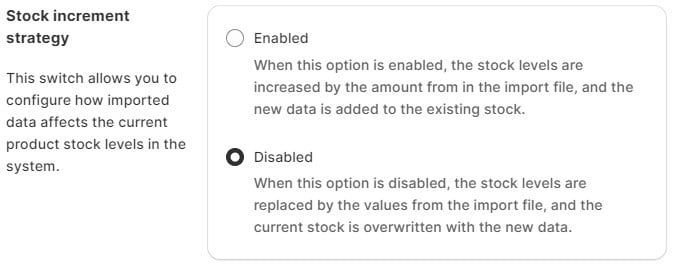
Stock increment strategy
This switch allows you to configure how imported data affects the current product stock levels in the system:
- If disabled -> the Qty of the product is updated to the one specified in the import file. If the store qty = 100 and the update qty is set to 50 in the import table, then after import the store qty = 50.
- If enabled -> the product qty is increased by the amount specified in the import file. If the actual product qty is 100 and the import table is set to 50, then after import the store qty = 150.
Mapping
The Mapping screen lets you match third-party column names from the imported file to Shopify’s default names.
- The first column contains the property names from the file you’re importing.
- In the second column, you can choose the corresponding properties from your Shopify store.
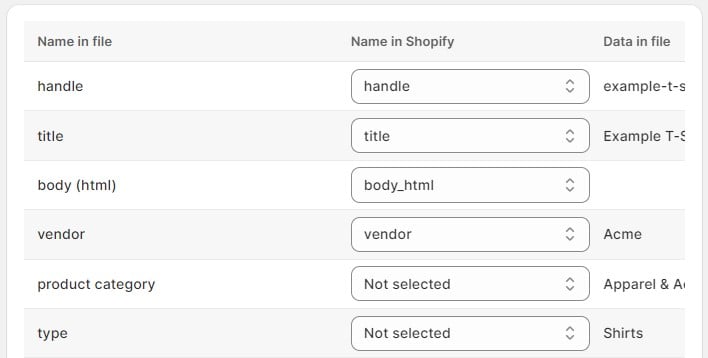
By matching these properties, you can successfully import custom files with different property names.
Final step: Import
Click the Import button to initiate the import process. While importing, you will receive information about the number of products imported, the duration of the import, import speed, and any warnings.
After the process is completed, you can review the import results, including an error log, if any issues were encountered.
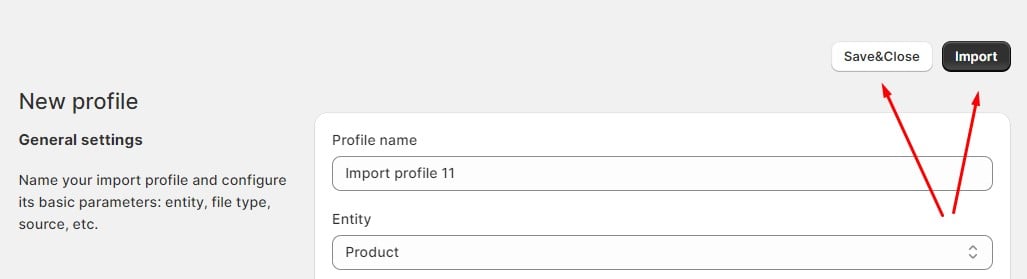
Alternatively, you can click Save&Close. In this case, the app will launch the import process according to the job’s schedule. If there is no schedule, you can launch it manually from the Import screen.
Product metafields import
Add columns with this file format – mf_<namespace>.<metafield key> – to your spreadsheet to import metafields.
You can leverage this feature for:
- Updating metafield values.
- Creating a product with metafields.
- Deleting metafield values: use an empty value – “” – in the metafield column.
You can import all product metafield types:
|
Content Type |
Attribute |
Value Example |
|---|---|---|
|
Multi-line text |
mf_custom.test_ml_text |
Test text |
|
Integer |
mf_custom.test_int |
5 |
|
Decimal |
mf_custom.test_dec |
4.0 |
|
Product |
mf_custom.test_entity |
gid://shopify/Product/7682399010997 |
|
File |
mf_custom.test_file |
gid://shopify/MediaImage/29058352742581 |
|
Date and time |
mf_custom.test_datetime |
2024-03-05T18:00:00Z |
|
Date |
mf_custom.test_date |
2024-03-06 |
|
Dimension |
mf_custom.test_dim |
{“value”:5.0,”unit”:”MILLIMETERS”} |
|
Weight |
mf_custom.test_weight |
{“value”:4.0,”unit”:”GRAMS”} |
|
Volume |
mf_custom.test_volume |
{“value”:7.0,”unit”:”MILLILITERS”} |
|
True or false |
mf_custom.test_bool |
true |
|
Color |
mf_custom.test_color |
#59ca22 |
|
Rating |
mf_custom.test_raiting |
{“scale_min”:”1.0″,”scale_max”:”10.0″,”value”:”4.0″} |
|
URL |
mf_custom.test_url |
|
|
Money |
mf_custom.test_money |
{“amount”:”4.00″,”currency_code”:”EUR”} |
|
JSON |
mf_custom.test_json |
{“name”:”John”,”age”:30,”car”:null} |
|
Rich text |
mf_custom.test_rich_text |
{“type”:”root”,”children”:[{“type”:”paragraph”,”children”:[{“type”:”text”,”value”:”test”}]}]} |
|
Single line text |
mf_custom.test_single_line_text |
Test text |
|
Collection |
mf_custom.test_collection |
gid://shopify/Collection/236417155253 |
|
Product variant |
mf_custom.test_product_variant |
gid://shopify/ProductVariant/43712193462453 |
|
Metaobject |
mf_custom.test_meta_object |
gid://shopify/Metaobject/56229429429 |
|
Page |
mf_custom.test_page |
gid://shopify/OnlineStorePage/73557213365 |
Order Fulfillment Import
With the latest version of our Import & Export Tool, you can save time and reduce errors by automating the import of fulfillment data. Whether your orders involve a single fulfillment location or require precise item-based multi-location fulfillment, our app ensures the data is imported smoothly and correctly, eliminating the manual hassle.
Supported Fields
This section explains the required and optional data fields necessary for the Shopify fulfillment import. Knowing these fields ensures you set up your import files correctly from the start.
Required Fields include:
- order_id: The unique Shopify order ID or number that identifies which order to fulfill. This is the most critical field as it connects your fulfillment data to the correct Shopify order.
- tracking_number: The tracking number associated with the shipment. You can use alternative field names like trackingNumber, trackingCode, or code for convenience.
Optional Fields include:
- location: The name of the specific Shopify location fulfilling the order. You can also use alternative formats like location_name or locationName. This is important when an order involves multiple shipping locations.
- lineItems: A way to specify which items and quantities to fulfill. Use the format product-handle:quantity;product-handle:quantity to ensure accuracy.
Users can set both SKUs and handles for products. During the import process, the system first looks for an item using the SKU. If no match is found, it then searches by the handle. You can mix SKUs and handles in the same row using this format: “sku:2;handle:3”.
⚠️ Note: Importing tracking numbers for product variants (products with options) is only supported when using SKUs. - tracking_company: Specifies the name of the shipping carrier (e.g., FedEx, UPS, USPS). Including this information makes tracking easier for customers and ensures accurate fulfillment records.
- tracking_url: The URL to track the shipment directly. If provided, it allows customers to view their shipment status in real-time. This can enhance the post-purchase experience by providing clear tracking information.
- notify_customer: Indicates whether customers should be notified when the fulfillment is created. Accepts true or false. Use this field to control communication, such as suppressing notifications for test orders or internal shipments.
Import Scenarios
The app supports different scenarios to accommodate simple and complex fulfillment setups. Choose the appropriate scenario to match your order structure.
Basic Fulfillment
What It’s For: This scenario works best for orders where all items are shipped from a single location in one fulfillment.
Example CSV:
order_id,tracking_number
4399760572622,DE123456789
How It Works: The app creates a fulfillment for all items in the order. However, if the order has multiple fulfillment locations, this setup will fail, as it doesn’t specify a location.
Location-Based Fulfillment
What It’s For: Use this scenario when your order includes multiple fulfillment locations, and you need to specify which location is handling the shipment.
Example CSV:
order_id,tracking_number,location
4399760572622,DE123456789,”Nettelbeckstrasse, 5″
How It Works: Fulfillment is created for all items and is associated with the specified location. This ensures clarity in orders involving different warehouses or fulfillment centers.
Line Item-Based Fulfillment
What It’s For: Ideal for orders where only specific items with specific quantities need to be fulfilled, such as partial shipments or backorders.
Example CSV:
order_id,tracking_number,lineItems
4399760572622,DE123456789,”product-a:2;product-b:3″
How It Works: The app fulfills only the specified items and quantities. This is helpful when managing large or complex orders where not all products are shipped together.
Combined Location and Line Item Fulfillment
What It’s For: This is the most advanced option that allows you to define both the location and exact items to fulfill. It’s perfect for highly complex orders.
Example CSV:
order_id,tracking_number,location,lineItems
4399760572622,DE123456789,”Nettelbeckstrasse, 5″,”product-a:2;product-b:3″
How It Works: The app ensures that the specified items are fulfilled from the correct location, combining the benefits of the location-based and item-based scenarios.
Common Error Messages and Solutions
When things go wrong, understanding error messages can save time. Here’s a breakdown of common issues and how to fix them.
- Error: “Order has multiple fulfillment orders. Please specify location or line items.”
- What It Means: The order involves multiple fulfillment locations or items, but the import file doesn’t specify which ones to fulfill.
- Solution: Add a location column to specify which location is fulfilling the order.
- Error: “No open fulfillment order found for location X in order Y.”
- What It Means: The location specified in your file doesn’t match any active fulfillment orders in Shopify.
- Solution: Double-check that the location name in your file exactly matches the name in Shopify. Ensure the fulfillment order at that location is still open.
- Error: “No matching fulfillment order found for specified line items in order X.”
- What It Means: The product handles or quantities in your file don’t match the available items in Shopify for that order.
- Solution: Verify that the product handles are correct, quantities are available, and items are assigned to the specified location.
- Error: “Failed to create fulfillment.”
- What It Means: The app couldn’t create the fulfillment, possibly due to a duplicate tracking number or fulfillment restrictions. Importing a tracking number that already exists in the order results in the following warning message “Skipping fulfillment for order 4407381164238: tracking number KPSF8D6YG0V4 already exists.”
- Solution: Check if the fulfillment already exists, ensure the order status allows fulfillment, and verify all products are still available.
Best Practices
To ensure seamless fulfillment imports, follow these tips:
- Match Location Names: Always use the exact location names as they appear in Shopify to avoid mismatches.
- Use Product Handles: When specifying lineItems, rely on product handles (not titles) for accuracy.
- Check Quantities: Verify available quantities before importing large batches to prevent errors.
- Specify Locations for Complex Orders: If an order spans multiple locations, include the location column to ensure clarity.
- Use Line Items for Partial Fulfillments: For partial shipments, define exact items and quantities in the lineItems column.
By following these clear steps and recommendations, the Import & Export Tool simplifies your fulfillment process, reduces errors, and ensures orders are shipped correctly every time.
AI-Based Quick Import
The Quick Import feature is designed to streamline the data import process using AI-powered capabilities. It consists of two key functionalities:
1. Profile Option Detection
The system can automatically identify and configure import profile options based on the user’s data file. Key aspects include:
- Entity Type Detection: The system analyzes the provided data file to determine the type of data being imported, such as products, customers, or order fulfillments. It can also recognize when an entity type is unsupported, ensuring accurate feedback for the user.
2. Intelligent Mapping
The system intelligently maps the columns in the user’s data file to the platform’s required attributes. This includes:
- Error Tolerance: Even if the column names in the user’s file are misspelled or written in a different language, the system can accurately match them to the appropriate attributes.
- Support for Multiple Systems: While optimized for Shopify, the system can also process files from other platforms.
Example:
If the user provides a file with columns such as reference, name, active, and cost, the system identifies the intent to import products and maps the columns as follows:
| User Column | Mapped Attribute |
| reference | handle |
| name | title |
| active | published |
| cost | variant_price |
This process enables users, especially those new to the application, to quickly and efficiently create import profiles without needing extensive knowledge of the platform’s settings.
Important Notes
- Not Always 100% Predictable: The system relies on a Large Language Model (LLM) to predict mappings, so results may vary depending on the input file and context.
- Versatility: While optimized for Shopify, Quick Import supports data from various systems, providing flexibility for diverse use cases.
This feature is designed to save time, reduce complexity, and enhance the overall user experience when configuring import profiles.
How to Use the Quick Import Feature
Follow these steps to use the Quick Import feature effectively:
- Access the Import Tool: Navigate to your Shopify admin panel and locate the Firebear Import & Export Tool.
- Upload Your File: Drag and drop your data file into the designated area, or provide the file’s URL for direct access.
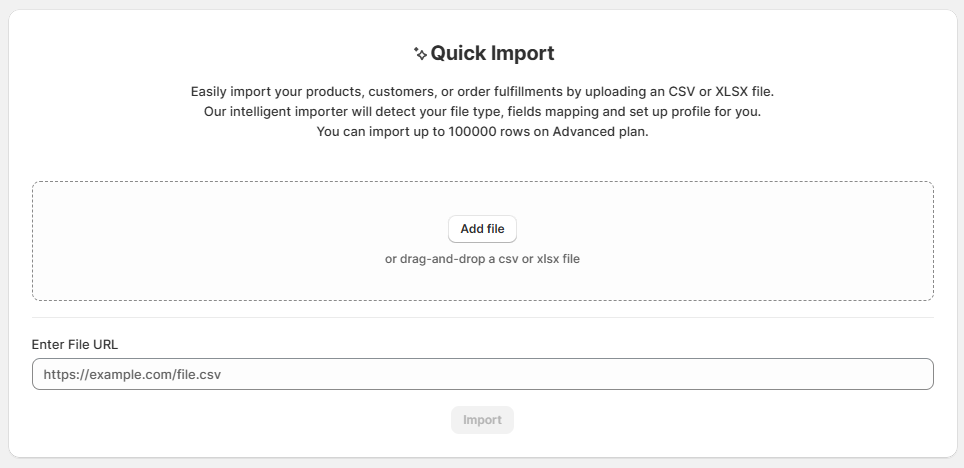
- Initiate Data Analysis: Hit the Import button to initiate the AI-based analysis of your data file. It will take some time to explore its content and apply mapping and other settings automatically.
- Review Import Settings: Before proceeding, double-check your import settings and mappings. While the tool leverages advanced AI to automatically detect and map your data fields, it’s essential to review the details to ensure everything aligns perfectly with your Shopify store requirements. This extra step helps prevent issues and guarantees a smooth import process.
- Start the Import: Once you’re satisfied with the settings, click the Import button to begin the process.
By following these steps, you can quickly and efficiently import your data, minimizing errors and saving time.
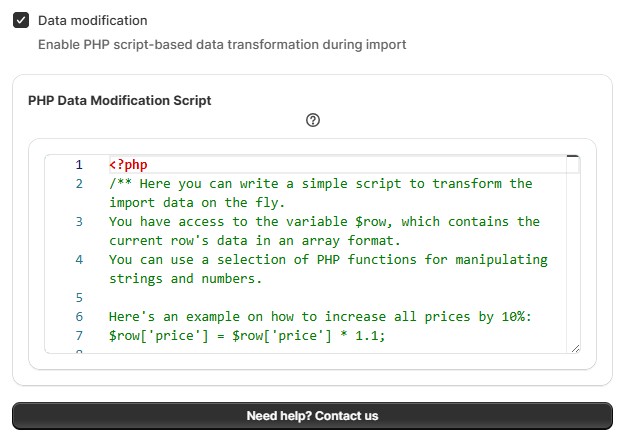
Data Transformation (Modification) in Shopify Imports
The Improved Import & Export app for Shopify now supports data transformation via scripting, allowing you to modify each imported row dynamically — directly during the import process. With this feature, you can apply changes to product data on the fly using a secure, whitelisted selection of PHP functions.
Note that you can always get help with scripts tailored to your specific business cases by .
Key Functionalities
- Script Input. At the first step of the import process, a script editor window becomes available. Here, users can input custom PHP-based logic to transform data rows using the $row variable. This variable is an associative array representing each row from your import file, where the keys correspond to Shopify product fields such as price, title, sku, etc.
- Function Whitelisting. For security and performance, the scripting environment only supports a limited set of PHP functions. These include commonly used string, math, array, and date/time operations — enough for a broad range of transformation tasks, while maintaining a safe execution environment.
Allowed PHP Functions
| Function Group | Functions |
| String Functions | strlen, strpos, strtolower, strtoupper, trim, substr, str_replace, explode, implode, htmlspecialchars, ucfirst, lcfirst |
| Hashing Functions | md5, sha |
| Array Functions | in_array, count |
| Math Functions | abs, round, ceil, floor, max, min, rand, sqrt, pow |
| Date/Time Functions | time, date, strtotime, mktime |
| Variable Handling | isset, empty |
| JSON Functions | json_encode, json_decode |
| Multibyte String Functions | mb_* (see full list above) |
✅ When to use multibyte string functions
Use them when:
- Your import data includes non-Latin characters (e.g. German, Japanese, Arabic, Chinese).
- You need accurate string manipulation (like length, case conversion, or substring extraction) in a UTF-8 encoded file.
- You’re transforming text fields like product titles, tags, or descriptions in multilingual Shopify stores.
Example Use Cases
With the new transformation script editor, you can automate logic directly within the import process, such as:
- Price Adjustment: Increase all prices by 10%
- Vendor Cleanup: Strip $ symbols from vendor names
- Tags Formatting: Convert tag separators from comma to pipe
- Stock Tweaks: Add buffer stock
- SEO: Generate meta titles by combining product titles and types
General Format for Shopify $row Script
Each import row is passed into the script as the $row variable — an associative array where each key is a Shopify product field, such as title, sku, price, tags, vendor, etc. You can modify these values as needed using supported functions and logic.
1. Accessing Row Data
Each column in the row is accessed using its key in the $row array:
$productTitle=$row[‘title’];
2. Modifying Row Data
You can modify the data by updating the corresponding key in the $row array:
$row[‘vendor’]=str_replace(‘$’,”, $row[‘vendor’]);
3. Using Allowed PHP Functions
The script can only use PHP functions from the predefined whitelist, which covers common operations like string manipulation, math, array handling, and date functions.
Example using string manipulation to convert a string to lowercase:
$row[‘Tags’]=mb_strtolower($row[‘Tags’]);
4. Conditionally Modifying Data
You can add logic to check conditions and modify values accordingly. For instance, the following script checks whether the fields Variant Inventory Qty and Inventory_#Paris Warehouse exist in the current import CSV and whether their value is 0.
if (isset($row[‘Variant Inventory Qty’]) && $row[‘Variant Inventory Qty’] == 0) {
$row[‘Variant Inventory Qty’] = ’99’;
}
if (isset($row[‘Inventory_#Paris Warehouse’]) && $row[‘Inventory_#Paris Warehouse’] == 0) {
$row[‘Inventory_#Paris Warehouse’] = ’99’;
}
If both conditions are true, it increases the inventory quantity by 99 units.
5. Performing Calculations
Calculations can be performed on numerical data in a row. For instance, the following script checks if the price field exists in the current import row and whether its value is greater than 100. If both conditions are true, it increases the price by 20% and rounds the result to two decimal places.
if (isset($row[‘Variant Price’]) && $row[‘Variant Price’] > 100) {
$row[‘Variant Price’] = round($row[‘Variant Price’] * 1.2, 2);
}
This is useful for automatically adjusting prices during import, for example, to apply a markup.
6. No Need to Return
You do not need to return the $row manually. All changes made to the $row array will be applied automatically during import.
🔐 Key Points to Remember
- $row is automatically provided during import and contains all field values from the current data row.
- You must not overwrite the $row variable entirely (e.g., $row = “text”), or the script will fail.
- Only functions from the whitelisted set are allowed.
- All modifications are applied on the fly — there’s no need to return the array or apply additional configurations.
- The script is stored securely and runs for each row individually during import processing.
By using this new feature, you can automate bulk data adjustments, enrich product listings, and clean up data inconsistencies straight in your Shopify admin — all without modifying the original import files. Start customizing your imports with flexible logic, right inside the app.
To get help with scripts tailored to your specific business cases,
Detect Variant by EAN for Shopify Product Import
In Shopify, EANs (European Article Numbers) or barcodes are stored on the variant level, not at the product level. This means each variant — such as different sizes or colors — has its own unique barcode or EAN. As a result, when importing or updating data, there’s no need to match variants by option name or title. Instead, the system can identify the exact variant directly using its barcode.
Automatic Parent Product Creation
When importing product data, the app can now automatically create parent (main) products even if your import file contains only variant rows.
This feature is especially useful when importing files from external sources or URLs where you cannot modify the file structure manually.
Why It Matters
In many supplier or marketplace feeds, product data is provided only at the variant level — for example, separate entries for each size or color.
Previously, imports like these required you to include both the parent and variant rows; otherwise, the import would fail.
Now, the app intelligently detects and builds parent products automatically, saving time and ensuring smooth imports from any data source:
- It automatically detects whether a parent product exists by checking the product handle or title.
- If multiple variants share the same handle or title, the system automatically groups them under one parent.
- If no parent exists, the app creates a new parent product automatically.
- Product options (such as size or color) are verified and merged correctly to ensure clean variant grouping.
Example
If your CSV file includes only variant rows like this:
title,variant_sku,variant_price,variant_barcode
T-Shirt,TSHIRT-S-RED,19.99,1234567890
T-Shirt,TSHIRT-M-RED,19.99,1234567891
T-Shirt,TSHIRT-L-RED,19.99,1234567892
The app will automatically:
- Detect that all rows belong to the same product (T-Shirt).
- Generate a unique product handle automatically.
- Create one parent product named T-Shirt.
- Add three variants under that parent (S, M, and L).
As a result, even without explicit parent entries in your file, the import will succeed — producing a fully structured parent product with linked variants.
Allow Product Handle Change
A new checkbox is now available under Import Profile Configuration → General Settings:
✅ Allow product handle change during import
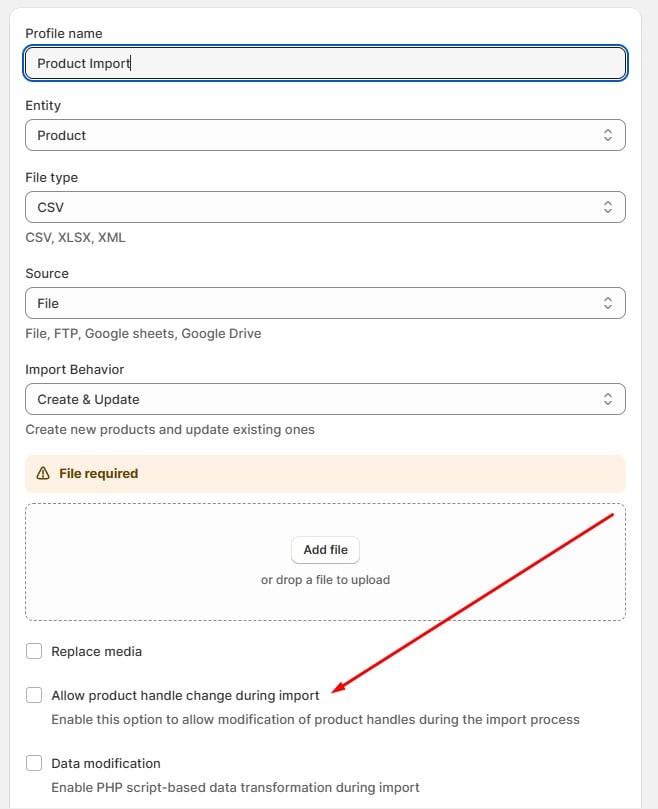
The new checkbox works as follows:
- Unchecked (Default): Product handles remain unchanged during updates. This prevents accidental changes to product URLs, preserving SEO and existing external links.
- Checked: Product handles can be updated during import. Use this when you want to intentionally modify product URLs — for example, when standardizing naming conventions across your catalog.
Important Notes
- This option affects UPDATE operations only.
- New products always have handles set automatically.
- Changing a handle changes the product URL, which can affect SEO and backlinks.
- The default state is OFF (unchecked) for safety.
When to Use
- ✅ Enable when you need to standardize or update product URLs across your store.
- 🚫 Keep disabled (default) to maintain existing URLs and SEO rankings.
Additional Improvements
Image Import
- Fixed handling of image URLs containing whitespace.
- Added support for both string and array formats in the image_src field.
- Automatically cleans and validates image URLs before import.
Performance
- Introduced chunked import processing for large product sets to stay within Shopify API limits.
- Optimized duplicate product lookups when importing by EAN/barcode.
- Improved memory management for imports containing many variants.
Data Processing
- Enhanced parsing of multi-value field separators (now cleaner and whitespace-free).
- Refined product grouping logic for complex imports.
- Improved handling of inventory quantities for both new and existing variants.
Shopify Product Import Behavior
The Import Behavior setting defines how the system handles products and variants during import operations. It lets you decide whether to create new products, update existing ones, or perform both actions simultaneously, providing fine-grained control over your import process.
Available Behaviors
The app supports three import behavior modes:
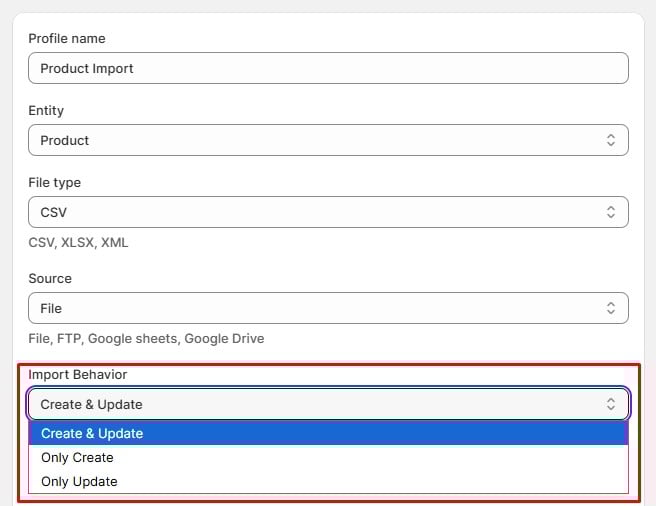
1. Create and Update (Default)
Value: create_and_update
What It Does
- Creates new products that don’t exist in Shopify.
- Adds new variants for existing products.
- Updates existing products and variants with data from the import file.
When to Use
- Standard imports and recurring synchronization jobs.
- Initial catalog imports or bulk updates.
- When you want to ensure Shopify stays fully aligned with your external data source.
Example
Your CSV file contains 100 products — 50 already exist in Shopify, 50 are new. The system will update the existing 50 and create 50 new ones.
2. Only Create
Value: only_create
What It Does
- Creates only new products and variants that don’t yet exist in Shopify.
- Skips all items that already exist (no updates).
When to Use
- When you’re adding new products to your store without affecting existing ones.
- When importing supplier feeds but want to preserve your custom descriptions and SEO data.
- During bulk product creation from multiple data sources.
Example
Your CSV contains 100 products, and 50 already exist in Shopify. The system will create only the 50 new items and skip the existing ones.
3. Only Update
Value: only_update
What It Does
- Updates only existing products and variants.
- Skips new products or variants that don’t yet exist in Shopify.
When to Use
- When updating prices, inventory, or product details for existing items.
- When synchronizing data from ERP or inventory management systems.
- When you want to avoid creating any new products by accident.
Example
Your CSV contains 100 products, but only 50 exist in Shopify. The system will update the 50 existing ones and ignore the 50 new items.
Variant-Level Granularity
Import behavior operates at the variant level, not just the product level. This means that even within a single product, each variant is evaluated independently based on the selected behavior.
Example
Your import file contains Product A with:
- Variant “Small” (already exists)
- Variant “Medium” (new)
If behavior = Only Update:
- Product A → Updated
- Variant Small → Updated
- Variant Medium → Skipped (not created)
If behavior = Only Create:
- Product A → Skipped (already exists)
- Variant Small → Skipped (already exists)
- Variant Medium → Created
This ensures full control over how each product and variant is processed during import.
How to Configure Import Behavior
You can configure import behavior in two ways:
Option 1: Via the User Interface
- Go to Import → Profiles.
- Create a new profile or edit an existing one.
- Locate the Import Behavior dropdown.
- Select your desired behavior:
- Create and Update (default)
- Only Create
- Only Update
- Save the profile and run your import.
Option 2: Via JSON Configuration
Add the import_behavior field directly to your profile configuration JSON.
Example:
{
“delimiter”: “,”,
“enclosure”: “\””,
“import_behavior”: “only_update”
}
Valid Values:
- “create_and_update” — Default (used when not specified).
- “only_create”
- “only_update”
Common Use Cases
Use Case 1: Price Updates from ERP
Scenario: Your ERP exports daily price updates.
Solution: Use Only Update.
- Updates pricing for existing products.
- Prevents new or test items from being created accidentally.
Use Case 2: Supplier Product Feeds
Scenario: You import product feeds from multiple suppliers but manually edit descriptions in Shopify.
Solution: Use Only Create.
- Adds new supplier products.
- Keeps existing product descriptions untouched.
Use Case 3: Inventory Synchronization
Scenario: Your warehouse exports stock levels for existing products.
Solution: Use Only Update.
- Syncs inventory quantities.
- Prevents errors if the export includes discontinued or unknown SKUs.
Use Case 4: Initial Catalog Import
Scenario: You’re importing your complete product catalog for the first time.
Solution: Use Create and Update (default).
- Creates all products on the first run.
- Updates them during subsequent imports.
Important Notes
- Default Behavior: If not specified, the system defaults to create_and_update.
- Matching Logic:
- Products are matched by handle.
- Variants are matched by option values (e.g., Size: Small, Color: Red).
- Validation: Invalid or incomplete records are automatically skipped and logged, regardless of behavior.
- Performance Considerations:
- only_update and only_create imports are faster for large catalogs since they skip unnecessary operations.
Troubleshooting
Q: My import shows “0 processed” with “Only Update.”
A: This means none of the products in your import file exist in Shopify. Double-check that the product handles in your file exactly match those in your store.
Q: New variants aren’t being created with “Create and Update.”
A: Verify that your variant option values (Size, Color, etc.) are unique. Variants are matched by option values, not by SKU.
Q: Products are being created even though I selected “Only Update.”
A: Confirm your configuration file or profile settings. Ensure import_behavior is correctly set to “only_update“.
How to export data
The export procedure is the same straightforward. Every export profile consists of the following four sections:
- General settings;
- Filters
- Mapping
- Advanced options.
General settings
First of all, name your profile. After that, configure the following parameters:
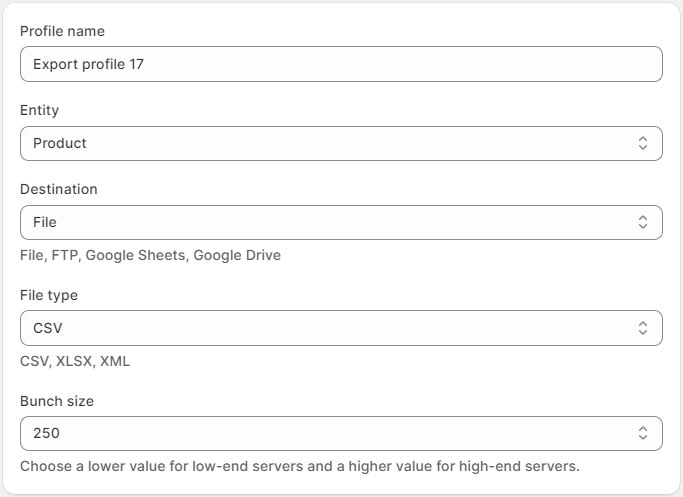
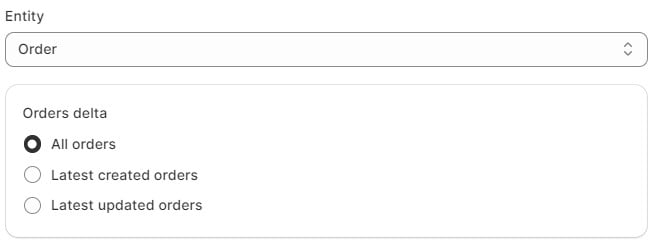
- Entity: Product, Customer, or Order;
When you select Order, the app lets you export all orders, only the latest created orders, or only the latest updated orders;
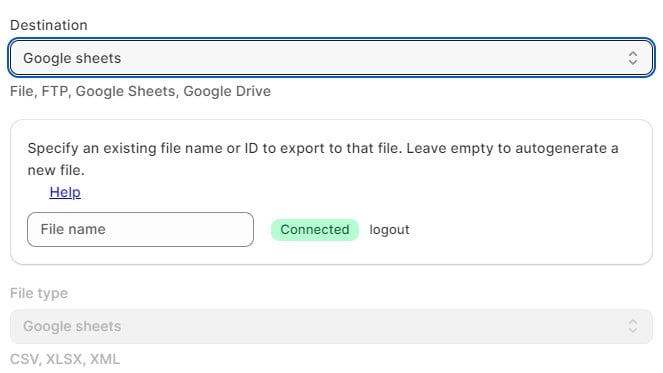
- Destinations: File, FTP, Google Sheets, or Google Drive;
- File type: CSV, XLSX, XML, or Google Sheets;
- Bunch size: Choose a lower value for low-end servers and a higher value for high-end servers.
File
If you choose File as your export destination, you can download it when the export process ends.
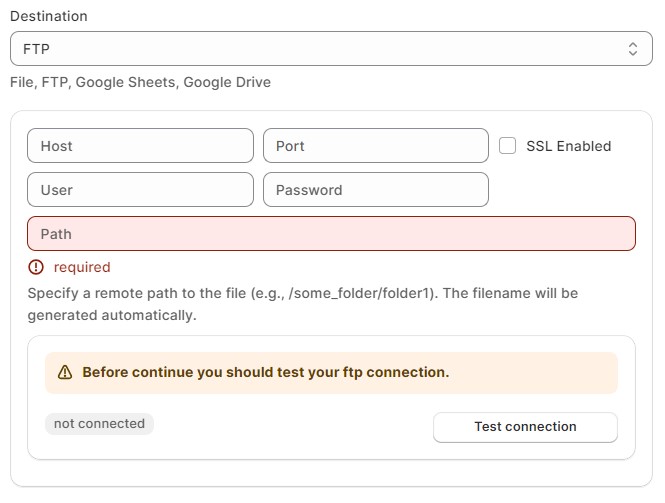
FTP
If you select FTP as your export source, fill in the following information:
- Specify your host;
- Enable/disable SSL;
- Specify your port;
- Provide a user email to get access to the remote file source;
- Specify the corresponding password;
- Type the remote path to your update file;
- Test the connection to make sure you’ve provided the correct credentials.
You can find more information in our Shopify FTP Export Guide.
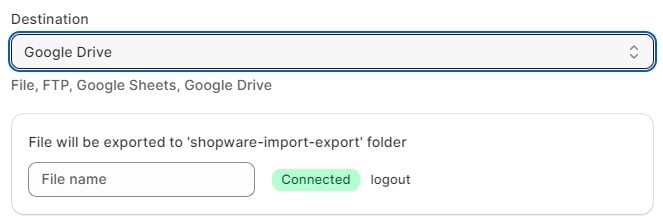
Google Drive
If you go with Google Drive as your export destination, choose the corresponding export source and let the Improved Import & Export Tool access your storage. Don’t forget to name your file. The app will export it to the shopware-import-export folder.
You can find more information in our Shopify Google Drive Export Guide.
Google Sheets
When dealing with Google Sheets, ensure that you grant the Improved Import & Export Tool access to your Google Drive storage. You’ll need to specify either a new file name or provide the ID of an existing spreadsheet. Your choice here will determine whether a new spreadsheet is created or if the data will be exported to an existing table. Leave the field empty to autogenerate a new file.
You can find more information in our Shopify Google Sheets Export Guide.
Filters
Create filters if you don’t want to export all records. On the Filter screen, follow these steps:
- Click Add filter +;
- Select a property/attribute, such as a financial status if you deal with orders.
- Select a value, such as unpaid.

This filter will export all orders with unpaid financial status.
You can create multiple filters by clicking the Add filter button.
Mapping
Now, you can rename all the default Shopify columns, specifying any new custom names. Our app lets you create an output file 100% suitable for any custom requirements!
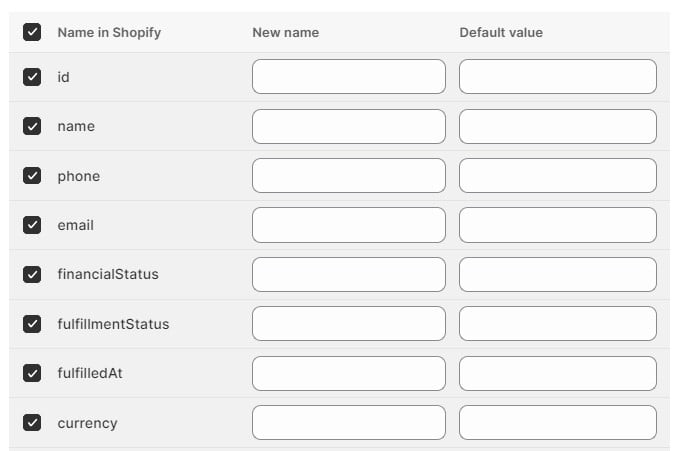
Also, note that it is possible to uncheck columns that you don’t want to export.
Additionally, you can include default values in your exports.
Default Values
The latest version of our app lets you apply default values to the data you export.
A default value is assigned if the attribute to which the default value is set has no value.
For example, suppose we set a default value of “ 99” to the weight attribute. In that case, this value is assigned automatically to products that do not have any value specified for the weight attribute after the export.

Products with a value for the weight attribute specified in the admin preserve the value from the admin – the default value is ignored.
Advanced Options
Use the advanced options to automate your export processes, get notifications about export results, and set additional parameters for your data transfers.
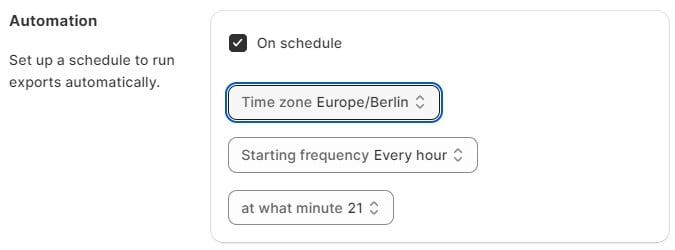
Automation
A scheduler is a feature that lets you automate your export processes by creating an update schedule. Enable the feature and do the following:
- choose your time zone;
- set your starting frequency: every hour, day, week, or month;
- choose the time to start.
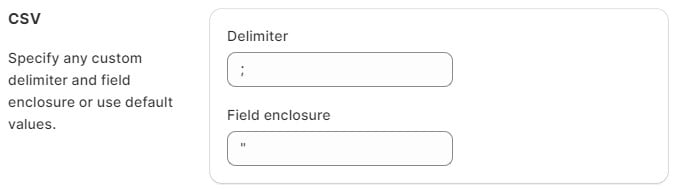
CSV
If you choose CSV as your file type, it is possible to define a custom delimiter and field enclosure.
Email notifications
With the Improved Import & Export Tool, you have the option to set up email notifications for successful, failed, or both types of job attempts. Here’s how to do it:
- Activate the feature.
- Choose the notification type: either for successful jobs, failed jobs, or both.
- Enter the email address where you want to receive the notifications.
- Specify the host for your email server.
- Enter the port number.
- Provide a sender’s username (usually an email address).
- Enter the corresponding password.
- You can also include job logs as attachments in the notification emails, but keep in mind that they might be large.
- Click the Test connection button to verify your connection. If all the provided information is correct, you will see a notification message in your mailbox.
Export
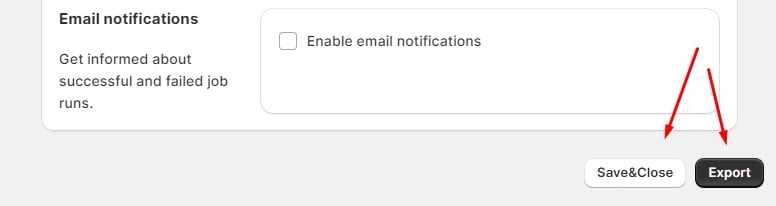
You can click the “Save & Close” button to save your Shopify export profile for future use. The app will launch it automatically according to a schedule.
To initiate the export process, click the “Export” button at the bottom of the screen. The app will then launch the data transfer from your Shopify store.
If you still have any questions regarding how the Import & Export Tool works, contact us.