
Advanced Shopify Export: How to Set up FTP for Shopify
![]()
In our previous discussion, we covered the process of importing files into Shopify via FTP. Today, we shift our focus to the reverse operation – exporting essential data, including Shopify customers, products, and orders, to a remote server using FTP. By default, Shopify offers an export procedure that results in a downloadable CSV file from your e-commerce storefront. However, for those who frequently provide partners with data updates, this manual process can be time-consuming. The solution to this challenge lies in embracing Shopify FTP export capabilities.
To enable this functionality, you will need to harness the power of the . In the upcoming tutorial, we will guide you through the steps to efficiently export files from your Shopify store via FTP. This approach offers a more streamlined and time-saving way to exchange crucial data with your partners or external systems.
For additional insights and tips to enhance your Shopify experience, be sure to explore our Shopify Cookbook. It’s a valuable resource for optimizing your e-commerce operations.

Table of contents
Default Shopify Export Without FTP
The default Shopify export is a built-in feature that allows users to export data from their Shopify store. It generates CSV files containing information about customers, products, orders, and more. However, it requires manual initiation and results in a downloadable CSV file from the Shopify admin panel. This process may be time-consuming, especially for those who need to provide frequent data updates to partners or external systems.
here’s a general step-by-step guide for exporting data from Shopify:
- Access Shopify Admin: Log in to your Shopify admin panel.
- Navigate to Export: Look for the export option. It is available on entity pages. For instance, you can find one on the Products screen.
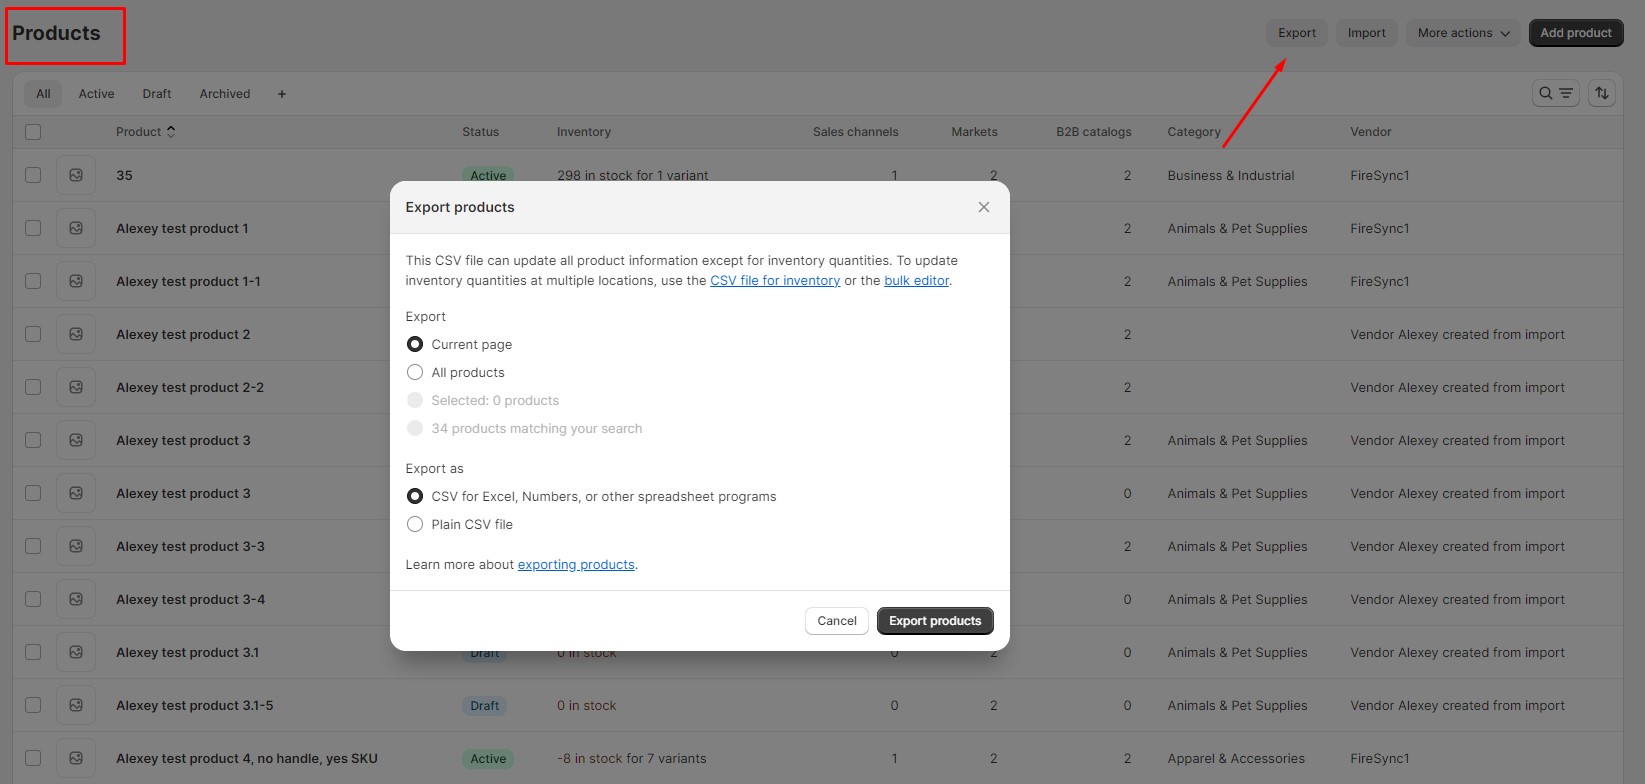
- Configure Export Settings: Configure settings for the data you want to export.
- Initiate Export: Start the export process, generating a CSV file. Once the export is complete, you will find the generated CSV file in the “Download” folder of your computer.
- Share or Use Data: You can now share or use the exported data as needed for analysis, reporting, or other purposes.
Please note that the specifics of the export process may vary depending on the selected entity. This is a simplified overview of the general steps involved. But, no matter what entity you choose, there is no place for FTP transfers here. Unless you switch your attention to a third-party app, such as the Firebear Import & Export Tool. This solution introduces a better way to export data from Shopify – via FTP.
What is FTP
FTP, or File Transfer Protocol, is a vital network protocol designed for the seamless transfer of files between two hosts over a network based on TCP (Transmission Control Protocol). In simpler terms, it serves as the conduit for file transfers over the vast landscape of the Internet.
FTP functions by establishing a direct link between two computers, enabling them to communicate and exchange data effortlessly. This process is characterized by its automation, which makes it the go-to choice for everyday file transfers in the context of Shopify.
As we’ve just explained above, the standard Shopify tools do not inherently support this method. Therefore, let’s explore an alternative approach that aligns better with the unique needs of your Shopify-based operations. But before going any further, let’s see why FTP file transfers are better than standard file uploads.
FTP Shopify Export Advantages
The advantages of using FTP export, as opposed to manual file downloads, are clear and compelling:
- Seamless Remote Data Transfer: FTP facilitates effortless data transfers to a remote server, eliminating the need for a labor-intensive sequence of manual downloads and uploads, which can be time-consuming and less practical.
- Enhanced Data Control, Consistency, and Time Savings: FTP provides greater control over the data transfer process, ensuring accurate and consistent file transfers. Automation streamlines the file transfer procedure, saving you valuable time, and allowing you to focus on other crucial aspects of managing your e-commerce website.
- Compatibility with Various File Formats: When implemented with the Import & Export Tool, Shopify FTP export accommodates a wide range of file formats, making it versatile for handling diverse data types, such as XML and XLSX.
- Reliable Connectivity: FTP establishes secure and dependable connections between computers, guaranteeing the safe and reliable transfer of files, even for substantial datasets.
- Effortless Scaling: As your e-commerce operations expand and the volume of data transfers increases, Shopify FTP export seamlessly adapts to meet your growing needs, ensuring efficient and scalable data management. You can easily manually upload a couple of files daily, but what if it is necessary to transfer dozens of them each day? In this case, you cannot scale your manual uploads, but scaling with the Import & Export Tool is a breathe.
As you can see, harnessing FTP export is cool, especially in conjunction with tools like the Firebear Import & Export Tool. It lets you significantly enhance your Shopify data management process with a host of advantages over traditional manual file uploads.
How to Set up FTP for Shopify
The Firebear Import & Export Tool brings the power of FTP file transfers to Shopify, allowing for efficient data export. To initiate this process, follow these steps:
Create your FTP export profile
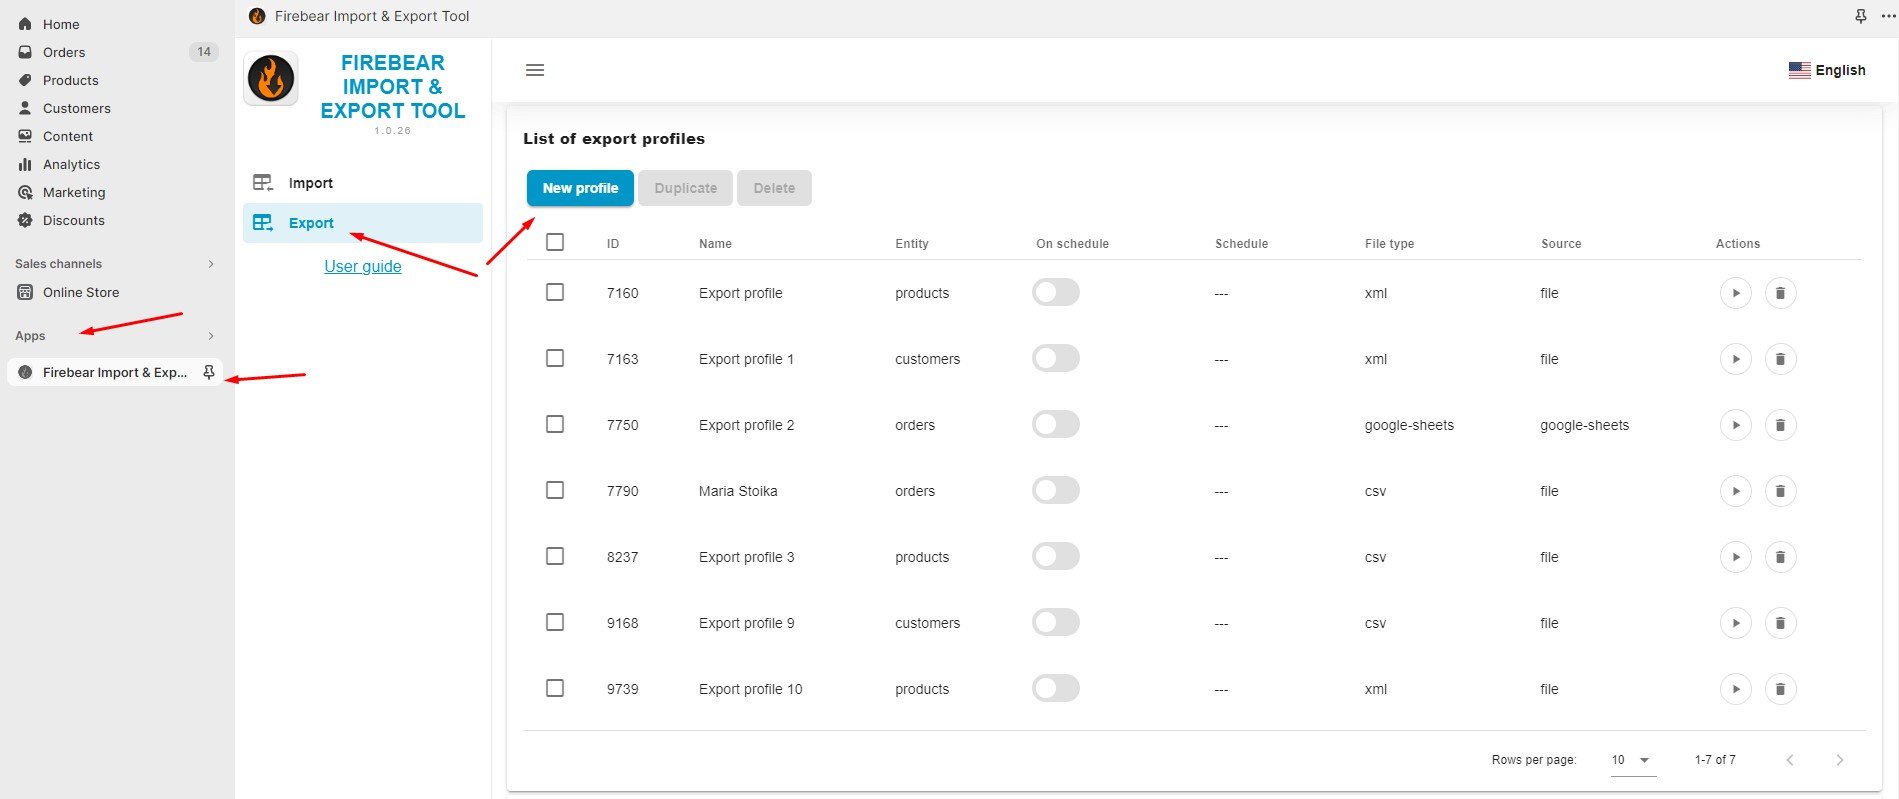
- Access the Firebear Import & Export Tool: In your Shopify admin panel, navigate to “Apps” and select the “Firebear Import & Export Tool.”
- Create a New Export Profile: Within the Firebear Import & Export Tool, click the “Export” option and then the “New Profile” button.
Configure basic export settings to set up FTP Export for Shopify
In the “Configure export” screen, configure your Shopify FTP export profile as follows:
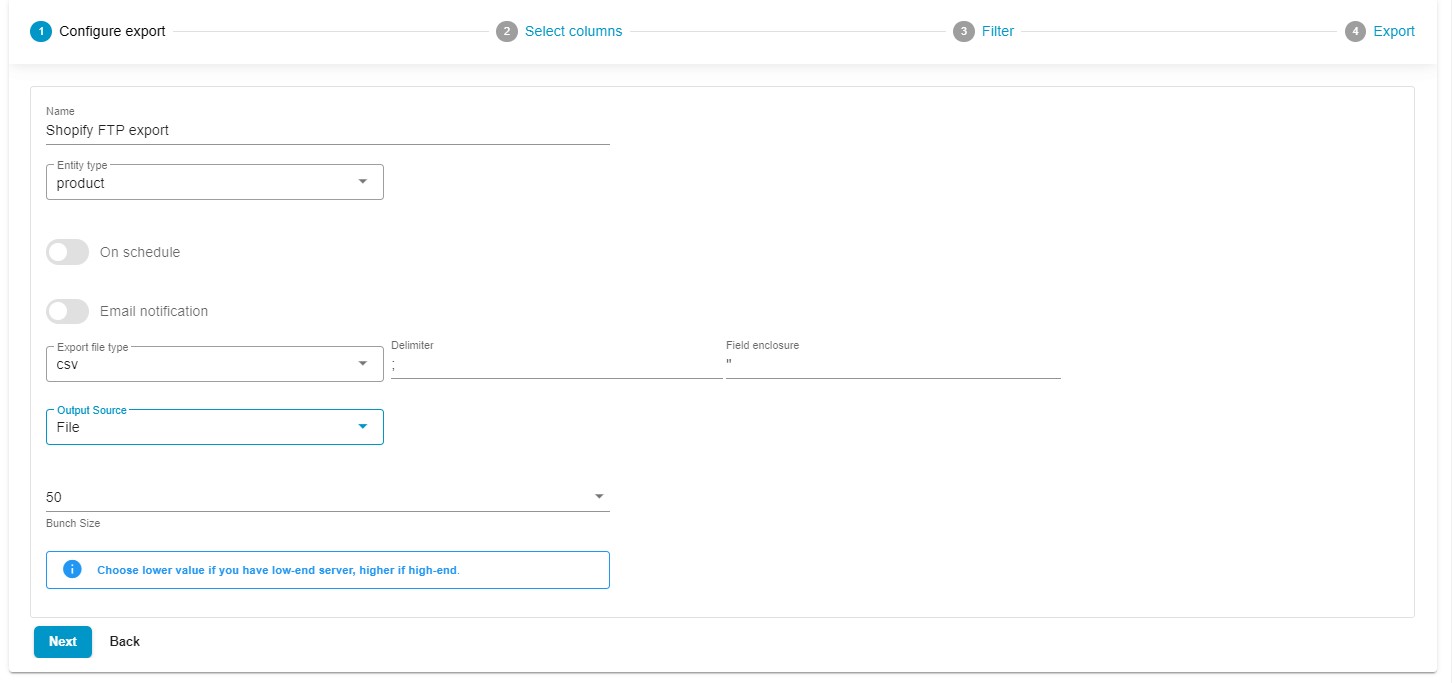
- Profile Name: Specify a name for your profile, for instance, “Shopify FTP Export.”
- Select Entity: Choose the type of data you want to export, such as “products.”
- Schedule Updates: If needed, set up a schedule for automatic updates.
- Email Notifications: Configure email notifications as required.
- File Format: Select the format for your exported data; options include CSV, XML, XLSX, or Google Sheets.
- FTP Details: Opt for FTP as your export source (it is available along with file downloads and Google Drive transfers) and provide the following details to set up FTP for Shopify:
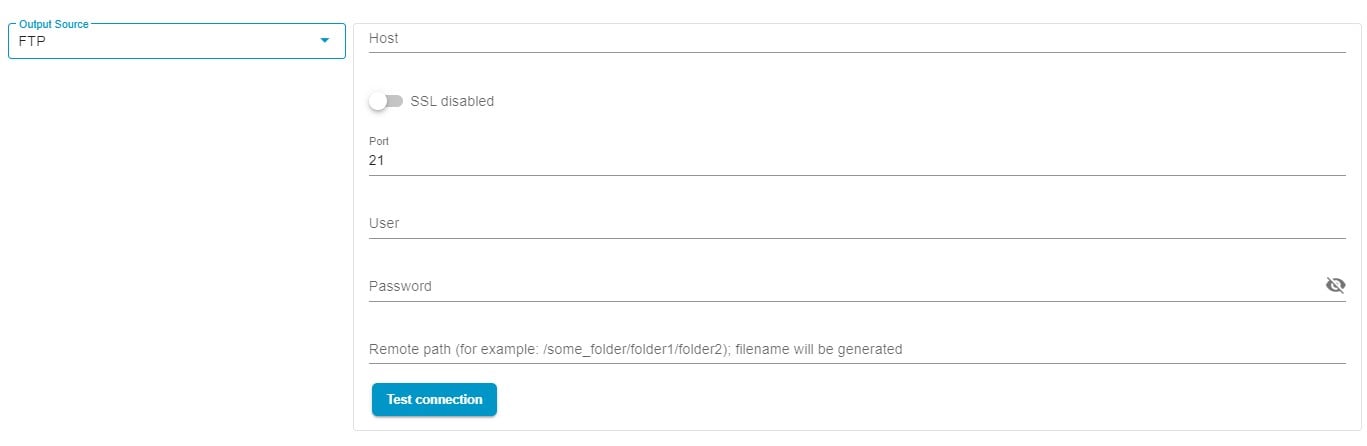
- Host
- Enable/Disable SSL
- Port
- User Email
- Password
- Remote Path for Storing Update Files
- Test the connection to verify your credentials.
- Bunch Size: Choose an appropriate bunch size for your file export, opting for a lower value if you’re working with a lower-end server.
Configure export mapping
Continue to the export mapping screen where you can customize the column titles to meet your partner’s requirements. You can rename default column titles by adding a new name (Rename) after the existing column name (Column).
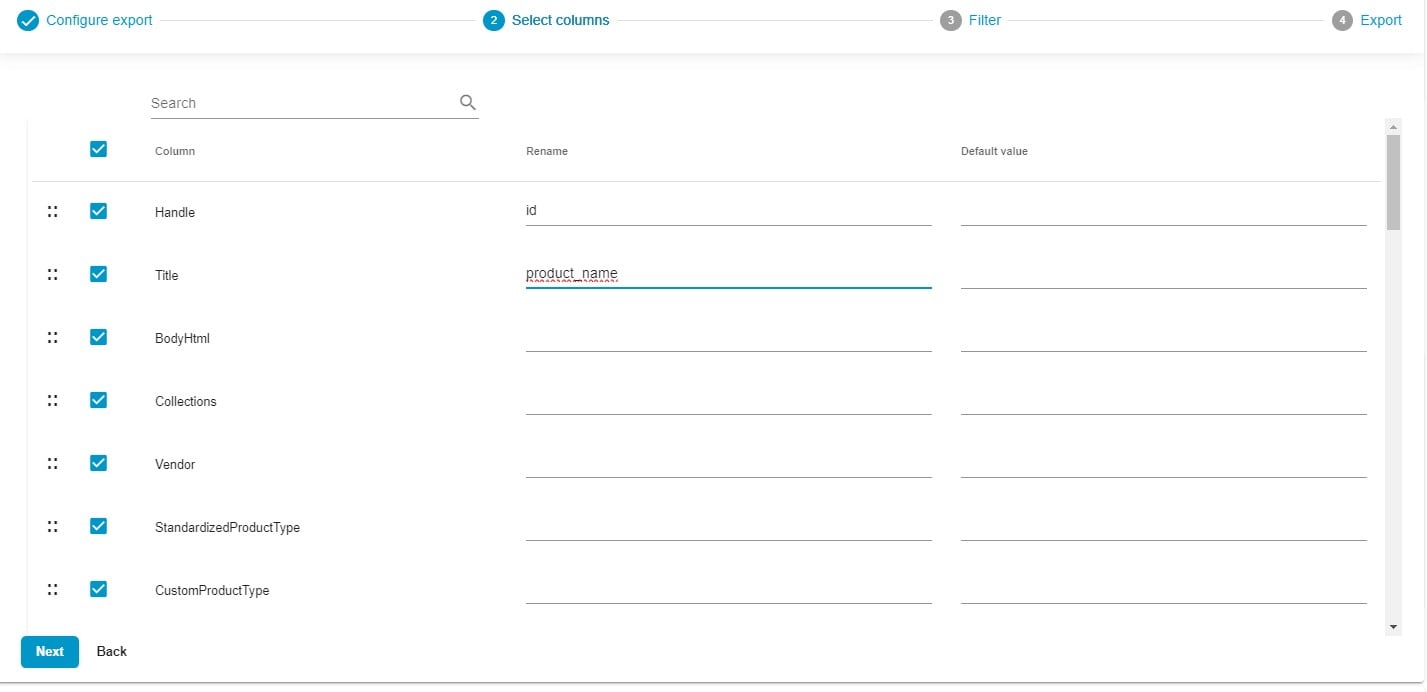
Additionally, it is possible to uncheck any columns you prefer not to include in your FTP export.
Column sorting is achieved through a simple drag-and-drop interface. Just click on the column you want to move and drag it to the desired place. It is way more convenient than clicking on arrows.
You can also add default values at this stage. Add them to the corresponding section if a specific attribute has no value. The export file will automatically include the designated default value in the place of missing data.
Filter data
If you wish to narrow down your data export by applying specific criteria, you can create filters on the Filter screen in the following way:

- Add a Filter: Click the “+” button to add a filter to your export profile.
- Select a Product Property: Choose a product property to define the criteria. For instance, you can opt for “fulfillmentStatus” to filter orders based on their fulfillment status.
- Choose an Operator: Select an operator that suits your filtering needs. If you use “fulfillmentStatus”, there is no need to select an operator since it is “Equals” by default.
- Specify a Value: Provide the value that aligns with your chosen criteria. For instance, if you’re exporting orders using “fulfillmentStatus,” you can specify a particular status: shipped, partial, unshipped, or unfulfilled.
- Create Multiple Filters: If you need to apply multiple filters to refine your data selection further, simply click the “Add filter” button to add additional filtering criteria.
Run Shopify FTP export
You can click the “Save & Close” button to save your Shopify FTP export profile for future use.
To commence the export process, click the “Export” button at the bottom of the screen. The app will then launch the data transfer from your Shopify store via FTP.

Now, you know how to set up FTP for Shopify. For a deeper understanding of the enhanced Shopify export capabilities, refer to our comprehensive documentation in the Firebear Import & Export Tool Manual.
Other Features
The Firebear Import & Export Tool not only creates Shopify FTP exports but also tackles the common challenges experienced by Shopify store owners during their import and export processes, elevating these operations in numerous ways. In contrast to conventional data transfer methods, this application presents a comprehensive array of features and functionalities designed to refine and diversify your data management capabilities. Here are some of the notable aspects that are already available or will soon be added and can help you enhance the way you setup FTP for Shopify:
- Full Product Import and Export: This tool enables you to import and export products, complete with customizable properties and attributes, allowing you to tailor your product listings to your unique requirements.
- Customer Data Import and Export: Simplify the management of customer data as the tool supports the import and export of customer information, including addresses, providing a holistic view of your clientele.
- Order Import & Export: Seamlessly export your order data to gain valuable insights and enhance order management. Moreover, you have the flexibility to import orders from another source to consolidate your sales data in one location.
- Product Properties Mapping and Mapping Presets: With the capability to map product properties and apply preset mappings, you can ensure that your data aligns precisely with your Shopify store’s specifications. The use of presets allows for the automation of repetitive import processes, streamlining your operations.
- Import and Export Schedules: The tool offers scheduling options, automating your data transfers at convenient intervals, ultimately saving you time and effort.
- Diverse File Format Support: You can seamlessly work with a range of file formats, including CSV, XLSX, and XLSX, accommodating various data sources and types.
- Google Sheets Import & Export: Seamlessly integrate your data with Google Sheets for collaborative, real-time data management.
- Direct File Uploads: Enjoy the convenience of direct file uploads, simplifying the data transfer process.
- FTP/FTPS Uploads: Ensure secure and efficient data transfers, with support for FTP and FTPS uploads, safeguarding the safety and integrity of your data.
- Google Drive Support: Leverage Google Drive for data uploads, expanding your data management options.
These extensive capabilities empower you to exercise precise control over your data, providing a comprehensive solution for efficient Shopify store management. While you are already familiar with how to set up FTP for Shopify, a more in-depth exploration of the product and its features is available here: