
Magento 2 Swatch Image Guide: How to Create, Manage & Import Color Swatches
Magento 2 swatch image functionality is crucial in creating a visually engaging shopping experience, especially for configurable products. Whether you’re showcasing different colors, textures, or patterns, Magento 2 swatches allow you to present product variations in an intuitive, customer-friendly way. However, many merchants struggle with managing and importing these swatches effectively, which can lead to poor product presentation and missed sales opportunities.
In this guide, we’ll walk you through everything you need to know about Magento swatches — including how to create color swatches, configure swatch image sizes, retrieve swatch image URLs, and most importantly, how to import Magento 2 swatch images using a streamlined, automated process. You will learn how to prepare your CSV files, map the necessary attributes, and avoid common pitfalls that come with importing swatches.
By the end of this article, you’ll be able to manage and import Magento swatches like a pro, giving your storefront the visual polish it deserves.

Table of contents
- What Is a Magento 2 Swatch Image?
- How Magento 2 Color Swatches Work in Configurable Products
- Magento 2 Swatch Image Size and Format Requirements
- How to Set Up Magento 2 Color Swatches
- How to Get Swatch Image URL in Magento 2
- Magento 2 Color Swatch Import: How to Import Swatch Images and Visual Attributes
- Common Swatch Import Issues and How to Fix Them
- Final Thoughts on Importing Magento 2 Swatch Images
- Magento 2 Swatch Image FAQ
What Is a Magento 2 Swatch Image?
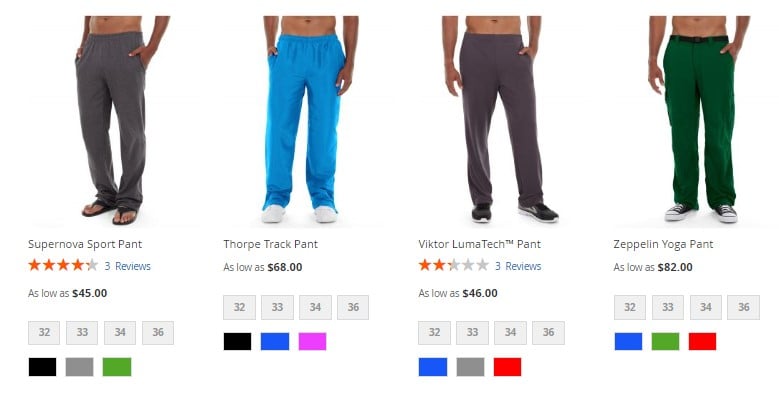
A Magento 2 swatch image is a visual representation of a product variation, such as color, pattern, or texture, used in configurable products. Unlike standard product images that showcase an entire item, swatch images act as clickable selectors that allow customers to preview different variations of the same product directly on the category or product page.
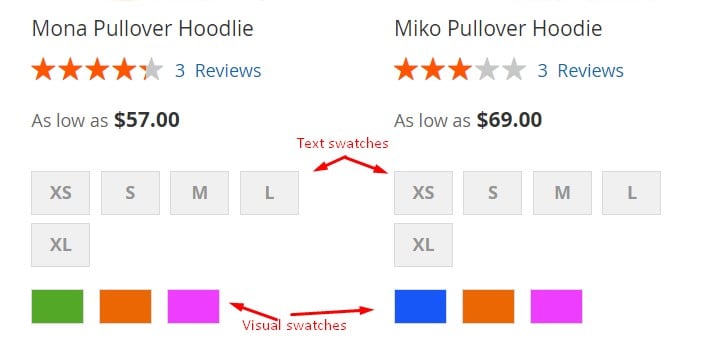
Magento 2 supports two main types of swatches:
- Text swatches – Simple labeled options like “Small” or “XL.”
- Visual swatches – These include Magento 2 color swatches (flat color blocks) and image swatches (custom thumbnails showing patterns, textures, or fabric).
Magento swatches can appear in product listings, on product detail pages, and in layered navigation. They’re particularly valuable for stores selling fashion, furniture, or other customizable goods where visuals heavily influence buying decisions.
In this tutorial, we’ll focus on visual swatches — especially Magento 2 color swatches — and explain how to properly manage and import swatch images to make your configurable products more interactive and engaging.
How Magento 2 Color Swatches Work in Configurable Products
Magento 2 color swatches significantly enhance the shopping experience by making product variations more interactive and visually appealing. Instead of selecting product options from dropdown menus, customers can click on swatches, such as color blocks or thumbnails, to instantly view and select different product variations.
This feature is particularly useful for Magento configurable swatches, where each swatch corresponds to a specific child product. For example, imagine you’re selling a T-shirt available in red, blue, and black. With Magento swatches, you can display clickable color boxes directly on the product page. When a shopper selects the red swatch, the main product image updates to show the red T-shirt, helping them visualize exactly what they’re buying.
Behind the scenes, Magento links each swatch to a unique simple product associated with the configurable parent. This setup not only improves the user interface but also reduces confusion and cart abandonment, especially in stores with many product variations.
By implementing Magento 2 color swatches effectively, merchants can deliver a cleaner, faster, and more engaging product selection process, ultimately boosting conversion rates and customer satisfaction.
Magento 2 Swatch Image Size and Format Requirements
When working with Magento 2 swatches, it’s crucial to follow the correct image size and format requirements to ensure seamless display across your storefront. Properly formatted swatch images help maintain a polished, professional look and prevent issues with layout, resolution, or fallback behavior.
The size and dimensions of the swatch usually depend on the theme. Although the recommended Magento 2 swatch image size is 50×50 pixels, saving an image as a square helps to preserve the aspect ratio of a pattern. It provides a clear visual cue without overwhelming the product layout. Also, note that swatches should be consistent across all product variations to maintain a uniform user interface.
As for file formats, Magento 2 supports JPG, JPEG, PNG, and GIF for swatch images. PNG is often preferred for color swatches due to its ability to handle transparency, especially for patterns or material textures.
Swatch images must follow logical naming conventions if you’re importing them — ideally, using lowercase filenames without spaces, such as red.png or blue-jeans.jpg. When uploaded, these images are mapped to the corresponding attribute options within the Magento admin or via CSV import.
In cases where a swatch image is missing or not properly mapped, Magento will fall back to a default visual indicator — either a color block (for color-type swatches) or a blank swatch. This fallback ensures the frontend remains functional, but to provide a consistent experience, always double-check that all Magento 2 swatches are assigned correctly and use valid images.
How to Set Up Magento 2 Color Swatches
Now that you’re familiar with the basics of Magento swatches, let’s walk through the process of creating and configuring Magento 2 color swatches for your configurable products.
Step 1: Create a New Swatch Attribute
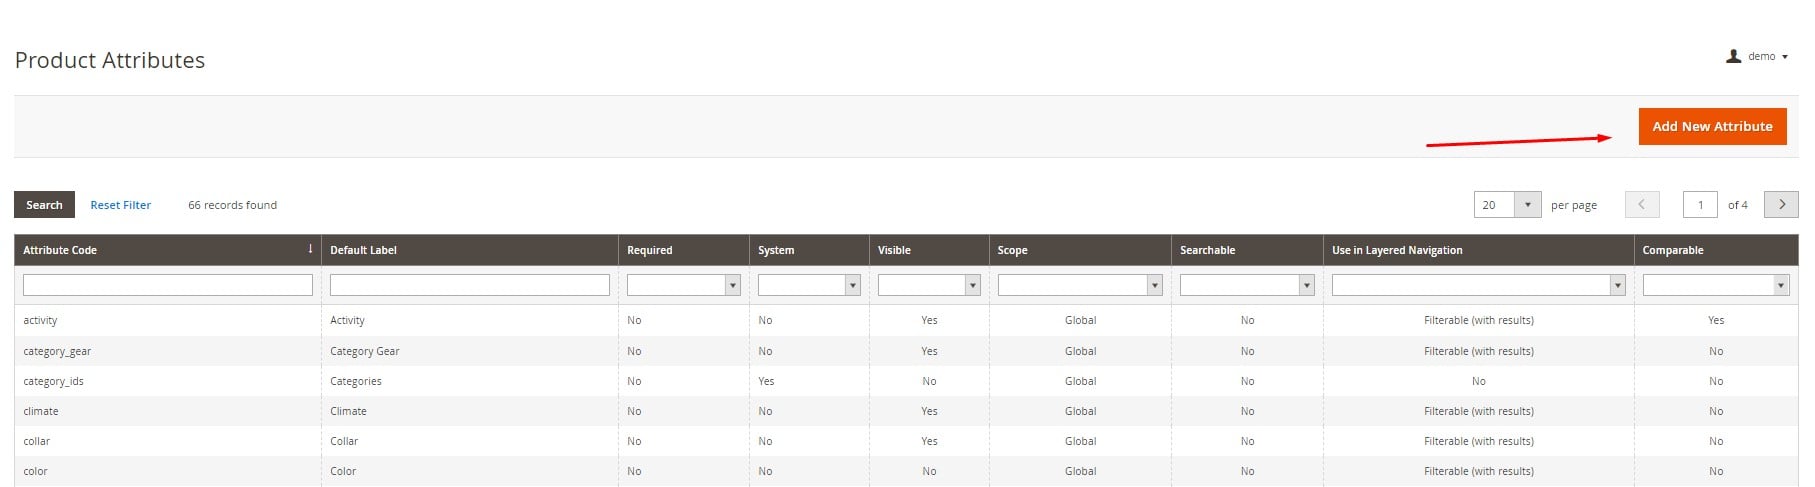
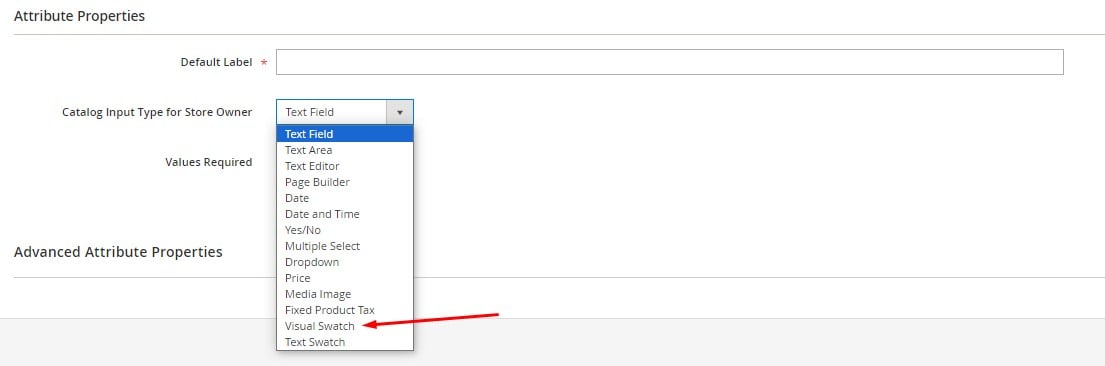
To get started, navigate to Stores > Attributes > Product in your Magento 2 admin panel and click the Add New Attribute button.
- Set a title for your attribute (e.g., “Color”).
- In the Catalog Input Type for Store Owner dropdown, choose Visual Swatch.
- Set Values Required to No unless you want to make color selection mandatory.
- Set Update Product Preview Image to Yes if you want the main image to change based on swatch selection.
- Set Use Product Image for Swatch if Possible to No to ensure Magento uses custom swatch visuals.
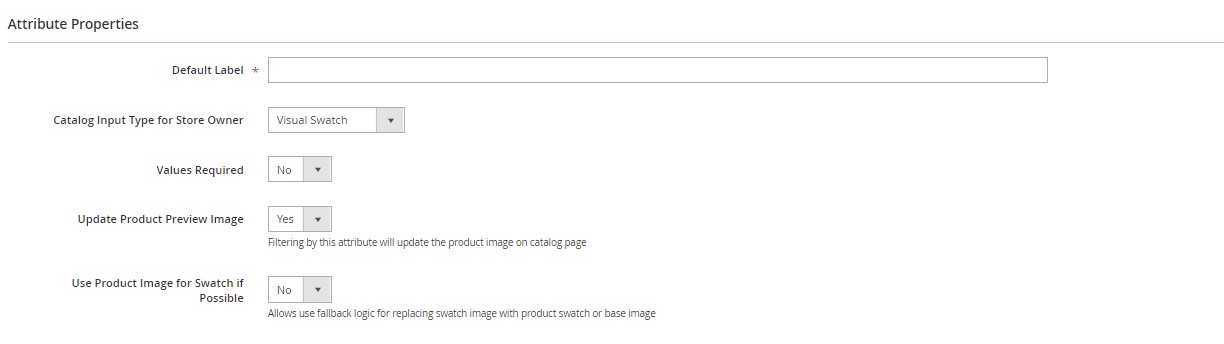
- Leave advanced properties at default unless you need custom behavior.
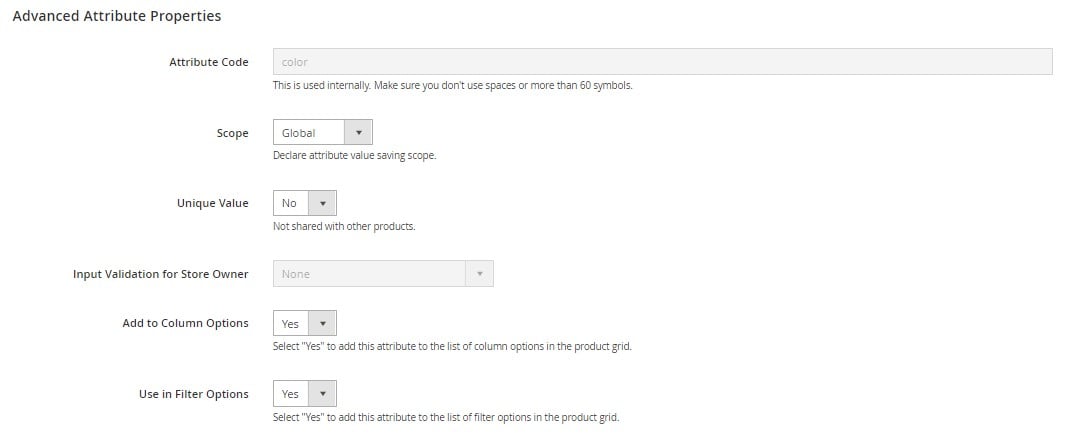
This defines your Magento 2 swatch image attribute and prepares it for assigning color options.
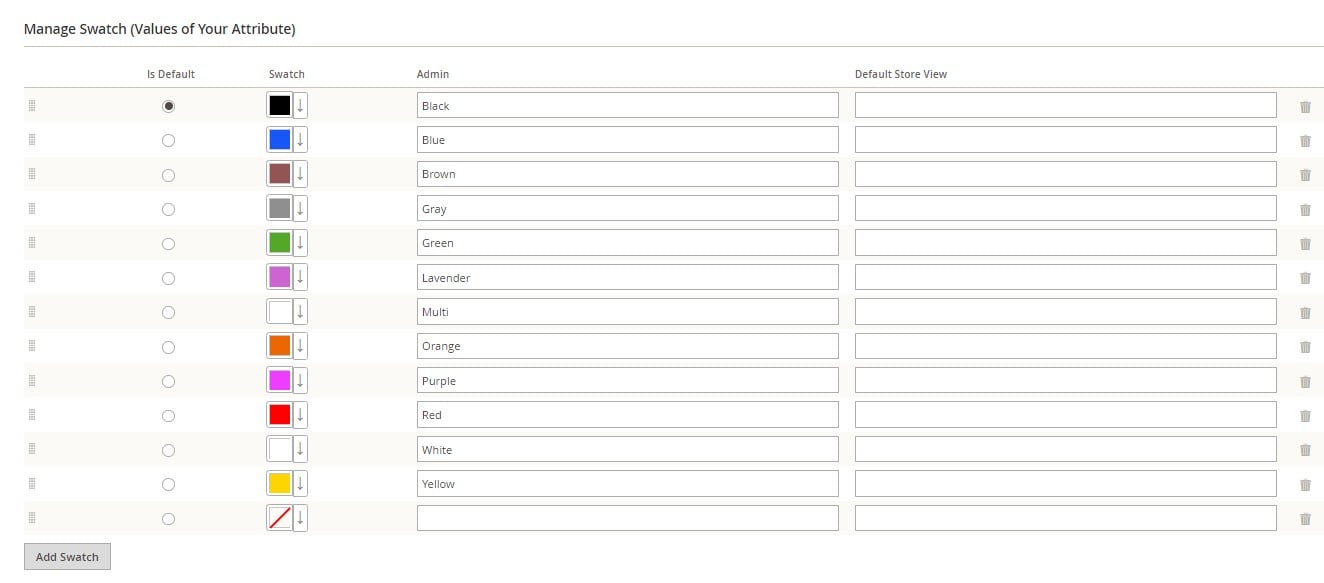
Step 2: Add Colors or Images to the Swatch Attribute
Now, let’s configure the actual visual swatches that will appear on the frontend. Magento lets you use either flat colors or image files as swatches.
Click Add Swatch to begin creating color options. You’ll see two options:
- Choose a color – Select a color using a color picker or by entering a hex code (e.g., #ff0000 for red).
- Upload a file – Add a custom image (e.g., fabric texture or pattern preview) to use as your swatch.
For color selection:
- Click the arrow next to the swatch box.
- Choose Choose a Color.
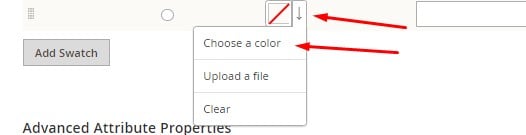
- Enter the hex code or use the picker.
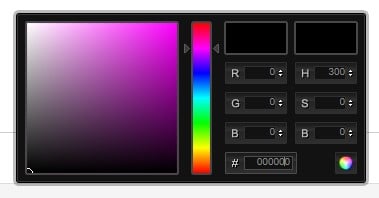
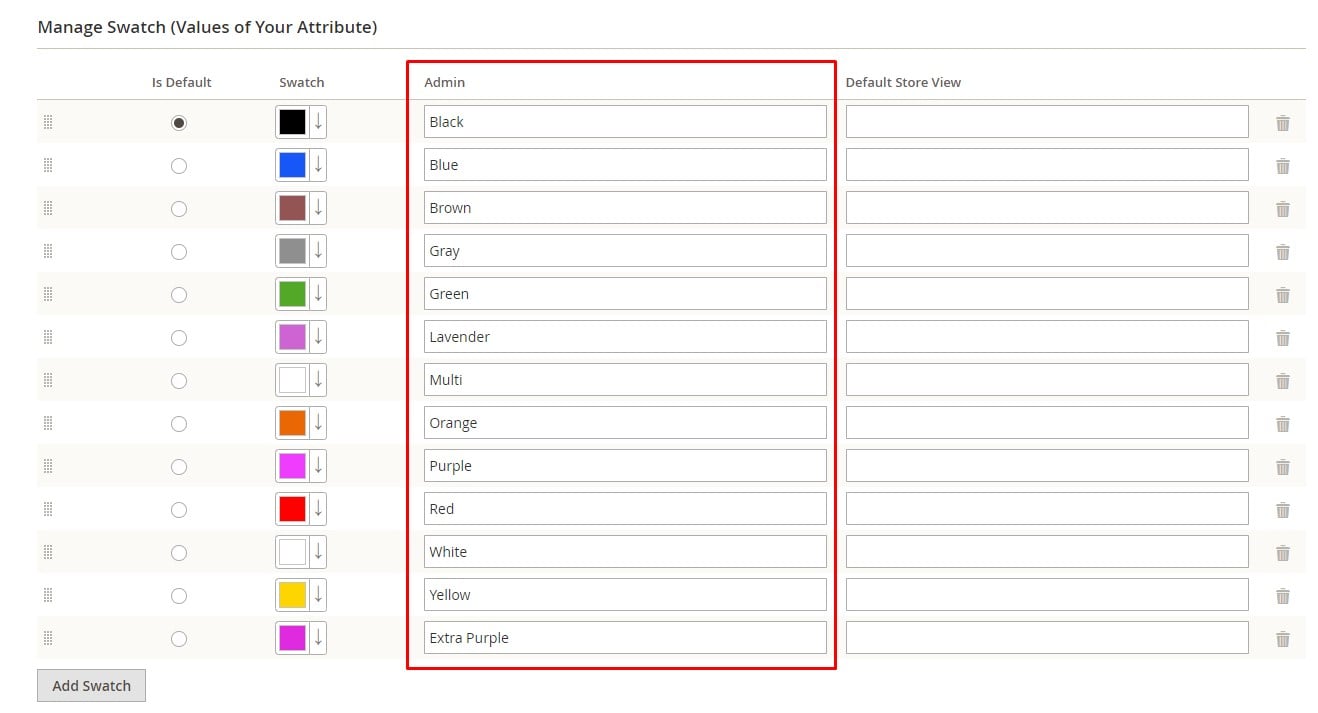
- Set a name for the swatch under the Admin column.
For swatch image upload:
- Choose Upload a File instead.
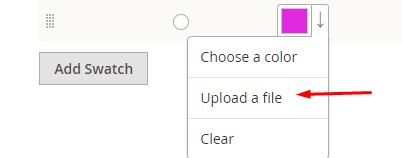
- Select the image you want to use for this swatch (JPG, PNG, or GIF).
- Magento 2 recommends using swatch images with dimensions of 50×50 pixels to ensure consistent display.

You can add as many color swatches as needed — just remember to save the attribute before leaving the page.
Step 3: Assign Magento 2 Swatches to a Configurable Product
Once your swatch attribute is ready, it’s time to link it to a product.
- Go to Catalog > Products and select a configurable product (or create one).
- Scroll to the Configurations section and click Edit Configurations.
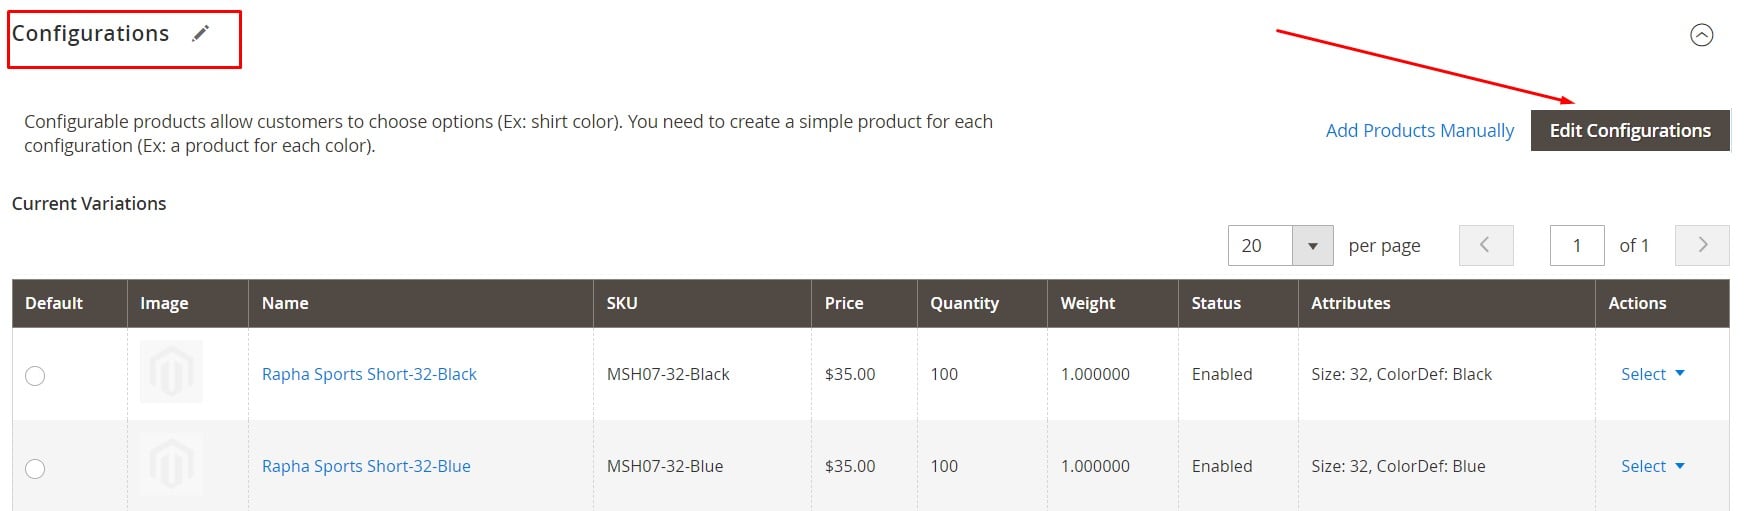
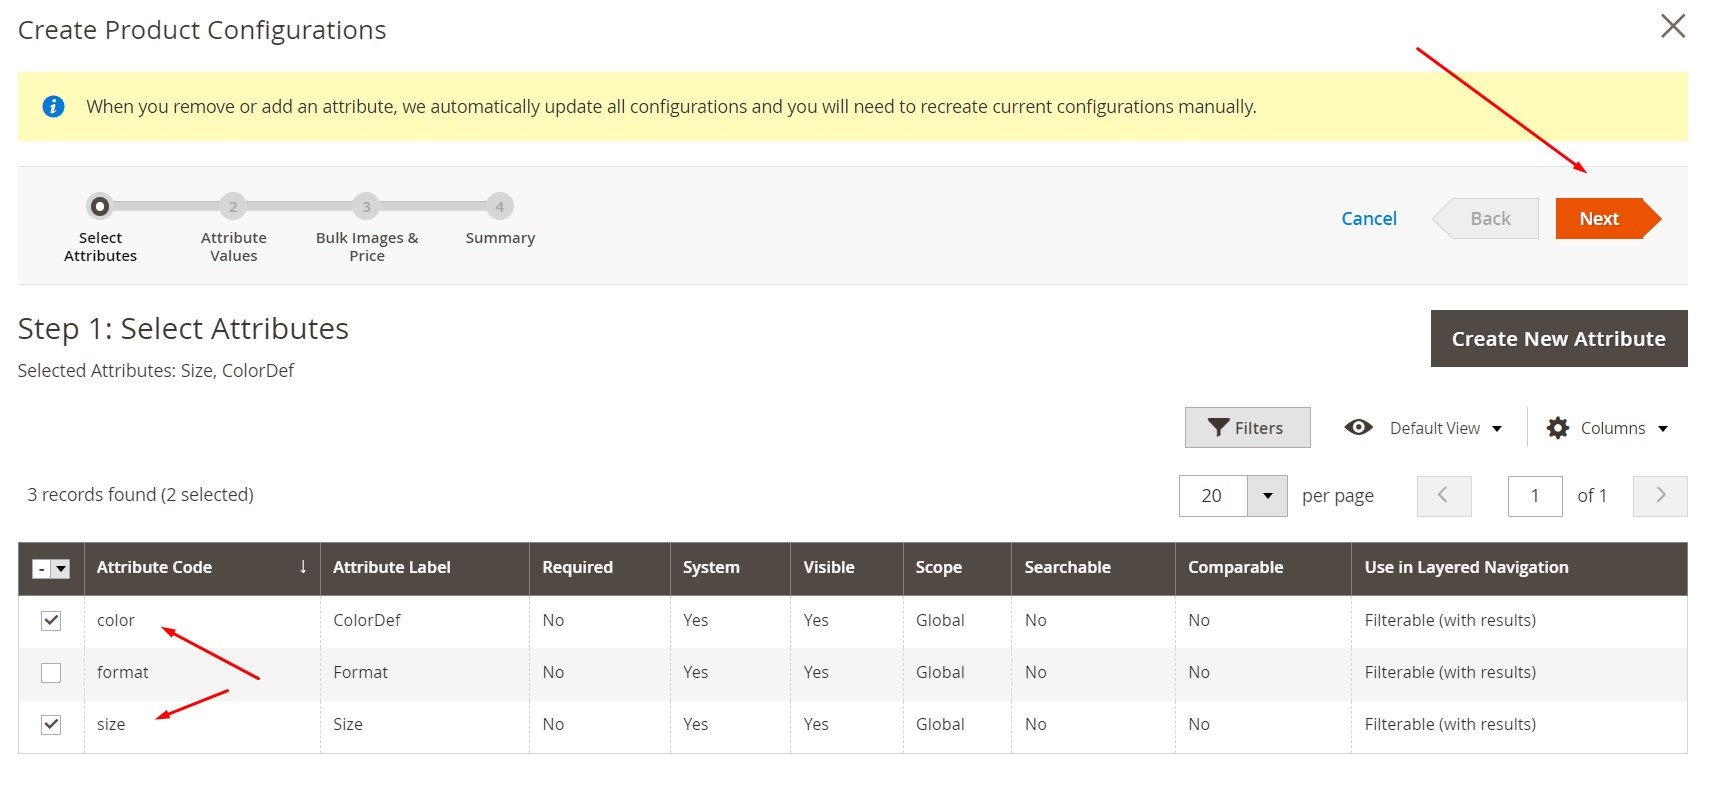
- Select the swatch attribute you created (e.g., Color), then click Next.
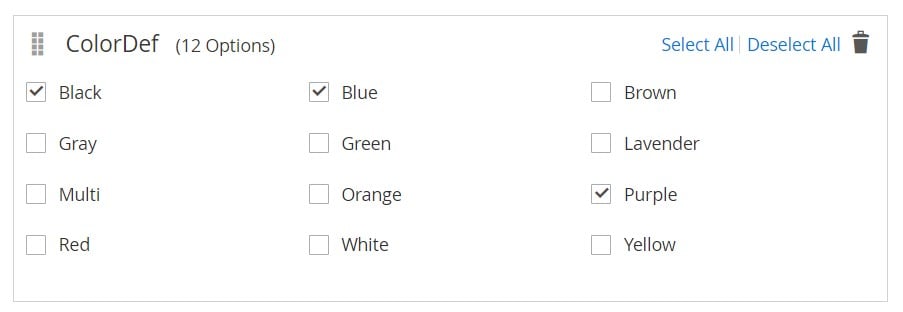
- Choose the swatch values you want to associate with this product.
- In the Images step, select Apply unique images by attribute to each SKU.
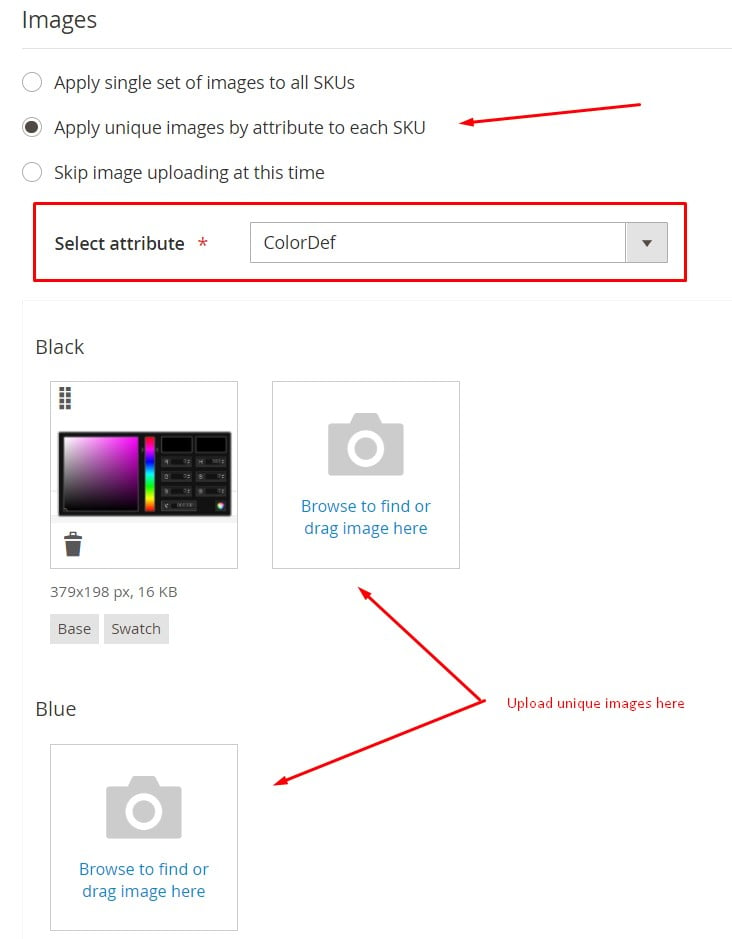
- Choose your Magento 2 color swatch attribute and upload a unique product image for each variation.
This setup ensures that when a customer selects a color swatch on the storefront, the corresponding product image updates dynamically — a key feature of Magento configurable swatches.
Preview the results in the summary step and save your product.

Now, head to your storefront and test the result: as you click between swatches, the product image updates in real time, making the shopping experience more interactive. If you have text-based options like size, those will remain static unless separate images are assigned.
While this guide focuses on visual swatches, text swatches follow a similar setup and can also be imported using the same logic described later in this article.
How to Get Swatch Image URL in Magento 2
If you’re working with custom themes or modules, you may need to programmatically retrieve swatch images associated with a specific attribute option. Magento 2 provides tools to help you get swatch image URLs for use in custom frontend components or integration logic.
To get a swatch image in Magento 2, you can use the \Magento\Swatches\Helper\Data class, which offers the getSwatchImageUrl() method for visual swatches. Here’s a basic example of how to use it:
|
1 2 3 4 5 6 7 8 9 10 11 12 13 14 15 16 17 18 19 20 |
use Magento\Swatches\Helper\Data as SwatchHelper; use Magento\Eav\Api\AttributeOptionRepositoryInterface; use Magento\Eav\Api\Data\AttributeOptionInterface; class SwatchUrlResolver { protected $swatchHelper; protected $optionRepository; public function __construct( SwatchHelper $swatchHelper, AttributeOptionRepositoryInterface $optionRepository ) { $this->swatchHelper = $swatchHelper; $this->optionRepository = $optionRepository; } public function getSwatchImageUrl($optionId) { $option = $this->optionRepository->get($optionId); return $this->swatchHelper->getSwatchImageUrl($option); } } |
In this snippet:
- $optionId refers to the ID of the swatch attribute option (e.g., the color “Red”).
- getSwatchImageUrl() returns the full URL path to the swatch image stored in the Magento media directory.
This method is useful when you need to dynamically display Magento 2 swatch images in custom UI components or data feeds.
❌ What You Can’t Do by Default
By default, Magento 2 does not display swatch image URLs directly in the admin panel (neither on the attribute options screen nor in the product configuration UI).
- Magento’s Stores > Attributes > Product section shows swatch images (color blocks or thumbnails), but not their direct URLs.
- The product edit page also doesn’t expose swatch image paths, even in the Configurations section.
However, here’s what you can and can’t do — and how to get around it if needed:
✅ Workarounds to Get Magento 2 Swatch Image URLs
1. Use Developer Tools
If you just want to find the swatch image URL manually:
- Go to the frontend product page where swatches are rendered.
- Right-click the swatch image → “Inspect” → copy the src from the <img> tag.
The URL usually looks like this:
https://yourstore.com/media/wysiwyg/swatches/123/red.png
2. Check Media Folder
Swatch images are stored under:
/pub/media/wysiwyg/swatches/
You can navigate to that folder via FTP or the admin file manager and review the files. The filenames often correspond to the attribute option label or ID.
3. Bonus Tip:
If you plan to import or manage swatch images in bulk, consider using the Improved Import & Export extension. It allows swatch image mapping via CSV, so you can control the image path during the import process, making it easier to reference swatch images by URL or relative file path. Let’s explore how it works.
Magento 2 Color Swatch Import: How to Import Swatch Images and Visual Attributes
Importing Magento 2 color swatches doesn’t have to be a manual or time-consuming task. With the Improved Import & Export extension, you can automate and streamline the entire process, whether you’re using simple color codes or full Magento 2 swatch images via URLs.
There are two main ways to import Magento swatches into your store:
- As part of a dedicated color attribute
- As embedded data within the additional_attributes column for configurable products
Both methods support two types of visual swatches:
- Color code-based swatches (e.g., #000000)
Image URL-based swatches (e.g., hosted logos, textures, or color previews)
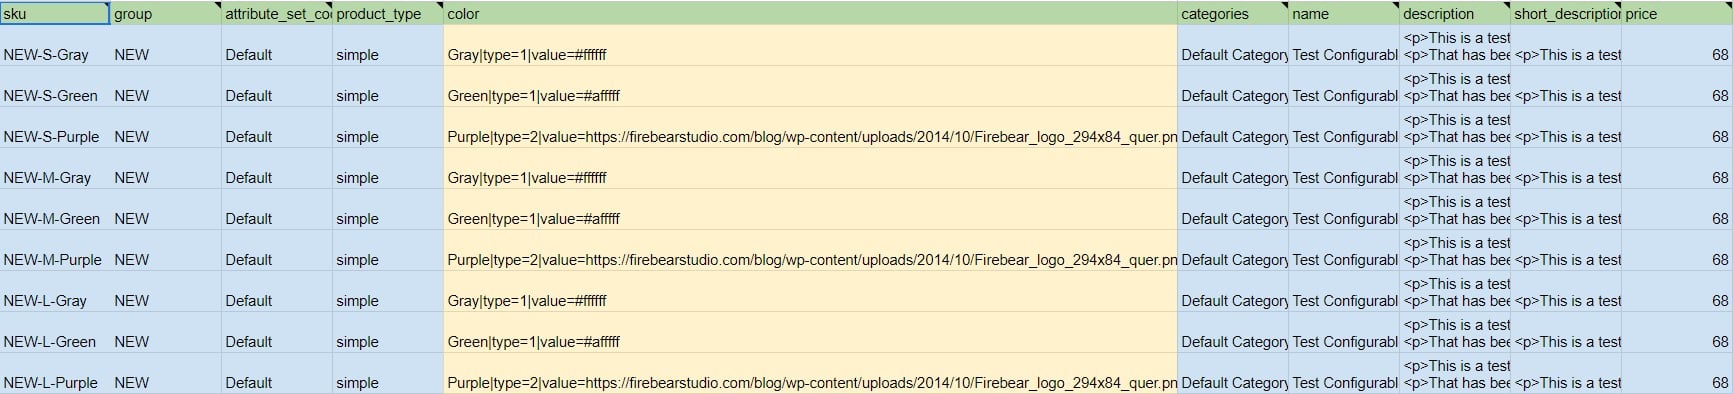
Option 1: Swatch Import via Color Attribute
To import swatches directly via the color attribute, your CSV file should include at least the following fields:
- sku – a unique product identifier
- attribute_set_code – the attribute set assigned to the product
- color – the attribute holding the swatch information
You can find their detailed descriptions in the table below:
| Attribute Name | Reference | Values | Value Example |
| sku | A unique value that is used to identify the product. The only mandatory field. | SKU is the first field of the table and cannot be removed.
Supports letters, numbers, and signs “-“, “_”. Can be up to 64 characters in length. Can not contain white spaces. Mind the letter case! You can find SKUs for products already in the catalog at Catalog > Products. |
downloadable-1 |
| attribute_set_code | Defines Attribute Set assigned to the product. | It should look the same as an attribute set name including capital letters (e.g. “Default”, “Man shoes” etc.)
Attribute set name can be found under Stores > Attribute Set attibute_set_code – is the default value for this column. This is also a mapping column containing ALL available product attributes, in case you need a quick reference to map data. |
default |
| color | An attribute that specifies product color. | Any color name, color code, or URL. Can include special signs. Values should be divided by a vertical bar “|”.
Visual swatch as a color attribute value contains extra syntax: type=1 — defines color code import type=2 — defines import via image URL |
Blue Navy|type=2|value=
https://firebearstudio.com/blog/wp- content/uploads/2014/10/ Firebear_logo_294x84_quer.png
Gray|type=1|value=#ffffff |
Each color swatch value follows this syntax:
SwatchName|type=1|value=#colorcode
SwatchName|type=2|value=https://yourdomain.com/path/to/image.png
For example:
Gray|type=1|value=#808080
Blue|type=2|value=https://firebearstudio.com/media/swatches/blue.png
This method lets you directly assign swatch values to your color attribute. A sample Magento 2 color swatch CSV might look like this:
It contains multiple additional columns. For further information, follow this .
Option 2: Importing Swatches via Additional Attributes
For more flexible data handling, especially when importing multiple attributes (like color and size swatches together), use the additional_attributes column.
Your CSV should include:
- sku
- attribute_set_code
- additional_attributes – includes all attribute data in a pipe-separated string
Example value in additional_attributes:
color=Blue|type=2|value=https://firebearstudio.com/media/swatches/blue.png,size=L
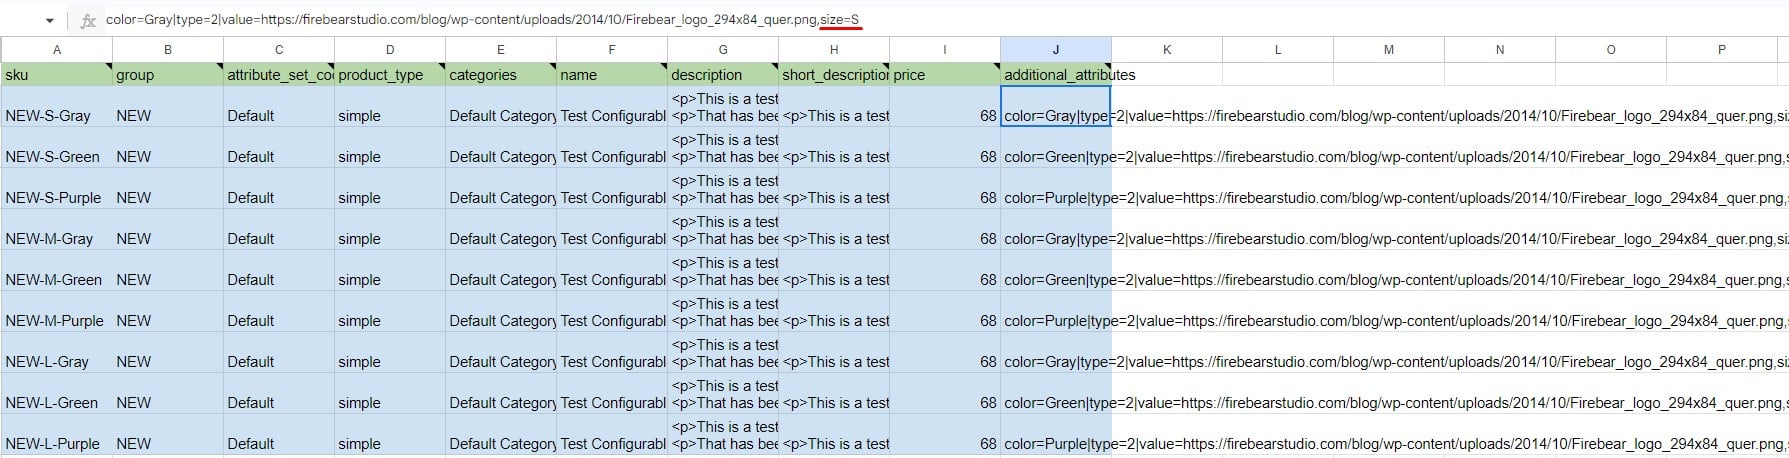
As you can see, it is also possible to place more information in the additional_attributes column than in the color column. For instance, there is also the size swatch specified along with the color. See the for more information.
This approach is ideal for bulk imports and complex configurable products. It also supports multiple swatch values per product and keeps your CSV clean and scalable.
How to Import Magento 2 Color Swatches Using Improved Import & Export
Once your swatch CSV is ready, follow these steps to perform the import:
- Navigate to System > Improved Import / Export > Import Jobs.
- Click Add New Job.
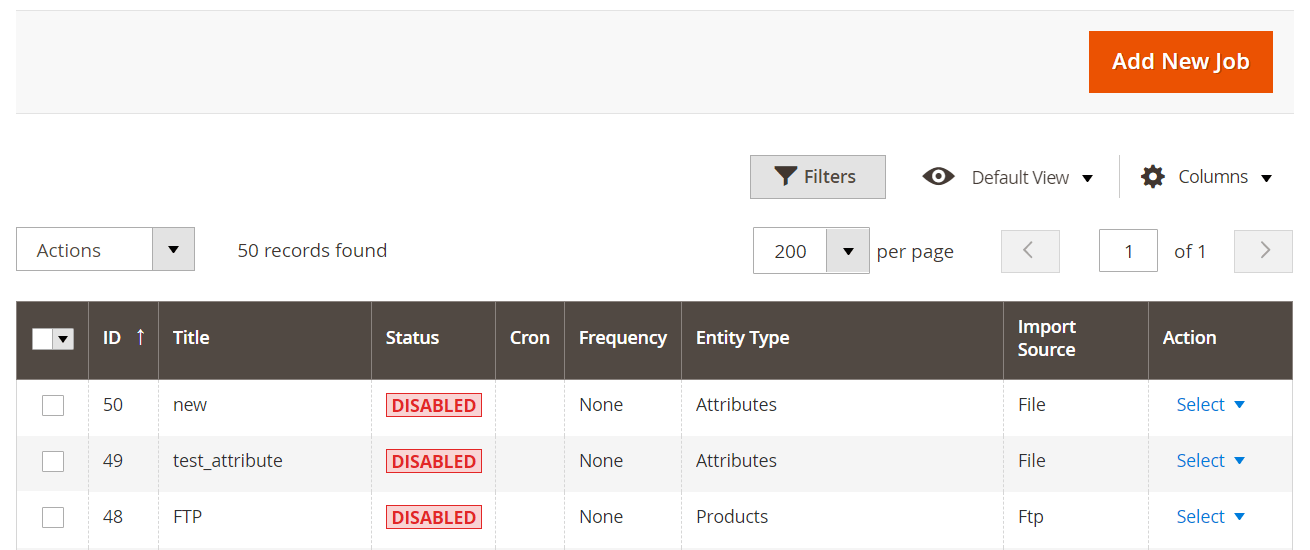
- Now, give your job a name. Schedule it if you want the import to run automatically.
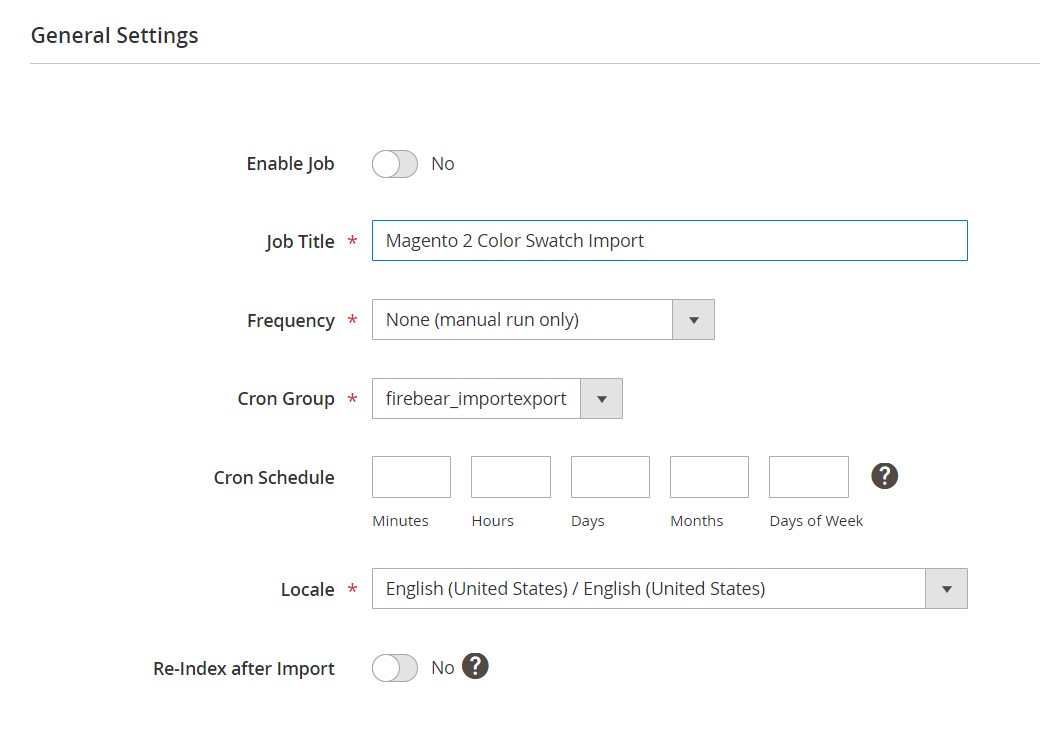
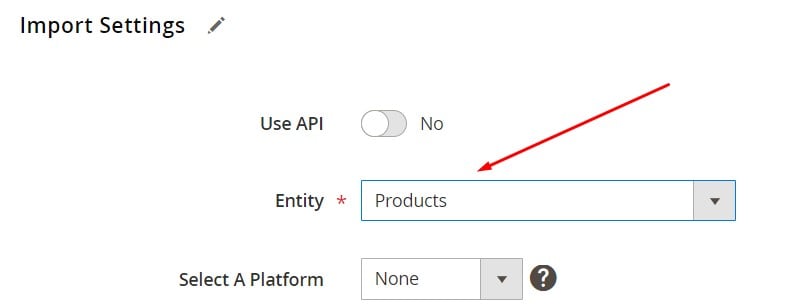
- In the Import Settings, select Products as the entity type.
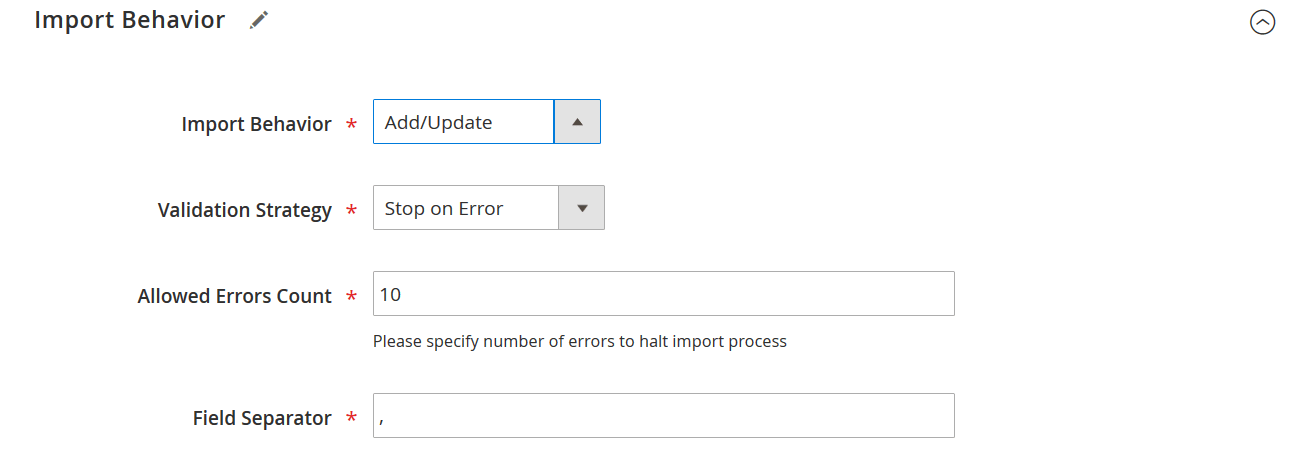
- Choose the appropriate import behavior:
- Add/Update – to assign swatches to existing SKUs
- Replace – to overwrite current swatches
- Delete – to remove swatch data
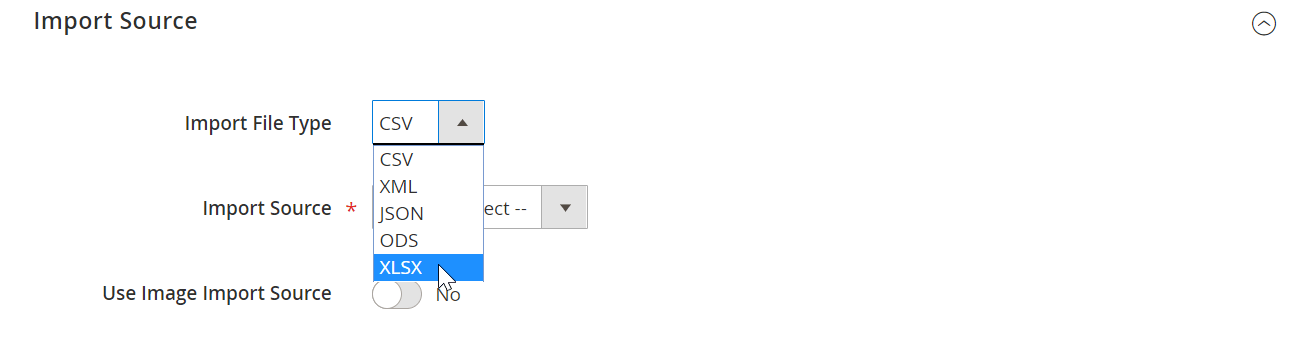
- Select your file format: CSV, XLSX, JSON, XML, or ODS.
- Choose your file source: local upload, FTP/SFTP, Google Sheets, Google Drive, or direct API.
- Upload your file and click Validate File.
- If validation is successful, click Save & Run followed by Run to start the import.

A log will be generated after the import process completes, showing success and any errors encountered.
Why Magento 2 Swatch Import Matters
Using the Improved Import & Export extension to manage Magento configurable swatches drastically reduces manual effort. You can:
- Apply swatches in bulk without editing each product
- Assign new color swatches or reuse existing ones
- Skip adding parent configurables — the system auto-matches swatches to child SKUs
This accelerates your catalog updates and ensures customers experience clean, visual, and interactive product pages. Whether you’re refreshing your store’s color schemes or syncing manufacturer images via URL, this method ensures you’re always ahead.
Common Swatch Import Issues and How to Fix Them
Importing Magento 2 swatches can significantly enhance your product presentation — but only if done correctly. Many merchants run into avoidable problems during the swatch import process that result in missing visuals, incorrect attribute values, or broken user experiences. Below are some of the most common issues and how to solve them effectively.
❌Broken or Missing Swatch Display
Symptoms: Swatch placeholders appear blank on the frontend, or product images don’t update when swatches are clicked.
Cause: This often happens when the Magento 2 swatch image path is invalid, the image wasn’t uploaded to the server, or the file format isn’t supported (e.g., wrong file extension or case sensitivity in filenames).
Solution:
- Ensure that your image URLs are correct and accessible if you’re using type=2|value=URL.
- Stick to supported formats like PNG, JPG, and GIF.
- Double-check the file paths and use lowercase filenames without spaces.
- With Improved Import & Export, you can validate and preview swatch images before running the import, avoiding common file path issues.
❌Incorrect Attribute Mapping
Symptoms: Swatches don’t appear, or the wrong colors are displayed for products.
Cause: This usually results from mismatched or misnamed attribute values during import. For example, the imported swatch value doesn’t match any existing options in your product’s color attribute, or the attribute isn’t assigned to the product at all.
Solution:
- Always verify that the color attribute (or your custom swatch attribute) is correctly mapped to each product.
- When using additional_attributes, ensure proper syntax and separator usage.
- The Improved Import & Export module allows easy attribute mapping, even for custom attributes, helping prevent value mismatches across product entries.
❌ Swatch Image Doesn’t Trigger Product Image Change
Symptoms: Clicking a swatch doesn’t switch the main product image in configurable products.
Cause: This occurs when swatches are imported without linking to product image variations, or if the “Update Product Preview Image” setting is disabled.
Solution:
- Make sure your swatch attribute is set to Update Product Preview Image = Yes.
- During import setup, use Apply unique images by attribute to each SKU so Magento can correctly associate images with swatches.
- With Improved Import & Export, you can automate this behavior and ensure correct bindings between swatches and product images.
❌Swatches Not Displayed on Frontend After Import
Symptoms: Swatches are visible in the admin panel but do not appear on the product page.
Cause: This can happen if the swatch attribute isn’t added to the attribute set or the configurable product isn’t properly reindexed.
Solution:
- Confirm that your swatch attribute is part of the product’s attribute set.
- Run reindexing and cache refresh after the import is complete.
- The Improved Import & Export extension can trigger post-import indexers automatically, ensuring your Magento configurable swatches display correctly without manual admin work.
When importing Magento 2 swatches, always test with a small dataset first. The Improved Import & Export extension provides validation tools, error logs, and flexible attribute mapping that help you catch and fix issues before they go live. This ensures smooth swatch functionality, faster setup, and an improved visual experience for your customers.
Final Thoughts on Importing Magento 2 Swatch Images
Magento 2 swatch images play a vital role in creating engaging and visually dynamic product pages, especially when managing configurable products. By using Magento 2 color swatches, merchants can showcase product variations like color, material, or texture in an intuitive way that boosts customer interaction and drives conversions.
While Magento allows you to create swatches manually, scaling this process across a large catalog can be time-consuming and error-prone. That’s where Firebear’s Improved Import & Export extension comes in. With full support for image URLs, color codes, and swatch attribute mapping, the extension streamlines the entire process, allowing you to bulk import Magento 2 swatches with precision and ease.
Whether you’re updating existing products or launching new configurable items, the extension gives you full control over data flow and swatch presentation. Plus, with support for advanced sources like Google Sheets, FTP, and APIs, it fits right into your ecosystem.
Ready to simplify your product management and improve the visual quality of your store?
👉 Contact Firebear Studio to discuss your Magento data needs
👉 Download the Improved Import & Export Extension and experience the fastest way to manage Magento configurable swatches and product visuals.
Want to master Magento 2 import from A to Z? Explore our complete guide and unlock step-by-step tutorials, tips, and expert tools.
👉 Go to the Full Magento 2 Import & Export Guide
Magento 2 Swatch Image FAQ
What is a swatch image in Magento 2?
A Magento 2 swatch image is a visual element used to represent product variations, such as color, texture, or material. Swatches can be displayed as flat colors or uploaded images and are typically used with configurable products to improve user experience.
How do Magento 2 color swatches enhance product pages?
Magento 2 color swatches replace dropdowns with clickable visual selectors, making it easier for shoppers to preview different product options. This leads to a more intuitive, engaging shopping experience and higher conversion rates.
Can I upload custom images for Magento 2 swatches?
Yes. Magento 2 allows you to upload custom images for visual swatches, such as patterns or fabric textures. These images must follow specific format and size requirements, typically 50×50 px PNG or JPG files.
What is the recommended Magento 2 swatch image size?
The ideal swatch image size in Magento 2 is 50×50 pixels. This size ensures clarity without disrupting layout consistency across the storefront.
Can Magento 2 swatches be imported by default?
By default, Magento 2 does not support flexible or advanced swatch image import. You must assign swatches manually within the admin, which is time-consuming for large catalogs.
How does Improved Import & Export help with swatch image import?
The Improved Import & Export extension lets you bulk import Magento 2 swatch images using CSV, XML, or Google Sheets. You can assign swatches using color codes or image URLs, eliminating manual setup and saving hours of work.
What are the possible ways to import swatches in Magento 2 using Improved Import & Export?
You can import swatches either directly through a specific attribute (like “color”) or via the additional_attributes column. Both methods support color codes (type=1) and image URLs (type=2) to define each swatch.
Can I use image URLs instead of uploading swatch files manually?
Yes. With Improved Import & Export, you can assign Magento 2 swatch images via external URLs, pulling them directly from your supplier or media server — no local storage needed.
What if my swatch images don’t appear after import?
Common issues include broken image URLs, incorrect attribute mapping, or missing reindexing. The Improved Import & Export extension validates your data before import and automates indexing to ensure proper swatch display.
Can I schedule automated swatch imports in Magento 2?
Absolutely. The Improved Import & Export extension supports scheduled imports, allowing you to automatically update Magento 2 swatches from external sources — perfect for syncing supplier catalogs or seasonal updates.
Related posts
 Magento Inventory Management: A Complete Guide to Stock Optimization and Efficiency
 Shopify Metafields Explained: How to Add, Manage & Import Them
 Magento to Shopify Migration – The Ultimate Guide
 How to Archive Products in Shopify: A Quick Guide
 Magento 2 Bundle Product with Custom Options: Complete Guide to Benefits, Limits & Import
 Mirasvit’s Magento 2 Product Reviews Extension Explored
 How to Merge Customers in Shopify: A Step-by-Step Guide
 Magento to Shopify Product Migration: CSV Field Reference & Step-by-step Guide