Advanced Shopify Export: Google Sheets Shopify Integration Guide
![]()
In the dynamic world of e-commerce, Shopify store owners a bound to data. Harnessing its power means the difference between good and exceptional e-commerce performance. And while Shopify provides a robust platform for managing your online business, there is room for improvement. You need to explore the potential of different third-party tools to implement features absent by default, such as the Shopify Google Sheets integration. Otherwise, you may spend lots of time on default processes that can be automated. In the following article, we explore how to export Shopify orders to Google Sheets along with customers, products, and other entities, gaining a secret ability for efficient data management, collaboration, and analysis.
As you might have already guessed, integrating Google Sheets with Shopify may be problematic. But fear not. In this comprehensive guide to Google Sheets Shopify integration, we compare two different approaches: one is based on the default instruments, and another incorporates the . But before going any further, let’s see what Google Sheets is. And don’t forget to visit our Shopify Cookbook for other useful tips.

Table of contents
- 1 What is Google Sheets
- 2 Default Shopify Google Sheets Integration (Export)
- 3 Google Sheets Shopify Integration Benefits
- 4 How To Export Customers, Orders, And Products From Shopify to Google Sheets
- 5 Other Features
What is Google Sheets
![]()
Google Sheets, a widely embraced spreadsheet application, offers an array of compelling features, all within a free and user-friendly package. Available via the web, as a mobile app on Android and iOS, and even as a desktop application on Google’s ChromeOS, it provides versatility in accessibility.
One notable strength of Google Sheets lies in its compatibility with Microsoft Excel file formats. This simplifies the process of uploading Excel files to Google Drive and swiftly converting them into Google Sheets tables with minimal effort.
Facilitating collaboration and real-time editing, Google Sheets allows multiple users to work on a single document concurrently, streamlining teamwork and data sharing. Features like change tracking, comments, and in-document communication enhance collaboration efficiency.
Moreover, Google Sheets boasts an extensive range of functions and formulas, akin to Excel, making it a valuable asset for data analysis and manipulation. Whether you require complex calculations, chart creation, or data visualization, Google Sheets offers a multitude of functions to meet your needs.
The ability to access Google Sheets from anywhere with an internet connection is another notable benefit of the Google Sheets Shopify integration. It is particularly advantageous for e-commerce businesses, enabling seamless data management for Shopify from virtually any location.
While direct integration between Google Sheets and Shopify is unavailable by default, two approaches provide a solution. The first involves manual integration using the default tools of both platforms. The second, a more streamlined and efficient way, leverages our application, transforming data management for those in pursuit of a dynamic solution. Let’s explore the default option.
Default Shopify Google Sheets Integration (Export)
Let’s take a look at the default Google Sheets Shopify integration first. This process of exporting Shopify orders to Google Sheets along with other entities involves the following steps:
- Log in to Shopify. Open your web browser and log in to your Shopify admin panel.
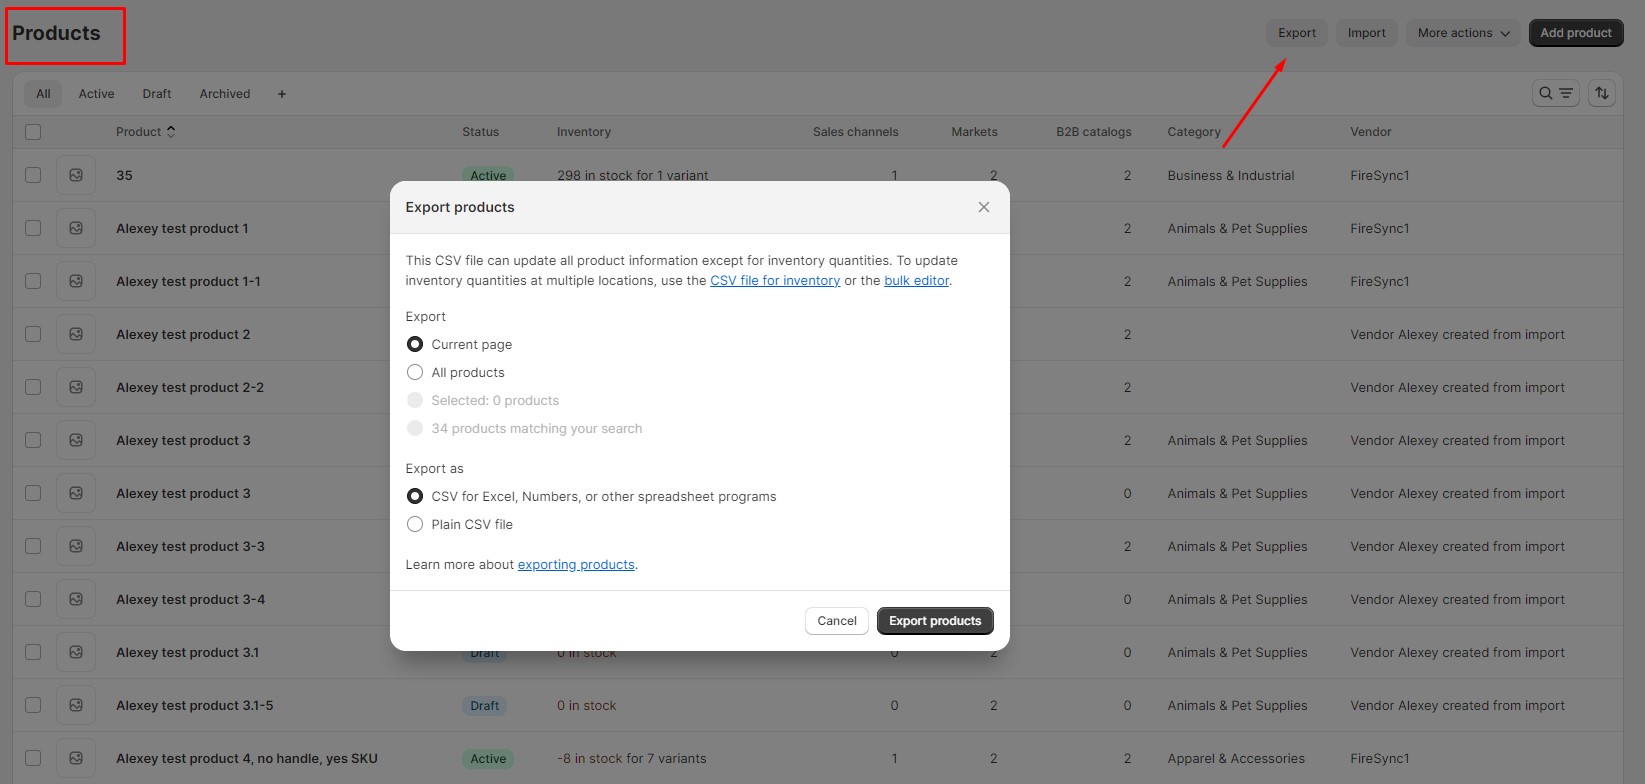
- Access Data Export. Navigate to an entity page you want to export. For instance, Orders.
- Set Export Options. Now, you can configure export parameters, such as the format of the exported file.
- Generate Export File. Click the “Export orders” button to generate the export file. Shopify will create a downloadable CSV file with the selected data. Once the export is complete, you’ll find your order data in your folder with downloads.
- Now, it’s time to import Shopify orders to Google Sheets:
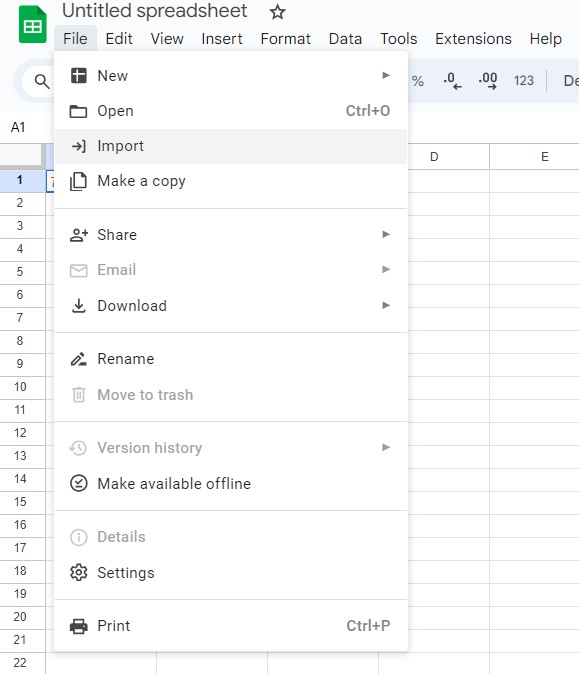
- Open Google Sheets and create a new document.
- Go to “File” and select “Import.”
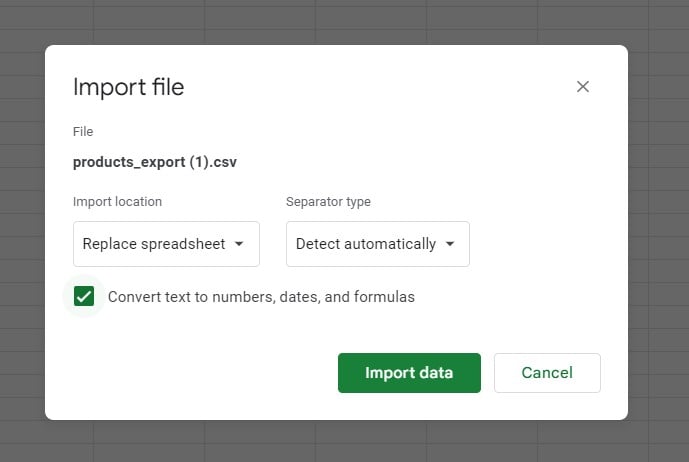
- Choose “Upload” and choose the exported CSV file with orders.

- Follow the prompts to import the data into your Google Sheets document.
Thus, importing Shopify orders to Google Sheets (or other entities) is possible by employing the built-in tools. Its most notable drawback is the lack of automation. If you require a more advanced and automated solution, consider using the Improved Import & Export Tool for Shopify. It can provide more control over the data you transfer. Let’s look at the benefits of the Shopify to Google Sheets integration and then explore the simplified data export routine.
Google Sheets Shopify Integration Benefits
The fusion of Shopify and Google Sheets yields a potent synergy, enriching your data management, accessibility, and collaborative efforts while ensuring robust, scalable solutions for your e-commerce operations. Below, we outline the benefits of this integration:
- Effortless Data Management: Simplify e-commerce data management by uniting Shopify and Google Sheets. Google Sheets provides an intuitive interface for data organization, editing, and sharing, enhancing your ability to oversee Shopify data effectively.
- Real-time Collaboration: Google Sheets facilitates real-time collaboration with multiple team members editing a document simultaneously. This feature fosters teamwork and ensures access to the most current data, proving invaluable for inventory and sales tracking.
- Access Anywhere, Anytime: With Google Sheets, you can access your data from anywhere with an internet connection. Whether you’re in the office, at home, or on the move, you can view and edit e-commerce data in real time.
- Automated Data Backup: Google Sheets automatically saves your data, serving as a safeguard against data loss. In case of accidental changes or data corruption, you can easily revert to previous spreadsheet versions.
- Excel Compatibility: Google Sheets seamlessly works with Microsoft Excel file formats. This means you can upload Excel files to Google Drive and swiftly convert them to Google Sheets format, eliminating the need for complex data conversions.
- Simplified Data Transfer: For streamlined data import from Google Sheets to Shopify, consider using the Import & Export Tool by Firebear. This tool automates the process, ensuring your Shopify store stays updated with the latest information, a valuable asset for tasks like product updates, inventory management, and order processing.
- Automation Potential: Combining Google Sheets with Shopify and our app empowers you to create automated workflows and scripts for various tasks, such as bulk product updates and order processing. This automation saves you time and effort.
- Scalable Storage: Google Drive offers scalable storage options, accommodating your expanding e-commerce data volumes as your business grows. This guarantees efficient and cost-effective data storage.
With these advantages in mind, let’s explore how to streamline the process of importing data from Google Sheets to Shopify, simplifying it beyond the default capabilities.
How To Export Customers, Orders, And Products From Shopify to Google Sheets
If you want to export data from your Shopify website to Google Sheets, here’s how you can do it step by step:
- Install the Improved Import & Export Tool. First things first, you need to install the Improved Import & Export Tool. It’s like the bridge that connects Shopify and Google Sheets, making data export possible.
- Get the Google Sheets Table ID (Optional). If you have specific Google Sheets to work with, you can find their unique Table IDs. This step isn’t necessary, but it’s handy if you have multiple sheets and want to be precise.
- Export Data from Shopify to Google Sheets. Now, with the Improved Import & Export Tool in place and your Google Sheets Table ID, you can start exporting Shopify orders and other entities to Google Sheets. This allows you to smoothly transfer info like customer details, product data, and order information.
By following these steps, you’re making data export a breeze. Your data will be at your fingertips, both on Shopify and in Google Sheets.
Discover Your Google Sheets ID
Each Google Sheets spreadsheet is uniquely identified by a specific “spreadsheetId” value, combined with letters, numbers, hyphens, or underscores. This “spreadsheetId” is an integral component of a Google Sheets URL. You can see it in your browser’s address bar as follows:
https://docs.google.com/spreadsheets/d/spreadsheetId/edit#gid=0
Let’s take a closer look at a sample Google Sheets URL to better understand how to identify the “spreadsheetId”:
URL Example:
https://docs.google.com/spreadsheets/d/1Z-FTBgXYsmv2gZifei5dDYnNm8KG5yUe5yZW64twg4g/edit#gid=0
From this URL, the corresponding “spreadsheetId” is:
1Z–FTBgXYsmv2gZifei5dDYnNm8KG5yUe5yZW64twg4g
This “spreadsheetId” serves as a unique identifier for the specific Google Sheets document, allowing you to pinpoint and access it directly for various purposes, including data imports and exports.
Prepare Your Google Drive for Google Sheets Shopify Integration
The Improved Import & Export Tool gives you a bunch of flexible choices to move your customer details, product listings, and order info into a Google Sheets spreadsheet neatly stored on your Google Drive. You’ve got two main ways to go when exporting data:
Export Data to an Existing Spreadsheet
This option lets you send your Shopify data to an already existing Google Sheets file. So, you can easily update the info inside that file. You can point to the existing file using its unique ID or its name. This flexibility makes it super handy, especially when you’ve got your spreadsheets nicely organized in folders. Managing data becomes a breeze.
Export Data to a New Google Spreadsheet
Alternatively, you can export your data into a new Google Sheets spreadsheet. The Improved Import & Export Tool will create a fresh, clean sheet on your Google Drive. You get to name it whatever you like as it gets made. It’s a nifty way to keep your data well-organized.
By the way, you can also team up with your partners or coworkers by sharing either the whole folder with your spreadsheet or the sheet itself. Sharing means automatic updates and everyone stays in the loop with the latest data. It’s like a teamwork boost that makes the Improved Import & Export Tool even easier for slick data management and easy sharing.
Configure A New Profile To Export Shopify Orders To Google Sheets
To initiate a Shopify Google Sheets export using the Improved Import & Export Tool, follow these detailed steps:
1. Access the Export Profile:
You can access your export profiles as follows:

- Go to your Shopify admin panel and navigate to “Apps.”
- Locate the “Firebear Import & Export Tool.”
- Inside the tool, select “Export” and click on the “New Profile” button to configure a new export profile.
2. Profile Configuration:
You are on the “Configure export” screen. Here, set up your Shopify Google Sheets integration and its export part:
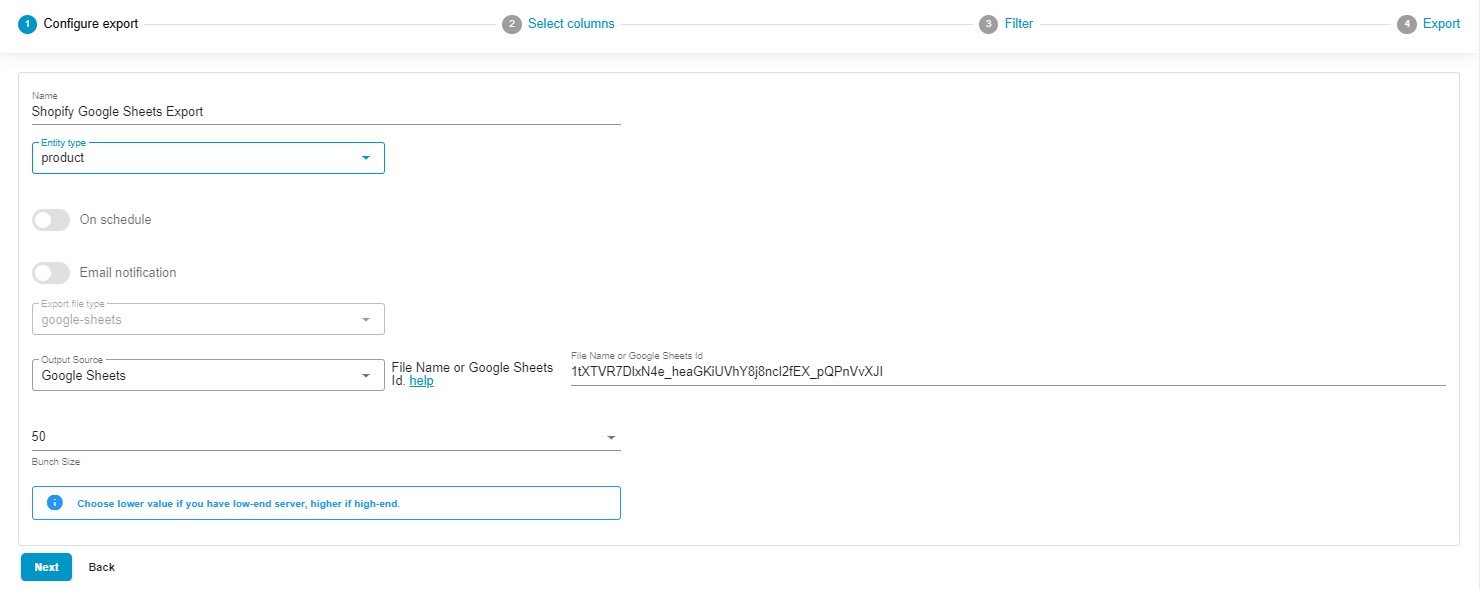
- Specify a name for your profile, e.g., “Shopify Google Sheets Order Export.”
- Choose the entity you wish to export. In addition to orders, you can transfer customers and products from Shopify to Google Sheets.
- Create a schedule for updates to automate your Shopify Google Sheets integration.
- Configure email notifications if needed.
- Select your preferred file format – Google Sheets. Other options include CSV, XML, and XLSX.
- Choose “Google Sheets” as your export source, granting the Improved Import & Export Tool access to your Google Drive storage. You can also export via FTP and to Google Drive. Standard file downloads are at your disposal too.
- Depending on your preference, specify either a new file name or an existing spreadsheet’s ID. This choice dictates whether a new spreadsheet will be created or if Shopify orders will be exported to an existing Google Sheets table.
- If you have a server with limited resources, you can choose a lower bunch size that suits your needs.
- Click “Continue” to proceed to the mapping screen.
3. Mapping Screen:
Now, you need to configure mappings. You can customize the default Shopify column titles to meet the specific requirements of your partner. Specify new values to replace the defaults.
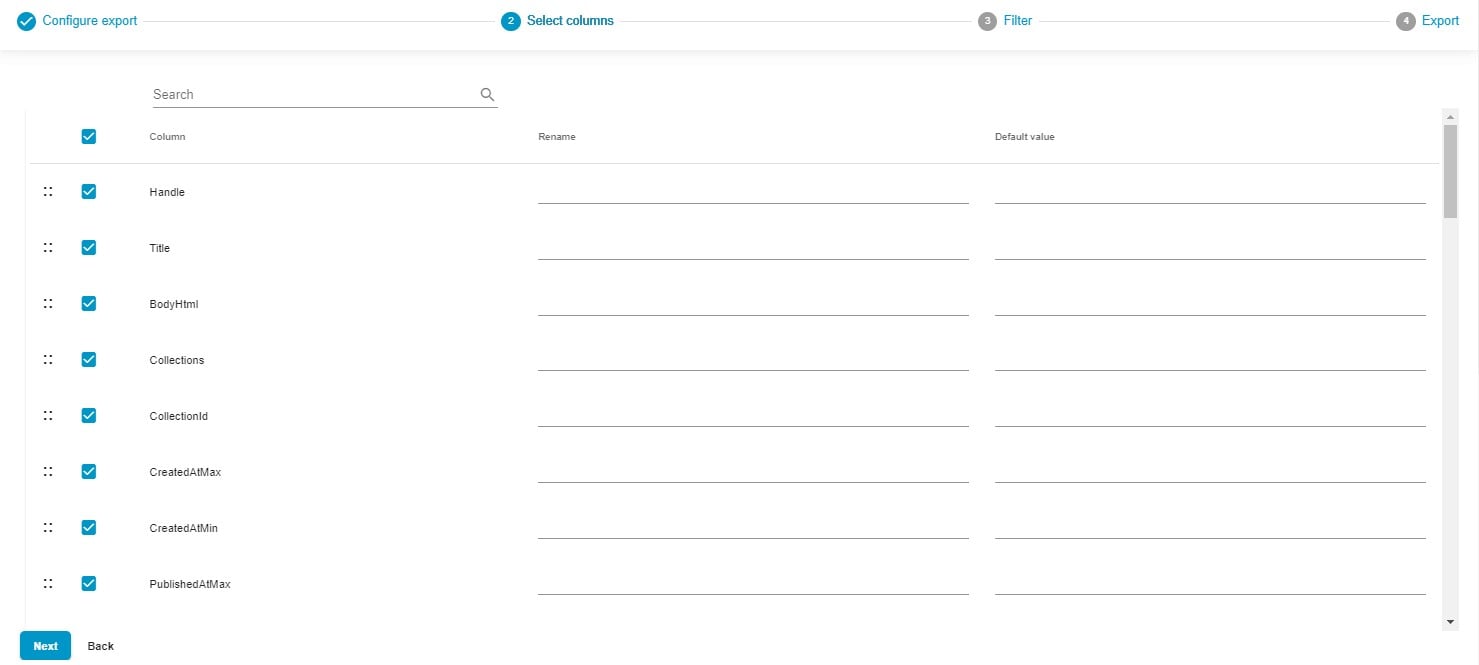
Furthermore, you have the option to deselect any columns you wish to exclude from your Google Sheets Shopify integration.
To arrange columns in the desired order, a user-friendly drag-and-drop interface is at your disposal. Simply select the column you wish to reposition and effortlessly drag it to the preferred location.
You can also incorporate default values on this tab. If a particular attribute lacks a value, assign a default value within the relevant section. The export file will then seamlessly incorporate the specified default value instead of any absent data.
4. Create Filters:
Proceed to the next section where you can create filters to refine your export selection. For instance, you can filter products by vendor:

- Add a Filter: Click the “+” button to add a filter to your Shopify Google Sheets export profile.
- Select a Product Property: Choose a product property to define the criteria. For instance, you can opt for “Vendor” to filter products based on their producer.
- Specify a Value: Provide the value that aligns with your chosen criteria. Let’s suppose you want to export all items produced by Gibson. Specify the name of this vendor.
- Create Multiple Filters: If you need to apply multiple filters to refine your data selection further, simply click the “Add filter” button to add additional filtering criteria.
Exporting Shopify orders to Google Sheets is not an exception. You can apply the same principle while creating filters for this entity.
5. Save and Export:
Click the “Save & Close” button to save your Shopify Google Sheets Integration export profile for future use. If you’ve created a schedule, the app will launch the export process automatically following the specified time frames.
When you’re ready, click the “Export” button to launch the update, transferring your data file directly from Shopify to Google Sheets.

After the successful Shopify Google Sheets export, you can find your updated data in the “shopware-import-export” folder on your connected Google Drive account.
For more detailed information on the Shopify export capabilities enhanced with the app, refer to the Improved Import & Export Tool manual.
Other Features
The Firebear Import & Export Tool is the ultimate problem-solver for Shopify store owners, making import and export tasks a breeze. Here’s how it transforms your data management:
- Comprehensive Product Import and Export: It’s a walk in the park to import and export products. You can tweak properties and attributes to create listings that perfectly match your needs.
- Effortless Customer Data Import and Export: Managing customer data is simplified, including addresses. Get a full view of your clientele without breaking a sweat.
- Seamless Order Import & Export: Managing orders and merging sales data from various sources is a piece of cake. Everything comes together in one place.
- Product Properties Mapping and Mapping Presets: Map product properties and use preset mappings to align your data precisely with your store’s specifications. You can say goodbye to the hassle of repetitive import tasks.
- Scheduled Import and Export Operations: Automate data transfers at your preferred intervals, saving you tons of time and effort.
- Versatile File Format Support: Work with various file formats like CSV, XLSX, and XLSX. You can handle diverse data sources and formats like a pro.
- Effortless Google Sheets Integration: You can effortlessly integrate with Google Sheets for real-time collaborative data management.
- Direct File Uploads: Streamline data transfer with straightforward direct file uploads.
- Secure FTP/FTPS Uploads: Ensure the security and integrity of your data transfers with FTP and FTPS support.
- Flexible Google Drive Shopify Integration: You can up your data management game by integrating Google Drive into your uploads.
These features help you implement a seamless Google Sheets Shopify integration. With the Firebear Import & Export Tool, you can effortlessly export Shopify orders to Google Sheets along with other entities. The best part of this process is that it is fully automated and takes much less time to be implemented compared with the default procedure. For detailed information on the app, please, refer to our comprehensive documentation:

