
Advanced Shopify Export: How to Export XML Files from Shopify
![]()
In this article, we continue our journey to the realm of Shopify and file formats. When it comes to different file types that can carry your data updates, Shopify’s preferences are fairly limited: CSV or CSV. You are bound to this format and its modification in the case of both import and export processes. But what if your data updates are stored in XML format? We’ve already described what to do in our Shopify XML Import guide. But what if you need to produce an export output from your e-commerce website in XML? Well, if you decide to go with the standard seat of tools, it is necessary to perform lots of manual transformations, converting the standard CSV files into XML. This process is notorious for its inefficiency and time consumption. However, there is a more streamlined solution introduced by our . This application supports not only CSV imports and exports but also a bunch of other file formats, including XML. You will learn how to export XML files from Shopify. We compare the difficulties of the default Shopify XML exports to a more advanced and automated procedure. Yet, before we embark on this enlightening journey, let us first delve into the nuanced disparities between CSV and XML. For further information on how to improve your e-commerce routine, follow our Shopify Cookbook. So, how to export XML from Shopify? Let’s see!

Table of contents
CSV vs. XML
A CSV file is essentially a text file that uses commas to delimit distinct data blocks. an XML file, in turn, employs a more intricate approach to data storage and transmission, incorporating tags and textual elements for structural organization. These tags follow specific syntax guidelines, encapsulating the intended textual content within the file.
The fundamental distinction between CSV and XML lies in the fact that CSV is a straightforward text format with values delimited by commas only (hence the name, Comma-Separated Values), while XML uses tags to denote relationships and store data related to complex objects.
CSV is convenient, requires fewer technical skills, and is more compact than XML, demanding fewer computational resources. XML, on the other hand, is a flexible and extensible format, suitable for storing and exchanging intricate, structured data.
Five benefits of using XML over CSV include:
- Structured Data: XML provides a structured way to store and organize data using tags, facilitating the representation of complex and hierarchical data relationships.
- Data Validation: XML allows for defining data validation rules using Document Type Definitions (DTD) or XML Schema Definition (XSD), ensuring data accuracy and consistency.
- Extensibility: XML is highly extensible, enabling the addition of new elements and attributes without disrupting the existing structure, useful for evolving data requirements.
- Interoperability: XML is a widely accepted standard for data interchange, ensuring compatibility across various platforms, programming languages, and applications.
- Human-Readable: XML files are human-readable, making them easier to understand and modify without specialized software. These advantages make XML a preferred choice for scenarios requiring structured, validated, and extensible data representation.
How to export XML files using the default Shopify tools
Exporting XML files directly using the default tools isn’t Shopify’s built-in feature. However, you can achieve this by following a multi-step process involving the use of CSV files:
Step1: Export Data as CSV:
First of all, you need to export a standard CSV file:
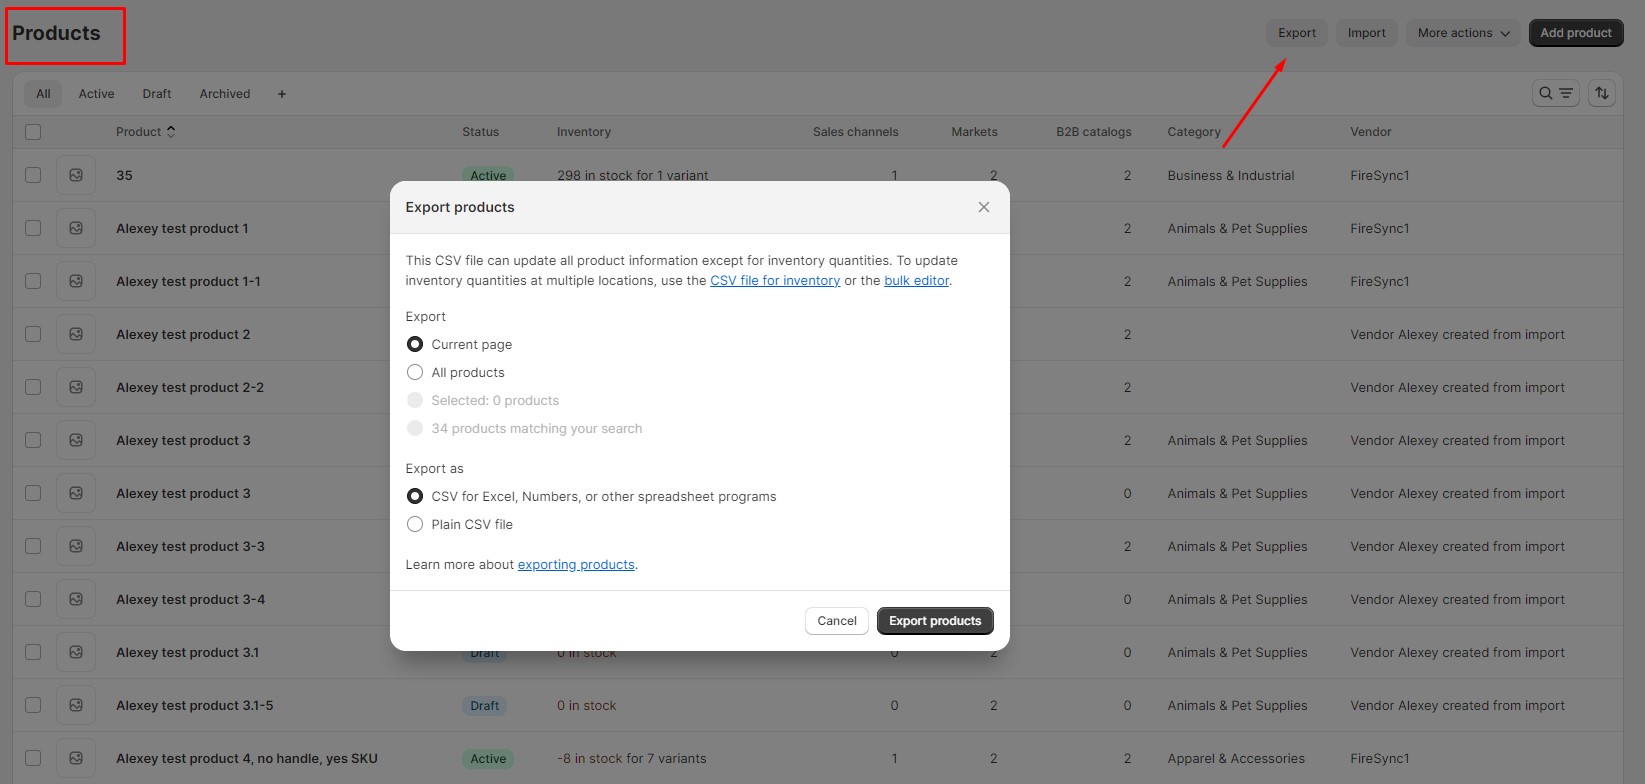
- In your Shopify admin, go to the relevant section (Products, Customers, etc.).
- Click on “Export.”
- Choose the data fields you want to include in the export.
- Select “CSV” as the export format.
- Click “Export” to download the CSV file.
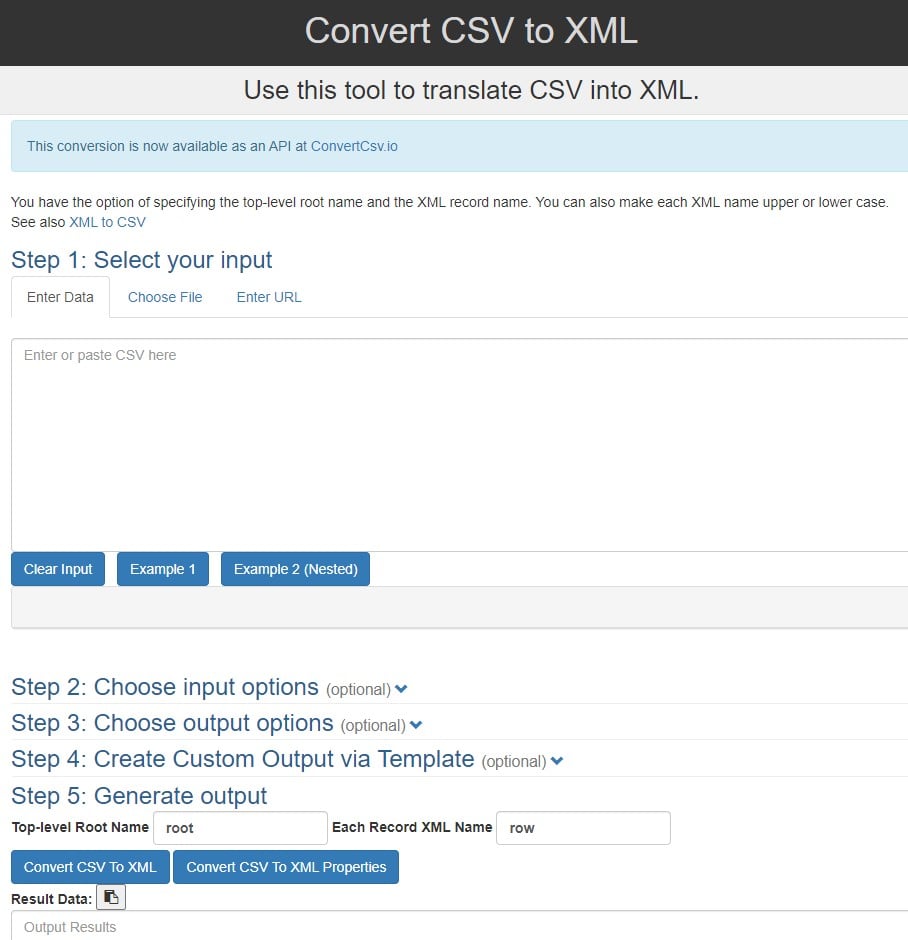
Step 2: Convert CSV to XML
Now, you need to convert the CSV output into XML. Use an online converter or a tool like Microsoft Excel or Google Sheets to open and save the CSV file as an XML file.
Step 3: Adjust XML Structure (if needed)
Ensure the XML file structure aligns with your requirements. Manually edit the XML file if adjustments are necessary, such as adding specific tags, rearranging data, or replacing Shopify’s column names.
Step 4: Save and Use XML
Now, you can save the edited XML file to your computer or provide it to a third party. Keep in mind that since this process involves some manual steps, it may take much time and effort, resulting in XML files that still require adjustments to meet your specific needs. For a more streamlined process, consider using third-party apps designed for XML data integration with Shopify, such as the Import & Export Tool for Shopify.
How to export XML into Shopify without conversion
Our Import & Export Tool for Shopify supports XML in both import and export processes. Follow this step-by-step guide to export XML files from Shopify:
Step 1: Access the Export Profile
You can create a new profile for XML export as follows:
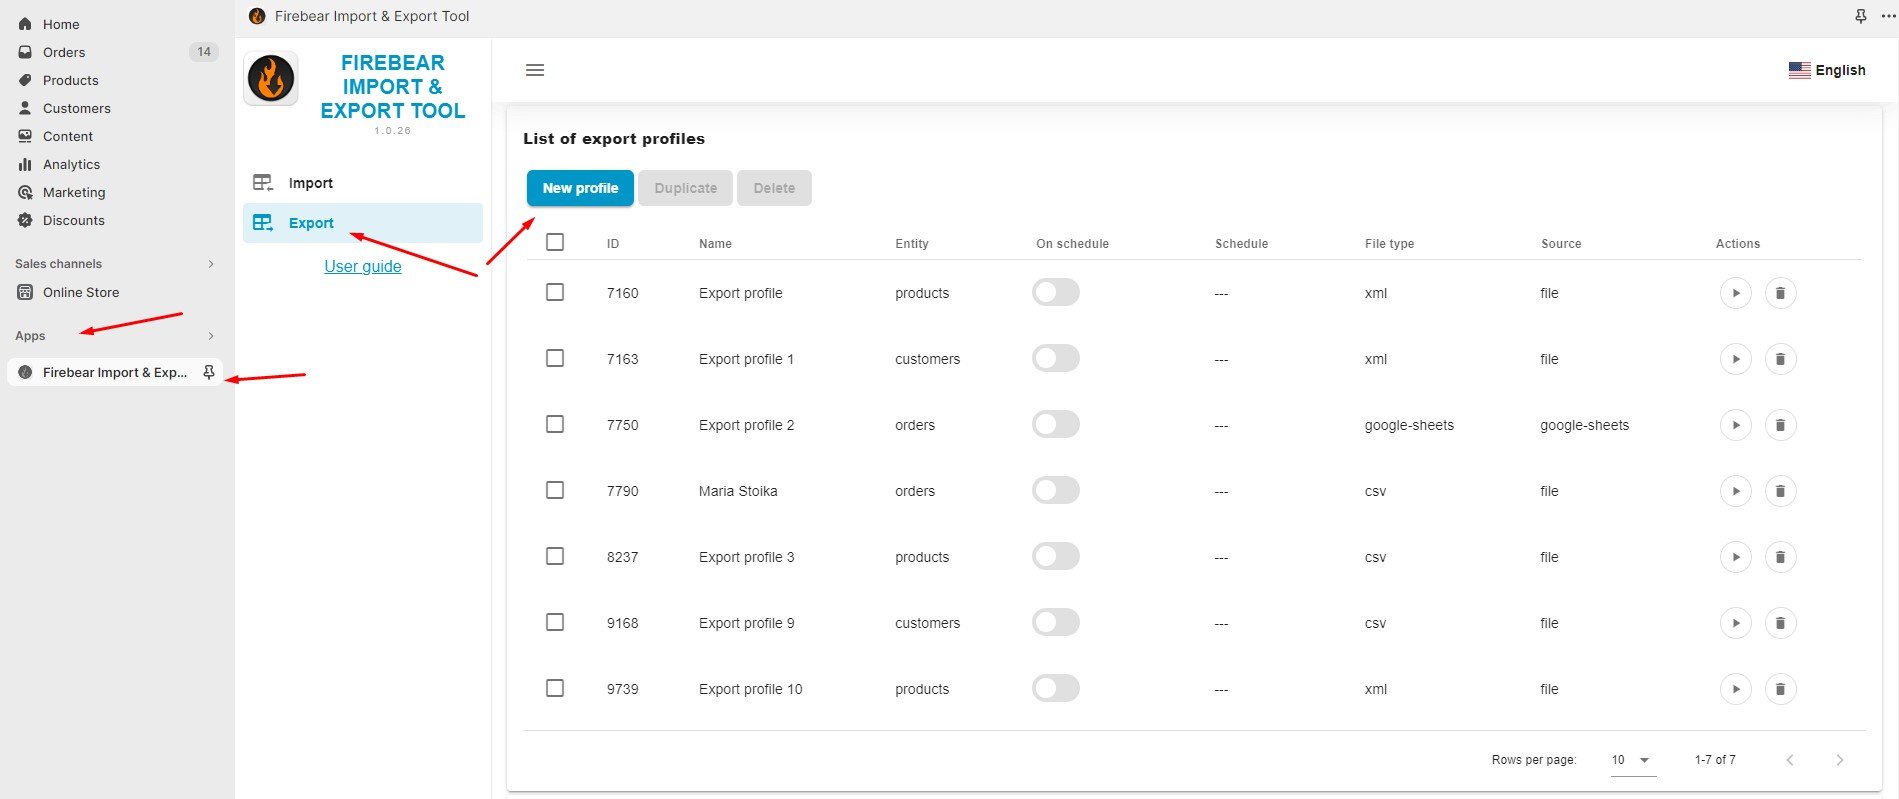
- Go to your Shopify admin panel and navigate to “Apps.”
- Locate the “Firebear Import & Export Tool.”
- Inside the tool, select “Export” and click on the “New Profile” button to configure a new XML export profile.
Step 2: Configure Export
You are on the “Configure export” screen. Here, set up your Shopify XML export profile. Just follow these steps:
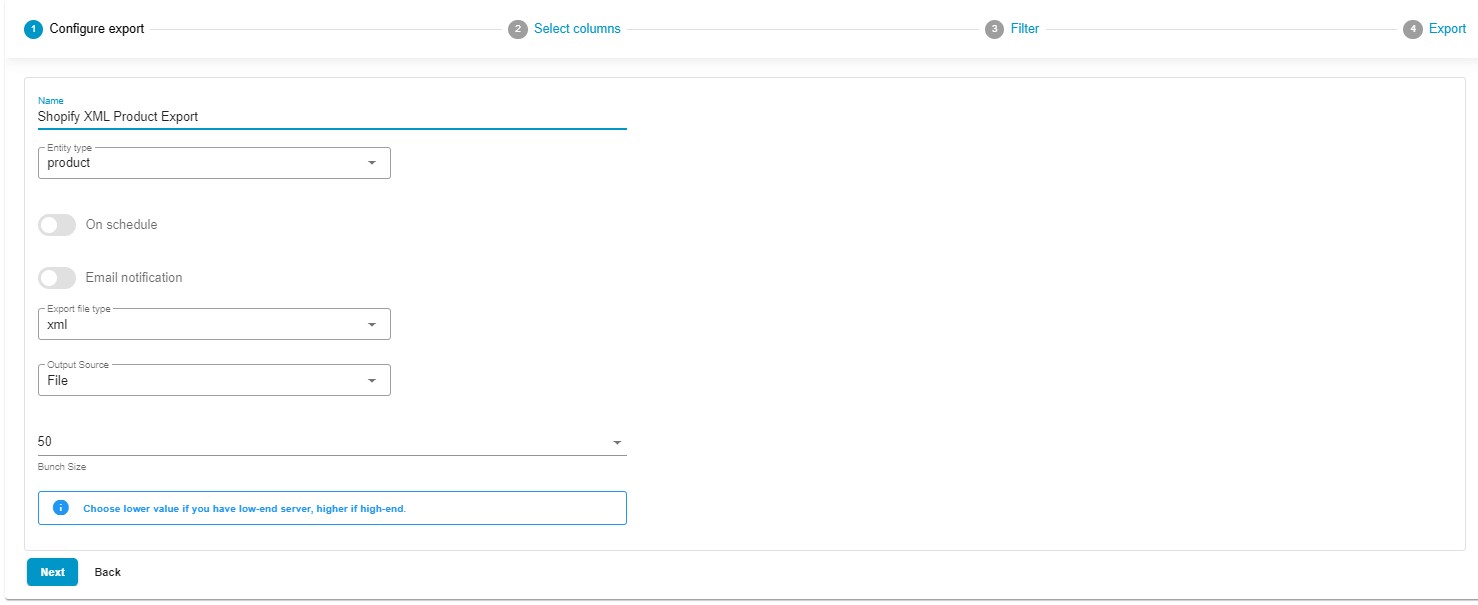
- Specify a name for your profile, e.g., “Shopify XML Product Export.”
- Choose the entity you wish to export: products, customers, or orders.
- Create a schedule to automate your XML exports.
- Configure email notifications to stay informed on the results of your XML exports.
- Select your preferred file format – XML. Other options include CSV, XLSX, and Google Sheets spreadsheets.
- Choose your export source. You can rely on standard file downloads or go with something more sophisticated, such as FTP transfers, or Google Drive exports.
- If you have a server with limited resources, you can choose a lower bunch size that suits your needs.
- Click “Continue” to proceed to the mapping screen.
Step 3: Configure Mapping
Now, you can configure mappings. At this stage, it is possible to customize the default Shopify column titles to meet the specific requirements of your partner. Specify new values to replace the defaults right in your admin rather than doing that in a data file manually after the export.
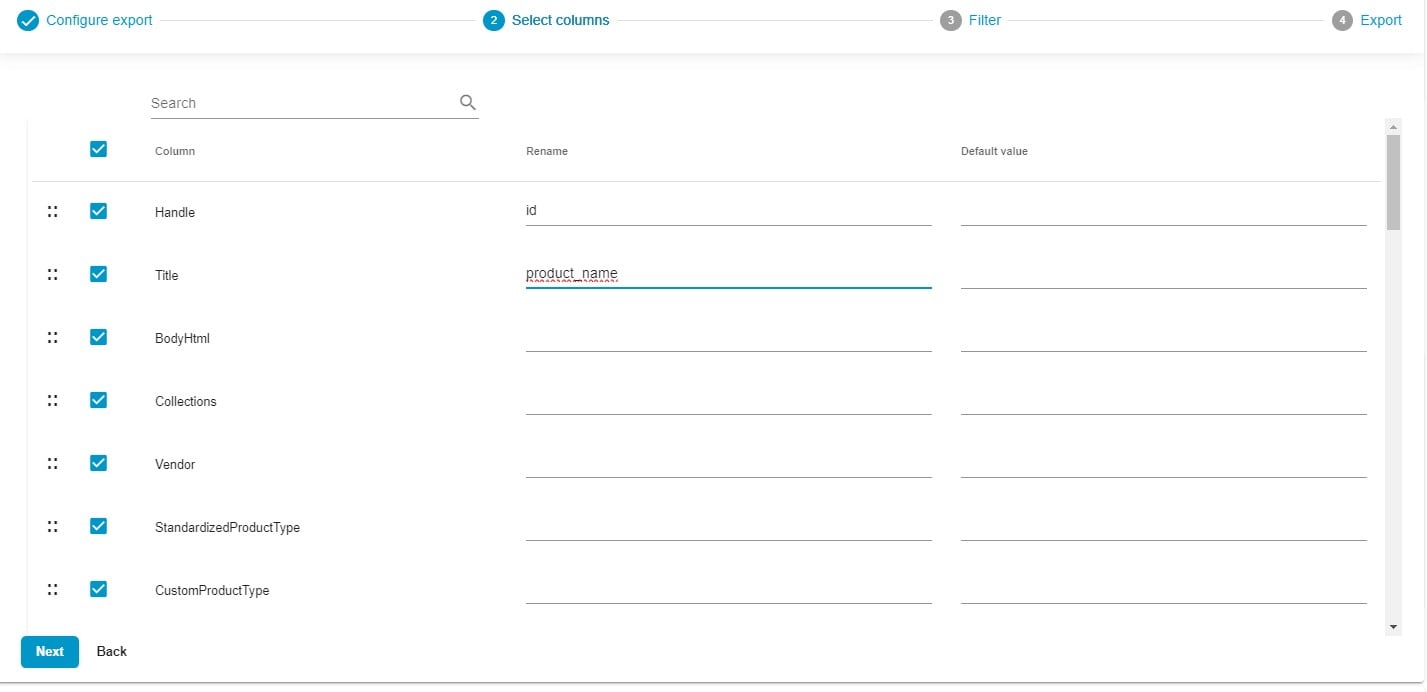
Furthermore, you can deselect any columns that should be excluded from your Shopify XML export.
To arrange columns in the desired order, a user-friendly drag-and-drop interface is at your disposal. Simply select the column you wish to move to a new place and effortlessly drag it to the preferred location.
You can also incorporate default values at this stage. Let’s say a few more words about this feature. If a particular attribute lacks a value, assign a default value within the relevant section. The export file will then seamlessly incorporate the specified default value instead of any absent data.
Another good news is that you save these parameters and the app uses the predefined mapping configurations for further XML exports. It means that no manual interactions are required for the next data transfer.
As you can see, the Import & Export Tool offers lots of useful instruments that can save time and effort while you export XML files from Shopify. However, these are not the only advantages.
Step 4: Create Filters
Proceed to the next section where you can create filters to refine your XML export selection. For instance, you can export products per vendor:

- Add a Filter: Click the “+” button to add a filter.
- Select a Product Property: Choose a product property to define the criteria – “Vendor”.
- Specify a Value: Provide the value that aligns with your chosen criteria – your vendor’s name, such as Samsung, Peavey, Apple, etc.
- Create Multiple Filters: If you need to apply multiple filters to refine your data selection further, simply click the “Add filter” button to add additional filtering criteria.
Step 5: Save and Export
Click the “Save & Close” button to save your Shopify XML export profile for future use.
When you’re ready, click the “Export” button to launch the update, transferring your data from Shopify as an XML file.

For more detailed information on the enhanced Shopify export capabilities associated with the app, refer to the Improved Import & Export Tool manual.
XML File Structure
If you export XML files from Shopify with the Improved Import & Export Tool, they are organized as follows:
|
1 2 3 4 5 6 7 8 |
<list> <item> … </item> <item> … </item> </list> |
Column names (attributes or properties) are stored between <item> and </item>.

Other Features
The Firebear Import & Export Tool emerges as the ultimate remedy, tackling the common hurdles associated with Shopify’s import and export processes. The app enhances and broadens your data management capabilities in the following ways:
- Comprehensive Product Import and Export. Seamlessly transfer products with customizable properties, tailoring listings to meet specific requirements.
- Effortless Customer Data Import and Export. Simplify customer data management, including addresses, providing a comprehensive view of your clientele.
- Seamless Order Import & Export. Handle orders and consolidate sales data from various sources under one roof for improved order management.
- Product Properties Mapping and Mapping Presets. Efficiently map product properties and utilize presets for precise data alignment with your store’s specifications.
- Scheduled Import and Export Operations. Automate data transfers at intervals that suit your needs, saving time and effort.
- Versatile File Format Support. Work with various file formats, including CSV, XLSX, and XLSX, catering to diverse data sources and formats.
- Effortless Google Sheets Integration. Seamlessly integrate with Google Sheets for real-time collaborative data management.
- Direct File Uploads. Simplify data transfer with convenient direct file uploads.
- Secure FTP/FTPS Uploads. Ensure data transfer security and integrity with support for FTP and FTPS uploads.
- Flexible Google Drive Shopify Integration. Enhance data management by integrating Google Drive for your uploads.
These features provide precise control over your data, offering a comprehensive solution for efficiently managing your Shopify store. For detailed information on the product and its features, please refer to our comprehensive documentation: