Magento 2 Backend Exploration: Taxes

The following article sheds light on Taxes and the corresponding screens of the Magento 2 backend. Below, we describe how to create new tax rates and rules. Besides, you will find a guide on how to import/export them. Let’s see what instruments the Magento 2 admin offers to simplify your tax management.

Table of contents
Magento 2 Taxes
Below, we describe the two subsections of Tax Rates. Firstly, you will find the core elements of Tax Zones and Rates. Secondly, the chapter explores Tax Rules.
Tax Zones and Rates
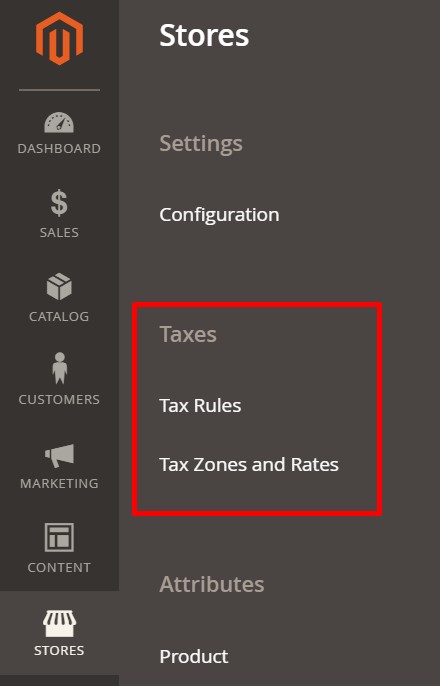
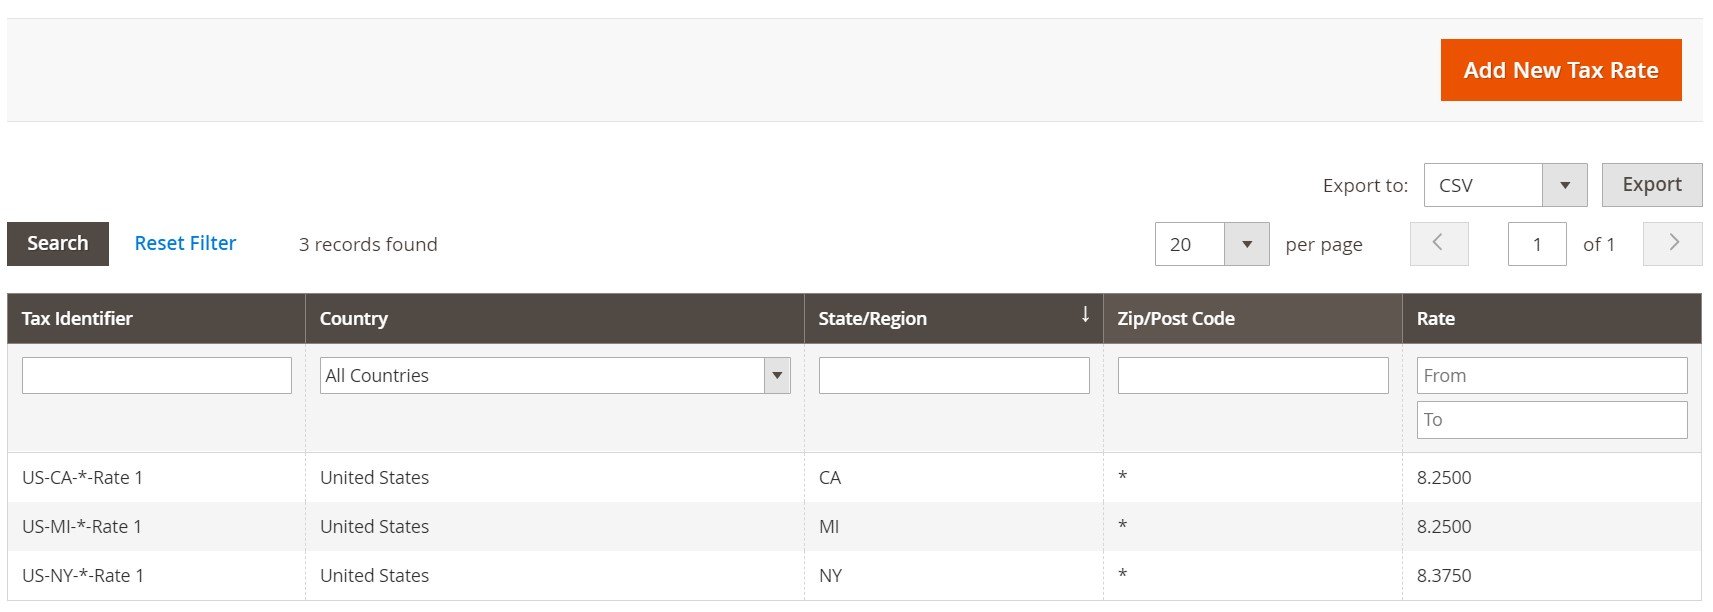
Go to Stores->Taxes->Tax Zones and Rates to manage your tax rates. Here, you can see a grid that consists of the following five columns:
- Tax Identifier – a visual representation of what your tax is; includes the following components:
- Country – a corresponding country;
- State/Region – a corresponding state or region;
- Zip/Post Code – a corresponding zip code;
- Rate – a tax rate associated with a tax identifier.
Note that you can apply filters to each column. The corresponding fields are available under column names.
It is also possible to export a CSV or XML file here as well as change the number of elements in the grid per page.
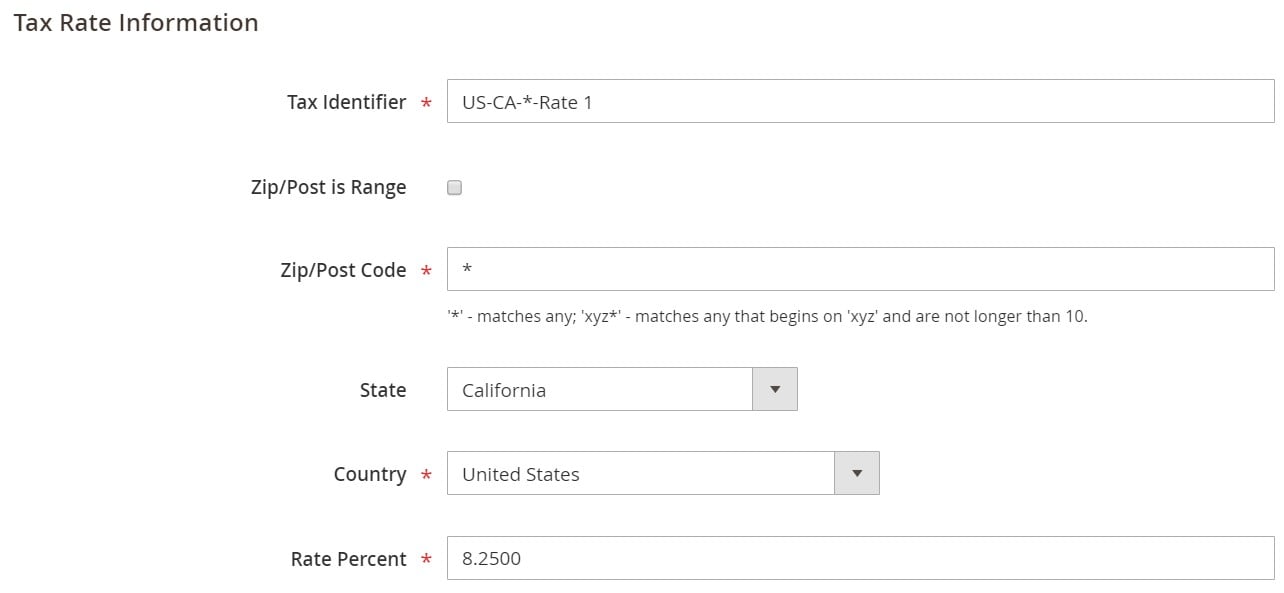
How to edit a tax rate in Magento 2
Doubleclick on a tax rate to edit it. You will be redirected to a tax rate page. It is possible to change such parameters as tax identifier, zip/postcode, state, country, as well as rate percent.
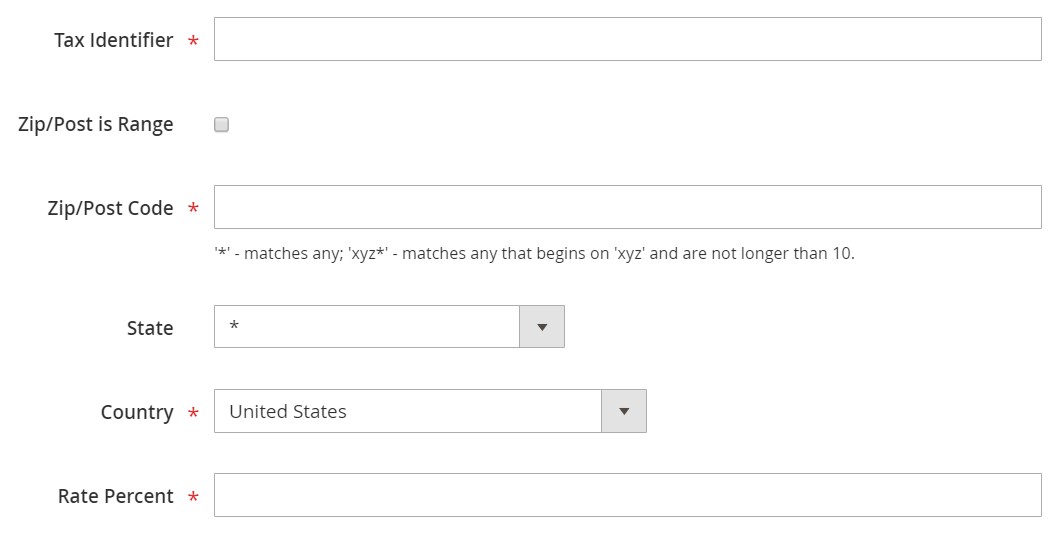
How to add a new tax rate in Magento 2
To add a new tax rate, return to the Tax Zones & Rates screen, and hit the Add New Tax Rate button.

Next, provide the system with the same data we’ve just described above: tax identifier, zip/postcode, state, country, and rate.
Save your new tax rate.
Tax Rules
Now, go to Stores->Taxes->Tax Rules. Here, you can see a grid that consists of the following seven columns:
- Name – a tax rule name;
- Customer Tax Class – retail customer, wholesale customers;
- Product Tax Class – taxable goods, none;
- Priority – use it to avoid conflicts between tax rates;
- Subtotal Only – for taxes based on the order subtotal;
- Sort Order – a number to indicate the order of a tax rule when listed with others.
As you can see, every column includes a filter. Enter a search query and click the Search button on the left above the grid.

How to edit a tax rule in Magento 2
To edit an existing tax rule in Magento 2, double-click on in in the Tax Rules grid. You will be redirected to a separate page. Here, modify such parameters as a rule name and tax rate.
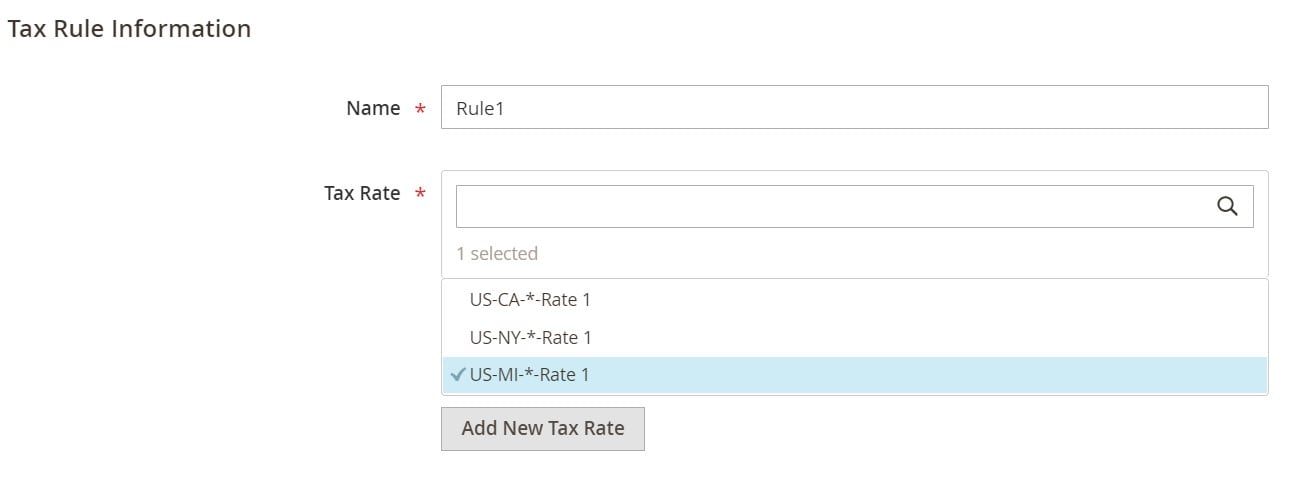
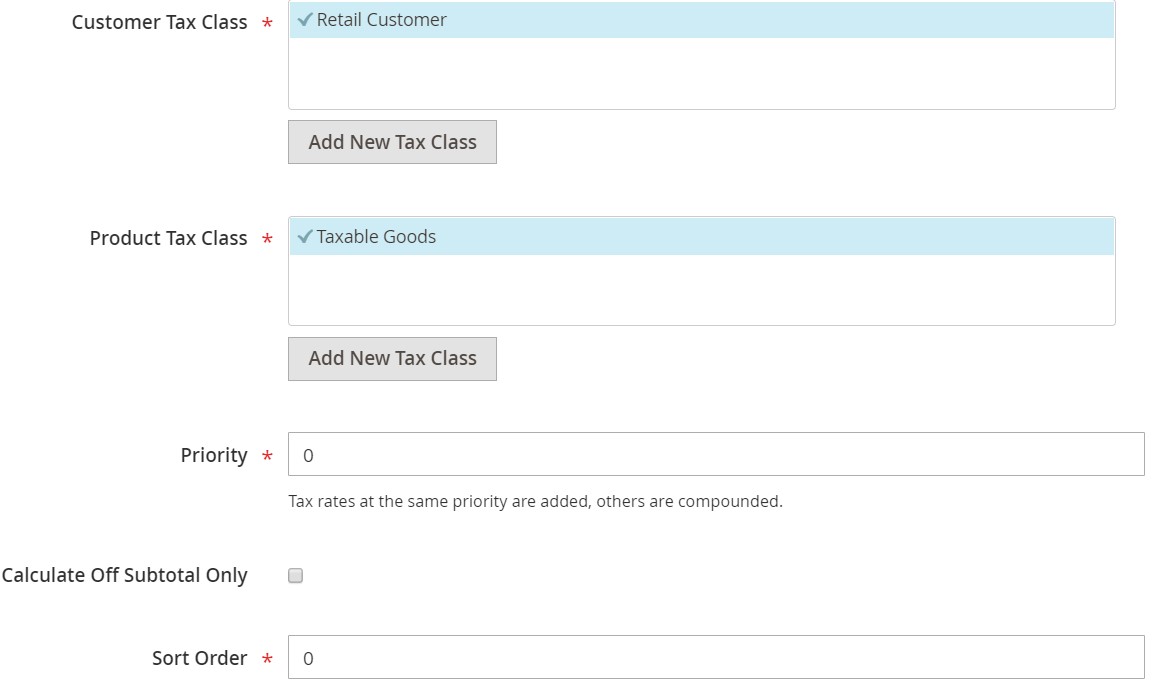
Besides, it is possible to change additional settings. The Magento 2 backend lets you choose a new customer tax class and a product tax class. Note that you can create new classes right here. Next, specify a priority, choose whether you want taxes to be based on the order subtotal, and set sort order.
Below, you can import/export tax rates.
How to add a new tax rule in Magento 2
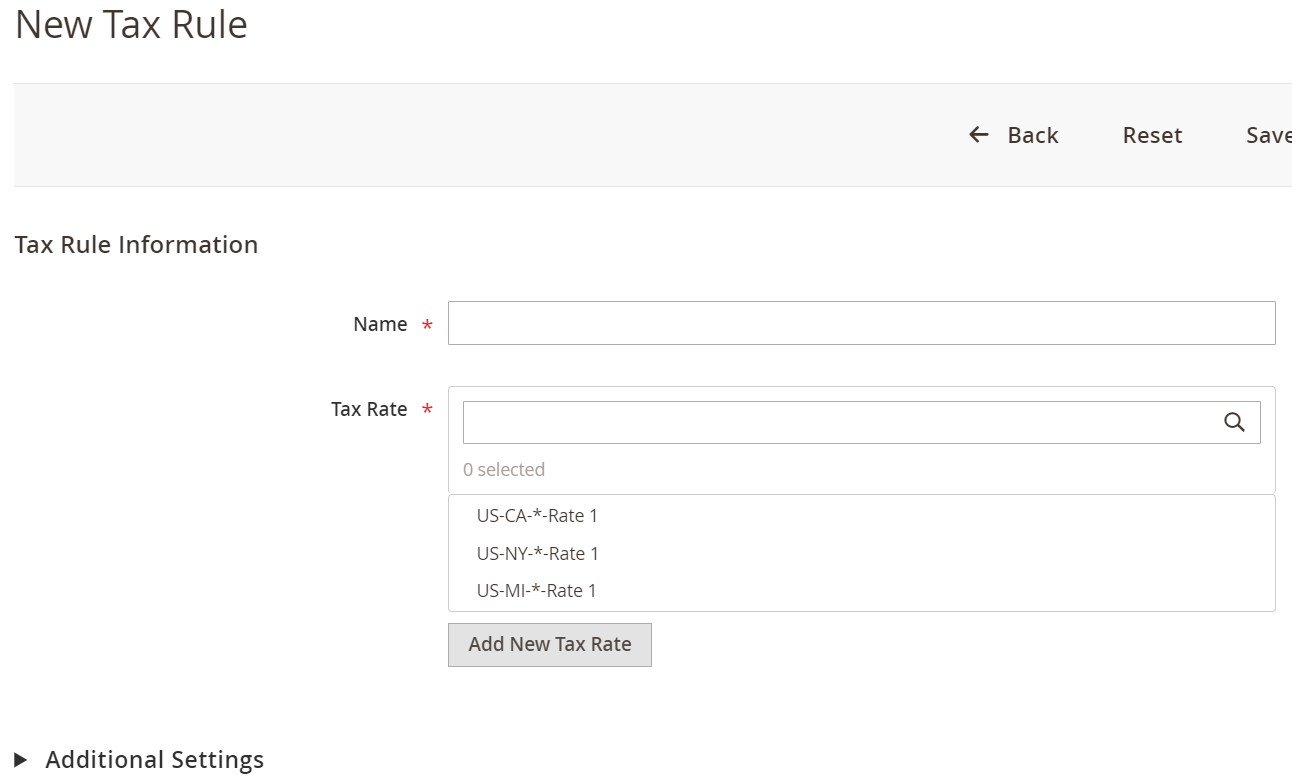
Return to the Tax Rules screen and hit the Add New Tax Rate Rule button.

You will be redirected to a new tax rule screen with the same parameters we’ve just described above.
You can import/export taxes using either native Magento 2 instruments or third-party tools. For instance, the Improved Import & Export Magento 2 extension is responsible for moving all possible entities between your e-commerce store and any external platforms. The module enables you to create a schedule of data transfers to import/export taxes automatically. Besides, you can choose a file format and a destination for data files and configure other parameters necessary to establish a reliable connection between the two systems. It is even possible to transfer data via API as well as intermediary services. Let’s see these and other features.
Improved Import & Export Features
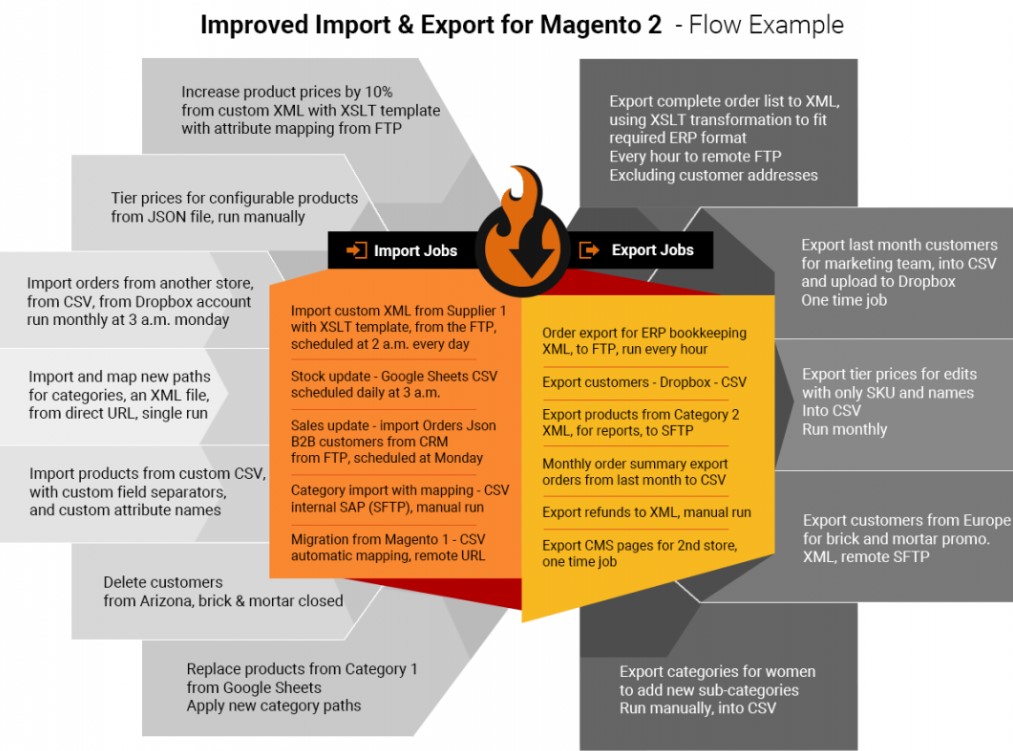
Developed to improve your daily duties, Improved Import & Export provides several benefits that none of the existing solutions offers. It can move all possible entities to and from your e-commerce store automatically. The extension incorporates the following features to achieve this goal.
Automated Import & Export
You can effortlessly automate import and export processes in two different ways with Improved Import & Export. It offers schedules and triggers. We describe each feature separately.
Schedules
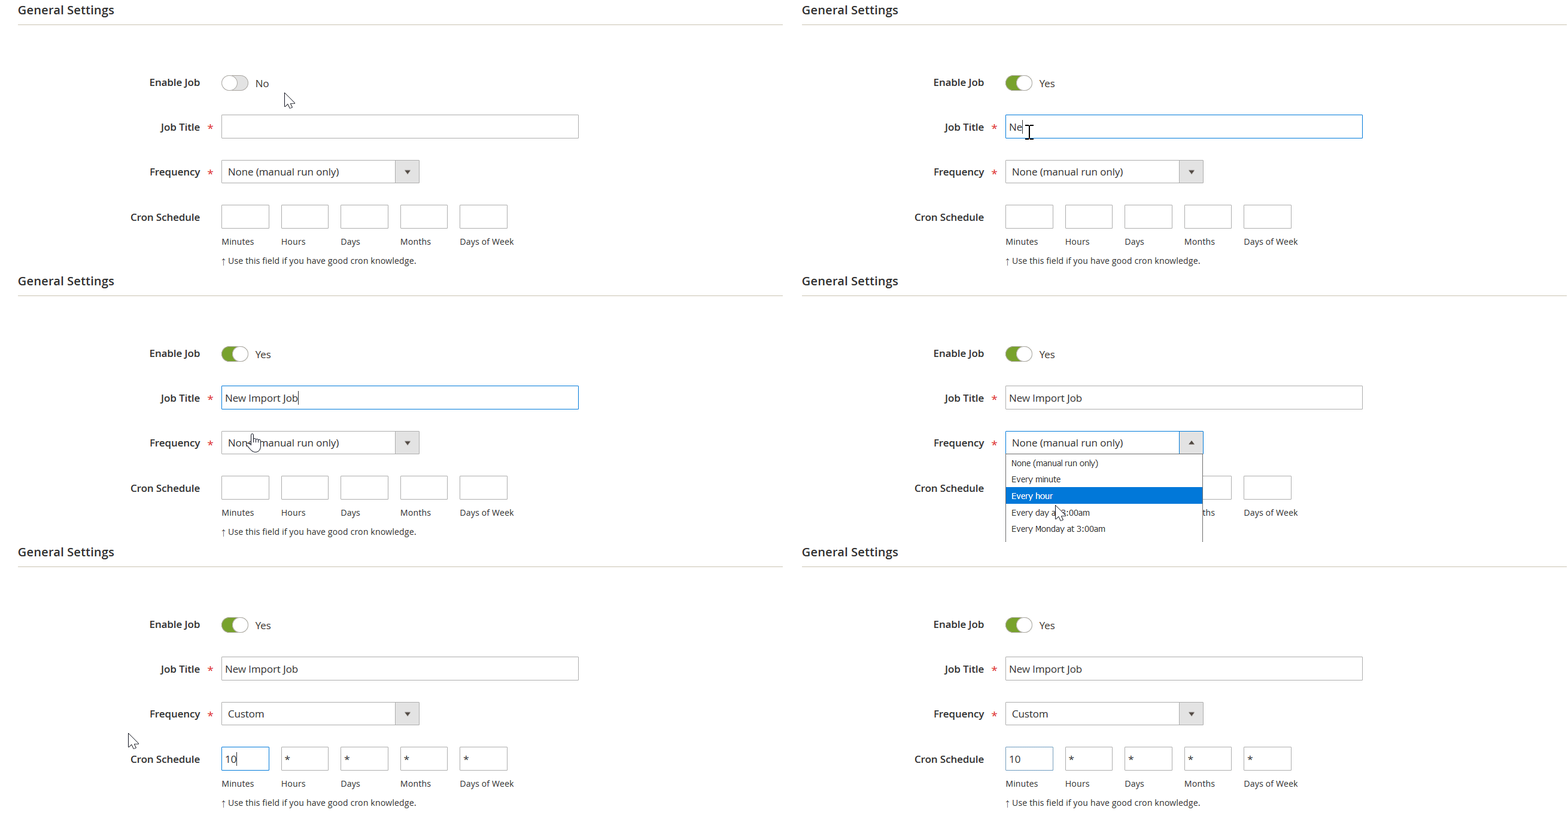
Schedules utilize the default cron syntax to provide you with automated data transfer. Specify an interval to launch a job to enable the module to transfers data at a specific date. It is possible to choose a predefined range or create a custom one. Creating a profile with no schedule is also possible. You can leverage a manual launch any time you need to transfer data due to asynchronous transfers that work with scheduled profiles as well. The configuration procedure is shown below:
Events
Event-based triggers represent another way of data transfer automation. Furthermore, you can enable real-time updates with their help. Select a trigger linked to a specific event. The trigger will launch a data transfer after the event takes place. Thus, the Improved Import & Export module will synchronize two systems in real-time.
For instance, the extension can export tax rates after a new tax rate is created. Read this article to discover more information: How to Run Magento 2 Import or Export After Specific System Event or Process.
Advanced Mapping Features
We should also describe the mapping functionality of the Improved Import & Export extension here. The feature comes in handy every time you transfer data from beyond the Magento 2 platform. Due to different standards of information storing, you cannot just take a third-party output and move it to your e-commerce website. It often requires tons of modifications. However, our module dramatically improved all the related processes.
Mapping Presets
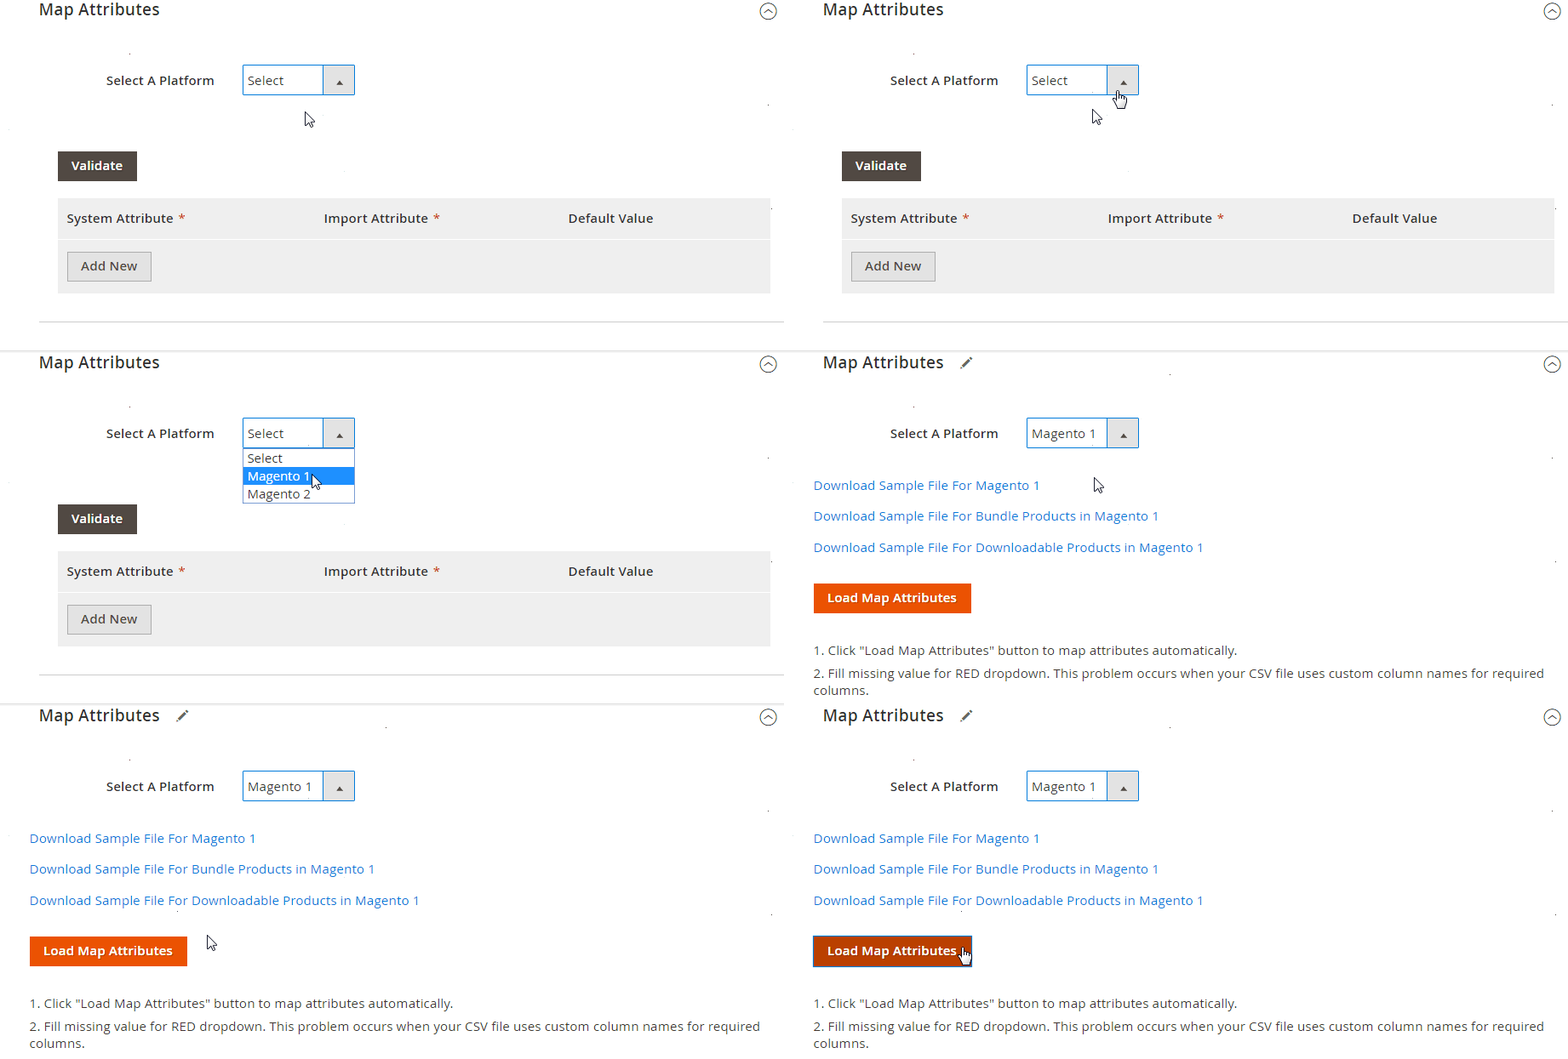
The extension provides mapping presets for numerous integrations. Use the predefined schemes to replace third-party attributes automatically. You choose a preset, and our module does all the work for you. It scans the input data, defines third-party attributes, and replaces them with the corresponding internal ones. Improved Import & Export acts the same when it comes to export processes. It can replace Magento 2 attributes with ones utilized by an external system. The process is illustrated below:
Matching Interface
While we create new and new presets, some integrations are still in a queue. However, you can always map attributes in a user-friendly way with a matching interface. The Improved Import & Export Magento 2 module adds a corresponding section to every import and export profile. You need to select an entity, choose a third-party attribute, and specify a replacement. The gif image below shows how everything works for export processes:
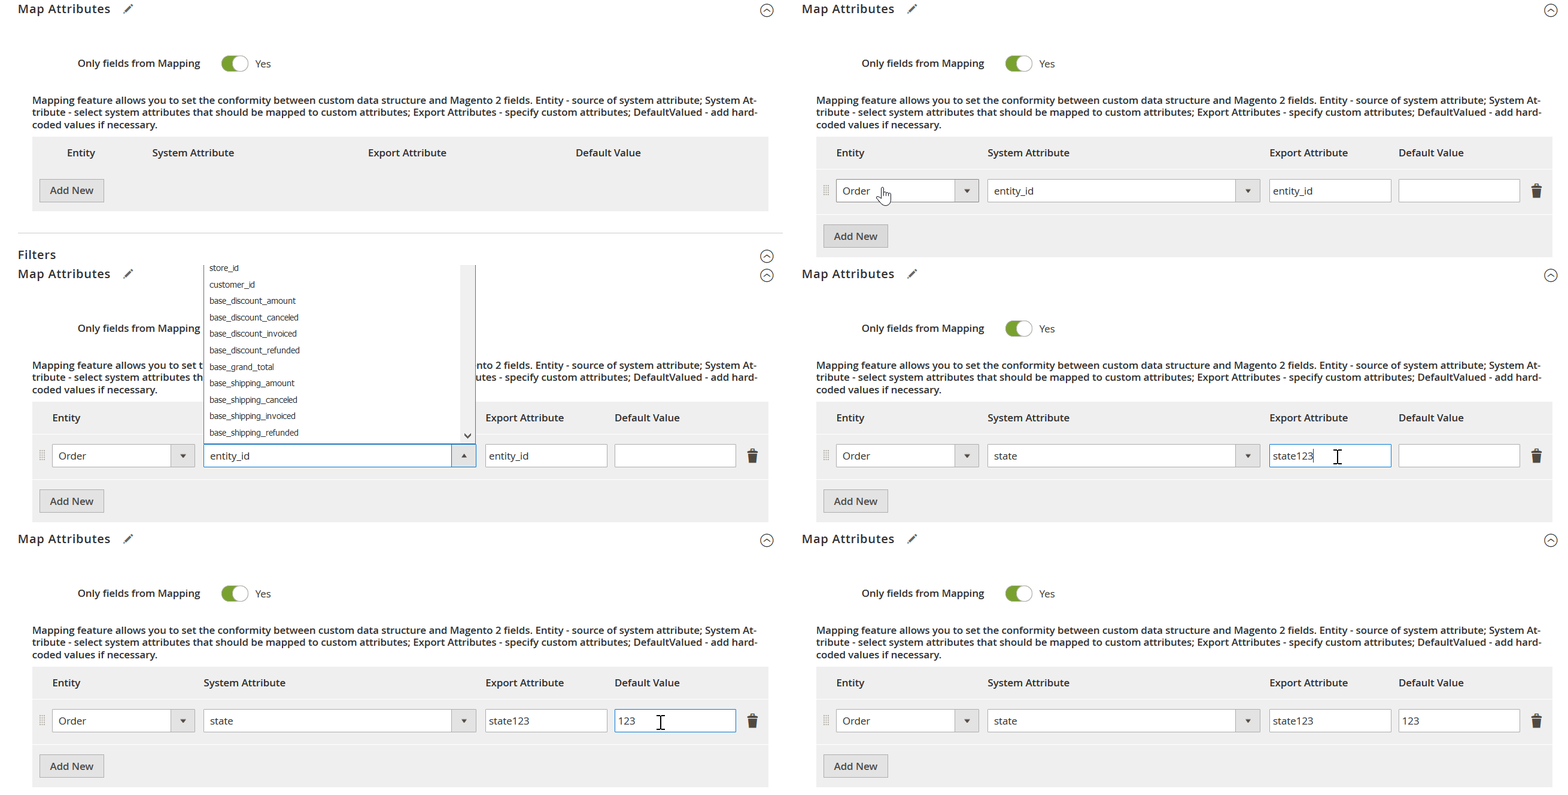
You can also add hardcoded (default) values so that the extension can provide all imported items with them. For instance, you need to import products from different store views to a single website. Just specify a hardcoded value for a store view attribute to achieve your goal.
Filters
When it comes to export processes, the Improved Import & Export also offers the ability to narrow down the selection of exported data. The module provides filters that let you eliminate all unnecessary attributes from an export file. You need to select an entity and a system attribute and specify filtering parameters. Add as many filters as you need.

Attribute Values Mapping & Editing
The Improved Import & Export extension also lets you map and edit attribute values right in the Magento 2 backend. It provides an interface that is similar to the one we described above to eliminate incorrect designations that negatively affect import processes. Attributes mapping becomes quite simple and requires much less time compared to the traditional manual approach. Just choose a third-party attribute value and specify a corresponding internal one in front of it. Follow this link for more information: Attribute Values Mapping.
If attribute values mapping is not enough, you can rely on another feature the Improved Import & Export Magento 2 extension provides. It lets you edit attribute values in bulk to make them more suitable for your business. The module provides the ability to add a prefix/suffix to multiple attribute values as well as split or merge them depending on your needs. Combine the rules and apply them in bulk. The feature is described here: How to Modify Attribute Values During Import and Export in Magento 2.
Category Mapping
When it comes to product transfers, the Improved Import & Export plugin also simplifies your daily duties. It can replace third-party product categories with ones used internally. You modify information from external catalogs right in your backend. All the annoying processes are replaced with the ability to take a third-party product category and specify a replacement. We illustrate the process below:
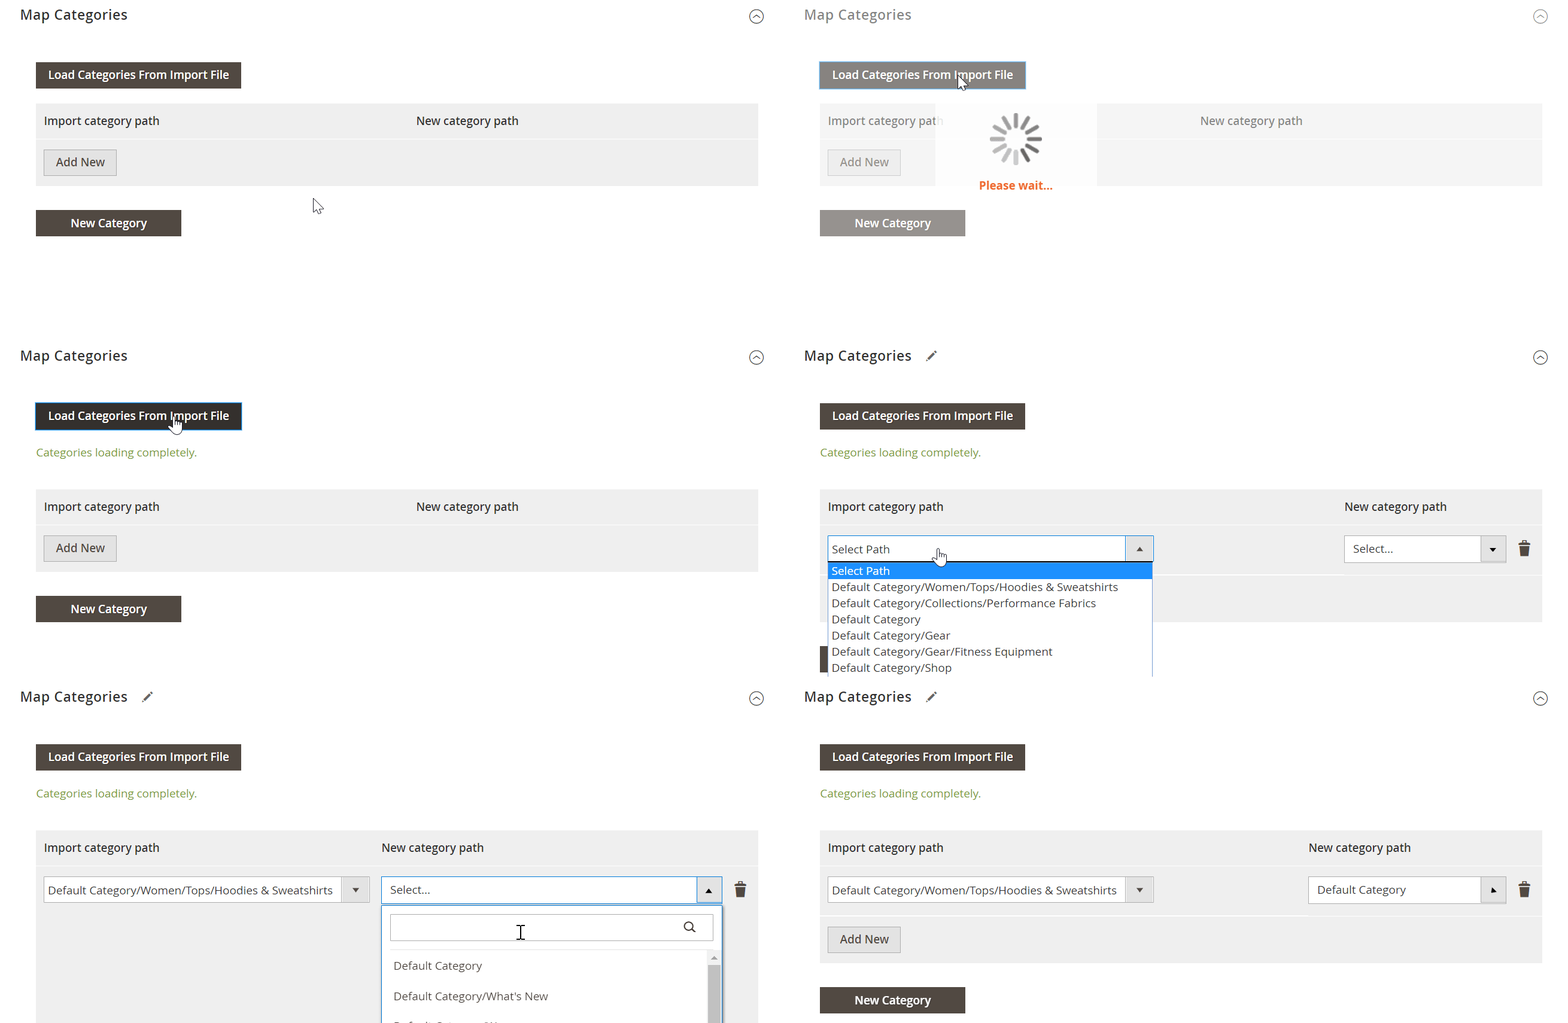
Create a category in an import profile if it is absent on your website. Improved Import & Export lets you do that by selecting a parent category and defining a new one. That’s it! The procedure is described here: Category Mapping.
Attributes On The Fly
Another mapping feature is related to absent attributes. When a data file lacks some of them, it is no longer an issue since our extension offers a solution as well. The Improved Import & Export module lets you create attributes on the fly with the helo of the following general form:
Attribute|attribute_property_name:attribute_property_value|…
Customize it according to your requirement, place in a data file, and let the plugin generate the missing designations. Follow this link for further information: Product attributes import.
Extended Connectivity Options
The Improved Import & Export module provides extended connectivity options to let you work with any external systems. The core improvements are described below.
Multiple File Standards & Sources
You are forced to convert data files into CSV before importing them to Magento 2 since its the only supported file format. When it comes to export processes, you have to do the opposite procedure. But Improved Import & Export eliminates this time-consuming routine. Our extension supports XML, JSON, ODS, and Excel files. You can transfer them to your website as file archives since the plugin can unzip compressed data automatically.
The Improved Import & Export Magento 2 module lets you streamline several file sources to improve file transfers even further. First of all, you can use FTP/SFTP so that both local or remote servers can be utilized. Other options include Dropbox and other cloud storages (Box, iCloud, Google Drive, OneDrive, and Amazon Drive). And you can streamline direct URL uploads.
Alternative Ways of Import & Export
However, file transfers are not the only option you can streamline. The Improved Import & Export extension provides more powerful alternatives: API connections and intermediary services. Note that Magento 2 doesn’t offer anything similar.
Improved Import & Export lets you create direct REST API connections to transfer data between your e-commerce store and any third-party systems. It can also work with SOAP and GraphQL standards if necessary.
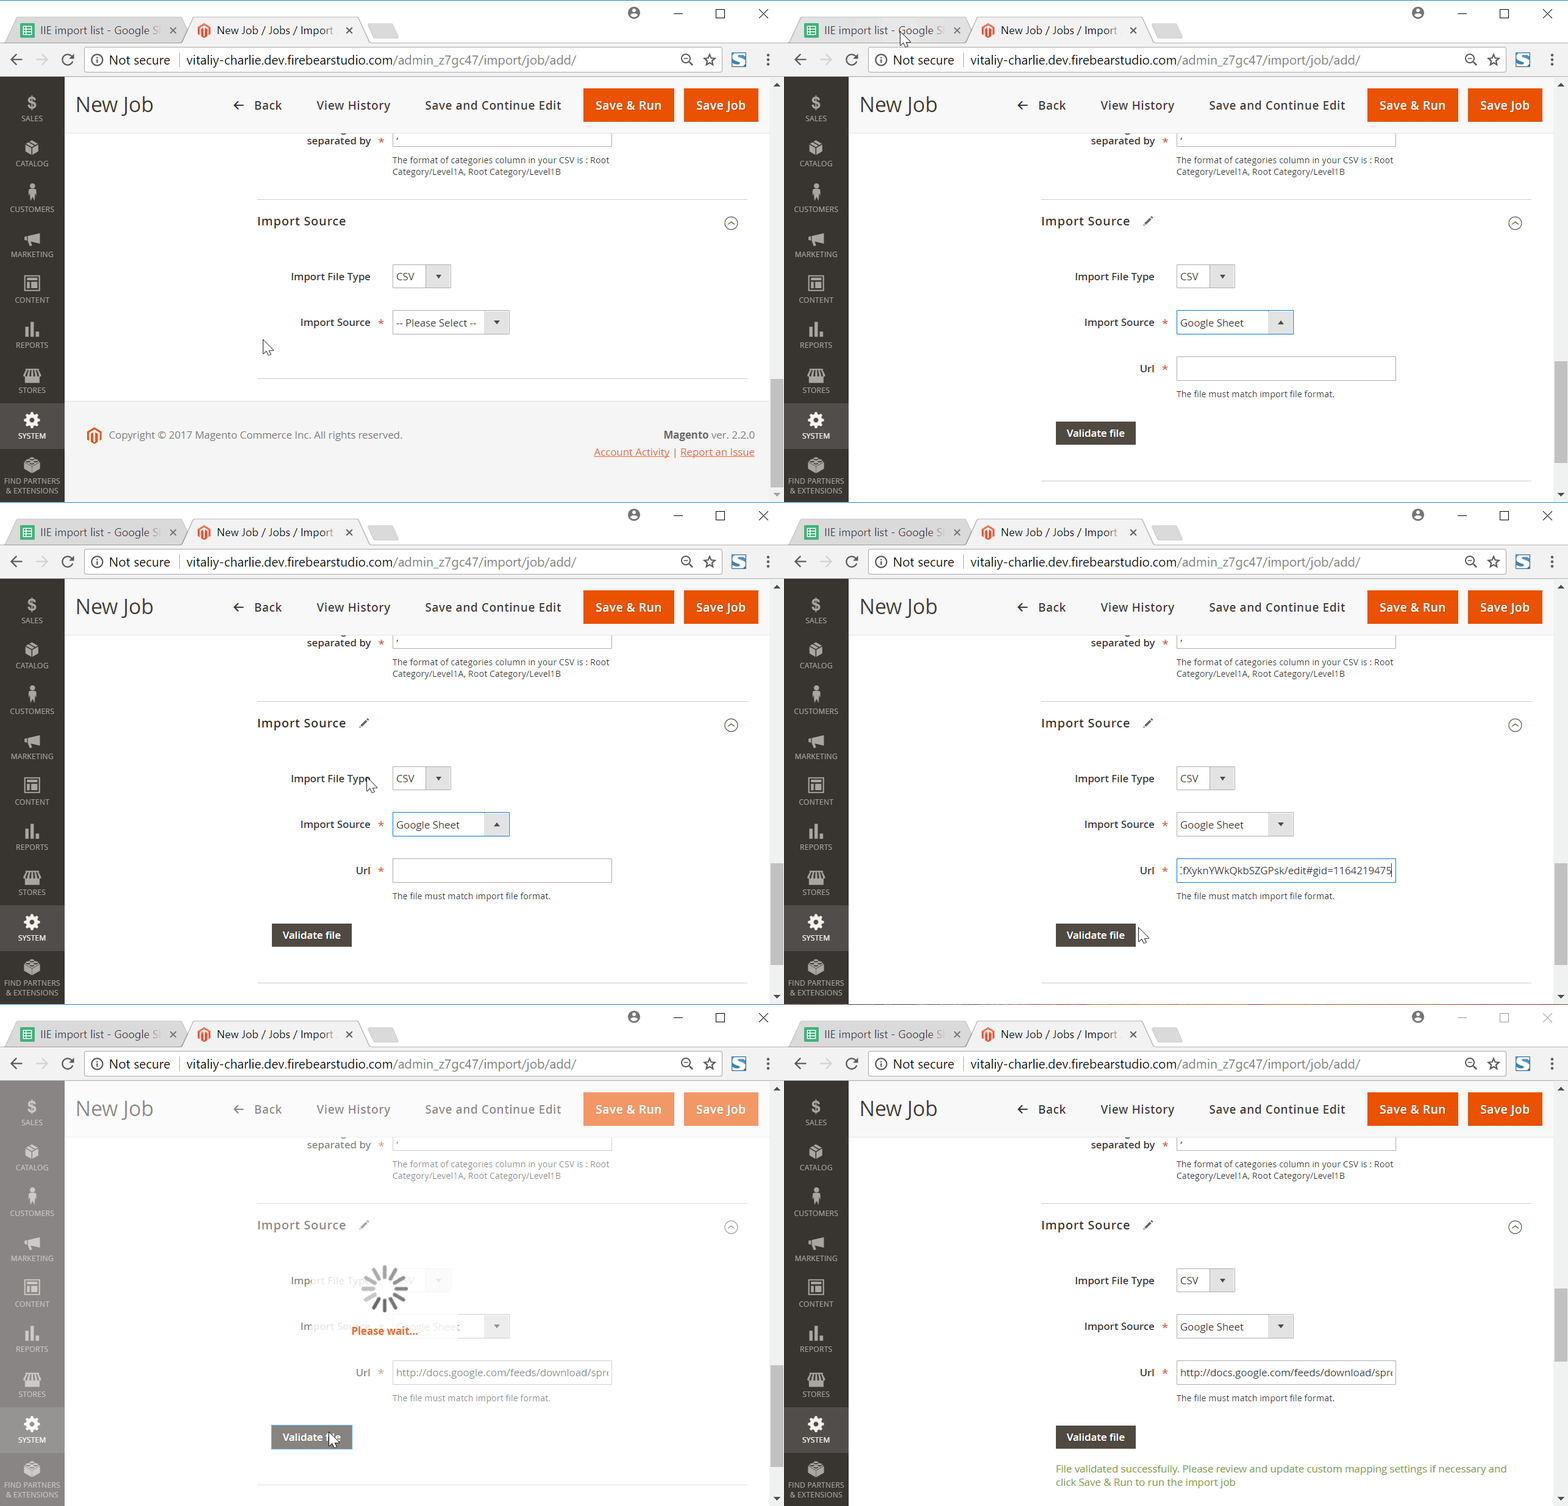
Supported intermediary services include such platforms as Google Sheets, Office 365 Excel, and Zoho Sheet. You can freely connect to them to move data to your store without data files. The process is illustrated below:
It is also necessary to mention that all the features described above are suitable for all the connection types the extension offers. Besides, the Improved Import & Export module offers additional opportunities related to the support for WSDL and WADL. This video displays the module in action:
Final Words
As you can see, all the screens connected to the Taxes section of the Magento 2 backend are intuitive and easy to use. You can freely create new tax rates and rules as well as edit the existing ones. Importing them is not a problem at all. If you want to leverage our module in this process, follow the link below and contact our support:
Get Improved Import & Export Magento 2 Extension


