
How To Bulk Import Products In Shopify: CSV Description & Step-By-Step Guide

In the following article, we shed light on how to import products to Shopify in bulk. You will learn the default approach to the Shopify product import that requires no additional instruments. You can open your admin and find all the necessary tools there.
Next, we provide a more advanced way to bulk import products to Shopify that involves the Import & Export Tool. You will learn how to automate your Shopify product bulk updates or transfer multiple products from such external sources as Google Sheets.
Before we begin, let’s look at the nuances of a Shopify product CSV necessary for your bulk update. We explain the peculiarities of a Shopify product import CSV templates including its column titles and required values. You will also learn, how to compose a CSV file with multiple product images, following the platform’s requirements. Overwriting the existing product data is another important topic described below.

Table of contents
Shopify Product Import CSV Template
We cannot talk about the nuances of a CSV file with product data without having this file. Therefore, we’ve prepared a Google Sheets spreadsheet with all the columns a product CSV includes. Feel free to download and view a to use as a template. But before going any further, consider the nuances of Shopify product import described below.
Peculiarities of Shopify Product Import Template
Please, be aware of the following aspects of using a CSV template with Shopify-ready product data:
- You will find an example product and a couple of variants in the sample file. While you can still import them, learning how to bulk import products in Shopify, keep in mind that a real file probably contains many more records. However, it is possible to use the sample file to create your exclusive import file. In this case, remove all the example products.
- The Variant Inventory Qty column is another important aspect of our sample file. We assume that it is used for a store with a single location. Use the inventory CSV file to import inventory quantities to multiple locations.
- In addition to that, our Shopify Product Import CSV Template includes the Price / International and Compare At Price / International columns. The corresponding rows are blank because there aren’t any unique pricing requirements for these products when being sold internationally.
- Check the export settings when you export the CSV to ensure that your file uses commas to separate values.
- The Title and Handle columns are the only required columns when you bulk import products to Shopify using a CSV file.
- Beware of data dependencies since the data in some columns depends on the data in other columns. If your data depends on a missing column, you will receive an error during the import.
For instance, updating a column related to variants, such as Variant SKU or Variant Grams, assumes that the data in it depends on the data about the corresponding variants. In this case, including the Option1 Name and Option1 Value columns is mandatory. If you don’t do that, a new default variant is created and the existing variants are deleted. - Some columns must have a value. When such columns are blank, default values are created automatically.
Shopify Product CSV Template Described
Below, you can find a detailed description of a Shopify product import CSV. We describe all column titles and values, explain what columns are mandatory, and shed light on default values created automatically to bulk import products to Shopify.
| Column | Description | Column is Required | Value Is Required | Default Value Created Automatically/ Value Example |
| Handle | Shopify uses handles as unique identifiers for each product. They can consist of letters, dashes, and numbers. Spaces, accents, and other characters, including periods, are prohibited. The system uses handles in product URLs.Every line in a CSV file that starts with a different handle is considered a new product. When you need to add multiple images per product, use multiple lines with the same handle. |
Required for product updates. | Yes | The handle for a “Women’s Shirt” should be womens-shirt. Then, the corresponding product URL is https://yourstore.com/products/womens-shirt.
If the column is blank, Shopify creates its values automatically following the value in the Title column: if the value in the Title column is Black Sun Rising, the value in this column is black-sun-rising. |
| Title | Shopify stores the title of your product in this column. For example, Black Sun Rising. | Required for product updates and new products | Black Sun Rising | |
| Body (HTML) | Here, you should place the description of the product in HTML format. | <h2>Black Sun Rising</h2> <p>Black Sun Rising takes place on Erna, a planet whose original human colonists were driven back to the dark ages by the mysterious energy known as the Fae.</p> |
||
| Vendor | Shopify uses this column to specify the name of the vendor for your product. For instance, Mike’s Apparel.
A minimum vendor name must be two characters long. |
Yes | If the column is blank, Shopify creates default values automatically, using the name of the store as you entered it when you created your Shopify account. For example, Mike’s Apparel or mikes-apparel. | |
| Product Category | Product categories indicate tax obligations and exemptions in the US. They are selected from a predefined and standardized list – Shopify Product Taxonomy. Product categories are also used to manage products. You can leverage them for the following activities:
There are two ways to input a standardized product category:
|
Apparel & Accessories > Clothing | ||
| Type | It describes the category of a product. This label is used in a free format. | Shirts | ||
| Tags | Specify a comma-separated list of tags in this column. | mens t-shirt example | ||
| Published | Data in this column indicates whether a product is published or not. Valid values are true and false. | Yes | true is used automatically when the column value is absent. It means that this product will be published and available in the online store sales channel. | |
| Option1 Name | If a product has an option, its name should be specified here, e.g., Color.
If there is only one option, then this value should be Title. |
Yes | Title is specified automatically if no data is provided. | |
| Option1 Value | If a product has an option, enter its value, e.g., Black.
If a product has only one option, specify Default Title here. |
Yes | Default Title is specified automatically if no data is provided. | |
| Option2 Name | If a product has a second option, then enter its name, e.g., Size. | Size | ||
| Option2 Value | If a product has a second option, then enter its value, e.g., Large.
Changing data in this column deletes existing variant ID values with the consequences mentioned above |
Large | ||
| Option3 Name | If a product has a third option, then specify its name here. | Color | ||
| Option3 Value | If a product has a third option, specify its value here.
Changing data in this column deletes existing variant ID values with the consequences mentioned above. |
Black | ||
| Variant SKU | Shopify requires the SKU of a product or variant in this column used to track inventory with inventory tracking services. Don’t leave this field blank if you’re using a custom fulfillment service. |
example-shirt-s | ||
| Variant Grams | Specify the weight of a product or variant in grams in this column. A unit of measurement and decimals are prohibited. If you want to specify a weight of 5.125 kg, enter 5125. Shopify always imports and exports the weight in grams. | Yes | 0 is the default value if the column is empty. | |
| Variant Inventory Tracker | Your inventory tracking for this variant or product includes shopify, shipwire, amazon_marketplace_web, or blank if inventory isn’t tracked. | shopify | ||
| Variant Inventory Qty | It is the number of items you have in stock specified for Shopify stores that have a single location. If your store manages inventory at multiple locations, don’t include this column and use inventory import instead. | Yes | 0 is the default value used if the column is blank. | |
| Variant Inventory Policy | This column lets you specify how to handle orders when the inventory level for this product or variant reaches zero:
|
Yes | deny is the default value used if the column is blank. | |
| Variant Fulfillment Service | The product or variant fulfillment service used can be one of the following:
For a custom fulfillment service, add its name considering the following requirements:
For example, if “Mike’s Fulfillment” is your fulfillment service’s name, then enter mikes-fulfillment here. |
Yes | manual is the default value used if the column is blank | |
| Variant Price | Use this column to specify the price of a product or variant. Currency symbols are prohibited. For example, 9.99. | Yes | 0.00 is the default value used if the column is blank. | |
| Variant Compare At Price | Use this column to specify the Compare At Price of a product or variant. Currency symbols are prohibited. For example, 9.99. | 24.99 | ||
| Variant Requires Shipping | Use this column to specify whether a product requires shipping. Valid values are true and false.
true indicates that it is a physical product. |
Yes | true is the default value used if the column is blank. | |
| Variant Taxable | Use this column to specify whether to apply taxes to this variant. Valid values are true or false. | Yes | true is the default value used if the column is blank. | |
| Variant Barcode | Use this column to specify the barcode, ISBN, or UPC of a product. | 123456789012 | ||
| Image Src | Use this column to specify the URL for the product image. Shopify will download the image during the import, re-uploading it into your store.
|
https://yourstore.com/photos/green-t-shirt.jpg?width=5000 | ||
| Image Position | Use this column to enter a number that represents the order in which you want the image to be displayed on the product’s page starting from an image position value of 1. | 1 | ||
| Image Alt Text | Use this column to provide an alt text of the image. Up to 512 characters. | Blank white t-shirt | ||
| Gift Card | Use this column to indicate whether the product is a gift card. Valid values are true or false.
Note that a gift card can only be created in the Shopify admin. You can’t do that with the help of a product CSV file import. |
Yes | false is the default value used if the column is blank. | |
| SEO Title | Use this column to provide an SEO Title. It is alphanumeric and can include up to 70 characters. | Our awesome T-shirt in 70 characters or less. | ||
| SEO Description | Use this column to provide an SEO description. It is alphanumeric and can include up to 320 characters. | A great description of your products in 320 characters or less | ||
| Google Shopping / Google Product Category | This column is used if you also use a Google product category. You can use the product category, the Google Product Category, or both to provide the most specific category possible for each item.
Note that GPC uses Google’s product taxonomy and there are two ways of input:
|
Apparel & Accessories > Clothing | ||
| Google Shopping / [Metafields] | This is a group of columns. Their headers vary based on the Google Shopping metafield: Google Shopping / + one of the following metafields:
|
Unisex | ||
| Variant Image | Use this column to provide the URL of a product variant image. | https://yourstore.com/photos/green-t-shirt.jpg?width=5000 | ||
| Variant Weight Unit | Use this column to provide a variant weight unit, such as g, kg, lb, or oz. | Yes | kg is the default value specified automatically when the column is blank. | |
| Variant Tax Code | This column is available to the Shopify Plus plan only. Use it to provide the Avalara code to apply taxes to the product.
However, if you import a CSV file with the Variant Tax Code column into a store that doesn’t have Avalara set up, your import fails. |
P000000 | ||
| Cost per item | This column indicates how much it costs you to get or produce the product or variant. If you resell a product, then you can enter the price that you paid to the manufacturer, excluding taxes, shipping, or other costs. If you create the product yourself, then you can enter a value that is based on your labor and material costs. Currency symbols are prohibited. | 9.99 | ||
| Included / [Primary] | Use this column to indicate whether the product is for sale in the primary market. Valid values are true or false.
As for the column heading name, it varies depending on the country or region determined to be your primary market in Shopify Markets. Changing the default primary market results in the column header combined with the new market name. |
Yes | true is the default value applied automatically when the column is blank. | |
| Included / International | Use this column to indicate whether the product is for sale in the market of the same name. Valid values are true or false.
Replacing the international market with your market results in the alteration of the header name: International changes to the name of the market. If your new market name is South America, the column headings are adjusted as follows:
|
Yes | true is the default value applied automatically when the column is blank. | |
| Price / International | Use this column to indicate a fixed price for a product in the market of the same name and in that market’s currency. | 9.99 | ||
| Compare At Price / International | Use this column to set a fixed compare-at price for a product in the market of the same name and in that market’s currency. | 9.99 | ||
| Status | Use this column to indicate whether a product is available to your customers:
|
Yes | active is the default value applied automatically when the column is blank. | |
| Collection | Use this column to add a product to the collection. Enter the name of the collection.
If it’s an existing automatic collection, then the product needs to meet the conditions for the collection. If the collection doesn’t exist, a manual collection is created automatically. It is possible to add a product to only one collection. The Collection column is the only column that can be added to the CSV file without breaking the format. |
best-sellers |
How to Create a Product CSV Suitable for Shopify Import
Now, Let’s explore a couple more nuances associated with a CSV file suitable for Shopify product import.
File Format Requirements
Shopify uses the following file format requirements for product import:
- Your CSV files must use UTF-8 encoding;
- A file size limit per file for products is 15MB;
- Each entry represents a cell in a spreadsheet;
- Each line represents a new row;
- Each comma indicates where one entry ends and another one begins.
Below, you can see how the data from a CSV file is represented in a spreadsheet:
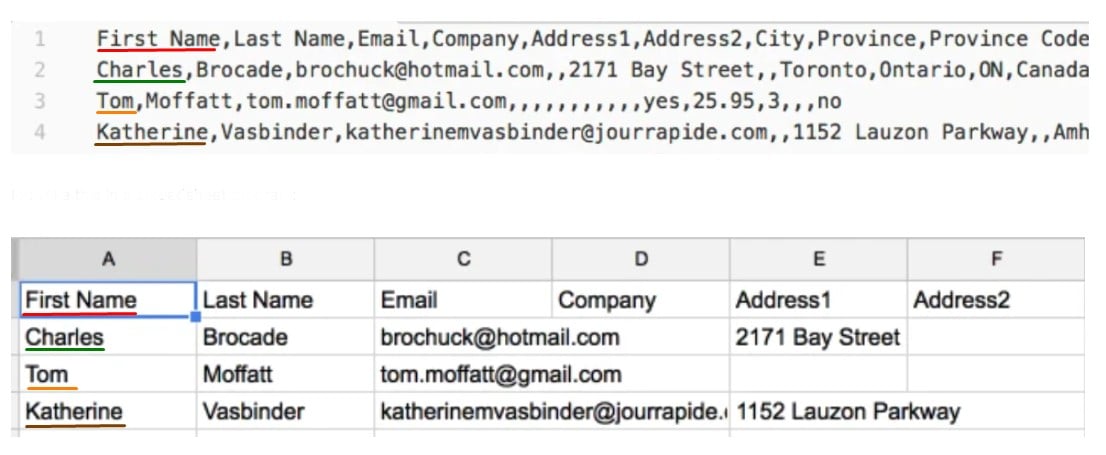
Simple Product & Product with Variants
Let’s see how to record simple products and products with variants in a CSV file:
- Simple Product. Since a simple product doesn’t include variants, you need to enter all its details in a single row that also includes a URL for the first image. Use additional rows to specify a handle and a URL for each additional image. We focus on that below.
- Product with Variants. Uploading a product that has variants is slightly different. You must enter all the fields for the product in the first row along with the URL for the first image. Use the following rows to enter the handle but keep the Title, Body (HTML), Vendor, and Tags columns empty, filling out the rest of the variants’ details and each image URL.

Shopify Import of Product Images
Of course, Shopify product import lets you transfer images along with other product details. However, since a CSV file can only contain text, you can only specify URLs. Below, you can find a few important things to remember when you import product images to Shopify:
- Make sure all product images are already uploaded to your website or an image hosting platform.
- If you migrate to Shopify from another platform, you can copy the current image URLs and use them in your Shopify product import CSV file.
- If your product CSV was produced as a result of a product export from Shopify, your images are already on your website. In this case, you can use the current URLs. However, removing products or product images from your Shopify store after exporting results in a failed import process.
When you have URLs for each product image, you can start adding them to your CSV file. Shopify has a limit of 250 images per product but that’s pretty much enough. Let’s see how to bulk import images to Shopify using a CSV file:
- Open your CSV file in Google Sheets or another spreadsheet editor.
- Locate the products to add images to.
- Place an image URL in the Image Src column.
- Add a new row below the product row you are adding images to.
- Specify the same product handle and a new URL for an additional image there.
- Enter a value into the Image Alt Text column to improve your SEO.
- Use the Image Position column to display product images in the specified order.
- Repeat steps 4 to 7 for all the images you plan to add to this product.
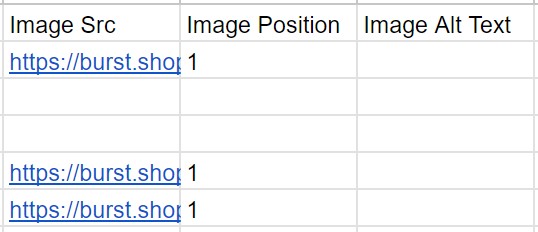
Use the Variant Image column to provide image URLs for product variants.
Overwriting Product Information with a CSV
You can use Shopify product import to overwrite the existing product information. Select the Overwrite products with matching handles option when importing a CSV file. Next, when a handle in your import CSV file matches an existing handle in your products list, the values in the CSV file overwrite the corresponding matching values in your database.

Here are a few things to consider when you use the Overwrite products with matching handles feature:
- A non-required column in a CSV is blank. In this case, the matching value in the product list is overwritten as blank. Let’s suppose that the Vendor value in your database is Mike’s Apparel, but the Vendor column is blank in the CSV file. Importing this file results in overwriting Mike’s Apparel with a blank value.
- A non-required column isn’t included in a CSV. In this case, no overwriting occurs since you don’t provide a column for overwriting. Let’s assume, your database stores information for the Variant Image attribute. When you import a CSV file that lacks the corresponding column, the database value remains untouched.
- A non-required column is included in a CSV and relies on other column data not included in the file. In this case, the existing data is deleted when you import this CSV. For instance, the Variant SKU column is included in your Shopify product import CSV file, but the Option1 Value and Option1 Name columns are absent. In this case, you delete the product variant option from your database by importing this CSV. Also note that changing data in the Option1 Value, Option2 Value, or Option3 Value columns deletes existing variant IDs, replacing them with new variant IDs. As a result, such changes can break third-party dependencies on variant IDs.
If you don’t enable the Overwrite products with matching handles feature, products that match existing handles are ignored.
How To Bulk Import Products In Shopify Step-By-Step Guide
There may be different reasons to bulk import products to Shopify: migration from other platforms, inventory and catalog updates, dropshipping, etc. No matter what motivates you to import products, you can always do that with built-in instruments but always back up your product data first to prevent any data loss.
Let’s suppose, you have a CSV file with a product update composed following all the Shopify requirements. Follow these steps to import products to Shopify:
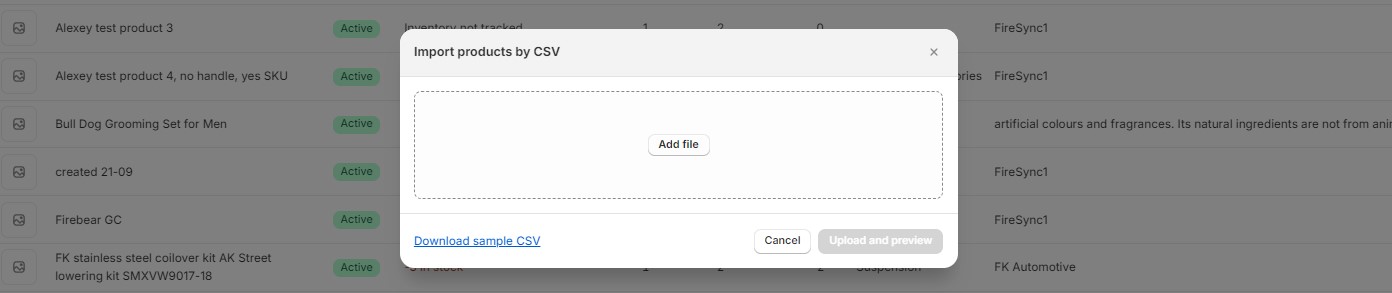
- Go to Shopify admin -> Products -> All products.
- Hit the Import button.

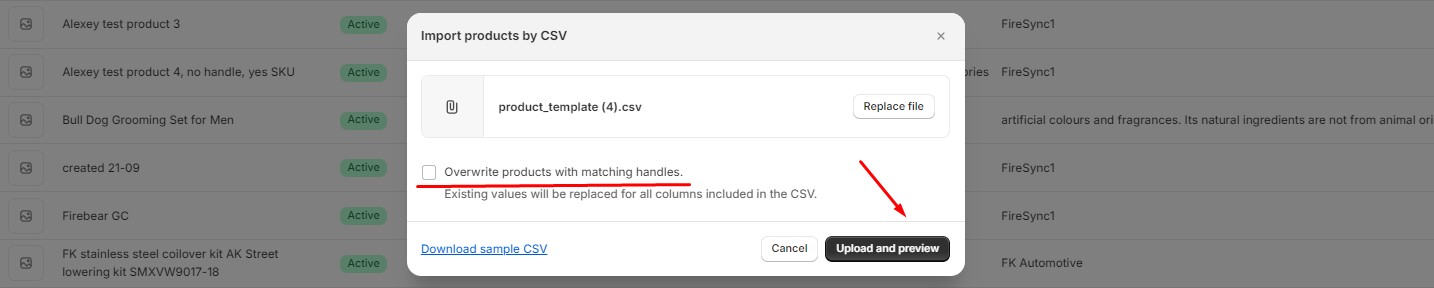
- Click Choose File in the Import products by CSV file window and pick your product CSV.
- Activate the Overwrite products with matching handles feature if necessary.
- Click Upload and continue to import products to Shopify in bulk using a CSV file.
When the product import is complete, you receive a confirmation email. But what if your update is stored in Google Sheets or Excel? What if you need to import products to shopify regularly? Is there any way to automate repetitive updates? What if a CSV file contains different column titles?
Well, you have to face tons of manual editing in case you use the platform’s default importer. However, the Import & Export Tool addresses all these and multiple other issues right in your admin. Let’s see.
How To Bulk Import Products In Shopify with Import & Export Tool
The Import& Export Tool by Firebear introduces the following 5 steps of bulk product import to Shopify:
- Create A Product Import Profile
- Select a Product Import CSV
- Configure Mapping for Third-Party Product Data
- Preview Results of Shopify Product Import
- Import Product Data to Shopify
Let’s see what gems are hidden in each step.
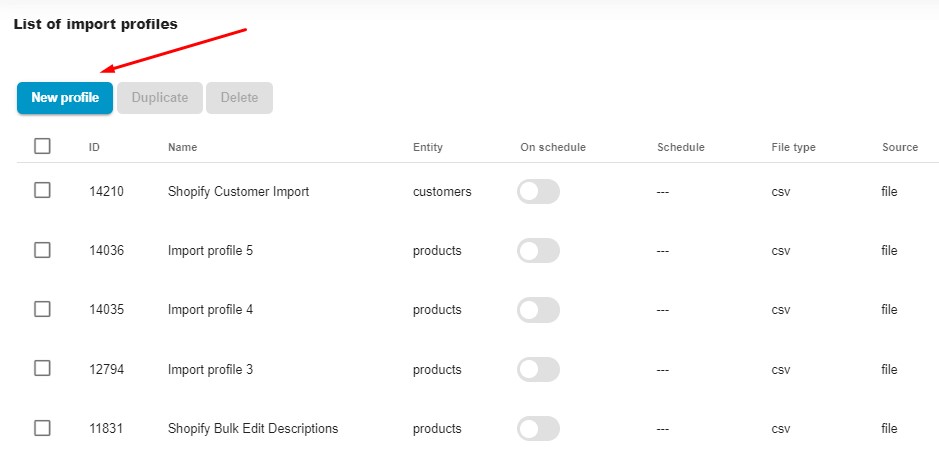
Step 1: Create A Product Import Profile
You can create a new import profile for a Shopify bulk product update under Apps -> Firebear Import & Export Tool -> Import. Just click the “New Profile” button.
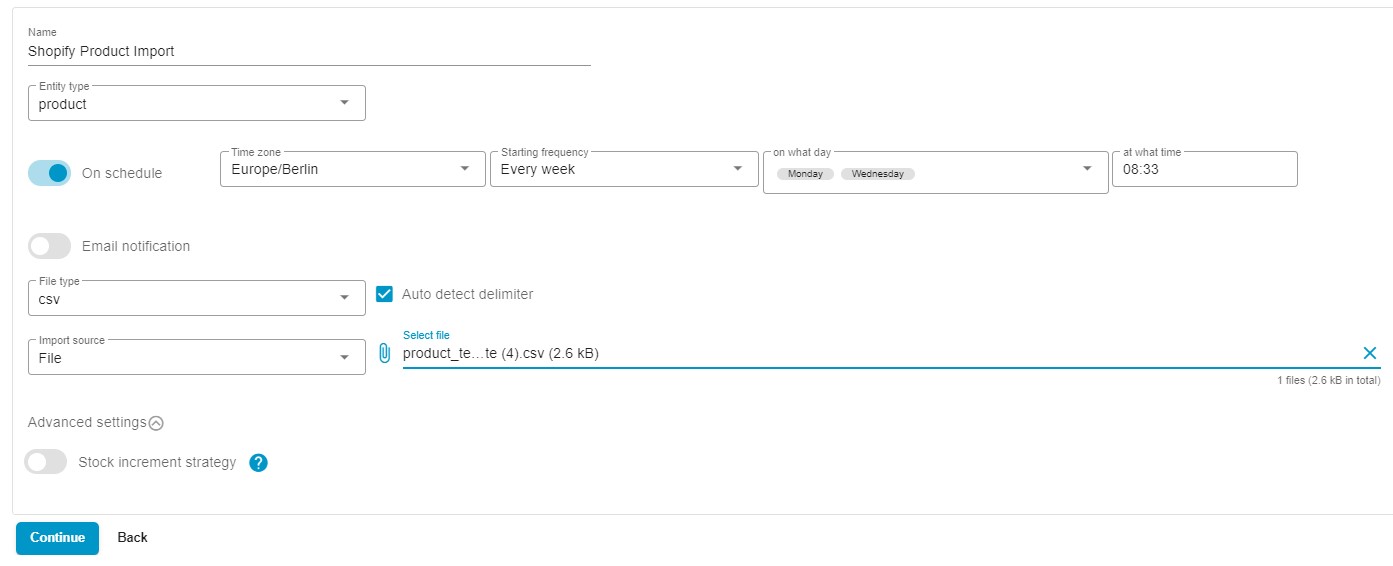
Step 2: Select a Product Import CSV
Now, you are on the “Select File” screen. It’s a place where you can automate your product updates and pick different file formats and sources. Follow these steps:
- Specify your profile name, such as Shopify Product Import.
- Choose the entity – Products.
- Create a schedule of updates to automate repetitive product imports. For instance, you can set up our app to import products to Shopify once a week automatically.
- Configure email notifications if necessary. It’s a useful feature for regular automated updates.
- Select your file format as “CSV” if you provide a standard product update file created according to the Shopify requirements. Note that our app also lets you import products to Shopify using CSV, XML, XLSX files, and Google Sheets spreadsheets.
- Opt for File as the import source of your Shopify product update and browse the file. Also, you can import products to Shopify over FTP, from a direct URL, out of your Google Drive storage, or from a Google Sheets spreadsheet.
- Specify separators if your update contains unusual separators. You can use the Auto Detect delimiter feature to let your app detect the delimiters used in your product update.
- Click “Continue” to proceed to the next screen.
Step 3: Configure Mapping for Third-Party Product Data
On the mapping screen, indicate which columns from the imported file should match the product properties of Shopify. If your update doesn’t align with Shopify requirements, replace unsupported column names with suitable ones. Thus, you will enable third-party product data import to Shopify.
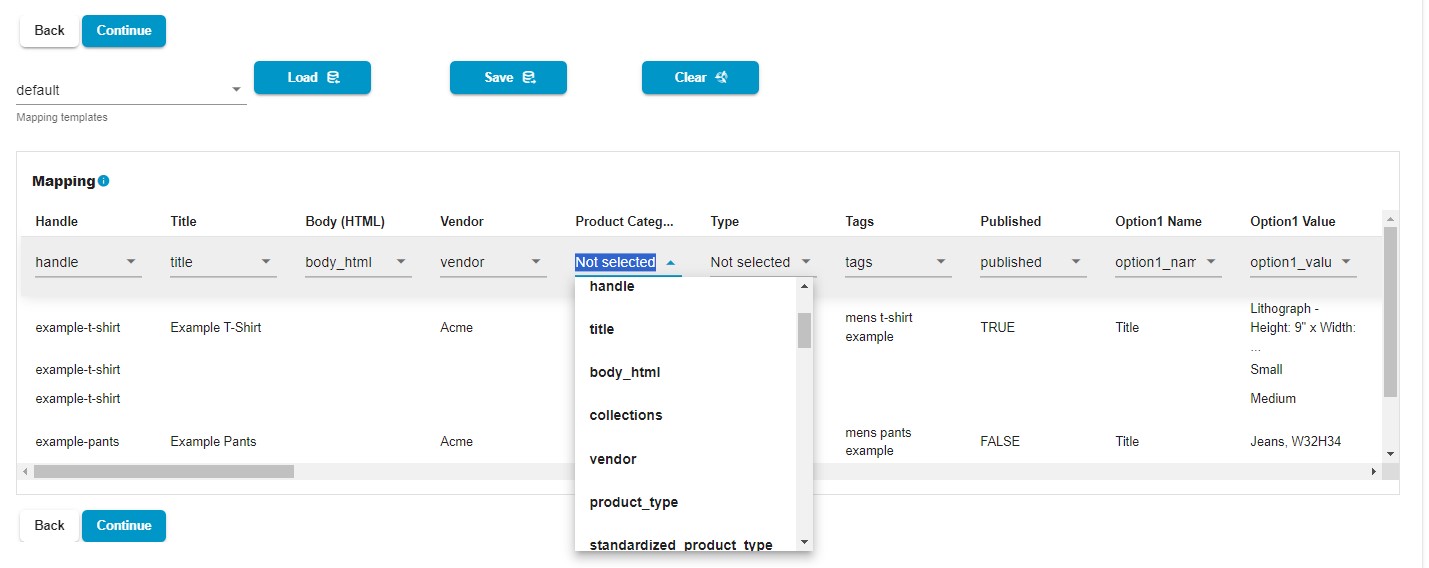
Click “Continue” to proceed to the next step.
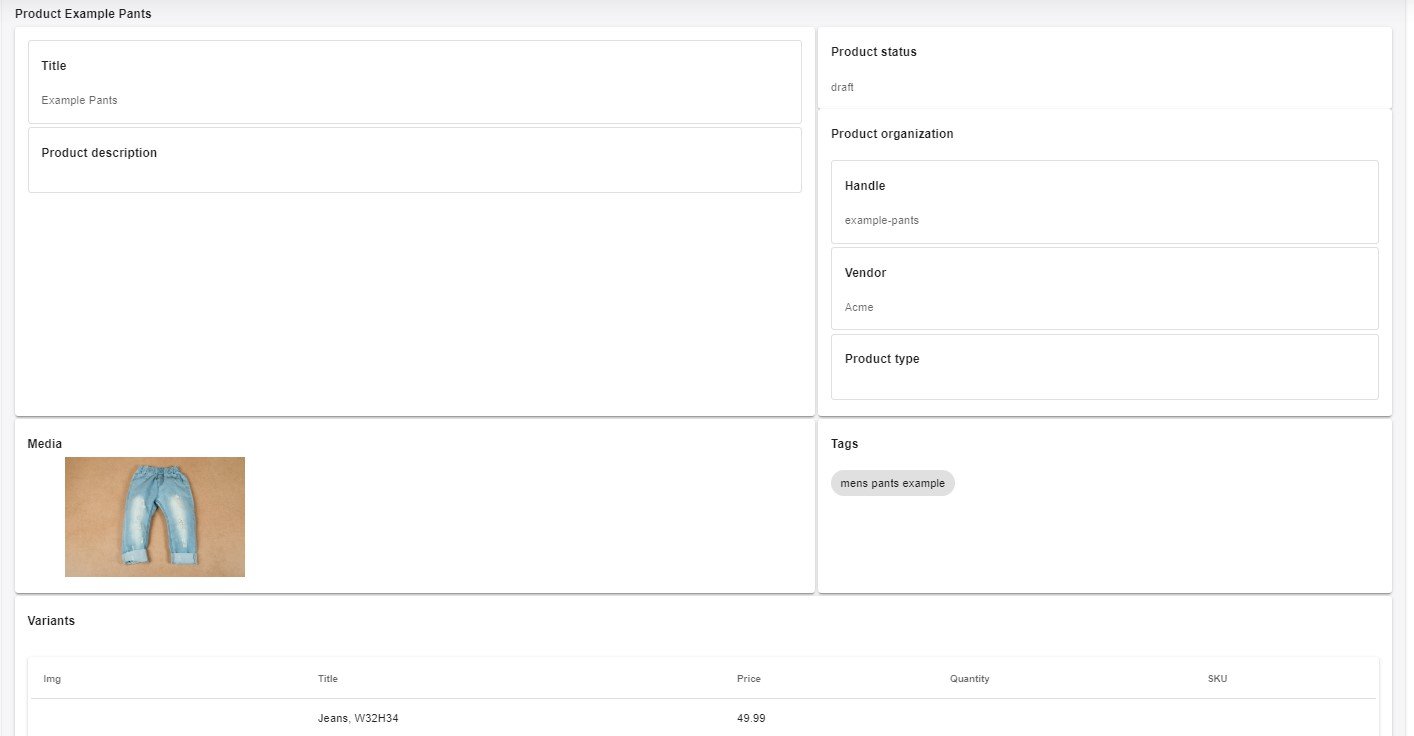
Step 4: Preview Results of Shopify Product Import
The app provides a preview of the product data you are about to transfer to Shopify. Here, you can spot any mistakes or inconsistencies, and return to previous steps to address them.
Step 5: Import Product Data to Shopify
Finally, click the “Save” button to save your Shopify product import profile. When you’re ready to import, click the “Import” button. The app will initiate the data transfer.

You will be informed regarding the import errors and the number of products that were successfully imported to Shopify.
For more detailed information on how to import and export data in Shopify, refer to our Improved Import & Export Tool Manual.
Shopify Product Import FAQ
How to import products to Shopify from Google Sheets?
You can use the Import & Export Tool to import products from Google Sheets. Create a new product import profile and specify Google Sheets as your import format and source. Next, add a link to the spreadsheet with your Shopify product import update.
Is it possible to bulk import products to Shopify from Excel?
If you use the default importer, there is no way to connect Shopify and Excle directly. You need to export a CSV file from Excel and then use the default import procedure. The Import & Export Tool, on the other hand, provides the ability to import XLSX files without any conversion. You just provide it as it is.
How to automate product updates in Shopify?
The Import & Export Tool provides the ability to create a schedule of updates for your Shopify product import. If you need to import products regularly, it is a useful time-saver. Just choose a frequency that suits your business needs.
How to import a CSV file that contains different column titles?
You have two ways to import a CSV file that contains column titles different from the ones Shopify uses. First of all, you can edit it manually following the requirements explained above. Secondly, it is possible to use the Import & Export Tool. The app provides a mapping interface that automatically detects all columns in a CSV file and provides the ability to select the corresponding default values from a dropdown. Thus, no manual editing is involved.
How to import products to Shopify over FTP?
While Shopify only lets you upload your product update manually, the Import & Export Tool supports product import over FTP. You just need to specify this data source in your import profile and provide other parameters necessary for the connection. Next, the app will automatically import products to Shopify over FTP.
Final Words
Shopify product import is a common process that thousands of merchants face all over the globe. Some of them need to update their product catalogs once in a blue moon while others face this procedure daily. No matter how often it happens in your life, you can now bulk import products to Shopify like a pro. If you need a more advanced tool for your data transfers that works with Google Sheets and Excel, offers FTP transfers, supports automation, and provides rich mapping functionalities, consider the Import & Export Tool your Shopify product importer. Follow this link for more details:
Related posts
 Shopify Order Tracking: How to Configure, Automate & Optimize the Post-Purchase Experience
 Shopify Metafields Explained: How to Add, Manage & Import Them
 How to Edit Products in Shopify: Step-by-Step Guide for Individual and Bulk Updates
 How to Import Metafields in Shopify: A Complete Guide
 How to Export Metafields in Shopify: A Complete Guide
 How to Cancel Shopify Subscription in 2025 — Your Extensive Walkthrough
 Shopify Draft Orders Explained: What They Are and How to Use Them
 How to Dropship on Shopify: Step-by-Step Guide for Beginners (2025)