
Exploring Shopware: Rule Builder in Shopware 6
![]()
Every e-commerce platform offers tools that let you treat customers according to their behavior. Usually, you create a set of rules. If the specific conditions are met, a customer gets a special proposition. Below, we describe one of Shopware’s core instruments that offer similar functionality – Rule Builder. The tool is used for creating specific rules that impact the way multiple areas of your storefront behave. Below, we shed light on how to find Shopware 6 Rule Builder. Besides, you will learn how to create rules in Shopware 6 to organize the frontend workflow. We explain general settings as well as specific conditions that you can build within the instrument. Import/export tips along with questions/answers are available below.

Note that we provide Shopware integration with external platforms. Contact our support for further information or try our Improved Import & Export Extension for Shopware.
Table of contents
- 1 Rule Builder in Shopware 6 Admin
- 2 Rule Builder Overview
- 3 Creating Rules in Shopware 6
- 4 How to Import Rules to Shopware 6
- 5 Shopware 6 Product List Settings FAQ
- 6 Shopware 6 Essentials FAQ
- 6.1 How to create a Shopware account?
- 6.2 What about a Shopware ID?
- 6.3 How to deal with Shopware master data and what is it?
- 6.4 How to add a new Shopware shop?
- 6.5 How to add a payment method to your Shopware account?
- 6.6 How to create a deposit in Shopware?
- 6.7 How to purchase Shopware extensions?
- 6.8 How to get support in Shopware?
- 6.9 How to automate import and export processes in Shopware 6?
- 6.10 How to migrate to Shopware 6?
- 6.11 How to integrate Shopware 6 with external systems?
Rule Builder in Shopware 6 Admin
Let’s see how to find the Rule Builder screen in the Shopware 6 administration:
- Go to your Shopware 6 administration;
- Open its main menu;
- Proceed to the Settings section;
- Open the Shop subsection;
- Hit the Rule Builder icon.
With the Shopware 6 Rule Builder, you can create individual rules based on conditions. Next, it is possible to apply these rules to shipping cost calculations or customer-specific product prices.
Rule Builder Overview
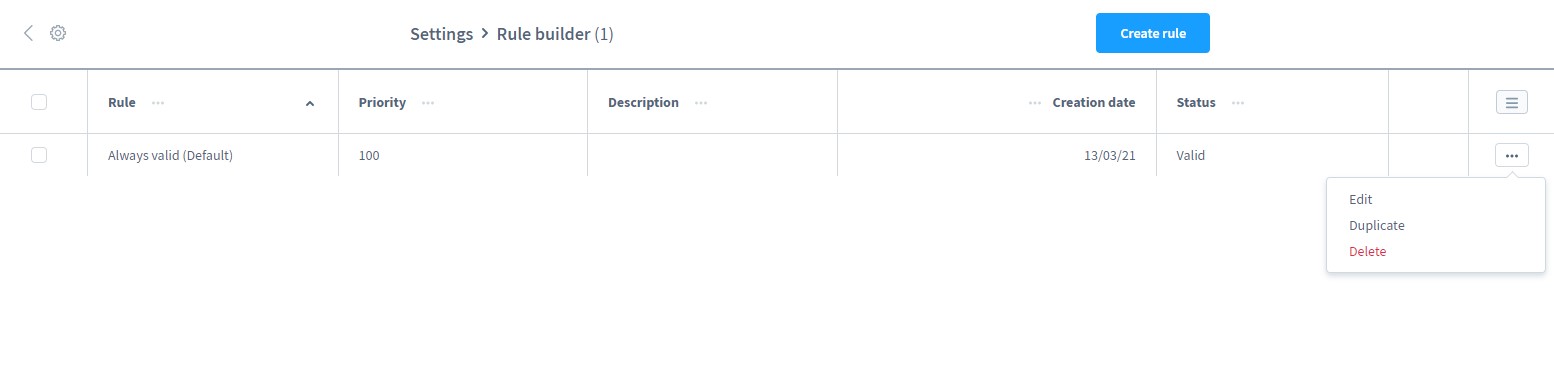
The Rule Builder screen looks as follows:

It contains all the rules that have already been created. As you can see, the Rule Builder grid offers the following information per rule:
- The rule name which used for assigning the rule to Shopware processes and areas;
- The rule description which contains more information about the rule;
- The rule priority indicates the order in which the rule is applied along with other rules;
- The rule creation date;
- The rule status indicates whether the rule is valid.
As usual, Shopware 6 lets you edit, delete, or duplicate rules with the help of the context menu. Rules can only be deleted if they are no longer used within the system. Otherways, you get a message that informs you about particular places in the system where the selected rule still exists.
Creating Rules in Shopware 6
A basic rule in Shopware 6 consists of at least one condition. However, it can also contain several conditions connected by AND/OR links. At the same time, you can also rely on subconditions to create more complex rules.
If you want to create a new rule, hit the Create Rule button.

Let’s see how to create rules and which conditions and operators to apply to them. The system redirects you to a screen divided into the following sections: General & Conditions.
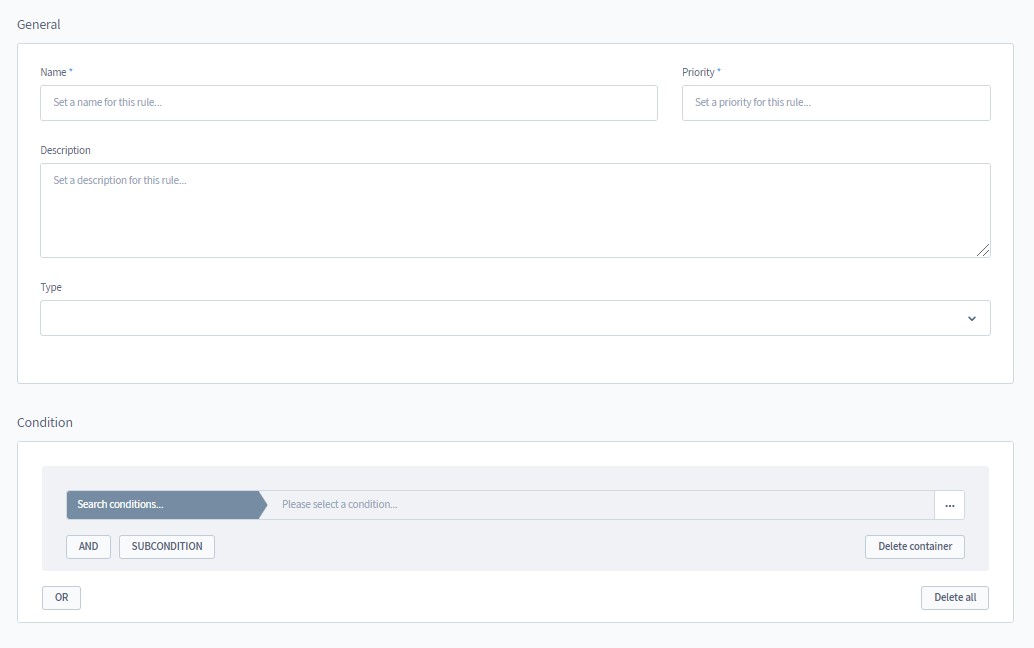
General
The first section requires such information as a rule name and priority. Optionally, you can also specify a description and type. The letter lets you display the rule in certain program modules only, such as the one responsible for counting shipping costs.

Conditions
The Conditions screen lets you create rules. As we’ve already mentioned, it is possible to generate basic rules that consist of one condition only or create complex rule structures that contain numerous conditions.
Shopware 6 lets you define conditions in more detail with the help of operators. Note that the visible operators depend on particular conditions. Thus, not all options are available for every condition. In general, the following functions are at your service:
- Is Equal to – the system applies the condition if the stored value is equal to the value specified;
- Is not Equal to – the system applies the condition if the stored value is not equal to the value specified;
- Is one of – the system applies the condition if one of the stored values matches the specification;
- Is none of – the system applies the condition if none of the stored values matches the specification;
- Is greater than – the system applies the condition if the corresponding value is greater than the value specified;
- Is greater than / equal to – the system applies the condition if the corresponding value is equal or greater than the value specified;
- Is less than – the system applies the condition if the corresponding value is less than the value specified;
- Is lower than / equal to – the system applies the condition if the corresponding value is equal or less than the value specified.
As for the conditions, the following tools are at your service when you create rules in Shopware 6:
- Different Addresses – a delivery address that differs from the billing address;
- Count of orders – the number of previous orders the customer placed on your website;
- Goods count – the number of goods in the shopping cart;
- Date range – the condition is valid within the specified date range: if you choose Excluding timestamp, only a start and an end date are selected and time is not considered;
- Business customer – the condition is valid if the client is (Yes) or is not (No) a business customer;
- Manufacturer – the condition is valid if the product manufacturer is the one specified in the rule for “Is one of” and is not the one specified for “Is none of“;
- Line item is promoted – one of the items is (or is not) marked as promoted;
- Always valid – a condition with no additional configuration;
- Customer Tag – a customer is assigned to a certain tag (keyword) or not (“Is one of” or “Is none of” respectively);
- Customer group – a customer is assigned to a certain customer group or not (“Is one of” or “Is none of” respectively);
- Customer number – with this condition, you can use a customer number for a precise restriction;
- Billing postal code – the billing address postal code “Is one of” or “Is none of“;
- Billing country – the billing country “Is one of” or “Is none of“;
- Billing street – the billing address street “Is one of” or “Is none of“;
- Last name – with this condition, you can use a customer last name for a precise restriction;
- Is new customer – with this rule, being a new customer becomes a condition;
- Line item is new – with this rule, new products are considered a condition;
- Line item of type – the item type is considered a condition: e.g., a product with discount or surcharge is available in the shopping cart;
- Line item – the item itself is considered a condition;
- Line item purchase price – the item purchase price is considered a condition;
- Line item total price – the total price of the same items in the shopping cart is considered a condition
- Line item unit price – the price of the positions which refers to the price of a single product is considered a condition;
- Line items in cart – certain products in the shopping cart are considered a condition;
- Line item in category – a product category is considered a condition;
- Line item with clearance sale – a product marked as a sale is considered a condition;
- Line item with quantity – the quantity of a specific product in the shopping cart is considered a condition;
- Line item with attribute – a certain attribute can be considered a condition: only attributes configured for use in products can be selected;
- Line item width – the width of a product is considered a condition;
- Line item property – a product property can be considered a condition;
- Line item with release date – a product’s release date can be considered a condition;
- Line item with creation date – a product’s creation date can be considered a condition;
- Line item weight – the weight of a product is considered a condition;
- Line item height – the height of a product is considered a condition;
- Line item length – the length of a product is considered a condition;
- Line item with tax rate – a specific tax rate assigned to a product is considered a condition;
- Line item list price – the list price of a product is considered a condition.
- Line item tag – if a product is assigned to a certain tag, it can be considered a condition;
- Line item count in cart – the number of items in the shopping cart is considered a condition;
- Goods price – the price of the goods in the shopping cart is considered a condition: discounts, vouchers, or shipping costs are not taken into account;
- Shipping postal code – the shipping postal code is considered a condition;
- Shipping country – the shipping country is considered a condition;
- Shipping street – the shipping street is considered a condition;
- Days since last order – the number of days after the last purchase is considered a condition;
- Line item is promoted – the state of being promoted is considered a condition;
- Sales channel – one or more of the existing sales channels can be considered a condition;
- Shipping method – a particular shipping type can be considered a condition;
- Free shipping – products that are marked as free of shipping costs can be considered a condition;
- Currency – the selected currency can be considered a condition;
- Weight of cart – the total weight of the shopping cart can be considered a condition;
- Cart amount – the shopping cart value can be considered a condition;
- Day of the week – a weekday can be considered a condition;
- Payment method – a particular payment type can be considered a condition;
- Time range – define a time period to apply the condition.
Shopware 6 lets you link several conditions within a single rule:
- AND – this link combines all the conditions. App of them must be followed for the rule to be considered valid;
- OR – only one of the conditions has to be followed.
As for subconditions, Shopware 6 works as follows:
- The system checks the parent condition;
- If it is met, the system checks whether the subcondition(s) is (are) followed.
How to Import Rules to Shopware 6
Importing shopping cart price rules and catalog price rules is a common task associated with Magento 2. If you need to achieve the same functionality with the Shopware 6 Rule Builder, you’ve come to the right place. With the help of our team, there is no need to recreate multiple rules manually. You can simplify and automate this process. Contact our support for more details and try our . You can use it to import any entity to Shopware 6, including rules created within Rule Builder. The extension provides the ability to create a schedule of updates to transfer data to and from your website periodically. At the same time, you can automatically apply changes to it via presets. Contact our support regarding these processes and rules as an import/export entity.
Shopware 6 Product List Settings FAQ
How to find Rule Builder in Shopware 6?
The Shopware 6 Rule Builder is situated under Settings -> Shop -> Rule Builder.
How to add new rules in Shopware 6?
You should use the Shopware 6 Rule Builder under Settings -> Shop -> Rule Builder to add new rules in your admin. Follow the instructions provided in this article.
How many conditions per rule can I use in Shopware 6?
The system lets you create basic rules that include only one condition as well as complex sets of conditions and subconditions.
What is the difference between subconditions and several conditions combined within the rule?
When it comes to subconditions, Shopware checks the parent condition and only then proceeds to subconditions. If two conditions are combined, the system checks both simultaneously. Depending on the link (OR, AND), either one of the conditions or all of them should be met.
How to assign rules to particular places of Shopware?
You need to select the rule in the corresponding configuration section of a place where you want to apply your rule. For instance, the promotion configuration screen contains a Conditions tab where you can assign rule-based conditions.
Shopware 6 Essentials FAQ
How to create a Shopware account?
Go to the registration page to create a Shopware account and click the Register Now link. Next, you need to fill in the form and receive a confirmation email. Follow the instructions provided in it.
What about a Shopware ID?
There is no need to worry about a Shopware ID. It is provided during the registration automatically.
How to deal with Shopware master data and what is it?
Shopware 6 master data is all the data about your company that you provide to the system. It usually contains such company details as physical addresses, phone numbers, emails, etc.
How to add a new Shopware shop?
You can add a new shop in Shopware 6 in your merchant area. Click the corresponding link, choose the type of your new shop (a cloud storefront or an on-premise installation), and provide the information required by the system.
How to add a payment method to your Shopware account?
In Shopware 6, not only the checkout page contains payment methods. You also need to add payment methods for internal purposes. You can do that under Basic Information -> Accounting. There, it is necessary to specify PayPal, credit card, or direct debit as a preferred way to pay for extensions and themes.
How to create a deposit in Shopware?
With an active payment method, you can purchase extensions and themes for your Shopware 6 website. Create a deposit under Merchant Area -> Shops. Choose a shop to provide funds to and click Open Account Details. Note that the deposit should be equal to the amount of your future purchase.
How to purchase Shopware extensions?
There are two ways to purchase extensions: Shopware Marketplace or Plugin Manager. In both cases, you need to create a deposit, choose a tool you want to buy, and complete the checkout.
How to get support in Shopware?
Write to info@shopware.com and call +49 2555 9288 50 regarding account or license issues. Try the following email and phone number – financial.services@shopware.com and +49 2555 9288 510 if you have questions regarding accounting and financial services.
How to automate import and export processes in Shopware 6?
You need a third-party tool to automate import and export processes in Shopware 6. We recommend using the Improved Import & Export extension for Shopware 6 to maintain recurring data transfers without interaction on the admin side. The Module provides the ability to create schedules to simplify regular data updates. As a result, you launch the corresponding import and export processes according to the specified time frames.
How to migrate to Shopware 6?
The Improved Import & Export module also lets you migrate to Shopware 6 from your existing e-commerce website. You can move from other e-commerce platforms or Shopware’s previous versions. Create schedules of updates and mapping schemes and connect your new website to other e-commerce systems. Note that we also offer export solutions for such platforms as Magento and Shopify. Contact us for more information.
How to integrate Shopware 6 with external systems?
With the Improved Import & Export extension, you can also connect your Shopware 6 website to ERPs, CRMs, accounting tools, and other similar platforms. Automate repetitive import and export processes and modify data with the help of mapping presets. The plugin lets you follow the requirements of your Shopware store during import and the rules of the connected platform during export. No interaction on the admin side is necessary after the tool is properly configured.
Related posts
 Shopware 6 Advanced Pricing Guide + Import Tutorial
 How To Bulk Import Products In Shopify: CSV Description & Step-By-Step Guide
 A Complete Guide to Shopify Customer Import
 CopyAI Review 2023
 Amasty ChatGPT AI Content Generator for Magento 2
 How to Import Customers & Customer Addresses to Magento 2
 Magento Open Source and Adobe Commerce 2.4.7 Release Notes
 Reputon Amazon Importer Review: How to Connect Shopify to Amazon in a Few Clicks