
Exploring Shopware: Snippet Settings in Shopware 6
![]()
If you want to reach customers abroad, you need to add more languages to your storefront. Shopware 6 lets you do that with the help of snippets. The system relies on them for translating and customizing texts displayed on your website. In the article below, you will find Shopware 6 snippets and snippet sets explained. The following article sheds light on the corresponding screen in your Shopware 6 admin. You will learn what Shopware 6 snippets are and how to manage them. The article explores how to create new snippets in Shopware 6 as well as apply several management tricks to simplify your daily routine associated with multiple languages.

Note that we provide Shopware integration with external platforms. Contact our support for further information or try our Improved Import & Export Extension for Shopware.
Table of contents
- 1 Snippet Settings in Shopware 6 Admin
- 2 Editing Snippets in Shopware 6
- 3 Creating a new snippet
- 4 Adding links
- 5 How to import snippet sets to Shopware 6
- 6 Shopware 6 Snippet Sets FAQ
- 7 Shopware 6 Essentials FAQ
- 7.1 How to create a Shopware account?
- 7.2 What about a Shopware ID?
- 7.3 How to deal with Shopware master data and what is it?
- 7.4 How to add a new Shopware shop?
- 7.5 How to add a payment method to your Shopware account?
- 7.6 How to create a deposit in Shopware?
- 7.7 How to purchase Shopware extensions?
- 7.8 How to get support in Shopware?
- 7.9 How to automate import and export processes in Shopware 6?
- 7.10 How to migrate to Shopware 6?
- 7.11 How to integrate Shopware 6 with external systems?
Snippet Settings in Shopware 6 Admin
You can find the Snippet settings page in the Shopware 6 administration as follows:
- Go to your Shopware 6 administration;
- Open its main menu;
- Proceed to the Settings section;
- Open the Shop subsection;
- Hit the Snippets icon.

Now, when you know where snippets are hidden in the Shopware 6 backend, let’s explain their purpose. The e-commerce system relies on snippets to translate and customize texts displayed on the storefront.
The overview section looks as follows:
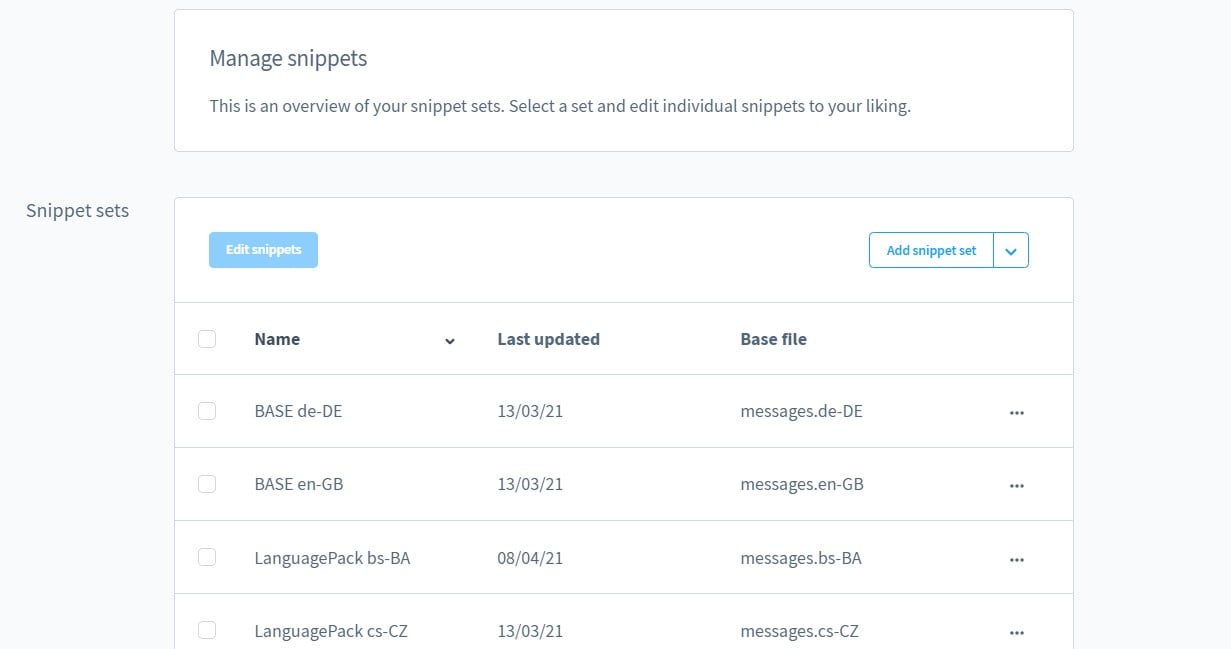
As you can see, all snippets are combined within sets. By default, you get the following two snippet sets in Shopware 6: BASE de_DE and BASE en_GB. As you’ve probably guessed already, they include the translations for German and English storefronts. Each set uses the respective base file: messages.de_DE and messages.en_GB. Shopware 6 uses them to store the standard values of the snippet sets. As a result, it is possible to reset the snippets at any moment. Also, it is not recommended to apply changes to these files. Otherwise, you won’t be able to reset the snippets to a basic value.
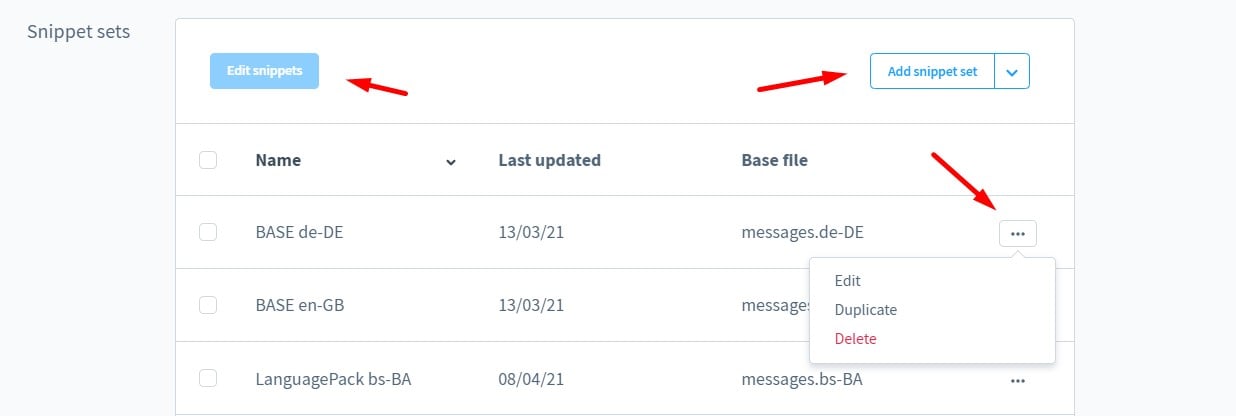
As usual, you can use the context menu to edit, duplicate, or delete snippet sets. As for the Edit snippets button, it lets you apply changes to the previously selected sets.
Editing Snippets in Shopware 6
Shopware 6 lets you edit a snippet by clicking on the respective set. Note that it is possible to edit a snippet in several sets. For that, you need to select them with the help of the respective checkboxes. Next, click the Edit snippets button. You will see the following screen:

The grid contains all the snippets stored in the database table snippets for the selected sets. You can see snippet names and translations per set. The context menu lets you edit snippets or reset them to the default values stored in the base file.
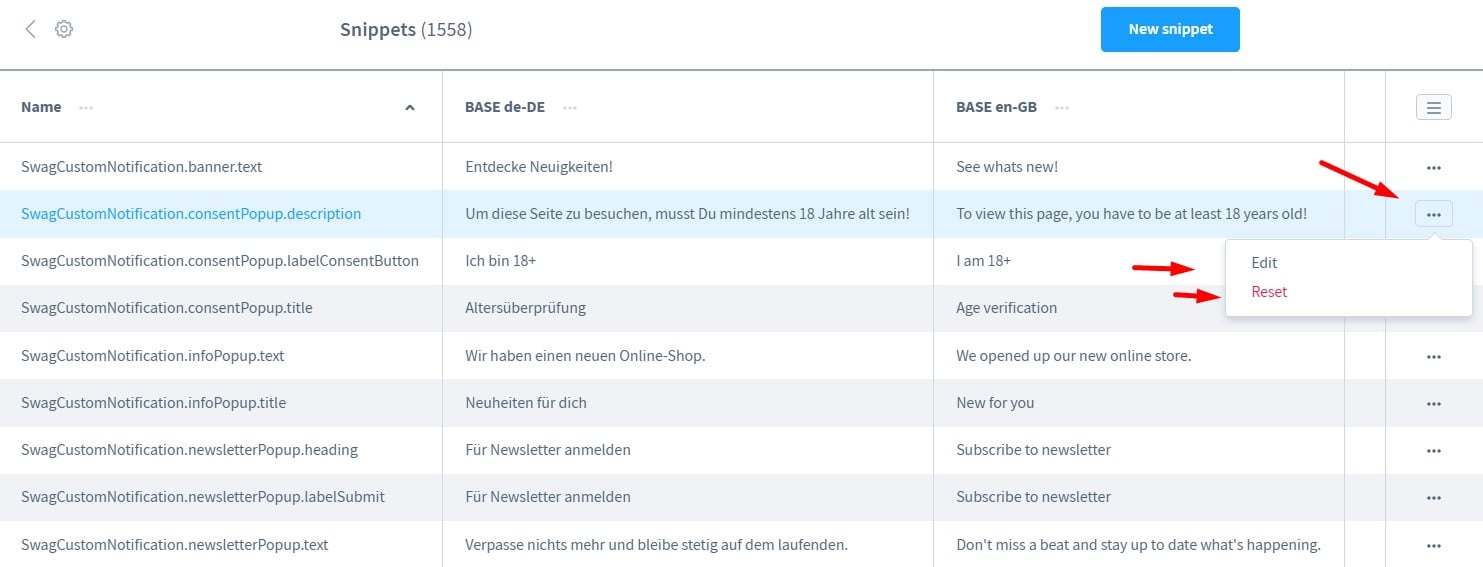
So, hit the edit option of the context menu. Shopware displays the variable name and translations. Now, you can edit snippet translations.
Creating a new snippet
It is possible to create a new snippet within a snippet set. Note that each new value is created globally. Switch to a snippet set via its context menu or by clicking on its name.
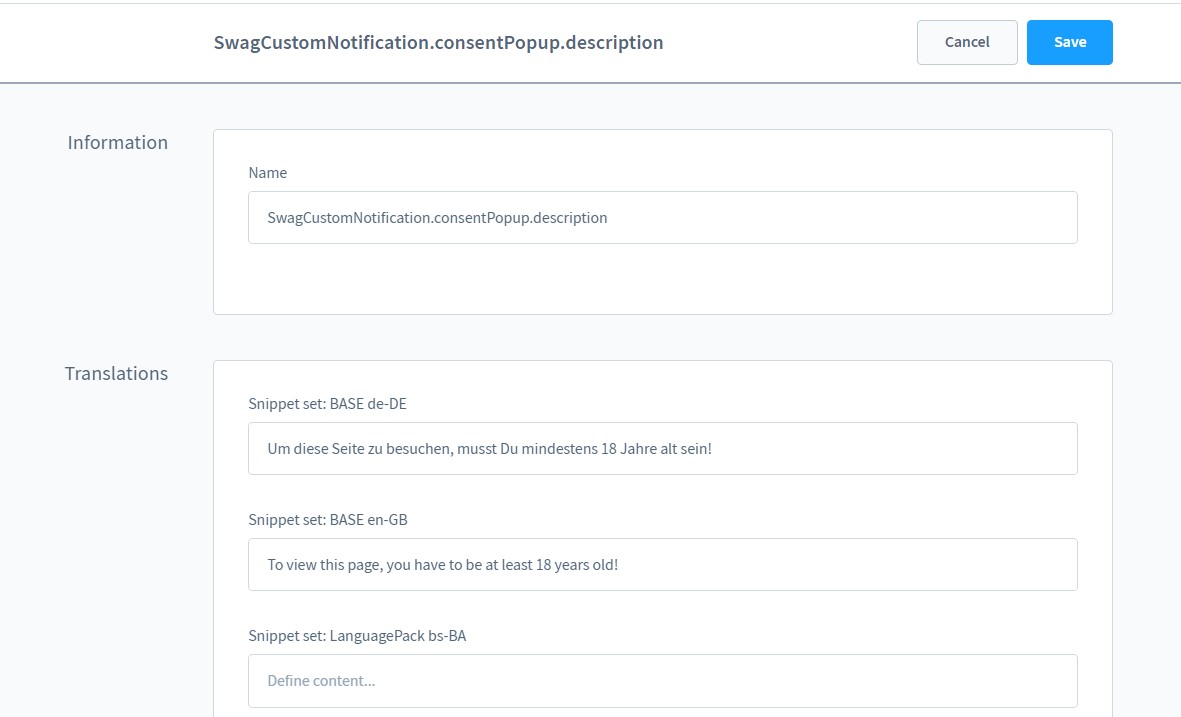
Click the New Snippet button to create a new snippet.
The system transfers you to a new screen where you can specify the name of your new snippet – do not use spaces or special characters. After that, provide translations and save your new snippet.
Creating a new snippet set
To use snippets in a sales channel that differs from the standard, you need to create a custom snippet set. Thus, you also keep the standard set unchanged.
Hit the Add snippet set button to create a new collection of snippets. Shopware 6 lets you use a new base file as a background of your new set. Alternatively, it is possible to duplicate an already existing set.

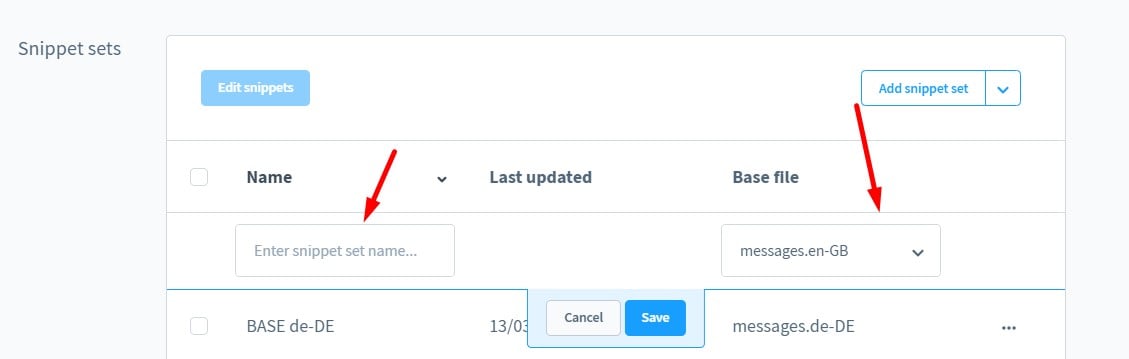
Add
After you hit the Add snippet set button, Shopware 6 opens a form where you have to provide the relevant information: the name of your new set and its base file.
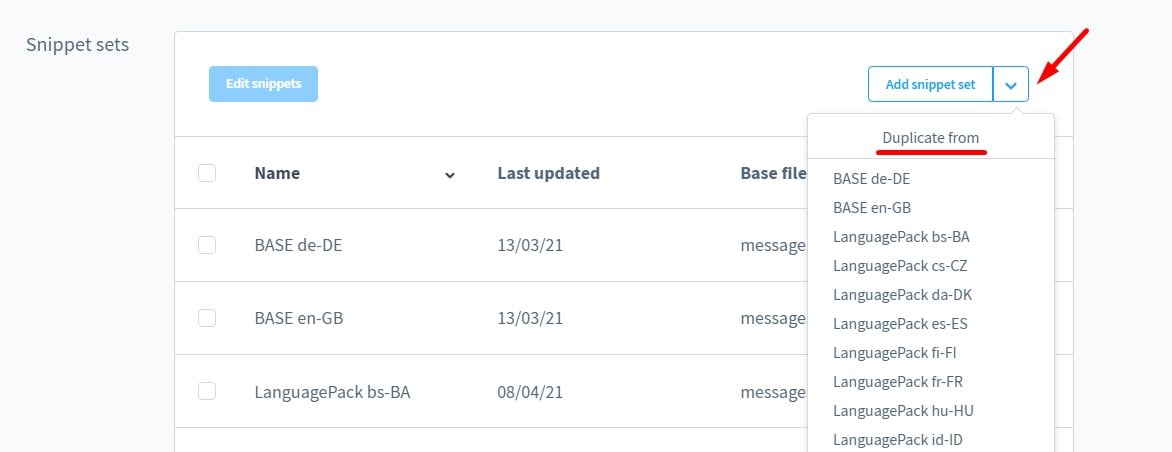
Duplicate
When duplicating a snippet set, you can choose from the existing sets. Shopware 6 generates a duplicate with the same name as the parent set but adding “copy” to its name. To change the new set name, proceed to the overview and edit the default title by double-clicking on the line of the snippet set.
Adding links
If you want to add a link to a text area, use the default HTML rules. In Shopware 6, you can use the a href attribute, like on many platforms:
<a href=”URL”>link text</a>
As a result, your built-in link may look as follows:
<a href=”https://firebearstudio.com/blog/exploring-shopware-getting-started-with-the-platform.html”>Exploring Shopware: Getting Started With The Platform</a>
How to import snippet sets to Shopware 6
Importing snippets and snippet sets to Shopware 6 may dramatically improve your migration to the platform. Instead of recreating every language manually, you may provide the necessary files as described above. However, there may be a necessity to transfer numerous other entities to your Shopware 6 website. It is where our team comes in handy. We can help you simplify and automate these processes. Contact our support for more details and try our . You can use it to import any entity to Shopware 6. The extension provides the ability to create a schedule of updates to transfer data to and from your website on a regular basis. At the same time, you can automatically apply changes to it via presets. Contact us for more information.
Shopware 6 Snippet Sets FAQ
How to find snippet sets in Shopware 6?
The Shopware 6 Shipping settings are situated under Settings -> Shop -> Snippets.
How to edit snippet sets in Shopware 6?
Go to Settings -> Shop -> Snippets and use the context menu to edit your snippet sets.
How to delete snippet sets in Shopware 6?
Go to Settings -> Shop -> Snippets and use the context menu to delete your snippet sets. Don’t delete the default sets since you won’t be able to restore the initial settings.
How to edit snippets in Shopware 6?
You can edit snippets in Shopware 6 within a snippet set. Go to Settings -> Shop -> Snippets, select snippet sets, and hit the Edit snippet button. Choose a snippet you want to edit, open its context menu, and choose the editing option. Apply changes.
How to delete snippets in Shopware 6?
Shopware 6 doesn’t let you delete snippets. You can only remove snippet sets.
Shopware 6 Essentials FAQ
How to create a Shopware account?
You can create a Shopware account in a few clicks. Firstly, you need to visit the registration page and click the Register Now link. After that, fill in the form and get a confirmation email. Follow the instructions provided in it.
What about a Shopware ID?
Your Shopware ID is provided automatically during the registration.
How to deal with Shopware master data and what is it?
Shopware 6 master data is all the information about your company. You specify it during the account creation. Master data usually contains such company details as physical addresses, phone numbers, emails, etc.
How to add a new Shopware shop?
Go to your merchant area to add a new shop in Shopware 6. Click the corresponding link on the start screen’s right part and specify the type of your new shop. It could be a cloud storefront or an on-premise installation. Next, provide the information about your website.
How to add a payment method to your Shopware account?
In Shopware 6, payment methods can be divided into two groups. First of all, it is a group of methods available on the checkout page. Secondly, you deal with payment methods used for internal purposes. The latter ones are available under Basic Information -> Accounting. Here, you can specify PayPal, credit card, or direct debit as a preferred way to pay for extensions and themes.
How to create a deposit in Shopware?
With an active payment method, you can create a deposit to purchase extensions and themes for your Shopware 6 website. Go to Merchant Area -> Shops and select a shop to provide funds to. Now, click Open Account Details and add a deposit that covers the amount of your future purchase.
How to purchase Shopware extensions?
You can purchase extensions on the Shopware Marketplace or in the Plugin Manager. In both cases, it is necessary to create a deposit, choose a tool you want to buy, and complete the checkout.
How to get support in Shopware?
Try the following email and phone number – financial.services@shopware.com and +49 2555 9288 510 if you have questions regarding accounting and financial services. Write to info@shopware.com and call +49 2555 9288 50 regarding account or license issues.
How to automate import and export processes in Shopware 6?
With the Improved Import & Export extension installed on your Shopware 6 website, you can automate recurring data transfers. The module provides the ability to create a schedule of updates to simplify regular import and export processes. You can launch the corresponding data transfers according to the specified time frames. No interaction on the admin side is necessary.
How to migrate to Shopware 6?
The Improved Import & Export module also lets you migrate to Shopware 6. No matter whether you move from another e-commerce system or Shopware’s previous versions. The extension lets you run all data transfers in the most efficient manner. You can create schedules and mapping schemes and connect your new website to other e-commerce stores. Note that we offer export solutions for such platforms as Magento and Shopify to simplify migration from them. Contact us for more information.
How to integrate Shopware 6 with external systems?
ERPs, CRMs, accounting tools, and other similar platforms are among the systems that you can connect to your e-commerce website with the help of the Improved Import & Export extension. As we’ve already mentioned, the module automates repetitive import and export processes and modifies data with the help of mapping presets. Furthermore, the plugin lets you follow the requirements of your Shopware store during import and the rules of the connected platform during export due to mapping presets.
Related posts
 How To Bulk Import Products In Shopify: CSV Description & Step-By-Step Guide
 A Complete Guide to Shopify Customer Import
 How to Import Customers & Customer Addresses to Magento 2
 Adobe Journey Optimizer: Unlock True, Real-Time Personalization
- How to generate order increment IDs automatically during Magento 2 import
 Amasty ChatGPT AI Content Generator for Magento 2
 Adobe Real-Time CDP: Unleashing the Power of Customer Data in Real Time
- How to update products that are not listed in a product table during Magento 2 import