
A Complete Guide to Shopify Customer Import

Transferring customer data is a critical step for any e-commerce business looking to migrate to Shopify, update existing customer profiles, or sync data across multiple sales channels. The ability to import customers to Shopify efficiently ensures a smooth transition without losing essential customer details, purchase history, or segmentation.
Although Shopify provides a built-in import tool that allows merchants to upload customer data via a CSV file, it has several limitations. For instance, the default importer lacks automation, does not support direct CRM or ERP integration, and cannot import customer passwords or purchase history. These restrictions often make it challenging for businesses dealing with large-scale migrations or frequent data updates.
This guide will walk you through the Shopify import of customers, explore the default Shopify customer import method, and introduce a more advanced alternative for merchants needing additional features and automation. But before going any further, let’s see why you may need to import customer data to your Shopify admin.

Table of contents
- Why Import Customers to Shopify? Key Scenarios for Data Migration
- Limitations of Shopify’s Default Customer Import Process
- Advantages of the Import & Export Tool for Shopify Over the Standard Customer Import
- Shopify Customer Import Prerequisites
- How to Import Customers into Shopify
- Final Thoughts on Shopify Customer Import
- Shopify Import Customers FAQ
Why Import Customers to Shopify? Key Scenarios for Data Migration
Managing customer data effectively is essential for any growing e-commerce business. Whether you’re switching platforms, updating customer details in bulk, or syncing data across multiple channels, the ability to import customers to Shopify ensures a seamless transition without losing valuable customer relationships. There are several key scenarios where businesses need to perform a Shopify import of customers, each requiring a structured approach to ensure data integrity and accuracy.
Migrating from Another E-Commerce Platform
Businesses moving from platforms like WooCommerce, Magento, or BigCommerce often need to transfer their entire customer database to Shopify. This process involves exporting customer data from the previous platform, formatting it to match Shopify’s requirements, and then importing it using a customer CSV template. Properly migrating customer profiles — including email addresses, phone numbers, and order history — ensures a smooth onboarding experience for returning customers.
Bulk Editing and Updating Customer Information
As businesses grow, customer data must be regularly updated to reflect changes in contact details, subscription preferences, or loyalty program status. Instead of manually editing each profile, merchants can export, edit, and import customers to Shopify with an updated CSV file, allowing bulk modifications in one streamlined action. This is particularly useful when restructuring customer segments, merging duplicate accounts, or adding new attributes such as VIP status, account tags, or discount eligibility.
CRM and ERP Integration
For businesses using external CRM or ERP systems, keeping Shopify’s customer database in sync is crucial. Importing customers enables merchants to align their Shopify store with CRM data, ensuring that sales teams, marketing platforms, and support teams have access to the latest customer information. Whether pulling customer data from HubSpot, Salesforce, or a custom ERP, the ability to import customers to Shopify keeps records consistent and up to date.
Multichannel Sales and Customer Data Sync
Omnichannel retailers selling across multiple platforms — such as Shopify, Amazon, eBay, and brick-and-mortar stores — must maintain a unified customer database. Importing customers allows for seamless data synchronization between different sales channels, ensuring that purchase history, contact information, and engagement details are consistent across all touchpoints. This is essential for businesses offering loyalty programs, personalized marketing campaigns, or cross-platform customer support.
Whether migrating from another platform, performing bulk updates, or integrating Shopify with external systems, the ability to import customers into Shopify ensures a smooth and organized data flow. However, the default import process is not as smooth as you may expect.
Limitations of Shopify’s Default Customer Import Process
While Shopify provides a built-in method to import customers into Shopify via the Customers screen, this approach comes with several limitations that can create challenges for merchants handling complex customer data migrations. The default procedure is sufficient for simple imports but lacks flexibility in key areas, particularly when dealing with large datasets, customer passwords, or multi-channel data synchronization.
No Password Import for Customer Accounts
One of the biggest limitations is that Shopify does not allow merchants to import customer passwords due to security reasons. When transferring customers from another e-commerce platform, users will need to manually reset their passwords or be prompted to create new ones. This can lead to a poor customer experience, as shoppers may be confused or frustrated by the need to reset their credentials.
No Support for Importing Customer Purchase History
Shopify’s default import process does not allow merchants to transfer order history along with customer data. This means that previous purchases, loyalty points, and account-specific order details from other platforms do not carry over during import. Merchants who want to preserve customer shopping history need additional solutions, such as third-party apps or custom API-based imports.
Inability to Handle Multi-Contact Customers
For businesses that store multiple phone numbers or email addresses for a single customer, Shopify’s import process falls short. The system does not support multiple contact details per customer entry, forcing merchants to choose only one primary email and phone number per record. This limitation is especially frustrating for B2B businesses or accounts with multiple contacts under the same customer profile.
Lack of Custom Field Support
Shopify’s default customer CSV import only supports a predefined set of fields, meaning custom attributes — such as account-specific tags, internal notes, or subscription preferences — cannot be imported unless they fit within Shopify’s existing structure. Merchants who rely on additional customer metadata often need to use Shopify apps or custom development solutions to extend import functionality.
Slow Processing for Large Datasets
When importing thousands of customer records, the default Shopify import tool can take time to process data, especially when dealing with large CSV files. Shopify queues large imports, meaning merchants may experience delays before their customer database is fully updated. There is also a risk of timeouts or partial imports, requiring additional troubleshooting.
No Built-In Error Handling or Validation Assistance
If a CSV file contains errors — such as missing required fields, improperly formatted data, or duplicate emails — Shopify provides minimal feedback on what went wrong. Instead of offering detailed validation tools, merchants must manually review and correct CSV files before attempting another import, leading to unnecessary trial-and-error.
While Shopify’s default customer import process is straightforward for simple use cases, it lacks advanced functionality for businesses that need seamless customer migration, real-time data synchronization, or bulk updates. Merchants dealing with large-scale imports or complex customer records often turn to third-party solutions. Such as the Import & Export Tool for Shopify.
Advantages of the Import & Export Tool for Shopify Over the Standard Customer Import
The Import & Export Tool for Shopify addresses many of Shopify’s default limitations by offering enhanced automation, error handling, and customization features, making it a superior solution for merchants handling complex customer data.
Automated Imports with Scheduled Tasks
Unlike Shopify’s manual import process, which requires merchants to upload CSV files each time, the Import & Export Tool supports automated, scheduled imports. This feature is crucial for businesses that regularly sync customer data from CRMs, ERPs, or external marketplaces, ensuring that Shopify’s customer database stays up to date without manual intervention.
Flexible Data Mapping for Seamless Integration
Shopify’s default import process only recognizes a fixed set of predefined fields, limiting the ability to restructure data from external sources. The Import & Export Tool provides a flexible mapping system, allowing merchants to align CSV fields from any source to Shopify’s required structure. This is particularly useful when migrating customer data from platforms like Magento, WooCommerce, or Salesforce, where field names and formats may differ.
Extended Support for Multiple File Formats and Sources
Shopify’s standard import process only accepts CSV files, restricting merchants who need to pull customer data from other formats. The Import & Export Tool extends compatibility by supporting multiple file types, including XML, XLSX, JSON, and Google Sheets, and allows direct imports from FTP, SFTP, Google Drive, etc. This eliminates the need for time-consuming file conversions, streamlining the data transfer process.
Additional CSV Fields for Enhanced Customer Profiles
The Import & Export Tool expands beyond Shopify’s default CSV limitations by supporting additional customer data fields, including custom tags, metadata, and unique identifiers. Merchants can import extra customer attributes, such as email and sms marketing consent and internal customer notes, ensuring a richer and more detailed customer database.
Error Handling with Detailed Logs
One of the major drawbacks of Shopify’s built-in import tool is its lack of detailed error feedback. When an import fails, merchants must manually troubleshoot without clear insights into what went wrong. The Import & Export Tool includes a comprehensive error log, which identifies specific issues, such as missing required fields, incorrect data formatting, or duplicate records, making it easier to resolve problems quickly and efficiently.
Bulk Updates Without Duplicating Customers
Shopify’s default import process struggles with updating existing customers, often creating duplicates instead of modifying existing records. The Import & Export Tool allows merchants to safely update customer profiles in bulk without generating duplicate accounts, ensuring a clean and organized database.
While the Import & Export Tool for Shopify does not solve every limitation of Shopify’s default customer import — such as password migration — it significantly enhances the process by providing automation, flexible data mapping, multi-format support, expanded fields, and better error handling. These features make it an essential tool for businesses managing large-scale imports, multi-channel customer data, or frequent updates.
Now that you are familiar with all these nuances of the Shopify customer import, let’s get started with the prerequisites.
Shopify Customer Import Prerequisites
To ensure a smooth Shopify import customers process, it’s essential to use a properly formatted CSV file. Below, you’ll find everything you need to get started, including a sample customer CSV template and a breakdown of its column headers. Instead of just providing a download link, we also explain the purpose of each field, helping you structure your data correctly before importing it into Shopify.
Shopify Import: Customers Template
You can access and review a Shopify customer CSV template in our Google Sheets file: . This template serves as a reference for creating your own customer list, ensuring that all required fields are correctly formatted for Shopify’s import system.

The template includes two example customer profiles:
- John Doe — a customer with an email address and a shipping address.
- Jane Doe — a customer with an email address and a phone number.
Each column in the template corresponds to a specific customer data field that Shopify recognizes. Below, we’ll go through the details of each column and highlight key nuances of the Shopify import customers process to help you avoid common formatting errors.
Shopify Import: Customer CSV Field Refference
Below, you can see a full description of the Shopify customer import template:
| Column | Description | Additional Comments | Example |
| Customer ID | A unique identifier assigned to a customer. | 7376666230965 | |
| First Name | The customer’s first name. | Jane | |
| Last Name | The customer’s last name. | Doe | |
| The customer’s email address. | This column is required, but the value can be blank. | jane.doe@shopify.com | |
| Default Address Company | The name of the company associated with the customer’s default address. | 123 Fake Street | |
| Default Address Address1 | The first line of the customer’s default address. | 123 Fake Street | |
| Default Address Address2 | The second line of the customer’s default address. | 123 Fake Street | |
| Default Address City | The city of the customer’s default address. | Ottawa | |
| Default Address Province Code | The province or state of the customer’s default address. | ISO code. | ON |
| Default Address Country Code | The country of the customer’s default address. | ISO code. | CA |
| Default Address Zip | The postal or zip code of the customer’s default address. | a1b2c3 | |
| Default Address Phone | The phone number of the customer’s default address. | +1 (613) 333-3333 | |
| Phone | The customer’s phone number. | +1 (613) 555-5555 | |
| Accepts Email Marketing | Sets whether or not the customer agrees to subscribe to email marketing, such as a newsletter. | Valid entries are yes or no. | no |
| Accepts SMS Marketing | Sets whether or not the customer agrees to subscribe to SMS marketing, such as discount offers. | Valid entries are yes or no. | yes |
| Tags | A comma-separated list of tags used to tag the customer. | Tags are not case-sensitive. You create a customer segment based on tags. | tag1,tag2,tag3 |
| Note | Additional information about the customer. | Very nice customer. | |
| Tax Exempt | Indicates whether the customer is tax-exempt. | Valid entries are yes or no. | yes |
| Total Spent | The customer’s total amount spent. | This column isn’t imported with customer details. | 300 |
| Total Orders | The customer’s total number of orders. | This column isn’t imported with customer details. | 2 |
Key Considerations for Shopify Customer Import
When preparing your Shopify import customers CSV file, it’s essential to follow Shopify’s formatting rules and data structure requirements. Failing to meet these standards can lead to import errors, skipped records, or incomplete customer profiles. Below are the key considerations to keep in mind when working with a Shopify customer import CSV.
Your CSV file must be encoded in UTF-8 format to ensure compatibility with Shopify’s import system. The first row of your CSV file should include column headers, as shown in the sample template. While these headers are not case-sensitive, they must be correctly formatted to avoid errors.
The Email column is required in the CSV file. Even if the email field is left blank for certain customers, the column itself must be present. If omitted, Shopify will return an error, preventing you from proceeding with the import.
When importing customers with an existing email address or phone number, Shopify overwrites all stored customer data in the admin panel with the information from the CSV file. This means that any existing details not included in the CSV will be lost during the import.
If a CSV file contains duplicate email addresses or phone numbers, Shopify skips all but the last occurrence of each duplicate during the import. To ensure all customer profiles are imported, remove duplicates from the CSV before uploading. If necessary, you can later manually merge customer profiles or add missing contact details within the Shopify admin.
Shopify allows merchants to export the Total Spent and Total Orders columns, but these fields cannot be imported back into the system. Shopify automatically tracks customer order history and spending based on transactions made within the store.
There is a 15 MB file size limit for customer CSV imports. If your customer list exceeds this limit, you’ll need to split it into multiple CSV files and import them separately.
Customer passwords cannot be imported due to security restrictions. After completing a Shopify import customers process, merchants must invite customers to reset their passwords and create new login credentials.
Shopify supports the import of custom metafields, allowing businesses to include additional customer attributes beyond Shopify’s default fields. To import metafields, you must first create them in the Shopify admin. Then, add corresponding columns to your CSV file, following the customer.metafields.namespace.key format. For example, to import a customer’s birth date, use the column title: customer.metafields.facts.birth_date.
The following metafield types can be imported and exported:
- Boolean (boolean)
- Date (date)
- Date and time (date_time)
- Integer (number_integer)
- Decimal (number_decimal)
- Single line text (single_line_text_field)
It’s important to note that order information cannot be imported via a Shopify customer import CSV. If order history needs to be migrated, a separate order import process must be used.
By understanding these key aspects, you can ensure a smooth import of customers to Shopify while avoiding common pitfalls and data inconsistencies.
How to Import Customers into Shopify
When importing customer data into Shopify, you have two main options: Shopify’s built-in default import method and a more advanced approach using a dedicated Import & Export Tool. Below, we’ll explore both methods, outlining their features, limitations, and key differences.
Shopify’s Default Customer Import Process
Shopify provides a built-in CSV import feature that allows merchants to add or update customer records manually. Follow these steps to complete a Shopify import of customers using the standard method:
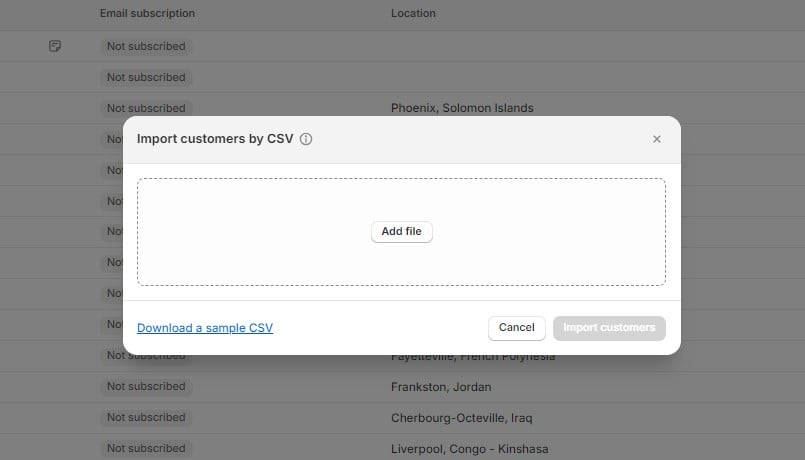
- Navigate to Admin > Customers and click Import.

- Click Add file and upload your Shopify customer import CSV.
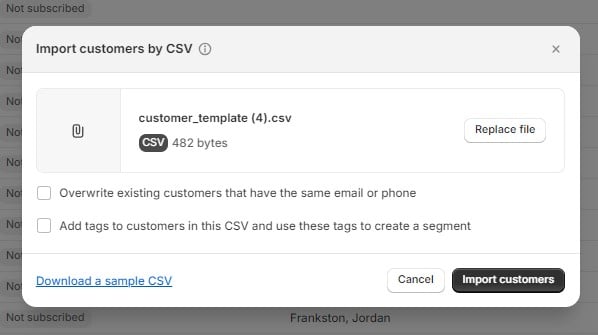
- Select Overwrite existing customers that have the same email or phone number if you need to update existing customer profiles.
- Check Add tags to customers in this CSV and use these tags to create a segment if you want to categorize customers from your import file.
- Click Import customers to finalize the process.
Once completed, Shopify will add new customers or update existing profiles based on email addresses or phone numbers. While this process is straightforward, it comes with several limitations.
Despite its simplicity, Shopify’s standard import process has significant drawbacks:
- No automation – Every import must be performed manually, making it impractical for frequent data updates.
- CSV-only format – Shopify restricts customer imports to CSV files, offering no support for Excel spreadsheets, Google Sheets, or other formats.
- No integration with third-party systems – Merchants cannot directly import customer data from CRM platforms, ERPs, or external databases.
Luckily, there is a tool that lets you fix these and multiple other issues associated with the standard Shopify import of customers.
Shopify Customer Import with Import & Export Tool
Here’s how to import customers into Shopify using the Firebear Import & Export Tool:
1️⃣ Access the Import Profile
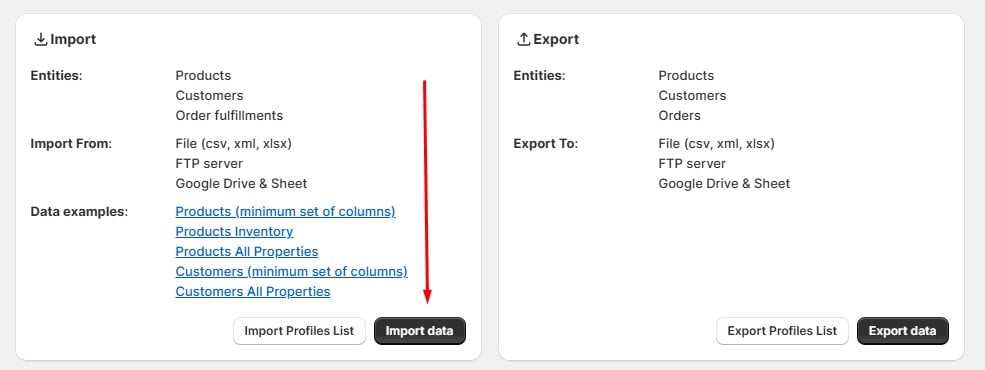
- Go to Apps > Firebear Import & Export Tool.
- Click Import and select Import Data.
2️⃣ Choose Customer as the Import Entity
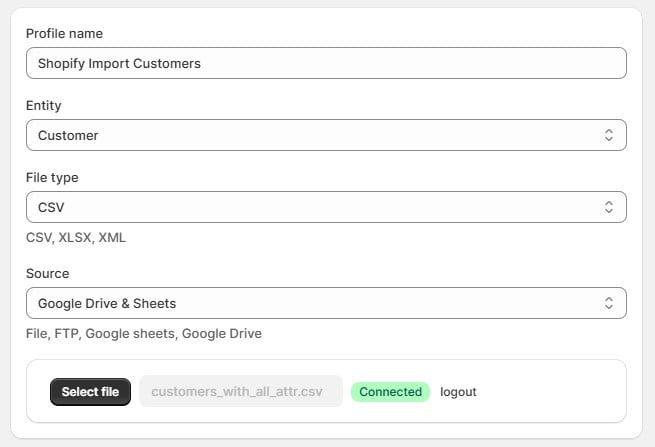
- Name your profile.
- Select Customer as the import entity.
- Upload the data file in CSV, XLSX, JSON, or Google Sheets format.
- Connect an external source if needed (Google Drive, FTP).
3️⃣ Automate the Customer Import Process
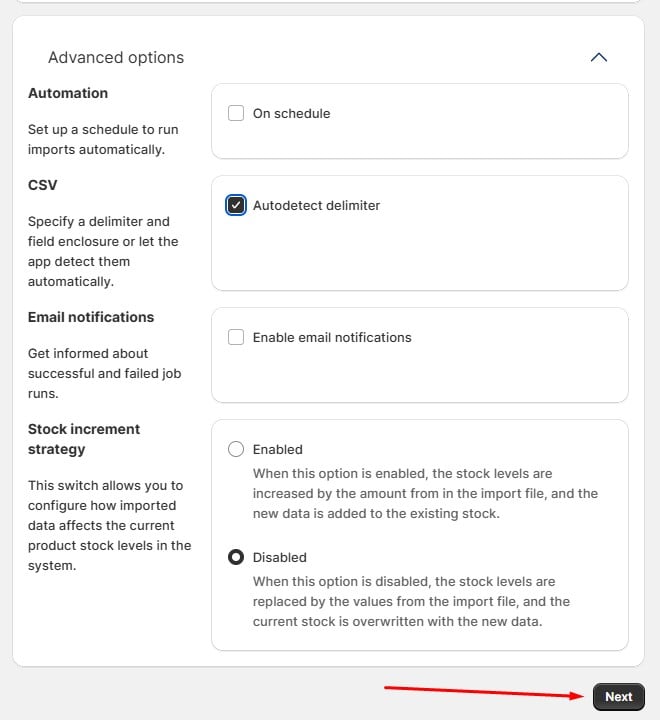
- Schedule imports to update customer data in Shopify automatically.
- Configure notifications for successful imports or errors.
4️⃣ Map Columns for Accurate Data Matching
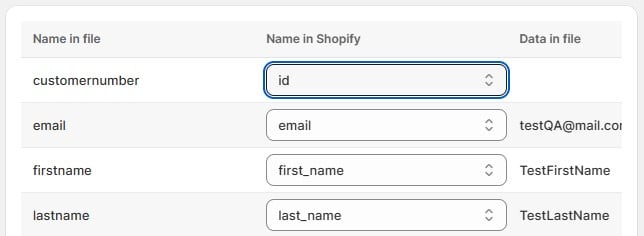
- Ensure that any third-party fields match Shopify’s structure, such as customernumber to id above.
- Use the built-in mapping tools to correct inconsistencies.
5️⃣ Run the Import & Verify Customer Data
- Click Import and let the tool process the data.
- Go to Customers in your Shopify admin to check the updates.
For more details, check out our user manual to learn about the required columns and file format.
Final Thoughts on Shopify Customer Import
Successfully managing customer data is a crucial part of running an efficient Shopify store, whether you’re migrating from another platform, updating customer details in bulk, or synchronizing data across multiple systems. While Shopify provides a default customer import tool, its limitations can create challenges for merchants handling large-scale data transfers.
For businesses that require more flexibility, efficiency, and control over their customer data, the offers a powerful alternative. With features like automated imports, flexible data mapping, multi-format file support, and real-time error handling, this tool eliminates manual work and ensures a smooth, error-free customer import process. Contact us now for more information.
Choosing the right import method depends on the complexity of your data and how frequently updates are needed. If you’re handling a one-time migration, Shopify’s built-in import tool may be sufficient. However, for businesses that need ongoing data synchronization, bulk updates, or integration with external systems, investing in an advanced import solution can save time, reduce errors, and improve overall data management.
No matter which method you choose, ensuring accurate, well-structured customer data is key to providing a seamless shopping experience for your customers. A properly imported and maintained customer database allows you to segment your audience effectively, enhance marketing efforts, and personalize customer interactions — ultimately contributing to higher engagement and increased sales.
Shopify Import Customers FAQ
What is customer import?
Customer import is the process of transferring customer data—such as names, email addresses, phone numbers, and addresses—into an e-commerce platform like Shopify. This can be done manually using a CSV file or through an automated tool that syncs data from external sources like CRMs or ERPs.
How to import Shopify customers?
To import customers to Shopify, go to Admin → Customers, click Import, upload a CSV file, and select whether to overwrite existing customer data. Shopify will then process the file and add or update customer profiles based on email addresses or phone numbers. For more advanced features like automation, custom field mapping, and external integrations, merchants can use an Import & Export Tool.
What file format is required for Shopify customer import?
Shopify requires customer data to be imported using a CSV (Comma-Separated Values) file encoded in UTF-8 format. While Shopify’s default import tool only supports CSV files, third-party import tools allow the use of additional formats such as XLSX, JSON, and Google Sheets.
Can I import customer passwords into Shopify?
No, Shopify does not allow the import of customer passwords due to security and privacy policies. After importing customer data, merchants must send account activation emails to customers, prompting them to set new passwords for their Shopify accounts.
How do I update existing customers without creating duplicates?
When importing customers with the same email address or phone number, Shopify overwrites existing data with the new information from the CSV file. However, Shopify does not allow partial updates, meaning any missing fields in the import file will be erased in the system. Advanced import tools provide better update mechanisms, allowing selective updates without data loss.
Can I import customer order history into Shopify?
No, Shopify’s default customer import does not support importing past orders or purchase history. If you need to migrate historical orders along with customers, you’ll need to use a separate order import tool or a third-party migration service that can transfer both customer and order data.
What happens if my customer CSV contains duplicates?
If a CSV file contains duplicate email addresses or phone numbers, Shopify will only keep the last occurrence of each duplicate entry. To ensure all customer profiles are imported, merchants should remove duplicate records before uploading or manually merge customer profiles in the Shopify admin after the import.
Can I import customers to Shopify from another e-commerce platform?
Yes, customers can be imported to Shopify from platforms like WooCommerce, Magento, BigCommerce, and PrestaShop by exporting the customer database from the original platform, formatting it to Shopify’s CSV structure, and then uploading it. Using an Import & Export Tool simplifies this process by handling file conversion and field mapping automatically.
Is there a size limit for customer import files?
Yes, Shopify has a 15 MB file size limit for customer CSV imports. If your file exceeds this limit, you must split it into multiple smaller CSV files and import them separately. Third-party import tools allow larger file sizes and support direct imports from cloud storage and FTP/SFTP servers.
Can I import custom customer fields into Shopify?
Yes, but only if the fields exist as metafields in Shopify. To import custom fields, merchants must first create metafields in the Shopify admin and then add corresponding columns in the CSV file using the format customer.metafields.namespace.key. Shopify’s default import tool has limited support for custom fields, but advanced import tools allow more flexibility with custom attributes.
Related posts
 How to Import Orders into Shopify: Best Tools and Methods in 2025
 How to Merge Customers in Shopify: A Step-by-Step Guide
 Magento to Shopify Migration – The Ultimate Guide
 How to Block Customers on Shopify: A Complete Guide to Protect Your Store
 How to Email Customers on Shopify: A Step-by-Step Guide for 2025
 Shopify NetSuite Integration Guide: Automated Data Sync Made Easy
 Magento to Shopify Product Migration: CSV Field Reference & Step-by-step Guide
 How to Import Reviews from AliExpress to Shopify: Best Tools, Step-by-Step Guide & Management Typs