Shopify Gift Cards Explained: How to Set Up, Manage & Sell Them

Shopify gift cards are a powerful tool for e-commerce businesses, offering an easy way to increase sales, attract new customers, and enhance customer loyalty. But how exactly do gift cards work in Shopify, and how can you use them to their full potential?
In this guide, we’ll walk you through everything you need to know about Shopify gift cards. You’ll learn what they are, how they work, and why they’re an essential feature for online stores. We’ll also show you how to set up and manage gift cards in your Shopify admin. From creating and customizing gift card products to managing expiration dates and applying discounts, we’ll cover all the key features.
Additionally, this guide explains how to activate gift cards in your store, add them to your product catalog, and showcase them on your storefront for maximum visibility. For advanced users, we explore the import and export process, making bulk management a breeze.
Whether you’re just getting started or looking to enhance your strategy, this guide will help you unlock the full potential of Shopify gift cards and turn them into a valuable asset for your business.

Table of contents
- 1 What Are Shopify Gift Cards? An Overview
- 2 How Do Gift Cards Work on Shopify?
- 3 Essential Tips for Managing Gift Cards in Your Admin
- 4 3 Key Steps Before You Start Selling Shopify Gift Cards
- 5 Advanced Gift Card Management: Tips & Tricks for Shopify Merchants
- 6 How to Import and Export Gift Cards in Shopify
- 7 Shopify Gift Cards: Conclusion
- 8 FAQs: Your Top Questions About Shopify Gift Cards Answered
What Are Shopify Gift Cards? An Overview
Shopify gift cards introduce a special type of product that holds value and can be used for future purchases on your e-commerce site or in a physical store. This flexible tool can be seamlessly integrated into your sales strategy to boost engagement and drive sales. Gift cards can be sold directly through your online storefront or shared via links on social media platforms to reach a wider audience. They’re also perfect for rewarding customers — whether as part of a loyalty program or as a surprise gift to enhance their shopping experience.
For example, you can add a gift card as a complimentary bonus to an existing order during fulfillment. Once added, the customer receives an email with a unique gift card code that they can use at checkout. This code allows them to redeem the card’s value when placing an order, either online or offline, making Shopify gift cards a versatile solution for any business.
Additionally, Shopify gift cards can be redeemed across various sales channels linked to Shopify’s checkout system. This includes your online store, Facebook Shop, Buy Button, Messenger, and Shopify POS, ensuring a consistent and flexible experience for both you and your customers.
Whether you’re selling gift cards to increase revenue or using them as a customer engagement tool, Shopify gift cards are a practical and impactful addition to your e-commerce strategy.
How Do Gift Cards Work on Shopify?
Now, we’d like to explain how buyers use gift cards at Shopify stores. If the feature is enabled and there are active gift cards, a customer can redeem gift card value while purchasing at your e-commerce store. In this case, Shopify gift cards work as follows:
- A gift card owner completes a purchase on your website;
- They enter a gift card’s unique code in the appropriate field on the checkout page;
- The discount is applied to the order.
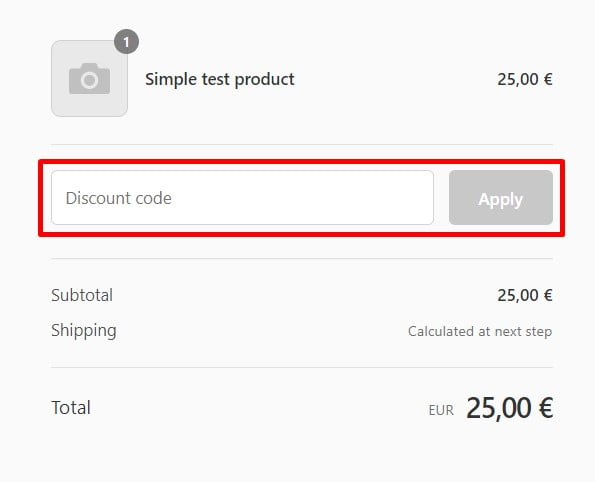
Shopify gift cards are designed to offer a seamless and flexible experience for customers. When used at checkout, the gift card balance is applied to the total order value, including taxes and shipping. If the balance isn’t enough to cover the order total, customers can complete the purchase with an additional payment method. A key benefit is that the gift card balance doesn’t have to be used in a single transaction — it can be spread across multiple orders.
For those buying gift cards for others, the process is simple: purchase a Shopify gift card and forward the email with the unique code to the recipient. Customers can rest assured knowing the gift card codes are case-insensitive, making them easy to redeem without formatting concerns.
While this illustrates how Shopify gift cards work from the customer’s perspective, the process behind the scenes in your Shopify admin is equally important. From setting up and managing gift card products to tracking balances and ensuring smooth redemption, the admin tools provide everything you need to streamline the gift card experience for your store. Together, these customer-facing and backend functionalities make Shopify gift cards a valuable addition to any e-commerce strategy.
Essential Tips for Managing Gift Cards in Your Admin
Let’s explore how Shopify gift cards function behind the scenes. As a store administrator, you have complete control over your gift card program through the Shopify admin panel. You can create new gift cards, track their status, and manage every aspect of their lifecycle. This includes monitoring redemption history, updating balances, and ensuring customers have a seamless experience.
Before offering gift cards to your customers, you’ll need to activate the feature. Follow these steps to get started:
- Go to the “Shopify Gift Cards” screen under Admin -> Products.
- Click “Add gift card product”.

Congratulations! Your first Shopify gift card was created. Its status is still draft. We describe how to change that and configure your new gift card product in a while. Now, it is necessary to focus on other basic tasks associated with gift cards.
Viewing a gift card’s detailed information is another part of the workflow. You can proceed to the corresponding page by clicking the gift card code.
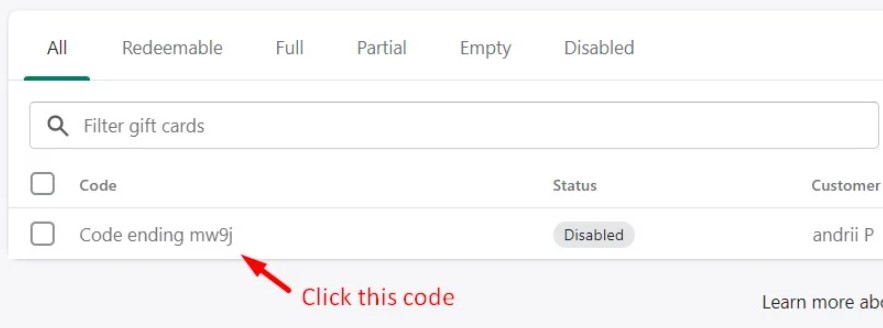
Here, you check facts about the gift card, such as its balance remaining, the order number connected to the gift card, the name of the client who ordered the gift card, and its expiration date.
By clicking the link under “Expiration date,” you can modify the expiration date of Shopify gift cards.
Previewing a gift card product in Shopify is another important step you need to master. Follow these steps to see how your customers see a gift card product page:
- Open a gift card product details page for a gift card that you want to preview.
- Click “Preview”.

Alternatively, you can use the preview icon on the Products page. Hover over your gift card product and hit the icon to preview it:
![]()
If you no longer need some of your Shopify gift cards, the platform lets you disable them. Note that this process is permanent. It means that disabled gift cards cannot be restored.
You can disable a Shopify gift card as follows:
- Proceed to Products > Gift Cards in your admin.
- Open the gift card details page by clicking on its code.
- Scroll down to the bottom of the page and click “Disable”.

You can email an updated gift card to the original customer if they forget their gift card code or need to update their balance. Only the sum remaining on a partially used gift card is delivered to the customer. Let’s see how to use Shopify gift cards if you need to email them to a customer:
- Go to the “Gift Cards” screen under Admin -> Products.
- Open the gift card that you want to resend.
- Click “Resend” on the right.

Alternatively, you can resend several Shopify gift cards in bulk:
- On the “Gift Cards” page, check the gift cards you want to send.
- Click “Actions”.
- Select “Resend selected gift cards”.
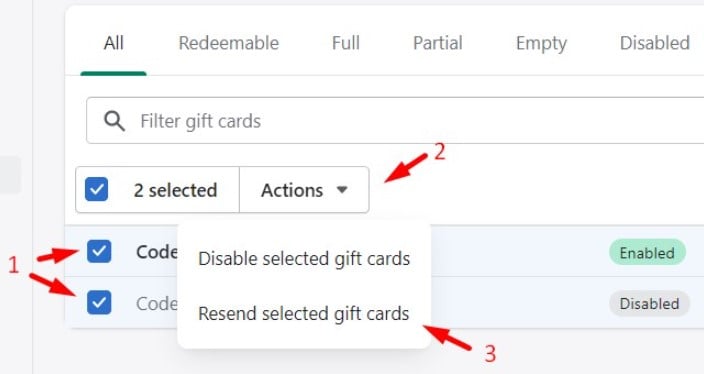
That’s it. Now, your client will get a message with the remaining gift card balance.
3 Key Steps Before You Start Selling Shopify Gift Cards
Now that you’re familiar with the basics of Shopify gift cards, let’s dive into creating gift card products in Shopify’s admin. This process allows you to set up, sell, and showcase gift cards in your online store. Here’s what you’ll learn:
- How to create a new gift card product in Shopify.
- How to publish your gift card products to specific sales channels for maximum reach.
- How to add gift cards to your Shopify store’s navigation for easy customer access.
With these steps, you’ll be ready to sell gift cards on Shopify, providing your customers with a flexible and convenient shopping option. Let’s get started!
Add Gift Cards to Your Store Store
You can add Shopify gift cards to your store as follows:
- Go to Shopify admin -> Products > Gift Cards.
- Click “Add a gift card product”.
- Specify the following information to add a gift card to Shopify:
- Title – specify a gift card product name;
- Description – specify a gift card product that appears on your storefront;
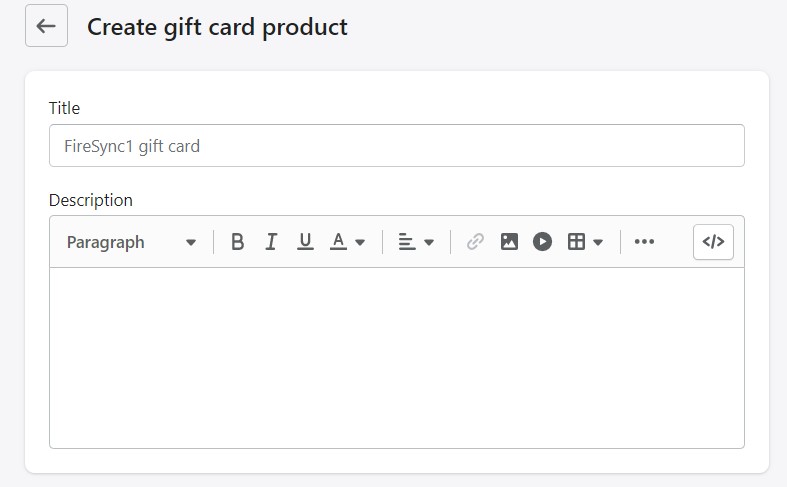
- Media – upload a product image shown on the product page;
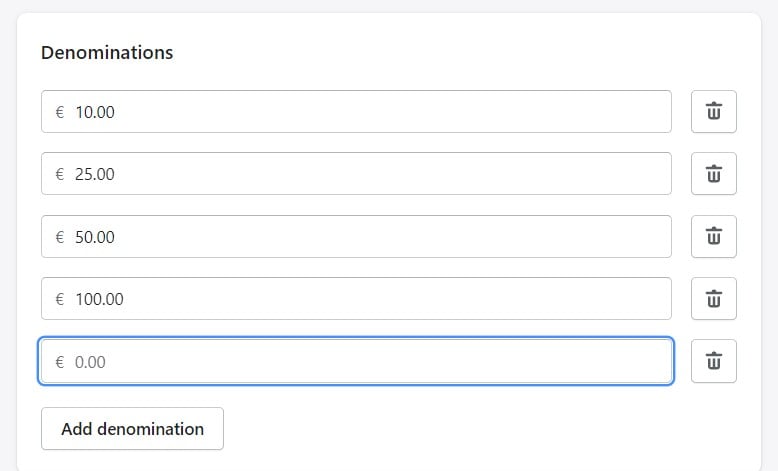
- Denominations – these are product variants with a different balance. Add as many as you need;
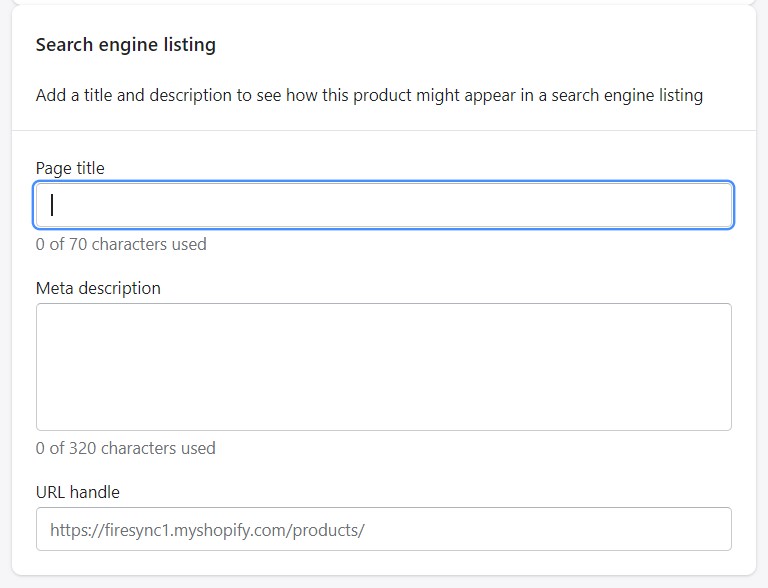
- Search engine listing preview – edit a gift card product page appearance in search engine results;
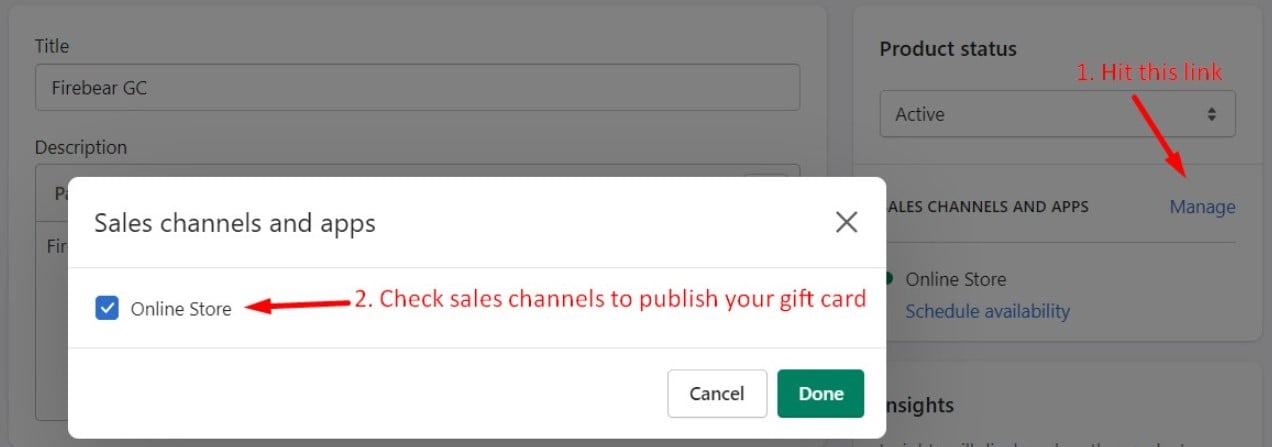
- Sales channels and apps – here, you can change the status of your Shopify gift cards, select sales channels to publish your gift card product (check channels where you want your product to appear), and specify a publishing date (click Schedule availability and select a publish date);
- Organization – add optional information about your new product here: the product type and vendor, collections, tags, etc.
- Click “Save” when finished.
That’s how to add gift cards to Shopify. Click the gift card product name in the list of products to update an existing gift card product.
Publish Shopify Gift Cards to Specific Sales Channels
When learning how to sell Shopify gift cards, it’s crucial to remember that simply creating a new gift card product isn’t enough. By default, new gift cards are hidden from your active sales channels. To start selling them, you must publish the gift card to one or more of your active sales channels.
You can publish a Shopify gift card product to sales channels in the availability settings on its details page as follows:
- Proceed to Products -> Gift cards and click “View gift card products” or filter out the selection of items on the Products page to display gift cards.
- Choose the gift card that you want to publish.
- In the “Sales channels and apps” section, click “Manage”.
- Make the gift card product available to one or more of your active sales channels by checking them.
- Click “Save” when finished.
Add Gift Cards to Your Sore’s Navigation
Now that your gift card product is created, you need to add Shopify gift cards to your store’s navigation system. This procedure takes place outside the Gift Cards section. Follow these steps to add gift cards to your Shopify store:
- Go to the “Navigation” page;
- Click the name of the menu to add your gift card product.

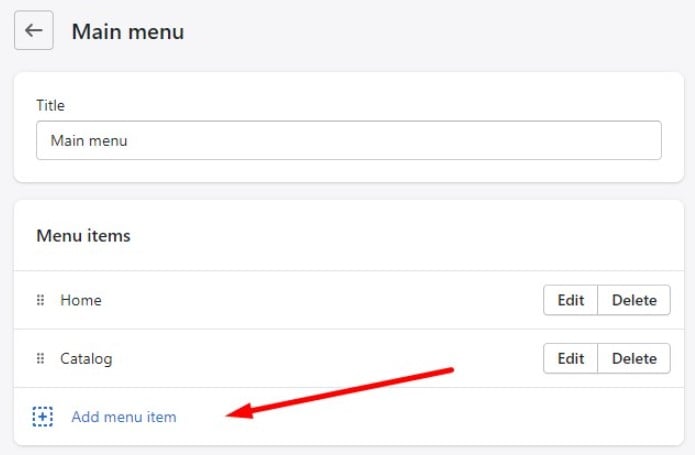
- Proceed to the “Menu items” section and click “Add menu item”.
- Proceed to the “Name” field to add gift cards to the Shopify store. Specify your gift card product’s name that is displayed on the storefront.
- Proceed to the “Link” list to add the product:
- Choose “Products”;
- Select the gift card product to add to your store’s navigation;
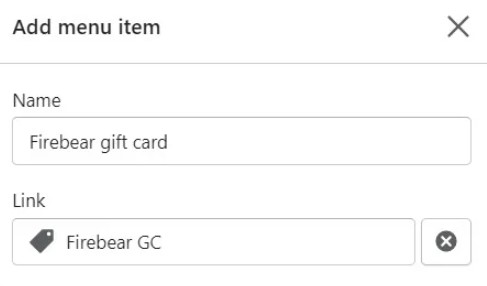
- Hit “Add”.
- Save your menu.
That’s it! Now, you know how to add Shopify gift cards to your store and its navigation. Still, there are a few aspects of gift card management to be discussed. Let’s see what other actions will help you sell gift cards on Shopify.
Advanced Gift Card Management: Tips & Tricks for Shopify Merchants
Ready to take your Shopify gift card management to the next level? In this section, we’ll share additional tips to help you optimize and customize your gift card offerings. Learn how to add new denominations to gift card products, organize gift cards into collections for better visibility, adjust expiry settings to suit your business needs, configure fulfillment options, and even apply discounts to boost sales.
These advanced techniques will help you fine-tune your gift card setup, ensuring it aligns perfectly with your store’s strategy and enhances the customer experience. Let’s dive into the details of setting up and managing Shopify gift cards like a pro!
How to Add New Product Denominations for Shopify Gift Cards
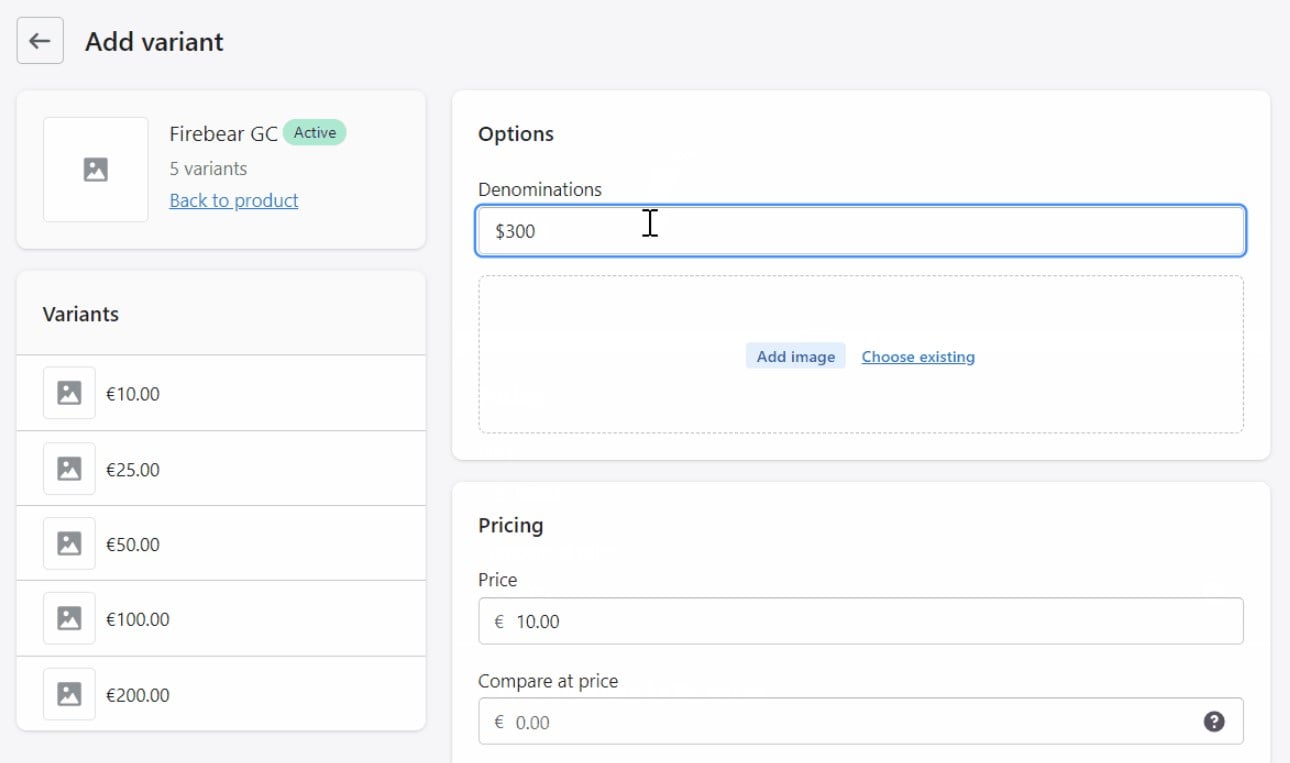
First, let’s see how to set different denominations for Shopify gift cards. In a nutshell, you need to create product variants for your gift card product. We’ve already described this process for common products here – how to add product variants in Shopify. However, a more in-depth instruction focused on gift cards is available below. Below, you will learn how to add new gift card product denominations in Shopify:
- Go to your Shopify admin and proceed to “Products”.
- Filter out your gift cards.
- Click the gift card to add new gift card product denominations.
- Proceed to the “Variants” section and click “Add variant”. Add as many variants as you need. Each variant is a new denomination.
- Configure your new gift card product denominations by specifying their titles, prices, and images.
- In the Variants section, click the trash can icon beside the variant that you want to remove.
- Click “Save” to add new product denominations to Shopify gift cards.
How to Add a Gift Card Product to Shopify Collections
There are several ways to add gift card products to Shopify collections. It is another essential step in selling Shopify gift cards. You can display them in either manual collections or automated collections in the same manner as other products.
Here’s how to sell Shopify gift cards by adding them directly to an existing manual collection from the gift card’s product details page:
- Find the gift card you want to edit on either the “Gift cards” page or the “Products” page.
- Proceed to the “Collections” field in the “Product Organization” section.
- Specify the name of an existing manual collection to add your gift card product.
- Hit the collection name to add the gift card.
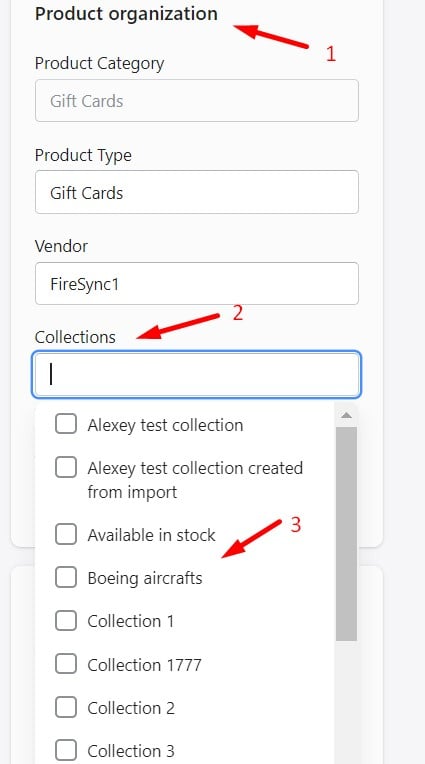
- Save your gift card product.
Alternatively, you can add a gift card product from the collection’s page as follows:
- Proceed to Collections.
- Open a manual collection to add your gift card product.
- Proceed to the collection’s Products section.
- Browse for your gift card product and add it to the collection.
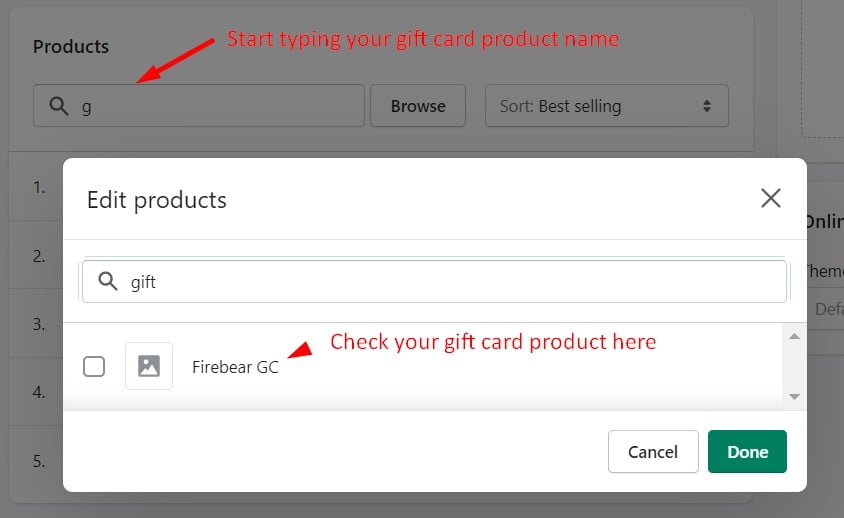
- Save your manual collection with a gift card product.
Now, we’d like to describe how to sell Shopify gift cards by adding them to automated collections. The process differs from the previous methods a lot because automated collections involve a distinct approach to products. Follow these steps to add gift cards to automated Shopify collections:
- Create a product tag for your gift card product;
- Open an automated Shopify collection to add a gift card product.
- In the collection conditions, add a new condition: click “Add another condition”.
- Create a condition to add gift cards to the collection:
- Choose a condition type (first drop-down) – “Product type” or “Product tag”;
- Select how a product should match the condition to display in the collection (second drop-down) – “is equal to”;
- Specify a condition value (third field) – type your product type (Gift Cards) or tag here. Note that you need to assign them to your product in advance;
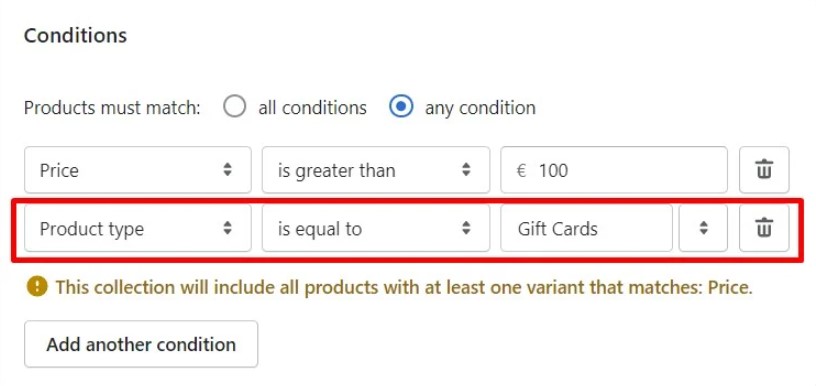
- Add more conditions if necessary by clicking “Add another condition”.
- Click “Save”.
Note that if you select “any conditions”, all products available in the collection before will still be displayed. However, if you choose “all conditions”, the collection will contain only products with the specified tag that also follow the other conditions set before.
How to Change Gift Card Expiry Settings in Shopify
Although there is no default expiration date or period for this kind of product, you can set Shopify gift cards to expire after a specific amount of time. When you activate this feature, all gift cards will automatically expire five years after their activation date. However, you can change the length of this period as follows:
- Proceed to Settings -> Gift Cards.
- Go to “Gift cards expire” and set the expiration details: specify either never or any custom date.
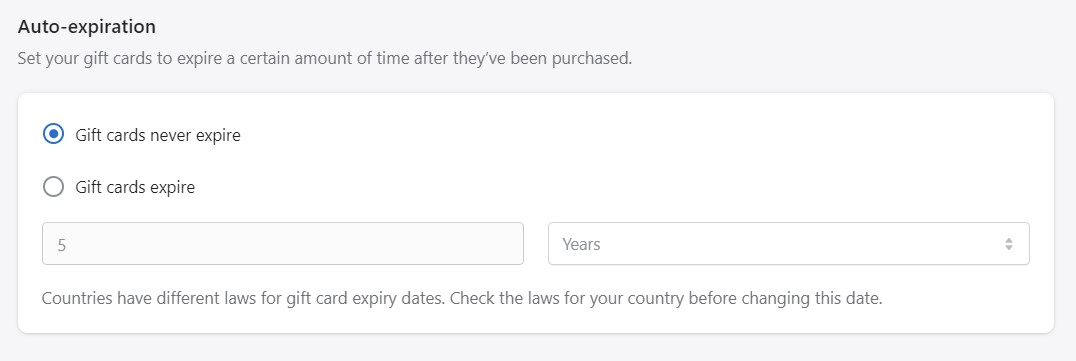
- Click “Save”.
Also, you can change the expiration date for each specific gift card. For instance, you’ve already sold a gift card to a customer. Its value is still unused, but it will expire soon. You can prolong the gift card’s expiration date and inform a customer about that, motivating them to make a purchase.
This is how to regulate the expiration settings of already-sold Shopify gift cards:
- Go to Products -> Gift Cards.
- Choose a gift card to edit its expiration date.
- Click the current expiration date (it is Never in our example).
- Check “Set expiration date” and specify the new date in the “Expires on” field.

- Save your gift card when finished.
It is extremely important to verify whether you follow the rules and regulations for gift cards in your country.
How to Configure Fulfillment Settings for Shopify Gift Cards
Shopify gift cards are fulfilled automatically when an order is paid. However, it is possible to change the fulfillment setting to manually fulfill all items in the order. This implies that gift cards are not fulfilled automatically. How to use gift cards in this case? You can change the default fulfillment settings for gift cards as follows:
- Proceed to Settings -> Checkout and Accounts.
- Scroll to the “Order Processing” section;
- After an order has been paid, you can check one of the following options depending on your needs:
- Automatically fulfill the order‘s line items – this one fulfills everything automatically;
- Automatically fulfill only the gift cards of the order – this one fulfills only gift cards automatically;
- Don’t fulfill any of the order’s line items automatically – this one doesn’t fulfill anything automatically;
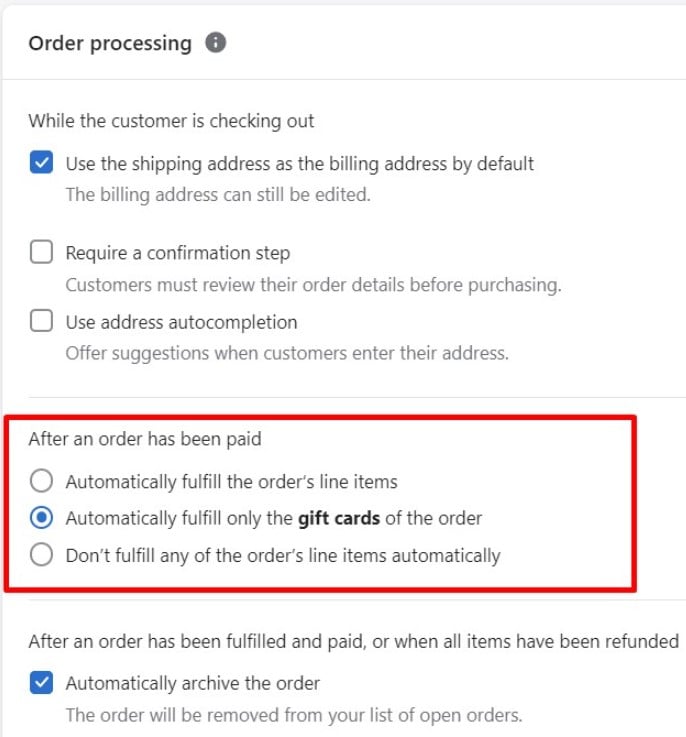
- Click “Save”.
How to Add a Discount to Gift Cards in Shopify
If you want to learn how to sell Shopify gift cards with a discount, you’ve come to the right place. Pay heed to the fact that gift cards included in a collection are not eligible for discounts that apply to collections. However, you can establish discount codes or automatic discounts that alter the gift card product price. The following methods can be used to sell gift cards on Shopify with a discount:
- A specific percentage, like 10% of the face value of the gift card.
- A specific sum, such as $10 off the face value of the gift card.
You can give the discount without requiring a minimum purchase, or you can demand a certain purchase before it takes effect, like with a Buy X Get Y deal, to sell gift cards on Shopify
However, the automatic discounts are subject to the following limitations:
- At any given time, there can only be one active automatic discount.
- Discount codes cannot be used concurrently, and automatic discounts take precedence over them.
- No more than one discount can be used on a single order by the customer.
- Customers with an automatic discount applied at checkout are not eligible for discount codes.
Before a discount is applied, customers must put each of the eligible goods in their shopping carts. This applies to the gift card item as well as any additional goods they must purchase to be eligible for the discount.
Discount for a percentage off a gift card
Shopify lets you create a discount for a percentage off of a specific gift card product or variant, which can be either a discount code or an automatic discount, as follows:
- Go to the “Discounts” page in your admin.
- Create a new discount for an amount off products:

- Specify the percentage to discount the gift card in the “Discount value” field: to offer a $50 gift card for $25, enter 50%.
- Choose the gift card product or variant in the “Applies to” section.
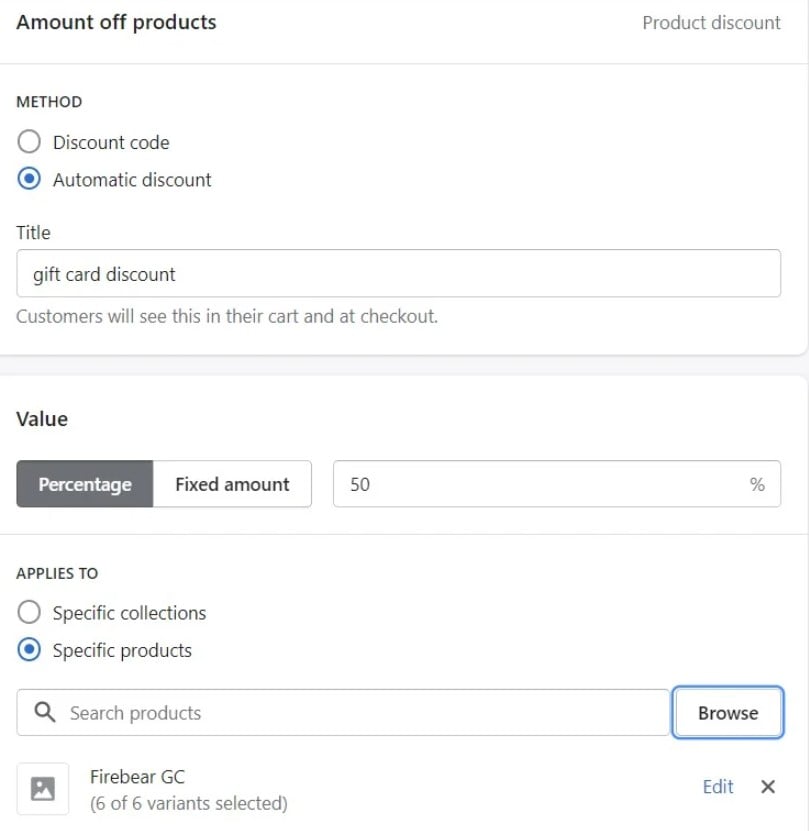
- Configure other parameters and save your discount to apply to Shopify gift cards.
Buy X Get Y discount
Alternatively, it is possible to create a Buy X Get Y discount for a free gift card, such as “Spend X and get a free Y gift card”.
- Go to the “Discounts” page in your admin
- Create a Buy X Get Y discount:
- Add a minimum purchase amount in the “Customer spends” section.
- Select products or collections eligible for the discount.
- Select “Any items from” in the “Customer gets” section and add the gift card product or variant.
- Choose “Free” for the discount value.
- You can also check “Set the maximum number of uses per order” to apply a limit on the maximum number of times this discount can be applied to an order.
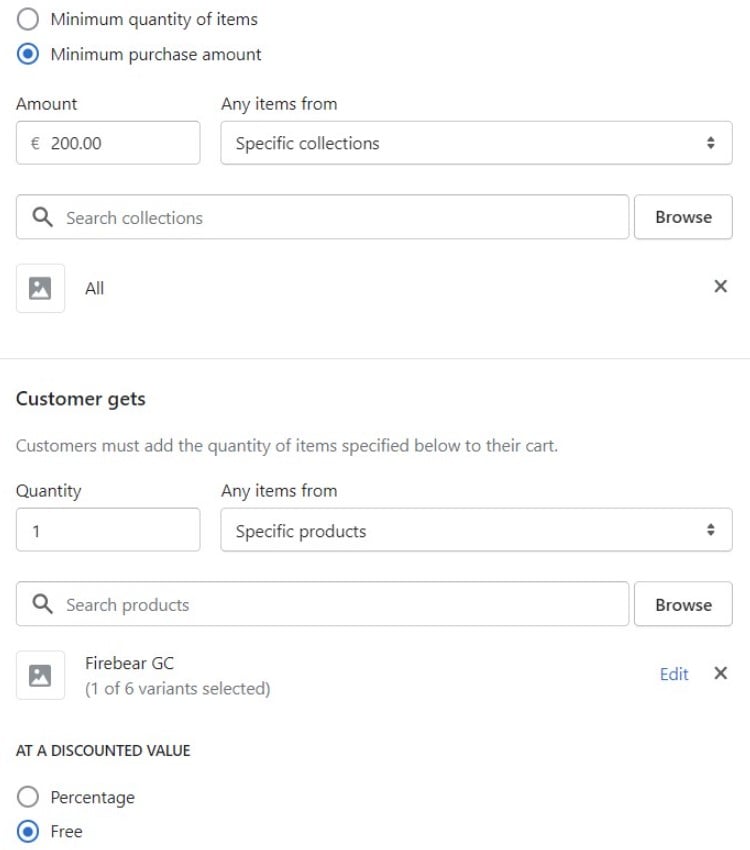
- Configure other parameters and save your discount.
How to Import and Export Gift Cards in Shopify
Shopify allows you to export gift card data into a CSV file, enabling you to review essential details like outstanding balances in a spreadsheet format. However, it’s important to note that Shopify does not support importing gift card information directly from a CSV file to create or update gift card products. If you need to bulk import gift cards, you’ll need to rely on a third-party app to handle this functionality.
Here’s a breakdown of the structure of an exported gift card CSV:
| Title | Description |
| Id | Each gift card’s unique identifier (don’t confuse it with the gift card code) |
| Last Characters | The gift card code’s last four characters |
| Customer Name | The name of the customer who purchased the gift card |
| Their email address | |
| Order Name | The order number associated with the gift card |
| Created At | The date the gift card was bought or issued in the following format: yyyy/mm/dd hh:mm:ss -time zone |
| Expires On | The gift card expiration date |
| Initial Value | The initial gift card’s value |
| Balance | The remaining gift card’s balance |
| Currency | The currency code (three digits) |
| Expired? | This column shows whether the gift card is expired or not |
| Enabled? | This column shows whether the gift card is enabled or disabled |
| Disabled At | This column shows whether the date when the gift card was disabled in the format: yyyy/mm/dd hh:mm:ss -time zone |
To get this information in a spreadsheet, export Shopify gift cards as follows:
- Proceed to Products > Gift cards.
- Click “Export”.
- Select a range of gift cards that should be exported:
- Current page – gift cards visible on the page;
- All gift cards – all your gift cards;
- Selected gift card – checked gift cards;
- Current Search – a list of gift cards with a search or filter applied.
- Choose “CSV for Excel, Numbers, and other spreadsheet programs” to be able to open your CSV file in Excel or another editor.
- Click “Export Gift Cards”.
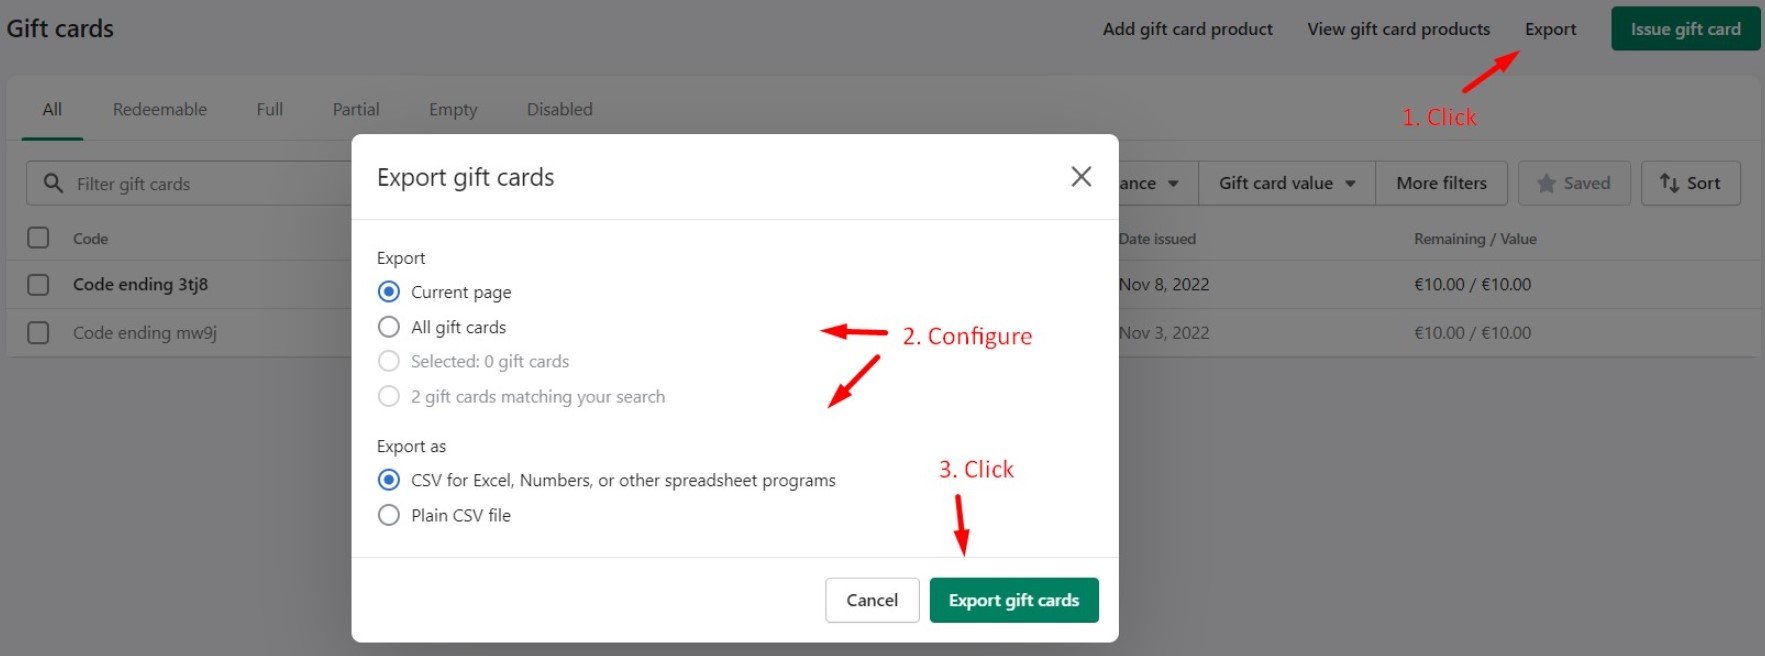
If you need to import Shopify gift cards, the platform’s native functionality falls short, as it doesn’t allow direct CSV imports for gift card creation or updates. To overcome this limitation, we recommend using a reliable third-party solution, such as the .
This tool enables seamless importation of gift card data, allowing you to bulk create or update gift cards efficiently. It’s especially useful for stores that need to transfer gift card information from another platform or manage large-scale gift card campaigns.
For detailed, step-by-step instructions, check out our Shopify Gift Card Import Guide, where we walk you through the entire process to ensure a smooth and successful import, or contact us directly. With the right tools, managing Shopify gift cards becomes easier and more efficient.
Shopify Gift Cards: Conclusion
Using Shopify gift cards is simple and requires no special skills or tools to get started. The platform’s built-in functionality makes setting up and selling gift cards a breeze for any store administrator. With an intuitive interface, you can quickly create gift card products, organize them into collections, send gift card codes to customers, and even apply discounts—all in just a few clicks.
Shopify’s seamless management tools allow you to handle everything from tracking balances to customizing gift card details effortlessly. This hassle-free process makes gift cards an excellent feature to enhance your store’s offerings, improve customer satisfaction, and boost sales. Whether you’re introducing gift cards for the first time or refining your existing strategy, Shopify provides all the tools you need to make the process efficient and effective.
However, for stores with larger-scale gift card needs, tools like the Import & Export Tool for Shopify can be a game-changer. This third-party solution allows you to efficiently handle bulk gift card operations, such as importing or exporting gift card data in CSV format. It’s especially useful for transferring gift card information from other platforms or managing extensive campaigns, saving time and minimizing manual effort.
FAQs: Your Top Questions About Shopify Gift Cards Answered
What are the limitations on Shopify gift cards?
Shopify gift cards have a few key limitations. While you can export gift card data to a CSV file, Shopify doesn’t support importing this data natively to create or update gift cards. Additionally, some customization features, like advanced branding, may require third-party apps or custom solutions.
How do customers pay with a gift card on Shopify?
Customers can pay with a Shopify gift card by entering the unique gift card code during checkout. The balance is automatically applied to the total order value, including taxes and shipping. If the gift card balance doesn’t cover the entire order, customers can use an additional payment method to complete the purchase.
Where are Shopify gift cards accepted?
Shopify gift cards can be redeemed on any sales channel linked to Shopify’s checkout system. This includes your online store, Facebook Shop, Buy Button, Messenger, and Shopify POS.
Do Shopify gift cards expire?
By default, Shopify gift cards do not expire. However, you can set expiration dates in the Shopify admin if needed. Be sure to comply with local regulations, as some regions may have restrictions on gift card expiration.
Can Shopify gift cards be reused?
Yes, Shopify gift cards can be reused until their balance is fully spent. Once the balance reaches zero, the gift card is no longer valid unless additional funds are added (if supported by your setup).
How to redeem a Shopify gift card?
To redeem a Shopify gift card, customers simply need to enter the gift card code at checkout. The value of the card is automatically deducted from the total order amount.
Can you add money to a Shopify gift card?
No, Shopify doesn’t allow you to reload funds onto an existing gift card. If additional funds are needed, you’ll need to issue a new gift card for the desired amount.
How to create and sell Shopify gift cards?
To create and sell Shopify gift cards, go to your Shopify admin and enable the Gift Card feature in the Products section. From there, you can set up gift card products, add them to collections, and publish them on your storefront or other sales channels.
How to handle bulk gift card imports and exports?
Shopify allows you to export gift card data to a CSV file for review. However, importing gift card data is not supported natively. To handle bulk imports, you can use a third-party app like the Import & Export Tool for Shopify, which simplifies the process and supports advanced gift card management.


