
Exploring Shopware: Number Ranges in Shopware 6 Settings
![]()
Every e-commerce website contains thousands of all possible records about every entity. This information helps to organize your daily workflow and keep everything in order. Shopware 6 provides the ability to use custom number ranges for this process uniquely identifying orders, customers, or documents. The system uses a series of character and number combinations for that. As a store administrator, you can create unique combinations. In the following article, we shed light on how to add new number ranges in Shopware 6 as well as manage the existing ones. Besides, you will find an FAQ section that briefly describes basic management duties associated with Shopware 6 number ranges in particular and the platform in general.

Note that we provide Shopware integration with external platforms. Contact our support for further information or try our Improved Import & Export Extension for Shopware.
Table of contents
Number Ranges Screen in Shopware 6 Admin
Let’s see how to find the Number Ranges screen in the Shopware 6 administration:
- Go to your Shopware 6 administration;
- Open its main menu;
- Proceed to the Settings section;
- Open the Shop subsection;
- Hit the Number Ranges button.
Note that depending on the country, number ranges may need to follow legal requirements. You may need to include day, month, or year in a number range, etc.
As for the Shopware 6 Number Ranges overview, it looks as follows:
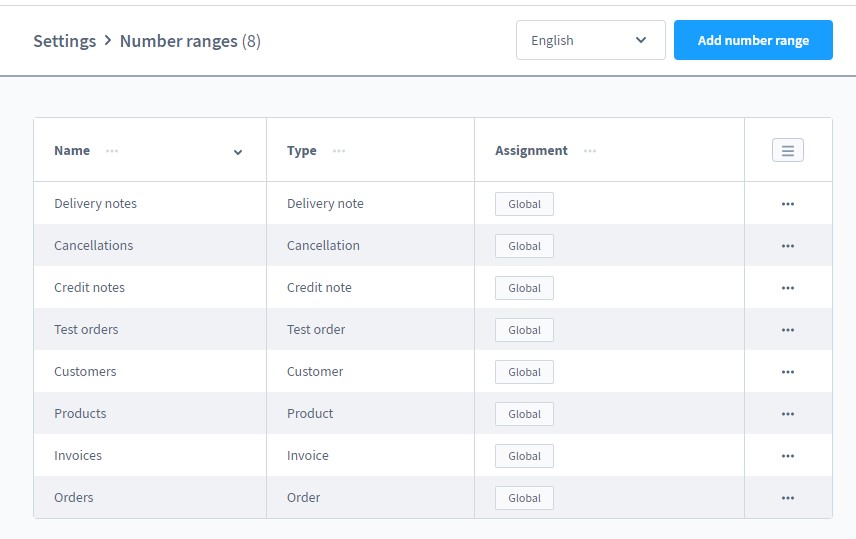
Here, you can see a list of available number ranges, including the number range name, application, and assignment.
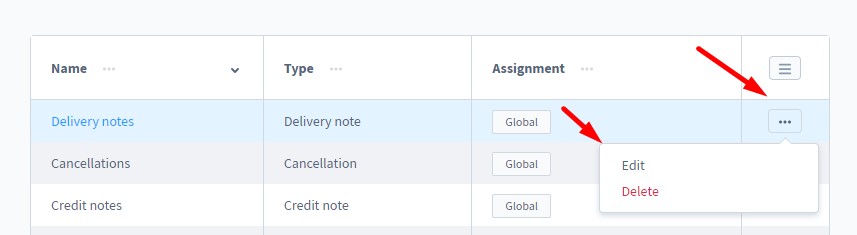
You can use the context menu to edit or remove the corresponding number range.
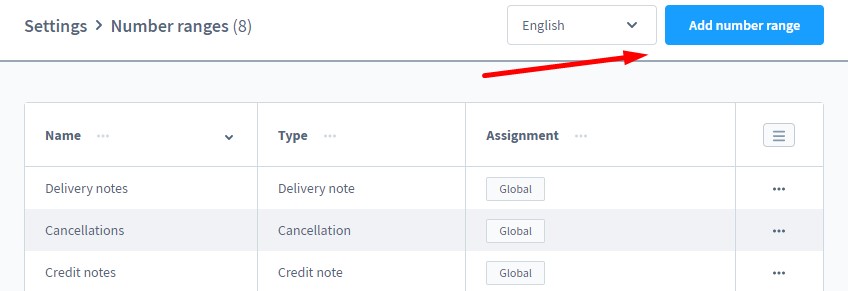
Adding a number range
To create a number range, hit the Add Number Range button.
After that, the following window will displays:
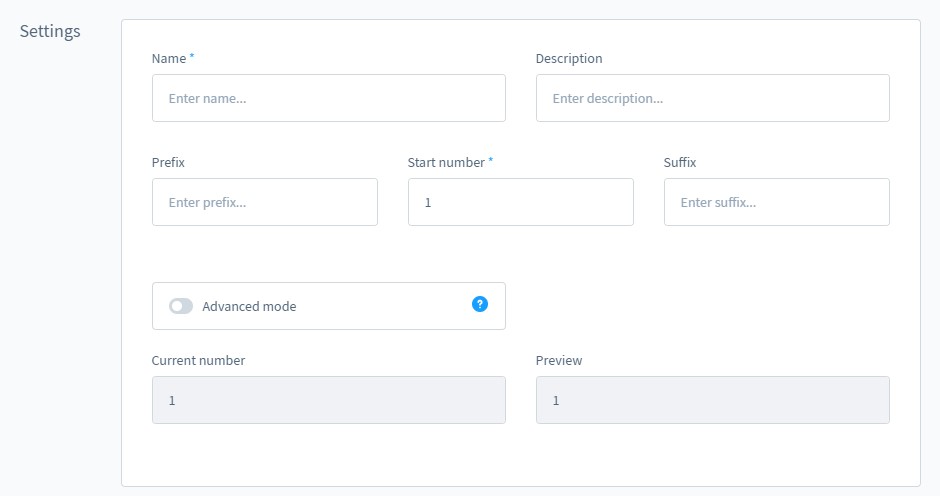
- Name – add a meaningful name;
- Description – specify a description to better identify the new range;
- Prefix – a string placed before the number;
- Start number – the range starts with this number;
- Suffix – a string set after the number;
- Advanced mode – this toggle disables the creation of the range with prefix and suffix, replacing it with the Pattern mode (described below);
- Current number – this row displays the last assigned number of the range;
- Preview – the final look of your number range.
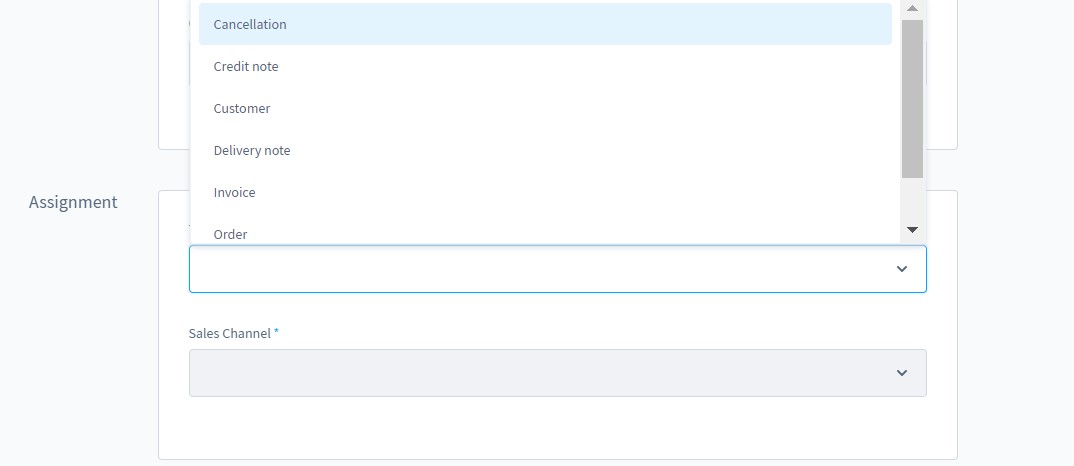
As for the Assignment section, it lets you specify two things. Firstly, it is the purpose of the number range. Secondly, it is a sales channel to which it is assigned.
Advanced mode
In the Advanced mode subsection, you can specify a pattern for creating your number range. It lets you create a custom format that includes additional data, such as the date.
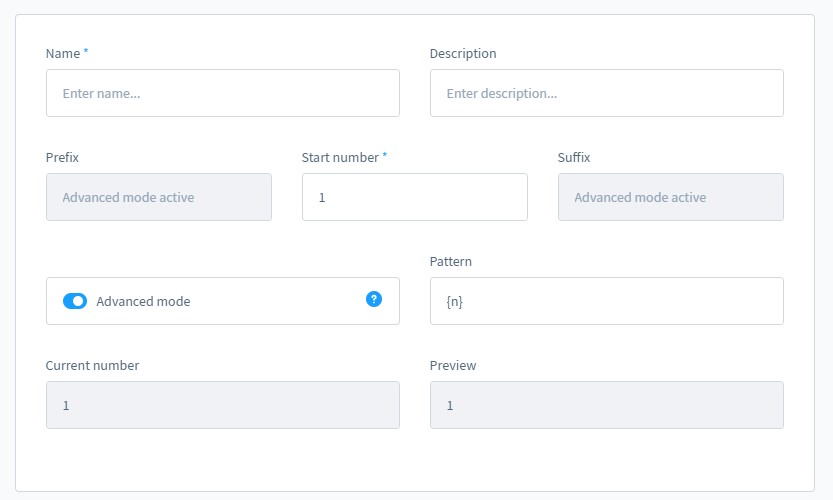
Shopware 6 lets you use the following variables in the pattern:
- {n} – an incrementing number that follows the specified start number;
- {date} – the current date in the international format: YYYY-MM-DD;
- {date_dmy} – a custom date format that incorporates additional variables:
- Y = Year,
- y = Year in two digits,
- M = Month,
- m = Month as number,
- D = Day,
- d = Day as number.
Let’s assume that the start number is 13 and the date is June 4, 2021. The following patterns transform as follows:
- Order{n}-{date} – Order13-2021-06-04
- Order{n}-{date_d.m.Y} – Order13-04.06.2021
- Order{n}-{date_Y-M-D} – Order13-2021-JUN-FRI
- Order{n}_{date_dmy} – Order13_050621
How to Import Number Ranges to Shopware 6
If you need to move data to Shopware 6, you’ve come to the right place. With the help of our team, there is no need to recreate multiple entities manually. You can simplify and automate this process. Contact our support for more details and try our . You can use it to import any entity to Shopware 6. While importing number ranges doesn’t seem very useful, you can rely on our tool to transfer other entities. It provides the ability to automate import and export processes with the help of schedules. At the same time, you get a mapping interface where it is possible to match any external data with the corresponding internal records so that the information is moved without obstacles and all changes are applied automatically.
Shopware 6 Number Ranges FAQ
How to find number ranges in Shopware 6?
You can find the number ranges configuration screen under Settings -> Shop -> Number Ranges.
How to add new number ranges in Shopware 6?
Hit the Add new range button under Settings -> Shop -> Number Ranges to create a new range in Shopware 6. Next, provide the necessary information as shown above.
How to edit number ranges in Shopware 6?
Go to Settings -> Shop -> Number Ranges and use the context menu to edit a number range.
How to delete number ranges in Shopware 6?
Use the same approach: go to Settings -> Shop -> Number Ranges and use the context menu.
How to assign number ranges to sales channels in Shopware 6?
You can assign a number range to a sales channel while creating the range. You can find the corresponding option in the configuration section as illustrated above.
Shopware 6 Essentials FAQ
How to create a Shopware account?
You can create a Shopware account as follows. Visit the registration page, click the Register Now link, and fill in the form. After that, you will receive a confirmation email. Follow the instructions provided in it.
What about a Shopware ID?
You don’t need to create a Shopware ID since it is provided automatically during the registration.
How to deal with Shopware master data and what is it?
Shopware 6 master data is all the information about your company that contains such company details as physical addresses, phone numbers, emails, etc. You provide it during registration.
How to add a new Shopware shop?
Adding a new shop in Shopware 6 begins in your merchant area where you click the corresponding link on the start screen’s right part. Specify the type of your new shop (a cloud storefront or an on-premise installation) and provide the required information.
How to add a payment method to your Shopware account?
In Shopware 6, you add payment methods not only to the checkout page but also for internal purposes. Under Basic Information -> Accounting, you can specify PayPal, credit card, or direct debit as a preferred way to pay for extensions and themes.
How to create a deposit in Shopware?
You can purchase extensions and themes for your Shopware 6 website only if you have a deposit. You can create it under Merchant Area -> Shops. Select a shop to provide funds to, and click Open Account Details. Note that the deposit should cover the amount of your future purchase.
How to purchase Shopware extensions?
There are two ways to purchase extensions and themes for your e-commerce website. You can do that either on the Shopware Marketplace or in the Plugin Manager. In both cases, the sequence of operations is similar. You create a deposit, choose a tool you want to buy, and proceed to checkout.
How to get support in Shopware?
Try these email and phone number if you have questions regarding account or license issues: info@shopware.com and +49 2555 9288 50. Try the following email and phone number if you have questions regarding accounting and financial services: financial.services@shopware.com and +49 2555 9288 510.
How to automate import and export processes in Shopware 6?
The Improved Import & Export extension for Shopware 6 lets you automate recurring data transfers associated with your website. It provides the ability to create schedules to simplify regular data updates. As a result, you launch the corresponding import and export processes according to the specified time frames without interaction on the admin side.
How to migrate to Shopware 6?
The Improved Import & Export module also lets you migrate to Shopware 6 from your existing e-commerce website. It is possible to simplify the transfer of core entities from external systems or Shopware’s previous versions. You can create schedules and mapping schemes and connect your new website to other e-commerce systems since we also offer export solutions for such platforms as Magento and Shopify. Contact us for more information.
How to integrate Shopware 6 with external systems?
The Improved Import & Export extension can help you with the integration with ERPs, CRMs, accounting tools, and other similar platforms. It automates repetitive import and export processes and modifies data with the help of mapping presets. The plugin lets you follow the requirements of your Shopware store during import and the rules of the connected platform during export.
Related posts
 solution25: Your Trusted Shopware Agency in New York & Germany
 How to Import & Export Shopware 6 Advanced Prices as Separate Entity
 New in Shopware 6 Product Import: Control Topseller Products with the markAsTopseller Field
 How to Import Products to Shopware 6 & Automatically Assign Them to Parent Categories: A Time-Saving Import Feature You Shouldn’t Miss
 Take Full Control over Product Visibility in Shopware 6: Introducing the ‘Replace Product Sales Channels’ Feature for Import
 How to Boost Sales with Shopware 6 Cross Selling: The Ultimate 2025 Guide
 E-Commerce Impulse Buys Guide: Boost Your Sales with Effective Strategies and Smart Tools
 Shopify Gift Cards Explained: How to Set Up, Manage & Sell Them