
Magento 2 XML Integration Guide 2026: How to Import Magento 2 Products from XML Feed & Export Them Back as XML (+Other Entities)
Working with supplier catalogs, marketplace integrations, or ERP systems often means handling XML data, yet Magento 2 does not fully support it even in 2026. If you need to import products from an XML feed into Magento 2 or perform a Magento export of products to XML, the default platform leaves you with only one option: converting everything to or from CSV files. While this works for basic tasks, it adds extra steps, increases the risk of formatting errors, and slows down your workflow, especially when managing large or frequently updated catalogs.
A better approach is to remove the conversion process entirely. The Improved Import & Export Magento 2 extension allows you to connect directly to XML product feeds, pulling data into your store without manual transformations, and to export your catalog back into XML for seamless integration with external systems. It makes Magento XML product import and export as straightforward as working with CSV, helping you keep your catalog in sync with suppliers, marketplaces, and internal tools.
In this guide, you’ll see how to work with XML in Magento 2 using both the default CSV-based method and the streamlined, conversion-free approach with Improved Import & Export. You’ll learn how to configure the Magento 2 import of products from an XML feed, automate this process, set up Magento XML exports for products and other entities, and avoid the common pitfalls that can cause data errors.

Table of contents
- What Is an XML Product Feed in Magento 2?
- Default Magento 2 XML Product Feed Import & Export — Limitations
- Step-by-Step Magento 2 Import of Products from an XML Feed
- How to Export Products from Magento 2 to XML
- Real-World Use Cases for XML Product Feed Import & Export in Magento 2
- Common Magento 2 XML Import & Export Errors & How to Fix Them
- Final Words — Why XML Integration Matters for Magento 2
- FAQ: Magento 2 XML Import & Export
What Is an XML Product Feed in Magento 2?
An XML product feed is a structured file format used to store and exchange product information in a way that both humans and machines can read. In the context of Magento 2, XML feeds contain all the essential product details — such as SKUs, names, prices, stock levels, descriptions, and images — wrapped in a clearly defined hierarchy of tags. This structured approach makes it easy for other systems to parse and process the data without errors.
XML product feeds in Magento are widely used for supplier integration, allowing merchants to receive regular product updates directly from manufacturers or distributors. Instead of manually entering changes, the feed delivers fresh data that can be imported straight into the store, ensuring that pricing, stock levels, and product attributes remain accurate.
A Magento 2 XML feed is equally valuable when connecting to marketplaces like Amazon, eBay, or Google Shopping, as these platforms often require XML-based uploads for product listings. They also play a central role in multichannel selling, where a single Magento catalog needs to be synchronized across multiple sales channels, POS systems, and ERP solutions. With a well-configured XML feed, you can maintain consistency, reduce manual work, and keep your product data flowing smoothly between all connected systems.
Default Magento 2 XML Product Feed Import & Export — Limitations
Out of the box, Magento 2 does not support XML as a native import or export format. If you want to import XML files into Magento 2 or perform a Magento XML export, you’ll quickly discover that the default tools only work with CSV. This limitation means that every XML file has to be converted to CSV before it can be processed, adding unnecessary steps and potential for error.
The only way to work with XML using Magento’s built-in features is by using an external converter to transform your XML file into a CSV. Once converted, you need to compare the resulting CSV against a Magento 2 sample import file to ensure that all required columns and attribute codes match the platform’s expectations. Any mismatch — whether in formatting, naming, or encoding — will cause the Magento 2 import of products from an XML feed to fail.
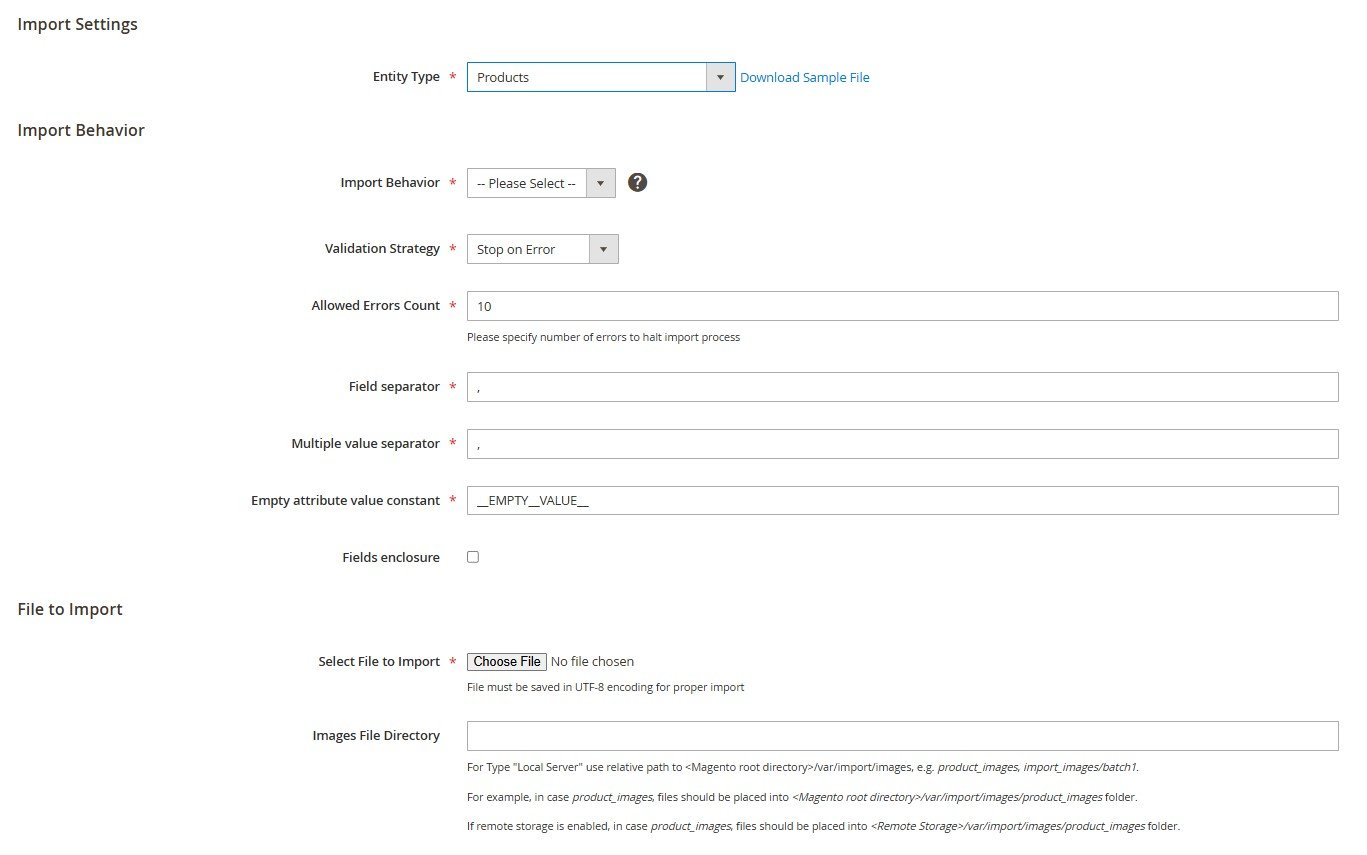
The import process itself follows Magento’s standard CSV workflow:
- From the Admin panel, you go to System → Import,
- Select the entity type (such as Products),
- Choose the import behavior (Add/Update, Replace, or Delete),
- Upload the CSV file,
- And run the “Check Data” validation.
If the file passes, the Magento 2 import of products from an XML feed can proceed. While functional, this method is time-consuming and prone to data integrity issues, especially when handling large catalogs or frequent updates.
For exporting, the situation is similar. Magento 2 cannot natively generate XML files, so a Magento XML export requires exporting to CSV first, then converting that CSV to XML with an external tool. This two-step process not only slows down operations but also increases the risk of losing data accuracy during conversion.
The Improved Import & Export Magento 2 extension, on the other hand, eliminates these bottlenecks.
Step-by-Step Magento 2 Import of Products from an XML Feed
If you need to import products from an XML feed into Magento 2 without endless conversions and formatting headaches, the Improved Import & Export extension makes the process straightforward. Instead of manually transforming your XML into CSV, you can connect your feed directly, map attributes, and even automate updates from external sources like FTP, Dropbox, Google Drive, or a direct URL. This turns Magento XML product import into a fast, repeatable workflow that works for any size catalog.
The extension also supports XSLT transformation, giving you the flexibility to convert any XML structure into the exact format Magento expects. You can read our detailed guide on XSLT transformation in Magento 2 for more insight. But before diving into advanced transformations, let’s walk through the basic steps of importing an XML file into Magento 2.
You’ll need two things: the latest version of the Improved Import & Export extension installed on your site and the XML file you want to import. Once those are ready, the process is as follows.
Step 1 — Create an import job for your Magento 2 XML product feed
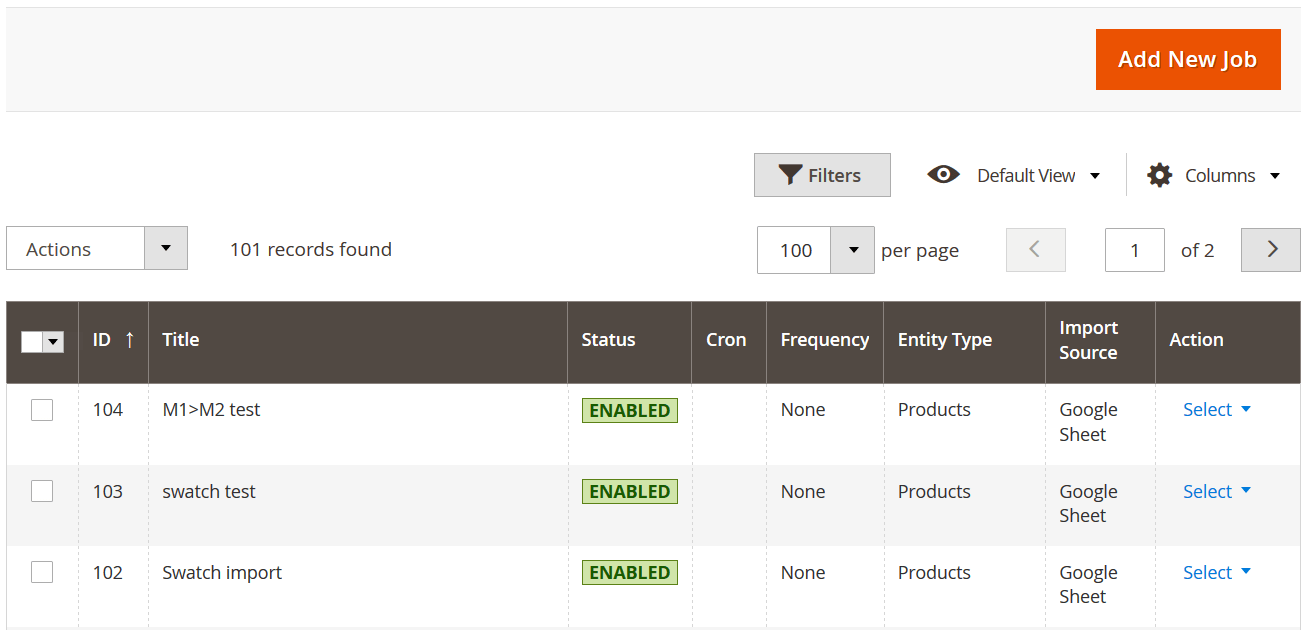
The extension works through jobs — automated rules that define when, how, and under what conditions a file should be imported. From the Magento Admin panel, go to System → Improved Import/Export → Import Jobs. You’ll see a grid of existing jobs, where you can manage, duplicate, or delete them. To start a new Magento 2 import of products from an XML feed, click Add New Job in the top right corner.
Step 2 — Configure general job settings
Name your job so it’s easy to identify later, decide whether you want it to run on a schedule, and choose if the store should be reindexed after the import completes. You can also enable options like automatic resolution of URL conflicts (see our guide on fixing the “Specified URL key already exists” error).
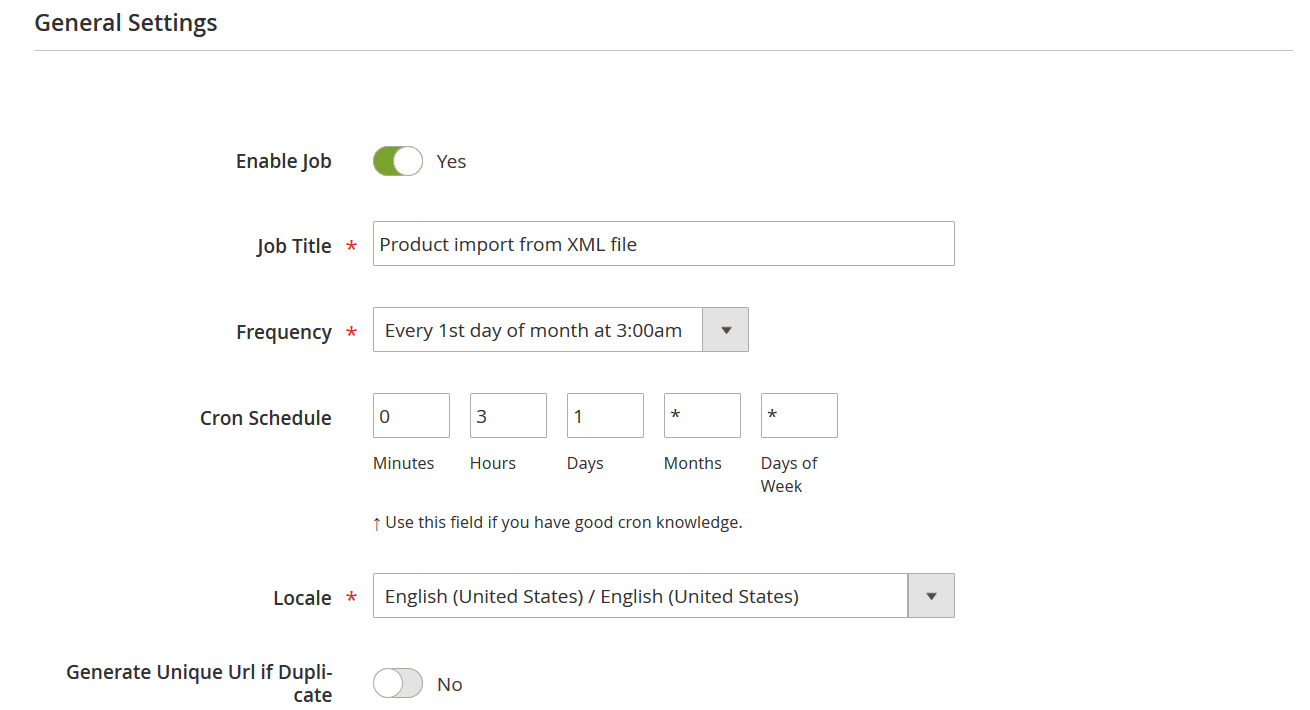
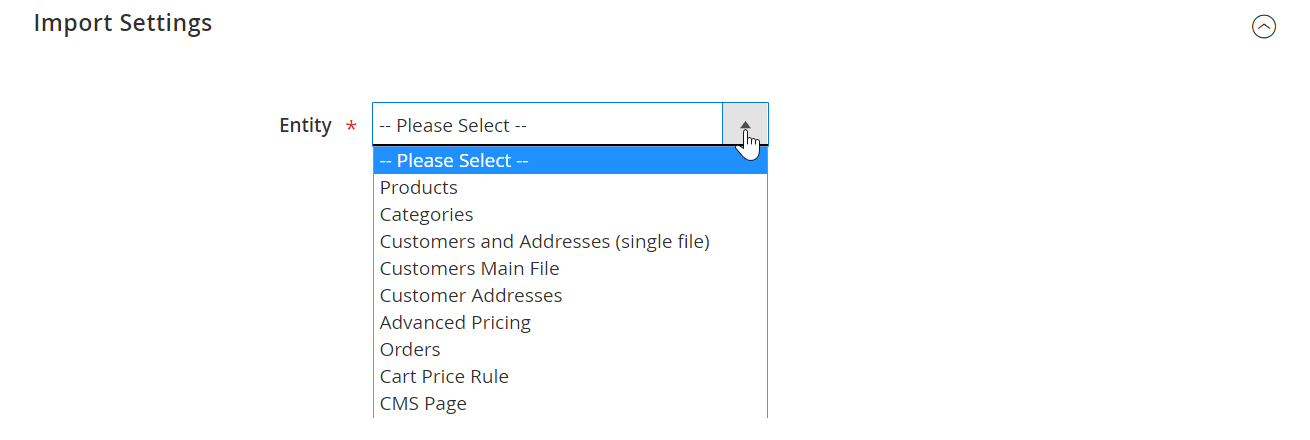
From the Entity dropdown, select Products to perform the Magento 2 import of products from an XML feed. Note that the extension also supports other entities, from CMS pages to cart price rules.
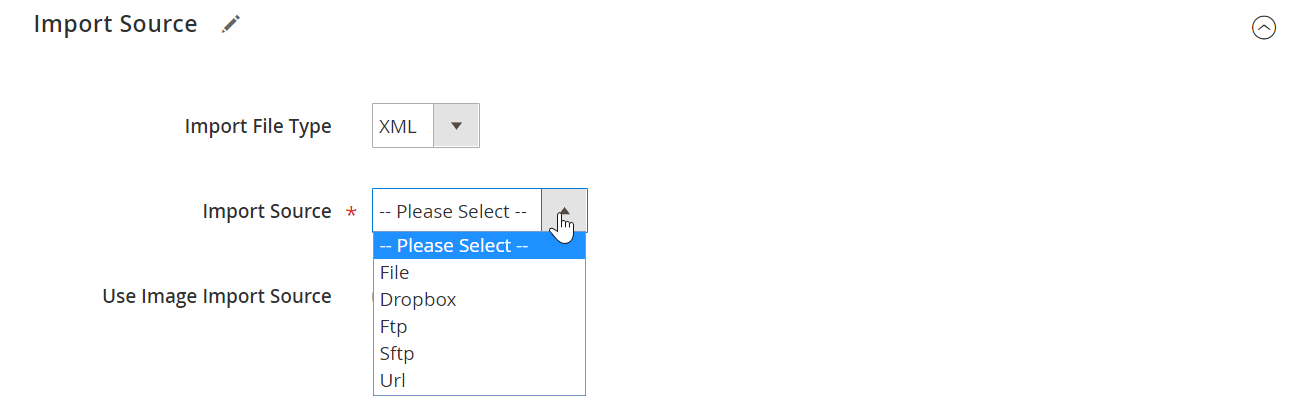
On the Import Source tab, set Import File Type to XML. Then choose where your file is coming from — local file, Google Sheets, FTP/SFTP, Dropbox, or a direct URL. Once the file path is entered, click Validate file to scan for unsupported attributes or values. If the validation passes, the rest of the job settings become available.
Step 3 — Apply XSLT transformation (optional) to change the external XML product feed for Magento 2 needs
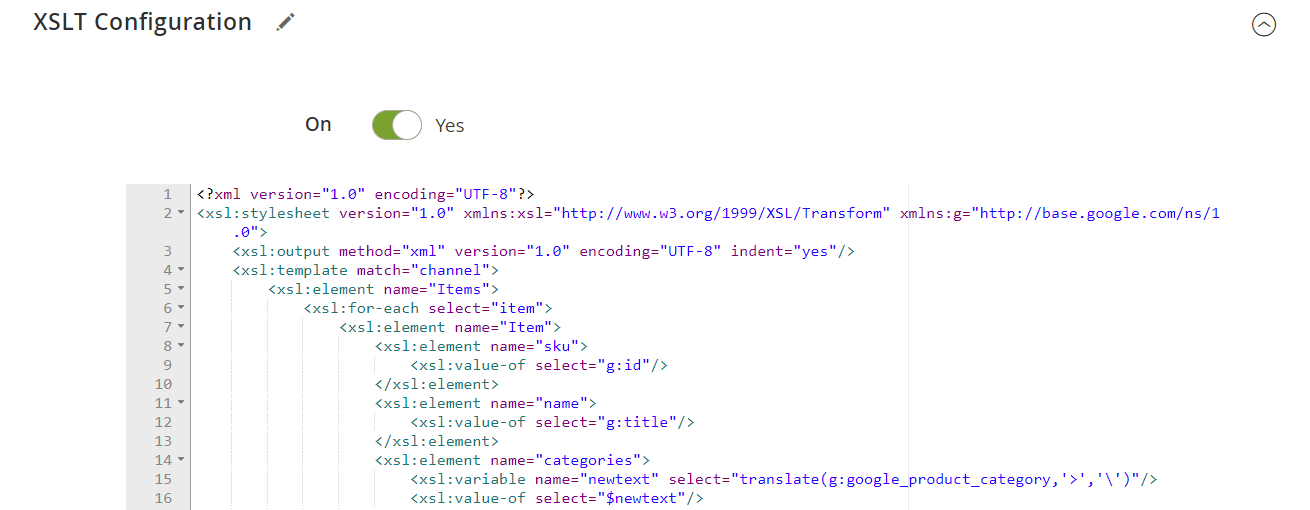
By default, the extension supports XML 1.0 with UTF-8 encoding, a space as the field separator, column names in the first row, “Items” as the root node, and “item” as the record name. If your feed uses a different structure, XSLT transformation can adapt it.
For example, if you’re importing a supplier feed with custom attribute names, you can use an XSLT template to map them to Magento’s format. You can find a working example in our along with the matching XSLT file. To apply it, scroll to the XSLT Configuration section of your import job, enable XSLT transformation, and paste your template.
If you’re unsure how to create an XSLT template for your unique Magento 2 import of products from an XML feed, contact our support team, and we’ll help you prepare one that matches your needs.
Step 4 — Run the job to import the XML product feed to Magento 2
Once the setup is complete, click Save & Run. The extension will process your XML file, apply any transformations, and import your product data into Magento 2 with the correct formatting.
If you encounter issues with custom XML files or need assistance building an XSLT template, our team can help you adapt any feed for a smooth Magento XML product import. This approach lets you skip manual conversions entirely, keeping your data accurate and your Magento 2 product import from an XML feed efficient.
How to Export Products from Magento 2 to XML
When it comes to data exports, the Improved Import & Export extension makes the process even simpler than imports. Whether you need a Magento XML export of products for a supplier, an ERP system, or a marketplace, or you want to create a Magento XML order export for reporting and fulfillment, the workflow is fast, flexible, and fully automated. With just a few clicks, you can generate an XML file that’s ready for direct integration without additional conversions:
- To set up a Magento export of products via XML, go to System → Improved Import/Export → Export Jobs in the Magento Admin panel and click Add New Job. This will open the export job configuration screen, where you can define how and when your data should be exported.
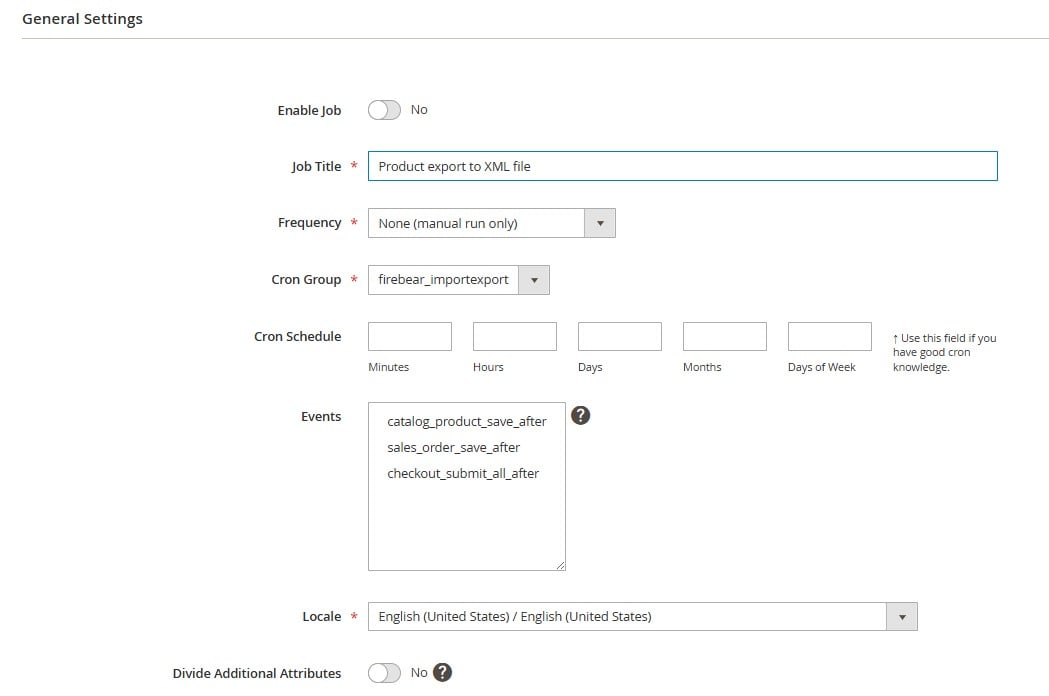
- In the General Settings, give your job a descriptive name and, if needed, set up a schedule so the export runs automatically — whether that’s daily, weekly, or at a custom interval. This is particularly useful if you maintain ongoing integrations with marketplaces or regularly update external systems.
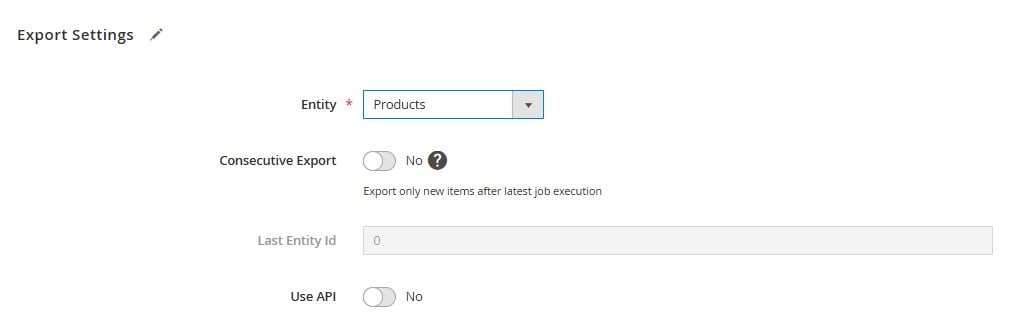
- Next, in the Export Settings, choose the entity you want to export. For this example, select Products. The extension also supports exporting other Magento entities, including orders, customers, categories, and CMS content, all in XML format.
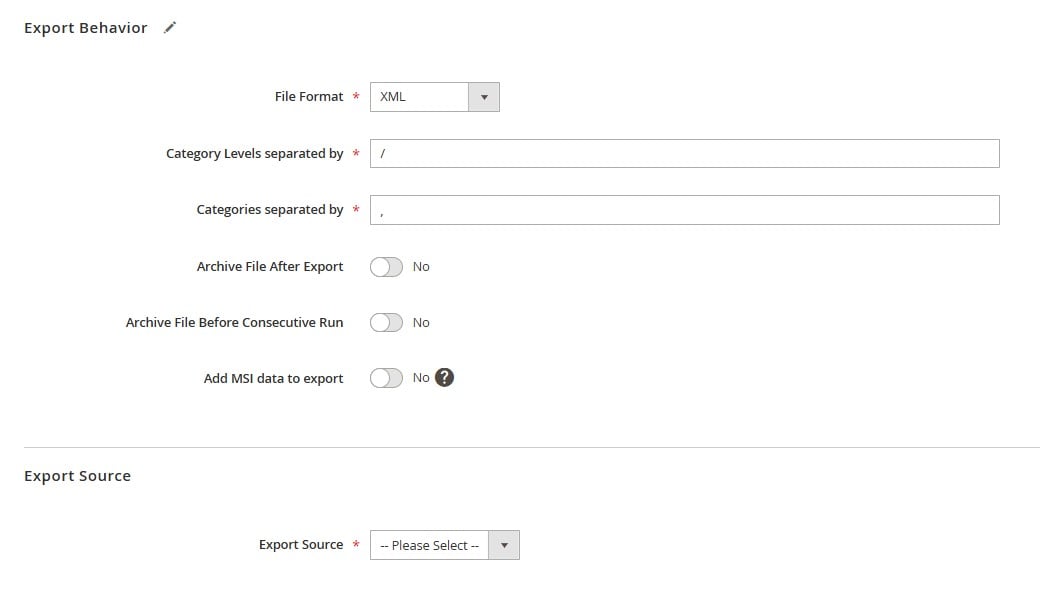
- Move to the Export Behavior section and set File Format to XML. This ensures the generated file is structured for easy parsing by other systems that rely on XML product feeds.
- In the Export Source section, decide where your file will be sent once it’s generated. Options include local storage, Google Sheets, Dropbox, FTP/SFTP, or a direct URL. Specify the output path, and the extension will create the XML file automatically. You can also download it directly from the export job screen once the process finishes.
- Like in the case of an import job, you can also leverage the XSLT Configuration section. Just enable XSLT transformation and paste your template.
If you’re unsure how to create an XSLT template, contact us now, and we’ll help you prepare one that matches your feed.
- Before running the export of products from Magento 2 as an XML feed, you can refine the data with attribute mapping and filters. Mapping lets you rename or rearrange Magento attributes so they match the exact structure required by the receiving system, while filters let you export only the products you need — for example, by category, SKU range, or stock status. You can read more about these capabilities in the Improved Import & Export Extension Manual.
- Once everything is configured, click Save & Run. The extension will process the data, generate the XML file, and deliver it to your chosen destination. From there, you can provide the file directly to your supplier, upload it to a marketplace, or feed it into an ERP or reporting tool without additional formatting work.
With this method, a Magento XML export of products — or any other entity — becomes a fast, repeatable process that saves time, reduces errors, and keeps your external systems perfectly in sync with your Magento store.
Real-World Use Cases for XML Product Feed Import & Export in Magento 2
Well-structured XML feeds are more than just a file format — they serve as a vital connection between your Magento store and the wider e-commerce ecosystem. In practice, XML product feeds in Magento make it possible to integrate with suppliers, marketplaces, and price comparison platforms while reducing manual work.
Supplier Stock Integration
A common use for a Magento 2 XML product feed is automating supplier stock updates. Many wholesalers and distributors provide inventory files in XML format, often updated daily or hourly. By connecting these feeds directly to Magento, you can keep product availability accurate, adjust pricing automatically, and ensure that descriptions reflect the supplier’s most recent data — all without manual intervention.
Marketplace Synchronization
Marketplaces such as Google Shopping, Amazon, and eBay frequently require product data in XML format for bulk uploads. By generating a dedicated Magento XML feed for each marketplace, you can keep your listings updated, maintain compliance with marketplace requirements, and speed up the process of launching new products across multiple channels.
Price Comparison Platforms
Price comparison engines aggregate offers from many sellers, and most prefer Magento 2 XML product feeds for quick data updates. By exporting a clean and structured XML product feed from Magento, your pricing and availability appear faster on these platforms, helping you stay competitive and visible to potential buyers.
ERP, CRM, and POS Integration
Beyond external sales channels, a Magento 2 XML feed can feed data directly into ERP systems, CRM software, or POS terminals. This ensures that internal tools always work with accurate and up-to-date product information, streamlining business operations and avoiding mismatches between systems.
Common Magento 2 XML Import & Export Errors & How to Fix Them
Even with a streamlined workflow, working with Magento 2 XML product feed import or export can still present challenges. Understanding the most common issues and how to resolve them will help you avoid failed jobs, incorrect data mapping, and formatting errors.
Malformed or Invalid XML Structure
Issue: The XML file does not follow the correct syntax or has missing closing tags, preventing Magento from reading it.
Fix: Validate your XML file against a schema before importing. Many online validators can check for syntax errors and structural issues. When using the Improved Import & Export extension, run the Validate File option to detect problems before processing.
Incorrect Attribute Names or Codes
Issue: The XML feed uses attribute names that don’t match Magento’s internal attribute codes, causing data to be skipped or rejected.
Fix: Use the extension’s attribute mapping feature to match the XML feed’s field names to Magento’s attribute codes without changing the original file. This is especially important when importing product data from suppliers who use custom naming conventions.
Unsupported Encoding or Character Corruption
Issue: Special characters, accented letters, or non-Latin alphabets appear broken after import.
Fix: Ensure your XML file is saved with UTF-8 encoding. The Improved Import & Export extension fully supports UTF-8, so you can import data without losing characters. Avoid copy-pasting content from incompatible editors that may introduce hidden formatting and disrupt your Magento 2 import of products from an XML feed.
Missing Required Fields
Issue: Essential fields like SKU, product name, or price are missing from the XML feed, causing Magento to reject the import.
Fix: Compare your XML feed to Magento’s sample file for the chosen entity type. Add any missing mandatory fields or use XSLT transformation to generate them from existing data in the feed.
Large File Timeouts or Performance Bottlenecks
Issue: Very large XML files take too long to process or cause server timeouts.
Fix: Split the XML into smaller batches or schedule imports during off-peak hours. The Improved Import & Export extension supports scheduled jobs, allowing large catalogs to be processed gradually without disrupting your site’s performance for the sake of Magento 2 product imports from an XML feed.
Schema Mismatch for Exports
Issue: The receiving system rejects your Magento XML export because the file structure doesn’t match its required schema.
Fix: Apply attribute mapping and, if needed, XSLT transformation to adjust the export’s XML format to meet the exact requirements of the target system. This ensures compatibility with marketplaces, ERPs, and supplier platforms.
Final Words — Why XML Integration Matters for Magento 2
In modern e-commerce, XML has become one of the most reliable and widely accepted formats for exchanging product, order, and customer data. From supplier stock feeds to marketplace listings, ERP integrations, and price comparison platforms, the ability to work with Magento 2 XML feeds directly can save hours of manual work and eliminate costly errors.
With the Improved Import & Export extension, the Magento 2 import of products from an XML feed becomes a simple, automated process. So does the Magento 2 XML export. You can connect directly to supplier feeds, push your catalog to external platforms, and even apply XSLT transformation templates to adapt any XML structure to Magento’s requirements. Whether you are importing thousands of SKUs or exporting a tailored order feed for your ERP, the extension ensures that your data transfer is accurate, efficient, and fully compatible with every system you work with.
If you’re ready to streamline your Magento 2 XML workflows, get the Improved Import & Export extension and see how easy it can be to handle XML in your store. For tailored advice or help configuring your setup, contact our support team — we’ll help you find the best solution for your specific cases of the Magento 2 import of products from an XML feed and the corresponding export needs.
Not sure how to import specific data types into Magento 2? Our guide covers everything — from products and customers to CMS pages and B2B entities.
👉 Browse all Magento 2 import topics
FAQ: Magento 2 XML Import & Export
Can Magento 2 import products directly from an XML feed?
No, the system does not natively support the Magento 2 import of products from an XML feed. By default, you must convert XML files to CSV before importing. However, with the Improved Import & Export extension, you can import products from an XML feed into Magento 2 directly, without conversion.
How can I export products from Magento 2 in XML format?
Magento 2’s default export only generates CSV files. To create a Magento XML export of products, you need a third-party tool like the Improved Import & Export extension, which supports XML output and lets you map attributes to match the required structure.
What are the advantages of using XML product feeds in Magento?
XML product feeds in Magento make it easier to integrate with suppliers, marketplaces, and price comparison engines. They use a structured format that systems can read easily, reducing errors and speeding up data exchange.
Can I schedule Magento 2 XML imports automatically?
Yes, the Improved Import & Export extension allows you to set up cron-based schedules so Magento 2 XML feeds are imported at regular intervals, such as hourly, daily, or weekly, without manual work.
How does XSLT transformation help with Magento 2 XML import?
XSLT lets you transform an XML file’s structure and field names to match Magento’s format. This is useful if your supplier’s XML feed uses different attribute names or a layout that Magento wouldn’t accept by default.
Can I use a Magento 2 XML feed for marketplaces like Google Shopping or Amazon?
Yes. You can configure the Improved Import & Export extension to generate marketplace-ready XML feeds from Magento 2. Attribute mapping ensures your Magento 2 product data in an XML feed matches each marketplace’s specifications.
What are common errors in Magento 2 XML import and how do I avoid them?
Typical issues include missing required fields, incorrect attribute codes, unsupported encoding, and malformed XML. Using file validation and attribute mapping in the Improved Import & Export extension helps prevent these problems.
Can I filter data when exporting Magento 2 products to XML?
Yes. The Improved Import & Export extension allows filtering by SKU, category, attribute set, product type, and other parameters before generating your Magento export of products via XML.
Is it possible to import other entities, like orders or customers, in XML format?
Yes. With the right tool, you can import and export orders, customers, categories, and CMS pages in XML format, not just products.
Where can I learn more about Magento 2 XML import and export processes?
You can find more detailed guides and tutorials in the Magento 2 Import & Export Guide List, covering XML, CSV, and other data exchange formats for all Magento entities.
Related posts
 How to Import Customers & Customer Addresses to Magento 2: Complete Tutorial, CSV Samples & Tips
 Shopify Product Import Behavior Explained: Take Full Control of Your Product Data
 Magento 2 B2B Company Explained: A Complete Guide to Setup, Structure, Management & Import
 Magento 2 Export Customers Tutorial: Export Customer Data with Ease
 Mastering Magento 2 Upsell Products: Setup, Management, Import & Export Guide
 Magento 2 Cross-Sell Products Guide: Manual Setup, Bulk Import & Cart Optimization Tips
 Magento to Shopify Product Migration: Complete 2026 Guide to Import & Export
 How to Import Shopify Product Variants by EAN