
Shopify Inventory Management: A Comprehensive Guide to Tracking and Optimizing Your Stock

Effective Shopify inventory management ensures you never sell out-of-stock items and provides timely alerts for restocking. Shopify admin offers built-in tools that empower you to track, monitor, and update inventory levels with ease. Through Shopify’s Inventory section, you can enable tracking, adjust stock levels, and review a detailed 90-day inventory modification history. If you’re unsure how to set up inventory or optimize processes, this guide has you covered.
In this article, we’ll walk you through the essentials of Shopify inventory management. You will learn how to set up inventory tracking and sell on Shopify without stock; manage inventory across multiple locations; adjust, monitor, and bulk-edit inventory; and handle inventory transfers, imports, and exports. By the end, you’ll be equipped with actionable steps to efficiently add, track, and optimize inventory in your Shopify store — whether through Shopify’s tools or powerful third-party integrations.
Table of contents
- What is Shopify Inventory Management and Why It Matters?
- How to Enable Inventory Tracking in Shopify
- Selling Out-of-Stock Products: When and How to Do It in Shopify
- Hiding Out-of-Stock Items from Customers in Shopify
- Managing Inventory Across Multiple Locations in Shopify
- Bulk Inventory Updates: Simplify Stock Adjustments in Shopify
- How to Manage Shopify Inventory Transfers Effectively
- Importing and Exporting Inventory Data in Shopify with CSV Files
- Enhancing Shopify Inventory Management with Third-Party Apps
- Final Words
- FAQs: Shopify Inventory Management
What is Shopify Inventory Management and Why It Matters?
Shopify Inventory Management is the process of overseeing and controlling your stock within the Shopify platform. It involves tracking inventory levels, managing stock across multiple locations, and ensuring that your products are available to meet customer demand without overstocking.
Effective inventory management in Shopify is crucial for several reasons:
- Optimizing Stock Levels: By accurately tracking your inventory, you can maintain optimal stock quantities. This reduces storage costs and minimizes the risk of stockouts or overstocking.
- Enhancing Customer Satisfaction: Keeping products in stock and providing accurate availability information improves the shopping experience. It prevents lost sales due to unavailable items and builds customer trust.
- Streamlining Operations: Efficient Shopify stock management saves time and reduces errors. Automated tracking and updates allow you to focus on other important aspects of your business.
- Data-Driven Decision Making: Access to real-time inventory data helps you make informed decisions about purchasing, marketing strategies, and inventory replenishment.
- Managing Multiple Locations: If you operate from multiple warehouses or retail outlets, Shopify’s inventory tools enable you to manage stock levels across all locations seamlessly.
- Cost Savings: Effective inventory management reduces carrying costs and minimizes losses due to unsold stock or spoilage, directly impacting your profitability.
Using the native inventory management solutions in Shopify is essential for scaling your business and staying competitive. It not only optimizes your operations but also enhances the overall customer experience, leading to increased loyalty and sales. Let’s break it down.
The quantity of each product and variant in your database is represented by Shopify inventory. Keep in mind that setting up your products and handling fulfillment always impact your inventory levels. Shopify inventory management system displays them for all your goods on the Inventory screen under Products -> Inventory grouped into the following states:
| Inventory state | Definition |
| Available | This inventory state refers to the product quantity that you can sell. Therefore, your available inventory is neither associated with any orders nor a part of incoming transfers. |
| Committed | This inventory state refers to the number of products that are part of a placed order that is not fulfilled. Note that products in a draft order cannot be committed unless the draft becomes an order. |
| Incoming | This inventory state refers to inventory that’s on the way to your warehouses. It is not yet available to be sold. When the incoming inventory is received, its state changes to Available. |
How to Enable Inventory Tracking in Shopify
When customers place an order on your Shopify store, accurate inventory management plays a crucial role in ensuring a smooth shopping experience. To achieve this, it’s essential to enable inventory tracking — one of the core features of Shopify inventory management. By setting up inventory tracking for a product, you can monitor and adjust its stock levels effortlessly. Additionally, Shopify provides a 90-day history of inventory changes, giving you valuable insights into your stock trends.
To set up inventory tracking and then add inventory to Shopify, use the default inventory management software as follows:
- Go to admin -> Products.
- Choose a product you want to track and click its name.
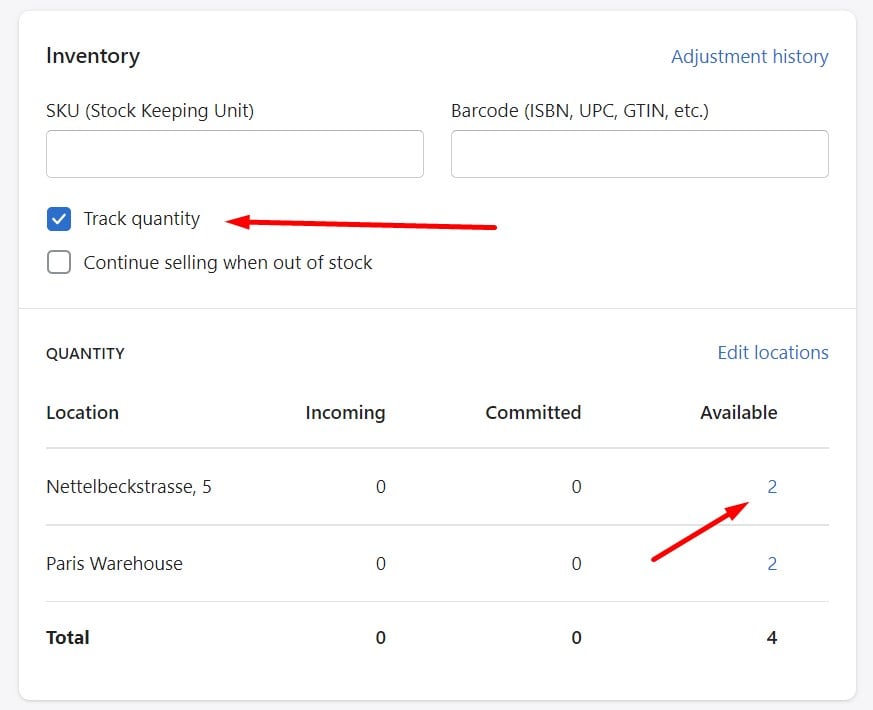
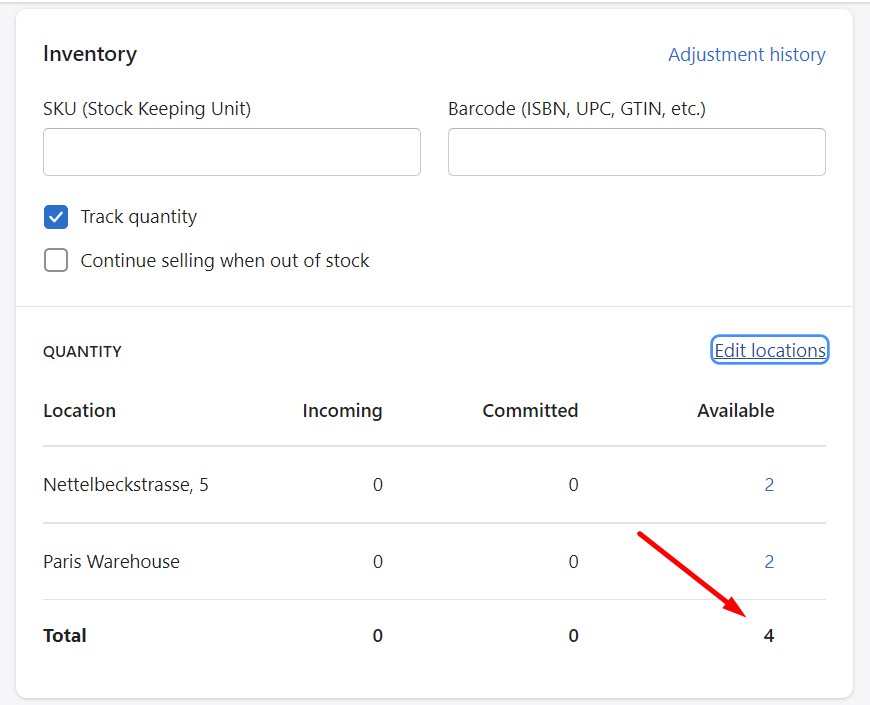
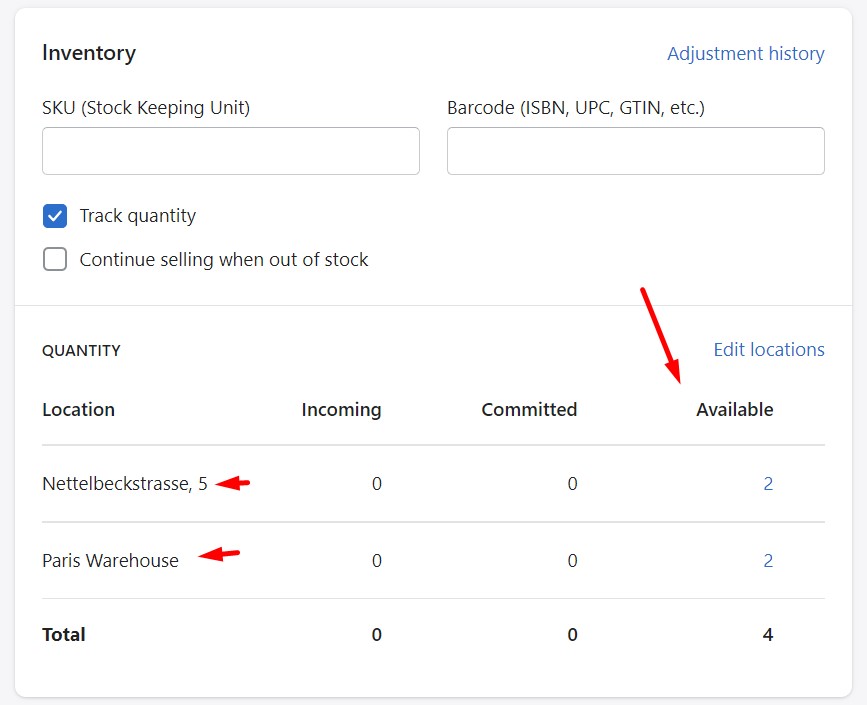
- Scroll down to the Inventory section on the product details page and check Track quantity.
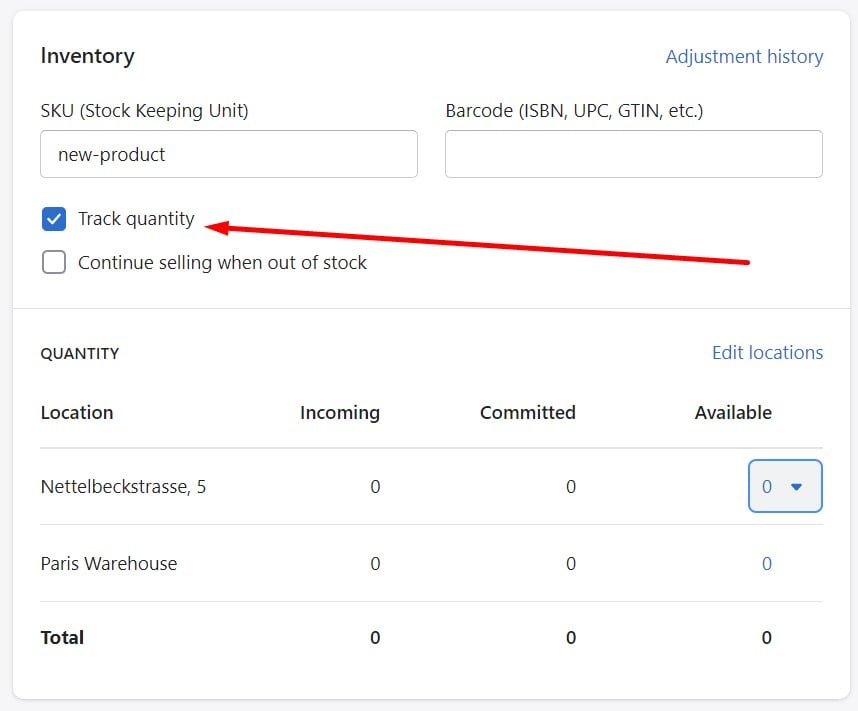
- In the Quantity section, enter the quantity information for each location.
- Click Save.
In the case of variants, you need to proceed to the variant’s details page and check the same option.
Click the variant that you want to track, scroll down to the inventory section, and enable Track quantity.
Selling Out-of-Stock Products: When and How to Do It in Shopify
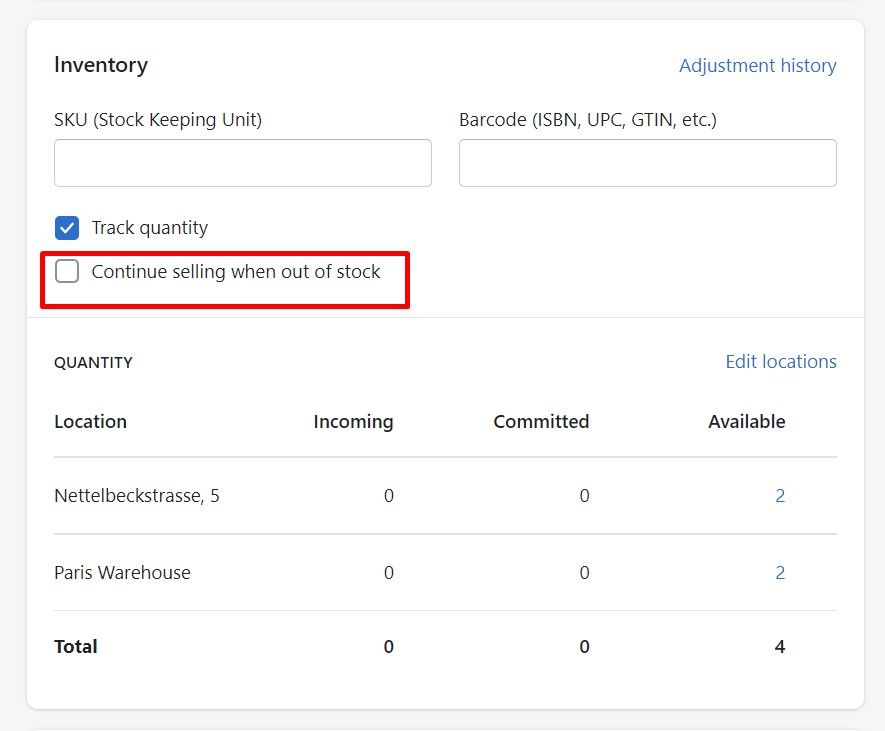
In the image above, you can see the Continue selling when out of stock option. It is a very handy feature for various situations when you run out of inventory but still want to continue selling. If you want to allow customers to purchase an item when it’s out of stock, check Continue selling when out of stock. The Shopify continue selling when out of stock functionality is a simple but powerful addition to your inventory management!
Turn off Inventory Tracking
To set up Shopify inventory tracking for a product, follow these steps:
- Go to admin -> Products.
- Choose a product you don’t want to track and click its name.
- Scroll down to the Inventory section on the product details page and uncheck Track quantity.
- Click Save.
In the case of variants, you must proceed to the variant’s details page and uncheck the same option. Click the variant you don’t want to track, scroll down to the inventory section, and disable Track quantity.
Sell Without Inventory
As you can see, selling products on Shopify is possible even when they are out of stock due to the Shopify continue selling when out of stock feature. You just need to check the corresponding option in the product’s or variant’s Inventory section. The system considers a product out of stock when its inventory level reaches zero or goes below. To continue selling, you need to check the Continue selling when out of stock option.
When your inventory is nil or less, you can still sell things without activating the option if you utilize Shopify POS. In this case, the Shopify POS app presumes you have all the necessary items on hand.
As for your online store, you can do so even if your inventory is at zero or lower with the Shopify continue selling when out of stock feature turned on. Customers cannot purchase the product, though, if you deselect the Continue selling when out of stock option. Disable this feature if you don’t want to sell a stock that has run out.
For any of the following reasons, you might want to enable Shopify’s continue selling when out of stock feature and let customers purchase things that aren’t currently on hand:
- Your products are available for pre-order.
- The stock update is about to arrive, so you want to continue selling before it comes.
- You sell first and then supply the order.
- You use another system to track the actual inventory quantity
If you want to keep Shopify’s continue selling when out of stock feature disabled, it is possible to hide products when they’re out of stock. Thus, they disappear from your online store, so customers cannot find and buy them.
Hiding Out-of-Stock Items from Customers in Shopify
With the default Shopify inventory management, you can hide out-of-stock products in a few ways:
- use automated Shopify collections;
- do that manually on the Collections page;
- automate the process with the help of an inventory management app.
Hiding out-of-stock products from collections
You can hide out-of-stock products from your automated collections as follows:
- Turn on product inventory tracking as described above.
- Configure your automated collections as follows:
- Choose all conditions for Products must match;
- Choose is greater than and specify 0 for the Inventory stock condition.
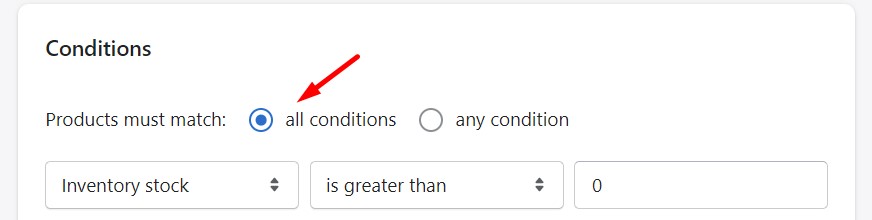
Note that it doesn’t work if you specify any condition in Products must match.
Hiding out-of-stock products from the default Catalog collection
Your default collection that stores all your products is available under yourstore.myshopify.com/collections/all. However, there is a Shopify inventory management trick that helps you hide products that are not available. You can override it with a custom automated collection. It will make out-of-stock products invisible on your storefront.
The default Shopify inventory management software lets you follow these steps to hide out-of-stock products from the default Catalog collection:
- Go to your admin -> Products -> Collections.
- Hit Create collection and do the following things:
- Name your collection as All.
- Choose Automated in the Collection type section.
- Choose all conditions for Products must match;
- Choose is greater than and specify 0 for the Inventory stock condition.
- Set Price is greater than $0.
- Click Save.
- Sort the products in your All collection:
- Scroll down to the Products section and the Sort drop-down menu.
- Choose Manually and rearrange products with drag-and-drop handles.
- If you change the collection name, ensure that the collection handle is still all:
- Scroll down to the Search engine listing preview section;
- Click Edit website SEO.
- Navigate to the URL and handle text box.
- A URL specified there should end in /all. If it ends in something different, change it to /all,
- Click Save.
Now, out-of-stock products won’t be available in the default Catalog collection.
Managing Inventory Across Multiple Locations in Shopify
One or more shop locations, as well as one or more fulfillment applications with multi-managed inventory enabled, are examples of locations for which you manage product inventory in Shopify.
Multi-managed inventory lets you control and handle product stock at several locations. Some of these processes may be automated by inventory management software for Shopify, such as dropshipping apps, logistics platforms, and specialized fulfillment services. But note that their functionality varies a lot depending on the particular application. For instance, if you manage a product’s inventory via a fulfillment app that doesn’t allow multi-managed inventory, you face limitations: in this case, it is impossible to stock the product in your store locations.
Managing your store’s inventory from multiple locations implies that you set a product’s inventory to be stocked at multiple store locations or one or more fulfillment apps, that support multi-managed inventory, handle some inventory.
To manage inventory quantities for multiple locations for a product or variant, do the following:
- Go to Admin -> Products and select a product.
- Select a variant if the product has variants.
- Scroll down to the Inventory section and choose Multiple locations in the Inventory will be stocked at list.
- Click Edit locations to add or remove locations.
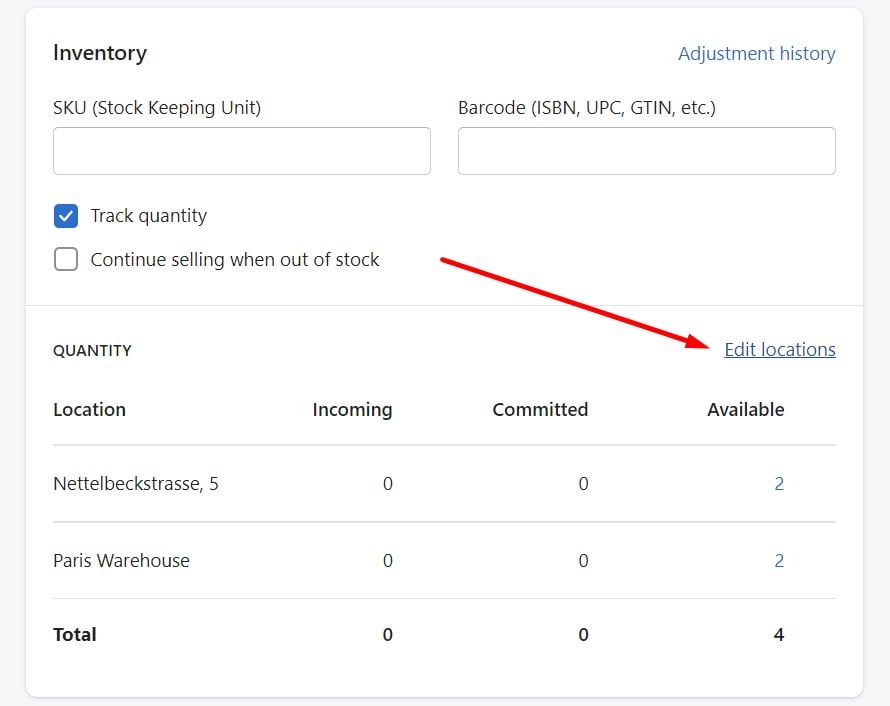
- After checking/unchecking locations in the list, click Save.
- Click the quantity listed under Available to set the new value, and then click Save.
- Check Track quantity to enable tracking.
- Click Save.
Shopify also lets you use the bulk editor to update product inventory in Shopify. We describe this process in our Guide to Shopify Products. Note that you need to add columns for each location.
Bulk Inventory Updates: Simplify Stock Adjustments in Shopify
You might need to manually modify your inventory based on the demands of your business. For instance, sales, seasonality, or the popularity of a product may influence your decision to offer more or less inventory through your Shopify site. Customers, in turn, benefit from accurate inventory levels while seeking to place an order on your e-store. Below, we explain how to examine and modify Shopify’s inventory quantities.
How to View Product Inventory in Shopify
The Shopify Products screen allows you to view product inventories, which includes a total inventory count for all product variants.
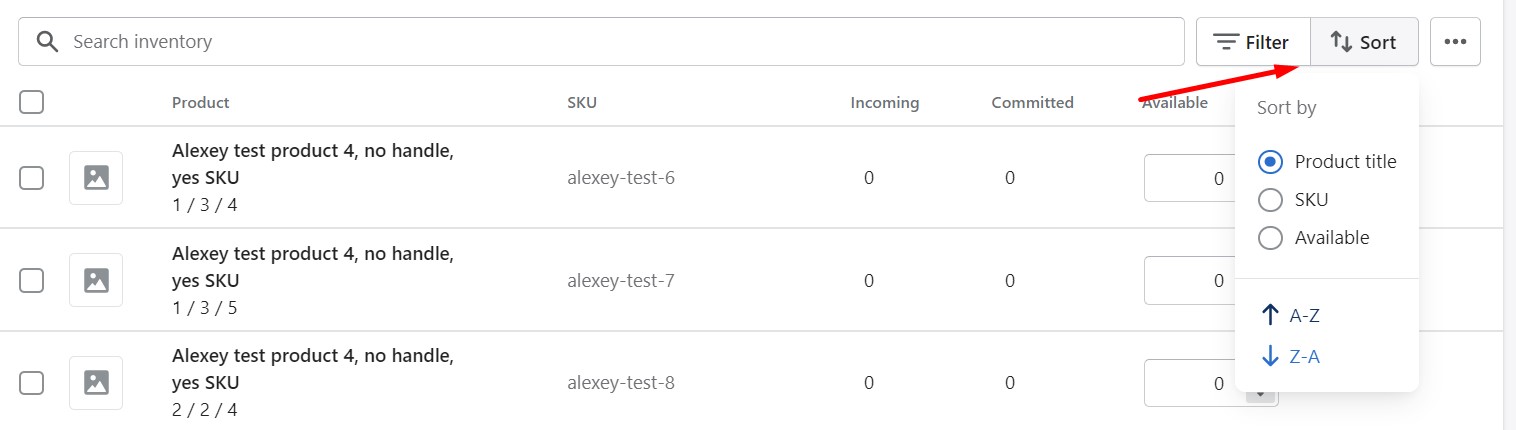
On the other hand, the Inventory page displays the inventory totals per variant for each location. You can do variant searches using the corresponding field:
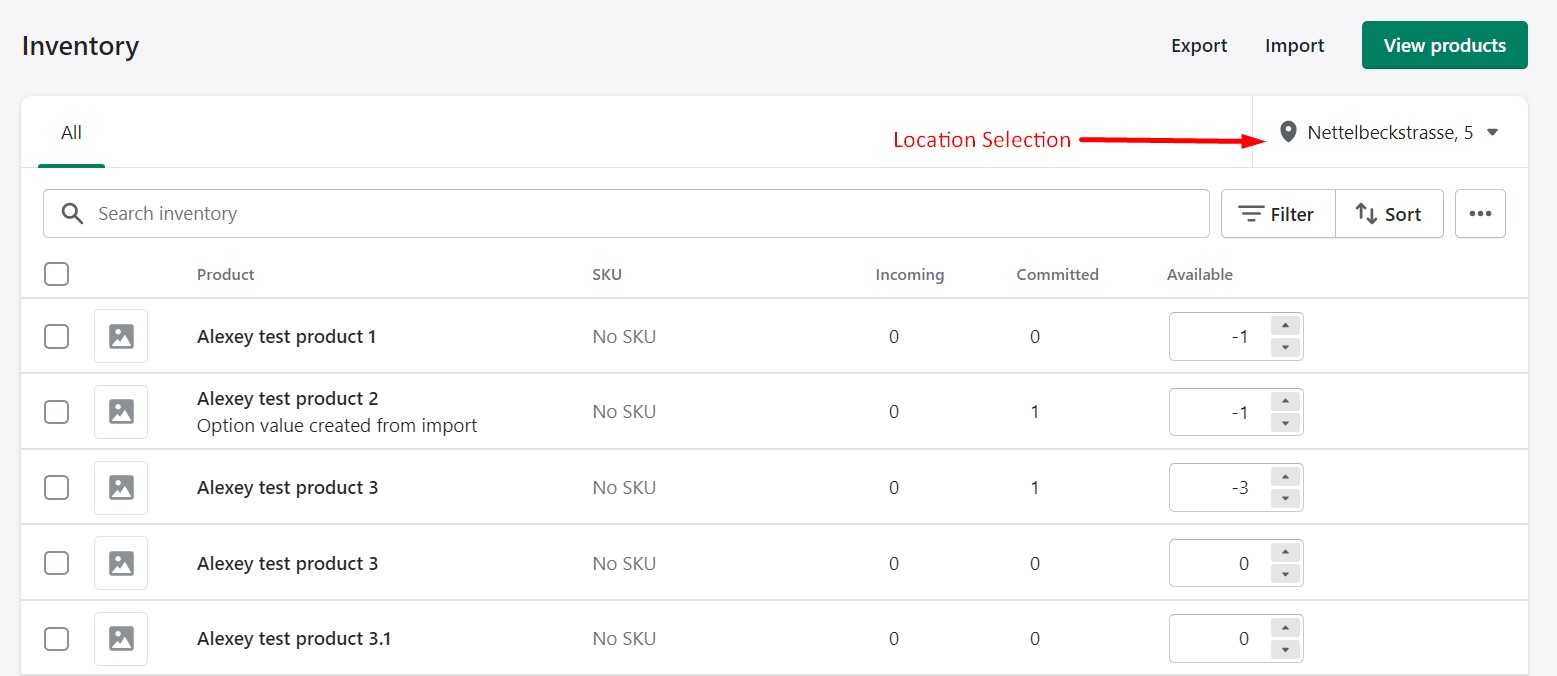
To sort your Shopify inventory, click the Sort button and choose Product title, SKU, or Available as a sorting parameter. Also, specify a sort order: A-Z or Z-A.
You can also apply filters to Shopify inventory:
- Click the Filter button;
- Select a filter;
- Select its value;
- Add more filters if necessary.

To aid in the administration of your inventory, you can also apply tags to your products, as we describe in our guide to Shopify products.
How to Add Inventory to Shopify
Shopify inventory management is associated with numerous ways of adjusting product quantity. The following basic methods are at your disposal:
- Add inventory on the Inventory page;
- Add inventory on the product details page;
- Add inventory with the help of the bulk editor;
- Add inventory via import and the inventory CSV file.
A product’s inventory quantities will only be assigned to the app’s location if they are tracked using the inventory application. However, the locations to which items are assigned can be changed on the product details page.
If you have numerous locations, a location filter will show up in the Shopify admin on the relevant pages, such as the Orders page and the Inventory page. The page preserves your selection once you choose a location in the filter until you decide to alter it. The chosen location for a page is not maintained across browsers and devices because it is recorded in a browser cookie only.
Now, let’s see how to add inventory to Shopify following the best inventory management practices:
- Go to your Shopify admin -> Products -> Inventory.

- Select a location from the drop-down menu on the right if multiple warehouse locations are associated with your business.
- Use filters and a search field to narrow the selection of products.
- Shopify provides the ability to adjust the available quantity of a single variant. Specify the quantity in the Available column of the variant you want to adjust.
- Alternatively, you can adjust multiple variants by the same amount:
- Check the variants you want to edit. You can select variants of different products.
- Click More actions -> Update quantity.
- You can add a particular amount to all products or set a new value. Use negative values to subtract from the inventory quantity or set the negative inventory amount. Note that Shopify shows the new value for each variant before you apply the change.
- Click Save.
Now, Shopify updates your Available column with new values.
If you cannot find a product in the selected location, there are two possible explanations. First of all, tracking inventory for that product may be disabled (see the first chapter). Secondly, you don’t stock the product at this location.
If you want to adjust inventory quantities for products that have no variants, you can also follow these steps:
- Go to the Products page.
- Open the product details page you want to edit.
- Scroll down to the Inventory section.
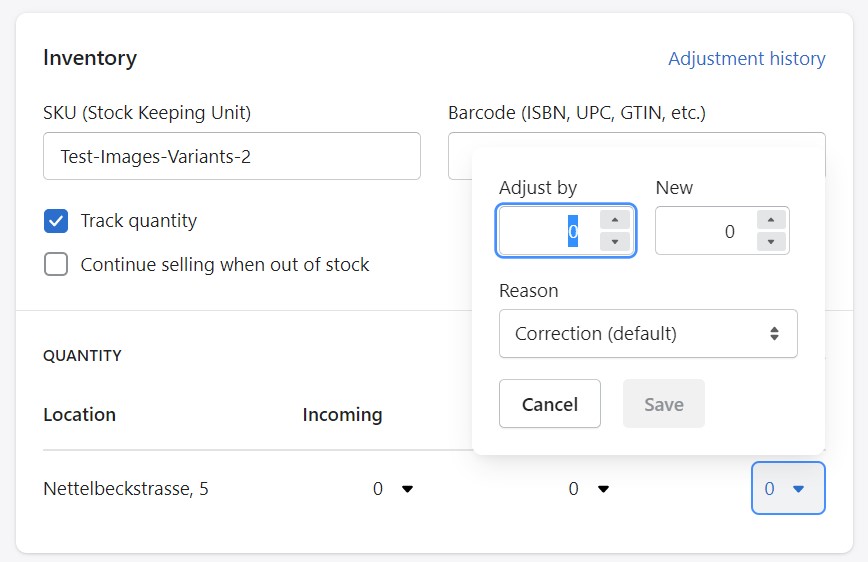
- Find the QUANTITY grid and click on the quantity you want to adjust in the Available column.
- Enter the quantity under Adjust by or specify the new number of items under New. Use negative numbers to subtract from the existing inventory quantity.
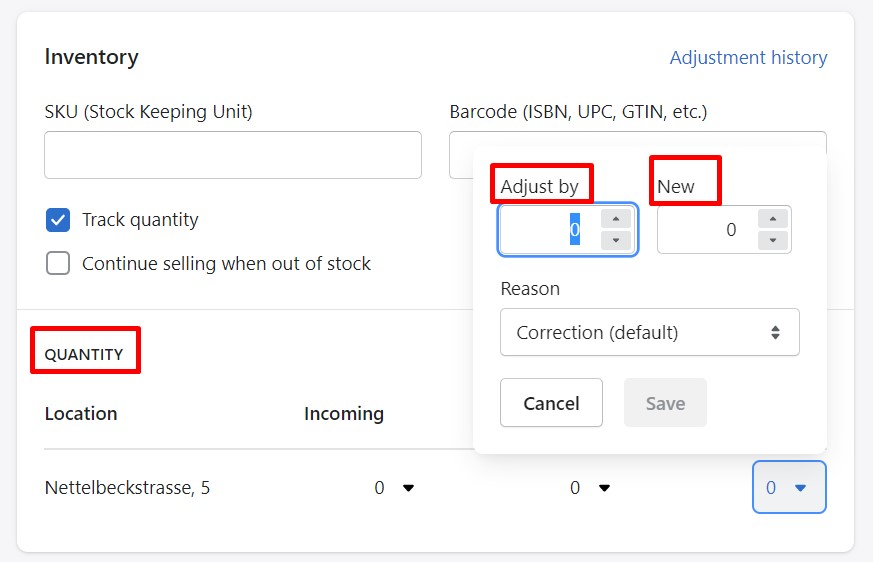
- Click Save.
Note that you can apply similar changes on the Inventory screen.
If you want to adjust inventory quantities for products with variants available in a single location, follow these steps:
- Go to the Products page.
- Open the product details page you want to edit.
- Scroll to the Variants section.
- You can edit the quantity for a variant as follows:
- Select a variant you want to edit;
- Scroll down to the inventory section;
- Find the QUANTITY grid and click on the quantity you want to adjust in the Available column.
- Enter the quantity under Adjust by or specify the new number of items under New. Use negative numbers to subtract from the existing inventory quantity.
- At the same time, you can edit quantities for all the variants:
- On the product details page, check all variants you want to edit;
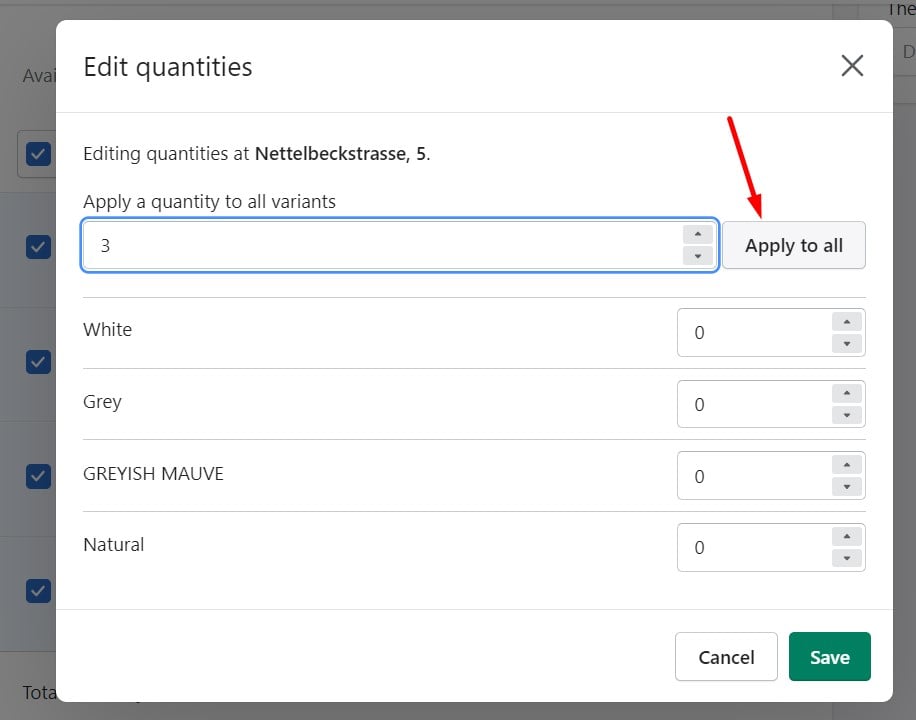
- Click More actions -> Edit quantities.
- Choose a location where you want to edit quantities. If your items are stored in a single location, you have only one option to select.
- Enter a quantity for all the variants, and then click Apply to all.
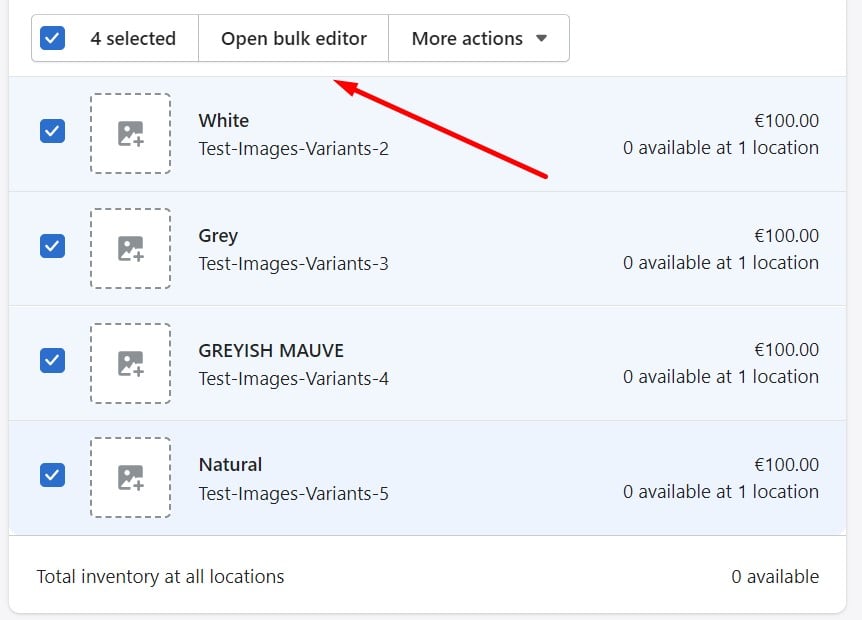
- Alternatively, you can check all variants you want to edit and click Open Bulk Editor:
- Click Columns and activate the warehouse where your items are stocked.
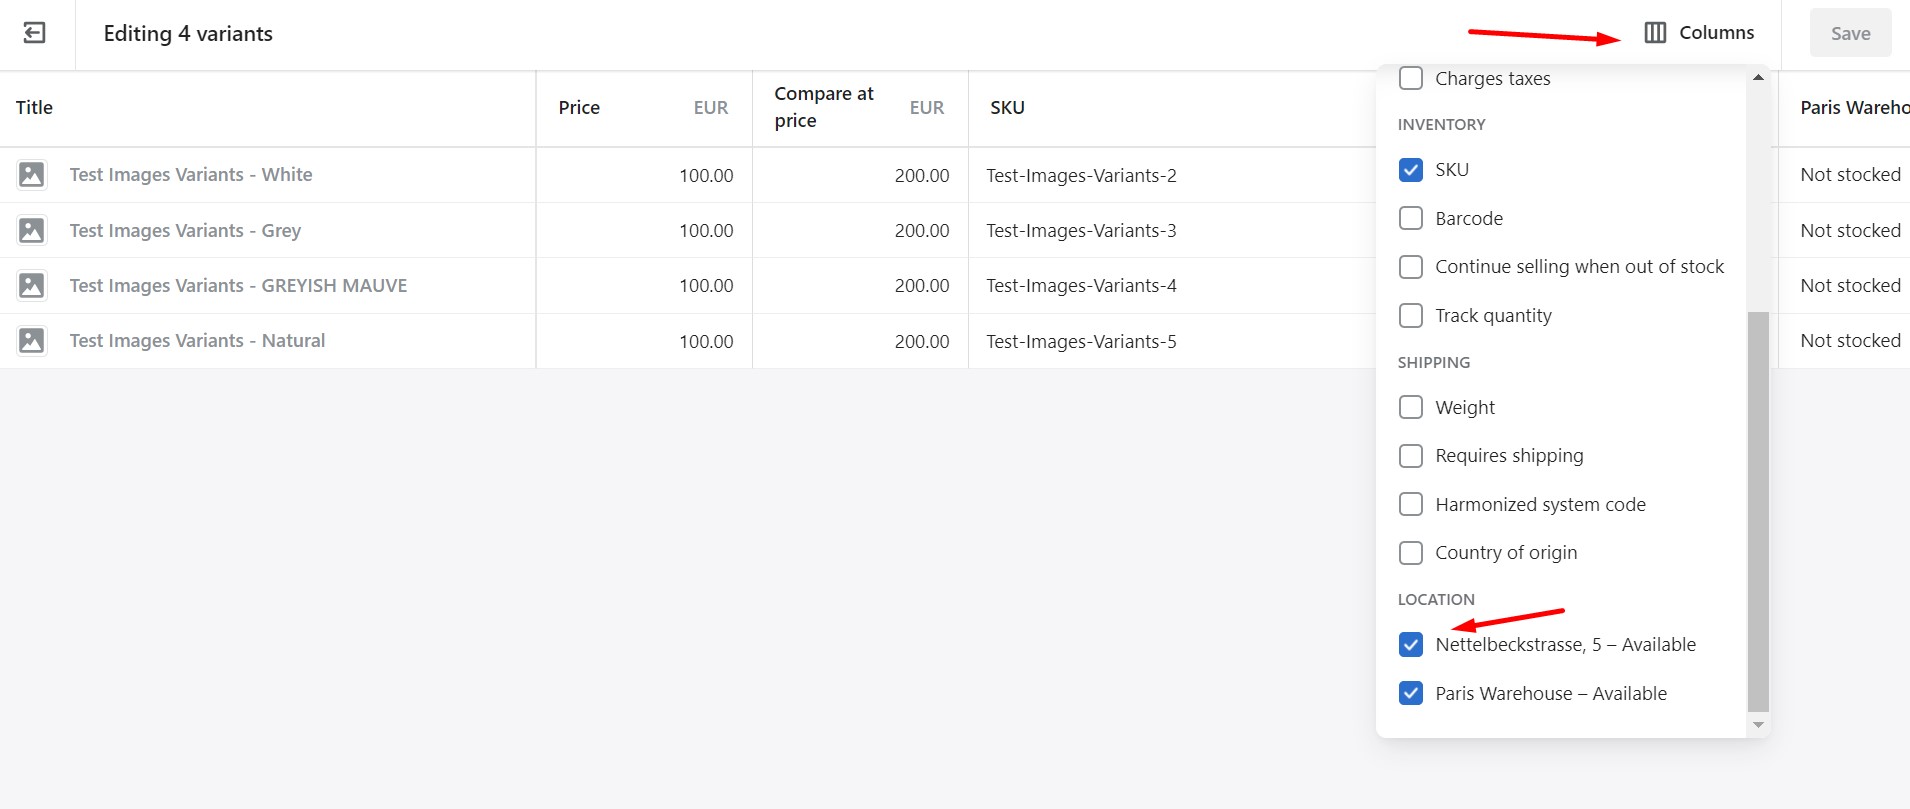
- Click on the row, type the adjustment, and apply it.
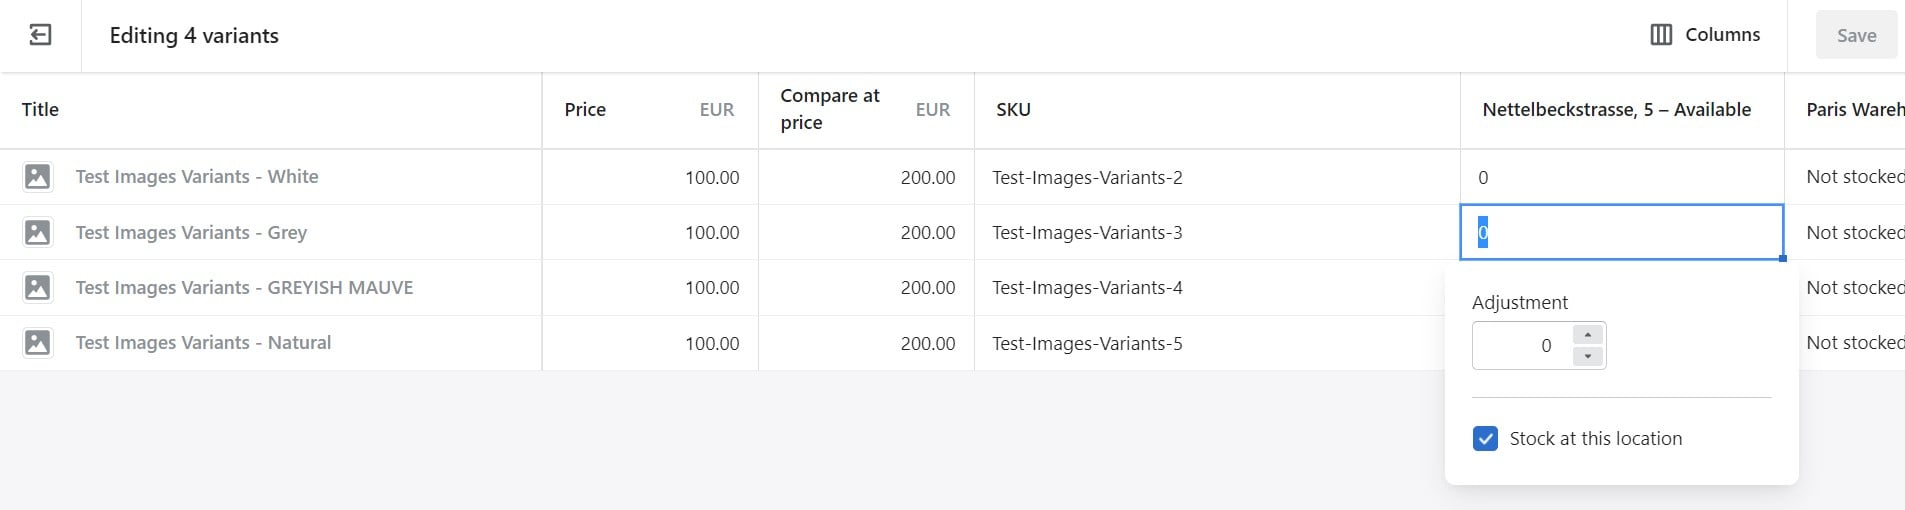
- Click Columns and activate the warehouse where your items are stocked.
- Click Save.
How to add inventory to Shopify if your products have variants and are stored in multiple locations? In this case, you can adjust inventory quantities as follows:
- Go to the Products page.
- Open the product details page you want to edit.
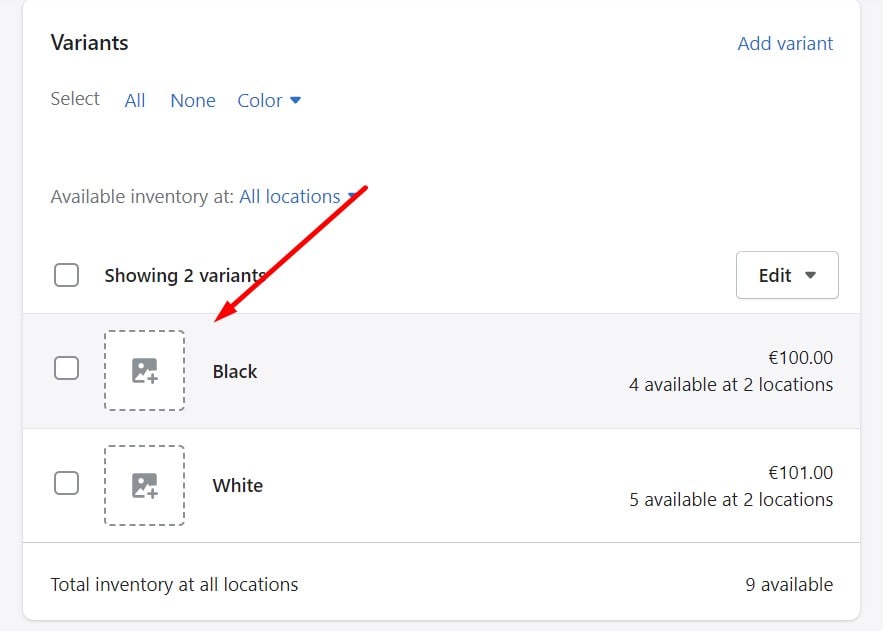
- Scroll to the Variants section.
- Edit quantities for a single variant by clicking the variant and scrolling to its inventory section, where you can apply all the necessary changes per location in the Available column:
- Add or subtract the quantity by a specific number in the Adjust by field.
- Specify the new quantity in the New section.
- Click Save.
How to View Product Inventory Adjustment History in Shopify
You can view a product’s inventory change history in Shopify. If the product contains variants, you can view the inventory adjustment history for each tracked variant individually, but not for all of the variants at once.
The Shopify inventory adjustment history is available only for the previous 90 days. You can see the following details about inventory adjustments:
- Date – Here, you can see the date of each adjustment.
- Activity – This column shows the event that caused the adjustment.
- Adjusted by – Here, you can see a staff member responsible for the adjustment.
- Available – The inventory quantity available after the adjustment is displayed here.
- Committed – This column shows the number of products that are part of a placed order that is not fulfilled.
You can view your adjustment history as follows:
- Go to the Products page.
- Open the product details page you want to edit.
- Scroll to the Variants section.
- Select a variant.
- Scroll down to the Inventory section.
- Click Adjustment history.

- You will see the following screen:
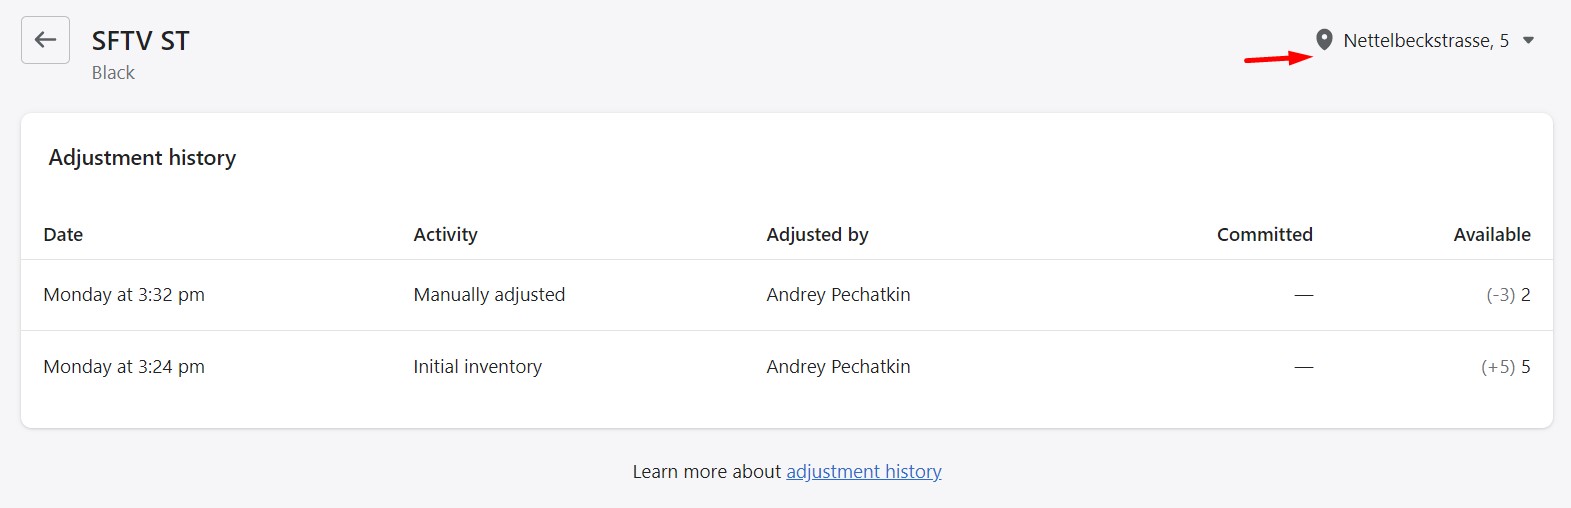
You can see that the adjustment history is displayed per location.
Inventory adjustment reasons
You can choose a reason for each quantity’s adjustment when doing your inventory management in Shopify. They are listed in the Activity column on the adjustment history page. At the same time, you add them while applying changes to inventory quantities.
The following inventory adjustment reasons are at your service:
| Inventory adjustment reason | Usage |
| Correction | This option is used by default to correct inventory errors or as a general reason. |
| Count | This option is used while counting physical stock and discovering a discrepancy between the actual inventory quantity and the previously recorded inventory quantity. |
| Damaged | This option is used to subtract damaged stock. |
| Data correction | This option is used automatically for error correction. Since it is read-only, you cannot change it in your Shopify admin. |
| Promotional or donation | This option adjusts inventory due to products used in promotions/donations. |
| Received | This option is used to refer to new stock when adding new inventory. |
| Return restock | This option is used to add a returned item if it can be resold. |
| Theft or loss | This option is used to adjust inventory due to theft or loss. |
How to Add Inventory to Shopify in Bulk
The bulk editing tool allows you to modify the inventory of numerous products and product variants at once. You can amend the product characteristics, choose which goods and variants you wish to adjust the inventory for, and then make your changes from your Shopify admin.
Note that a browser impacts the way bulk editing of Shopify inventory management works. Web browsers like Chrome, Firefox, and Safari are the most effective with the bulk editor. Alternate browsers, including Internet Explorer, may result in mistakes or improper inventory modifications.
There are two ways to edit inventory for multiple products in bulk. You can do that either from the Inventory page or from the Products page. If you need to update the inventory of only a few products with numerous versions, you might use the individual product page. Access the bulk editor from the Inventory page if you need to update the inventory for more than a few products.
On Inventory Page
Let’s see how to add inventory to Shopify on the inventory page. You can edit products and variants in bulk using the default Shopify inventory management software as follows:
- Visit your inventory page.
- Select variants you want to edit. You can check variants of different products.
- Click Edit Variants.
- The system transfers you to Bulk Editing mode.
- Hit the Columns button and check the columns associated with your locations.
- Click on the quantity you want to edit.
- Specify the adjustment. Shopify displays the update in real time.
- You can also disable stocking in a particular location by unchecking Stock in this location.

The value in the Location field for a product is displayed as “–” if the inventory quantity for this product isn’t tracked. However, you can change the situation in Bulk Editing mode:
- Click Columns;
- Check Track quantity in the list of columns;
- Check Track quantity in the Track quantity column.
There is also a situation when the Track quantity is checked, but the product is not stocked at a particular location. In this case, the value in the location cell is displayed as Not stocked. You can change that as follows:
- Click the field;
- Check Stock at this location;
- Set the inventory quantity.
On Product Details Page
Now, let’s see how to add inventory to Shopify from a product details page. You can use the bulk editor from there to edit several products at once:
- Go to your Shopify admin -> Products.
- Open a product view page of the product that you want to duplicate.
- Go to the product’s Variants section.
- Click the Edit button.
- Select Open bulk editor.
- Click the Columns button and activate inventory columns.
- Apply changes as described above.
- Save your new inventory levels.
How to Manage Shopify Inventory Transfers Effectively
Below, we explain how to add inventory to Shopify using the inventory transfers screen. It is another built-in instrument introduced in Shopify by default. You can use inventory transfers for many purposes, such as recording, tracking, and receiving incoming inventory from suppliers or from one store location to another. Consequently, you can manage your Shopify inventory as follows:
- After submitting and receiving your supplier’s confirmation of your purchase order (PO), start recording incoming inventory.
- As you move your goods between various warehouses, keep track of it.
- Process inventory at your own pace and indicate whether you’ve received complete or partial inventory.
- Get items in a transfer automatically, and your product inventory is updated.
- In the product’s information, monitor the quantity of arriving items and the anticipated date of their arrival.
However, you can’t create transfers for products associated with third-party fulfillment applications.
Enable Shopify inventory tracking
In the default Shopify inventory management software, inventory transfers require enabled inventory tracking. You can activate this feature as follows:
- Go to admin -> Products.
- Choose a product you want to track and click its name.
- Scroll down to the Inventory section on the product details page and check Track quantity.
- In the Quantity section, enter the quantity information for each location.
- Click Save.
Now, since a product’s inventory is tracked, Shopify will update the inventory quantity that’s available at a location automatically every time a product transfer is received.
How to add inventory to Shopify by creating an inventory transfer
By setting up inventory transfers in Shopify, you can keep track of incoming goods, and receiving updates automatically. If you have numerous store locations, you can utilize inventory transfers to track inventory coming from suppliers or one that transfers between them.
If the app or custom fulfillment service does not support multi-managed inventory, you cannot create transfers for the products they manage. Such limitations are often associated with dropshipping applications, third-party logistics solutions, and custom fulfillment services.
Before going any further, we need to clear the distinction between a vendor and a supplier:
- A supplier is your provider of products. You can order goods either from a single supplier of multiple partners.
- A vendor, in its turn, is associated with the product’s brand. While a product may have numerous suppliers, it has only one vendor.
For instance, you sell car parts and need to restock some car parts for BMW. You can order them anywhere, including such platforms, as Euro Car Parts. In this case, Euro Car Parts is your supplier, while BMW is the vendor. Although you may order the same car parts from another platform, such as RockAuto, BMW still remains the vendor while the supplier may change.
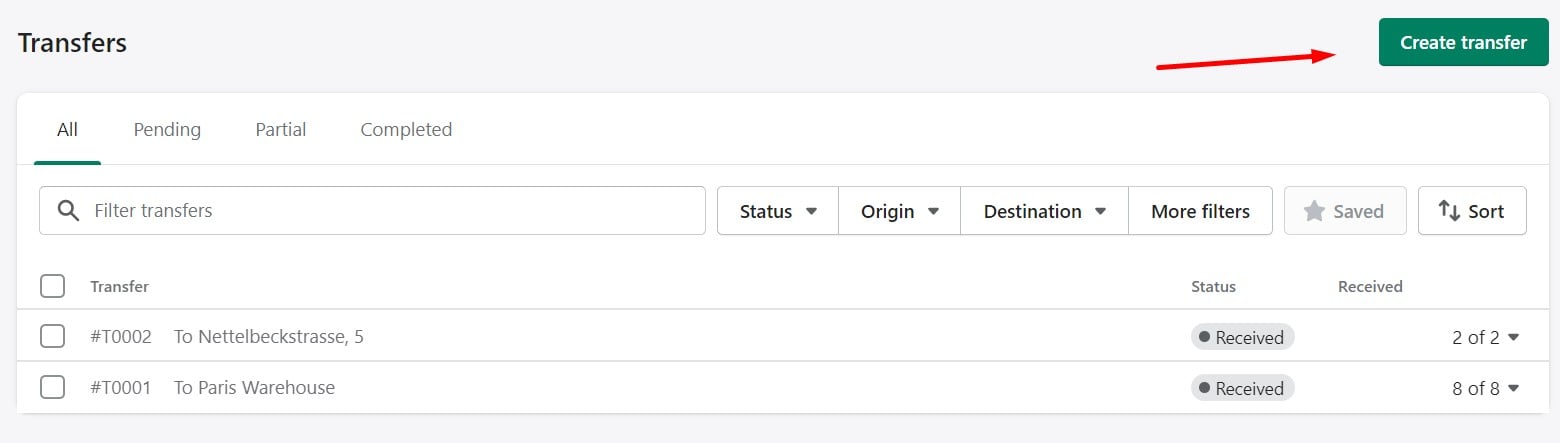
You can create an inventory transfer in Shopify as follows:
- Go to your admin -> Products -> Transfers.
- Hit the Create transfer button.
- Select the location where the inventory originates by clicking Select origin in the ORIGIN column. If you have several locations, the suppliers are listed after the list of locations in the SUPPLIERS section. By selecting Create new supplier and entering your provider’s name and any additional information, you can add a supplier..
- Proceed to the DESTINATION section, click Select destination, and choose the active location to receive inventory.
- Go to the Add products section to specify the products and variants that you want to add to the transfer.
- Provide information on the quantities for each product in the transfer Under Quantity. Note that the inventory quantity at the original location may be a negative number if you enter a quantity greater than the available amount.
- Proceed to the Shipment details section and configure the Expected arrival date, shipment Tracking number, and the Shipping carrier. The latter might be selected automatically based on the tracking number.
- Proceed to the Additional details section to assign a reference number or a tag to the transfer. This will help you find your transfer in the future.
- Click Save transfer when finished.
You must select a different location for a transfer if you deactivate a location related to this transfer. Otherwise, the transfer won’t take place. The inventory is refilled at the chosen destination if you select the same location as the origin.
Receive an inventory transfer
Now that you know how to create inventory transfers, it is necessary to describe how to receive them. It is the second essential part of adding inventory to Shopify via transfers. Follow these steps to receive an inventory transfer in Shopify:
- Go to Products -> and choose the transfer to be received.
- Click the Receive inventory button.
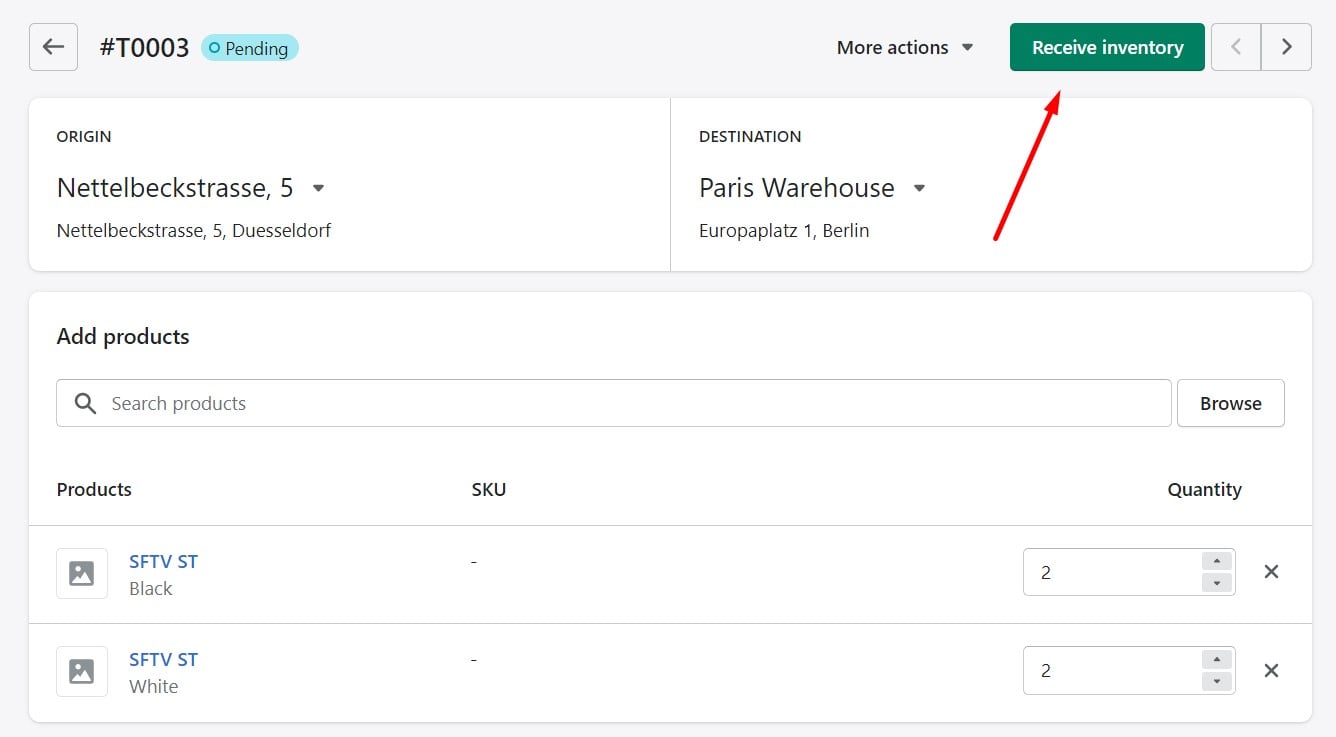
- Accept items:
- Specify the number of items you’re accepting manually;
- Locate the Accept column and click ALL to accept all for the line item;
- Use the Accept all unreceived command to add all quantities that have not yet been received to your inventory.
- Also, it is possible to reject items that are damaged:
- Specify the number of items that you’re rejecting manually;
- Locate to the Reject column and click All to reject all for the line item;
- Or you can simply click Reject all unreceived to reject all quantities that have not yet been received.
- Click Save when finished.
Calculate inventory
Make sure you comprehend how things are counted and monitored when you receive them from the supplier. Depending on the items you’ve already gotten, different items arrive at different times and in different conditions. Therefore, you may need to alter the transfer’s quantity. You can still see how many inbound products are available on a product’s details page in the Inventory section. However, proper Shopify inventory management requires a little example of how transfers work.
Let’s assume that you are expecting a transfer with 10 items of a particular product. You receive only 7 of them: 4 are marked as Accepted, and 3 are marked as Rejected. 3 items are still incoming. In this situation, you should act as follows:
- Go to Products -> and choose the transfer of 10 items.
- Click the Receive inventory button.
- Specify the number of items you’re accepting manually – 4 items;
- Reject items that are damaged or unreceived:
- Specify the number of items you’re rejecting – 3 items;
- Simply click Reject all unreceived to reject the remaining 3 items.
- Click Save.
Importing and Exporting Inventory Data in Shopify with CSV Files
Inventory quantities at your sites are available via an inventory CSV file. You can export it, edit,and then re-import back, updating the inventory levels. Let’s see how to add inventory to Shopify using import and export functionalities.
How to Export Inventory in Shopify
You can export a CSV file with your inventory quantities using the default Shopify inventory management software. The exported CSV file can be used as a template to update the inventory quantities. Import the updated version back to Shopify to change the inventory levels for each product in each location.
You can create a template with your uniquely recognized products or product variants. Just export an inventory CSV file to use it with different programs or systems.
If you have many locations, you may choose whether to export the data for each site separately or for every location at once.
You can export the inventory in Shopify as follows:
- Visit Products > Inventory.
- Press Export.
- Choose the rows that you want to export.
- Specify whether you want to export from a single location or all locations.
- Click Export inventory.
We describe this procedure in more detail here: How to export inventory from Shopify.
If you need to exceed the default limit or want to automate inventory exports from Shopify, you can replace the standard data exporter with the Shopify Improved Import & Export application. It not only supports huge files and multiple data formats but also lets you create export schedules and apply presets to automatically match third-party requirements. Contact us for more information about the tool.
How to Import Inventory to Shopify
You can individually import inventory data into Shopify in addition to product data. This process just modifies inventory quantity. Neither a location is created nor are the other values used to identify products updated. That’s how the default Shopify inventory management software works.
To prevent mistakes and potential problems, it is advised to import your inventory only while no other adjustments are being made. For instance, manual adjustments or transferring the update during active sales will result in inaccurate product amounts.
You can import the inventory data to Shopify as follows:
- Go to your Admin -> Products -> Inventory.
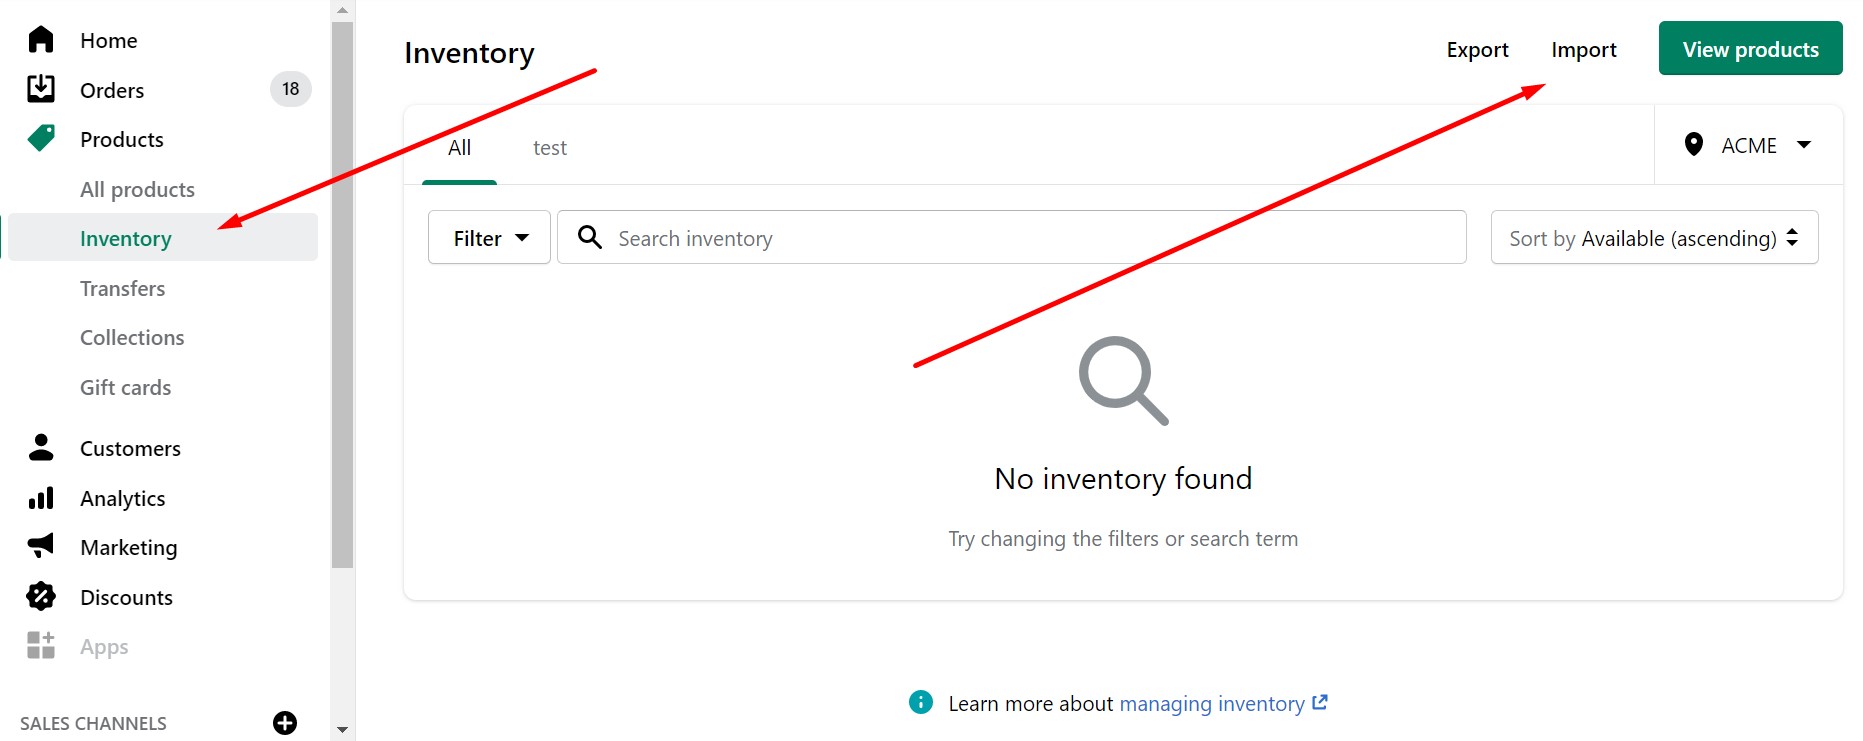
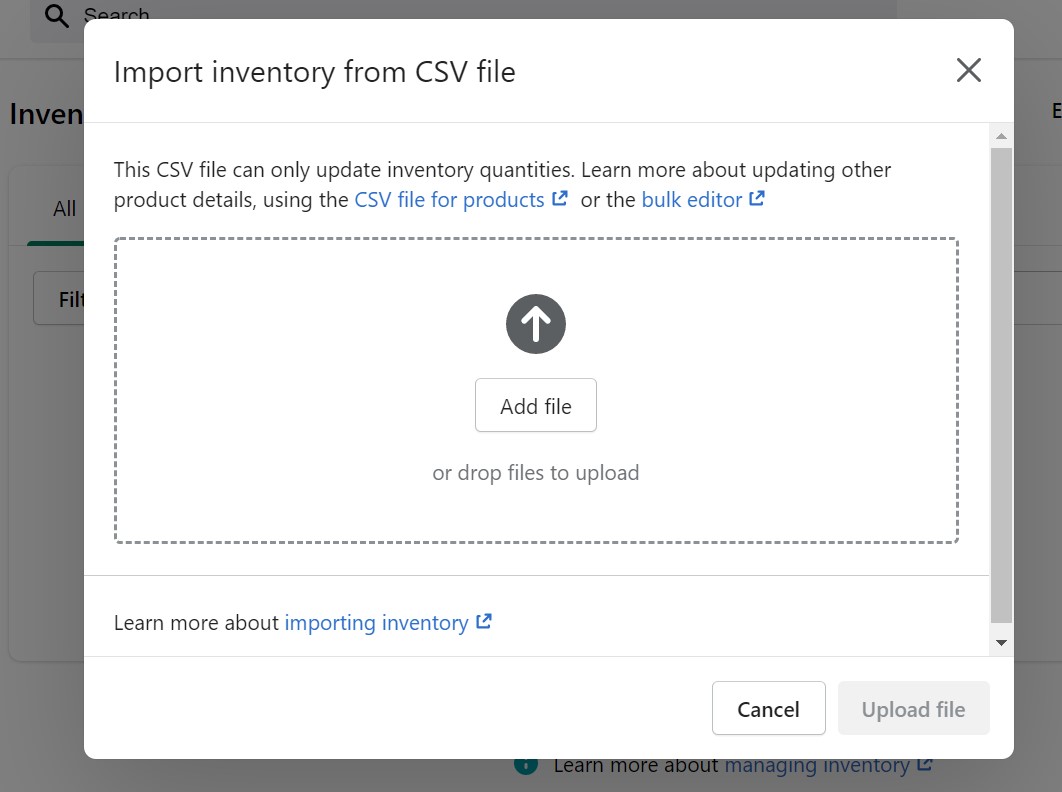
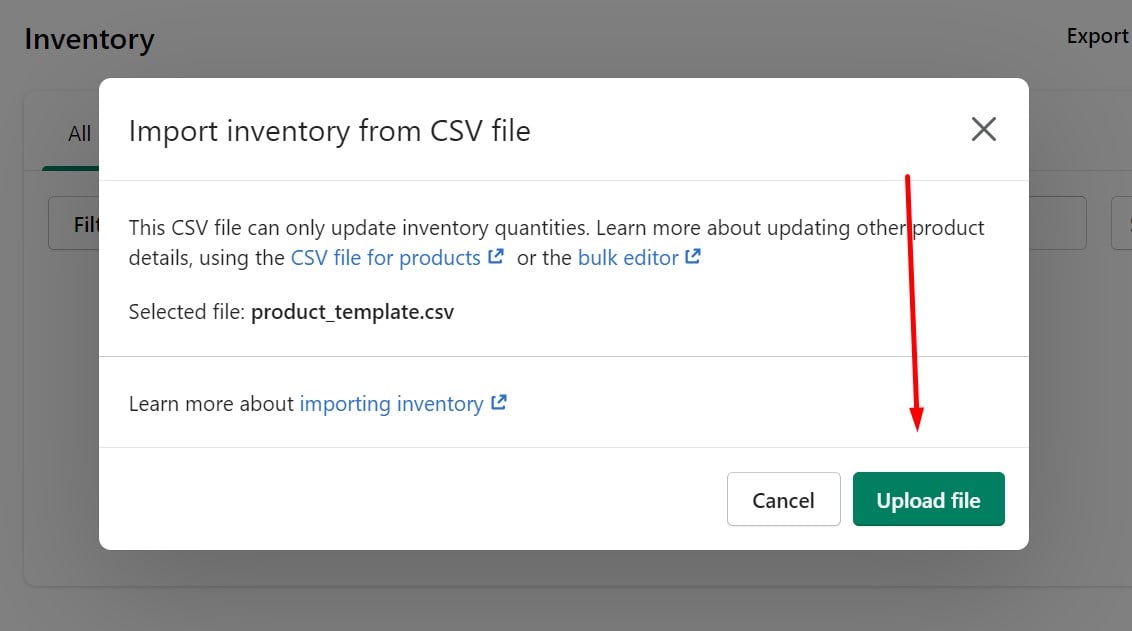
- Click Import and select your CSV file with the update.
- Click Import inventory, verify what you intend to import, and hit the Start import button.
We describe this procedure in more detail here: How to import inventory to Shopify.
If you need to exceed the default limit or want to automate inventory uploads to Shopify, you can replace the standard data importer with the Shopify Improved Import & Export application. It not only supports huge files and multiple data formats but also lets you create update schedules and apply presets to automatically match third-party data to Shopify’s requirements so that inventory files are imported smoothly. Contact us for more information about the tool.
Enhancing Shopify Inventory Management with Third-Party Apps
Effective Shopify inventory management is critical for running a successful e-commerce business. While Shopify provides built-in inventory tools, third-party applications can take your stock management to the next level. By incorporating these apps, you can automate repetitive tasks, enhance accuracy, and optimize stock control across all your sales channels.
Why Use Third-Party Apps for Shopify Inventory Management?
Third-party apps go beyond Shopify’s default inventory features, offering solutions tailored to diverse business needs. Here’s how they can help:
- Automate Inventory Processes: Eliminate manual tasks like stock level updates and reconciliation. Automation reduces errors and saves valuable time.
- Low-Stock Alerts: Receive real-time notifications when inventory levels are low, ensuring you restock on time and avoid missed sales opportunities.
- Seamless Integration with External Systems: Sync your Shopify inventory with ERP systems, accounting software, and external databases to maintain consistent data across platforms.
- Multi-Location Inventory Tracking: If your business operates across multiple warehouses or stores, third-party apps help you assign, track, and update inventory levels for each location efficiently.
- In-Depth Reporting and Insights: Access advanced analytics to track sales trends, optimize stock levels, and plan for future inventory needs.
Firebear’s Import & Export Tool for Shopify: A Game-Changer
For businesses looking to maximize efficiency, Firebear’s Import & Export Tool for Shopify is an essential solution. Here’s how it outperforms Shopify’s native inventory management:
- Automated Imports and Exports: Automate inventory updates to ensure stock levels are always accurate without manual intervention.
- Advanced System Integration: Map your Shopify inventory data with external systems for seamless imports and exports. This feature is invaluable for maintaining consistency across all platforms.
- Support for Various File Formats and Data Sources: Whether your data is in CSV, XML, JSON, or another format, the Firebear tool supports it all. It even allows integration with Google Drive, Google Sheets, and FTP/SFTP servers.
- Multi-Location Fulfillment Updates: Update inventory levels for specific products at individual locations, ensuring precise control over stock distribution.
- Scheduled Workflow Automation: Set up scheduled imports and exports to automate recurring inventory tasks, saving time and improving accuracy.
- Custom Inventory Solutions: Tailor the tool to your unique needs, whether it’s managing supplier updates, integrating multi-channel inventory, or streamlining data synchronization.
Transform Your Shopify Inventory Management Today
The Shopify App Store features numerous inventory management solutions, but Firebear’s Import & Export Tool stands out for its robust features and unparalleled flexibility. Whether you need help with automated inventory updates, integration with external systems, or managing stock across multiple locations, Firebear has you covered.
Contact Firebear now to learn how our Import & Export Tool can streamline your inventory management and optimize your Shopify operations. Let us help you stay ahead in the competitive e-commerce landscape with smarter, more efficient inventory solutions!
Final Words
Effective Shopify inventory management is the backbone of a successful e-commerce business. Whether you’re a small merchant managing a single store or a large retailer with multiple locations, having the right tools in place is essential for ensuring smooth operations, maintaining accurate stock levels, and providing an exceptional customer experience.
While Shopify’s built-in inventory features are robust, third-party solutions like the can elevate your business to the next level. With advanced automation, seamless integrations, support for multiple file formats, and the ability to manage multi-location inventory updates, this tool is a game-changer for merchants looking to optimize efficiency and reduce manual tasks.
Investing in the right inventory management tools not only saves time but also prevents costly errors like stockouts or overstocking, helping you maximize profits. Moreover, by integrating your inventory processes with external systems, you gain better visibility and control, enabling data-driven decisions to support your growth.
If you’re ready to take your Shopify inventory management to the next level, explore the possibilities with Firebear. Contact us today to learn how our Import & Export Tool can transform your inventory processes, streamline your workflows, and position your business for long-term success in the competitive e-commerce landscape.
FAQs: Shopify Inventory Management
If you’re looking to streamline your stock control processes, these frequently asked questions will guide you through the essentials of Shopify inventory management. Learn how to track inventory, edit quantities in bulk, and even sell without holding stock.
Can I use Shopify for inventory management?
Yes, Shopify offers built-in inventory management tools that help you track product quantities, monitor stock levels, and manage inventory across multiple locations. With these features, you can automate stock updates, prevent overselling, and ensure a seamless shopping experience for your customers.
Does Shopify keep your inventory?
Shopify maintains inventory data for all products with tracking enabled. It records quantities, manages stock history for up to 90 days, and allows you to set thresholds for low-stock alerts. This helps ensure that your inventory information is accurate and up-to-date.
How do I set inventory on Shopify?
To set up inventory tracking for a product on Shopify, follow these steps:
- Log in to your Shopify Admin and navigate to Products.
- Select the product you want to manage and open its details page.
- Scroll down to the Inventory section and check the box for Track quantity.
- In the Quantity section, enter the stock details for each location.
- Click Save to apply the changes.
How do you track inventory in Shopify?
Inventory tracking in Shopify allows you to monitor stock levels automatically. By enabling the Track quantity option for a product, Shopify updates inventory quantities in real time as customers place orders or as you restock products. You can also review stock history to identify trends or discrepancies.
Do you need your own inventory for Shopify?
No, Shopify allows you to operate without owning inventory. You can adopt models like:
- Dropshipping: Collaborate with third-party suppliers to ship products directly to customers.
- Shopify Collective: Partner with other Shopify merchants to expand your product catalog.
How to sell on Shopify without inventory?
To sell products on Shopify without maintaining inventory:
- Disable Track quantity for those products.
- Alternatively, enable Continue selling when out of stock to allow orders even when inventory levels are at zero.
For businesses without inventory, consider using dropshipping or services like Shopify Collective to expand your product offerings.
How to bulk edit inventory on Shopify?
To update inventory levels for multiple products at once:
- Go to the Inventory page in your Shopify admin.
- Select the product variants you want to edit.
- Click Edit Variants to enter Bulk Editing mode.
- Use the Columns button to add or adjust location-specific inventory fields.
- Modify the quantities as needed. Shopify updates the changes in real time.
- To disable inventory tracking for a specific location, uncheck the Stock in this location option.
How to change inventory location on Shopify?
To move inventory from one location to another:
- Enable inventory tracking for your products.
- Go to Products -> Transfers in your Shopify admin and create a new transfer.
- Select the location from which the inventory will be transferred.
- Choose the receiving location where the inventory will be moved.
- Add the products and variants you want to include in the transfer.
- Specify the quantity for each product and configure other transfer details.
- Save the transfer and mark it as Accepted to complete the process.
Related posts
 Shopify Gift Cards Explained: How to Set Up, Manage & Sell Them
 How to Delete Products from Shopify: Step-by-Step Guide
 How to Export Metafields in Shopify: A Complete Guide
 How to Add Products to Shopify: Manually, as Duplicates, or via Import
 How to Archive Products in Shopify: A Quick Guide
 Detailed Guide to Shopify Product Data Entry Fields
 How to Import Metafields in Shopify: A Complete Guide
 Magento to Shopify Migration – The Ultimate Guide