
Shopify Product Mapping Guide

Welcome to our guide to Shopify product mapping. Since the platform has no built-in mapping instruments, you must rely on additional tools to match product attributes for different data exchange purposes. All core Shopify product metafields, for instance, are mapped automatically if you use Marketplace Connect. Some marketplaces, however, require certain product attributes to be displayed on your listings that aren’t part of your product details in the Shopify admin by default. How to align your product mapping efforts on Shopify with your integration strategies most efficiently? Let’s see!
The following article teaches how to map products on Shopify without headaches. We explain how to create a Shopify product mapping scheme and use it for integrations with various external systems, including marketplaces, ERPs, CRMs, etc., with the help of the Import & Export Tool for Shopify. Below, you will learn how to create flexible schemes for both import and export, automating all further data synchronization. Also, there is a table that contains all product attributes and their descriptions. You will need this information for mapping third-party column titles.

Table of contents
Shopify Product Mapping with Import & Export Tool
Meet a game-changing application that will take your Shopify product mapping to the next level. The Import & Export Tool is a Swiss Army knife for e-commerce data management, offering features that simplify, enhance, and supercharge your product data mapping on Shopify.
This application lets you map product attributes when you import data to Shopify or export it to external systems. These two cases are associated with slightly different features. For instance, export processes introduce default values and the ability to exclude attributes from a CSV file. As for the import side of the process, it provides all the instruments necessary for transferring third-party data to Shopify. Let’s explore each interface to learn how Shopify product mapping is implemented in the Import & Export Tool.
How to Map Data During Import
Like in the case of the default Shopify import, it’s a breeze to get started. Click the “Import” button under Admin-> Apps -> Import & Export Tool -> Import.
You are on the screen with general settings. Here, you can choose XML, XLSX, or Google Sheets as your file format, select Google Drive, URL, FTP, or manual file upload, and provide a file that contains the update.
Next, the app lets you automate your product import, enable email notifications, and apply several more features to your data import. You can learn more about these steps in the app’s manual.
After that, you proceed to the Shopify product mapping step. The Mapping section lets you match third-party column names from the imported file to Shopify’s default names.
- The first column contains the property names from the file you’re importing.
- In the second column, you can choose the properties that correspond to your Shopify store (see the table below).
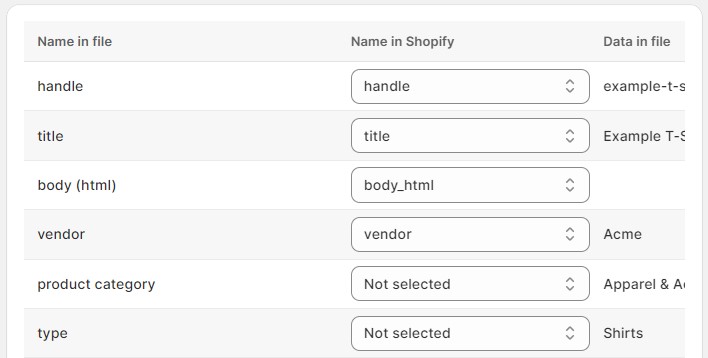
By matching these properties, you can implement Shopify product mapping and successfully import custom files with different property names.
The Import & Export Tool analyzes the update and automatically adds the column names from your import file to the mapping table. Next, you match them to the default namings. For instance, you can see that the CSV’s body (html) is mapped to Shopify’s body_html. You just need to find third-party column names and specify the system’s replacement for them below to enable product mapping on Shopify. That’s it!
Export Mapping
When it comes to export processes, the Import & Export Tool offers a similar approach to Shopify product mapping. Start a new export profile under Admin -> Apps -> Import & Export Tool -> Export. Hit the “Export” button to proceed to general settings, automation, and other features described in our manual.
When you are ready, proceed to the Mapping screen, where Shopify product export mapping takes place.
Now, you can rename all the default Shopify columns, specifying any new custom names for your Shopify product mapping. Our app lets you create an output file 100% suitable for any custom requirements!
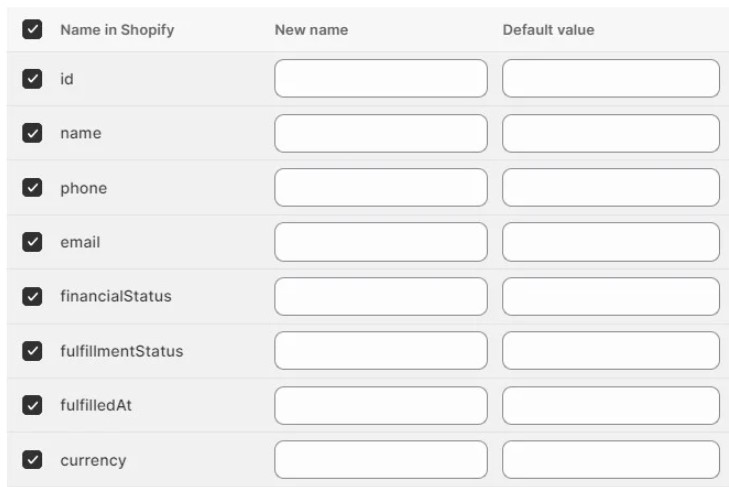
Also, note that it is possible to uncheck columns that you don’t want to export.
Additionally, you can include default values in your Shopify product mapping. If a specific attribute has no value, the export file will automatically include the designated default value in its place.
Shopify Product Attributes (Column Titles)
Shopify product mapping is associated with the following default attributes (column names in your data file):
| Product Attribute | Description |
| Handle | Shopify uses handles as unique identifiers for each product. They can consist of letters, dashes, and numbers. Spaces, accents, and other characters, including periods, are prohibited.
The system uses handles in product URLs. Every line in a CSV file that starts with a different handle is considered a new product. When you need to add multiple images per product, use multiple lines with the same handle in your Shopify product mapping. |
| Title | Shopify stores the title of your product in this column. For example, Black Sun Rising. |
| Body (HTML) | Here, you should place the description of the product in HTML format. |
| Vendor | Shopify uses this column to specify the name of the vendor for your product. For instance, Mike’s Apparel.
A minimum vendor name must be two characters long. |
| Product Category | Product categories are crucial for Shopify product mapping since they indicate tax obligations and exemptions in the US. They are selected from a predefined and standardized list – Shopify Product Taxonomy.
Product categories are also used to manage products. You can leverage them for the following activities:
There are two ways to input a standardized product category:
|
| Type | It describes the category of a product. This label is used in a free format. |
| Tags | Specify a comma-separated list of tags in this column. |
| Published | Data in this column indicates whether a product is published or not. Valid values are true and false. |
| Option1 Name | If a product has an option, its name should be specified here, e.g., Color.
If there is only one option, then this value should be Title. |
| Option1 Value | If a product has an option, enter its value, e.g., Black.
If a product has only one option, specify Default Title here. Pay attention to the fact that changing data in this column deletes existing variant ID values, and creates new variant IDs. Any change to variant ID values, in turn, can break third-party dependencies on variant IDs. It’s crucial for Shopify product mapping. |
| Option2 Name | If a product has a second option, then enter its name, e.g., Size. |
| Option2 Value | If a product has a second option, then enter its value, e.g., Large.
Changing data in this column deletes existing variant ID values with the consequences mentioned above |
| Option3 Name | If a product has a third option, then specify its name here. |
| Option3 Value | If a product has a third option, specify its value here.
Changing data in this column deletes existing variant ID values with the consequences mentioned above. |
| Variant SKU | Shopify requires the SKU of a product or variant in this column used to track inventory with inventory tracking services.
Don’t leave this field blank if you’re using a custom fulfillment service in your Shopify product mapping. |
| Variant Grams | Specify the weight of a product or variant in grams in this column. A unit of measurement and decimals are prohibited. If you want to specify a weight of 5.125 kg, enter 5125. Shopify always imports and exports the weight in grams. |
| Variant Inventory Tracker | Your inventory tracking for this variant or product includes shopify, shipwire, amazon_marketplace_web, or blank if inventory isn’t tracked. |
| Variant Inventory Qty | It is the number of items you have in stock specified for Shopify stores that have a single location. If your store manages inventory at multiple locations, don’t include this column and use inventory import instead. |
| Variant Inventory Policy | This column lets you specify how to handle orders when the inventory level for this product or variant reaches zero:
|
| Variant Fulfillment Service | The product or variant fulfillment service used can be one of the following:
For a custom fulfillment service, add its name in Shopify product mapping, considering the following requirements: Use only lowercase letters. Spaces aren’t allowed – replace them with a dash (-). Periods and other special characters should be removed. A custom fulfillment service must be set up in your Shopify admin. For example, if “Mike’s Fulfillment” is your fulfillment service’s name, then enter mikes-fulfillment here. |
| Variant Price | Use this column to specify the price of a product or variant. Currency symbols are prohibited. For example, 9.99. |
| Variant Compare At Price | Use this column to specify the Compare At Price of a product or variant. Currency symbols are prohibited. For example, 9.99. |
| Variant Requires Shipping | Use this column to specify whether a product requires shipping. Valid values are true and false.
true indicates that it is a physical product. |
| Variant Taxable | Use this column to specify whether to apply taxes to this variant. Valid values are true or false. |
| Variant Barcode | Use this column to specify the barcode, ISBN, or UPC of a product. |
| Image Src | Use this column to specify the URL for the product image in Shopify product mapping. Shopify will download the image during the import, re-uploading it into your store.
Don’t change the image file name after that image has been uploaded to your store. Don’t upload images with the suffixes _thumb, _small, or _medium in their names. |
| Image Position | Use this column to enter a number that represents the order in which you want the image to be displayed on the product’s page starting from an image position value of 1. |
| Image Alt Text | Use this column to provide an alt text of the image. Up to 512 characters. |
| Gift Card | Use this column to indicate whether the product is a gift card. Valid values are true or false.
Note that a gift card can only be created in the Shopify admin. You can’t do that with the help of a product CSV file import. |
| SEO Title | Use this column to provide an SEO Title in your Shopify product mapping. It is alphanumeric and can include up to 70 characters. |
| SEO Description | Use this column to provide an SEO description. It is alphanumeric and can include up to 320 characters. |
| Google Shopping / Google Product Category | This column is used if you also use a Google product category. You can use the product category, the Google Product Category, or both to provide the most specific category possible for each item.
Note that GPC uses Google’s product taxonomy and there are two ways of input:
|
| Google Shopping / [Metafields] | This is a group of columns. Their headers vary based on the Google Shopping metafield: Google Shopping / + one of the following metafields:
|
| Variant Image | Use this column to provide the URL of a product variant image. |
| Variant Weight Unit | Use this column to provide a variant weight unit, such as g, kg, lb, or oz. |
| Variant Tax Code | This column is available to the Shopify Plus plan only. Use it to provide the Avalara code to apply taxes to the product.
However, if you import a CSV file with the Variant Tax Code column into a store that doesn’t have Avalara set up, your import fails. |
| Cost per item | This column indicates how much it costs you to get or produce the product or variant. If you resell a product, then you can enter the price that you paid to the manufacturer, excluding taxes, shipping, or other costs. If you create the product yourself, then you can enter a value that is based on your labor and material costs. Currency symbols are prohibited. |
| Included / [Primary] | Use this column to indicate whether the product is for sale in the primary market. Valid values are true or false.
As for the column heading name, it varies depending on the country or region determined to be your primary market in Shopify Markets. Changing the default primary market results in the column header combined with the new market name. Remember it when creating Shopify product mapping. |
| Included / International | Use this column to indicate in Shopify product mapping whether the product is for sale in the market of the same name. Valid values are true or false.
Replacing the international market with your market results in the alteration of the header name: International changes to the name of the market. If your new market name is South America, the column headings are adjusted as follows:
|
| Price / International | Use this column to indicate a fixed price for a product in the market of the same name and in that market’s currency. |
| Compare At Price / International | Use this column to set a fixed compare-at price for a product in the market of the same name and in that market’s currency. |
| Status | Use this column to indicate whether a product is available to your customers:
|
| Collection | Use this column to add a product to the collection. Specify the name of the collection in your Shopify product mapping.
If it’s an existing automatic collection, then the product needs to meet the conditions for the collection. If the collection doesn’t exist, a manual collection is created automatically. It is possible to add a product to only one collection. The Collection column is the only column that can be added to the CSV file without breaking the format. |
You will need to map third-party column names (attributes) to the product attributes from this table to import data to Shopify.
Final Words
The Import & Export Tool for Shopify introduces robust product mapping for both import and export processes. When you need to import third-party data, the app lets you gently match any unsupported attributes to Shopify’s native column names. When it comes to export processes, you get even more. Shopify product mapping is enhanced with default values, column sorting, and the ability to exclude columns from a CSV file. Also, note that products are not the only supported entity. You can also use our tool to map customer and order data on Shopify. Follow these links to discover more facts about the Import & Export Tool:
FAQ
How do I map a product on Shopify?
You can easily map a product on Shopify in both import and export processes with the Import & Export Tool. Install the app, open it, and create a new import or export profile. Next, configure its basic settings and proceed to the mapping screen. For Shopify product mapping associated with import, select Shopify’s attribute from a drop-down list below each third-party value. For product export mapping, specify a third-party column name to the right of the original one.
How do I import third-party data to Shopify?
You can import third-party data to Shopify with the help of the Import & Export Tool. The app lets you create a precise Shopify product mapping scheme. Map external attributes to Shopify’s default column names, freely importing them into the system. Furthermore, you can also transfer XLSX and XML files or import data straight from Google Sheets.
How do I export Shopify data suitable for external systems?
Use the Import & Export Tool to export data that is already suitable for third-party systems. The app’s mapping interface introduces the ability to replace Shopify’s default attributes with any third-party names. In addition to that, you can also rearrange the order of columns in your export table as well as exclude unnecessary product data, creating a perfect Shopify product mapping scheme for export.