
Shopify Order Line Item Properties: How to Add Additional Line Item Information

In the following article, we shed light on Shopify order line item properties. We explore properties available in Shopify’s standard export procedure and then compare them to a third-party output based on the . You will learn how to add additional line item information for orders in Shopify which is often necessary if you provide this data to a third party, such as an ERP system, for further processing. But let’s first see what an order line item is.

Table of contents
What Is an Order Line Item in Shopify?
In general, a line item is an object used to represent a product added to an order. However, things are a little bit more complicated when we dive deeper. Under an order line item in Shopify, we assume a non-subscription-based item created by an order that represents transactional charges, including one-time fees, physical goods, or professional service charges. Note that all these types of charges should not be sold on a subscription basis to consider an item an order line item.
As you can see, line items are validated against the products they are created from. However, the relationship between the two is not maintained since only several properties (like name and description) are copied from the product side. And the number of these properties depends on the instrument used to export orders. We will focus on this aspect below. Now, let’s be more specific on what line item properties are.
What Are Shopify Order Line Item Properties?
Order line item properties of Shopify, in turn, are attributes used to collect information for each item added to the cart. For instance, it can be a product name, price, quantity, and SKU.
When you use the platform’s default export tools, the variety of possible line item properties in order is limited to the following attributes:
- Lineitem quantity;
- Lineitem name;
- Lineitem price;
- Lineitem compare at price;
- Lineitem sku;
- Lineitem requires shipping;
- Lineitem taxable;
- Lineitem fulfillment status;
- Lineitem discount.

Your order export table is restricted to these line item properties. A reliable third-party tool, however, can help you extend this list.
Additional Order Line Item Properties in Shopify
Below, we explain how to enhance your order export data with additional line item information when you use the Shopify Import & Export Tool.
Additional Line Item Information vs. Default Selection of Properties
Our app provides two additional columns with line item data when you export orders: lineItems.id and lineItems.vendor. Although it is not a huge improvement, it still offers additional flexibility in comparison to the standard order export in Shopify. Especially in combination with other features our tool offers. If you need more order line item properties to be added, contact us.

It is also worth mentioning that our app doesn’t export the data associated with the Lineitem compare at price column available in the standard export.
Let’s compare the two groups of Shopify order line item properties side by side:
![]()
How to Add Additional Line Item Information for Orders in Shopify
Install the to add additional line item information for orders in Shopify. Next, follow these steps:
Step 1: Create a New Export Profile
Create a new export profile. Go to your Shopify Admin -> Apps -> Firebear Import & Export Tool -> Export and click the New Profile button.
Step 2: Configure Basic Export Settings
The app transfers you to the Configure export screen. Here, you can configure automation and specify other order export parameters:
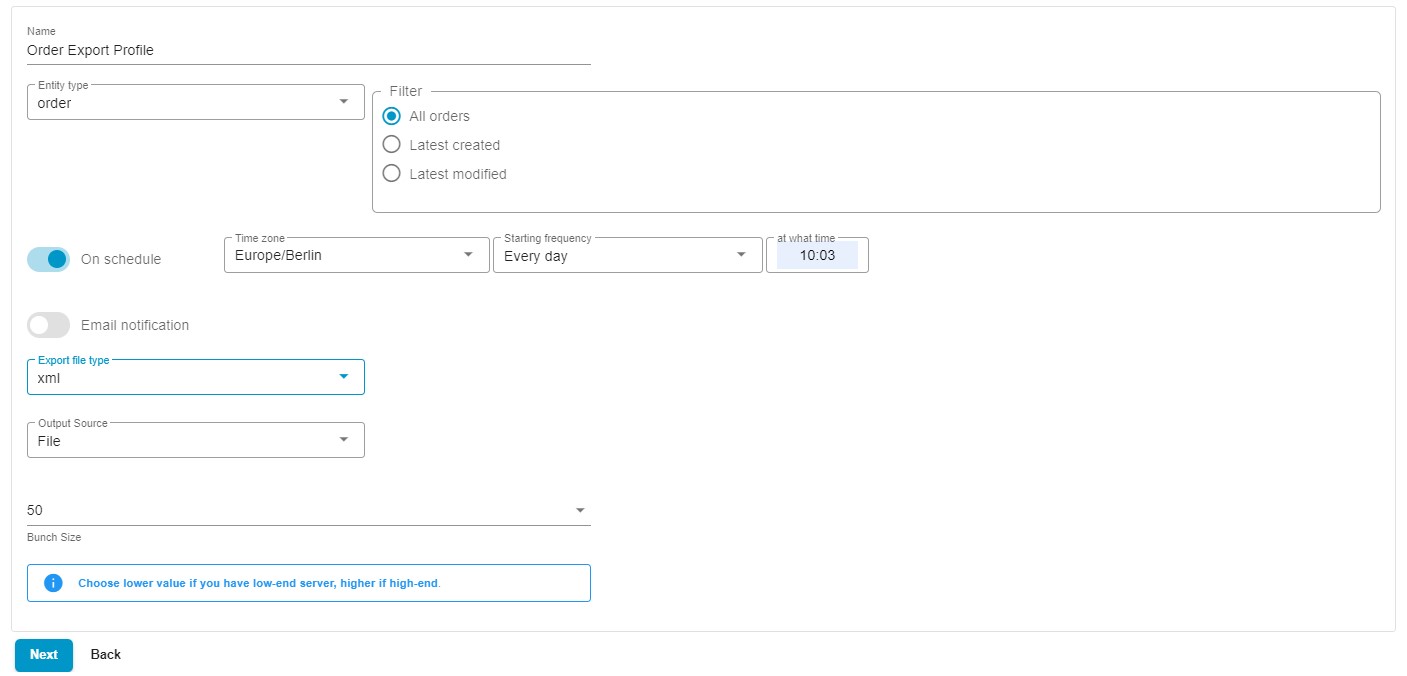
- First of all, you need to name your profile, for instance, Order Export.
- Now, choose Orders as your export entity.
- Select All orders to export all orders with their line item properties from Shopify. Alternatively, you can transfer the latest created or modified orders only.
- Now, you can automate your order export. Disable the On Schedule toggle for manual transfers. Enable it to create a schedule of updates: specify your time zone and select a starting frequency. You can export orders automatically every hour, day, week, or month.
- Configure email notifications to stay informed on the results of your order exports. Or you can view the outcome manually in your admin.
- Now, choose your preferred file format. In addition to CSV, you can export Shopify order line item properties as XML or XLSX files or even Google Sheets spreadsheets.
- Choose your export source. Our tool supports a broad selection of export sources from manual file downloads to FTP and Google Drive exports.
- If your server has limited resources, choose a lower bunch size to reduce the load.
- Click “Continue” to proceed to the mapping screen.
Step 3: Configure Mapping
You can configure mappings according to the conditions of the accepting side. At this stage, it is possible to replace the default Shopify order line item properties and other attributes with the ones the external system understands. For instance, your new attribute may look as follows:
Shopify order line item property mapping example
| Property | Possible new property name | |
| lineItems.quantity | -> | Line Item Quantity |
| lineItems.name | -> | Line Item Name |
| lineItems.price | -> | Line Item Price |
| lineItems.id | -> | Line Item ID |
| lineItems.sku | -> | Line Item SKU |
| lineItems.requiresShipping | -> | Line Item Requires Shipping |
| lineItems.taxable | -> | Line Item Taxable |
| lineItems.fulfillmentStatus | -> | Line Item Fulfillment Status |
| lineItems.totalDiscount | -> | Line Item Total Discount |
| lineItems.vendor | -> | Line Item Vendor |
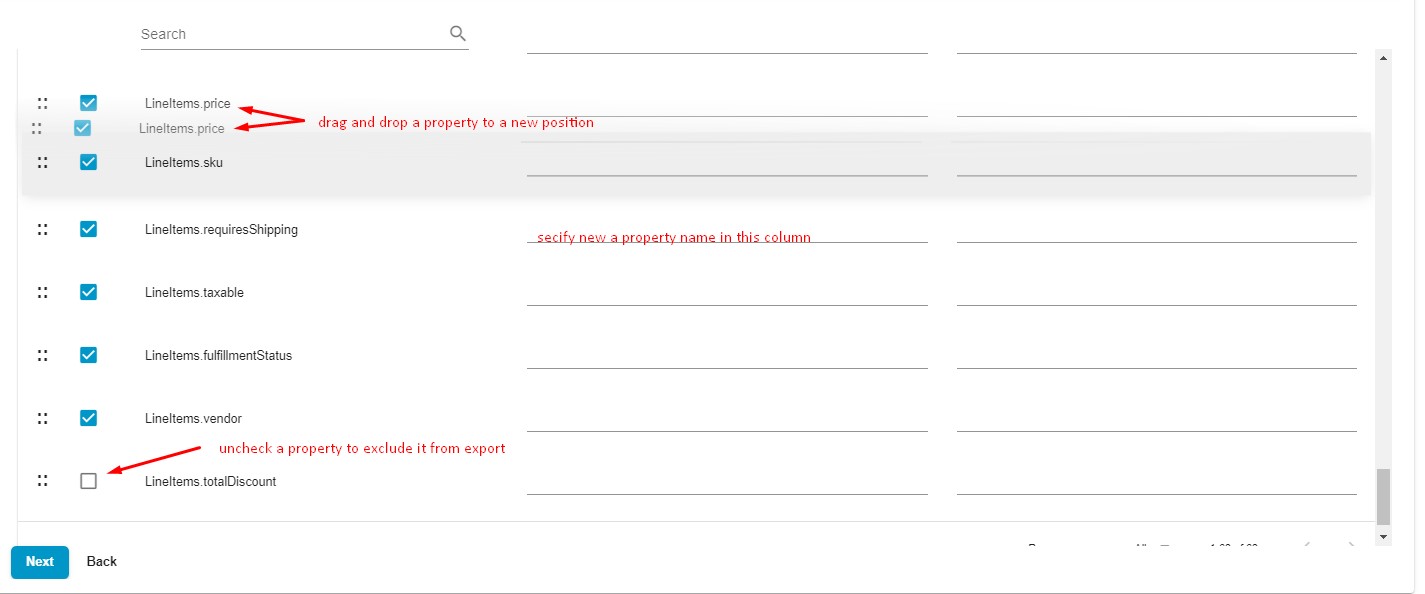
Furthermore, it is possible to deselect any columns that should be excluded from your order export.
Another good news is that you can rearrange the order of line item props in Shopify on this screen. Simply drag a column name and drop it to the new place.
Don’t forget to save these parameters for further exports so that the app can use them automatically.
Step 4: Create Filters
Now, you can create filters for your export profile to narrow down the selection of orders you transfer. For instance, if you transfer orders to a dropshipper, you need to create a filter based on the order’s financial status, since the accepting side requires only paid orders. You can filter out them as follows:

- Ass a new filter by clicking the + button.
- Choose financialStatus from the list of properties as your filter criteria.
- Select Paid from the value dropdown.
Step 5: Save Your Profile & Export Data
Now, click the Save & Close button to save your new export profile. It will be launched automatically according to the predefined schedule. Alternatively, you can run it immediately by clicking the Export button. You will be able to download a file that contains the additional Shopify order line item properties when the export procedure is complete. Click the Download button.

Or you will find it according to the specified export destination.
Final Words
Adding additional line item information for orders is not possible in Shopify by default. However, you can rely on third-party instruments to achieve this goal. The Import & Export Tool, for instance, not only introduces new Shopify order line item properties but also lets you rearrange their position in the export file or even disable some of them for your data transfers. Moreover, the app provides the ability to automate your order exports, choose between several file formats and destinations, and create filters to narrow down the selection of orders you export. Contact us for further information and read the app’s user manual to discover more outstanding features.