
How to Migrate from VTEX to Magento 2 or Sync Data Between Them
While you might have thought that is a dominant e-commerce platform in Brazil since it originates from there, the real picture is slightly different: the solution is still widely used in this country, but not as much as Magento. Despite the rising trend, some merchants migrate from VTEX to Magento 2. Why do they do that? Although each business case may involve unique reasons, VTEX lacks some advanced features, third-party extensions, scalability, and performance provided by the Magento ecosystem. VTEX is not the best option to start an e-commerce website, and you will need to switch to something more powerful at a certain point of your business journey. That’s why, we shed light on the Magento 2 VTEX migration below, so if you also want to get extra e-commerce capabilities, you’ve come to the right place. The following article contains a detailed guide on how to migrate from VTEX to Magento 2. Besides, we describe how to synchronize data between the two platforms. Let’s say a few more things about VTEX and then compare it with Magento 2 before going any further.

Table of contents
Introduction to VTEX
Local phenomenons often remain linked to a certain area only. And VTEX is not an exception. This platform is mostly used in Brazil but has all chances to become popular in the whole South American region and beyond. The customer base of VTEX consists of both local businesses and top market players, including WalMart, Coca-Cola, Lego, Disney, etc. But how did the platform gain its popularity?
The main feature that attracts merchants to VTEX is its advanced checkout. The procedure is dramatically improved in comparison to other e-commerce platforms. Being password free, it lets buyers complete the purchase in a much more natural way. As a result, VTEX websites experience a huge boost by 54% in conversion rates. As you might have already guessed, it is caused by a dramatic decrease in cart abandonment rate.
What is at the same time good and bad about VTEX is its cloud nature. On average, a cloud-based ecommerce technology implements 68% faster than a conventional setup, but you lose the complete ownership over your e-commerce store.
And don’t forget about the lack of a free option. If you choose the cheapest plan, you have to pay $500 per month + 2.5% of an ongoing B2C fee or 1.3% in the case of other channels.
And it seems that it is not possible to provide products to eBay, Amazon, and other platforms without third-party agencies.
Luckily, VTEX provides the ability to run an e-commerce website of any size, but the fees for small merchants are too high. While the ongoing expense for the On Demand plan is 2.5% per month, the Enterprise users are charged just 0.5%.
Let’s summarize what we know about VTEX. The platform lets you create a full-fledged e-commerce store without any technical difficulties, but you have to pay a lot for it. And the ecosystem is relatively small, so the variety of feature is limited in comparison to Magento. Let’s proceed to the Magento vs. VTEX chapter to see how multiple differences impact the position of both platforms in the market.
Magento vs. VTEX
This chapter is based on materials by . According to the website, both Magento and VTEX ascend, gaining new and new customers worldwide. As for the volume of each ecosystem, the one around Magento includes 147,585 stores. As for VTEX, the platform is much smaller: it is home for 6,158 websites.
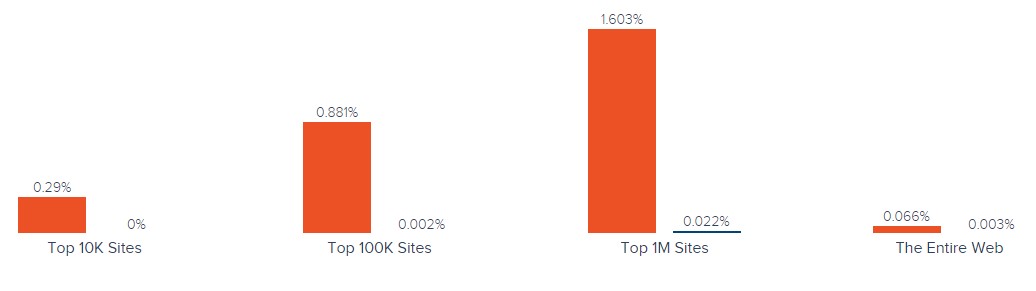
Unlike Magento, which offers both free and paid options, VTEX costs money, so you cannot create even a basic website for free. Also, note that Magento is well ahead of VTEX in Top 10K Sites, Top 100K Sites, Top 1M Sites, and Entire Web. The following diagrams display the dominance of our favorite e-commerce platform:
Magento has better usage coverage in more websites categories including Shopping, Business & Industry, Clothing, Arts & Entertainment, and 231 others. As for VTEX, it hasn’t got a lead over Magento in any websites category.
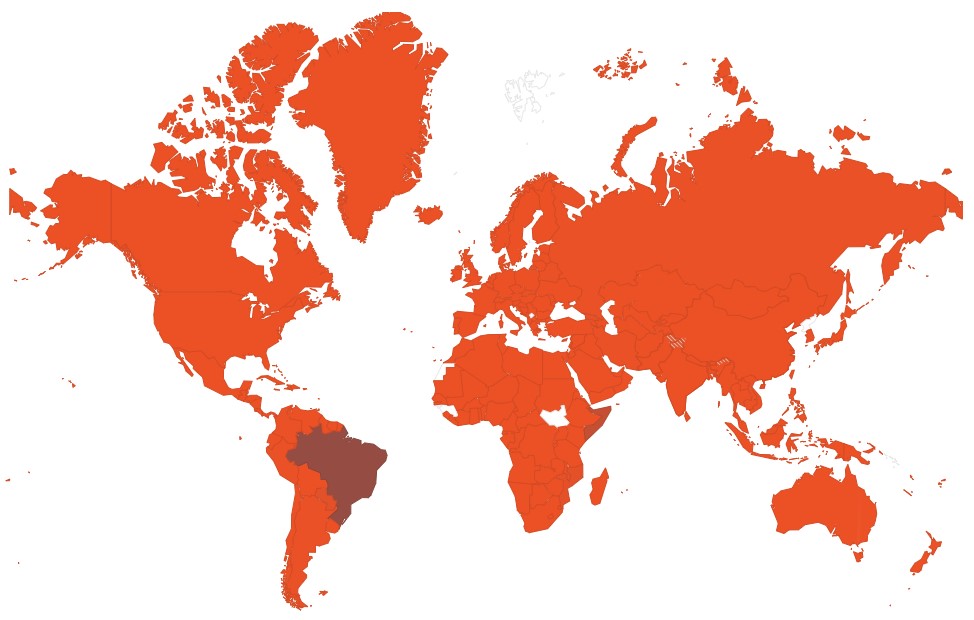
As for the geographical distribution, VTEX is popular in Brazil, but it is not dominant there. As for Magento, the platform is leading in all countries:
Despite its cloud nature and ease of use, VTEX is still far from being as popular as Magento. The following situation is caused by the platform’s limitations, relatively high price, small ecosystem, and the lack of free options. All these disadvantages don’t let VTEX become a serious competitor for Magento 2 and are a reason to migrate from VTEX to Magento 2. Let’s see how to do that.
How to Migrate from VTEX to Magento 2
The following chapter explains how to migrate from VTEX to Magento 2 reducing headaches. It also describes how to synchronize the data flow between the two platforms.
While the most evident way to migrate from VTEX to Magento 2 is to use the default import tools, we don’t recommend you to do that, since it is related to many difficulties. The default import and export instruments are very limited and will never help you complete the procedure. By default, you cannot automate data transfers or map third-party attributes in the Magento admin. That’s why it is necessary to install an additional module to run the complete VTEX Magento migration.
We’d like to draw your attention to several parameters mandatory for seamless data transfers between Magento 2 and VTEX or other external systems. First of all, the chosen module should support all Magento 2 entities. Next, it should be able to automate data transfers. Besides, your solution should solve the problem of different attribute standards. The only Magento 2 extension that combines all these features is the Improved Import & Export extension – a module developed to move any data to and from your e-commerce storefront. With its help, you will seamlessly run the Magento 2 VTEX migration as well as connect your store to all possible external systems including ERPs, CRMs, marketplaces, databases, etc. Let’s see how to import any data from VTEX to Magento 2 in a few clicks using data file transfers or API connections.
Migrate from VTEX to Magento 2 via Data Files
- First of all, it is necessary to export products, orders, customers, catalog, and other entities in XML or CSV formats from your VTEX website. If the desired functionality is not available by default, you have to rely on third-party specialists. All corresponding VTEX solutions and partners are presented here: .
- Now, import data files to the Magento 2 website with the help of the Improved Import & Export extension. Go to the Magento 2 admin and create a new import job under System -> Improved Import / Export -> Import Jobs.
- Configure General Settings, Import Settings, Import Behavior, and Import Source:
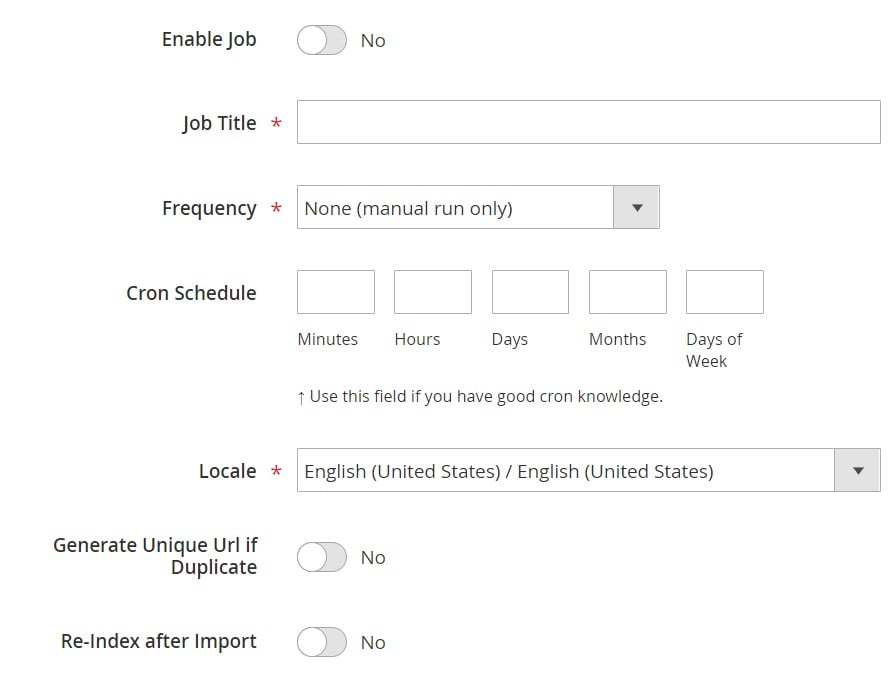
- In General Settings, type a job title and configure other parameters;
- In Import Settings, choose an entity that should be moved from VTEX to Magento 2. The Improved Import & Export extension allows transferring Products, Categories, Customers, Advanced Pricing, Orders, Attributes, Cart Price Rules, CMS Pages and Blocks to your Magento 2 website. Some of them may include additional features. Thus, you can get rid of product associations or old categories for products in the Import Settings section;
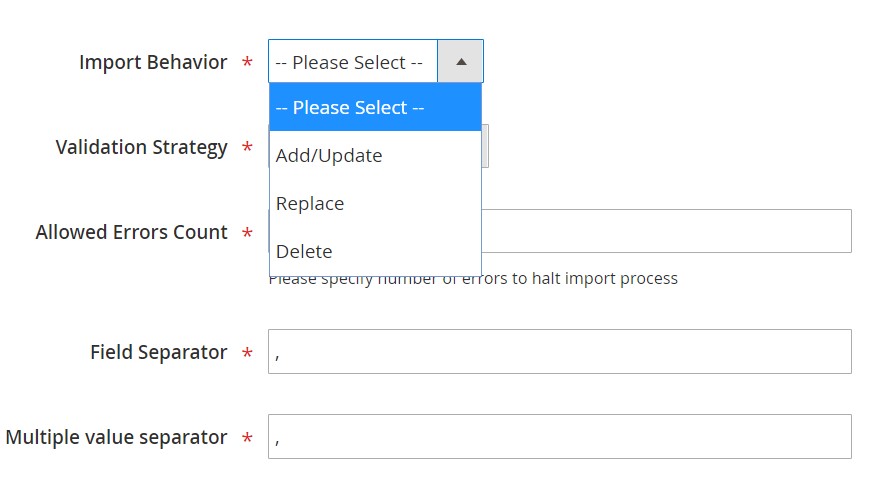
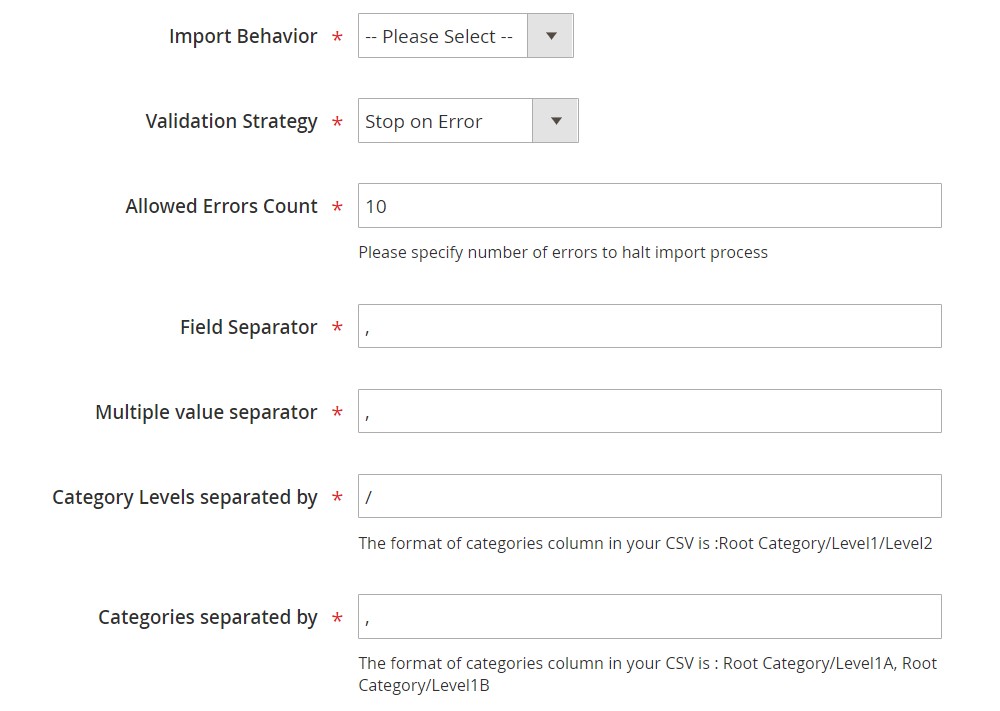
- In Import Behavior, specify one of the available import behavior options. Next, select a validation strategy suitable for the Magento 2 VTEX migration and add separators;
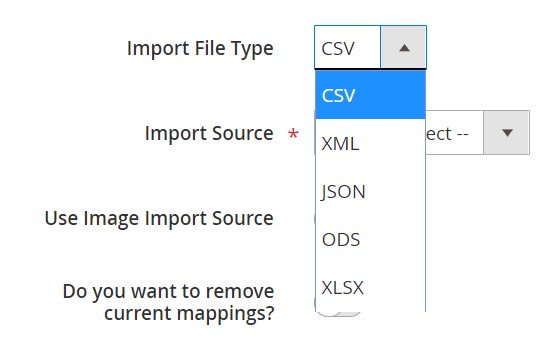
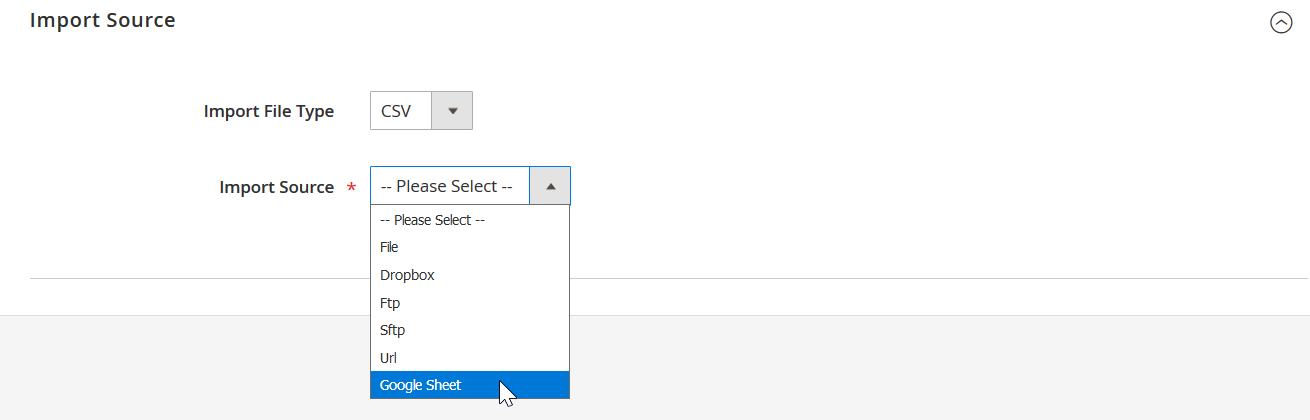
- In Import Source, select an import file type and file source. Configure other parameters, upload a data file, and validate it.
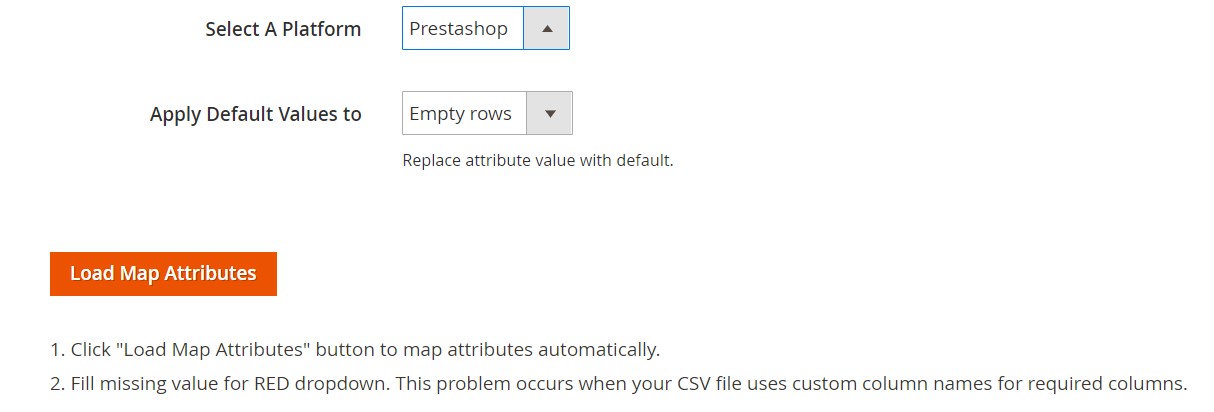
- Match VTEX attributes to ones used in Magento 2. You can use either a mapping preset or the extension’s matching grid.
- In General Settings, type a job title and configure other parameters;
Don’t forget to create a separate import job for each entity. Otherwise, you won’t complete the VTEX Magento 2 migration. Contact our support here to get more information: . We will help you run the Magento 2 VTEX migration on the basis of data files.
Migrate from VTEX to Magento 2 via API
The alternative way of running the Magento 2 VTEX migration is based on the ability to connect to VTEX directly via API using the Improved Import & Export Magento 2 module. To replace file transfers with REST or SOAP connections, follow the guide below:
- In your Magento 2 admin go to System -> Improved Import / Export -> Import Jobs and create a new import job.
- Configure General Settings, Import Settings, Import Behavior, and Import Source. Note that the procedure slightly differs from the one described above:
- In General Settings, specify a job title and configure other parameters;
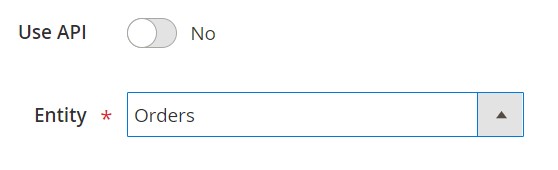
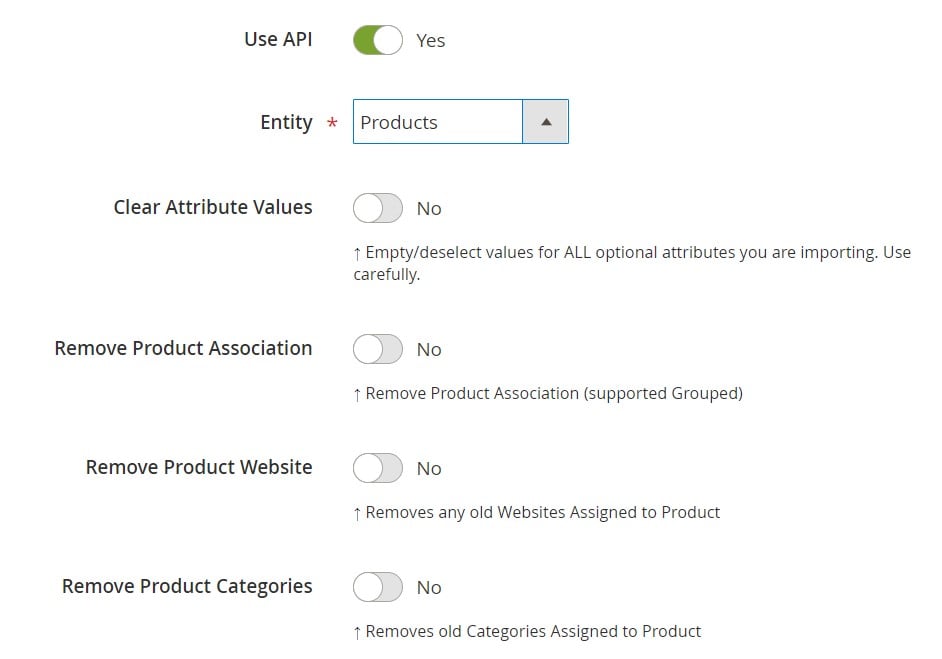
- In Import Settings, turn on API transfers: set ‘Use API’ to ‘Yes’ to enable the feature. Next, select an entity that will be transferred from VTEX to Magento 2;
- In Import Behavior, select one of the available import behavior options and specify a validation strategy. Type separators to finish the configuration of this section;
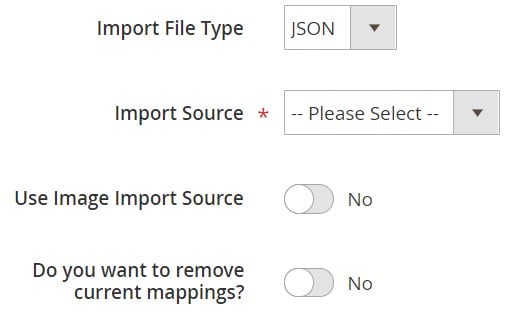
- In Import Source, choose a type of the import file: the Improved Import & Export extension lets you run the Magento 2 VTEX migration using XML or JSON. Next, select its source: it can be either REST or SOAP. Configure other parameters to continue. Validate the data file in the end.
- Next, map VTEX attributes to Magento 2 attributes using presets or the manual grid. Otherwise, the further import procedure will be interrupted.
- In General Settings, specify a job title and configure other parameters;
Create a separate import job for each entity and run multiple import processes to migrate from VTEX to Magento 2 via API. For further information, contact our support here: . You will get help regarding the Magento 2 VTEX migration via API.
How to Synchronize Magento 2 and VTEX
If you want to run the migration between Magento 2 and VTEX in several stages or need to sync both stores, the Improved Import & Export extension will be helpful as well. It is possible to use either data files or APIs.
Synchronize Magento 2 and VTEX via Data Files
- Go to your VTEX website and export products, orders, customers, catalog, and other entities in XML or CSV formats just like in the example mentioned above. If the desired functionality is not available by default, you have to rely on third-party specialists. All corresponding VTEX solutions and partners are represented here: .
- Create a new import job in your Magento 2 admin under System -> Improved Import / Export -> Import Jobs.
- Configure General Settings, Import Settings, Import Behavior, and Import Source:
- In General Settings, specify a title of your new job and create a schedule of updates to enable automated import processes;
- In Import Settings, choose an entity you want to move from VTEX to Magento 2;
- In Import Behavior, specify import behavior, validation strategy, and separators;
- In Import Source, select a type of your import file and its source. Upload and validate data to continue.
- Apply a mapping preset or match attributes manually to make the VTEX output suitable for Magento 2.
- In General Settings, specify a title of your new job and create a schedule of updates to enable automated import processes;
Create a separate import job for each entity to synchronize the entire data flow from VTEX to your Magento 2 website.
Now, we’d like to draw your attention to another side of the Magento 2 VTEX synchronization. The following guide illustrates how to provide your VTEX website with the Magento 2 data.
- You need to enable data import on your VTEX website. If the desired functionality is not available by default, you have to rely on third-party specialists. All corresponding VTEX solutions and partners are provided here: .
- In the Magento 2 admin, create a new export job under System -> Improved Import / Export -> Export Jobs.
- Configure General Settings, Export Settings, Store Filter, Export Behavior, and Export Source:
- In General Settings, specify a title of your new import job and manage automated updates. The created schedule will automate the Magento 2 VTEX synchronization;
- In Export Settings, select an entity you want to move from Magento 2 to VTEX;
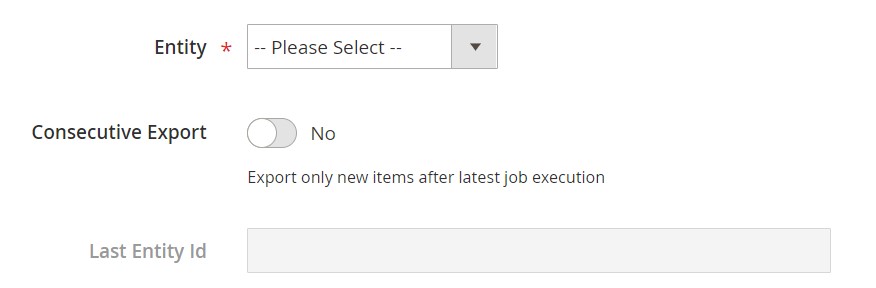
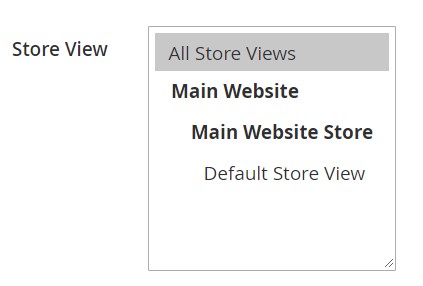
- In Store Filter, choose a Magento 2 store view to export data from;
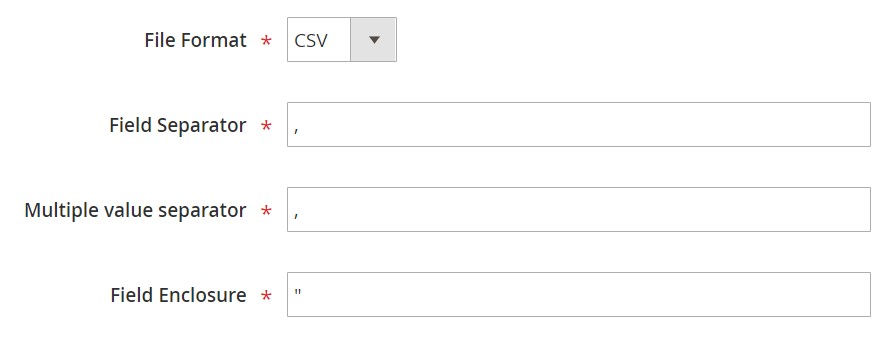
- In Export Behavior, specify file format and separators;
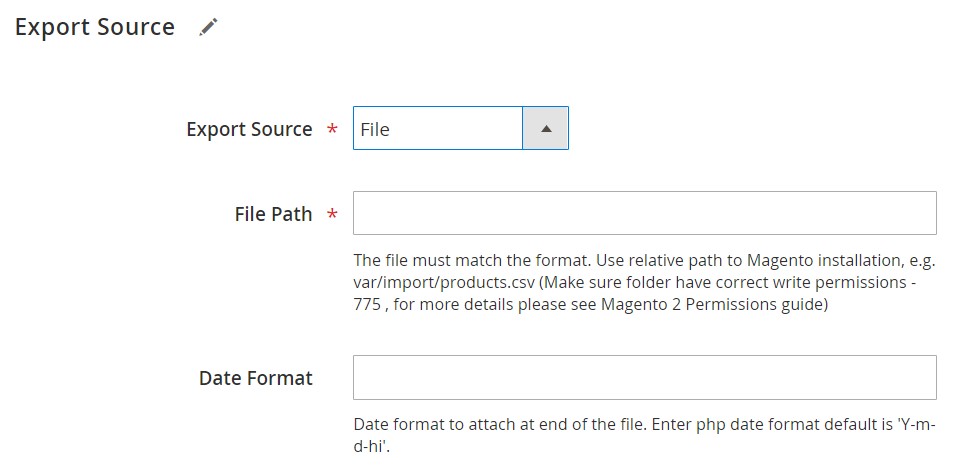
- In Export Source, select a source to export your data file to.
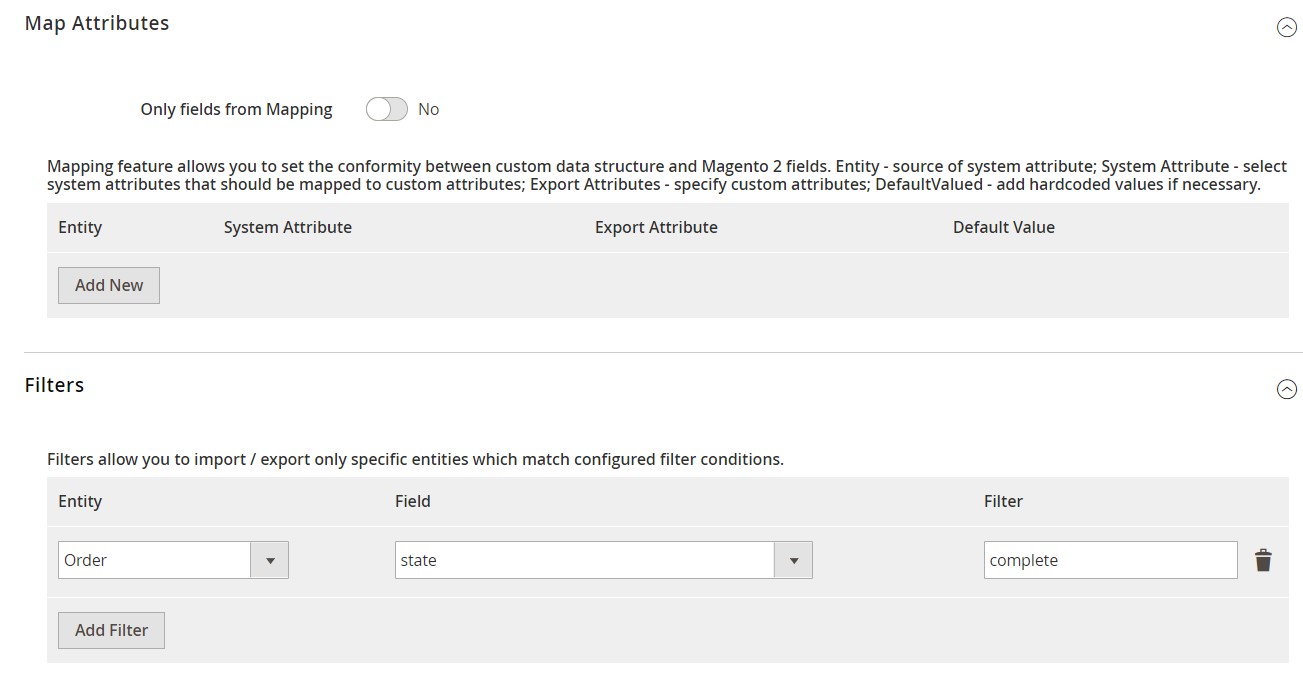
- Apply mapping and filters, matching Magento 2 attributes to ones used in VTEX.
- In General Settings, specify a title of your new import job and manage automated updates. The created schedule will automate the Magento 2 VTEX synchronization;
Don’t forget to create a separate export job for every entity used in the Magento 2 VTEX synchronization. Save and launch all import and export jobs to synchronize the two systems using data files. To find more information, contact our support here: . We will help you explore all the opportunities related to the Magento 2 VTEX migration via data files.
Synchronize Magento 2 and VTEX via API
Besides, the Improved Import & Export Magento 2 extension provides the ability to synchronize Magento 2 and VTEX via API. The module lets you move all the necessary information from your old store to a new one via REST or SOAP.
- The procedure starts in your Magento 2 admin. As always, create a new import job under System -> Improved Import / Export -> Import Jobs.
- Configure General Settings, Import Settings, Import Behavior, and Import Source:
- In General Settings, type a job title and configure a schedule of updates;
- In Import Settings, turn on API transfers: set ‘Use API’ to ‘Yes’. Next, choose an entity you want to import from VTEX to Magento 2;
- In Import Behavior, select an import behavior option and a validation strategy that suitable for the migration. Specify separators;
- In Import Source, choose an import file type. As mentioned above, it can be either XML or JSON. As for an import source, nothing changes: use either REST or SOAP. Configure other parameters and validate the data file.
- Apply mapping to match attributes used in VTEX to the corresponding Magento 2 designations.
- In General Settings, type a job title and configure a schedule of updates;
Create and configure a separate import job for each entity. Thus, you will enable multiple import processes synchronizing data transfers from VTEX to Magento 2 via API. Also, create corresponding export jobs to provide VTEX with the Magento 2 data.
For further information, contact our support here: . We will help you with the Magento 2 VTEX migration via API.
Get Improved Import & Export Magento 2 Extension
Improved Import & Export Magento 2 Extension Features
Now, when you are familiar with the Magento 2 VTEX migration, we’d like to draw your attention to the Improved Import & Export features that simplify the procedure. Our extension completely revamps the default import and export processes providing the ability to avoid recreating your old e-commerce store on a new platform manually. With our tool, all data transfers can be automated, different external attributes and their values – matched to ones used internally, multiple file formats – leveraged in the migration, and all entities – imported/exported! As a result, you effortlessly migrate from VTEX to Magento 2.
Automated Import & Export
The migration from VTEX to Magento 2 is usually a one-time procedure, so it doesn’t require automation. As for the synchronization of the two platforms, it is based on regular data transfers. And you can delegate powers to Improved Import & Export to perform everything for you. The extension allows automating data transfers in two different ways: via schedules and event-based triggers.
Schedules
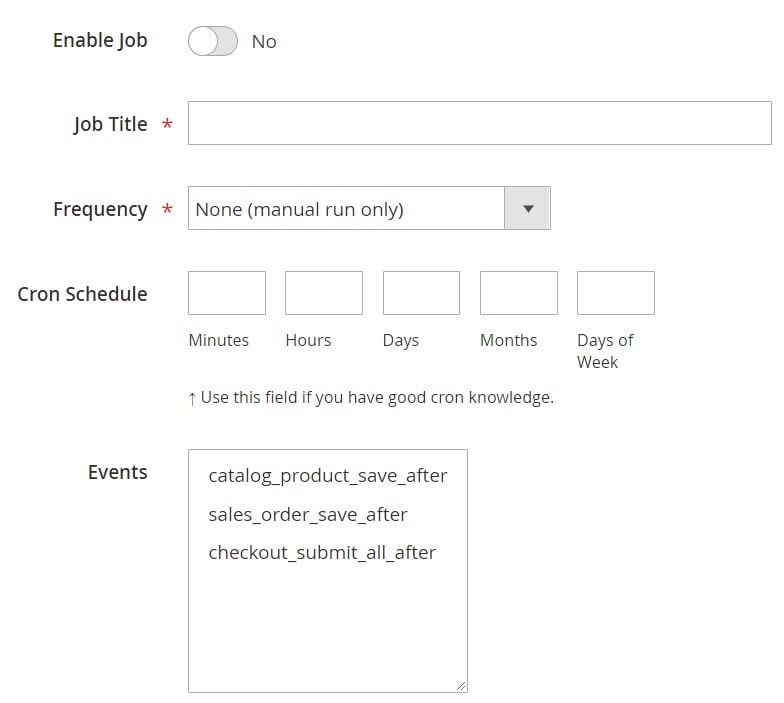
Schedules are the most intuitive and comfortable way of automating data transfers. They incorporate cron, so you can leverage this technology to create fully independent import and export jobs that connect Magento 2 and VTEX. The Improved Import & Export Magento 2 module offers custom intervals as well as fully customizable predefined update schemes; profiles with no schedules, which are good for maintaining such tasks as the Magento 2 VTEX migration; and asynchronous data transfers (you can launch every scheduled profile manually whenever you want). Check the following gif image to see how to configure a schedule:
Events
At the same time, the Improved Import & Export module provides an alternative way of automation – event-based triggers. Use the following algorithm to automate data transfers between Magento 2 and VTEX:
- Create a trigger;
- Connect it to an event;
- Link an action to a trigger to launch it automatically.
Thus, transferring data to VTEX or other external systems with the help of a trigger, which launches various export processes after a certain action occurs, is also possible. The same functionality can be streamlined for import processes. Read this article for further information: How to Run Magento 2 Import or Export After Specific System Event or Process.
Advanced Mapping Features
Map VTEX attributes to ones used in Magento 2 to automate data transfers. If you don’t do that, you cannot import data to Magento 2 since external attributes are not supported by the platform. In case of the default tools, this procedure takes lots of time and effort, since you have to apply changes in a file editor repeating the same process every time a new update is provided. As for the Improved Import & Export Magento 2 extension, it dramatically simplifies the migration from VTEX to Magento 2 in terms of attributes and their values with the help of the following features:
Mapping Presets
Use our module to solve the problem of different attribute standards without headaches and enable the Magento 2 VTEX migration in the most intuitive way with mapping presets – predefined mapping schemes that reduce manual attributes matching.
You can enable the plugin to do all the necessary changes automatically. Our module analyzes the input data file transferred from VTEX, discovers third-party attributes, and matches them to the ones used in Magento. You only need to select a matching scheme, which will be applied to all further updates. The whole process looks as follows:
Matching Interface
While importing data from VTEX to Magento 2, you can also map external attributes to the corresponding internal ones right in the Magento admin. The Improved Import & Export Magento 2 module has a matching interface where you can take full control over mapping. To enable the import process, you have to match external designations to the corresponding internal ones in a special grid situated within your admin section. This procedure is way more comfortable and faster than doing the same things right in a data file. Use manual attributes editing when a preset designed to satisfy your needs is absent. Here is how the procedure looks:
As for the “Default Value” column, it lets you specify hardcoded attribute values. Such values are provided to all items of a corresponding attribute. For instance, you can transfer product data from your old VTEX store replacing multiple old categories with a new one. Specify a hardcoded value for the “_store” attribute, and the Improved Import & Export extension will delete the elements of a third-party catalog adding the specified one instead of them.
Attribute Values Mapping
The Improved Import & Export Magento 2 extension offers a separate interface for attribute values mapping that provides the ability to automate the Magento 2 VTEX synchronization. No third-party designations will interrupt data transfers: choose an external value and specify the internal one in front of it. Repeat the procedure until all external designations from your old VTEX store are replaced. That’s it! For further information, read this article: Attribute Values Mapping.
Attribute Values Editing
If attribute values mapping is not enough, you can rely on attribute values editing transferring data from VTEX or other systems. It is another handy feature introduced in the Improved Import & Export module that simplifies the migration to Magento 2. To modify attribute values in bulk, use the following rules:
- Add a prefix to multiple attribute values;
- Add a suffix to multiple attribute values;
- Split multiple attribute values;
- Merge multiple attribute values.
Combine them and create conditions to increase the efficiency of the applied changes. For further information, read this article: How to Modify Attribute Values During Import and Export in Magento 2.
Category Mapping
Another feature, designed to simplify data transfers to Magento 2, is category mapping. With our extension, you can match external categories to ones used internally, dramatically simplifying product transfers from VTEX to Magento 2. The Improved Import & Export module allows mapping external product categories to ones used in your catalog in the following way:
Also, note that you can create new categories on the fly: choose a parent category and specify a new one. If your new Magento 2 store doesn’t include a category from the VTEX website, it’s no longer a problem. You can find more information about this feature here: Category Mapping.
Attributes On The Fly
And if a VTEX data file lacks attributes, our module provides the ability to create them on the fly via the following general form:
Attribute|attribute_property_name:attribute_property_value|…
The feature is described here in more detail: Product attributes import.
Extended Connectivity Options
Now, let’s say a few words about the extended connectivity options introduced in our module. They improve all data transfers including the Magento 2 VTEX migration since you not only get an increased number of supported file formats but also two alternative ways of transferring data between your e-commerce store and external systems. Also, note that all Magento 2 entities are supported, while the default Magento tools work with CSV files only and let you transfer much fewer objects.
Multiple File Standards
The Magento 2 VTEX migration on the basis of the Improved Import & Export extension can be performed leveraging XML and JSON file. Besides, you can transfer ODS and Excel files for other integrations. Another feature that radically simplifies data transfers is the ability to import compressed data based on our module’s ability to unpack file archives automatically.
Multiple File Sources
The following file sources can be leveraged to import and export data files:
- FTP/SFTP. Transfer data files using a local or remote server.
- Dropbox. Use a Dropbox account to establish a connection between the two systems. Alternatively, you can rely on Box, OneDrive, Google Drive, iCloud, and Amazon Drive.
- URL. A direct URL can be used to import a data file as well.
Alternative Ways of Import & Export
As for the alternative ways of import and export, they are represented by direct API connections and intermediary services. Let’s say a few more words about each approach.
To connect Magento 2 to VTEX, the Improved Import & Export extension provides the ability to leverage REST or SOAP APIs. Note that our module also supports GraphQL. All API connections are fully compatible with all the extension’s features so that you can streamline mapping, schedules, attributes on the fly, etc.
As for the intermediary services, they are represented by Google Sheets, Office 365 Excel, and Zoho Sheet. Although they cannot be used to establish the migration from VTEX to Magento 2, you can leverage them for other data transfers. The following image shows how to use Google Sheets:

The following video displays the extension in action:
Final Words
As you can see, it is possible to use the Improved Import & Export Magento 2 module to simplify the Magento 2 VTEX migration dramatically. Our plugin turns a complicated procedure into something more intuitive and user-friendly, substantially decreasing the time and effort necessary to complete it. You can forever forget about multiple issues and headaches caused by the default import and export tools due to the support for all entities and numerous file formats, API connections and various file sources, schedules and mapping, etc. Effortlessly import everything you need from any external systems to your e-commerce store turning the Magento 2 VTEX migration into an entirely automated process. For further information, follow the link below and contact our support:
Get Improved Import & Export Magento 2 Extension