
Magento CMS Block Guide: How to Create, Import & Export Static Blocks in Magento 2
Creating a standout storefront in Magento 2 often comes down to how well you manage your CMS blocks or static blocks that power everything from homepage banners to promotional widgets. These reusable content elements are the building blocks of engaging layouts and dynamic pages. Whether you’re customizing your homepage, setting up seasonal offers, or building with Magento Page Builder, Magento CMS blocks are key to delivering rich, branded experiences.
Yet, despite their critical role, Magento 2 doesn’t offer built-in tools for importing or exporting CMS elements like static blocks, pages, or widgets. That’s where the Improved Import & Export extension steps in, enabling seamless data transfers across stores and environments.
In this comprehensive guide, we explore what Magento 2 CMS blocks are, the difference between static and dynamic blocks, how to create and insert blocks, and how to import and export Magento 2 static blocks quickly and accurately. You’ll learn how to structure your import table, configure import jobs, and avoid common pitfalls. We’ll also walk through every CMS block attribute, share ready-to-use sample files, and explain how to move CMS content between Magento 2 installations with confidence. Whether you’re a developer, store admin, or agency partner, this tutorial will help you master Magento CMS block management like a pro.

Table of contents
- What Are Magento CMS Blocks?
- Difference Between Static and Dynamic Blocks in Magento 2
- How to Create Magento 2 Static Block
- How to Insert a Static Block in Magento 2 CMS Page
- How to Import Magento CMS Blocks to Magento 2
- How to Export Magento CMS Blocks from Magento 2
- Troubleshooting Common Magento CMS Block Import Errors
- Final Words: Master Magento CMS Block Import & Export With Ease
- FAQ: Magento CMS Static Blocks
What Are Magento CMS Blocks?
In Magento 2, CMS blocks, also known as static blocks, are reusable pieces of HTML content that can be placed throughout your store’s layout. Whether you’re showcasing a promotional banner, inserting a custom message on a product page, or building a rich homepage layout, the Magento CMS block is your essential building unit. Think of them as the “Lego bricks” of your storefront — modular, flexible, and easy to manage.
Despite the different terminology, Magento CMS blocks and Magento 2 static blocks refer to the same feature. These blocks are not dynamic in terms of business logic but can still deliver dynamic-looking content by using variables, widgets, or embedded media. They allow store admins to create, update, and reuse consistent design elements across multiple pages, saving time and ensuring a unified visual identity.
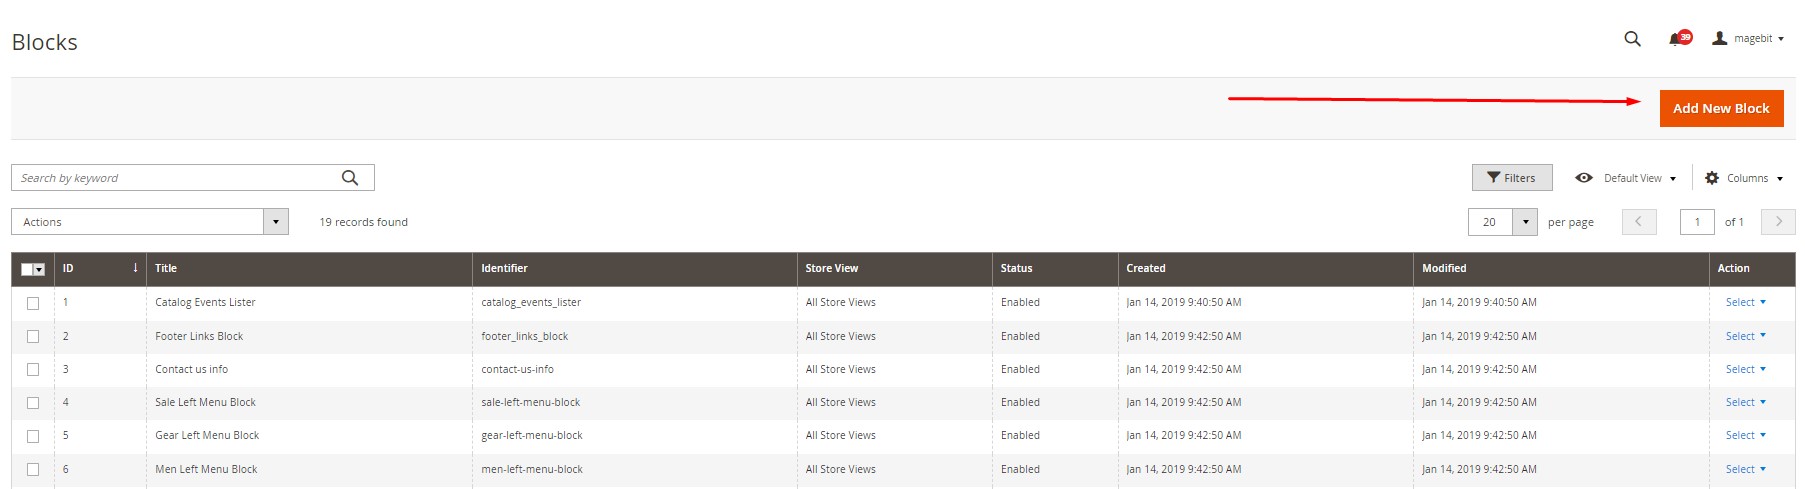
You’ll find CMS blocks in the Magento 2 admin panel by navigating to Content → Elements → Blocks. From there, you can create new blocks or edit existing ones, assigning them titles, identifiers, and content.
Unlike CMS pages, which structure full-page content, or widgets, which inject functionality or dynamic data, static blocks are ideal for repeating, content-focused snippets. Used properly, they reduce redundancy, improve workflow, and provide full control over localized or promotional content.
And while creating CMS blocks manually is fine for smaller stores, managing dozens or even hundreds of blocks across multi-store setups becomes a real challenge. That’s where import and export automation comes into play. But before we explore that, let’s look at the difference between block types in Magento 2.
Difference Between Static and Dynamic Blocks in Magento 2
Magento 2 offers two primary types of content blocks: static blocks (CMS blocks) and dynamic blocks. Understanding the difference between them is crucial for efficient store design and content management.
🔹 Static Blocks (CMS Blocks)
Magento 2 static blocks are created and edited directly from the admin panel under Content → Elements → Blocks. They are ideal for reusable HTML content, such as:
- Homepage banners
- Custom messages on category pages
- Footer links or store policies
Static blocks don’t include logic — they simply output the HTML or widgets you define. You can easily insert them into CMS pages, product pages, or layout XML using block identifiers or widgets.
📌 Example: A promotional banner for a seasonal sale that appears on multiple pages.
🔹 Dynamic Blocks
Dynamic blocks, on the other hand, are rendered through backend logic and templates. These blocks are programmatically defined in XML layout files or PHP classes, often pulling real-time data or executing custom logic before rendering.
Use cases include:
- “Recently Viewed Products” widget
- Personalized product recommendations
- Mini-cart content block
Dynamic blocks respond to context, such as the logged-in user, cart contents, or current category, and are not editable from the admin like static blocks.
📌 Example: A sidebar block that displays products on sale, based on the current category and customer segment.
In short, if you’re dealing with static design elements that need consistent formatting across your store, Magento 2 static blocks are the right tool. But for features that depend on runtime logic or dynamic user data, you’ll need dynamic blocks created by developers.
Understanding this distinction is key when deciding whether to import static HTML-based content or build blocks programmatically.
How to Create Magento 2 Static Block
Follow these steps to create a new CMS block in Magento 2:
- Navigate to Admin -> Content ->Blocks.
- Click the Add New Block button.
- Activate your new Magento 2 Static block.
- Type its name.
- Create a unique identifier for this CMS block. You will use it to implement this block into other pages.
- Choose a store view to display the block.
- Specify the content elements used in your new Magento 2 static block. You can use templates here to simplify the routine configuration.
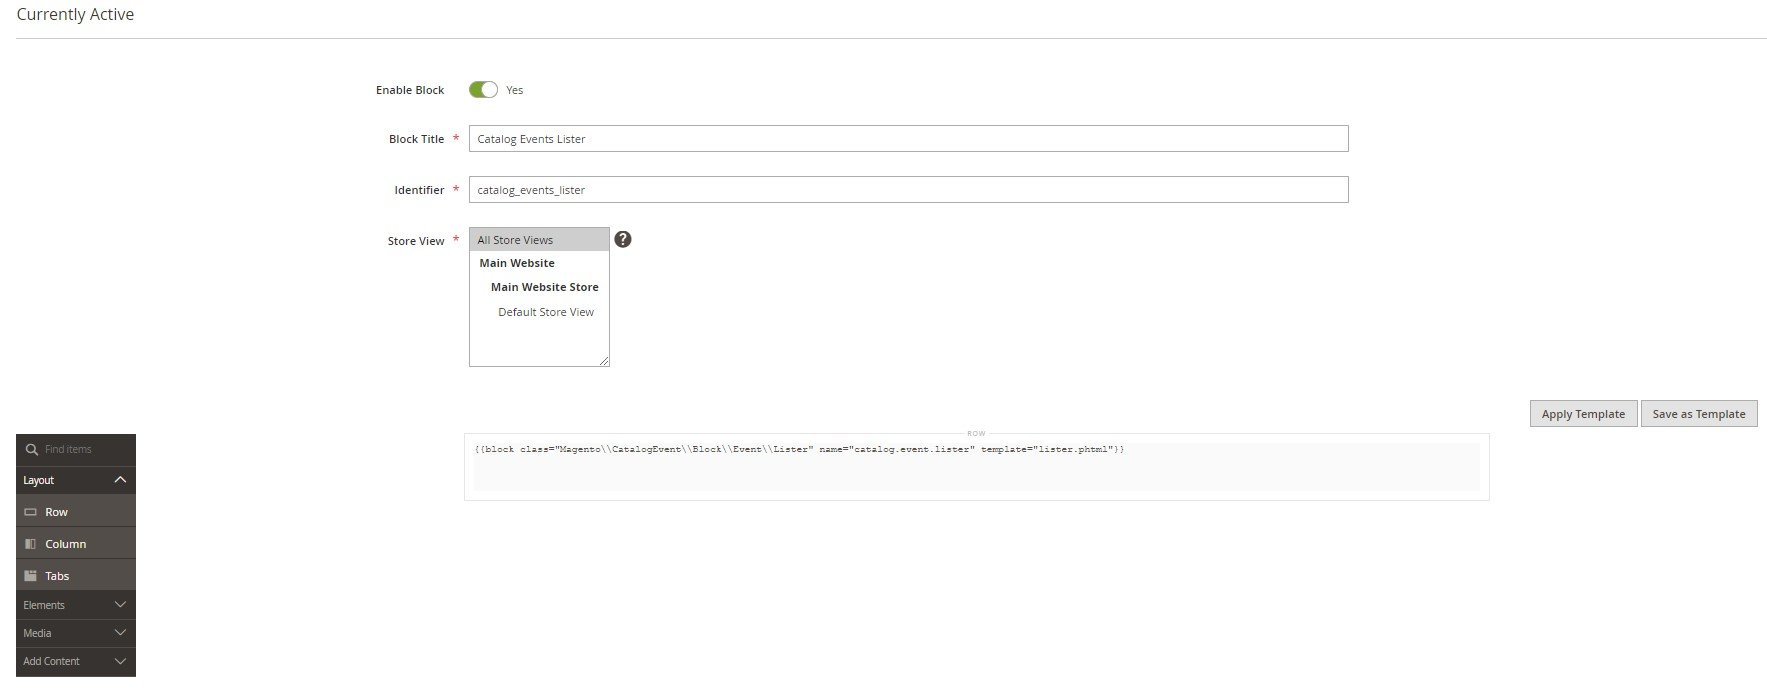
- When done, click Save.
How to Insert a Static Block in Magento 2 CMS Page
Once you’ve created a Magento 2 static block, the next step is to insert it into a CMS page or layout. Whether you’re updating your homepage, customizing a landing page, or embedding promotional content, Magento makes it easy to add CMS blocks using either the admin interface or layout XML.
✍️ Inserting a Static CMS Block in Magento 2 Using the WYSIWYG Editor
The easiest way to insert a static block in a Magento 2 CMS page is via the WYSIWYG content editor.
- Go to Content → Pages, and select the CMS page where you want to insert the block.
- Click Edit and scroll to the Content section.
- In the editor toolbar, click the Insert Widget icon.
- In the pop-up:
- Choose CMS Static Block as the widget type.
- Select your block from the list using its unique identifier.
- Click Insert Widget, then Save Page.
This method uses Magento’s built-in widget system to render your static block within page content.
🔧 Alternative (manual code method):
You can also insert the block manually using the {{block}} directive:
{{block class=”Magento\Cms\Block\Block” block_id=”your_block_identifier”}}
Replace your_block_identifier with the unique ID of your CMS block.
🧱 Adding Static Blocks via Layout XML
If you need to inject a static block into templates or custom layout files, use XML layout updates.
Here’s a sample layout XML snippet:
<referenceContainer name=”content”>
<block class=”Magento\Cms\Block\Block” name=”custom.cms.block”>
<arguments>
<argument name=”block_id” xsi:type=”string”>your_block_identifier</argument>
</arguments>
</block>
</referenceContainer>
- referenceContainer name=”content” defines the target container.
- block_id should match the unique identifier of your static block.
You can apply this code in your theme’s default.xml or via CMS Page Layout Update XML.
💡 Why Use Static Blocks?
By using Magento CMS blocks, you gain full control over your site’s layout and design, without writing custom code for every change. Static blocks can be reused across multiple pages, easily updated through the admin panel, and styled independently for each store view. Whether you’re managing landing pages or injecting seasonal content, Magento 2 insert static block workflows let you deliver dynamic layouts with minimal effort. Alternatively, you can manage Magento 2 static CMS blocks via import and export processes.
Magento 2 Static Block Import & Export: Sample CSV and Prerequisites
Before you can import or export Magento CMS blocks, it’s essential to understand the required data structure, file formats, and attributes involved. Whether you’re managing a large catalog of Magento 2 static blocks or migrating content across environments, having clean sample files and a reliable extension will streamline the entire process.
In this section, we’ll cover everything you need to start importing and exporting CMS blocks, including where to find sample CSV files, what attributes are required, and how to prepare your Magento 2 environment.
⚙️ Prerequisites for Importing and Exporting Magento CMS Blocks
Magento doesn’t support CMS block import/export natively, but with the Improved Import & Export extension, you can automate this process across all entity types, including Magento CMS blocks, CMS pages, and even Page Builder content.
Here’s what the extension offers out of the box:
- Full CMS support: Import and export static blocks, CMS pages, and Page Builder content.
- Support for all Magento 2 entities: Products, categories, orders, attributes, B2B entities (shared catalogs, companies, quotes), and more.
- Flexible import sources: Upload files directly or fetch them from FTP, SFTP, Google Sheets, Dropbox, or direct URLs.
- Multiple file formats: Supports CSV, XML, JSON, XLSX, and ODS.
- Attribute and separator mapping: Match column names and delimiters with ease.
- Filters and conditions: Import only the data you need, based on store views, categories, or other attributes.
- High-speed processing: Up to 3,000 entities per minute on a standard Magento setup.
These features not only make your workflows faster, they also eliminate manual data entry and reduce the risk of errors when deploying or updating content across stores.
🧾 Magento 2 Static Block Sample CSV Files
To simplify your start, Firebear provides free sample tables you can use to structure your Magento CMS block data correctly.
1. Google Master Import Table
A comprehensive spreadsheet containing attribute descriptions and example values for every Magento 2 entity, including static blocks.
🔗
2. Firebear Studio GitHub Repository
Find downloadable sample files in multiple formats (CSV, XML, JSON, XLSX, ODS) alongside XSLT templates and helpful README documentation.
🔗
Alternatively, if you’ve already installed the extension, you can export your existing Magento 2 static blocks to generate a working sample directly from your store.
🧷 Magento CMS Block Attributes Explained
Here’s a breakdown of the required and optional fields you’ll encounter when importing static blocks into Magento 2. These attributes should be included in your CSV file to ensure a smooth import process:
| Attribute Name | Reference | Values | Value Example |
| block_id | Unique Static Block ID | In the administrator panel, can be found in the link of the static block preferences page. For example:
/index.php/admin/cms/block/edit/block_id/19/ Where ‘19‘ is the block ID. |
13 |
| content | Content of the static block | Can contain any symbols and references. Just as when you create and edit a static block. | <p>Content of the <strong>custom static block #1</strong>.</p>
<p> </p> |
| creation_time | The time the static block has been created | Only the following date format is allowed:
YYYY-MM-DD HH:MM:SS |
2/10/2019 7:29:55 |
| identifier | REQUIRED FIELD TO CREATE A BLOCK
Static block ‘Identifier’. A unique name of the static block that is used as a reference for internal purposes. |
Can be up to 64 Latin characters in length, without spaces, and can contain “-” and “_”. | custom-block-1 |
| is_active | ‘Enable Block’ setting of the static block. Defines if the block is enabled or disabled. | Allowed values:
1 – enabled 0 – disabled |
1 |
| title | REQUIRED FIELD TO CREATE A BLOCK
‘Block Title’ of the static block. Can contain any value. A name of the static block. |
Can contain any value. A name of the static block. | Custom static block #1 |
| update_time | The time the static block has been last updated | Only the following date format is allowed:
YYYY-MM-DD HH:MM:SS |
2/10/2019 7:29:55 |
| store_view_code | REQUIRED FIELD TO CREATE A BLOCK
The code of the store view the static block belongs to. |
Can contain multiple store view codes separated by commas without spaces.
Store View Code can be found under Stores > All Stores. Next, click the required store view and check the “Code” column. |
Store View 1,Store View 2,German Store |
Tip: If your static block uses Magento 2 Page Builder, the content will still be stored in the content column. You can edit it manually or reuse it across stores — just be sure to preserve valid HTML or Page Builder markup. For further reference, follow the from the Google Master Import table.
Once you’ve prepared your static block file and reviewed the necessary fields, you’re ready to proceed with the import or export operation. In the next section, we’ll walk you through the import process using the Improved Import & Export extension — step by step.
How to Import Magento CMS Blocks to Magento 2
When managing multiple stores or migrating content, manually recreating CMS blocks wastes valuable time. Fortunately, with the Improved Import & Export extension, you can fully automate the Magento CMS block import process — no copy-pasting or duplication needed.
Here’s a step-by-step guide to help you import Magento 2 static blocks efficiently using CSV, XML, JSON, XLSX, or ODS files.
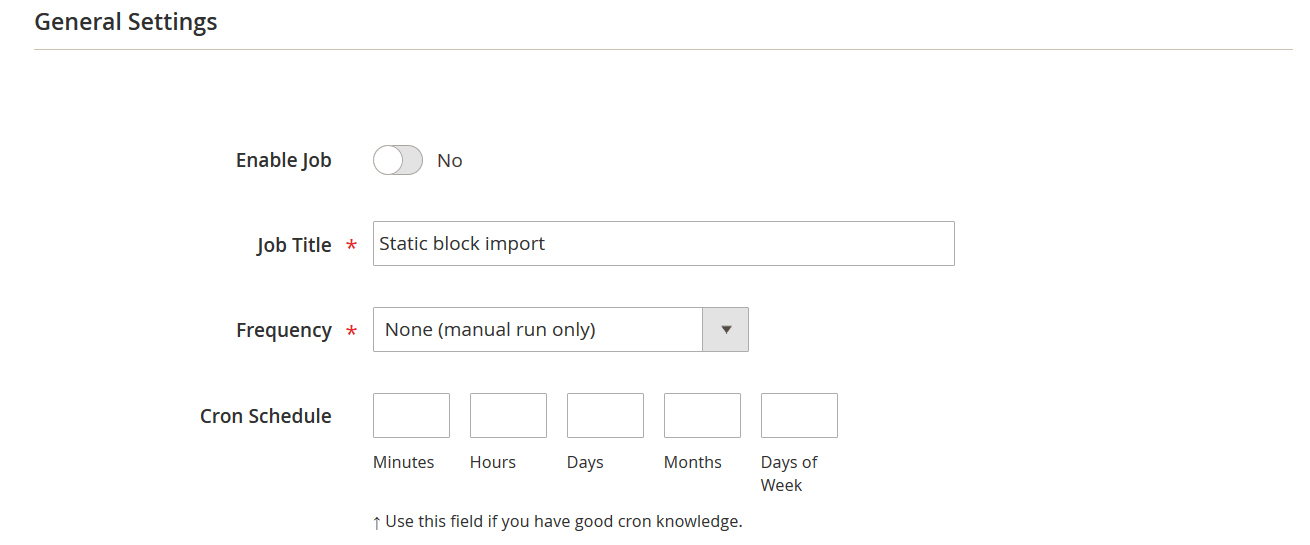
🛠 Step 1: Create a New Import Job
Go to your Magento admin and navigate to: System → Improved Import/Export → Import Jobs
From the import grid:
- Click “Add New Job” to start a new import process.
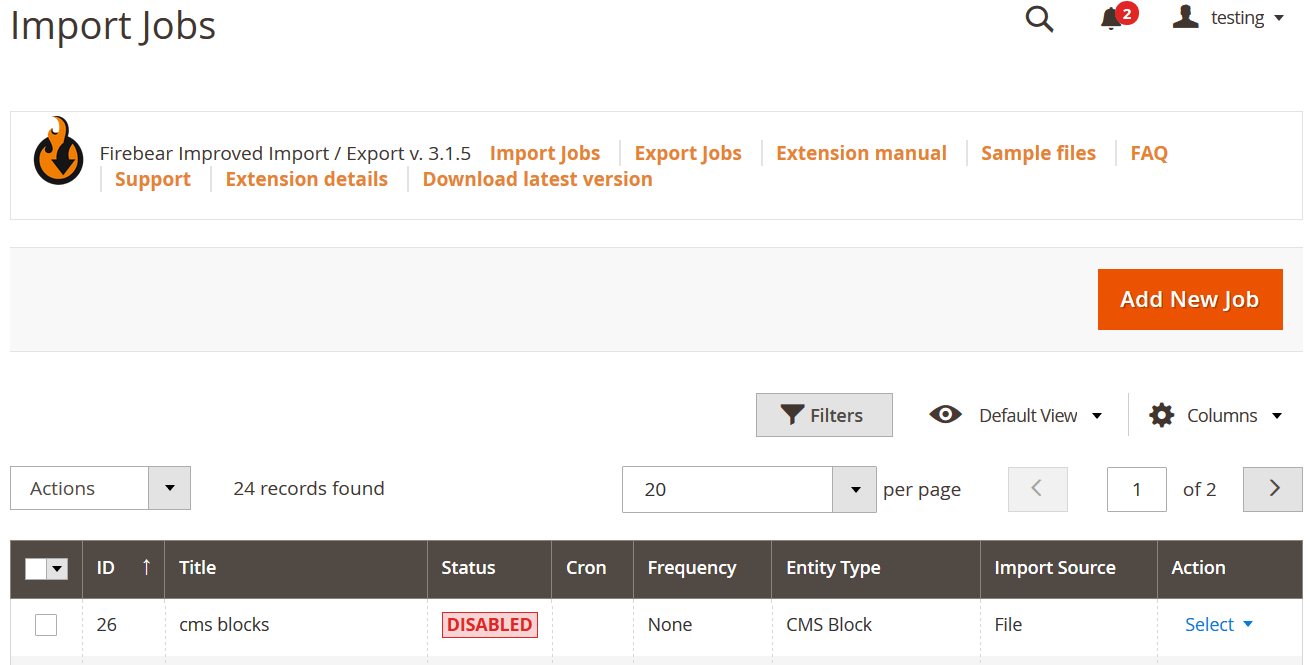
- Assign a Job Name and configure a schedule if you want to automate regular imports.
📄 Step 2: Choose CMS Blocks as the Import Entity
Under the Import Settings tab, set the entity type to CMS Block. This tells the extension to treat the uploaded file as a magento cms block import.

⚙️ Step 3: Define Import Behavior
In the Import Behavior section, choose how the extension handles blocks that already exist in the system:
- Add/Update – Add new blocks, update existing ones by identifier.
- Replace – Completely replace existing blocks with matching IDs.
- Delete – Remove blocks listed in your import file.
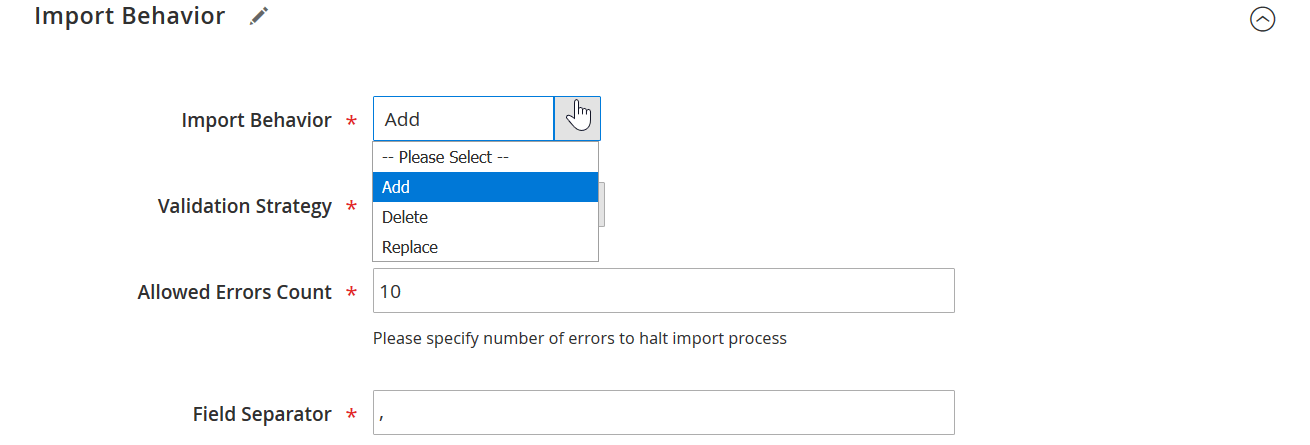
You can also define:
- Allowed errors count
- Field separator mapping (e.g., comma or semicolon delimiters)
📂 Step 4: Set the Import Source and File Format
In the Import Source tab:
- Upload your file directly or connect to an external source:
- File Upload
- FTP/SFTP
- Dropbox
- Direct URL
- Google Sheets
- Supported file formats:
- CSV
- XML
- JSON
- XLSX
- ODS
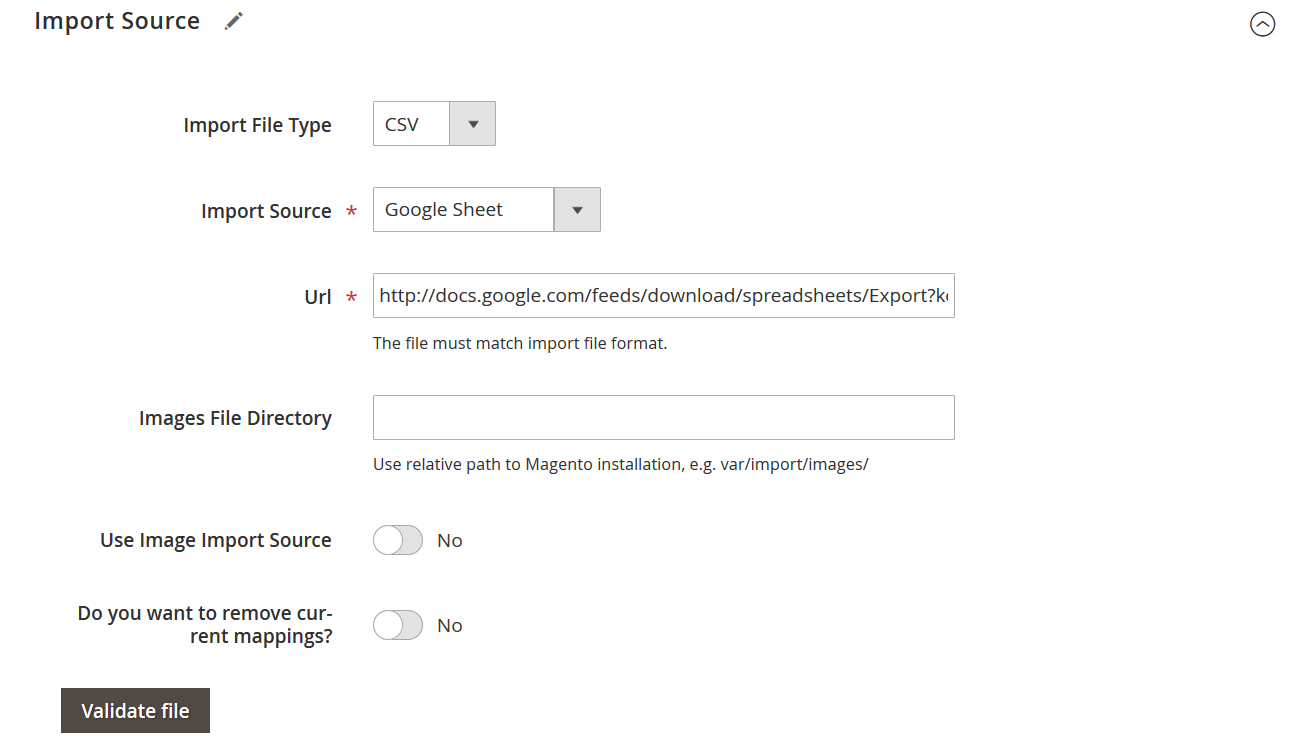
This flexibility makes it easy to adapt imports to your team’s preferred data format or integration environment.
✅ Step 5: Validate and Run the Import
Once your file is uploaded:
- Click “Validate File” to let the extension check for formatting or attribute issues.
- After validation passes, click “Save & Run” to start the import.
Your Magento CMS blocks will be added or updated automatically, whether they’re simple HTML or advanced Page Builder content.
You can learn more about the process in the Improved Import and Export user guide.
🚀 Why Automate Magento CMS Block Imports?
Manual content management might work for a handful of blocks, but it quickly becomes unmanageable at scale. By automating your magento cms block import:
- You eliminate human error
- You sync content across multi-store setups
- You save hours of repetitive work
- You support continuous content updates using scheduled jobs
If you’re building or maintaining multiple Magento 2 instances, automating CMS block imports is a game-changer.
How to Export Magento CMS Blocks from Magento 2
If you need to back up, migrate, or synchronize Magento CMS blocks across multiple environments, automating the export process is a major time-saver. With the Improved Import & Export extension, you can easily configure and schedule Magento CMS block exports in just a few clicks — no manual copying or external tools needed.
This section will walk you through creating export jobs, selecting CMS blocks, choosing export destinations (e.g., Google Drive, FTP), and scheduling recurring exports using cron.
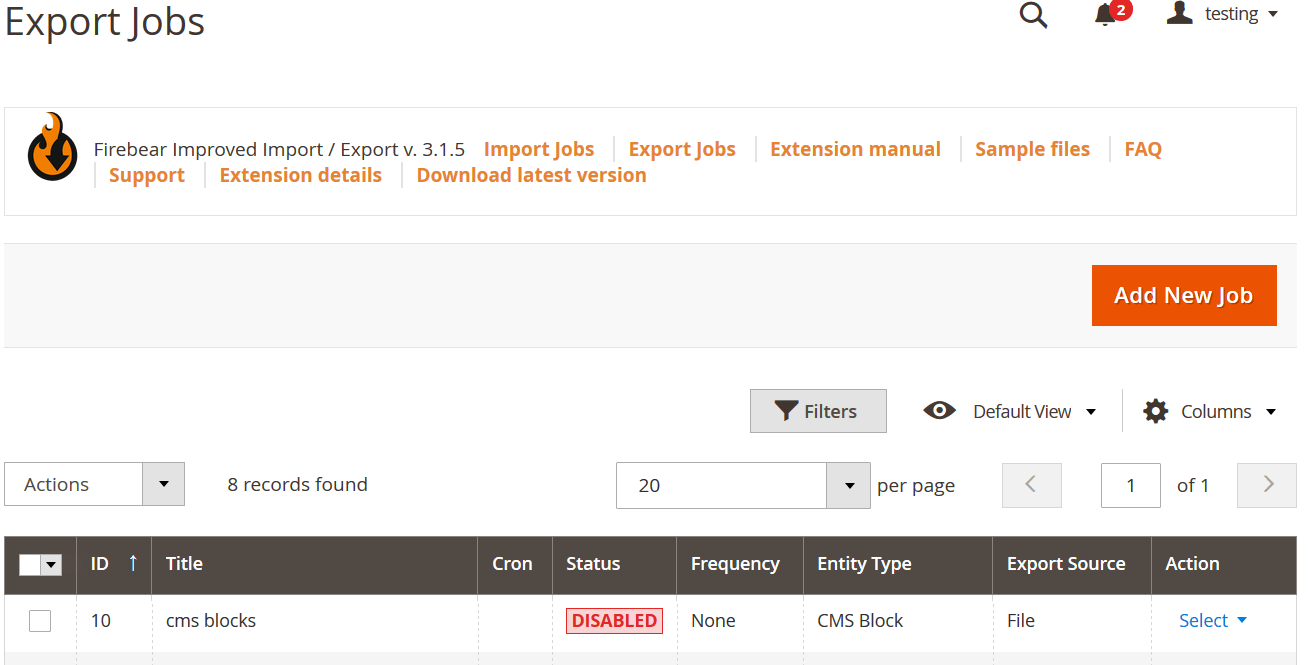
🧭 Step 1: Access Export Jobs
In your Magento 2 admin panel, go to: System → Improved Import/Export → Export Jobs
You’ll see a grid with existing export jobs. Here you can:
- Create new export jobs
- Edit or duplicate existing ones
- Filter jobs by name, entity, or schedule
Click “Add New Job” to begin creating a new export process.
⚙️ Step 2: Configure General Export Settings
In the General Settings section:
- Enter a Job Name (e.g., “CMS Block Weekly Backup”)
- Enable Cron Schedule to run the export automatically (e.g., every Sunday at 2 AM)
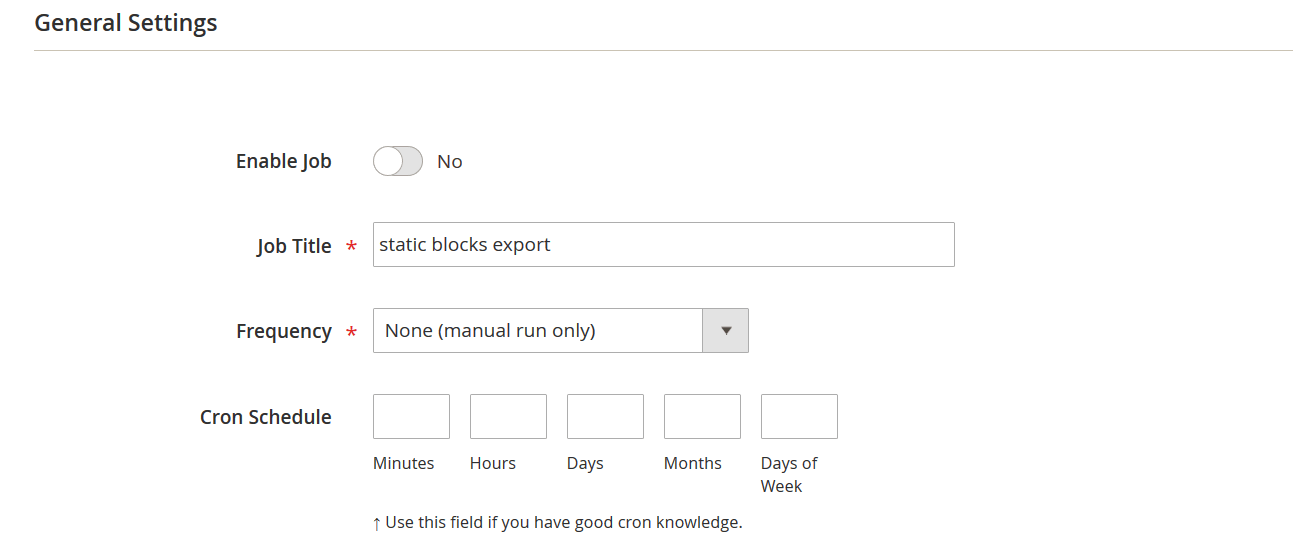
Scheduled exports help you maintain updated backups or sync content with third-party platforms or staging environments — completely hands-free.
📦 Step 3: Choose Magento CMS Blocks as the Export Entity
Under Export Settings, set the entity to CMS Block
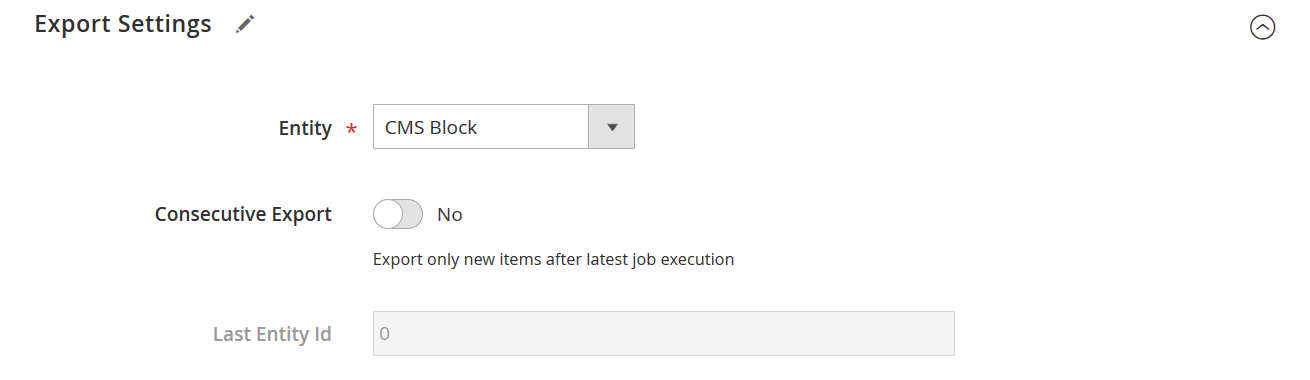
You can also enable Consecutive Export, which ensures only new or modified blocks since the last job run are exported. This is ideal for weekly or monthly automation workflows, keeping your files lean and relevant.
📝 Step 4: Define Export Behavior and File Format
In the Export Behavior tab:
- Choose the file format: CSV, XML, JSON, XLSX, or ODS
- Configure the field separator, enclosure, and header inclusion based on your target system’s requirements
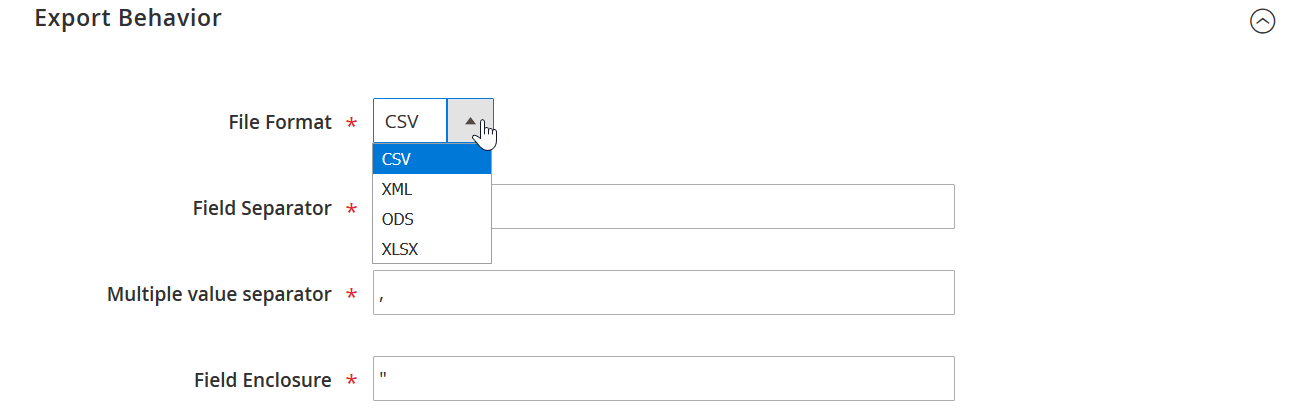
This flexibility lets you integrate exports with any platform or internal toolchain.
🌐 Step 5: Set the Export Destination
Under Export Source, select where your Magento CMS block data should be sent:
- Local file (stored in the Magento root directory)
- FTP/SFTP (ideal for remote servers or partner integrations)
- Dropbox
- Direct URL
- Google Sheets

Specify the file path or target location, and the extension will automatically generate and deliver the export file after each run. You can also download the file directly from the export job grid once complete.
🔍 Optional: Use Filters and Attribute Mapping
Fine-tune your export job with:
- Attribute filters (e.g., export only enabled blocks or blocks from a specific store view)
- Field mapping to rename columns for compatibility with third-party systems
These tools make your magento cms block export clean, consistent, and adaptable to any workflow.
🚀 Step 6: Save and Run the Export Job
Once all settings are configured, click “Save & Run”. The extension will generate your export file based on the parameters you’ve defined.
Your Magento 2 static blocks are now exported — ready to be archived, reused, or transferred to another instance.
Troubleshooting Common Magento CMS Block Import Errors
Running into problems during your Magento CMS block import? You’re not alone. Many users experience issues when importing static blocks, especially when dealing with custom CSVs or multi-store setups. Fortunately, most errors are easy to fix once you understand what’s causing them.
Here are the most common Magento 2 CMS block import errors, how to resolve them, and how the Improved Import & Export extension helps you avoid them altogether.
❌ 1. Malformed CSV or File Format Errors
The Problem:
Magento throws errors when your import file is not properly structured, often due to:
- Incorrect column headers
- Improper delimiters (commas, semicolons)
- Missing required fields
The Fix:
- Always validate your CSV before uploading.
- Use official sample files (like the ones from Firebear’s ).
- Ensure you’re using UTF-8 encoding.
✅ How the extension helps:
Improved Import & Export includes file validation before running the job, helping you catch structural issues in advance. It also allows custom delimiter mapping, so you can adapt to any file format.
❌ 2. Missing Identifiers or Required Attributes
The Problem:
Magento won’t create a CMS block without key fields like:
- identifier (the block’s unique reference)
- title
- store_view_code
The Fix:
- Make sure each block has a valid identifier (alphanumeric, no spaces).
- Confirm required columns exist in your CSV.
- Check that store_view_code matches the codes in your Magento instance.
✅ How the extension helps:
The extension provides field mapping, letting you match your column headers (e.g., “block name” → title) to Magento’s expected attributes.
❌ 3. Duplicate Block IDs or Conflicting Entries
The Problem:
If your file contains duplicate block_ids or identifiers already used in Magento, the import may fail or overwrite content unintentionally.
The Fix:
- Avoid manually setting block_id unless you know the exact internal ID.
- Rely on identifier as your unique reference for new or updated blocks.
- Use the Add/Update or Replace behavior wisely.
✅ How the extension helps:
With behavior settings like Add/Update, Replace, and Delete, you can fully control how existing CMS blocks are handled, preventing unwanted duplicates or data loss.
❌ 4. Unsupported HTML or Page Builder Content
The Problem:
Rich content from Magento Page Builder may break the import if it includes unsupported markup or special characters.
The Fix:
- Always preserve valid HTML/XML formatting in the content column.
- Use CDATA tags in XML files if needed.
✅ How the extension helps:
Improved Import & Export supports importing complex content, including Page Builder data, stored in the content column. You can also preview and edit this content safely before import.
❌ 5. Wrong Store View Codes
The Problem:
If the store_view_code doesn’t match any existing store view in your Magento setup, the CMS block won’t appear.
The Fix:
- Check store view codes in Stores → All Stores
- Use exact values (case-sensitive), separated by commas without spaces
✅ How the extension helps:
It provides multi-store compatibility, allowing you to import Magento 2 static blocks for one or many store views in a single operation.
By addressing these common errors and using the advanced features of the Improved Import & Export extension, you can ensure your magento cms block import runs smoothly every time — no headaches, no broken layouts.
Final Words: Master Magento CMS Block Import & Export With Ease
Magento CMS blocks play a vital role in shaping content-rich, dynamic storefronts. Whether you’re creating promotional banners, inserting custom messages, or reusing layout components across pages, static blocks are key to managing Magento 2 design efficiently. But managing them manually, especially at scale, can quickly become time-consuming and error-prone.
That’s where automation makes all the difference. With the Improved Import & Export extension, you can seamlessly import and export Magento 2 static blocks, automate workflows with scheduled jobs, and migrate content across stores without touching a single line of code. The extension supports all major file formats (CSV, XML, JSON, XLSX, ODS), multiple import sources (FTP, Google Sheets, Dropbox, etc.), and even complex Page Builder content.
From validating files and mapping attributes to solving common import issues, this guide has walked you through every essential step of managing Magento CMS block import and export operations.
💡 Ready to save time and eliminate manual work?
👉 Download the Improved Import & Export Extension for Magento 2
💬 Got questions or need help with custom implementation?
Reach out to the Firebear team — we’re here to help you integrate, scale, and streamline your Magento 2 store content.
👉 Contact Firebear Studio
With the right tools and automation in place, managing Magento CMS blocks can be faster, cleaner, and far more scalable.
Want to master Magento 2 import from A to Z? Explore our complete guide and unlock step-by-step tutorials, tips, and expert tools.
👉 Go to the Full Magento 2 Import & Export Guide
FAQ: Magento CMS Static Blocks
Can I import CMS static blocks in Magento 2 by default?
No, Magento 2 does not support CMS block import out of the box. You need a third-party tool like the Improved Import & Export extension by Firebear to automate static block imports.
How do I export Magento CMS blocks from my store?
Using the Improved Import & Export extension, you can configure export jobs to extract CMS static blocks in CSV, XML, or JSON format and deliver them to destinations like FTP, Dropbox, or Google Drive.
What’s the difference between static blocks and CMS pages in Magento 2?
Static blocks are reusable content snippets (like banners or messages), while CMS pages are full pages. Both are managed via the Magento admin but serve different layout purposes.
How do I insert a static block into a CMS page in Magento 2?
You can insert a static block using the WYSIWYG editor’s widget tool or by using the {{block}} directive or layout XML in your theme.
What file formats are supported for Magento CMS block import?
The Improved Import & Export extension supports CSV, XML, JSON, XLSX, and ODS file formats for static block import and export.
What are the required attributes for Magento 2 static block import?
You must include identifier, title, and store_view_code in your CSV file. Other useful fields include content, is_active, block_id, creation_time, and update_time.
Can I automate Magento CMS block exports?
Yes. With Firebear’s extension, you can schedule cron-based export jobs for static blocks and set up consecutive exports to only capture new or updated content.
Does the Improved Import & Export extension support Page Builder content in CMS blocks?
Absolutely. Page Builder content is stored in the content column and can be imported/exported along with other block attributes using the extension.
How do I troubleshoot Magento CMS block import errors?
Common issues include missing identifiers, incorrect formatting, or invalid store view codes. The Improved Import & Export extension offers file validation and attribute mapping to help prevent and resolve these errors.
Where can I find sample CSV files for Magento 2 static blocks?
You can access ready-to-use sample files in CSV, XML, JSON, and other formats from Firebear’s GitHub repository or the Google Master Import Table.