
UPS Shipping Manager Pro Multistore for Magento 2
Today, we present you a tool that significantly improves shipping management on an ecommerce store. Meet the UPS Shipping Manager Pro Multistore by Infomodus – a powerful Magento 2 module that provides integration with UPS Shipping services.
is one of the largest package delivery companies in the world that covers more than 220 countries and regions. The company has an extensive delivery fleet and operating facilities, allowing to provide top-notch transportation and logistics services to its clients.
UPS Shipping Manager Pro for Magento 2 offers a comprehensive toolset that lets merchants automate various shipment processes, easily generate and print UPS shipping and return labels, set a pickup schedule, and more.
Below, we have a closer look at the module’s main features and describe how to configure its backend.

Table of contents
Features
- Shipping, return, and invert UPS labels;
- Automatic, manual, and bulk mode of labels generation;
- Possibility to create test and billable labels;
- Generation of return labels in the customer account area;
- Tracking number inserted automatically in shipping documents;
- Compliance of regular shipping methods with UPS Service;
- Address book with shipper addresses;
- UPS Pickup services;
- International paperless invoices;
- Automatic creation of packages;
- Multishipment and multipackage functionality;
- Quantum View notifications;
- Various formats for label printing: PDF, GIF, HTML, ZPL, EPL2;
- Bulk printing of labels;
- Support for multiple stores;
- Based on UPS Shipping API and Pickup API.
With the UPS Shipping Manager Pro extension, online store owners can create UPS shipping, return, and invert labels for 108 countries where UPS Shipping API is supported. When creating labels, merchants use their own UPS account credentials. Return labels can be generated by admin when creating a credit memo in the backend. As for invert labels, they act as a shipping label with interchanged “ship from” and “ship to” addresses, meaning that a package is shipped from customer to warehouse or shop.
The Magento 2 UPS Shipping Manager module allows users to create labels in fully automatic or manual mode as well as in bulk. In fully automatic mode, labels are generated simultaneously with placed orders. In case of manual mode, you create shipments first and then manually generate shipping labels. With this option, you can configure each parameter of your labels based on your requirements. As for bulk creation of UPS labels, you can do it by selecting necessary orders on the appropriate grid and creating labels for all of them in one click.
Moreover, you can switch between the test mode and real mode of labels creation. This way, you can check how your settings work in the test environment before going into production mode and generating billable labels.
With the Magento 2 UPS Shipping management module, you can also allow customers to create and print return labels on your storefront. This function works for completed orders with created invoices. Frontend users can generate a UPS return label in a few clicks in their account area and get a link to immediately print them from a special page on the UPS website or get them via email for printing later.
Besides, the extension allows to automatically insert a shipment tracking number in the shipping documents and send it to customers in a confirmation email. As for other features offered by UPS Shipping Manager Pro Multistore, they allow admin users to configure various settings as default, including UPS negotiated rates, shipping methods for domestic and international delivery, payer, COD, payment conditions for transportation fees, duties, and tax charges, and more. It is also possible to set compliance between standard shipping methods, like free shipping, flat rate, etc., and UPS methods so that customers will be able to select UPS shipping option even if UPS services are disabled on your store. Furthermore, you can create pickup points and set a pickup schedule, as well as generate paperless commercial invoices for international shipments.
With the UPS shipping manager extension, you can set weight and dimensions of packages as well as create up to 10 boxes with pre-defined size. The Magento 2 module offers the autopackaging function, applying a smart algorithm for calculation of packages based on the dimensions of products and boxes. It is also possible to create shipping labels for multiple packages of the same order.
We also want to say a few words about UPS Quantum View manager allowing to view important shipping information and track shipment procedures. With Magento 2 UPS Shipping Manager Pro, you can set Quantum View notifications to let admins and customers monitor changes in a shipment’s status. With this feature, it is possible to enable notifications on various types of events: label creation, return, order shipped, delivery, and others.
As for printing options, the Magento 2 module generates shipping labels in GIF, HTML, PDF, ZPL, and EPL2 formats. You can also utilize the bulk printing function that lets you get all labels generated for selected orders in one PDF file.
It is also necessary to mention that UPS Shipping Manager for Magento 2 supports multiple stores management. So, if you run a few stores on one Magento installation, you can use different UPS accounts and configure the settings in different ways for each store view.
Backend
Note that to be able to configure the extension, first, you need to get your .
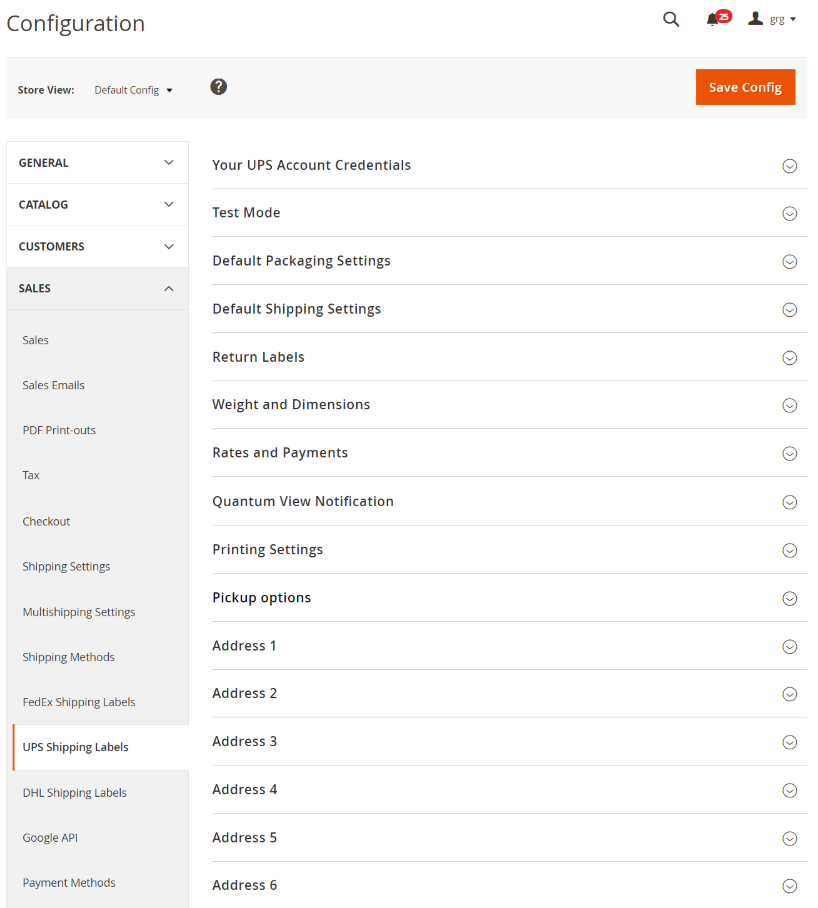
After obtaining your UPS account credentials, navigate to the configuration page of the module under Stores → Configuration → Sales → UPS Shipping Labels. Configuration settings are divided into several sections at each one of which we look closer below. The values entered in most of the fields are set by default based on the common practice and can be modified depending on your needs.
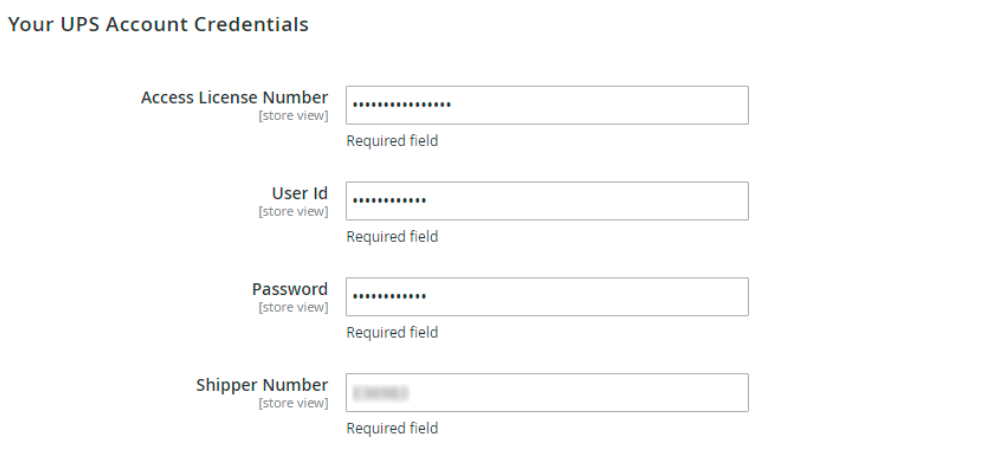
First, enter your UPS account credentials: Access License Number, User ID, Password, and Shipper Number.
Next, you can enable the test mode to check how everything works when creating UPS labels and disable it when you need to print real labels that can be used for shipments.

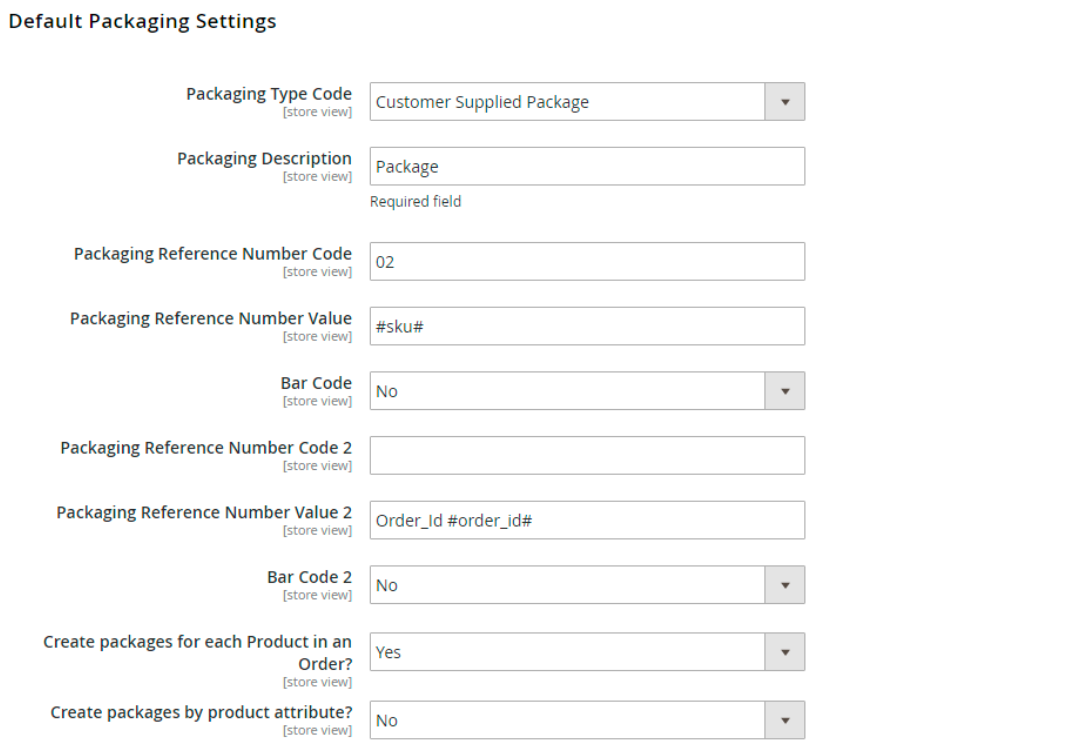
In Default Packaging Settings, choose the most relevant packaging type and create its description, enter packaging reference number codes and values, and activate bar code if necessary. Here, you can also enable the creation of packages for each product in order and by product attributes.
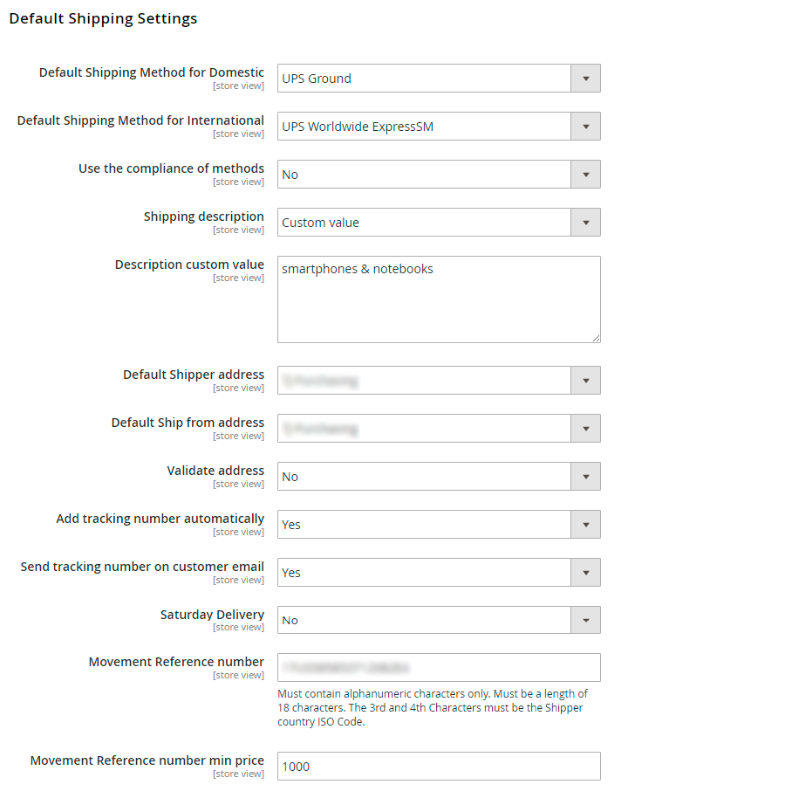
The next settings tab allows you to set default shipping methods for domestic and international shipments and the compliance of regular shipping methods and UPS Service. Then, select a custom value or one of the available options for description displayed at the labels. If you want to use custom value, type in a text in the relevant field. Next, choose default Shipper and Ship From addresses and enable/disable UPS address validation. Here, you also decide whether to automatically include a tracking number in the shipping documents and confirmation email sent to customers and enable/disable delivery on Saturdays. If you are shipping products to third countries with the value worth €1000 and more, specify a movement reference number and the minimum price when it should be used.
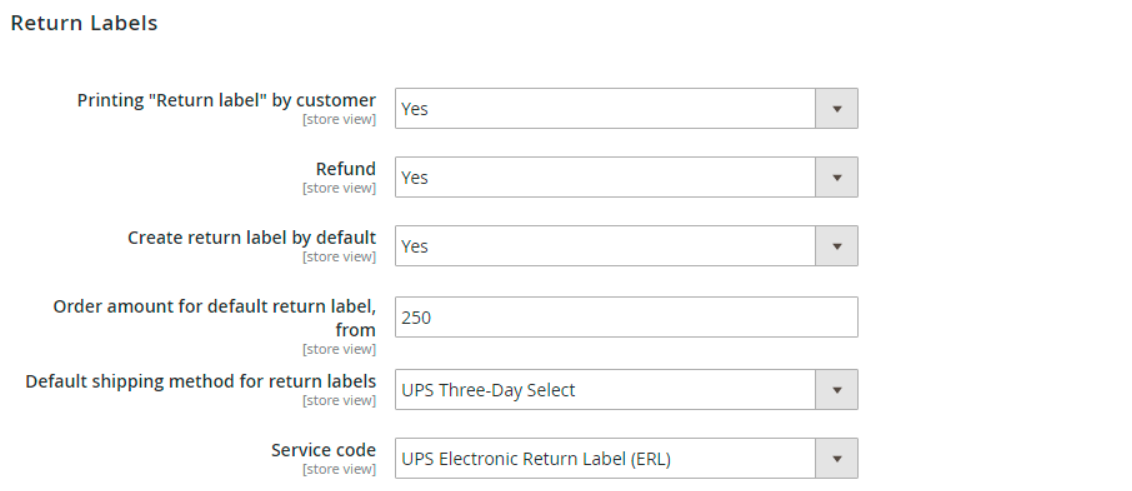
In Return Labels, you can allow printing return labels by customers, enable refund functionality on the frontend, and decide whether to create return labels simultaneously with shipping labels creation. Then, specify the minimum order value that will trigger the automatic generation of a return label and select a default shipping method for return labels as well as a service code.
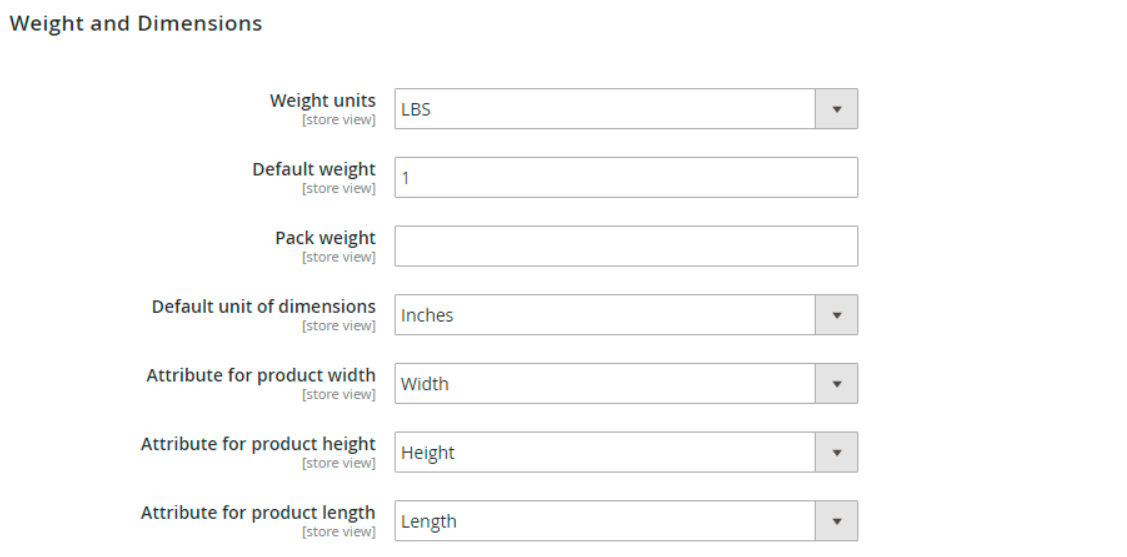
In the next section, you should choose default weight (LBS or KGS) and dimension units (inches or centimeters), enter the numbers for default product and package weight, and select attributes for product width, height, and length.
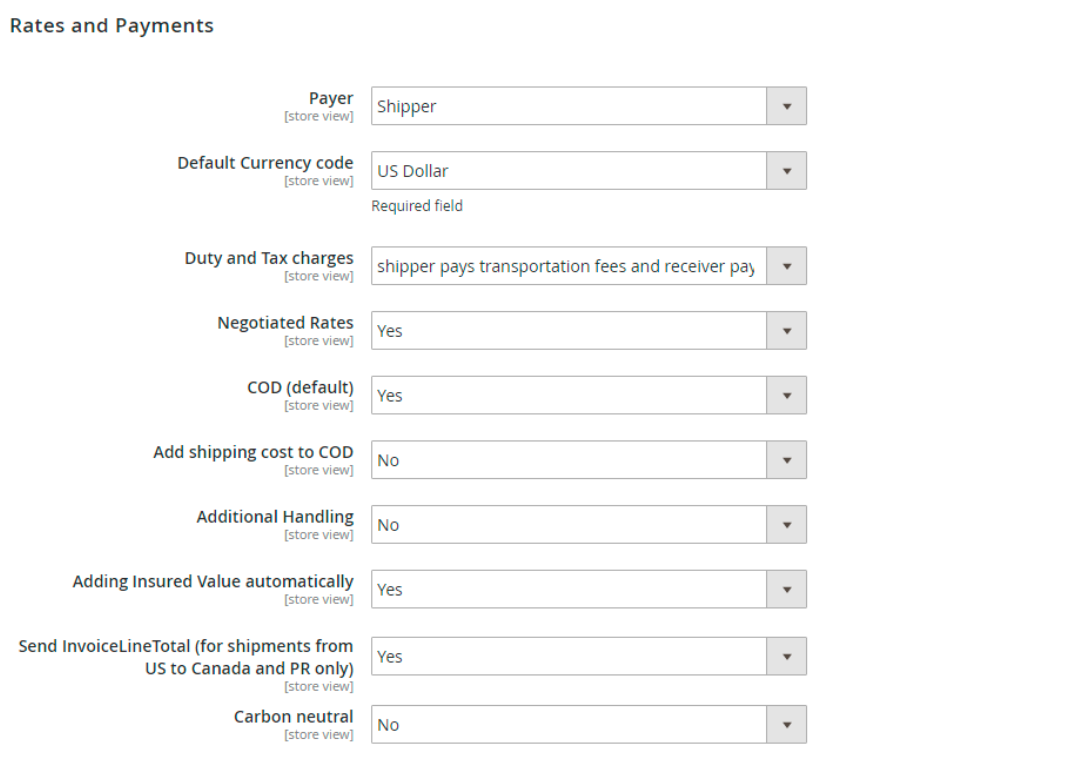
In the next settings tab of the Magento 2 UPS Shipping Manager module, you select who pays for shipping (a shipper or third party), select default currency, define the conditions of paying transportation fees and duties and taxes, and decide whether you will apply negotiated rates. Besides, you can enable cash on delivery option to be used by default and add shipping costs to it. Here, you also define whether to automatically include additional handling and insured value in the shipping costs. It is also possible to activate sending Invoice Line Total as well as UPS Carbon Neutral functionality.
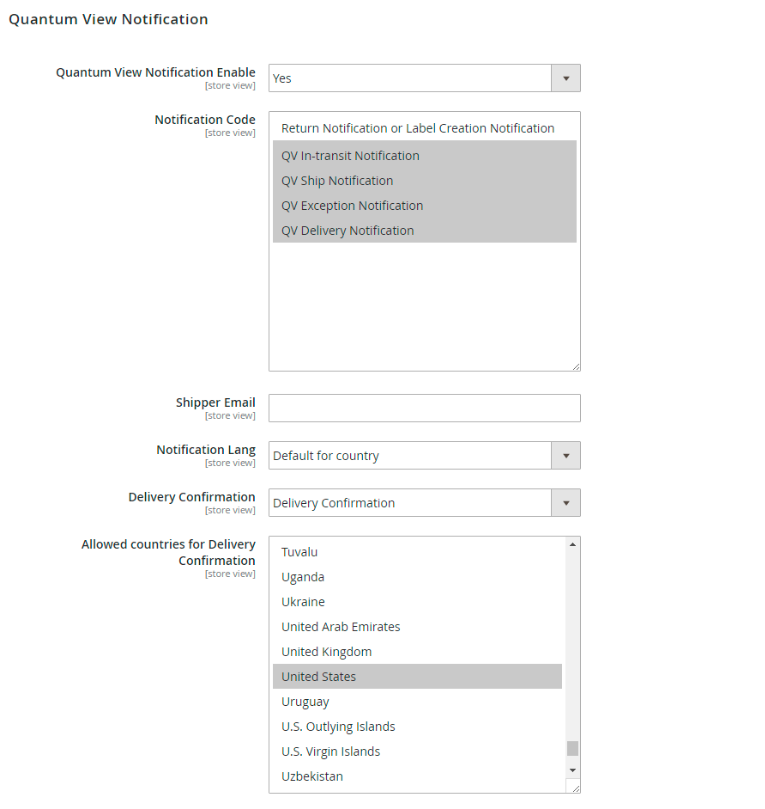
Next, you can enable Quantum View notifications, select their types (Notification Code), enter a shipper’s email address, choose a specific language, type of delivery confirmation, and allowed countries.
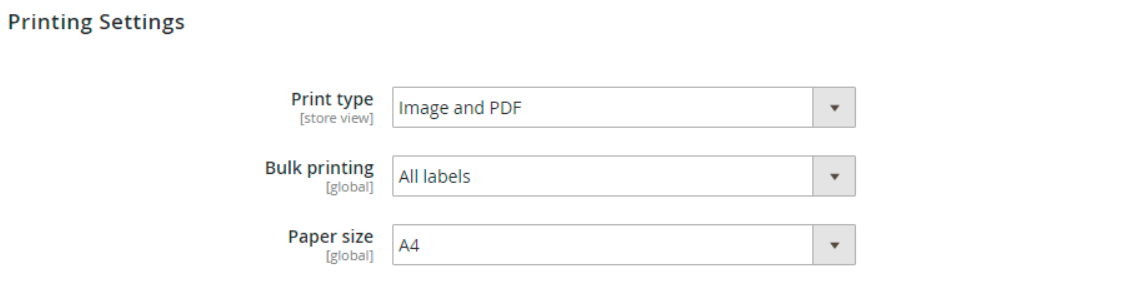
In Printing Settings, first, select a print type: Image and PDF, EPL2, SPL, ZPL, or STAR. If you will get your labels in PDF, decide whether all labels or only unprinted ones should be printed in bulk and select a paper size.
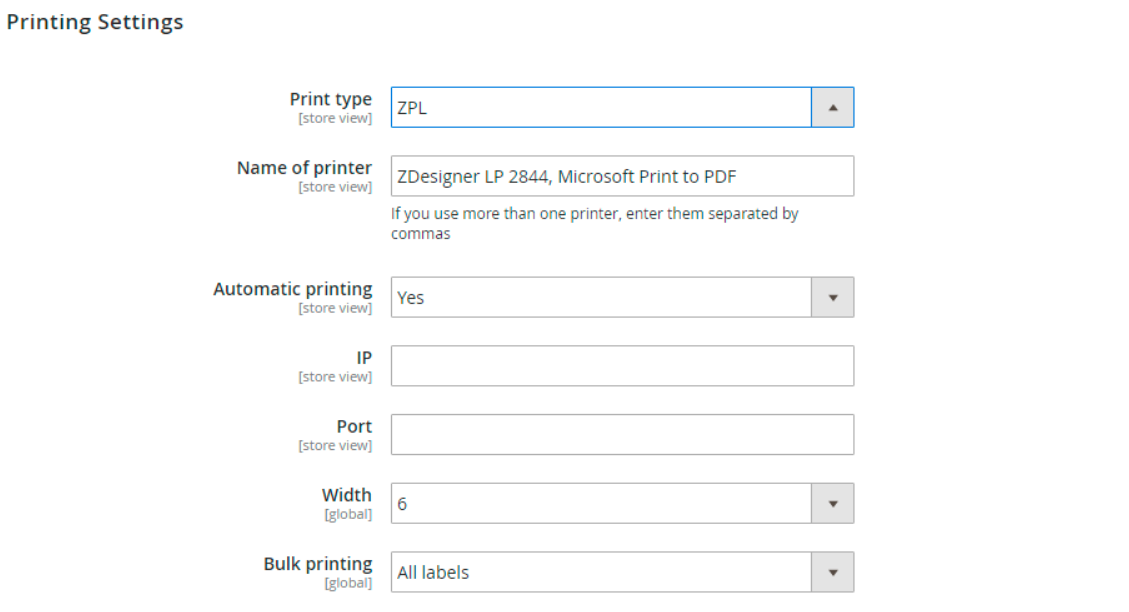
EPL2 and ZPL are the formats suitable for thermal printing. If you will use these printing formats, enter the name of your printer, enable/disable automatic printing, specify external IP and Port of your printer, select required width, and configure a bulk mode option.
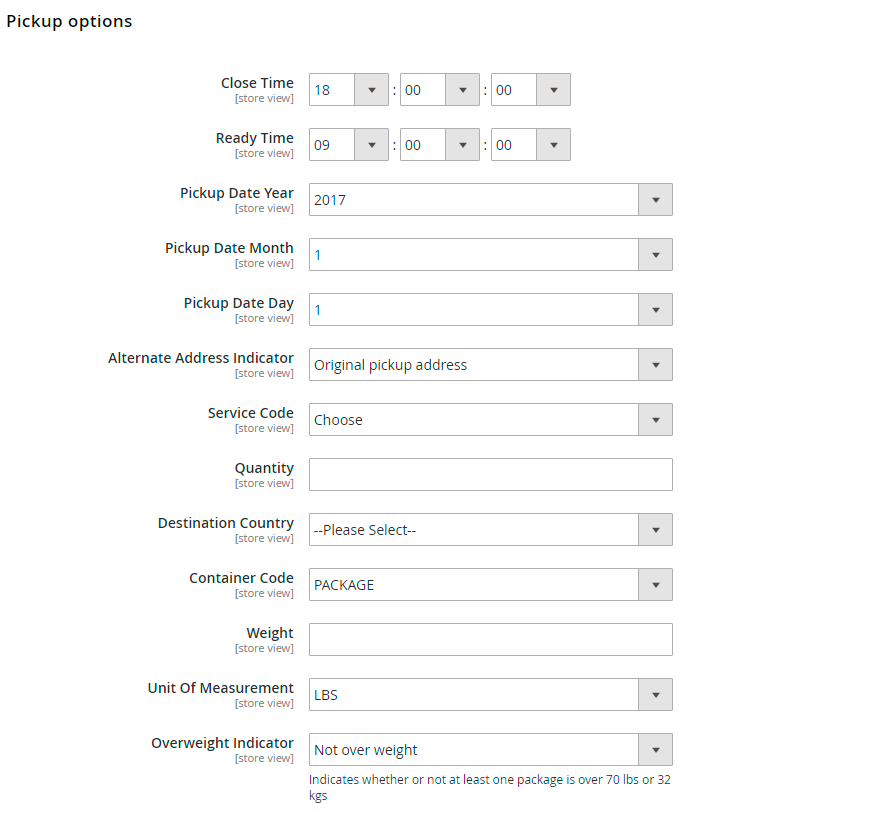
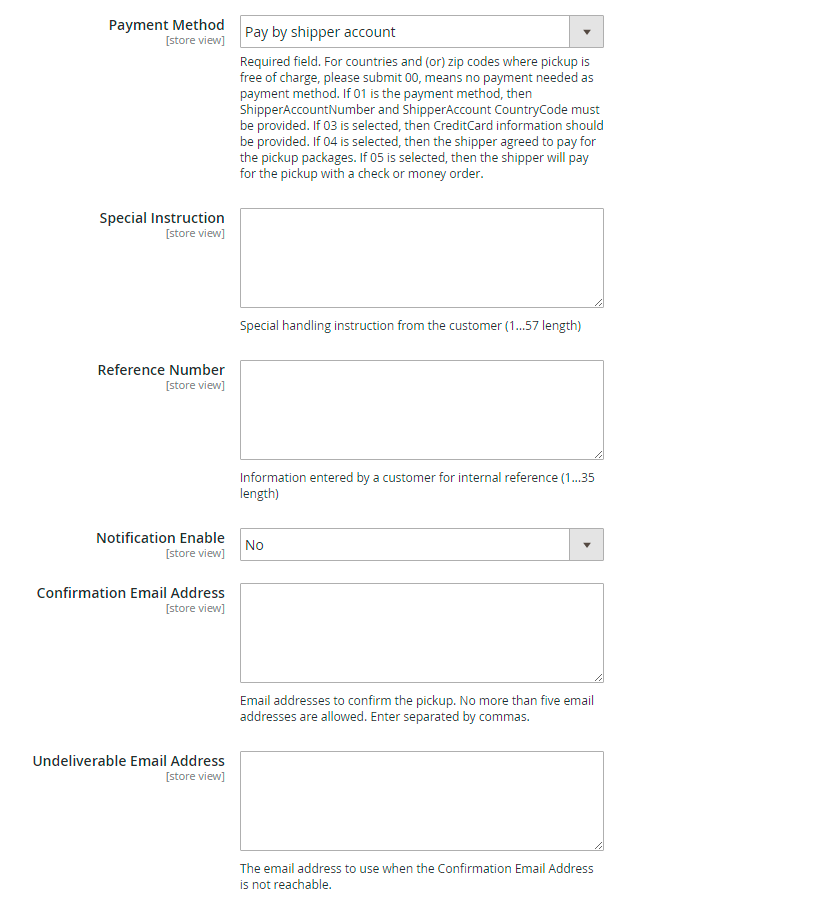
In the Pickup options tab, specify the closing and opening time of your office and default date for pickup, decide whether you want to use original or alternative pickup address, choose a service code of applied shipping method, and enter the number of packages. Next, select a destination country and container code, specify the total weight of boxes, and choose a measurement unit and relevant options for Overweight Indicator and Payment Method.
Then, enter a text for the special handling instruction and internal reference, enable/disable notifications on the status of your requests, and specify email addresses.
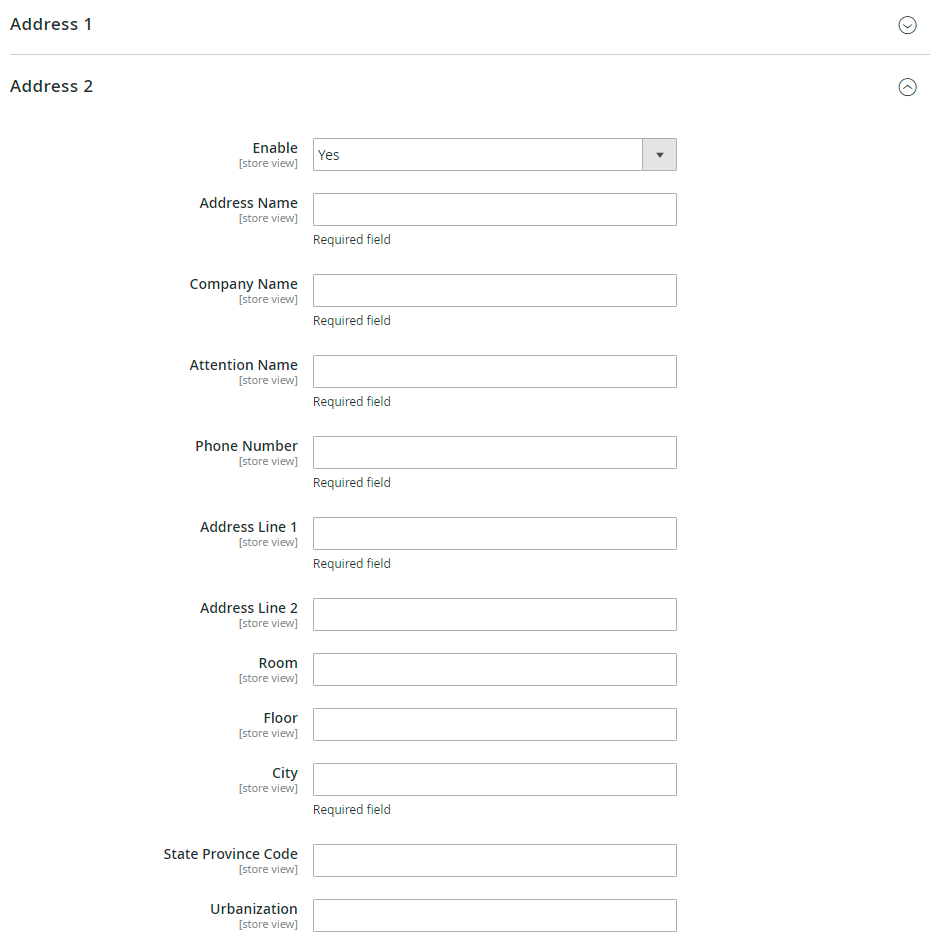
UPS Shipping Manager Pro lets you create up to 10 shipper addresses.
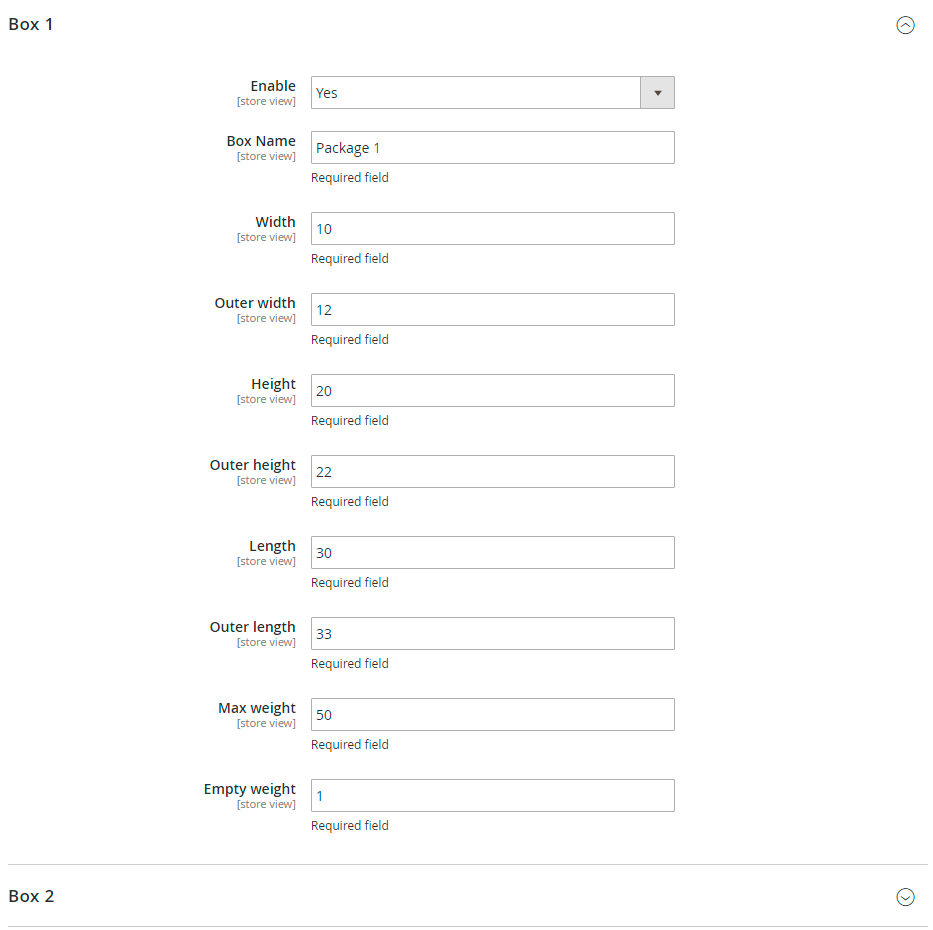
Besides, you can create up to 10 boxes of different size that will be selected by the module’s algorithm according to the dimensions of products being shipped.
In the next section, you enable or disable International Paperless Invoice function. Here, you can add comments, choose a reason for export, “Sold to” option (Shipper or Customer), international terms of shipment, measurement units, and product commodity attribute, and create a custom product description.
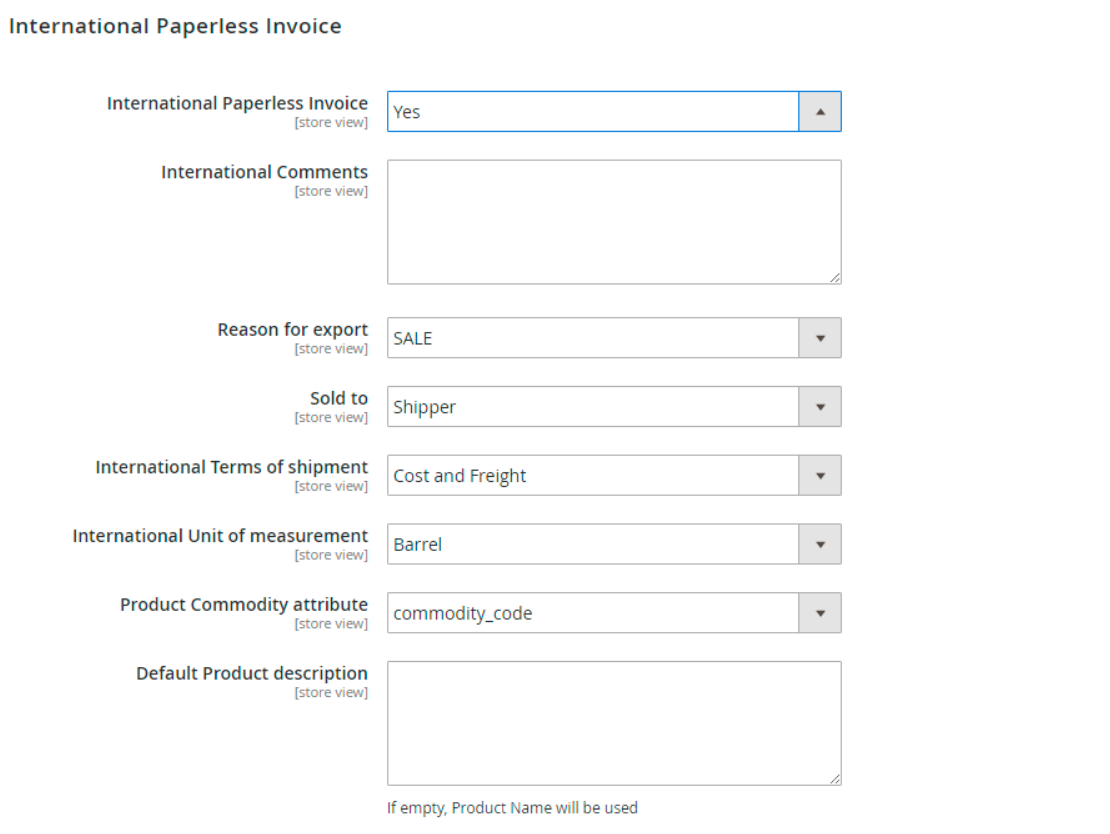
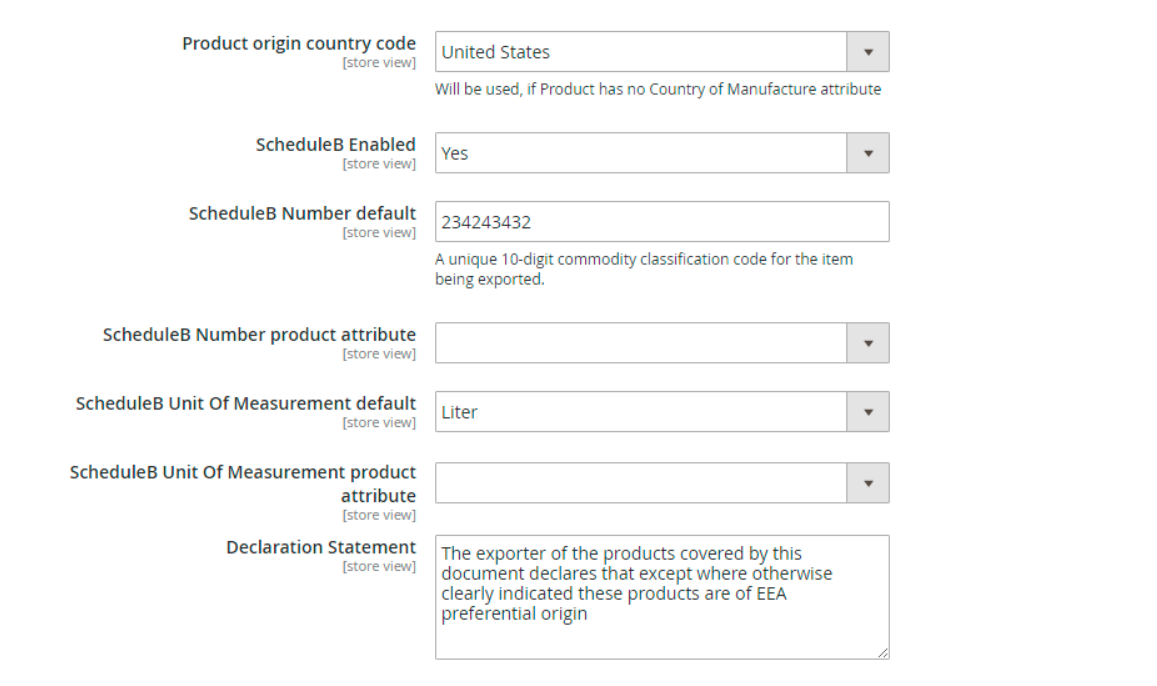
Other options in this section let you select a country of product origin, configure settings for Schedule B if enabled, and type text for a special declaration statement.
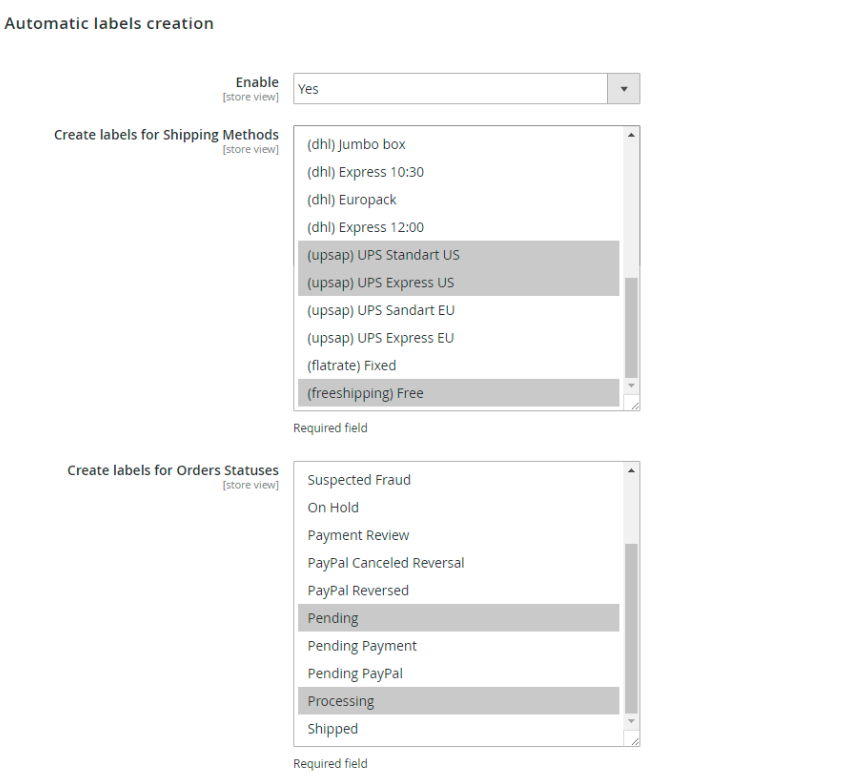
Next, you can enable automatic creation of UPS labels on the order submission and choose shipping methods and order statuses from available options for which they will be generated.
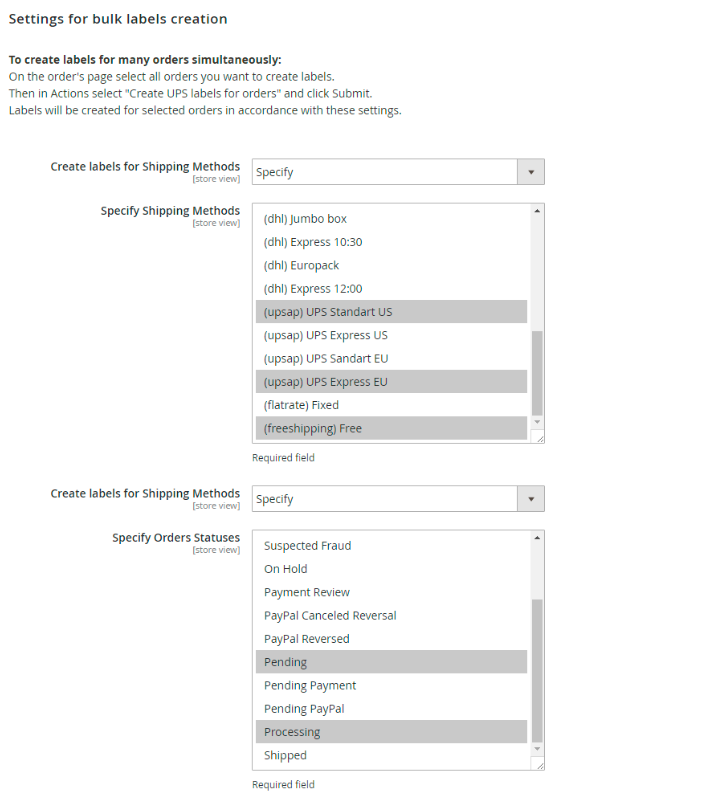
It is also possible to generate labels in bulk for all shipping methods and order statuses or specified ones.
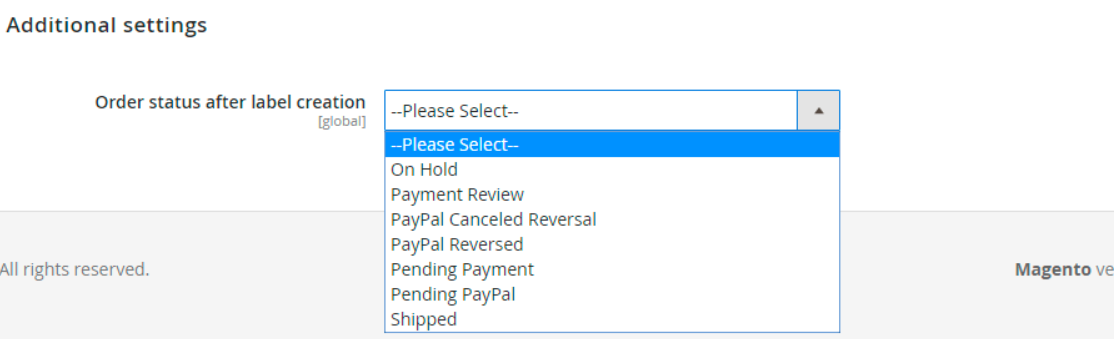
As for Additional Settings, here you can select a status an order will get after the creation of shipping labels.
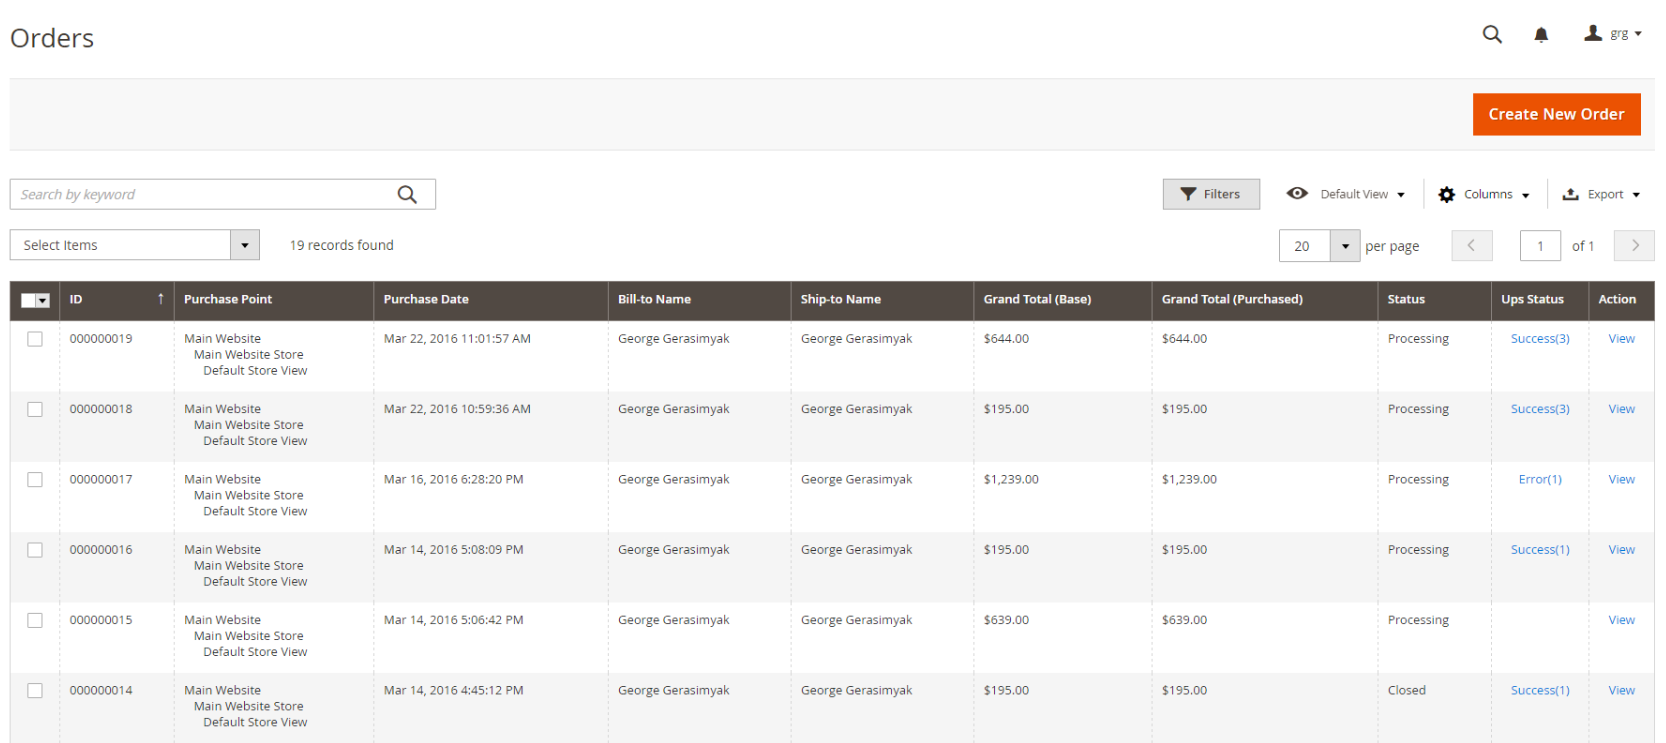
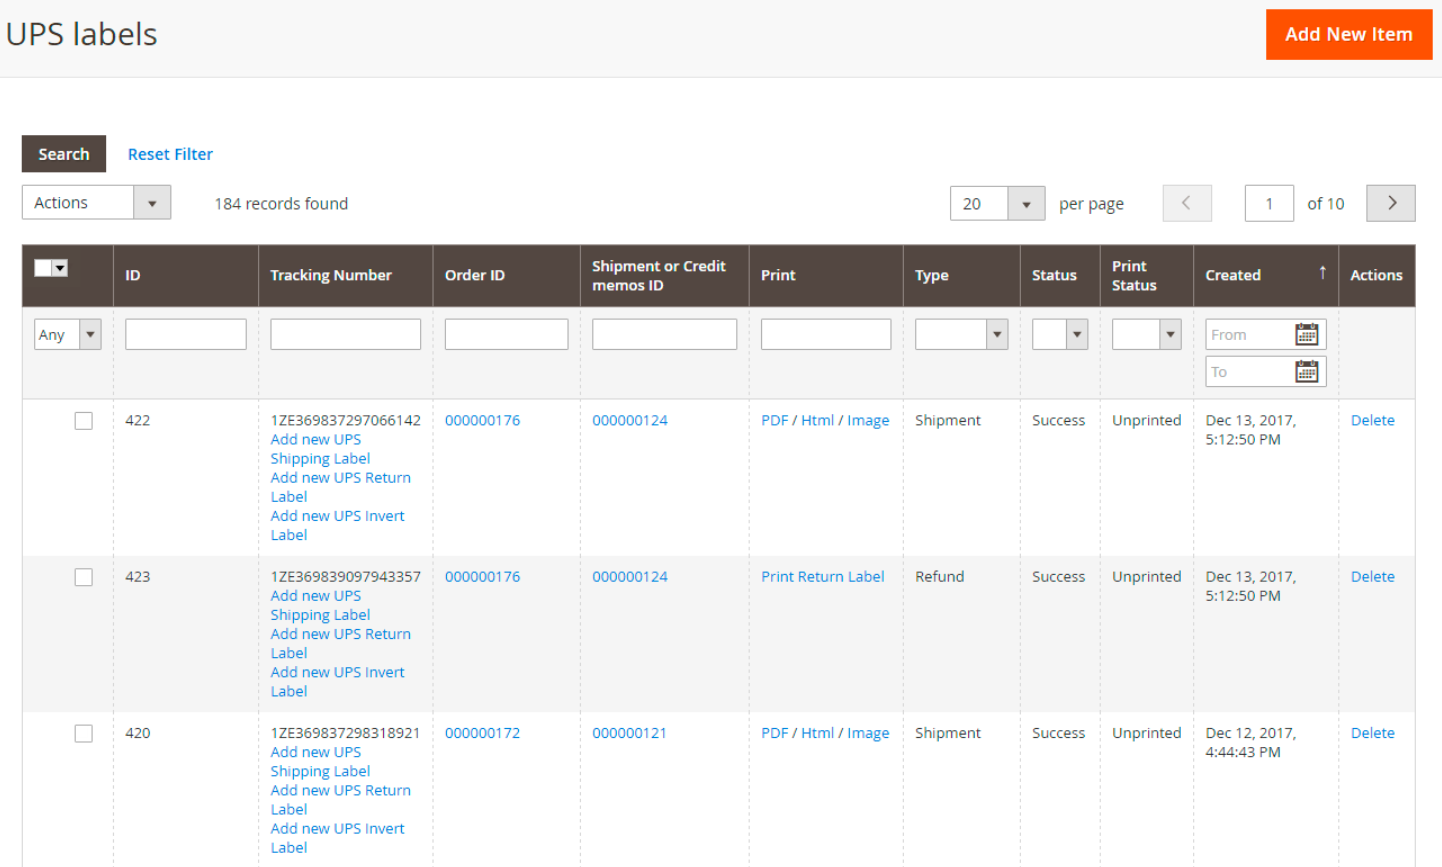
Now, let’s see how UPS labels are generated in various modes. In case you are using automatic mode, you can check the status of labels (Success or Error)in the Ups Status column on the Orders grid. To generate shipping labels in bulk, select necessary orders in the grid and choose “Create UPS Shipping Labels” from the mass actions list. If labels creation is successful, orders will receive a “Success” status. If labels generation fails, you will see “Error” in Ups Status. You can check the description of an issue by clicking the Error link. To print shipping labels in bulk, select orders for which you want to generate a file with labels and select “Print UPS Shipping labels” in the Actions drop-down list.
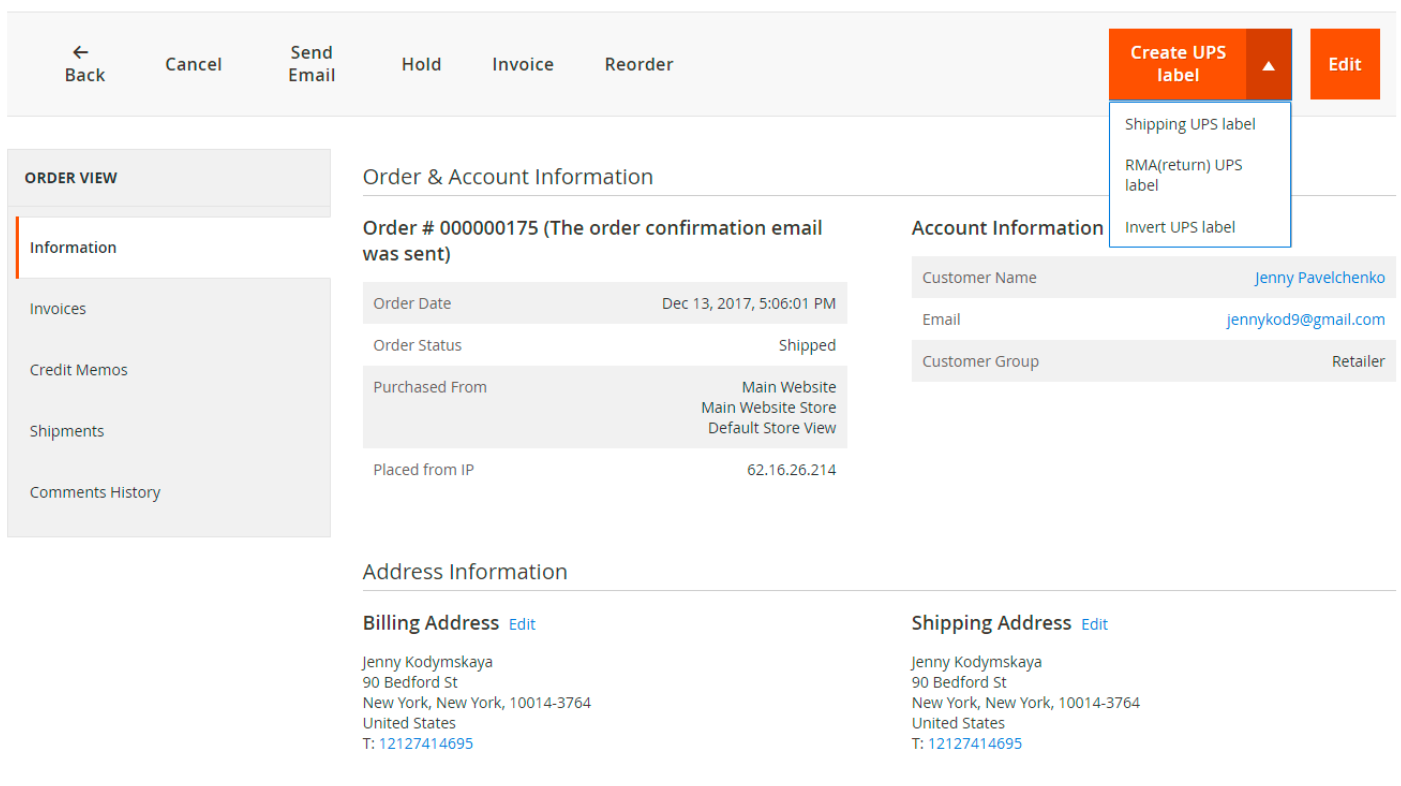
As for manual creation of labels, you should choose a specific order, click “Create UPS label” on the order view page, and select a type of label you want to generate: Shipping UPS label, RMA (return) UPS label, or Invert UPS label.
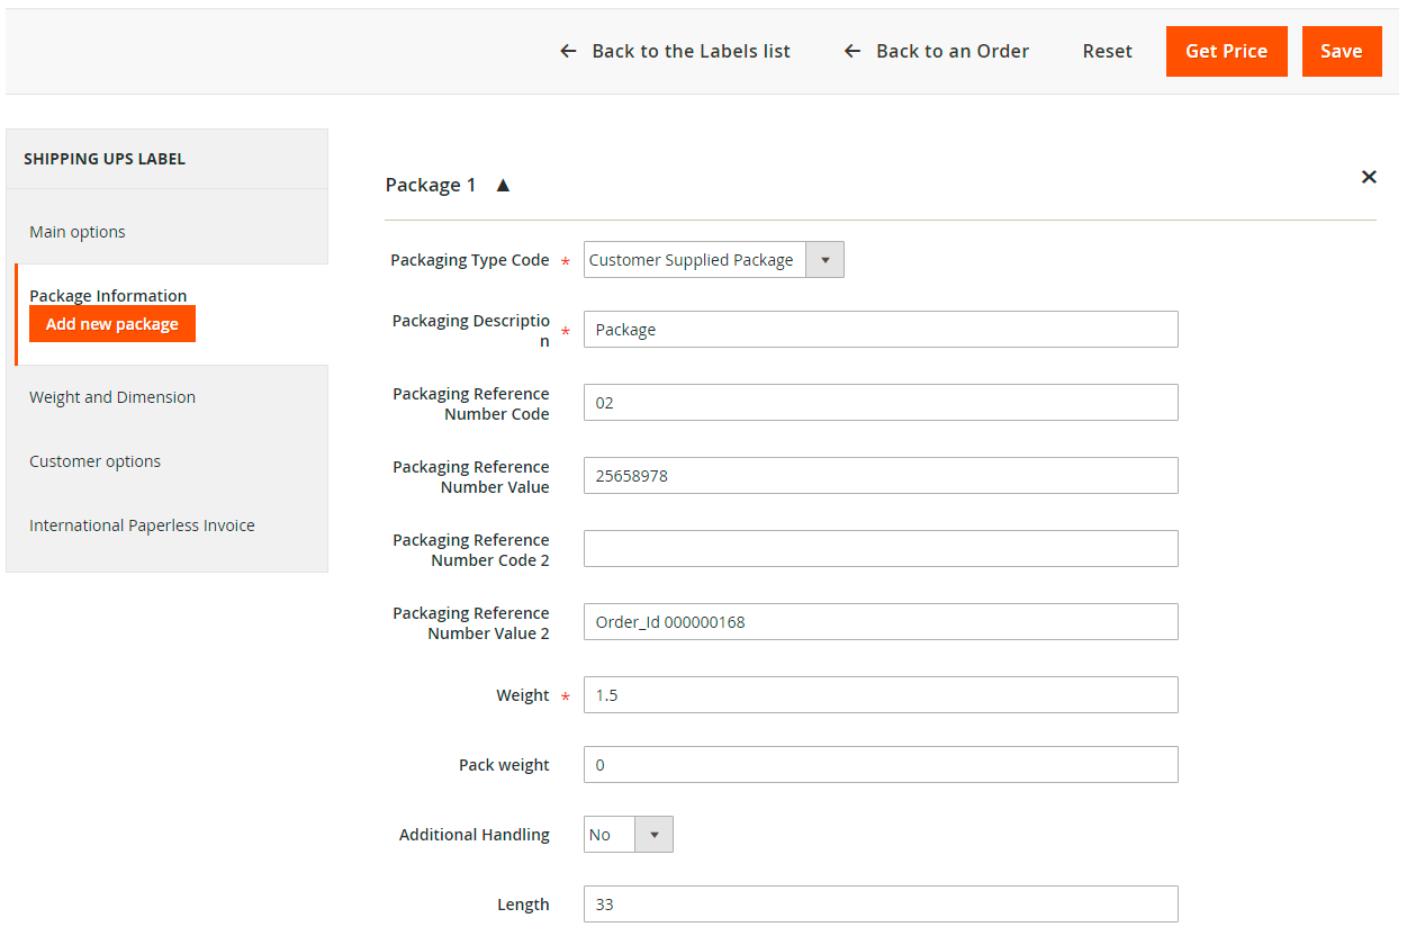
Then, you will be redirected to the Shipping UPS Label page divided into 5 tabs of settings: Main options, Package Information, Weight and Dimension, Customer options, and International Paperless Invoice. All the fields here have the values entered by default according to your settings in the general configuration of the module. You can change these options if necessary.
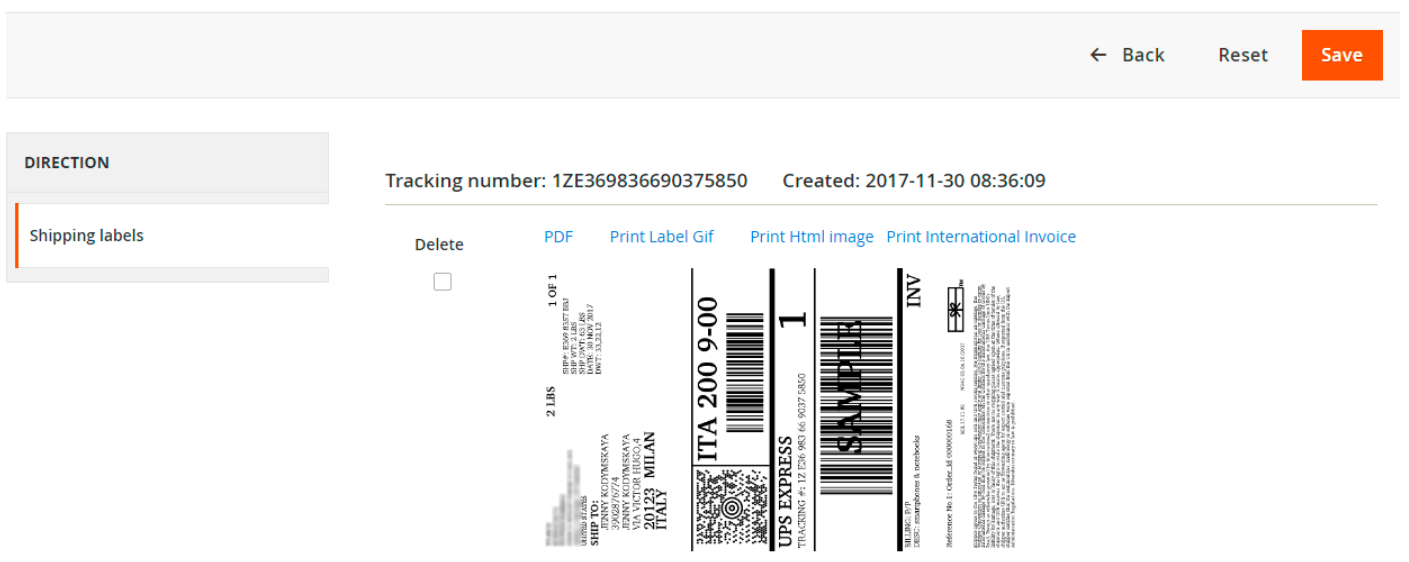
After configuring all settings of a new UPS label and saving them, you will be forwarded to a page where you can view generated labels and print them in PDF or ZPL/EPL2 format depending on the Printer settings. You will also receive a link for printing return labels in case of enabling appropriate settings in the general configuration of the module.
It is also possible to print shipping labels from the order view page as well as the UPS labels grid.
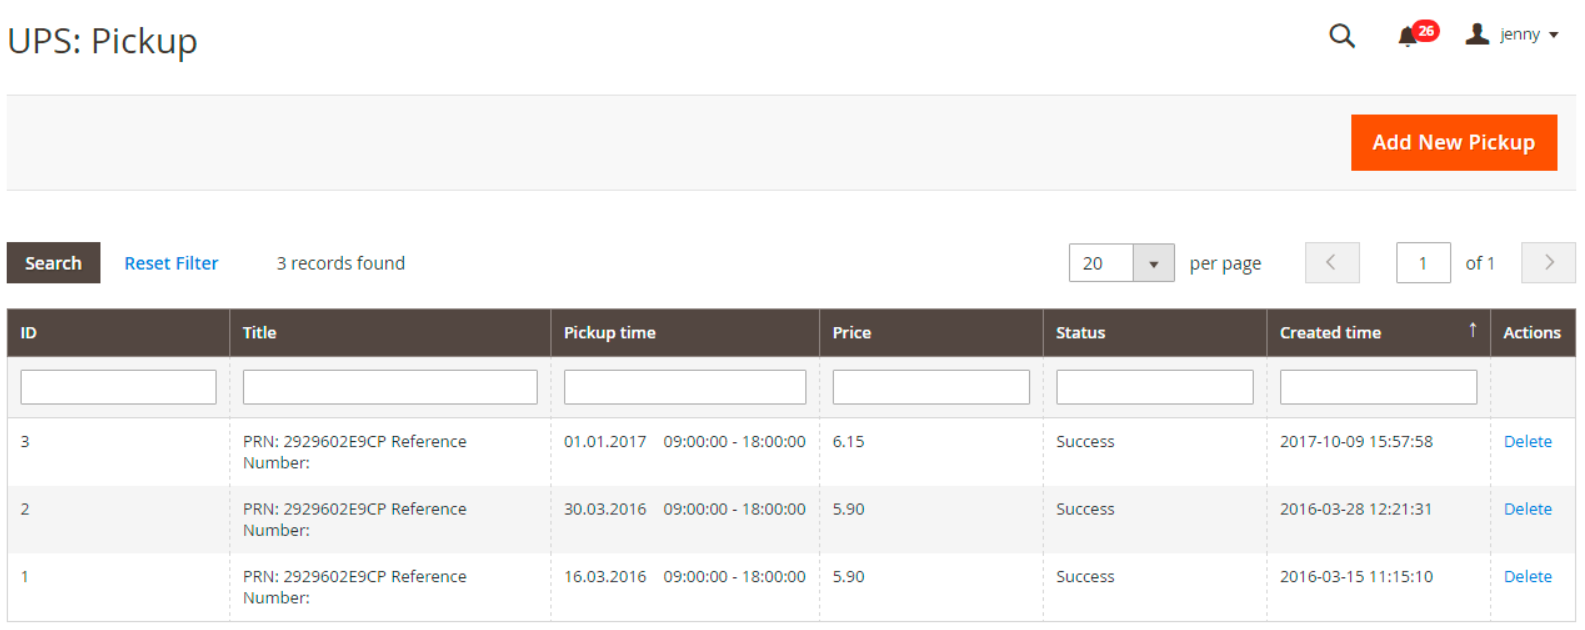
Another grid in the Magento Admin of the UPS Shipping Manager module gathers information on all existing pickup points: a PRN number, pickup date and time, price, status, and date and time of creation. It is possible to edit and delete selected pickups, as well as add new ones.
Frontend
If you enable printing return labels by customers, your clients will be able to generate and print labels in the My Orders tab in a customer account area for every completed order. The module adds “Create UPS Return label” link to the order page on the frontend.
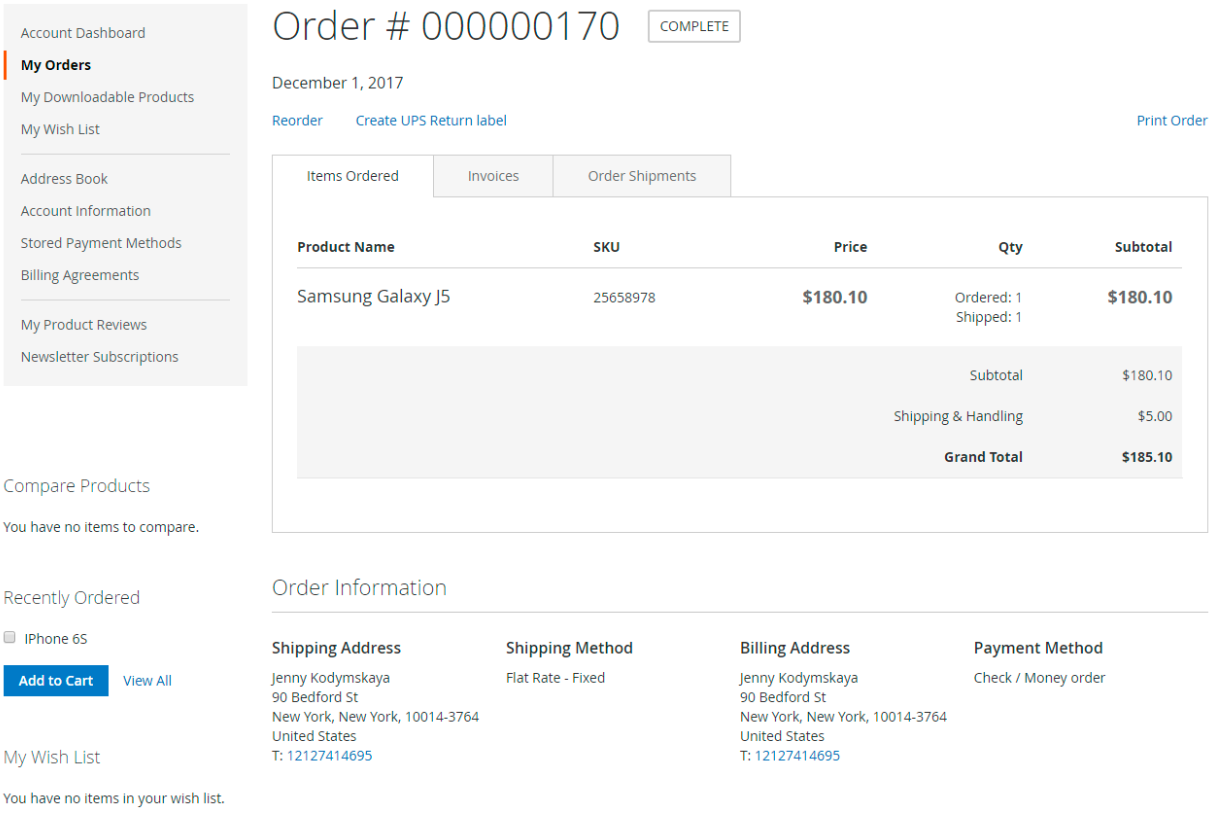
After a user clicks the link, he or she will be redirected to the UPS RMA Create Lable page. Here, customers can enter the number of items for refund, generate return labels, and print them from the UPS official website.

Final Words
UPS Shipping Manager Pro Multistore for Magento 2 is a necessary tool for online store owners that need a reliable solution for integration with UPS Shipping services. The Magento module provides an extensive set of features that can be fine-tuned according to specific business requirements. Using UPS Shipping Manager Pro, you will simplify shipping management procedures on your website and provide customers with convenient delivery options and returns. As for the price, you can buy the M2 module for $249.
Related posts
 Amasty ChatGPT AI Content Generator for Magento 2
 Magento 2 B2B Company Guide: Revealing Company Structure & Import
 How to Import Customers & Customer Addresses to Magento 2
 Shopware 6 Advanced Pricing Guide + Import Tutorial
 Adobe (Magento 2) Commerce and Cloud (Enterprise Edition) Specific Features
 Reputon Amazon Importer Review: How to Connect Shopify to Amazon in a Few Clicks
 CopyAI Review 2023
 Magento Open Source and Adobe Commerce 2.4.7 Release Notes