
Magento 2 B2B Requisition List Guide: Management, Optimization, Import & Export Explained
Magento 2 B2B requisition list functionality is a game-changer for streamlining repeat orders and simplifying bulk purchasing. In this guide, we’ll walk you through everything you need to know about requisition lists in Magento B2B: what they are, how they work, and most importantly — how to import and export requisition list data efficiently.
Although the feature is exclusively available in Adobe Commerce with the B2B module, Magento’s native tools don’t support B2B entity transfers out of the box. That’s why we’ll show you how to use a powerful third-party extension to handle Magento 2 requisition list imports using properly structured CSV files. Below, you will discover a ready-to-use sample CSV and a detailed breakdown of all supported attributes to help you avoid errors and speed up implementation.
Whether you’re just getting started with Magento requisition lists or looking to automate the process, this article will guide you step by step — from setup to bulk data transfers.

Table of contents
- What Is a Magento 2 B2B Requisition List?
- Benefits of Using Magento 2 Requisition Lists in B2B
- Magento 2 B2B Requisition List vs. B2C Wish List
- Use Cases For Magento 2 Requisition Lists in B2B eCommerce
- Magento 2 Requisition List Workflow: How to Manage, Edit, and Use B2B Lists
- How to Import and Export Magento 2 B2B Requisition Lists
- How Firebear Studio Helps with Requisition List Management in Magento 2
- Final Words: Streamline Magento 2 B2B Requisition List Management with Automation
- Magento 2 B2B Requisition List FAQ
What Is a Magento 2 B2B Requisition List?
A Magento 2 B2B requisition list is a powerful feature designed to streamline repeat purchases for business customers. Available exclusively in Adobe Commerce with the B2B extension, it allows logged-in users — and even guests — to create, manage, and reuse multiple lists of frequently ordered products. This functionality simplifies routine procurement tasks and speeds up the buying process for B2B teams.
Unlike a standard wishlist, a requisition list in Magento 2 persists even after the products are moved to the cart. This makes it ideal for recurring orders such as monthly restocks, team-specific purchases, or vendor-based procurement. Think of it as a smarter, purpose-built B2B repeat order tool — not just for personal favorites, but for operational efficiency.
Each Magento requisition list supports the following features:
- Bulk actions: Add multiple items to the cart at once, including defined quantities.
- Flexible structure: Buyers can create up to 999 requisition lists per company account, or fewer, depending on admin settings.
- Compact UI: A streamlined interface enables faster navigation and easier list management for larger product sets.
- Segmented lists: Customers can maintain lists for different teams, projects, buyers, or campaigns, allowing for organized procurement workflows.
From a merchant’s perspective, the Magento 2 requisition list feature improves customer retention and B2B satisfaction by offering a more intuitive, time-saving experience. Admins can also configure limits for the number of requisition lists per customer and control how users interact with their lists.
In short, requisition lists in Magento 2 provide a practical and efficient way for B2B customers to save time, minimize errors, and speed up order placement, transforming the way businesses shop on your site.
Benefits of Using Magento 2 Requisition Lists in B2B
As you can see, the Magento 2 B2B requisition list is more than just a convenient shopping feature. It’s a strategic tool that empowers business buyers to reorder products quickly, accurately, and with minimal friction. In the fast-paced world of B2B commerce, where repeat purchases and large orders are the norm, requisition lists offer a clear competitive edge, introducing the following benefits:
Save Time With Repeat Ordering
One of the biggest advantages of the Magento 2 B2B requisition list is speed. Buyers can save frequently purchased products to a list and reorder them in just a few clicks, eliminating the need to search for SKUs or navigate multiple category pages. This is especially useful for recurring orders like office supplies, replacement parts, or seasonal inventory.
Reduce Manual Errors
Manual entry is a common source of errors in B2B bulk ordering. Requisition lists mitigate this risk by storing pre-approved products, quantities, and configurations. When it’s time to reorder, everything is already in place, reducing mistakes and ensuring consistency across purchases.
Streamline Procurement Workflows
With support for multiple requisition lists per user or company account, buyers can segment their purchasing by project, department, or buyer role. This level of personalization aligns with broader Magento 2 B2B features like company accounts and custom roles, allowing businesses to create structured, role-based procurement workflows.
Enable Faster Decision-Making
The clean and compact interface of requisition lists makes it easy to scan products, update quantities, and add items to the cart instantly. For teams working on tight deadlines or managing large catalogs, this drastically improves ordering efficiency and purchasing accuracy.
Support Scalable B2B Operations
Whether you’re dealing with a few key accounts or managing hundreds of business clients, requisition lists help scale your B2B operations without adding complexity. They simplify the customer experience, reduce support inquiries, and ultimately drive higher conversion rates.
With all these benefits up the sleeve, Magento 2 B2B requisition lists turn the typical B2B shopping process from a time-consuming task into a seamless, repeatable system, perfectly suited for modern wholesale and enterprise environments. To make things even clearer, let’s compare requisition lists and wishlists.
Magento 2 B2B Requisition List vs. B2C Wish List
While both requisition lists and wish lists allow customers to save products for later, they serve very different purposes, especially when comparing B2B and B2C use cases. If you’re running a Magento store, understanding these differences is essential for optimizing your user experience and aligning with buyer intent.
The Magento requisition list is a core feature of Adobe Commerce’s B2B suite, designed specifically for business users who need to reorder frequently and manage purchases efficiently. The Magento wish list, on the other hand, caters to personal shopping preferences and casual product tracking.
Let’s break down the differences side by side:
| Feature | Magento Wish List | Magento Requisition List |
| Availability | Magento Open Source & Adobe Commerce | Adobe Commerce with B2B extension only |
| Intended Audience | Individual shoppers (B2C) | Business buyers and procurement teams (B2B) |
| Purpose | Save favorite items for personal interest | Save frequently ordered products for operational use |
| Persistence after adding to cart | Items are removed after checkout | Items remain on the list after checkout |
| Support for multiple lists | One wish list per customer | Multiple requisition lists per company account |
| Quantity management | No | Yes — set custom quantities per product |
| Bulk add-to-cart | No | Yes — add all list items to cart with one click |
| Interface | Standard product list | Compact layout optimized for large product volumes |
| Segmentation options | Not supported | Yes — lists can be grouped by buyer, project, or team |
| Use case examples | Gift ideas, personal favorites | Office supplies, wholesale reorders, recurring purchases |
Why This Difference Matters in B2B
When it comes to B2B tools in Magento 2, the requisition list stands out as a productivity booster. Business buyers aren’t shopping for enjoyment — they’re making decisions that impact budgets, timelines, and operations. That’s why they need tools like requisition lists that support structured reordering, allow bulk actions, and ensure fewer errors.
By contrast, wish lists play a smaller role in B2B workflows and are better suited for casual or inspiration-based browsing in the B2C space.
Use Cases For Magento 2 Requisition Lists in B2B eCommerce
Below are practical Magento 2 B2B requisition list examples that demonstrate how different types of businesses can streamline operations and reduce friction using this tool.
🏭 Manufacturer Reordering Spare Parts
A factory maintenance manager responsible for keeping machinery operational creates a requisition list with frequently used spare parts — bolts, bearings, filters, and hydraulic components. Every month, they review the list, adjust quantities based on usage, and reorder within minutes. This use of a Magento 2 requisition list eliminates the need to search for product SKUs manually, saving time and preventing downtime.
🛒 Wholesaler Managing Retail Orders
A wholesale distributor working with dozens of small retailers builds standard requisition lists based on each retailer’s typical inventory needs — one list per client. When it’s time to restock, the team simply selects the appropriate list, modifies quantities if needed, and places the order. This Magento 2 requisition list use case shows how the tool simplifies bulk reordering and supports account-based workflows.
🧑💼 Corporate Procurement For Multiple Departments
A company buyer overseeing multiple departments — marketing, HR, and office admin — creates separate requisition lists for each team’s recurring needs. For instance, the marketing list includes branded items and trade show supplies, while HR’s list contains onboarding kits. This scenario demonstrates how requisition lists support repeat orders across different teams, allowing centralized procurement with customized workflows.
In each of these Magento 2 B2B requisition examples, the value is clear: faster ordering, fewer mistakes, and greater control over B2B purchasing cycles. Whether you’re managing parts, products, or people, requisition lists turn repetitive tasks into efficient workflows.
Magento 2 Requisition List Workflow: How to Manage, Edit, and Use B2B Lists
Managing a Magento 2 B2B requisition list is essential for streamlining bulk purchases, automating repeat orders, and improving B2B buyer efficiency. In this section, you’ll learn how to enable requisition lists, create and manage them, add or remove products, and perform advanced actions like renaming, copying, or printing a list.
How to Enable Requisition Lists in Magento 2
To activate the Magento requisition list feature:
- Navigate to Stores → Configuration → General → B2B Features.
- Set Enable Requisition List to Yes.
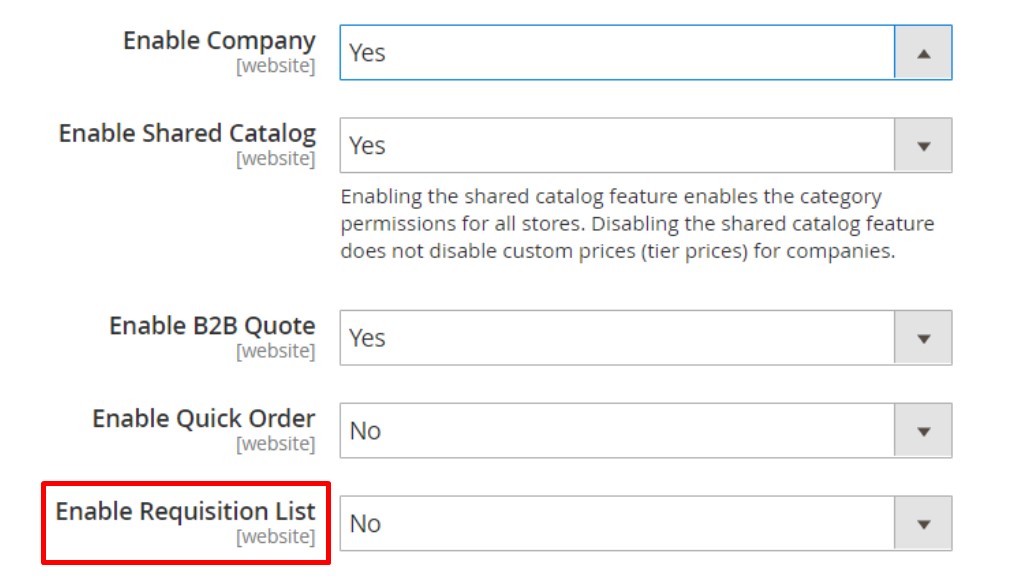
This enables your B2B customers to create and manage requisition lists directly from their accounts.
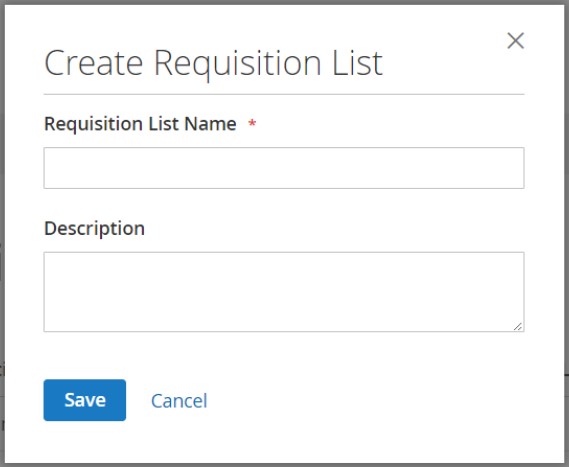
How to Create a Magento 2 B2B Requisition List
You can create a requisition list using two methods:
From the Customer Account Dashboard:
- Go to My Account → My Requisition Lists.
- Click Create New Requisition List.
- Enter a name and optional description, then click Save.
From a Product Page:
- On any product page, click Add to Requisition List.
- Select Create New Requisition List.
- Name your list and hit Save.
How to Add Products to a Magento 2 Requisition List
There are three ways to add products to an existing Magento 2 B2B requisition list:
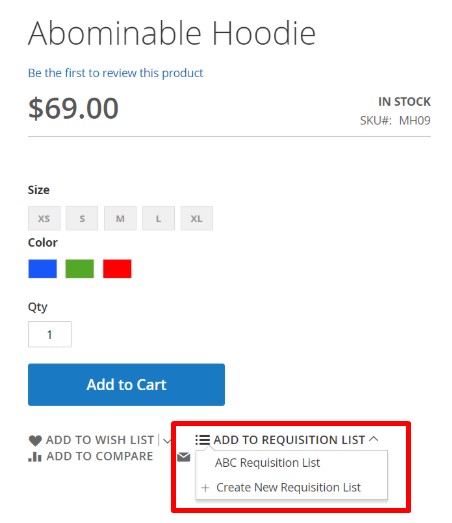
From a Product Page:
- Visit the product page.
- Select Add to Requisition List.
- Choose an existing list or create a new one.
- The quantity (QTY) selected on the product page will be preserved.
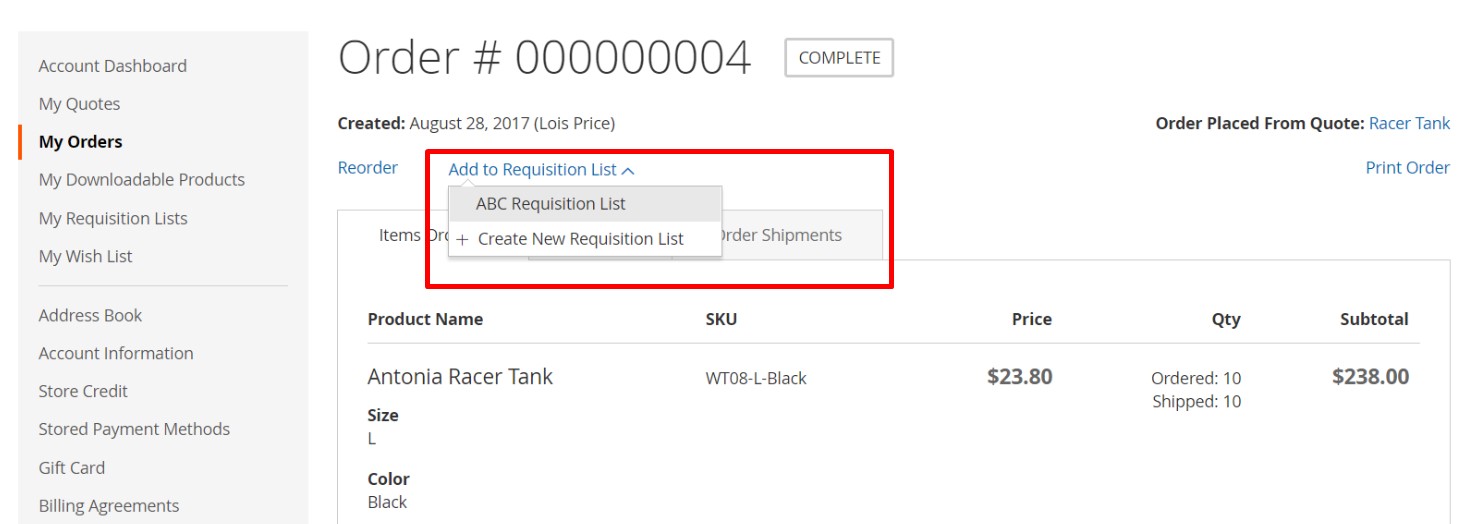
From an Existing Order:
- Go to My Account → My Orders.
- Click Add to Requisition List next to the relevant order.
- Select or create a list.
From the Shopping Cart:
- Inside the cart, select products to add to a requisition list.
- Use the Add to Requisition List option.
- Choose or create a destination list.
How to View an Updated Requisition List in Magento 2
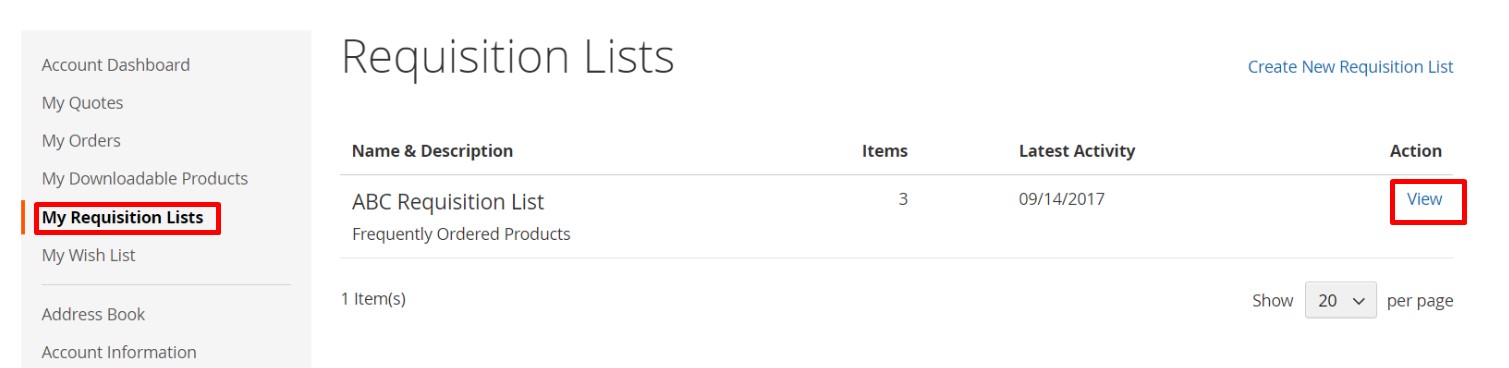
To view or edit an existing requisition list:
- Navigate to My Account → My Requisition Lists.
- Click View next to the desired list.
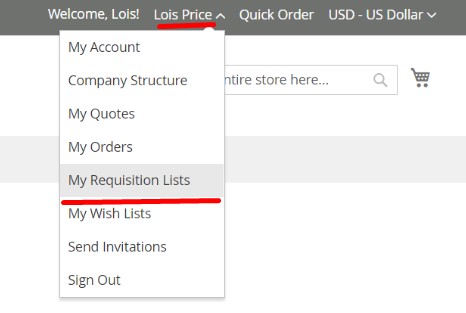
Alternatively, use the quick access menu:
- Click your username at the top of the page.
- Select My Requisition Lists from the dropdown
For further information, follow this link: .
How to Add Products to Cart from a Magento 2 B2B Requisition List
To place an order using a requisition list:
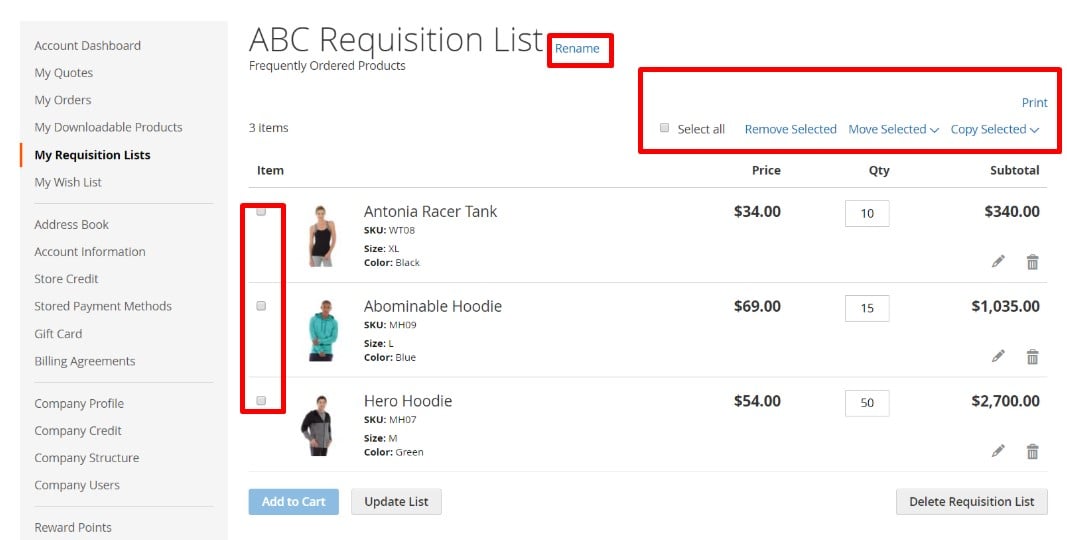
- Open your desired list.
- Mark the checkbox next to each product, or use Select All.
- Enter the quantity you wish to add for each item.
- (Optional) Click Edit to change product options, then Update Requisition List.
- Click Add to Cart to proceed with checkout.
How to Move or Copy Items Between Magento 2 Requisition Lists
Move Items:
- Select products using checkboxes.
- Click Move Selected.
- Choose an existing list or create a new one to move the items.
Copy Items:
- Select items using checkboxes.
- Click Copy Selected.
- Duplicate the selected items to another requisition list or create a new one.
How to Remove Items from a Requisition List in Magento 2
To delete items from a list:
- Select products using checkboxes.
- Click Remove Selected.
- Confirm deletion by clicking Delete.
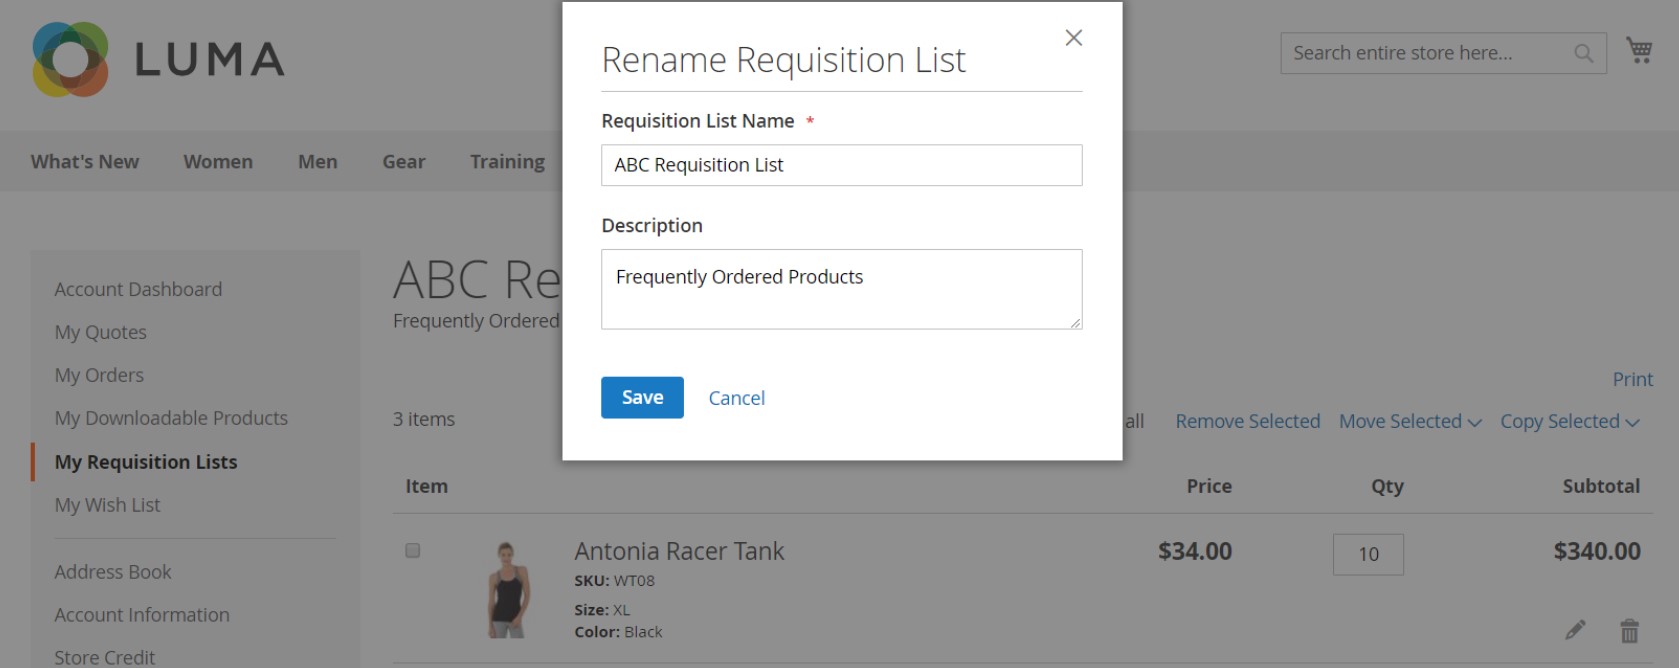
How to Rename a Magento 2 B2B Requisition List
To rename an existing list:
- Click Rename beside the list title.
- Enter the new name.
- Click Save to apply the changes.
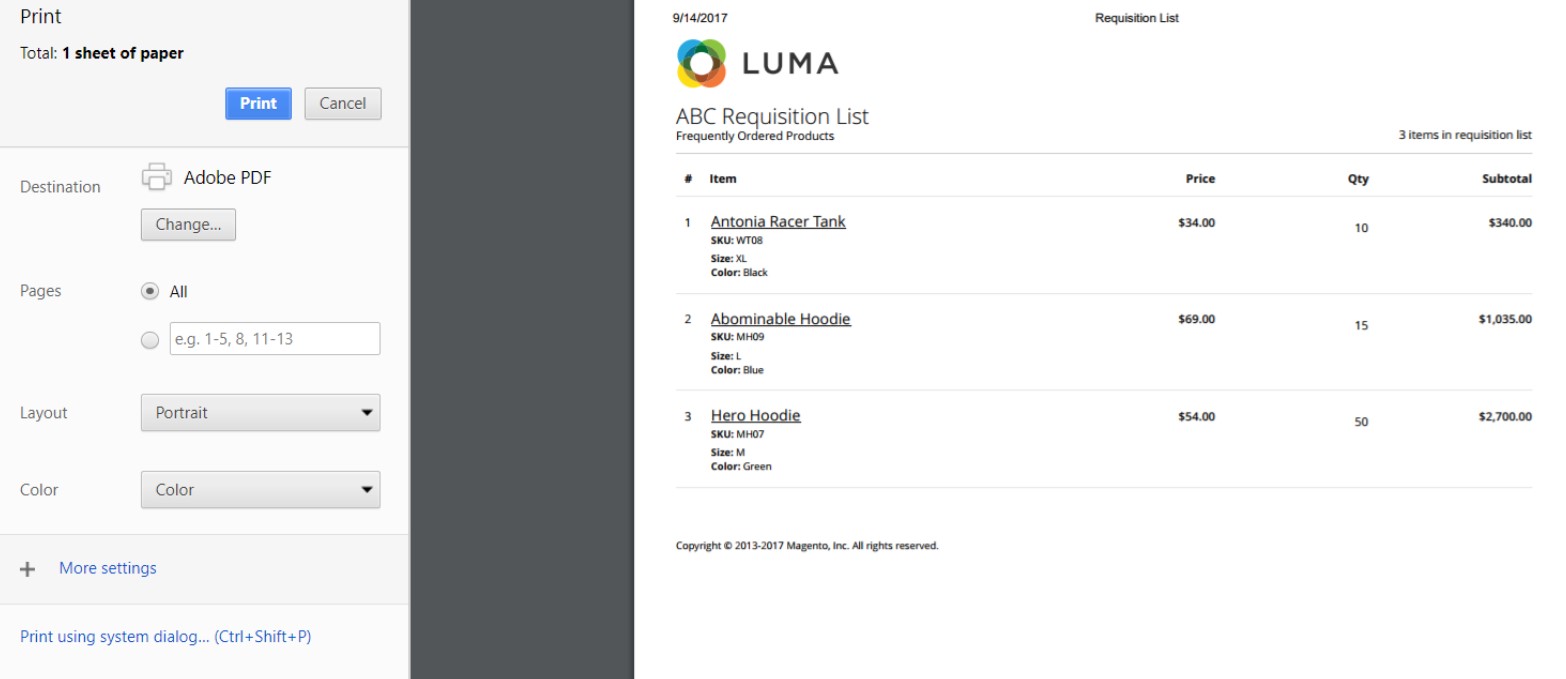
How to Print a Magento 2 Requisition List
To print a requisition list:
- Open the list you want to print.
- Locate the Print button in the upper-right corner.
- Verify your printer setup and click Print.
For any further information, follow this link: .
How to Import and Export Magento 2 B2B Requisition Lists
Importing and exporting Magento 2 B2B requisition lists is essential for merchants managing large volumes of customer data, repeat orders, and multi-user workflows. Since Adobe Commerce does not offer native tools to handle requisition list imports or exports, a third-party solution is required.
This section explains how to import requisition lists into Magento 2 using the Improved Import & Export extension by Firebear Studio and its dedicated B2B Add-On. You’ll also find a sample table, a detailed attribute reference, and step-by-step instructions for successful data transfer.
Prerequisites: Tools You’ll Need
Before importing Magento 2 requisition list data, ensure the following:
- Improved Import & Export Extension is installed.
- B2B Add-On is installed to enable entity support for B2B requisition lists.
- Your CSV file follows the required structure.
Download a Sample Requisition List CSV for Magento 2
To streamline the process, we provide a ready-to-use sample with the correct format:
📄
You can also explore the full with comprehensive attribute mapping for all B2B entities.
Magento 2 B2B Requisition List CSV Attributes Explained
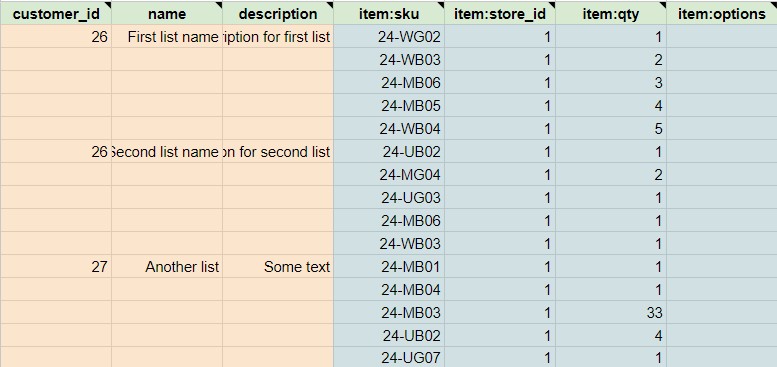
To ensure your import works correctly, your CSV file must include the following fields:
| Attribute Name | Reference | Values | Value Example |
| customer_id | The ID of the customer the requisition list belongs to | Make sure to specify the IDs only for the existing customers. Otherwise, you might get errors | 26 |
| name | Name of the requisition list | Can be any value | John |
| description | Description of the requisition list | Can be any value | Office monthly |
| item:sku | SKUs of the items added to the requisition list | Make sure to add only the items from the product catalog available for the customer | ITM001 |
| item:store_id | The ID of the store view the product in the requisition list belongs to. When adding products, make sure that products are available for the proper store views. | Make sure to add only existing store view IDs | 10 |
| item:qty | Qty of the items in the requisition list | Only numerals are allowed | 15 |
| item:options | If the product has options, make sure to specify them for the requisition lists | Codes of the complex product variations. Such as variations of configurable products. |
These attributes ensure accurate linkage between products, customers, and store views in your Magento requisition list import.
How to Import Requisition List Data into Magento 2
Once your CSV file is ready, follow these steps:
- Go to System → Improved Import / Export → Import Jobs.
- Click Add New Job to create an import profile.
- Under General Settings, name your job and optionally set it to run on a schedule.
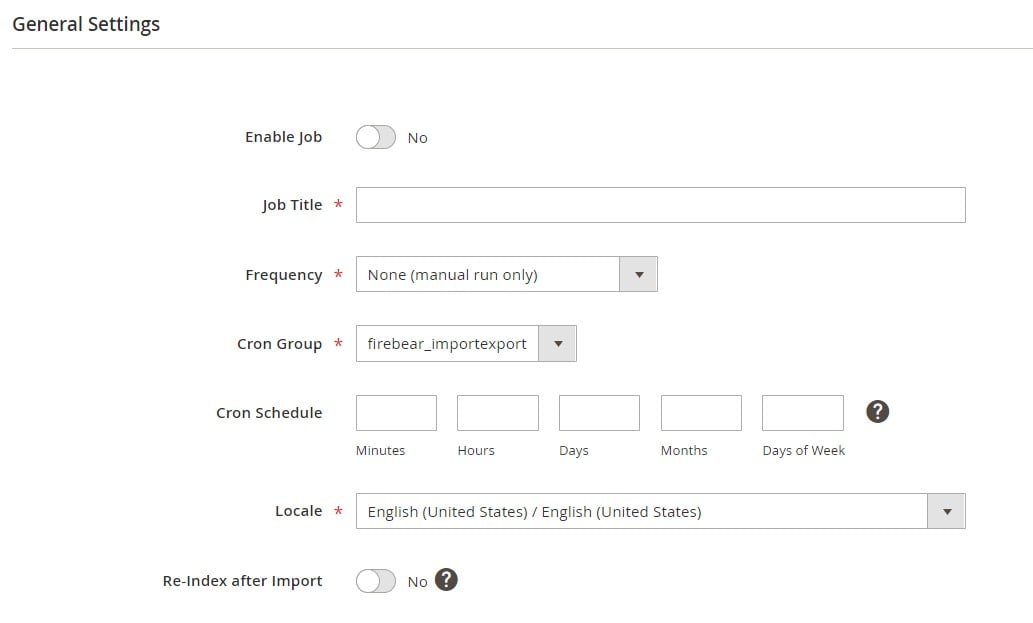
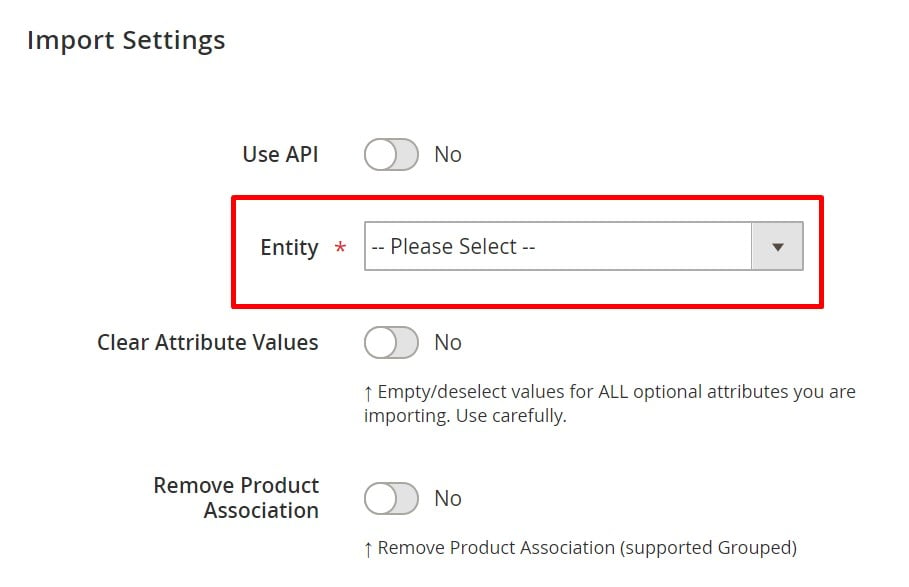
- In Import Settings, choose Requisition List as the import entity.
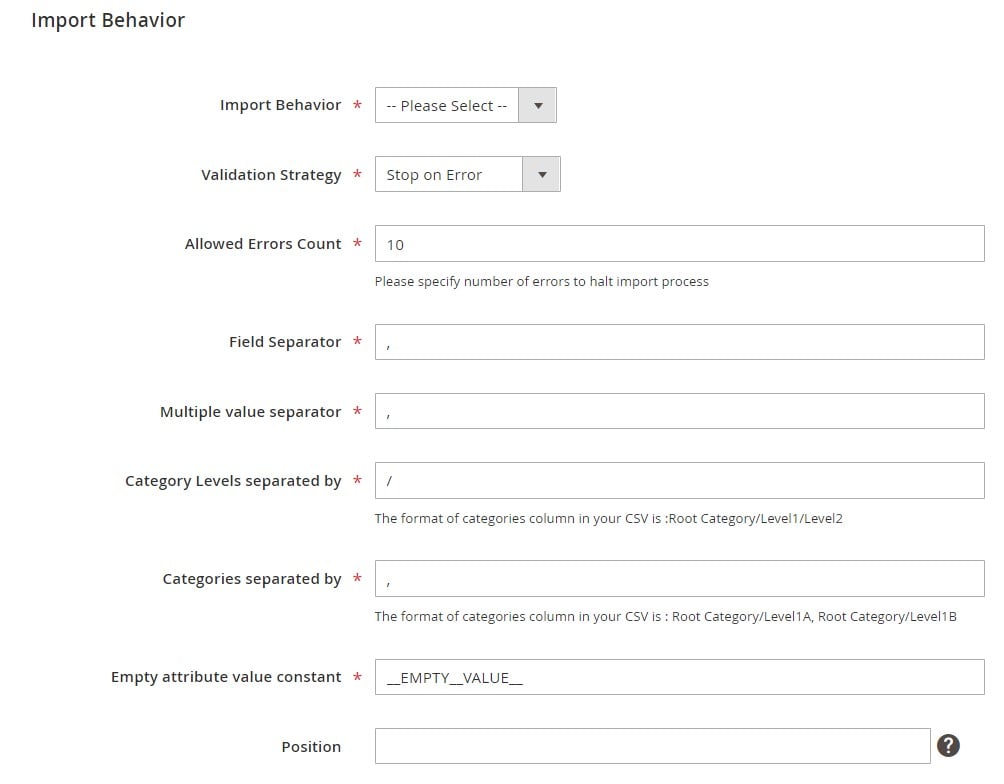
- Select the import behavior. For instance, Add/Update to create new or update existing requisition lists.
- Choose your file type (e.g., CSV) and data source (File, FTP, URL, etc.).
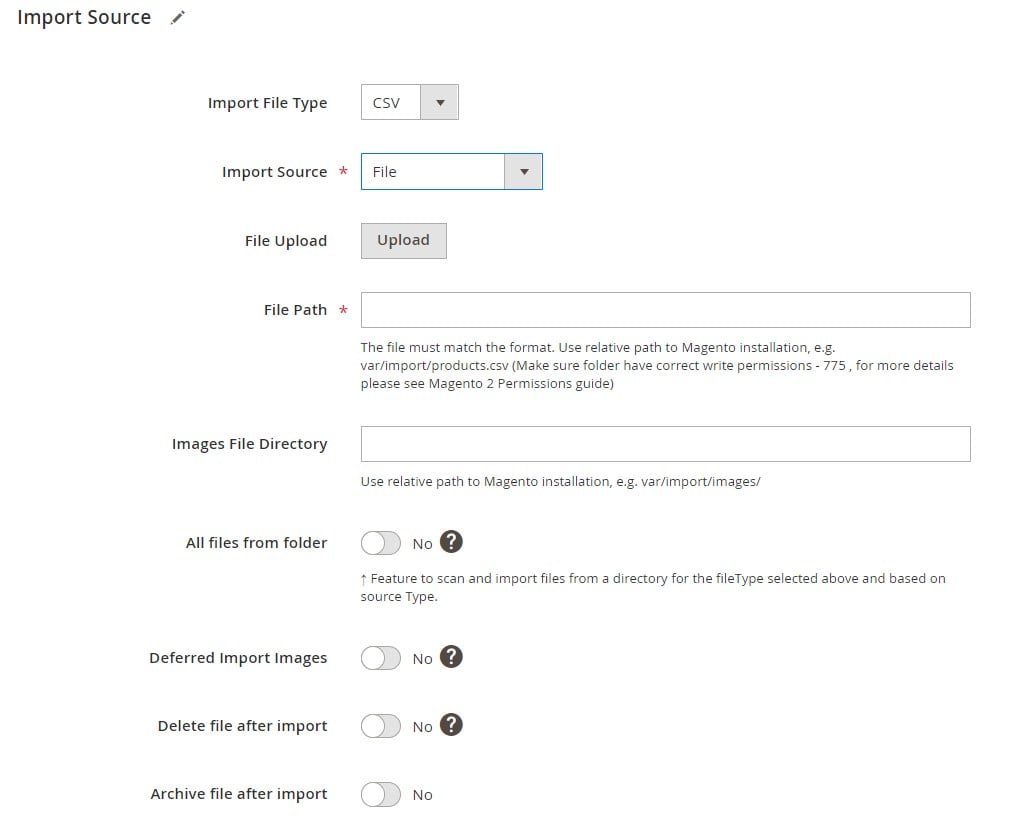
- Upload your Magento 2 B2B requisition list CSV file.
- Click Save and then Run Job to start the import process.
How to Export Requisition List Data into Magento 2
When it comes to the export side of the requisition list management in Magento 2, it is a pretty standard procedure. You need to create a new export job within the Improved Import & Export extension (with an active B2B Add-On), select Requisition Lists as your export entity, and configure other parameters. That’s it! For detailed configurations, refer to the Improved Import & Export User Manual.
By using the right tools and a properly structured file, importing and exporting requisition lists in Magento 2 becomes a smooth, scalable process — ideal for teams that manage B2B workflows, onboarding, or data migrations.
How Firebear Studio Helps with Requisition List Management in Magento 2
Managing Magento 2 B2B requisition lists manually can quickly become time-consuming and error-prone, especially when dealing with hundreds of customers, products, or recurring orders. That’s where Firebear Studio’s tools come in.
The Improved Import & Export extension combined with the B2B Add-On offers a powerful, automated way to manage Magento 2 requisition list imports and exports — no custom coding required.
Automate Magento 2 B2B Requisition List Imports
Firebear Studio’s solution acts as a full-featured Magento import tool. With it, you can:
- Import and export requisition lists using CSV, XML, XLSX, ODS, or Google Sheets.
- Set up cron-based scheduling to automate recurring import/export tasks.
- Use smart attribute mapping to connect CSV columns with Magento fields, avoiding manual edits.
- Apply filters to narrow down exported data — ideal for segmented B2B operations.
This dramatically reduces setup time and ensures your Magento 2 requisition list import extension aligns with your store’s operational logic.
Unlock Advanced Magento 2 B2B Automation
By integrating with Magento’s core B2B features, Firebear’s extension supports end-to-end Magento 2 B2B automation, including:
- Company accounts
- Shared catalogs
- Negotiable quotes
- Requisition lists
- Company roles
With support for scheduled jobs, advanced import logic, and compatibility with APIs and external services, the extension allows your team to automate repetitive B2B workflows and focus on growth — not data entry.
Final Words: Streamline Magento 2 B2B Requisition List Management with Automation
The Magento 2 B2B requisition list feature is a powerful tool for any business focused on streamlining repeat purchases, reducing manual errors, and enhancing the customer buying experience. However, managing requisition list data at scale — especially across multiple accounts and stores — demands more than native functionality can offer.
That’s where Firebear Studio’s advanced import solution comes in. With the Improved Import & Export extension and its B2B Add-On for Magento 2 Commerce, you gain full control over requisition list imports and exports. Whether you need to automate data transfers, connect with external systems, or filter complex B2B data, our tools help you unlock true Magento 2 B2B automation.
✅ Save time with scheduled jobs
✅ Avoid errors with smart attribute mapping
✅ Scale effortlessly with multi-format support and filters
Ready to transform how you manage Magento B2B requisition lists?
👉 Explore the Improved Import & Export Extension
👉 Discover the B2B Add-On for Magento 2 Commerce
👉 Contact Firebear Studio for a custom demo or consultation
Start automating smarter — not harder.
Overwhelmed by Magento 2 import errors? We’ll show you how to avoid common mistakes and fix issues fast.
👉 Check out our Magento 2 import troubleshooting tips
Magento 2 B2B Requisition List FAQ
What is a Magento 2 B2B requisition list?
A Magento 2 B2B requisition list is a feature in Adobe Commerce that allows business customers to create reusable lists of frequently purchased products, streamlining repeat orders and improving procurement efficiency.
Who can use requisition lists in Magento 2?
Only customers on Adobe Commerce with the B2B module can use requisition lists. The feature is not available in Magento Open Source.
What is the difference between a requisition list and a wish list in Magento 2?
A wish list is for personal or one-time interest, while a requisition list is persistent and designed for recurring B2B orders. Items in a requisition list are not removed after being added to the cart.
Can customers create multiple requisition lists in Magento 2?
Yes, each company account can maintain up to 999 requisition lists, allowing users to organize lists by team, buyer, department, or project.
How can customers add products to a Magento requisition list?
Customers can add products from product pages, the shopping cart, or past orders. They can also define product quantities and options when saving items.
Can I import requisition lists to Magento 2 by default?
No, Magento 2 does not support requisition list import/export out of the box. You need a third-party extension to enable this functionality.
What is the best extension to import Magento 2 requisition lists?
The Improved Import & Export extension by Firebear Studio, along with the B2B Add-On, is the most robust solution for importing requisition lists and other B2B entities.
What format is used to import Magento 2 requisition lists?
Requisition lists can be imported using CSV, XLSX, XML, or Google Sheets, depending on your import tool. Firebear Studio provides a sample CSV with all required attributes.
What attributes are required for Magento 2 requisition list import?
Key attributes include customer_id, name, description, item:sku, item:store_id, item:qty, and item:options for configurable products.
Can Magento 2 requisition list imports be automated?
Yes, using the Firebear Improved Import & Export extension, you can schedule automated imports using cron jobs and configure advanced filters and mappings.