How to Use B2B Shared Catalogs in Magento 2: Full Guide with Import & Export Tips
Shared catalog Magento 2 functionality is one of Adobe Commerce’s most powerful B2B tools — and yet, it’s often underutilized. In this guide, we break down everything you need to know about shared catalogs in Magento 2: what they are, how they work, and why they matter for your B2B pricing strategy. You’ll discover how to create a shared catalog in Magento 2, what makes them different from standard catalogs, and, most importantly, how to mass import products to shared catalogs and export them efficiently.
While Magento 2 provides built-in tools to manage shared catalogs, true flexibility only comes with advanced solutions like the Improved Import & Export extension with the B2B Add-on. Whether you’re syncing thousands of SKUs or tailoring catalogs for different customer segments, this article will show you how to streamline your workflow and avoid common pitfalls.
If you’re serious about making the most of Magento B2B shared catalog capabilities, you’re in the right place. Let’s start with the basics — what is a shared catalog in Magento 2, and how can it transform your commerce strategy?

Table of contents
- What Is a Shared Catalog in Magento 2?
- Benefits of Magento B2B Shared Catalogs
- How to Manage Shared Catalogs in Magento 2
- How to Import Shared Catalogs to Magento 2
- How Firebear Studio Simplifies Shared Catalog Management
- Final Words: Optimize Shared Catalog Workflows in Magento 2
- FAQ: Magento 2 Shared Catalog Import & B2B Features
Shared catalog Magento 2 functionality is a key B2B feature available exclusively in Adobe Commerce (formerly Magento Commerce). It allows store admins to create personalized catalogs with custom pricing and product visibility for different customer groups — a capability not found in the Magento Open Source edition.
So, what exactly is a shared catalog in Magento 2? Imagine you want to offer special pricing to a specific B2B client or group of companies, without showing those discounts to everyone else. That’s where the Adobe Commerce shared catalog steps in. It lets you define unique product selections and tiered pricing rules for different business partners, ensuring a tailored and private shopping experience.
Using Magento 2 shared catalogs, store administrators can:
- Assign custom prices per SKU
- Control which products or categories are visible to which companies
- Create targeted catalogs for wholesalers, distributors, or enterprise clients
This functionality is essential for B2B sales models that require contract-based pricing, volume discounts, or exclusive product lists.
2 Types of Shared Catalogs in Magento 2
There are two types of shared catalogs available:
- Public Catalog – Automatically created during B2B module installation, this is the default catalog visible to all guest users, non-logged-in customers, and customers who don’t meet any custom catalog conditions.
- Custom Catalog – Created manually and assigned to specific companies. Only users from those companies can view and purchase from this catalog. You can create multiple custom catalogs to match different B2B partner needs.
While only one public shared catalog can exist in your Adobe Commerce setup, multiple custom shared catalogs can be created and tailored for individual companies or customer segments.
Shared catalogs are foundational to Magento B2B pricing strategies, enabling you to deliver a more controlled, contract-based sales experience and better serve your business clients.
Whether you’re selling to wholesalers, distributors, or enterprise clients, Magento B2B shared catalogs give you a selection of valuable benefits:
🎯 Personalized Pricing for Each Client
With a Magento 2 B2B shared catalog, you can define specific product prices for different companies. This allows you to offer negotiated or contract-based rates without exposing them to other buyers. You can also tailor price tiers based on volume or customer loyalty, enhancing your ability to close large B2B deals.
👥 Targeted Catalogs for Customer Groups
Instead of maintaining one-size-fits-all product listings, shared catalogs in Adobe Commerce let you customize the catalog for each company or customer group. This means you can hide certain categories or SKUs, present only relevant items, and simplify the buying process for each business partner.
🛒 Streamlined Procurement for Wholesalers
For wholesalers and repeat buyers, efficiency is critical. The Magento B2B shared catalog simplifies procurement by showing the exact products and prices customers need, reducing time spent searching or requesting quotes. This creates a smoother buyer journey and encourages repeat orders.
🤝 Ideal for B2B Marketplaces and Manufacturer-Distributor Setups
Shared catalogs are essential in complex B2B environments like:
- Manufacturer–Distributor partnerships, where pricing agreements and product visibility vary per partner.
- Multi-vendor marketplaces, where each buyer may have unique access rights or negotiated pricing.
- Corporate procurement portals, where each branch or department has its own catalog and purchase permissions.
On the surface, the Magento 2 B2B shared catalog functionality empowers merchants to offer precision-based pricing and catalog visibility, making it an indispensable tool for scalable and flexible B2B commerce. Let’s see what happens under the hood.
Managing shared catalogs in Magento 2 B2B environments is essential for customizing pricing and product visibility per customer or company. This capability is available exclusively in Adobe Commerce, so make sure the Magento 2 B2B extension is installed before proceeding.
📍 How to Access Magento 2 Shared Catalogs
To access shared catalogs, log in to your admin panel and navigate to
Admin Sidebar → Catalog → Shared Catalogs. This opens the Shared Catalogs grid, where all existing catalogs are listed.
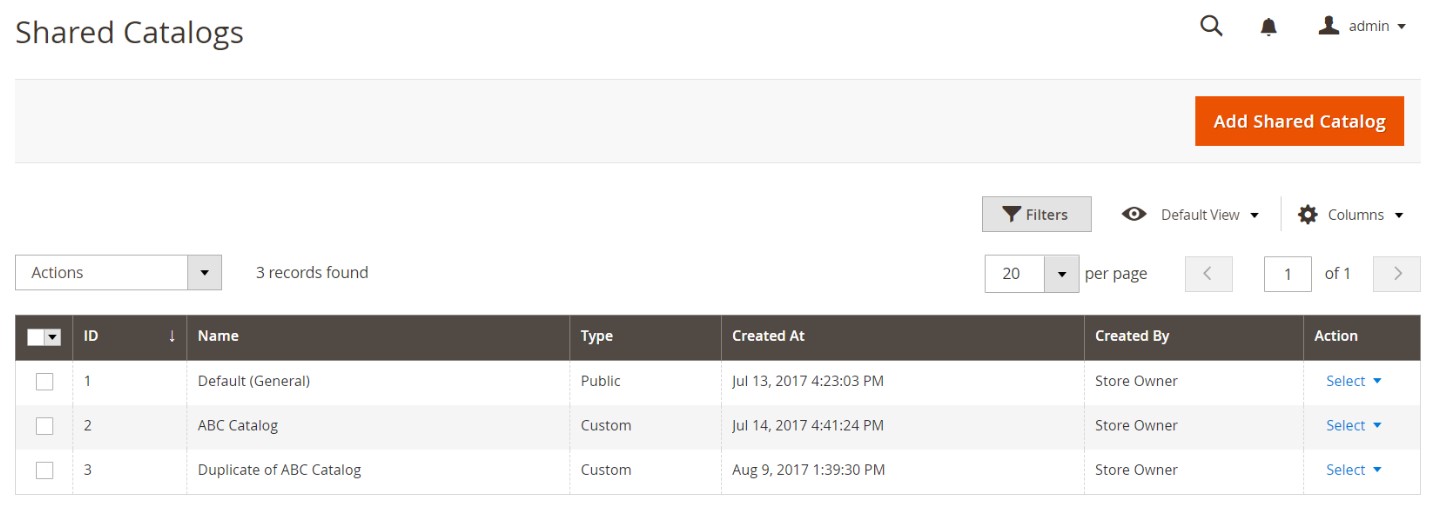
Keep in mind: while a master catalog still exists in the backend, it is hidden from the storefront once a public shared catalog is active. What customers actually see on the frontend is the public shared catalog, not the original product list from the admin. So, don’t be surprised if your store’s frontend content appears filtered or modified based on catalog settings.
How to Create a Shared Catalog in Magento 2
Magento 2 allows you to create a custom shared catalog in two ways:
➕ Create a New Magento 2 Shared Catalog
You can build a new catalog from scratch with no products or customer assignments yet. Here’s how:
- Navigate to Admin → Catalog → Shared Catalogs
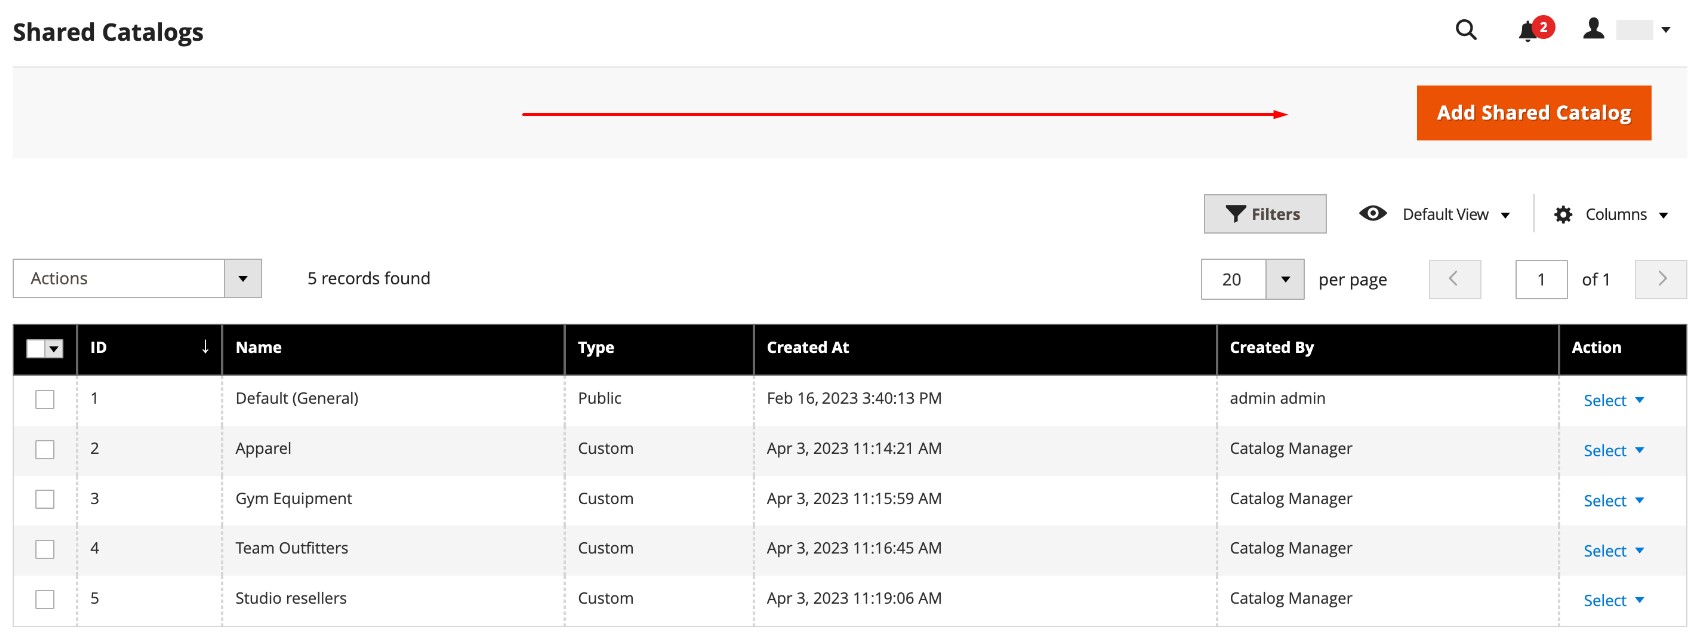
- Click Add Shared Catalog in the top-right corner
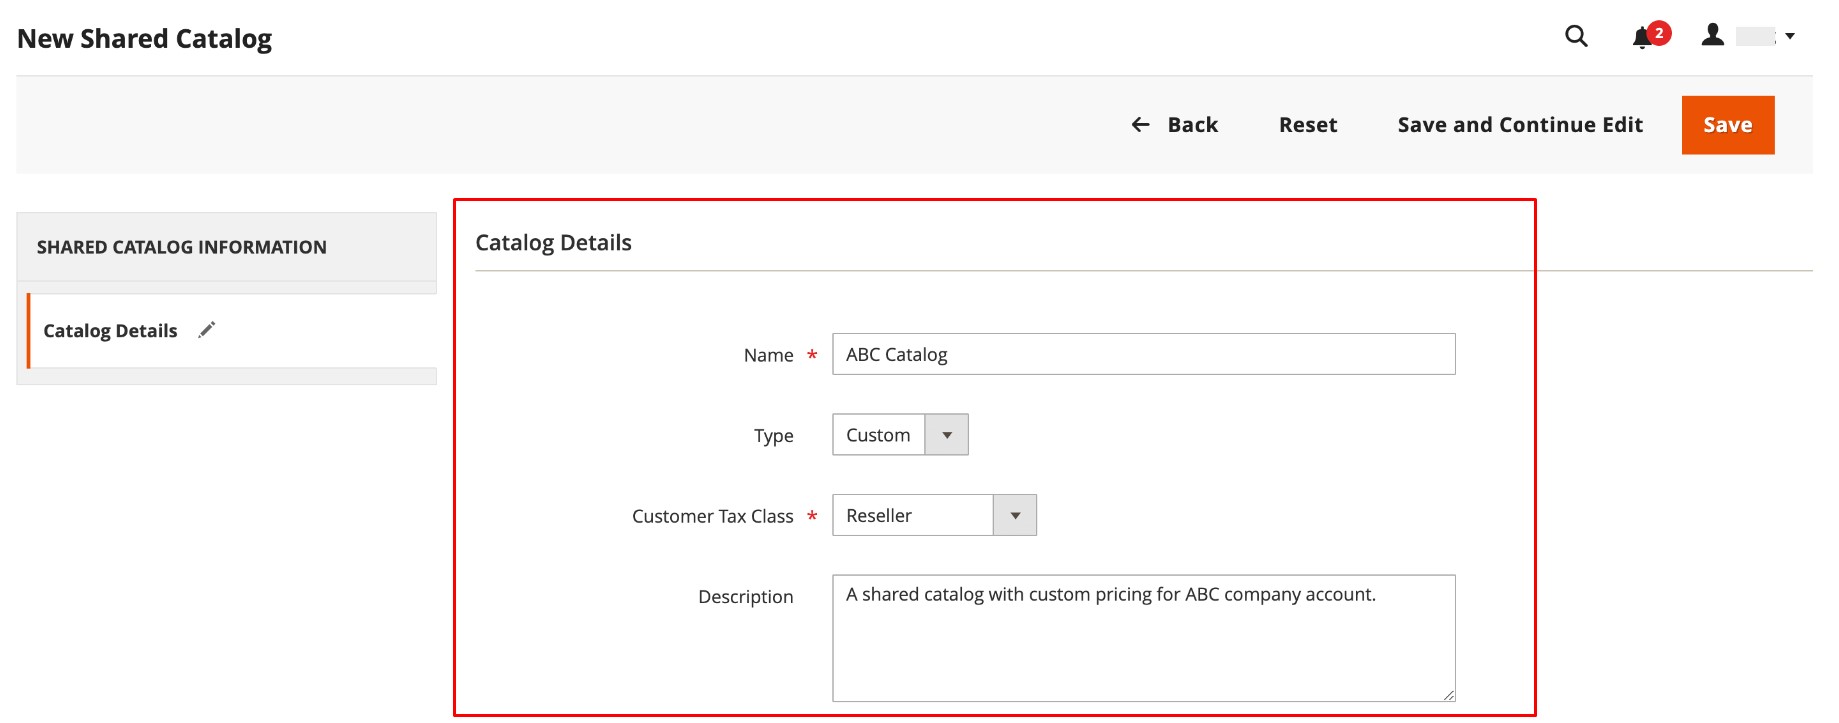
- Fill in the following fields:
- Name: Will be used both in the admin and assigned customer dashboards
- Catalog Type: Set this to Custom
- Customer Tax Class
- Description (optional)
- Click Save
Magento will automatically generate a customer group with the same name as your new catalog. You can then assign companies and products as needed.
🛠️ Note: Unlike the public shared catalog (which is pre-configured and automatically assigned to guests or users without a company), new custom catalogs start empty and need to be configured manually.
📄 Duplicate an Existing Shared Catalog in Magento 2
Duplicating a catalog is helpful when you want to reuse an existing pricing structure or product selection. Follow these steps:
- Go to Admin → Catalog → Shared Catalogs
- In the grid, select the catalog to duplicate
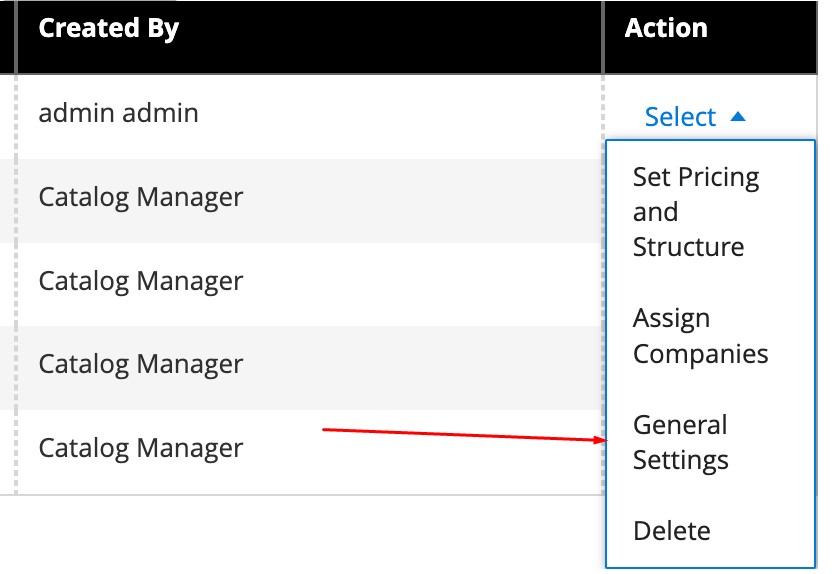
- Click General Settings under the Actions colum
- Click Duplicate
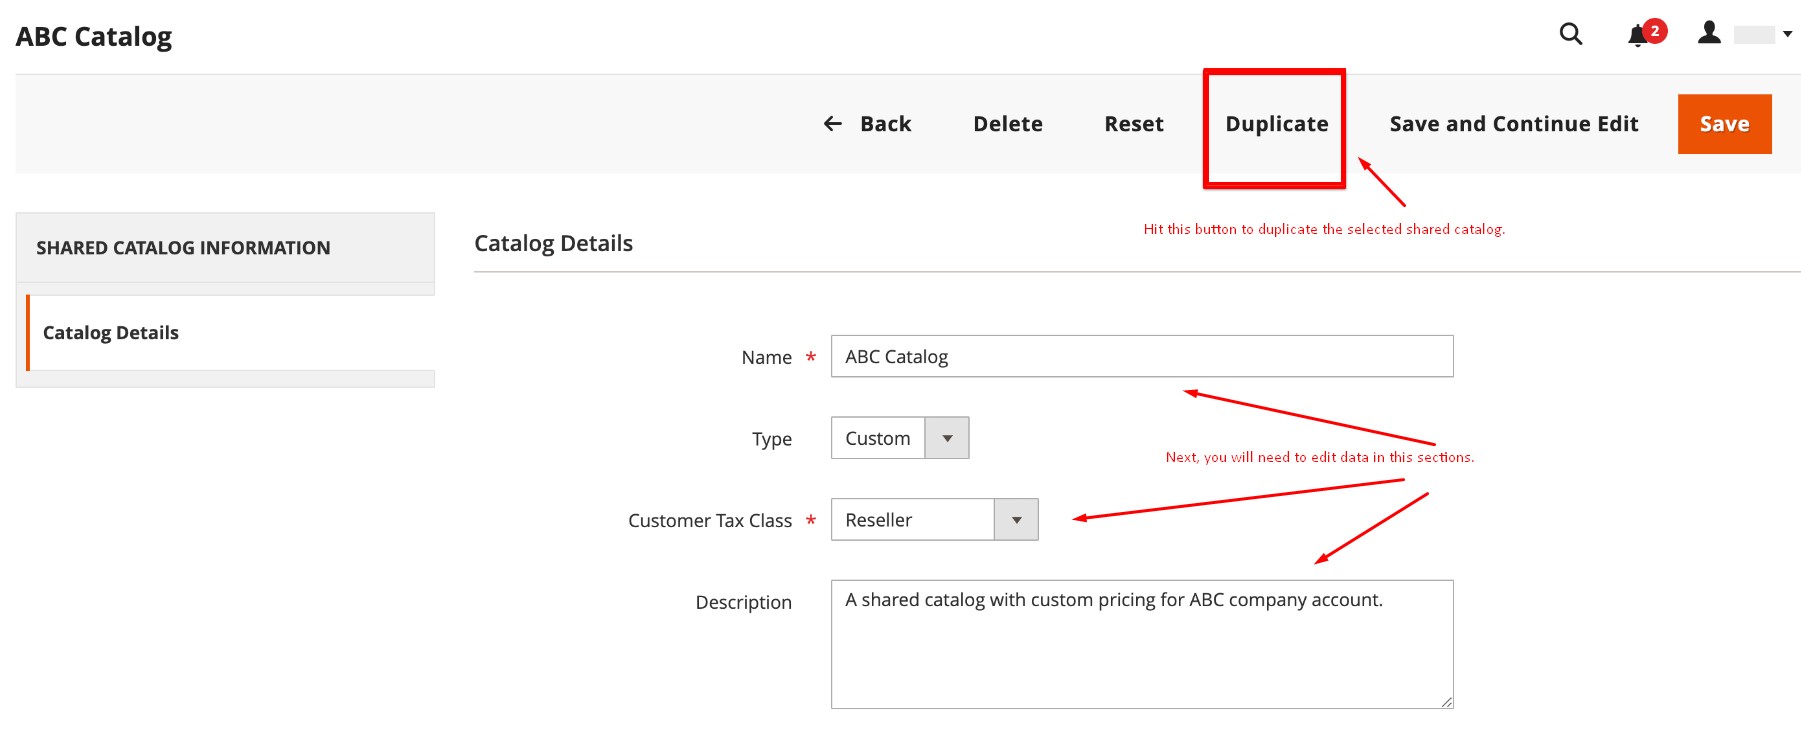
Magento will create a new custom catalog with:
- The same pricing model
- A newly generated customer group
- No company assignments (you’ll need to add these manually)
Update the name, tax class, and description, then click Save to complete.
📝 Tip: Even if you duplicate the public shared catalog, Magento will convert the copy into a custom shared catalog.
How to Set Shared Catalog Pricing and Product Structure
Once your shared catalog is created, it’s time to define what products it includes and what prices your B2B customers will see.
- In the Shared Catalogs grid, locate your catalog
- Under the Actions column, select Set Pricing and Structure

- Click Configure
From here, you can:
- Select individual products from the product grid
- Choose entire categories from the sidebar
- Set custom prices by applying fixed values or discounts
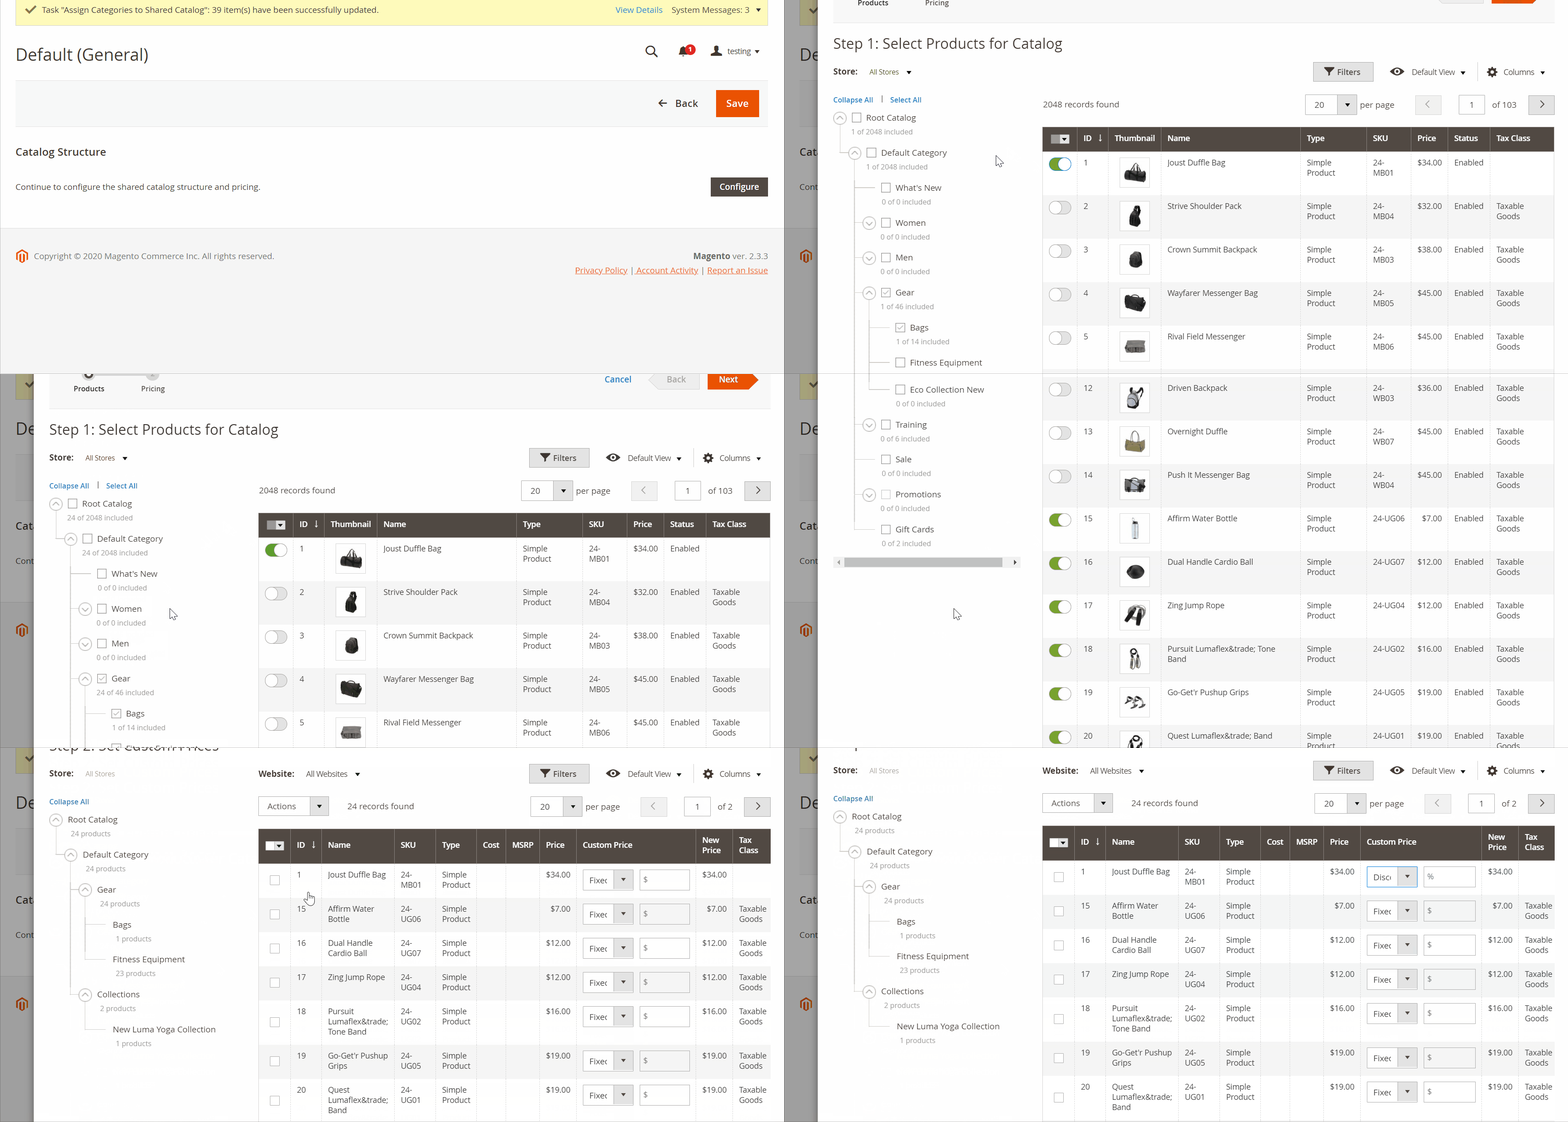
This is where the Adobe Commerce shared catalog feature truly shines — you can offer personalized pricing per company without impacting your master catalog or public pricing.
How to Assign Companies to a Shared Catalog
You can assign companies to a shared catalog using two different methods:
🔁 Method 1: Assign from the Shared Catalogs Grid
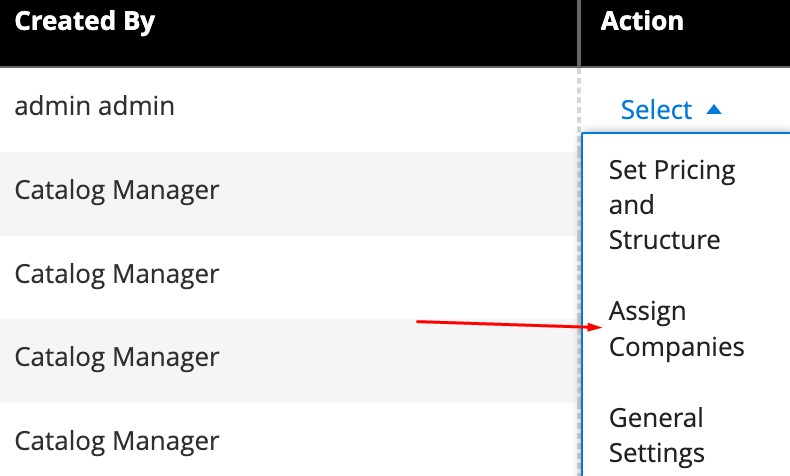
- In the Shared Catalogs grid, select Assign Companies from the Actions column
- In the company selection grid, check the companies you want to assign
- Choose Assign from the Actions dropdown

- Click Save
🧩 Method 2: Assign via Customer Groups
- Go to Customers → Companies
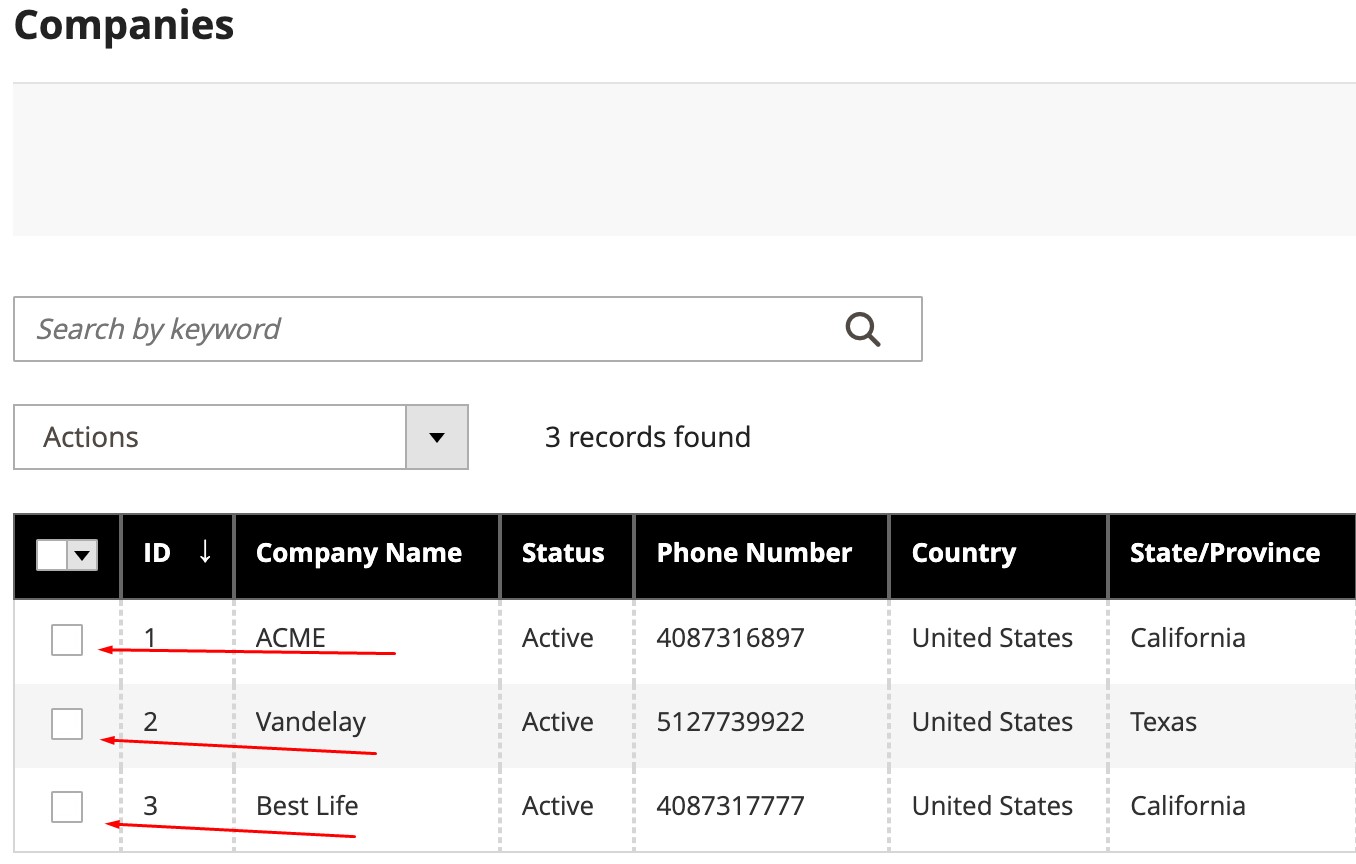
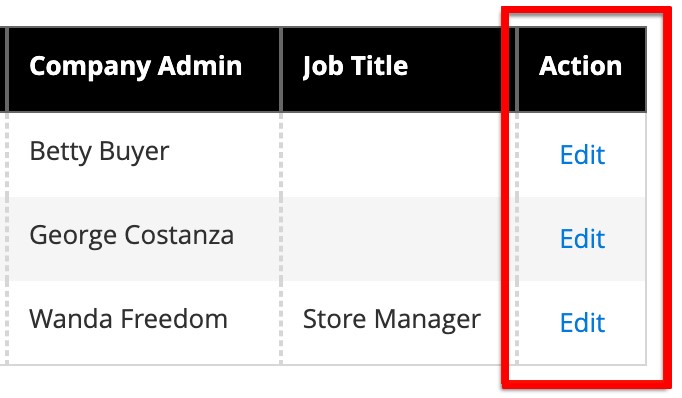
- Find the company to assign and click Edit
- Scroll to Advanced Settings
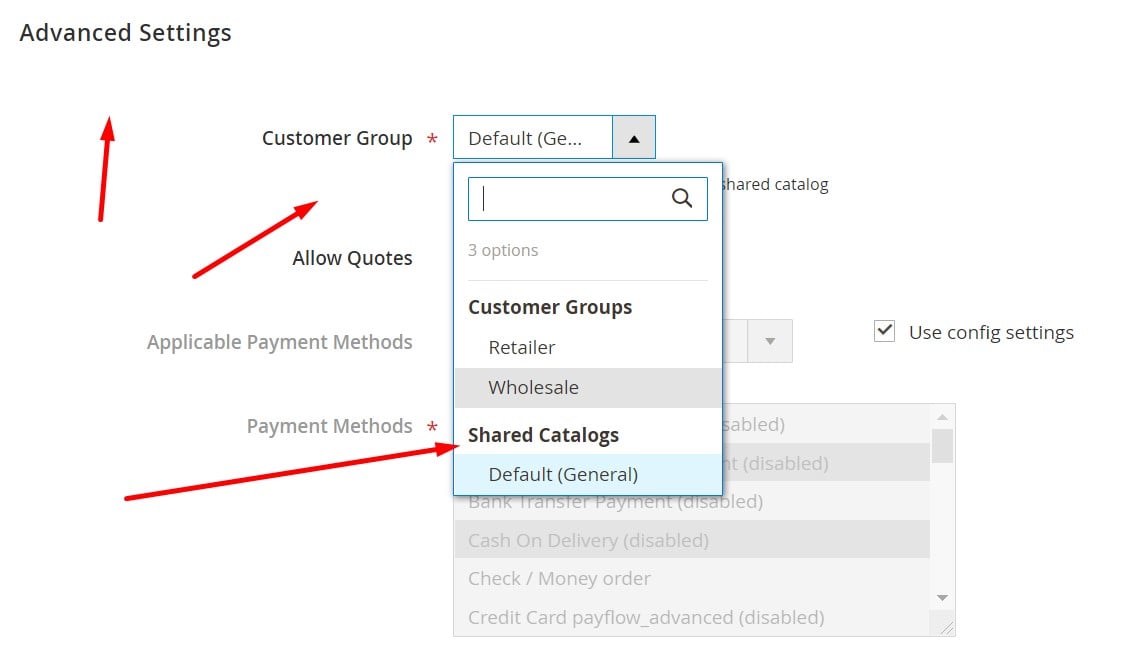
- Select the Customer Group associated with the desired shared catalog
- Save your changes
This method is especially helpful when managing large client databases with predefined customer groups tied to specific catalogs.
How to Update Category Permissions for Shared Catalogs
By default, Magento allows all shared catalog products to be browsed, priced, and added to cart. However, you can easily fine-tune this using category permissions:
- Go to Catalog → Categories → Category Tree
- Select the category you wish to modify (or the top-level category for all)
- Scroll down to Category Permissions and click New Permission
- Choose the relevant Customer Group tied to your shared catalog
- Set access levels for:
- Category Browsing
- Product Prices
- Add to Cart option
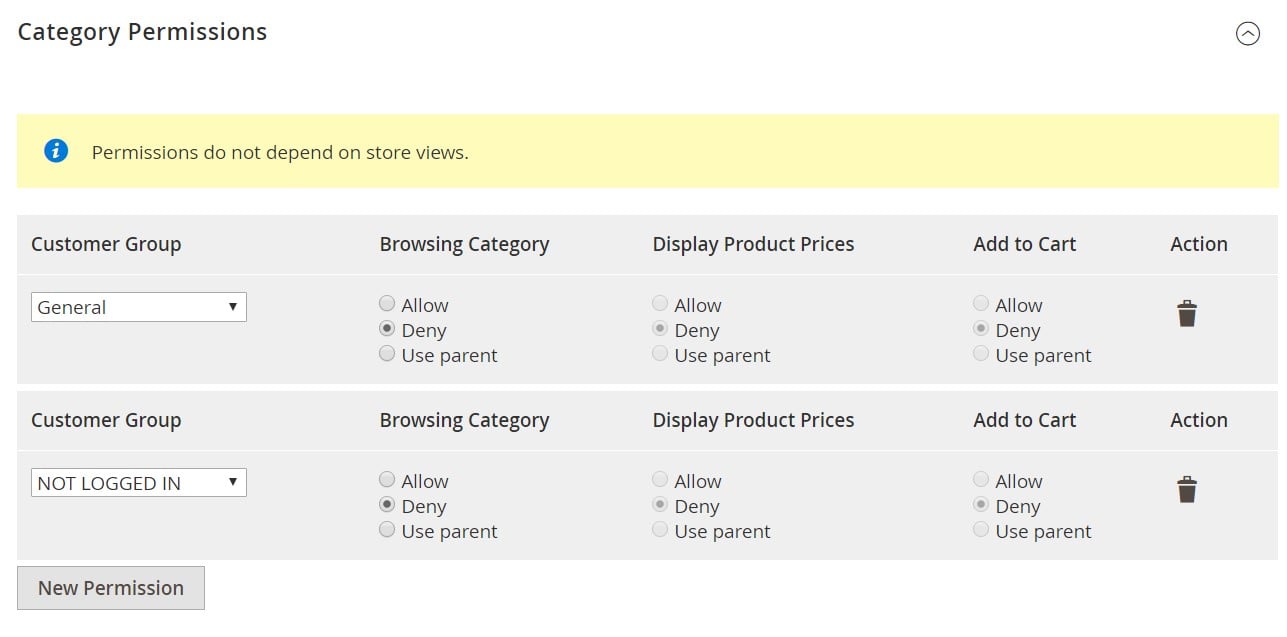
- Click Save when finished
This feature gives merchants granular control over what each customer group sees and interacts with — a critical component of an effective Magento 2 B2B shared catalog strategy.
Importing a shared catalog in Magento 2 is not supported out of the box, even though this functionality is critical for many B2B merchants. By default, Magento 2 does not offer tools to import or export shared catalogs. However, this limitation can be easily overcome using third-party solutions.
To enable Magento 2 shared catalog import, you’ll need the Improved Import & Export extension along with the B2B Add-On by Firebear Studio. This combination allows you to fully automate the process of adding, updating, or migrating shared catalogs between systems, including bulk operations.
📄 Prepare a CSV File for Magento 2 Shared Catalog Import
Before running an import job, you need to format your data correctly. Use this to structure your CSV. It includes all required attributes and formatting rules.

🔍 Magento 2 Shared Catalog Attributes Explained
Here are the seven key attributes required to import a Magento B2B shared catalog successfully:
| Attribute Name | Reference | Values | Value Example |
| name | Name of the shared catalog. Also the name of the customer group associated with the shared catalog.If you are importing a shared catalog with a particular name, and there is no customer group with such a name – the custom group will be created automatically. | Can contain any symbols | Test Shared Catalog |
| description | Description of the shared catalog. For internal identification purposes. | Can contain any symbols | This is a test shared catalog I’ve created |
| tax_class_id | The ID of the Customer Tax Class applied to the Shared catalog. | Can contain only numerals | 2 |
| type | Type of the shared catalog. For ALL shared catalogs can only be a single type: custom.A public catalog is a general product catalog available for the general public. | 0 – custom catalog1 – public catalog | 0 |
| company | Email of the company associated with the Shared Catalog. Please note that this is a COMPANY EMAIL, not the email address of the company’s administrator. If you specify a company email for the catalog after the catalog is created, the company’s customer group is changed to the one associated with a shared catalog you import |
Valid email address with the domain name. Multiple company emails can be entered separated by a comma.
Make sure you don’t put spaces after commas. |
john@doe.com,jane@roe.com |
| category | IDs of the categories included in the shared catalog. Please note, that if you include a category in the Shared Catalog – all its products will be included in the catalog. | Can contain only numerals. Multiple category IDs can be entered separated by a comma.
Make sure you don’t put spaces after commas. |
1,2,3 |
| sku | SKUs of the products included in the shared catalog. If you don’t want to include whole categories – you can include only particular SKUs in the Shared Catalog. | Can contain symbols allowed for SKUs.Multiple SKUs can be entered separated by a comma.
Make sure you don’t put spaces after commas. |
PRDCT1,PRDCT2 |
💰 How to Assign Prices to Shared Catalog Products
Shared catalogs allow differentiated pricing for B2B clients using Magento’s tier pricing system. However, product prices are not imported within the shared catalog file itself.
To apply catalog-specific pricing:
- Use the Advanced Pricing entity in a separate import job
- Link prices to the same customer group assigned to the shared catalog
This two-job setup ensures that:
- One job manages the catalog structure (products, SKUs, companies)
- The other job applies custom pricing per SKU and customer group
For details on importing pricing, refer to our Magento 2 Advanced Pricing Import Guide.
🚀 Steps to Import Shared Catalog Data in Magento 2
Once your CSV is ready, follow these steps to launch the import process:
- Go to Admin → System → Improved Import / Export → Import Jobs
- Click Add New Job
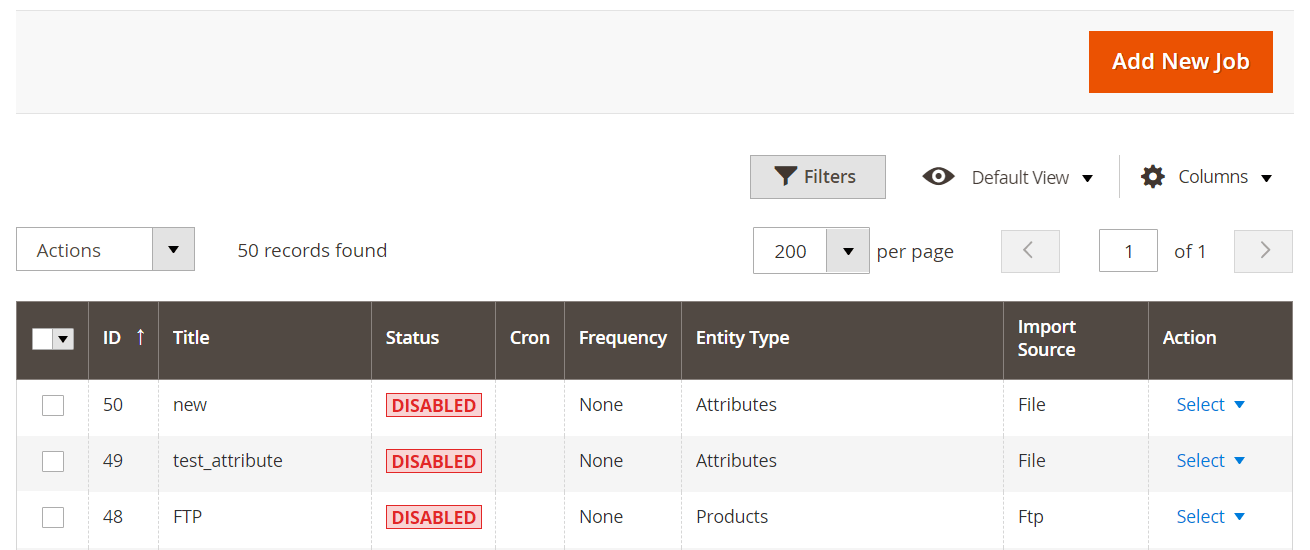
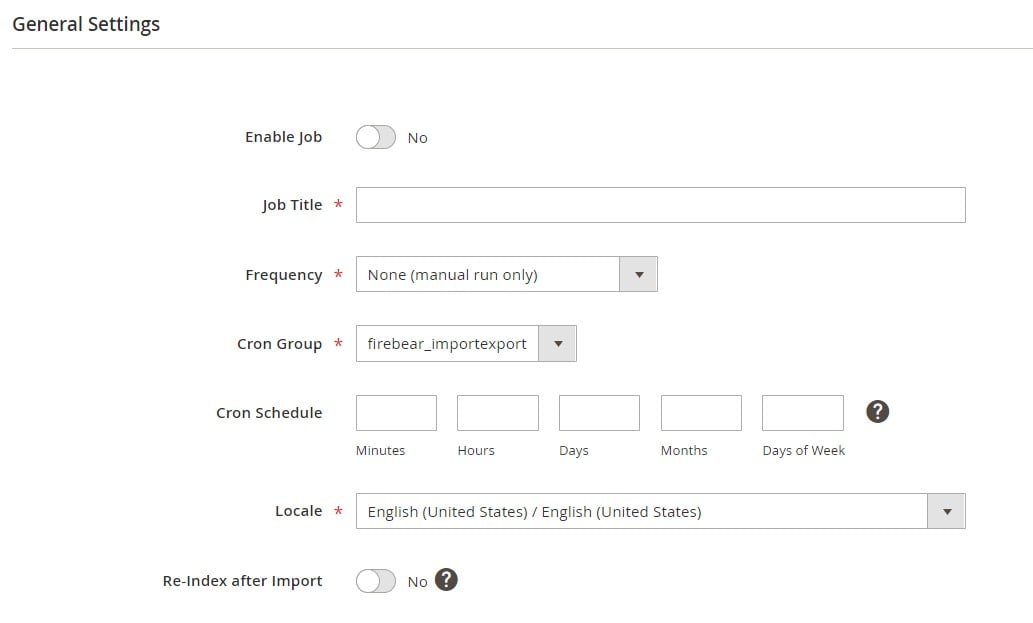
- Under General Settings, name your import job and configure schedule options if needed
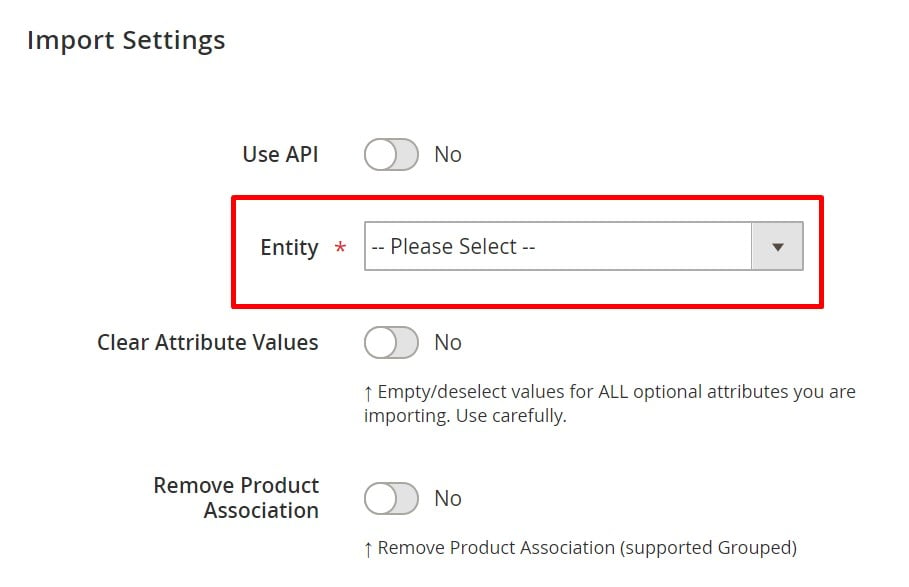
- In the Import Settings section, set Entity to Shared Catalogs
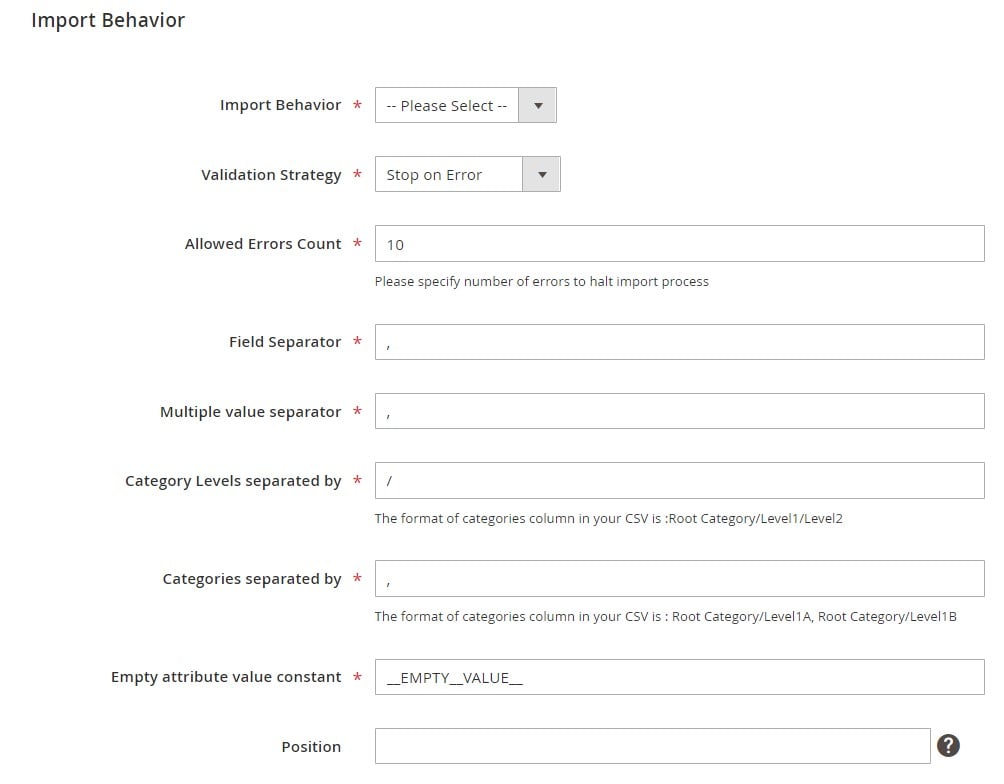
- Choose the behavior: Add/Update
- Under Import Source, select:
- File Type: CSV
- Source: File or other (FTP, Dropbox, etc.)
- Upload your CSV file
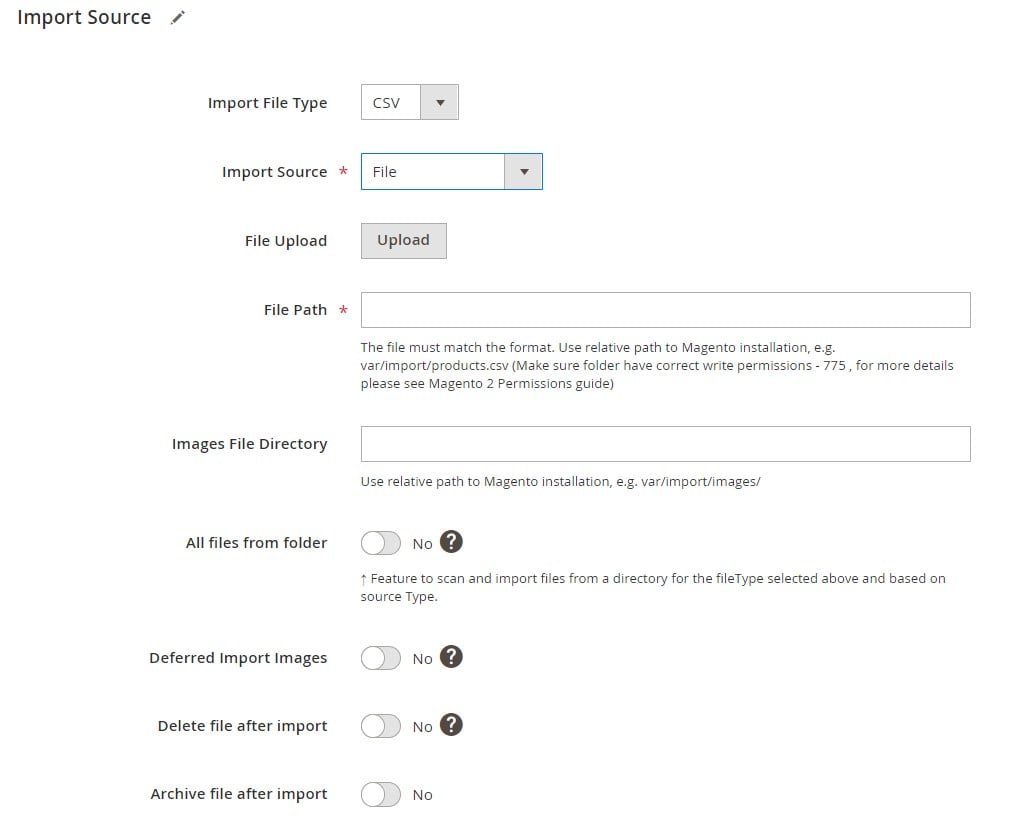
- Save the job and run the import manually or automatically
✅ After running the import, your shared catalogs — with products, categories, and company associations — will be visible in the Shared Catalogs grid.
For advanced options and export procedure, refer to the Improved Import & Export Extension Manual.
Managing a shared catalog in Magento 2 can be time-consuming and error-prone, especially when dealing with complex B2B pricing, multiple customer groups, and product variations. That’s where Firebear Studio’s Improved Import and Export Magento 2 extension comes in.
This powerful tool extends the default capabilities of Adobe Commerce, giving you full control over shared catalogs and other B2B entities with automation, precision, and flexibility.
✅ Full Import & Export Support for Shared Catalogs
Unlike the default Magento setup, the Improved Import and Export Magento 2 extension lets you import and export shared catalogs with ease. You can bulk upload catalogs with:
- Custom product selections (by SKU or category)
- Company assignments
- Custom pricing setup (via linked advanced pricing jobs)
- Category permissions and tax settings
No more manual updates or workarounds — Firebear Studio streamlines the entire process for B2B merchants.
🔁 Automate Shared Catalog Jobs with Schedules
You can configure scheduled import/export jobs to keep your shared catalog data in sync with external platforms like ERPs, CRMs, or PIMs. Whether you want to run updates daily, weekly, or in real-time, the extension gives you complete automation control.
It supports a wide range of data sources:
- FTP/SFTP
- Google Sheets
- Dropbox
- Direct URLs
- REST/SOAP APIs
🎯 Advanced Filtering and Mapping Capabilities
Filter shared catalog data during export. Use advanced mapping to align third-party data formats with Magento’s internal logic without modifying the original files during both import and export.
You can also apply attribute transformations, add conditions, and preview changes before running the import.
🧩 Full Compatibility with Magento B2B Modules
Firebear’s solution is built specifically to work with Magento 2 B2B shared catalog features and supports all related entities, including:
- Companies and company structure
- Requisition lists
- Negotiable quotes
- Shared catalogs and advanced pricing
This means you can manage your entire Magento B2B workflow — from catalog creation to customer-specific pricing — using one centralized tool.
If you’re running a B2B store on Adobe Commerce, the shared catalog Magento 2 feature isn’t just useful — it’s essential. It enables you to deliver personalized product selections and pricing to specific companies, simplify large-scale purchasing, and gain full control over catalog visibility. Whether you’re managing manufacturer-distributor relationships or operating a multi-brand wholesale store, the Magento B2B shared catalog system gives you the flexibility to scale with precision.
However, Magento’s native tools fall short when it comes to mass operations. That’s where automation becomes critical. With Firebear Studio’s Improved Import and Export Magento 2 extension and its dedicated B2B Add-On, you can mass import products to shared catalogs, assign companies, apply advanced pricing, and sync everything with external systems — all without manual effort.
Ready to simplify your B2B workflows and boost efficiency?
👉 Download the Improved Import & Export Extension
👉 Add the B2B Add-On to unlock full shared catalog support
📩 Contact Firebear Studio — our team is here to help you set up, customize, and optimize your Magento 2 shared catalog strategy.
Want to level up your Magento 2 catalog? Learn how to import attributes, categories, swatches, and related product links.
👉 Enhance your catalog via our full Magento import guide
What is a shared catalog in Magento 2?
A shared catalog in Magento 2 is a B2B feature available in Adobe Commerce that allows store owners to create custom product catalogs with tailored pricing and visibility rules for specific companies or customer groups.
Is the shared catalog Magento 2 feature available in the Open Source version?
No, the shared catalog Magento 2 feature is only available in Adobe Commerce (formerly Magento Commerce) and is not included in the Open Source edition.
Can I mass import products to a shared catalog in Magento 2?
Magento does not support mass import to shared catalogs by default. However, with the Firebear Improved Import & Export extension and its B2B Add-On, you can mass import products, categories, companies, and more into shared catalogs.
How do I assign custom prices to products in a shared catalog?
To assign custom prices in a shared catalog Magento 2 setup, use Magento’s tier pricing functionality. These prices are linked to the customer group associated with the shared catalog and can be imported using a separate Advanced Pricing import job.
Can I export shared catalog data from Magento 2?
Magento does not allow shared catalog export natively. To export shared catalog data, including product assignments and company links, you need a third-party tool like the Improved Import & Export Magento 2 extension.
What happens if a shared catalog includes an empty category?
If you assign a category to a shared catalog that contains no products, Magento still links the category to the catalog. You should ensure relevant products exist within the assigned categories for proper functionality.
Can I assign multiple companies to a shared catalog during import?
Yes. When importing a shared catalog using the Firebear extension, you can assign multiple companies by listing their emails in the CSV file, separated by commas (no spaces).
What’s the difference between public and custom shared catalogs in Magento 2?
A public shared catalog is automatically visible to all guest and non-company users. Custom shared catalogs are created for specific companies or groups and allow personalized product selections and pricing.
How do I control product and category visibility in a shared catalog Magento 2 environment?
You can manage visibility by setting category permissions. Magento lets you control access to category browsing, pricing, and add-to-cart functions for each shared catalog’s customer group.
What tools are needed to fully manage shared catalogs in Adobe Commerce?
To manage shared catalogs efficiently, including import/export, automation, and pricing configuration, you need the Improved Import & Export Magento 2 extension and B2B Add-On by Firebear Studio.


