
Improved Import, Export & Mass Actions app for Shopware 6 user manual


NOTE: The manual is for the MVP version of the application.
Table of contents
- Performance
- Installation
- Find the extension
- How to import data
- Import Cross-Selling Data
- Advanced Prices Import/Export As a Separate Entity
- Multi-Currency Support for Advanced Prices Import
- Replace Product Sales Channels
- Important Notes
- Auto-Assign Parent Categories on Import
- The markAsTopseller Field for Product Import
- Different Data Formats for Shopware 6 Import
- Data Transformation
- Product Export: Parent/Variant Filtering
- New Field: price_inherited
- Import Advanced Pricing to Shopware 6 with Product Update
- Product Import Behavior Control
- Custom Export File Name (FTP/SFTP)
- Manufacturer Filter for Advanced Prices Export
- Inherited Fields and the “Preserve Empty Values” Option
- Customer Filter By Sales Channel
- FTP/SFTP Filename Pattern Support
- Automated Post-Processing Of Import Files
- Organize Product Media By Manufacturer Folders
- Trigger Export Profiles Via Shopware Flows
- Workflow
- Salutation Support For Customer And Address Import
- Product Export Filters By created_at and updated_at
- Export Order Line Item Payload Fields
- Export Last X Days Orders
- Export Customer Comment for Shopware Orders
- Order Export Filters for Order, Delivery, and Payment Statuses
- Products Delta Export (“Last X Days” Support)
- Product Import Field Reference
- Customer Import Field Reference
- How to export data
- How to export orders
- How to Export Cross-Selling Data
- How to Import & Export Product Properties in Shopware
- How to Import & Export Configurable Products in Shopware
- FAQ & Troubleshooting
Performance
- Maximum number of imported rows: 300000
- Maximum number of exported rows: 300000
- Number of import jobs that can be launched simultaneously: 3
- Number of export jobs that can be launched simultaneously: 3
- File Limit for URL & Manual Uploads: 200Mb
Installation
The application can only be installed through your Shopware 6 backend via your Shopware Account, whether you’re using an on-premise or cloud installation.
- Log into your store’s backend and proceed to Extensions > Store.
- Log into your Shopware Account.
- Search for Improved Import, Export & Mass Actions.

- Click on the Improved Import, Export & Mass Actions application
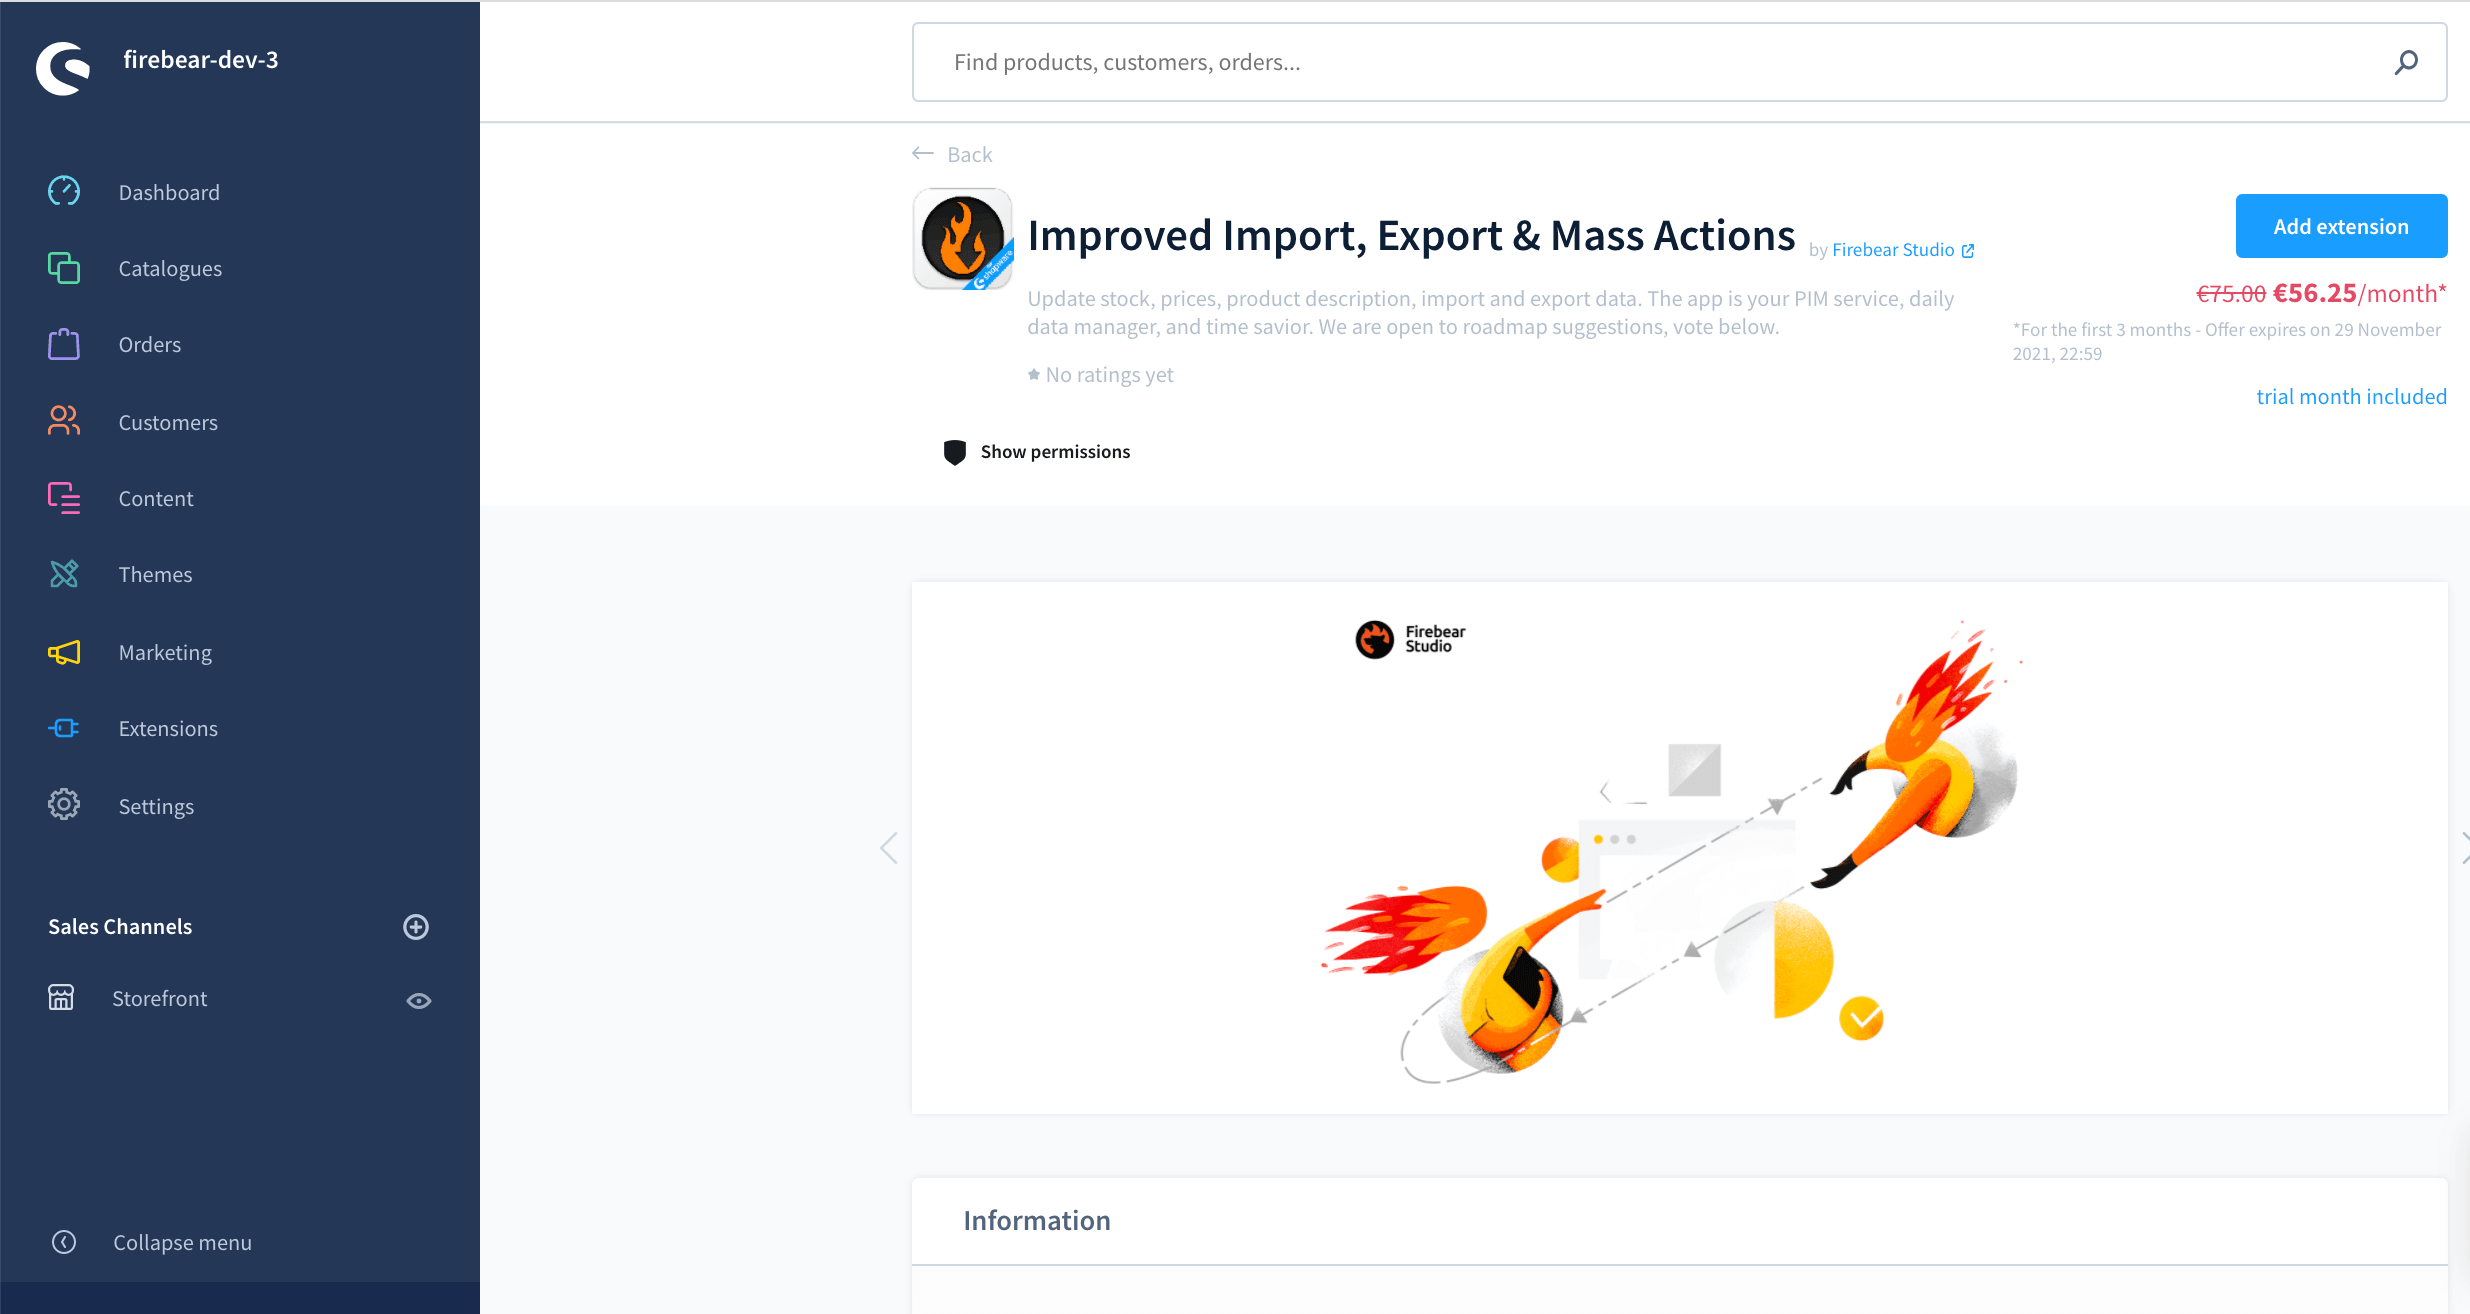
- Click the “Add extension” button
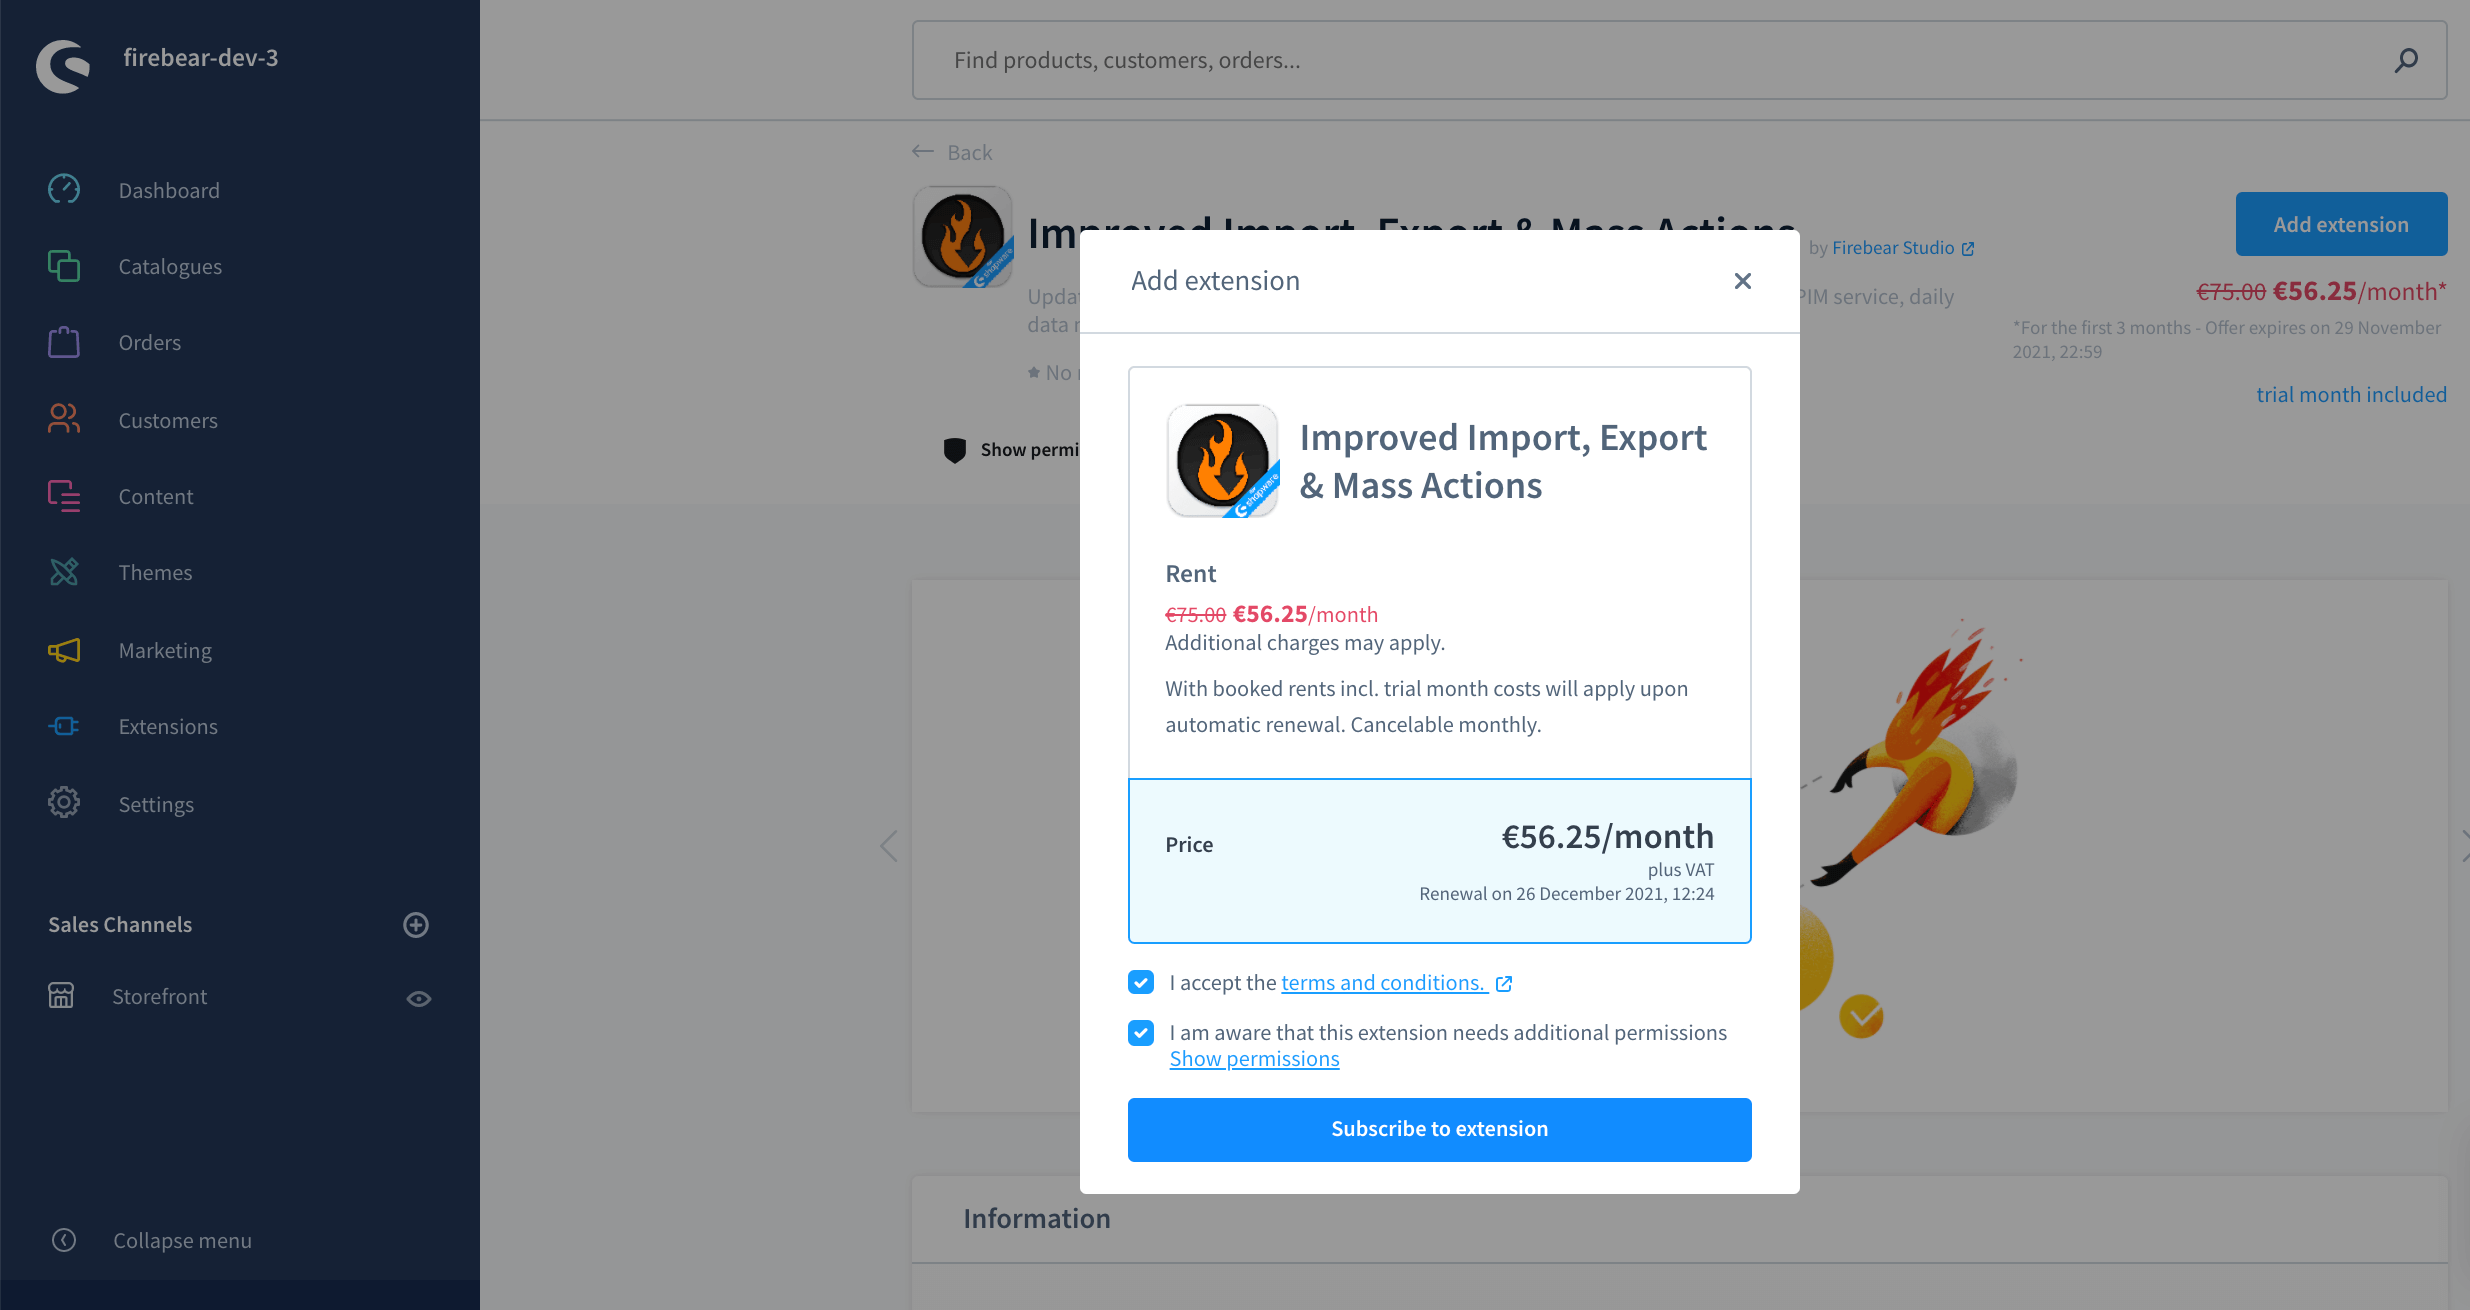
- Tick in the checkboxes and click the “Subscribe to extension” button.
Installation Troubleshooting
Find the extension
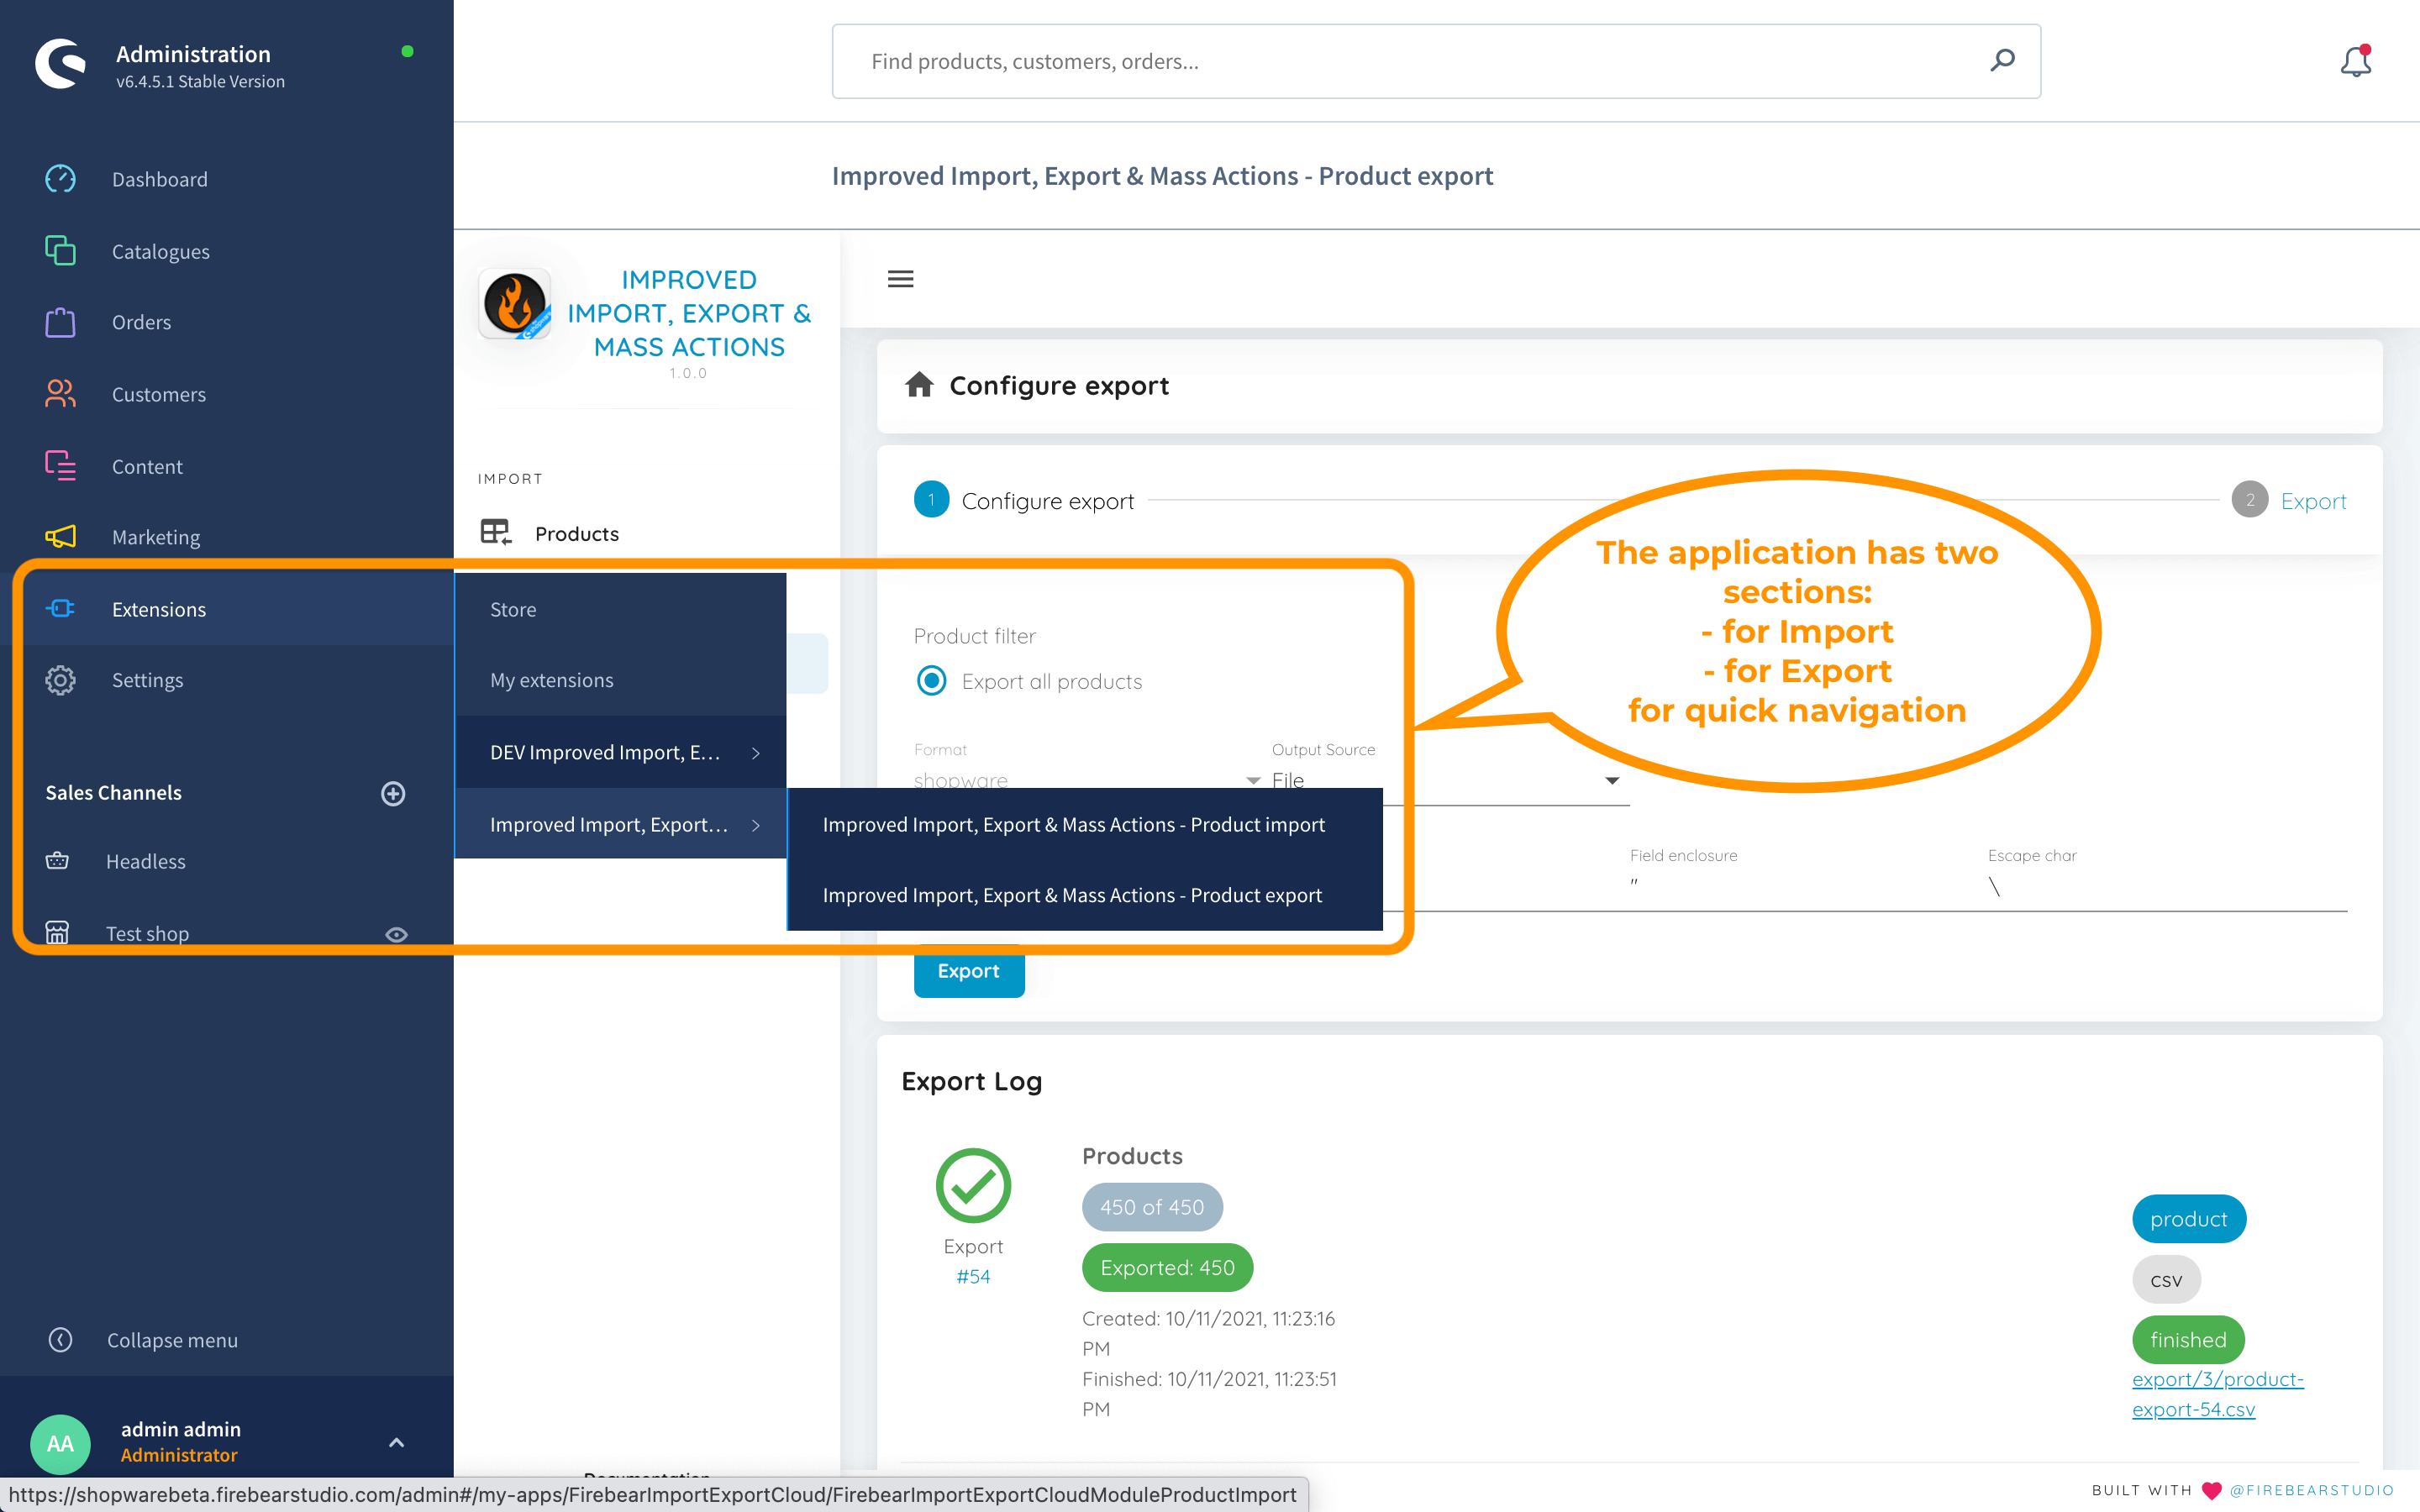
How to import data
In the following section, we’ll guide you through the process of importing data into Shopware 6 using the Improved Import, Export & Mass Actions app.
NOTE:
- In the current version, system properties available for Shopware products by default cannot be excluded from the import mapping.
- To disable a product during import, the ‘Active’ product property should be left empty.
Also, check our for more detailed examples of importable tables.
Step 1: Select File
Your very first step with Improved Import, Export & Mass Actions consists of the following activities:
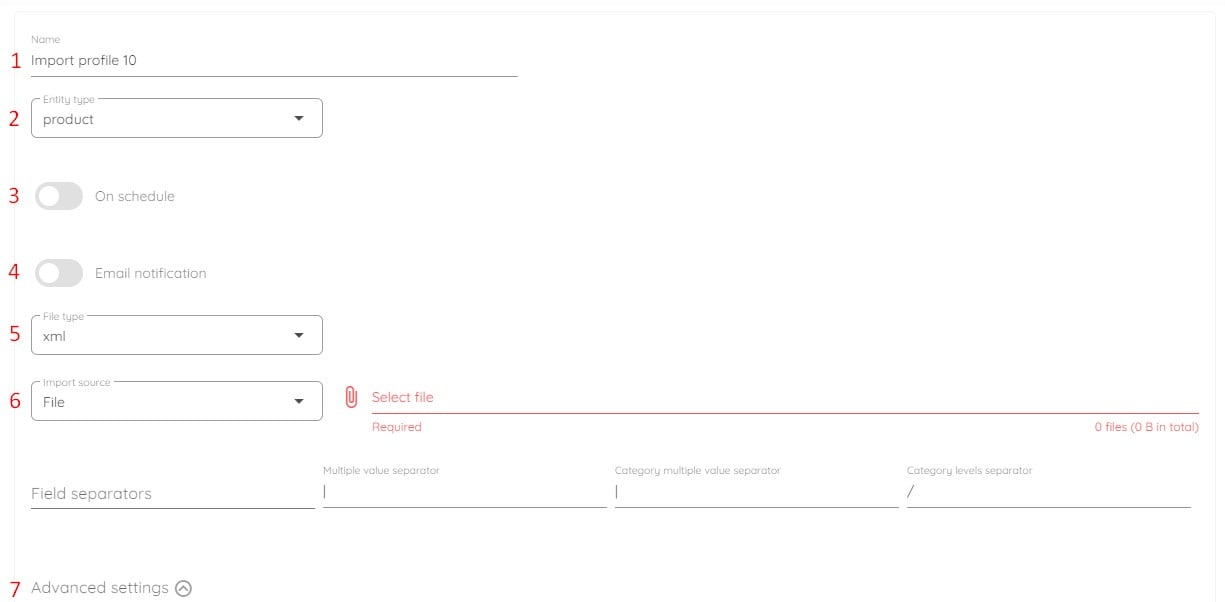
- Name your profile;
- Select an entity you want to import (e.g., products or customers);
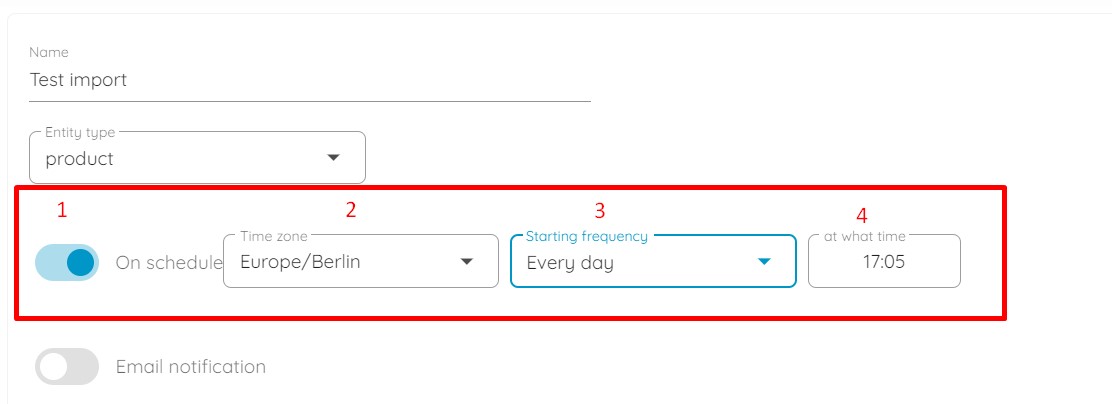
- Create a schedule of updates.
Turn on the toggle(1), choose your time zone(2) (you can type in the city instead of scrolling), specify your starting frequency(3) (every hour, day, week, or month), and configure additional parameters(4) (such as the exact time if you choose daily update or day and time if you decide to update once per week).
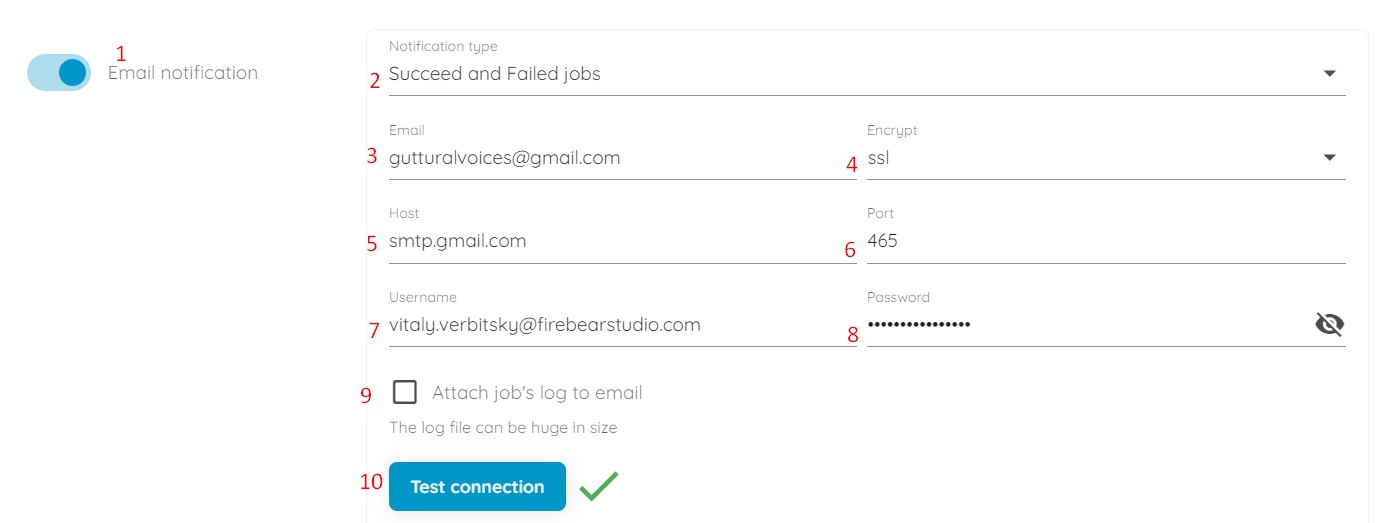
- Configure email notifications;
- Enable the notification toggle.
- Choose your notification type: succeed, failed, or succeed and failed jobs.
- Specify an email address to send notifications to.
- Select the encryption.
- Specify the host for your email address.
- Type the port.
- Specify a sender’s username (an email address).
- Provide the corresponding password.
- You can attach job logs to the notification emails. However, they may be huge in size.
- Select the file you want to import. The app currently supports CSV, XML, and XLSX file formats.
Additionally, you can specify the delimiters used in the CSV file manually, or click the “Auto detect delimiter” checkbox and let the extension do the job.
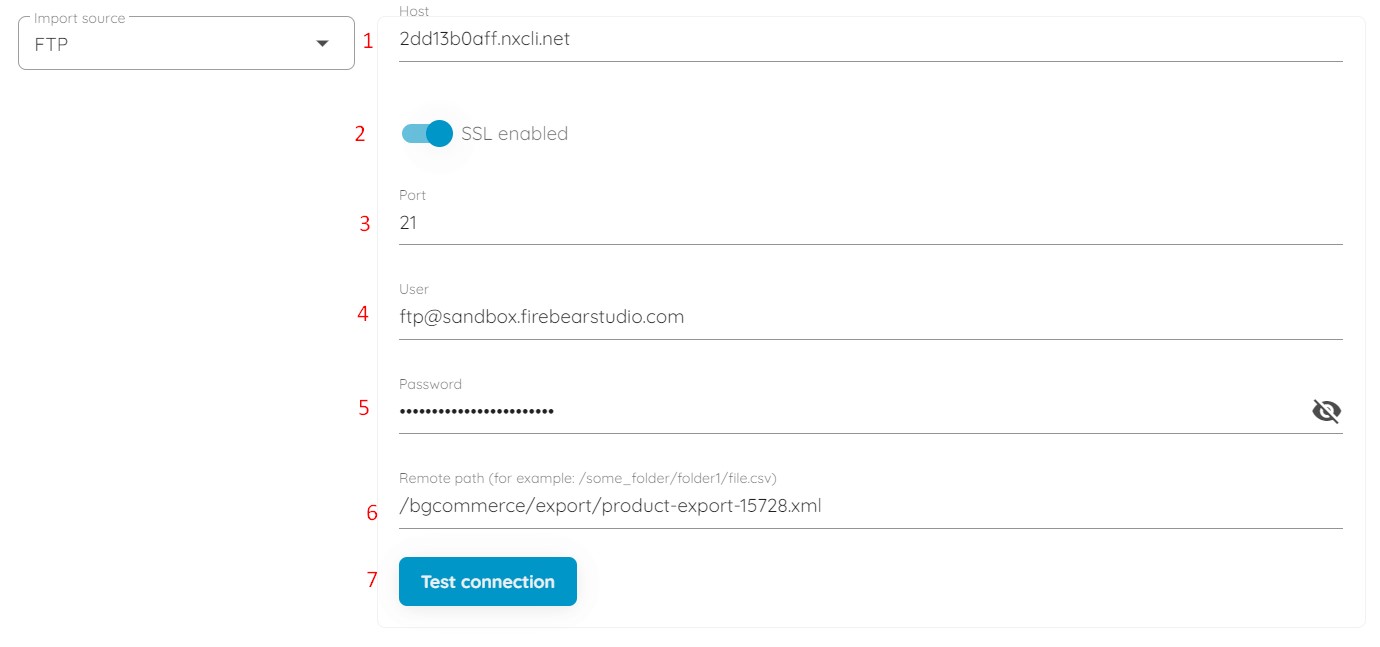
- Choose an import source (e.g., file, FTP, URL, Google Drive). If you provide a file via FTP, follow these steps:
- Specify your host;
- Enable/disable SSL;
- Specify your port;
- Provide a user email to get access to the remote file source;
- Specify the corresponding password;
- Type the remote path to your update file;
- Test the connection to make sure you’ve provided the correct credentials.
 For Google Drive, let Improved Import, Export & Mass Actions use all permissions and specify a full file name with its extension, e.g., “pe5.1.xlsx”, stored in the “shopware-import-export” folder. Read more about the Shopware 6 Google Drive integration here: How to Import Files from Google Drive to Shopware 6.

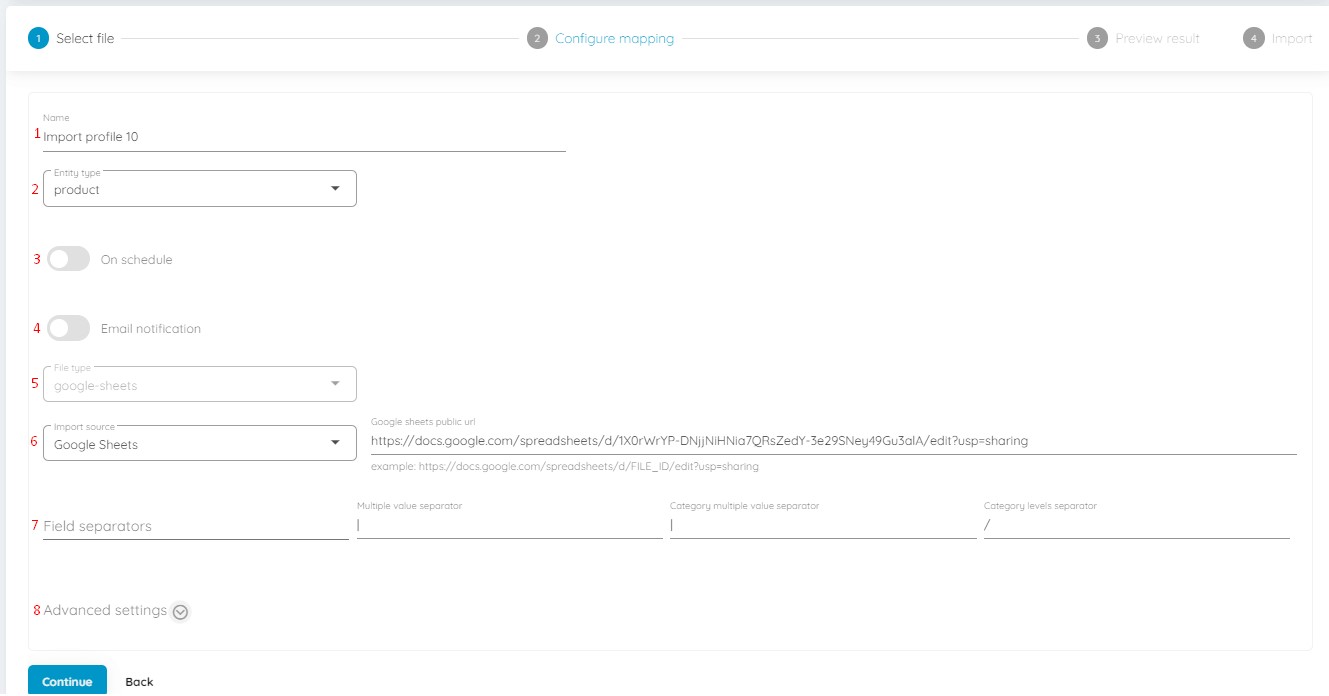
You can also import data from Google Sheets. It is necessary to select the corresponding file type and source and specify a link to your Google Sheets table. You can find more information here: How to Import Data to Shopware 6 from Google Sheets.
Good old URL imports are possible too. Just select “URL” as your import source. Next, specify a public URL where your update is stored, for example, https://example.com/download-me. You can find more information here: Shopware 6 Import From URL.
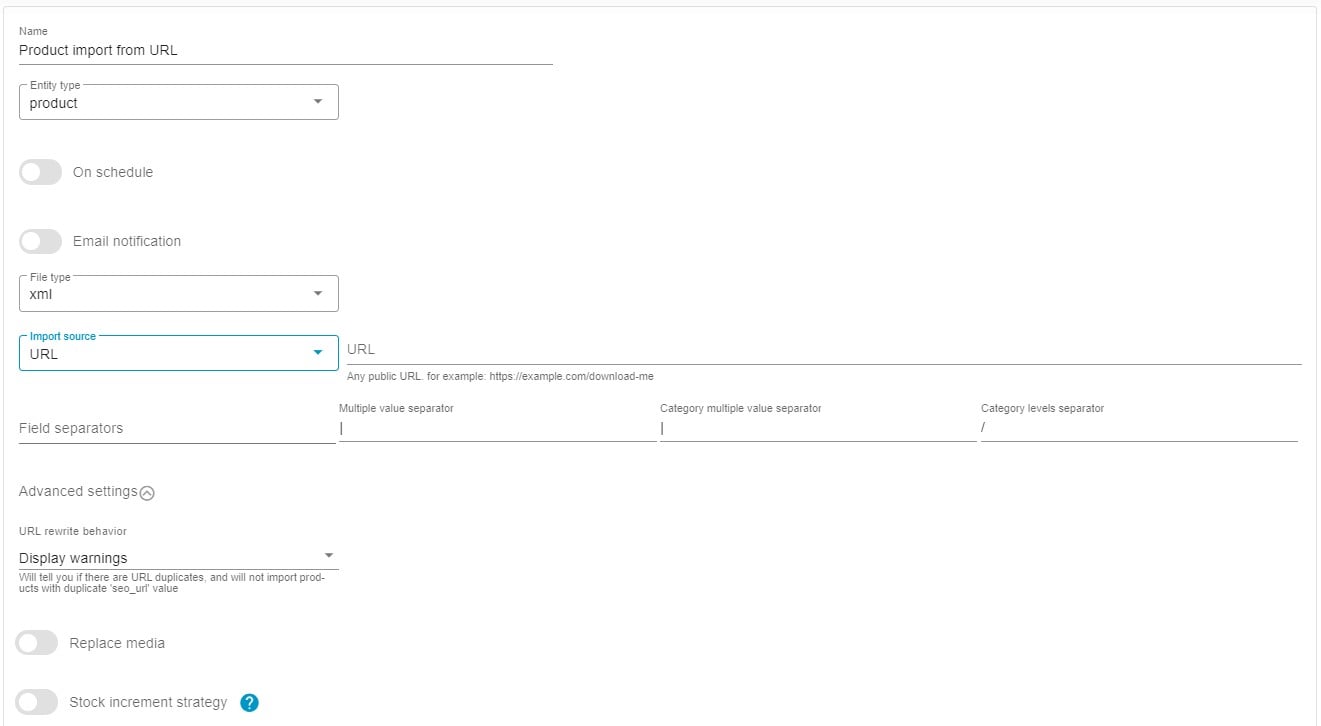
- Configure advanced settings that include:
- URL rewrite behavior;
- media replacement behavior;
- advanced price replacement behavior;
- stock increment strategy;
- data transformation.
- Display Warnings: When selected, the app alerts you if there are duplicate URLs in the imported file. If an imported product shares a URL with an existing product on your website, the app generates a new URL based on the product name.
- Increment Duplicate: With this option, the app imports products with duplicate URLs but modifies their URLs to follow the format “existing_url-n+1,” where “n” represents the duplicate number (starting at “0” for the first duplicate, resulting in “existing_url-1” after import).
- Force Overwrite: This option assigns the existing URLs to the imported products if duplicates are found in the import file. As a result, the imported products retain the existing URLs, while the original products are left without URLs.
Enable this option to overwrite the existing advanced prices of products on your website with those specified in your CSV file.
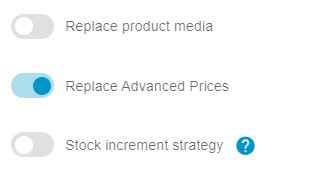
To combine the existing price tiers with the imported ones, keep the Replace Advanced Prices feature disabled.
- If Disabled: The product quantity is updated to match the quantity specified in the import file. For example, if your store’s current quantity is 100 and the import file specifies 50, the store quantity will be updated to 50 after the import.
- If Enabled: The product quantity is increased by the amount specified in the import file. For instance, if the current quantity is 100 and the import file specifies 50, the store quantity will be updated to 150 after the import.
When this feature is enabled, a Reload Product Before Update toggle appears:
- If Disabled: The quantity is updated immediately, following the selected stock increment strategy, without reloading the product data.
- If Enabled: The product data is reloaded first, and then the quantity is updated according to the selected stock increment strategy
Data Transformation is described separately below.
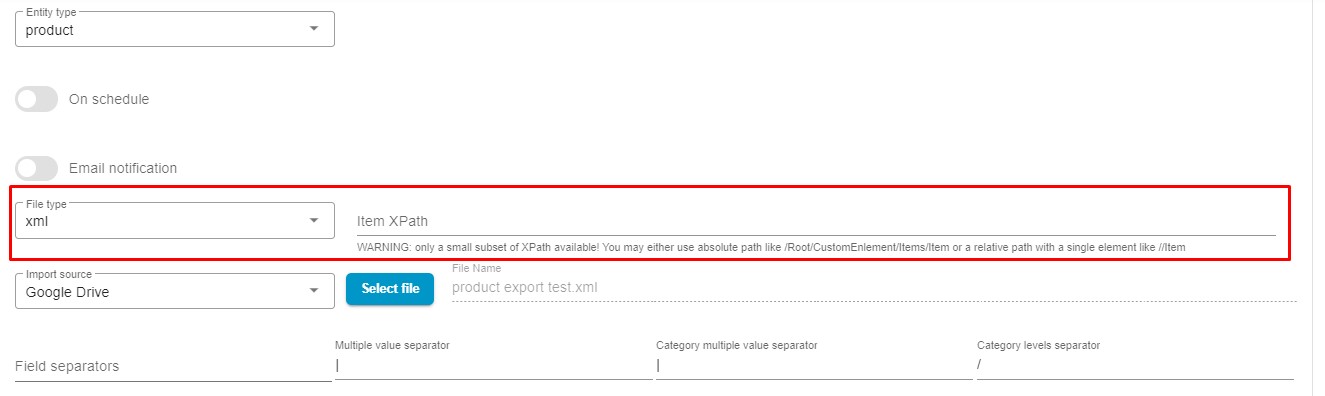
Note that for XML import to Shopware 6 your file structure should be organized as follows:
Where column names (attributes or properties) are stored between <item> and </item>.
 Additionally, the latest release of our app includes an XPath input feature for specifying data paths in XML files. This allows you to select relevant data structures, such as products or customers, with greater precision.
MIME Type
|
1 2 3 4 5 6 7 8 9 10 11 12 13 14 15 16 17 18 19 20 |
"csv" => [ "text/html", "text/csv", "text/comma-separated-values", "text/x-comma-separated-values", "text/tab-separated-values", "application/x-csv", "application/csv", "text/plain", "application/octet-stream" ], "xml" => [ "text/html", "application/xml", "text/xml" ], "xlsx" => [ "application/vnd.ms-excel", "application/vnd.openxmlformats-officedocument.spreadsheetml.sheet" ] |
If you import an unsupported file, the app displays the following error:
Failed! Bad url. mime/type mismatch or max size exceeds
Step 2: Configure mapping

Shopware requires product properties to have specific names so the system can recognize them correctly. To accommodate this, we’ve made it possible for you to import files with property names that differ from Shopware’s naming conventions. This is where the mapping section comes into play:
- The first row displays the property names from the file you are importing.
- The second row allows you to select the corresponding properties from your Shopware store.
By matching these properties, you can import files with any naming format.
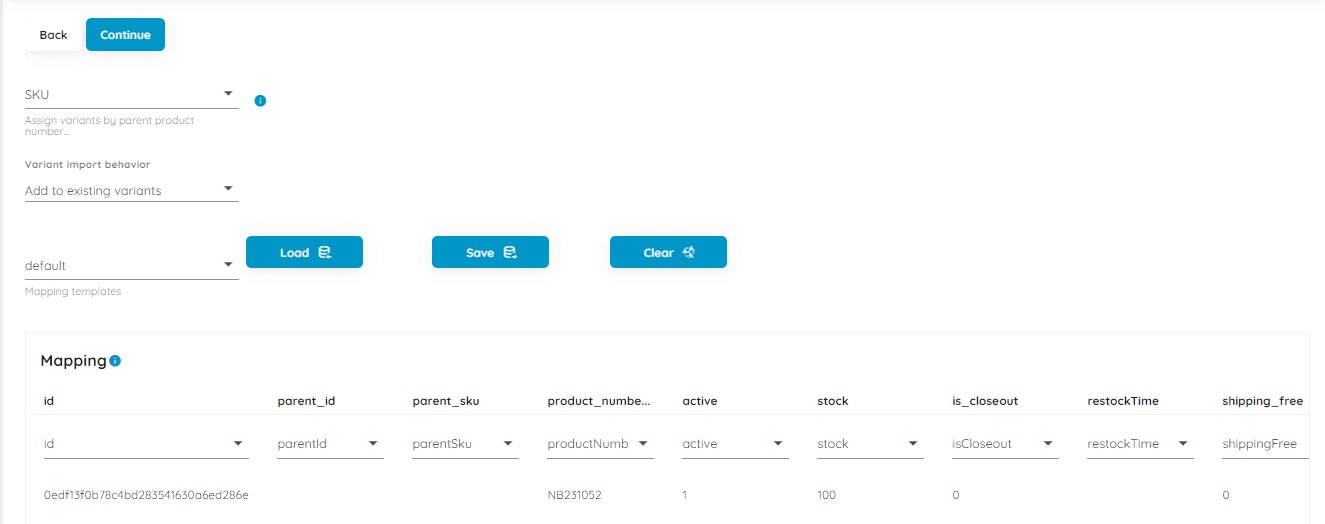
If your updates involve product variants, the mapping screen offers additional options. Here, you can choose to assign variants using either the parent product’s SKU or ID. You can also decide whether to add new variants to the existing ones or completely replace the old variants. This flexibility allows you to manage your products according to your specific needs and preferences.
Mapping templates
What are product properties and how to work with them
Each Shopware 6 product has multiple fields, such as ‘Name,’ ‘Product Number,’ and ‘Manufacturer.’ These fields are known as product properties or attributes. Each property is associated with a database entity where its values are stored, and each has a dedicated internal name that doesn’t allow spaces.
When importing products, you’re directly interacting with the database, so it’s crucial to use the exact names of these properties as they appear in the database. For example, the Manufacturer is stored as ‘manufacturer_id,’ and the Product Number is stored as ‘product_number.’ You can refer to an exported file to see how these properties are named.
This is important because, during the import process, the column names in your file must match the internal names of the product properties in Shopware. This ensures that the extension correctly maps the imported values to the appropriate properties.
This is where the Mapping section of the Improved Import, Export & Mass Actions app comes into play.
For instance, if your supplier, Microsoft, sends you a CSV file with products labeled as ‘microsoft_product_number’ and ‘microsoft_name’ instead of the standard ‘product_number’ and ‘name,’ you can use the Mapping section to align these custom names with Shopware’s internal property names

Step 3: Preview results
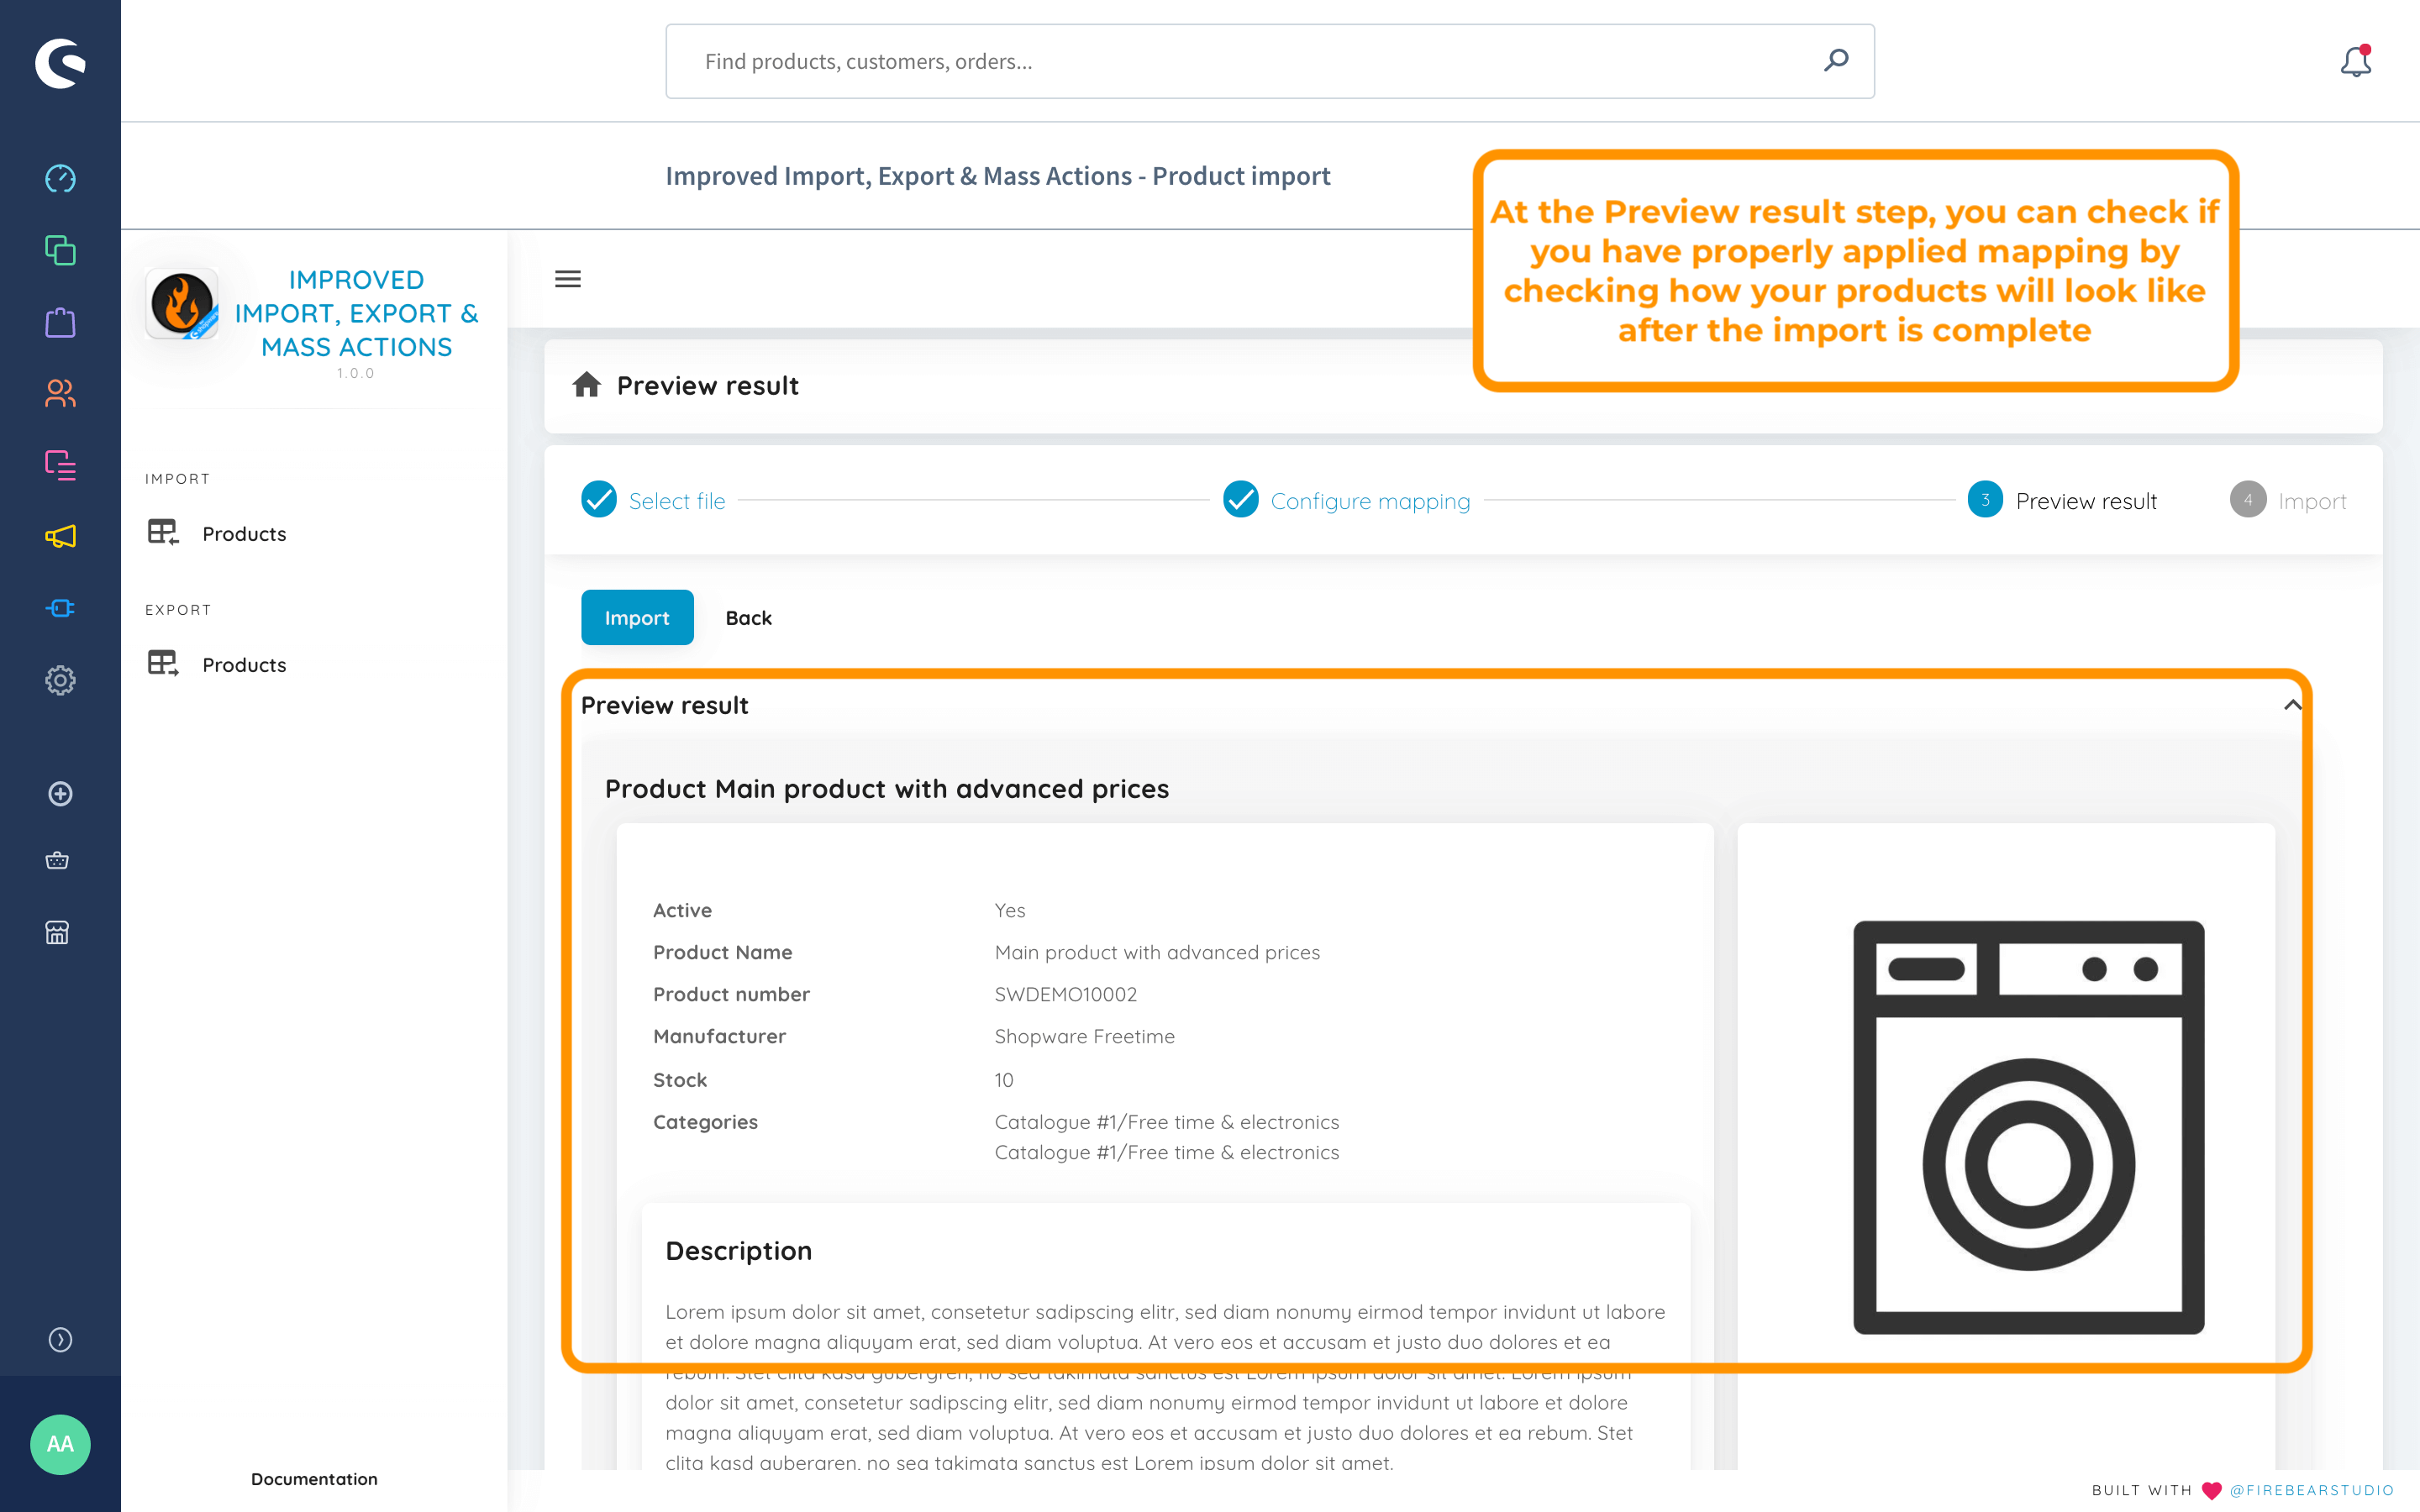
The “Preview Result” section lets you review the first 100 rows from the imported file. Once you’ve checked the results and everything looks good, you can proceed with the import procedure.
Final step: Import
When you click the “Import” button at the bottom of the Preview result step of the import, the extension starts importing the file you have uploaded.

During the import process, you’ll see the number of imported products, excluding child products of configurable items, as well as the average import time.
Once the process is complete, you can review the products you’ve imported into your Shopware 6 store.
Import Cross-Selling Data
Preparation
Before importing Shopware 6 cross-selling data, make sure you have:
- Created the products you want to link through cross-selling
- Created any necessary product dynamic groups for the “Dynamic Product Group” type
- Prepared your import file with all required fields
Import Process
To import cross-selling data:
- Go to Extensions > Improved Import, Export > Import and create a new profile
- Select “cross selling” as your import entity type
- Choose your import source (CSV, XML, Google Sheets, etc.)
- Map the fields from your source file to Shopware fields
- Run the import
Field Reference Table for Cross-Selling Import
Master table:
| Field Name | System Field Name | Description | Value Example |
|---|---|---|---|
| ID | id | Unique identifier for the cross-selling entry. Optional for new entries, can be used for updating existing ones. | 11a12b13c14d15e16f17g18h19i20j |
| Name | name | Name of the cross-selling section. Required when creating new entries. | “Recommended Products” |
| Product ID | productId | ID of the product to which the cross-selling will be attached | 22a23b24c25d26e27f28g29h30i31j |
| Product Number | productNumber | Product number of the product to which the cross-selling will be attached. Can be used instead of productId. | “SW10001” |
| Position | position | Display order of this cross-selling section. Lower numbers appear first. | 1 |
| Sort By | sortBy | How to sort the displayed cross-selling products. | “name”, “price”, “releaseDate”, or “productNumber” |
| Sort Direction | sortDirection | Direction to sort the cross-selling products. | “ASC” or “DESC” |
| Type | type | Type of cross-selling. Required when creating new entries. | “productList” or “productStream” |
| Active | active | Whether the cross-selling is active. | true or false, 1 or 0 |
| Limit | limit | Maximum number of products to display. | 4 |
| Product Stream ID | productStreamId | ID of the dynamic product group to use. Required when type is “productStream”. | 33a34b35c36d37e38f39g40h41i42j |
| Product Stream Name | productStreamName | Name of the dynamic product group. Can be used instead of productStreamId. | “New Products” |
| Assigned Products | assignedProducts | Product numbers of manually assigned products, separated by |
. Required when type is “productList”. |
Import Logic and Requirements
- Identification and Updates:
- You can update existing cross-selling entries by either:
- Providing the id field
- Providing both productId (or productNumber) and name fields
- You can update existing cross-selling entries by either:
- Type-Specific Requirements:
- For productList type:
- The assignedProducts field is required
- Product numbers must be separated by “|” (configurable in Import Profile settings)
- Products must exist in the system
- For productStream type:
- Either productStreamId or productStreamName is required
- The product stream (productStreamName) must exist in the system (automatic creation not supported)
- For productList type:
- Field Validations:
- sortBy accepts: “name”, “price”, “releaseDate”, “productNumber”
- sortDirection accepts: “ASC”, “DESC”
- position and limit must be numeric values
- active accepts boolean values (true/false, 1/0)
- Special Features:
- Updates to existing entries completely replace previously assigned products
- The system automatically resolves productId from productNumber if needed
- The system automatically resolves productStreamId from productStreamName if needed
Advanced Prices Import/Export As a Separate Entity
Overview
This feature adds a dedicated import/export entity for Advanced Prices, enabling you to manage quantity-based pricing tiers in Shopware 6 efficiently.
Supported Fields
When importing or exporting, the following fields are available. Fields are processed in the order of priority:
- productId — Product UUID (has priority over productNumber)
- productNumber — Product number (e.g., SW10001)
- ruleId — UUID of the price rule (has priority over ruleName)
- ruleName — Name of the price rule (e.g., “All customers”, “VIP customers”)
- quantityStart — Minimum quantity that triggers the price tier (required)
- quantityEnd — Maximum quantity for the price tier (optional for the last tier)
- priceNet — Net price for the quantity range
- priceGross — Gross price for the quantity range
- listPriceNet — List price (net)
- listPriceGross — List price (gross)
- regulationPriceNet — Regulation price (net)
- regulationPriceGross — Regulation price (gross)
Data Format Examples
CSV Example
productId,productNumber,ruleId,ruleName,quantityStart,quantityEnd,priceNet,priceGross,listPriceNet,listPriceGross,regulationPriceNet,regulationPriceGross
0195283f926c72e68fbc7dbc72c41c15,SP-BOM2002,019527c9fc0c7194839e02040dc8e406,Cart >= 0,1,,180,180,,,,
0195283f926c72e68fbc7dbc72c41c15,SP-BOM2002,019527c9fc3373658987c2578a7f0185,All customers,1,4,151.26,180,,,,
XML Example
|
1 2 3 4 5 6 7 8 9 10 11 12 13 14 15 16 17 18 19 20 21 22 23 |
<?xml version="1.0" encoding="UTF-8"?> <list> <item> <ProductId>0195283f926c72e68fbc7dbc72c41c15</ProductId> <ProductNumber>SP002</ProductNumber> <RuleId>019527c9fc0c7194839e02040dc8e406</RuleId> <RuleName><![CDATA[Cart >= 0]]></RuleName> <QuantityStart>1</QuantityStart> <QuantityEnd></QuantityEnd> <PriceNet>180</PriceNet> <PriceGross>180</PriceGross> </item> <item> <ProductId>0195283f926c72e68fbc7dbc72c41c15</ProductId> <ProductNumber>SP002</ProductNumber> <RuleId>019527c9fc3373658987c2578a7f0185</RuleId> <RuleName>All customers</RuleName> <QuantityStart>1</QuantityStart> <QuantityEnd>4</QuantityEnd> <PriceNet>151.26</PriceNet> <PriceGross>180</PriceGross> </item> </list> |
Import Behavior
Field Priority
- productId overrides productNumber if both are provided.
- ruleId overrides ruleName if both are provided.
Price Replacement Logic
- Prices are replaced only within the same rule.
- Existing rules not included in the import remain unchanged.
- When importing prices for a rule, all existing entries for that rule are deleted before new records are created.
Automatic Price Calculation
- If gross price is missing, it is calculated from net price using the product’s tax rate.
- If net price is missing, it is calculated from gross price using the tax rate.
Export Filtering
You can export advanced prices filtered by:
- Product ID
- Product number
- Rule ID
- Rule name
Important Notes
Currency Support
- Only the system (default) currency is supported in this version.
- Multi-currency support is planned for future updates.
Quantity Ranges
- quantityStart must be specified for every tier.
- quantityEnd can be left empty for the last tier to indicate no upper limit.
- Quantity ranges in the same rule must not overlap.
Validation Rules
- At least one of productId or productNumber must be provided.
- At least one of ruleId or ruleName must be provided.
- Either priceNet or priceGross is required (the missing value will be auto-calculated).
- Referenced products and rules must already exist in Shopware.
Multi-Currency Support for Advanced Prices Import
The app now fully supports multi-currency advanced prices import for Shopware. This enhancement allows you to import product prices for multiple currencies in a single file — with automatic field detection, tax calculation, and UI integration.
With this update, every currency defined in your Shopware store can now have its own price set, including net, gross, list, and regulation prices, all built dynamically from your import file.
Key Features Implemented
1. Currencies Registry
File: app/Models/Registries/Shopware/CurrenciesRegistry.php
A new Currencies Registry has been introduced to efficiently handle currency lookups. It follows the same design pattern as other registries, such as LanguagesRegistry and TagsRegistry.
Available Methods:
- getIdByIsoCode() – Returns a currency ID by its ISO code (e.g., EUR → 1).
- getIsoCodeById() – Finds the ISO code for a given currency ID.
- getNameByIsoCode() – Returns the full name of the currency (e.g., “Dänische Kronen”).
- getAllIsoCodes() – Lists all active currency ISO codes available in Shopware.
Purpose: The registry provides a single, optimized source for currency information during price imports.
2. Dynamic Field Mapping
File: app/Models/DTO/Shopware/AdvancedPrices.php
The Dynamic Field Mapping mechanism allows the app to automatically generate import fields for each available currency.
How It Works:
- The methods getAllFields() and getFields() now dynamically build field lists using the active currencies.
- Field naming follows this format:
[ISO].[priceType]
Example: DKK.priceNet, DKK.priceGross.
Human-Readable Labels: Each field is displayed with a friendly name, such as “priceNet (Dänische Kronen)”, making it easy to identify in the import UI.
Supported Price Types:
- priceNet, priceGross
- listPriceNet, listPriceGross
- regulationPriceNet, regulationPriceGross
This ensures complete multi-currency flexibility for both standard and promotional pricing.
3. Multi-Currency Price Payload Builder
File: app/Models/Import/AdvancedPrices/ApiEntityRequestBodyFactory.php
A new price payload builder handles the transformation of import data into Shopware’s expected structure.
New Methods Added:
- extractCurrencyPrices() – Reads and parses currency-specific columns (e.g., DKK.priceNet) from the import file.
- buildCurrencyPrice() – Creates complete, valid price objects for each currency, applying tax calculations and linked attribute logic automatically.
Key Functionalities:
- Automatic Tax Calculation: If only the net or gross price is provided, the missing value is calculated using the product’s tax rate.
- Linked Attribute Handling:
- linked = false → Both net and gross prices provided manually.
- linked = true → One price auto-calculated by the system.
- Multi-Currency Structure: Separate price objects are built for each currency, including nested listPrice and regulationPrice values.
Example Price Object:
|
1 2 3 4 5 6 7 8 9 10 11 12 13 14 15 16 17 18 19 20 21 |
[ [ 'currencyId' => 'xxx', 'net' => 100, 'gross' => 120, 'linked' => false, 'listPrice' => [ 'currencyId' => 'xxx', 'net' => 80, 'gross' => 96, 'linked' => false ], 'regulationPrice' => [ 'currencyId' => 'xxx', 'net' => 50, 'gross' => 60, 'linked' => true ] ], // Additional currencies... ] |
4. UI Integration
Files:
- app/Models/Import/Mapping/MappingResolver.php
- app/Models/Import/Importers/Shopware/AdvancedPricesImporter.php
The import interface has been updated to automatically display new currency fields and make mapping easier.
Highlights:
- Currency-specific price fields now appear automatically in Step 2 of the import wizard.
- Field detection supports dynamic colorization — new fields are highlighted, removed ones are grayed out.
- Custom column mapping is supported. Example: You can map “priceDat” → “DKK.priceNet”.
This makes setup simple — the app recognizes new currencies and price fields without requiring manual configuration.
Technical Implementation Summary
| Functionality | Description |
| Currency Parsing | Recognizes columns in [ISO].[priceType] format (e.g., EUR.priceGross). |
| Tax Calculation | Uses existing getProductTaxRate() from the product registry to compute missing values. |
| Linked Attribute Logic | Mirrors Shopware system behavior: linked=false when both prices are provided; otherwise linked=true. |
| Data Structure | Builds fully Shopware-compliant nested price arrays with support for listPrice and regulationPrice per currency. |
Testing Recommendations
To ensure correct behavior, we recommend the following validation tests:
- Test with currency-specific columns. Example: DKK.priceNet, DKK.priceGross, USD.priceNet.
- Verify tax calculation. Provide only one price (net or gross) and confirm that the other is calculated automatically.
- Test custom column mapping. Example: Map “MyPrice” → “DKK.priceNet”.
- Test multiple currencies. Import a single CSV containing several currencies at once.
- Validate list and regulation prices. Check that nested price fields are correctly imported for all currencies.
- Verify linked attribute. Confirm that “linked” is correctly displayed in Shopware when both or only one price is imported.
- Check system currency compatibility.
Ensure that your default store currency still imports as before (no changes in behavior).
Files Affected
- New File: app/Models/Registries/Shopware/CurrenciesRegistry.php
- Modified Files:
- app/Models/DTO/Shopware/AdvancedPrices.php
- app/Models/Import/AdvancedPrices/ApiEntityRequestBodyFactory.php
- app/Models/Import/Mapping/MappingResolver.php
- app/Models/Import/Importers/Shopware/AdvancedPricesImporter.php
Summary
The new multi-currency advanced pricing functionality brings Shopware imports to a new level of flexibility. You can now import, calculate, and manage prices for any number of currencies — all in one seamless process.
With automated currency detection, dynamic field mapping, and native UI integration, this update removes the need for manual configuration or multiple import jobs. Simply include currency-specific columns in your import file, and the system will handle the rest.
Replace Product Sales Channels
This feature allows you to fully control which Shopware sales channels each product is assigned to, and define exactly how visible the product should be in each channel when importing data.
Supported Fields
Sales Channel Columns
- salesChannel — List of sales channel UUIDs, each optionally paired with a visibility value
- salesChannelNames — List of sales channel names, each optionally paired with a visibility value
Visibility Values
- 10 — Hidden from listings and search (accessible only via direct link)
- 20 — Hidden from listings (visible in search results)
- 30 — Visible in listings and search (default)
Data Format Examples
CSV Example with Channel Names
productNumber, salesChannelNames
SW10001, Storefront:30
SW10002, Headless:20|Storefront:30
SW10003, Storefront
CSV Example with Channel IDs
productNumber, salesChannel
SW10001, 019527ca391372d5a256adf8a79152a0:30
SW10002, 98432def39fc4624b33213a56b8c944d:20|019527ca391372d5a256adf8a79152a0:30
SW10003, 019527ca391372d5a256adf8a79152a0
Multiple Sales Channels
Use | (pipe) to separate entries:
salesChannelNames
Headless:20|Storefront:30|API-Channel:10
Import Behavior
Replace Mode (Enabled)
- Complete Replacement — All existing sales channel assignments for the product are removed.
- New Assignment — Only the channels specified in the import file are assigned.
- Visibility Update — If the same channel is included, its visibility is updated.
Update Mode (Disabled)
- Preserve Existing — Existing sales channel assignments remain unchanged.
- Add/Update Only — New channels are added, but existing ones are not updated.
- No Removal — Channels not listed in the import are retained.
Visibility Handling
- Explicit Values — Use colon notation, e.g., Storefront:20
- Default Visibility — If no value is provided, visibility defaults to 30 (fully visible)
- Valid Range — Only 10, 20, and 30 are accepted
Data Format Rules
- Channel Identification Priority: If both IDs and names are provided, IDs take precedence
- Format: channelIdentifier:visibilityValue
- Multiple Channels: Separate entries with pipe (|)
Use Case Examples
Basic Assignment
productNumber, salesChannelNames
SW10001, Storefront
Result: Product assigned to Storefront with default visibility (30)
Specific Visibility
productNumber, salesChannelNames
SW10001, Storefront:20
Result: Product visible in search only
Multiple Channels
productNumber, salesChannelNames
SW10001, Storefront:30|Headless:20|B2B-Portal:10
Result: Different visibility levels across channels
Channel Removal (Replace Mode)
productNumber, salesChannelNames
SW10001, Storefront:30
Result: All previous channel assignments removed; only Storefront remains
Important Notes
- Channel Validation:
- All sales channels must exist in Shopware prior to import
- Channel names are case-sensitive
- Invalid names or IDs will trigger import errors
- Performance:
- Replace Mode performs delete operations; large imports may take longer
- Existing visibility IDs are retained to ensure referential integrity
- Compatibility
- Works with CSV and XML import files
- Supports new products and updates to existing products
- Error Handling
- Invalid visibility values (anything other than 10, 20, or 30) will cause errors
- Non-existent channels will stop the import
- Improper formatting (missing “:” or “|”) will be rejected
Auto-Assign Parent Categories on Import
When importing products with category paths, you no longer need to manually include each parent category in the categories_all_paths field. With the Auto-assign parent categories option enabled, the system automatically expands each category path to include all its parent categories.
Without the Feature:
You must explicitly list every level:
categories_all_paths: “Home|Home/ATCart1|Home/ATCart1/ATCart2”
With Auto-Assign Enabled:
Simply provide the deepest path:
categories_all_paths: “Home/ATCart1/ATCart2”
The system will automatically assign the product to all relevant categories: Home, ATCart1, and ATCart2.
☝ Tip: You can include multiple paths, separated by a vertical bar (|). For example:
“Home/ATCart1/ATCart2|Store/Electronics/Phones”
will assign the product to all parent categories in both hierarchies.
Technical Overview:
- Config option: auto_assign_parent_categories
- Backend logic: CategoriesProvider::expandCategoriesWithParents()
- UI control: Toggle switch in the import profile wizard
This feature saves time, reduces errors, and ensures consistent category assignment during bulk imports.
The markAsTopseller Field for Product Import
A new optional field — markAsTopseller — has been introduced to the product import process. This field allows you to control whether a product should be marked as a “Topseller” in your Shopware 6 storefront.
How to Use:
In your import file, use the markAsTopseller column and set the value as follows:
- 1 — marks the product as a Topseller
- 0 — does not mark the product as a Topseller
The field is optional. If left empty, no changes are applied to the Topseller status.
Technical Implementation:
- Field mapping: markAsTopseller → markAsTopseller
- Not a required field; supports empty values
- Included in export (not filterable)
- Integrated into:
- Product.php (app/Models/DTO/Shopware/Product.php)
- ExportMapping.php (app/Models/Export/Mapping/Shopware/ExportMapping.php)
This addition streamlines the way you manage product highlights during import and export operations, enabling better automation and storefront visibility control.
Different Data Formats for Shopware 6 Import
The Improved Import, Export & Mass Actions app allows you to transfer various types of product data to Shopware 6, including standard fields, custom fields, translations, and properties. Each data type follows a specific format, as described below.
System Properties
Each Shopware 6 product is defined by multiple fields, such as “Name”, “Product Number”, and “Manufacturer.” These fields, also known as product properties or attributes, are stored in the database with specific internal names that do not allow spaces.
When importing products, you are directly interacting with the database, so it’s crucial to use the exact names of these properties as they appear in the database. For example, “Manufacturer” is stored as “manufacturer_id“, and Product Number is “product_number“. You can refer to an exported file to see how different properties are named.
This is essential because when importing, the column headers in your file must match the internal names of product properties in Shopware to ensure that the data is correctly mapped to the corresponding fields.
Custom Properties
By default, Shopware 6 exports products without including any custom properties you’ve added, such as “Size” or “Color”. This means custom properties won’t be part of the exported product data. While you can export custom product properties as a separate entity, this export won’t include references to the products they’re assigned to, making it difficult to re-import products with their associated custom properties.
The Improved Import, Export & Mass Actions app solves this issue by allowing you to export custom properties along with your products in a format that includes both the database ID of the custom property and the name displayed in the store’s backend for easy reference.

In the exported file, custom properties are formatted like this: color#0bde8db993684f8b92a713913aa3d9c3, where:
- color is the name of the property as displayed in the Shopware 6 backend.
- #0bde8db993684f8b92a713913aa3d9c3 is the property’s unique ID in the database.
When importing products with custom properties, you can use three different formats for column names:
- property_name#property_id – the default format as it appears in the export file.
- property_name – using only the name of the property as it appears in the Shopware 6 admin panel.
- #property_id – using only the property’s ID, preceded by the # symbol.
During the import process, you need to map all custom properties in your file by selecting the corresponding “propertiesSources” option in the dropdown for each property. This step ensures that Shopware correctly recognizes and processes the custom properties, regardless of the order or format used.
Using both the property name and ID is important because Shopware 6 allows you to create multiple custom properties with the same name. The property ID, which is always unique, helps distinguish between similarly named properties.
If you want to add translations to your custom properties, use this column title format:
[language code].[property_name#property_id]
Where:
- language code is the of the language you provide translation for, e.g., en_GB, en_US, de_DE, de_CH, etc.
- property_name is the name of the property as displayed in the Shopware 6 backend.
- property_id is the property’s unique ID in the database.
For instance, you can translate the Material custom property with the ID #a67cdd9627cb488bb4cd91f3e8d66e32 to German by adding the following column to your CSV file: de-DE.Material#a67cdd9627cb488bb4cd91f3e8d66e32.
![]()
Custom Fields
For Firebear imports, all custom field names must begin with “cf_“. Following this prefix, include the technical name of the custom field.
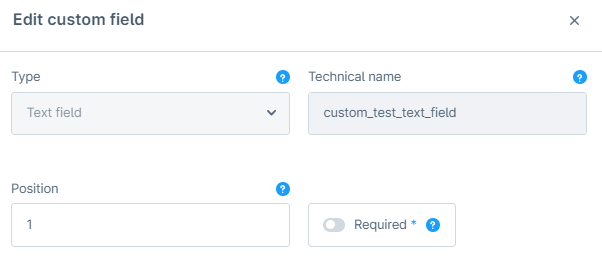
For instance, to import data associated with the custom_test_text_field custom field, you need to add the cf_custom_test_text_field column to your CSV.

Translations
When importing translations to Shopware, the CSV file should include specific column headers that indicate the language and type of translation. Use this general format to name your columns:
translations.[language code].[original column title]
Where:
- language code is the of the language you provide translation for, e.g., en_GB, en_US, de_DE, de_CH, etc.
- original column title is the name of a column associated with the translations you import, e.g., name or keywords.
For example, to import English keywords, you would use the column header “translations.en_GB.keywords“, while for German product names, the column header should be “translations.de_DE.name“.
Each column should be followed by the corresponding translated content, ensuring that the language code (e.g., en_GB for British English and de_DE for German) matches the translations you’re importing. This format ensures that our app correctly associates each translation with the appropriate language and content type.
![]()
You can also import translations for your custom fields. Add a column with this format:
translations.[language code].cf_[custom_field_technical_name]
Where:
- language code is the of the language you provide translation for, e.g., en_GB, en_US, de_DE, de_CH, etc.
- custom_field_technical_name is the technical name of a custom field.
For instance, you can import German translations for your custom test text editor custom field with the help of the translations.de_DE.cf_custom_test_text_editor column.
![]()
Importing a New Product in Shopware 6.5:
- When importing a custom attribute of the ‘cf_’ type, values are successfully imported for all languages, not just the main language.
- There are no translation columns for custom attributes of the select type, so translations for these cannot be imported.
- Similarly, there are no translation columns for custom price attributes, preventing the import of translations for these as well.
- For custom attributes like checkboxes and active switches, the same value is imported across all languages, even if different values are specified in the import file.
Updating a Product in Shopware 6.5:
- If you update the select attribute in the ‘cf_’ column, it is only updated in the main language; other languages are not affected.
- Updating the price attribute in the ‘cf_’ column also only affects the main language.
- For checkboxes and active switches, if you specify different values for different languages, the import will maintain those distinct values without resetting or updating them to match the main language.
- For custom attributes such as text fields, date/time, number fields, media fields, color pickers, and text editors, you can successfully import translations and unique values for the custom field both when importing a new product and during updates.
Importing a New Product in Shopware 6.4:
- When importing a custom attribute of the ‘cf_’ type, values are imported only for the main language; other languages are not included.
- There are no translation columns for custom attributes of the select type, so translations cannot be imported.
- For custom attributes like checkboxes and active switches, different values are imported for different languages if specified in the import file.
Updating a Product in Shopware 6.4:
- If you update the select attribute in the ‘cf_’ column, it is only updated in the main language, with no changes in other languages.
- For checkboxes and active switches, if different values are specified for different languages, the import process will maintain these values across languages, rather than resetting them to the main language’s value.
- For custom attributes such as text fields, date/time, number fields, media fields, color pickers, and text editors, you can import translations and unique values for the custom field both when importing a new product and during updates.
In both versions, Shopware allows for flexible import and update processes, but with different capabilities regarding language support and translation of custom attributes.
Delivery Time 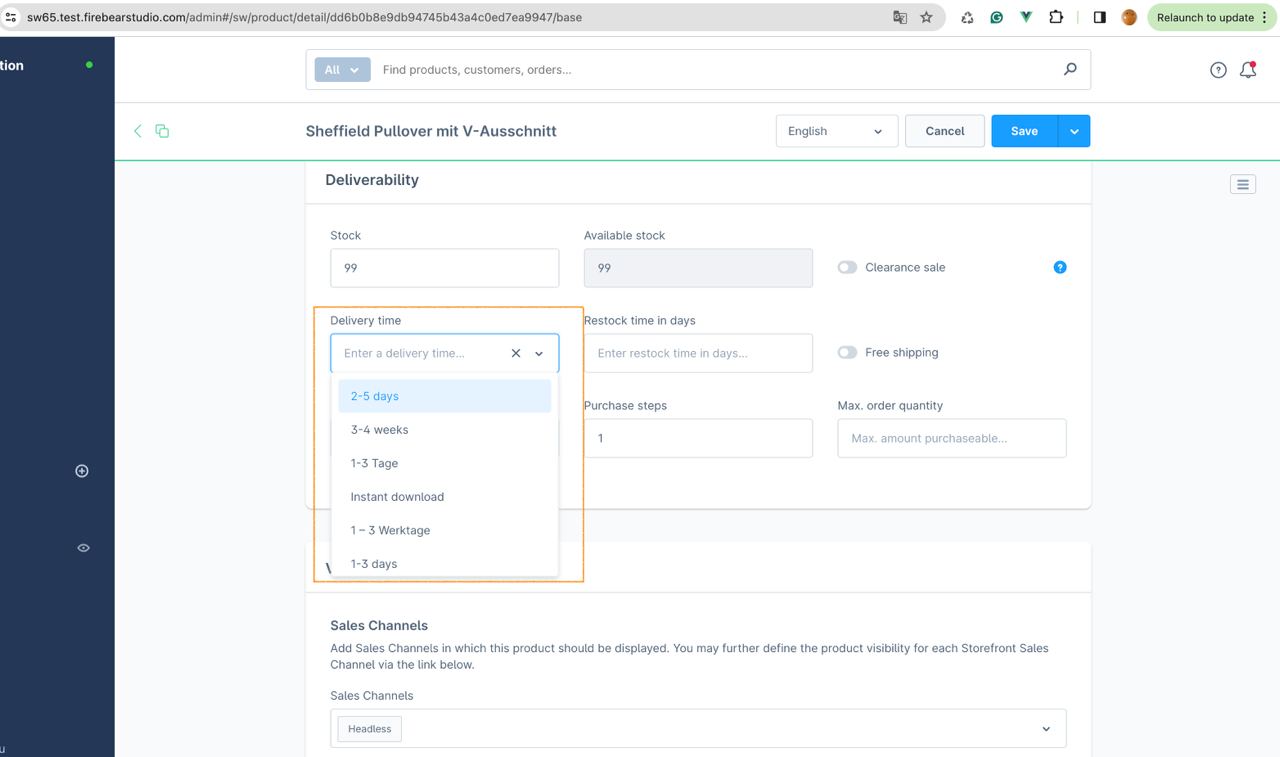
You can import delivery time fields into Shopware 6 using three different methods:
- By ID: If all delivery times are already created in Shopware, you can import them using the “delivery_time_id” column in your import file.
- By Name: If the delivery times are already set up in your store, but you don’t want to look up all the IDs, you can import them using the “delivery_time_name” column. The app will automatically find the existing ID based on the name and attach it to the product.
- Creating New Delivery Times: To create a new delivery time during import, use four columns: “delivery_time_name“, “delivery_time_min“, “delivery_time_max“, and “delivery_time_unit” to fully describe the new delivery time.
You can find an example in the :

Advanced Pricing
It is possible to import advanced pricing to Shopware 6 as a part of your product update. The corresponding information can be added to a product CSV in the “advanced_prices“ column.
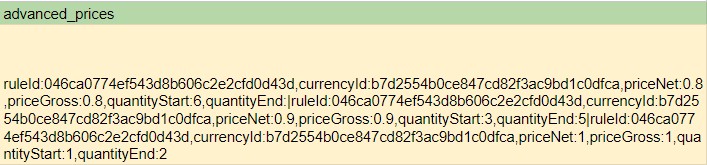
The value in this column should look as follows:
ruleId:046ca0774ef543d8b606c2e2cfd0d43d,currencyId:b7d2554b0ce847cd82f3ac9bd1c0dfca,priceNet:0.8,priceGross:0.8,quantityStart:6,quantityEnd:|ruleId:046ca0774ef543d8b606c2e2cfd0d43d,currencyId:b7d2554b0ce847cd82f3ac9bd1c0dfca,priceNet:0.9,priceGross:0.9,quantityStart:3,quantityEnd:5|ruleId:046ca0774ef543d8b606c2e2cfd0d43d,currencyId:b7d2554b0ce847cd82f3ac9bd1c0dfca,priceNet:1,priceGross:1,quantityStart:1,quantityEnd:2
This complex value consists of attributes and values that describe multiple rules or price tiers. Tiers are separated by a pipe (“|”), and the attributes within each tier are separated by a comma (“,”).
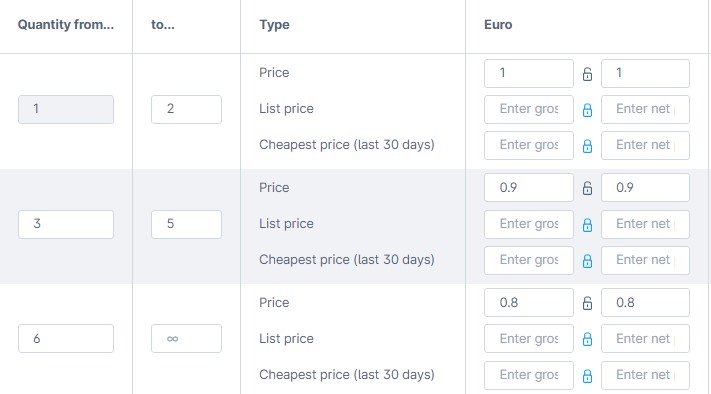
The value above represents the following three price tiers:
- The price is 1 Euro if a customer orders 1-2 items.
- The price is 0.9 Euro if a customer orders 3-5 items.
- The price is 0.8 Euro if a customer orders 6 or more items
Below, you’ll find a description of each advanced pricing import attribute for Shopware 6.
| Column Name | Description | Value |
| ruleId | The alphanumerical rule ID used in Shopware. | 046ca0774ef543d8b606c2e2cfd0d43d |
| currencyId | The alphanumerical currency ID used in Shopware. | b7d2554b0ce847cd82f3ac9bd1c0dfca |
| priceNet | A product net price used in this rule. | 0.8 |
| priceGross | A product gross price used in this rule. | 0.8 |
| quantityStart | The minimum amount of items that should be purchased to apply the rule. | 6 |
| quantityEnd | The maximum amount of items that should be purchased to apply the rule. | 8
Leave blank to set the upper limit to infinity. |
Note that you can replace the existing advanced prices with the ones specified in your CSV by activating the Replace Advanced Prices feature.
SEO URLs
Every successful website needs to address SEO URLs, and Shopware provides built-in SEO URL functionality to streamline your optimization efforts. The platform supports SEO URLs for both products and categories. While Shopware doesn’t natively support importing SEO URLs, our Improved Import, Export & Mass Actions app fills that gap.
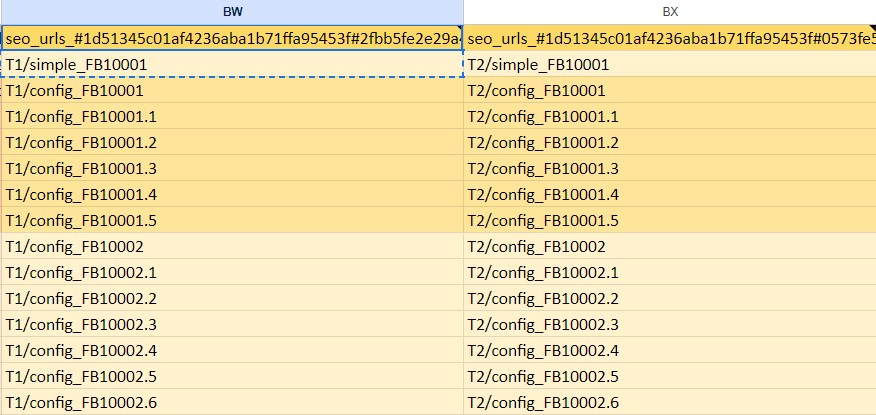
Since you can add multiple custom SEO URLs for different store languages, your CSV file with product updates can include several columns for SEO URLs. Each Shopware 6 SEO URL attribute must start with “seo_url_#”, followed by the sales channel ID and the language ID, as shown in this example:
seo_urls_#1d51345c01af4236aba1b71ffa95453f#2fbb5fe2e29a4d70aa5854ce7ce3e20b
Be sure to use “#” to separate the sales channel ID from the language ID.
The attribute value can include any characters and spaces, allowing you to enter SEO-friendly URLs for your Shopware update, such as “seo-friendly-product-page”.
Below is an example of Shopware 6 SEO URL attributes and values ready for import, as outlined in our :
EAN Product Import (Alternative to SKU)
We’ve introduced the ability to import products using the EAN (European Article Number) as an alternative to SKU (product_number). This feature allows you to update existing products, but please note that new products cannot be created using the EAN.
Additionally, the product_number can also be updated during import using EAN. If you do not wish to update the product_number, ensure it is not mapped or included in your import file.
All product attributes available for import can be updated using the EAN, with the exception of tags and SEO URLs – these can only be updated using the product_number. It means that you need both the ean and product_number columns to update ALL product attributes.
To update products in Shopware 6 with the help of EAN, add the ean column to your CSV file:

Create a new import profile and configure its basic settings. Next, choose EAN instead of SKU in the Lookup Attribute section on the mapping screen:
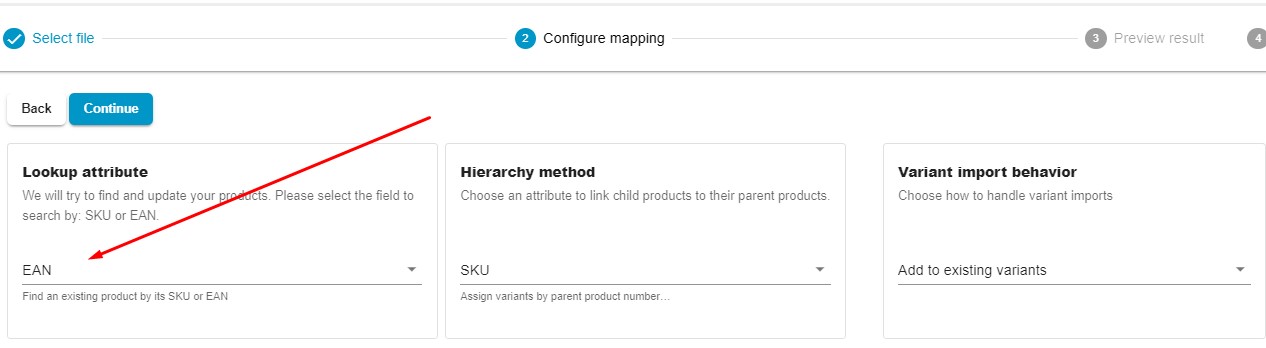
Configure other parameters and import the update.
Data Transformation

The new feature introduces a script editor window available at the first step of the import process. This editor allows customers to write and apply scripts to modify rows of imported files directly. In other words, it is possible to edit attribute values with the help of a custom script.
Key Functionalities
- Script Input: Users can access the editor and write scripts to modify data using the variable $row, which represents the row being processed.
- Function Whitelisting: For security purposes, only a limited set of PHP functions is allowed in the editor. These functions enable common string, array, and mathematical operations, ensuring users can perform common modifications without compromising system security.
Allowed PHP Functions
| Function Group | Functions |
|---|---|
| String Functions | strlen, strpos, strtolower, strtoupper, trim, substr, str_replace, explode, implode, htmlspecialchars, ucfirst, lcfirst |
| Hashing Functions | md5, sha |
| Array Functions | in_array, count |
| Math Functions | abs, round, ceil, floor, max, min, rand, sqrt, pow |
| Date/Time Functions | time, date, strtotime, mktime |
| Variable Handling Functions | isset, empty |
| JSON Functions | json_encode, json_decode |
| Multibyte String Functions | mb_ereg_replace, mb_ereg_replace_callback, mb_eregi_replace, mb_split, mb_str_pad, mb_str_split, mb_strcut, mb_strimwidth, mb_stripos, mb_stristr, mb_strlen, mb_strpos, mb_strrchr, mb_strrichr, mb_strripos, mb_strrpos, mb_strstr, mb_strtolower, mb_strtoupper, mb_substr, mb_substr_count |
Example Use Cases
With the new feature, you can apply the following modifications to the imported data right in your Shopware 6 administration:
- Manufacturer Name: Remove extra $ symbols from any values.
- Options: Strip out spaces and replace ; with |.
- Stock: Increase all values by 10.
- Price Modification: If price_gross and list_price_gross are 0, set them as net * 1.19.
- Keywords: Replace , with |.
- Meta Title: Concatenate meta_title and name columns.
General Format for the $row Script
In the context of the feature allowing users to write scripts for row modification, the general format of the script involves processing each row of data through the variable $row, which is an associative array. Each key in the $row array represents a column or field from the imported data, and the corresponding value holds the actual data for that field.
Here’s how the general format can be structured:
1. Accessing Row Data:
Each column in the row is accessed using its key in the $row array.
$manufacturerName = $row[‘manufacturer_name’]; // Access the ‘manufacturer_name’ field
2. Modifying Row Data:
You can modify the data by updating the corresponding key in the $row array.
// Remove any extra $ symbol from the manufacturer name
$row[‘manufacturer_name’] = str_replace(‘$’, ”, $row[‘manufacturer_name’]);
3. Using Allowed PHP Functions:
The script can only use PHP functions from the predefined whitelist, which covers common operations like string manipulation, math, array handling, and date functions.
Example using string manipulation:
// Convert a string to lowercase
$row[‘options’] = strtolower($row[‘options’]);
4. Conditionally Modifying Data:
You can add logic to check conditions and modify values accordingly.
// Increase stock by 10 if it’s greater than 0
if (isset($row[‘stock’]) && $row[‘stock’] > 0) {
$row[‘stock’] += 10;
}
5. Performing Calculations:
Calculations can be performed on numerical data in the row.
// If price_gross is 0, set it as net * 1.19
if (isset($row[‘price_gross’]) && $row[‘price_gross’] == 0) {
$row[‘price_gross’] = $row[‘net’] * 1.19;
}
6. Returning the Modified Row:
After performing all modifications, the script doesn’t need to explicitly return anything as the $row is passed by reference, meaning changes to the $row will automatically reflect in the system.
Example of a Full Script
|
1 2 3 4 5 6 7 8 9 10 11 12 13 14 15 16 17 18 19 20 21 22 23 24 25 26 27 28 29 30 31 32 33 34 35 36 37 38 39 40 41 |
// Remove any extra $ symbols from manufacturer_name $row['manufacturer_name'] = str_replace('$', '', $row['manufacturer_name']); // Remove spaces and replace ';' with '|' in options $row['options'] = str_replace(';', '|', trim($row['options'])); // Increase stock by 10 if (isset($row['stock'])) { $row['stock'] += 10; } // Set price_gross to net * 1.19 if price_gross is 0 if (isset($row['price_gross']) && $row['price_gross'] == 0) { $row['price_gross'] = $row['net'] * 1.19; } // Replace commas with '|' in keywords $row['keywords'] = str_replace(',', '|', $row['keywords']); // Join meta_title and name fields $row['meta_title'] = $row['meta_title'] . ' ' . $row['name']; |
Key Points
- $row is an associative array where each key represents a field/column of the row.
- You can access and modify the row data using $row[‘column_name’] where column name is an actual column name from the imported file.
- Only a whitelist of PHP functions is allowed, ensuring the script stays secure.
- The modifications made to $row are automatically reflected in the import process.
By following this general format, you can write flexible and secure scripts for row modifications within the constraints of the whitelisted functions.
Product Export: Parent/Variant Filtering
Overview
You can now filter product exports by parent/variant relationships to export only the products you need.
Filter Options
Option 1: Export Only Variants
How to configure:
1. Go to export profile → Advanced Filters
2. Select field: parent_id
3. Select operator: equals
4. Leave value empty (do not enter anything)
5. Save profile
Result: Only variant products will be exported (no parent products)

Option 2: Export Only Parent Products (Without Variants)
How to configure:
1. Go to export profile → Advanced Filters
2. Select field: parent_id
3. Select operator: not equals
4. Leave the value empty
5. Save profile
Result: Only parent products will be exported (no variants)

Option 3: Export Variants from Specific Parent Product
How to configure:
1. Go to export profile → Advanced Filters
2. Select field: parent_id
3. Select operator: equals
4. Enter the UUID of the parent product (e.g., 019527ca391372d5a256adf8a79152a0)
5. Save profile
Result: Only variants of the specified parent product will be exported

Default Behavior
If no parent_id filter is set:
- The app exports parent products with all their variants
- Variants appear immediately after their parent product in the export file
Known Limitation
⚠️ Important: When exporting only variants (Options 1 or 3 above), the parent_sku column will be empty in the export.
Why: The parent_sku field is computed during export and requires loading the parent product data. When you filter for variants only, parent products are not loaded.
Workaround: If you need parent_sku values:
1. Export without filters (gets parents + variants)
2. Filter the results in your spreadsheet/database after export
New Field: price_inherited
Purpose: Clear variant-specific prices and link them to the parent product’s pricing.
Location: Available in the product import mapping step
Usage: Add a price_inherited column to your import file
Accepted Values:
- 1 (recommended)
- true
- Empty/not set (default – keeps variant prices)
How It Works:
When you set price_inherited=1 for a variant product, the import will remove any custom pricing from that variant and link it to inherit all prices from the parent product.
productNumber,name,price_inherited
PARENT-001,Parent Product,
VARIANT-001-RED,Red Variant,1
VARIANT-001-BLUE,Blue Variant,1
In this example:
- Parent product keeps its own pricing
- Red and Blue variants will inherit pricing from PARENT-001
- Any existing variant prices will be cleared
Note: This field only affects variant products. Setting it on parent products has no effect.
Import Advanced Pricing to Shopware 6 with Product Update
It is possible to import advanced pricing to Shopware 6 as part of your product update. The corresponding information can be added to a product CSV in the “advanced_prices” column.
The value in this column should look as follows:
ruleId:046ca0774ef543d8b606c2e2cfd0d43d,currencyId:b7d2554b0ce847cd82f3ac9bd1c0dfca,priceNet:0.8,priceGross:0.8,listPriceNet:1.0,listPriceGross:1.19,quantityStart:6,quantityEnd:|ruleId:046ca0774ef543d8b606c2e2cfd0d43d,currencyId:b7d2554b0ce847cd82f3ac9bd1c0dfca,priceNet:0.9,priceGross:0.9,listPriceNet:1.1,listPriceGross:1.31,quantityStart:3,quantityEnd:5|ruleId:046ca0774ef543d8b606c2e2cfd0d43d,currencyId:b7d2554b0ce847cd82f3ac9bd1c0dfca,priceNet:1,priceGross:1,listPriceNet:1.2,listPriceGross:1.43,quantityStart:1,quantityEnd:2
This complex value consists of attributes and values that describe multiple rules or price tiers. Tiers are separated by a pipe (“|”), and the attributes within each tier are separated by a comma (“,”).
The value above represents the following three price tiers:
- The price is 1 Euro (with list price 1.2 Euro) if a customer orders 1-2 items.
- The price is 0.9 Euro (with list price 1.1 Euro) if a customer orders 3-5 items.
- The price is 0.8 Euro (with list price 1.0 Euro) if a customer orders 6 or more items.
Below, you’ll find a description of each advanced pricing import attribute for Shopware 6.
| Column Name | Description | Value |
| ruleId | The alphanumerical rule ID used in Shopware. | 046ca0774ef543d8b606c2e2cfd0d43d |
| currencyId | The alphanumerical currency ID used in Shopware. | b7d2554b0ce847cd82f3ac9bd1c0dfca |
| priceNet | A product net price used in this rule. | 0.8 |
| priceGross | A product gross price used in this rule. | 0.8 |
| listPriceNet | A product list net price (MSRP/RRP before discount) used in this rule. Optional. | 1.0 |
| listPriceGross | A product list gross price (MSRP/RRP before discount) used in this rule. Optional. | 1.19 |
| quantityStart | The minimum amount of items that should be purchased to apply the rule. | 6 |
| quantityEnd | The maximum amount of items that should be purchased to apply the rule. Leave blank to set the upper limit to infinity. | 8 |
Important Notes:
- You can provide only priceNet OR priceGross – the system will automatically calculate the missing value using the product’s tax rate.
- You can provide only listPriceNet OR listPriceGross – the system will automatically calculate the missing value using the product’s tax rate.
- For automatic tax calculation to work, the product must already exist in Shopware with an assigned tax rate.
- listPriceNet and listPriceGross are optional fields used to show customers the original price before discount (commonly known as MSRP or RRP).
Note that you can replace the existing advanced prices with the ones specified in your CSV by activating the Replace Advanced Prices feature.
Product Import Behavior Control
The Product Import Behavior Control feature lets you decide how the system should handle existing products during import. This setting applies to both parent products and their variants. This gives you more control over bulk operations and helps prevent accidental overwrites.
Import Behavior Options
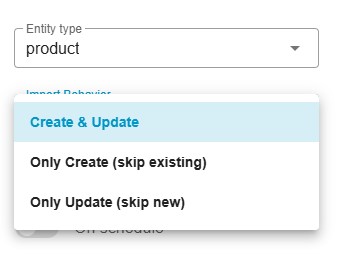
When creating or editing a Product import job, you will see a new Import Behavior selector in the Import Wizard. Three modes are available:
- Create & Update (default) — Imports all products from the file.
New products are created, and existing products are updated. - Only Create — Imports only products that do not yet exist in the system.
Any product that already exists is skipped. - Only Update — Updates only existing products.
New products found in the file are ignored.
Select the behavior that best matches your workflow.
How It Works
1. Create & Update (Default)
Description: Creates new products and updates existing ones (standard behavior)
How it works:
- If a product doesn’t exist → Creates it
- If a product exists → Updates it
- Applies to both parent products AND variants
Use Cases:
- Regular imports where you want to sync all data
- Full product catalog updates
- Initial imports and subsequent updates
Variant Behavior:
- New parent products are created with their variants
- Existing parent products are updated
- Existing variants are updated with new data
- New variants are added to existing parents
2. Only Create (Skip Existing)
Description: Only creates new products. Skips existing products and variants.
How it works:
- If a product doesn’t exist → Creates it
- If a product exists → Skips it entirely
- Applies to both parent products AND variants
Use Cases:
- Adding new products without touching the existing catalog
- Importing new product lines while keeping current data intact
- Preventing accidental overwrites during catalog expansion
Variant Behavior:
- New parent products are created with all their variants
- Existing parent products are skipped (no updates, no new variants added)
- If parent exists but variant doesn’t → Variant is still skipped (because parent is skipped)
- This mode is conservative: it won’t modify existing product structures
Important: This mode checks existence at the parent product level. If the parent exists, the entire product (including any new variants) is skipped.
3. Only Update (Skip New)
Description: Only updates existing products. Skips new products and variants.
How it works:
- If a product doesn’t exist → Skips it
- If a product exists → Updates it
- Applies to both parent products AND variants
Use Cases:
- Updating prices, stock, or descriptions for existing catalog
- Bulk updates without adding new products
- Maintaining existing catalog structure
Variant Behavior:
- New parent products are skipped (not created)
- Existing parent products are updated
- Existing variants are updated with new data
- New variants for existing parents are skipped (not created)
Important: This mode only updates what already exists. It will not expand your catalog with new products or variants.
Key Points for Variants
- Existence Check: The system determines if a product/variant exists by checking:
- Product Number (SKU)
- EAN/GTIN if configured
- Parent-Variant Relationship:
- Variants are always children of parent products
- Import behavior applies to both levels independently
- In “Only Create” mode: if parent exists, new variants are not added
- In “Only Update” mode: if variant doesn’t exist, it’s not created
- Performance Impact:
- “Only Create” and “Only Update” modes skip existence checks for items that don’t match the criteria
- This can significantly speed up imports for large catalogs
- Data Safety:
- Use “Only Create” when you want to preserve existing product data
- Use “Only Update” when you want to maintain catalog structure
- Use “Create & Update” for full synchronization
Recommendations
- First Import: Use “Create & Update” (default)
- Adding New Products: Use “Only Create” to avoid touching existing items
- Price/Stock Updates: Use “Only Update” to avoid creating duplicates
- Full Sync: Use “Create & Update” for complete data synchronization
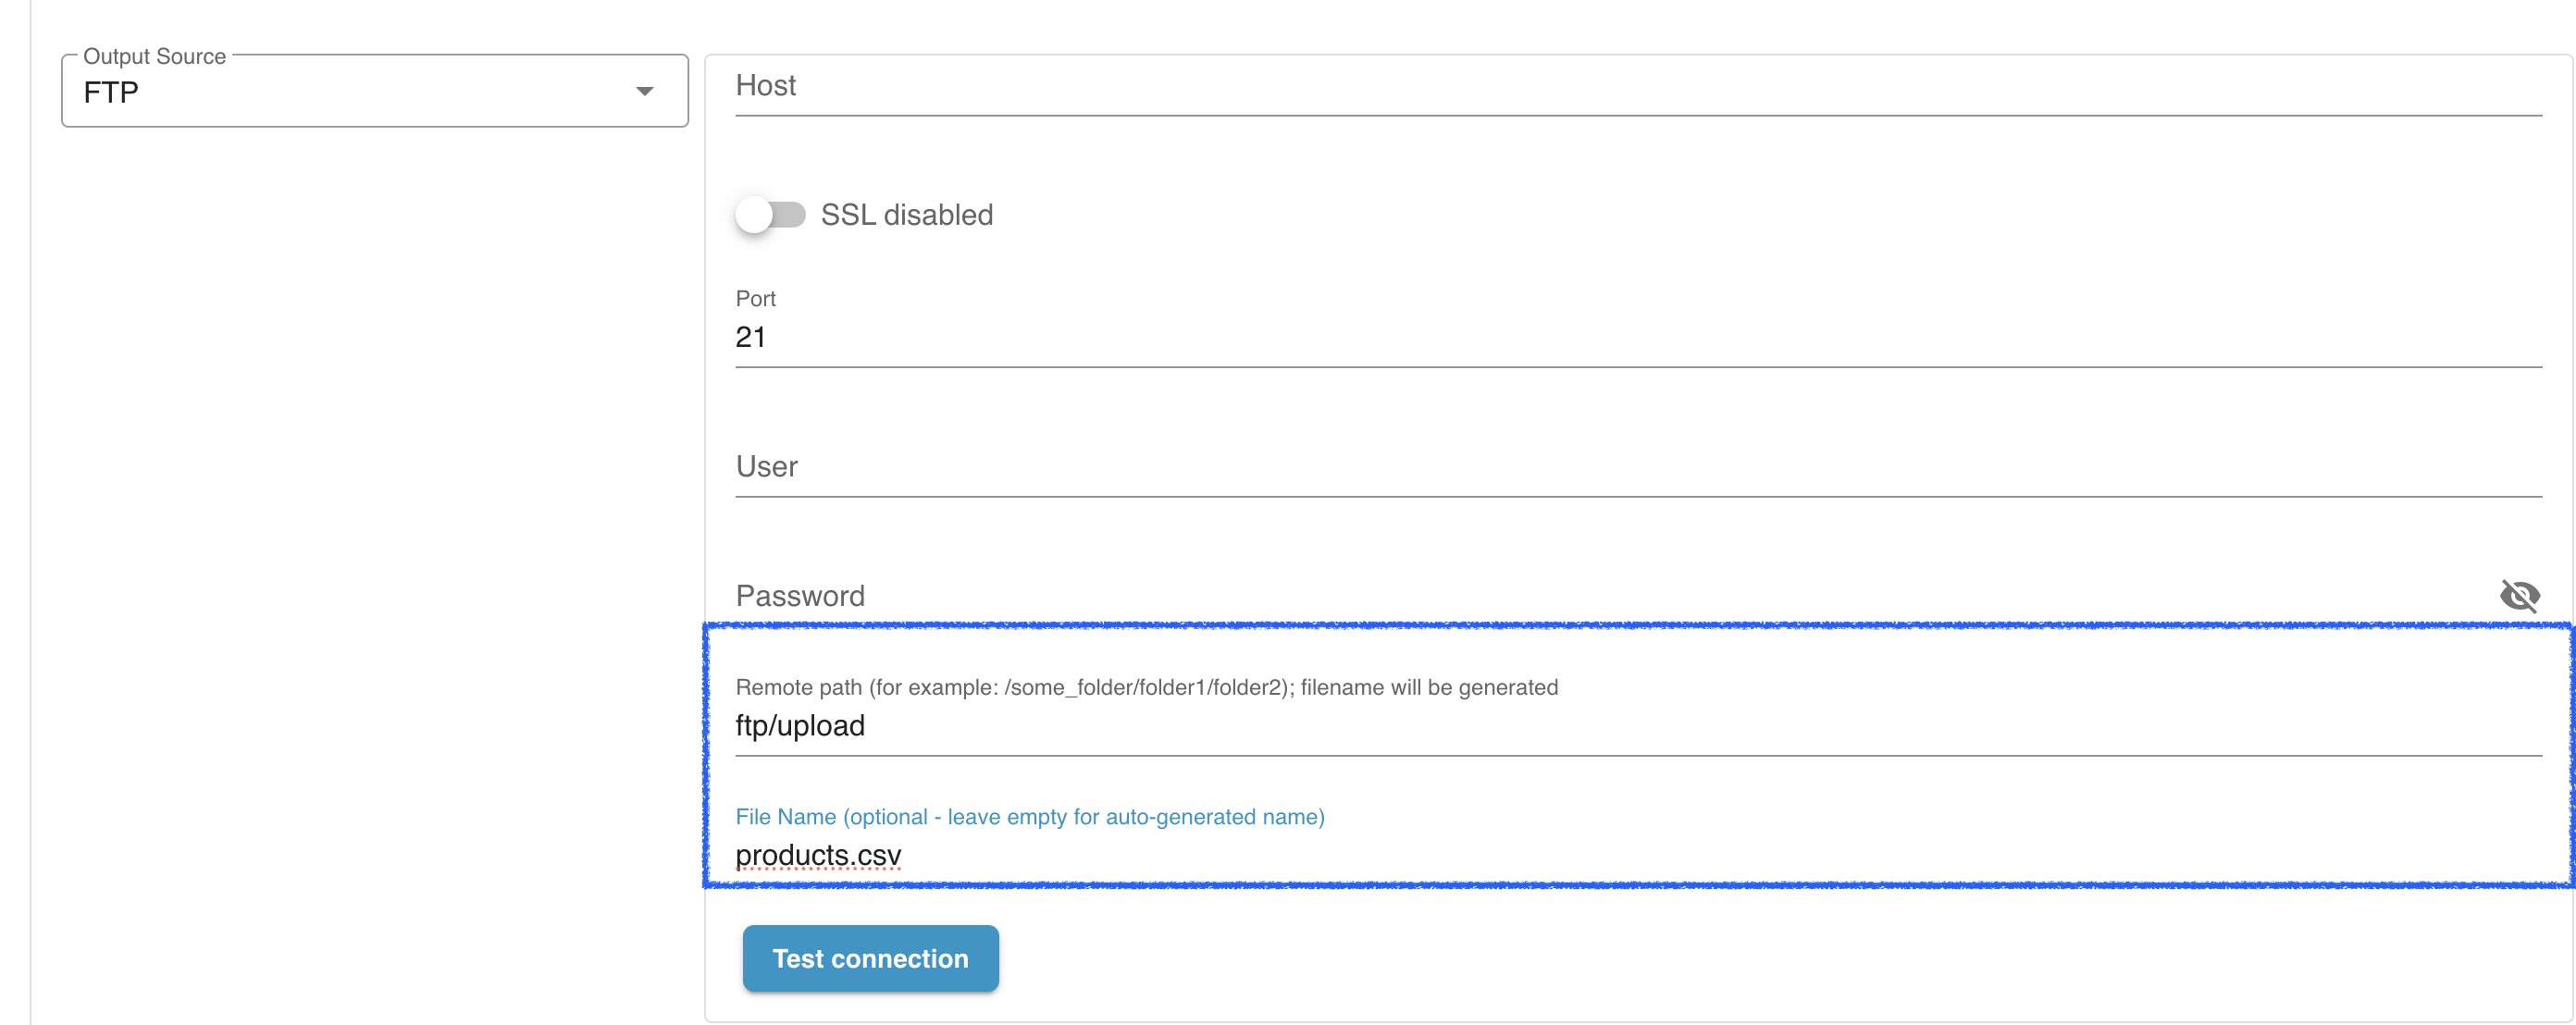
Custom Export File Name (FTP/SFTP)
The Custom Export File Name option allows you to control how export files are named and stored when sending them to an FTP/SFTP destination. This setting is available for all Shopware export jobs.
What This Feature Does
By default, every export job generates a unique file name, usually containing a timestamp. This prevents collisions but can be inconvenient if another system expects a fixed file name.
With the new option, you can set a custom file name that will be used for every export sent to an FTP/SFTP server. When this is enabled, the system always overwrites the existing file on the remote server.
How It Works
You can configure this in any export job that uses FTP or SFTP as the destination.
1. When the field is empty (default)
- The app generates a unique file name for every export.
- Each new file is stored separately on the FTP/SFTP server.
- This is ideal for maintaining a history of exported files.
Example:
products_export_2025-01-10_12-43-21.csv
products_export_2025-01-11_12-43-21.csv
2. When you enter a custom file name
- The app uses exactly this file name for every export.
- The previous file on the remote server is overwritten automatically.
- This is ideal when another system (ERP, BI tool, automation script) always reads the same file.
Example:
Custom name entered: products_latest.csv
Every export will overwrite this file on the server.
Where to Configure
You can find the setting here:
Export Job → Export Destination → FTP/SFTP Settings → Custom File Name
Enter the desired name, including extension (e.g., export.csv, stock.xml, orders.json).
If the field is left empty, the system switches back to auto-generating unique names.
Benefits
- Ensures consistent file names for external integrations.
- Prevents unnecessary clutter on FTP/SFTP servers.
- Provides full control over how export files are stored.
- Reduces manual clean-up when only the latest file is required.
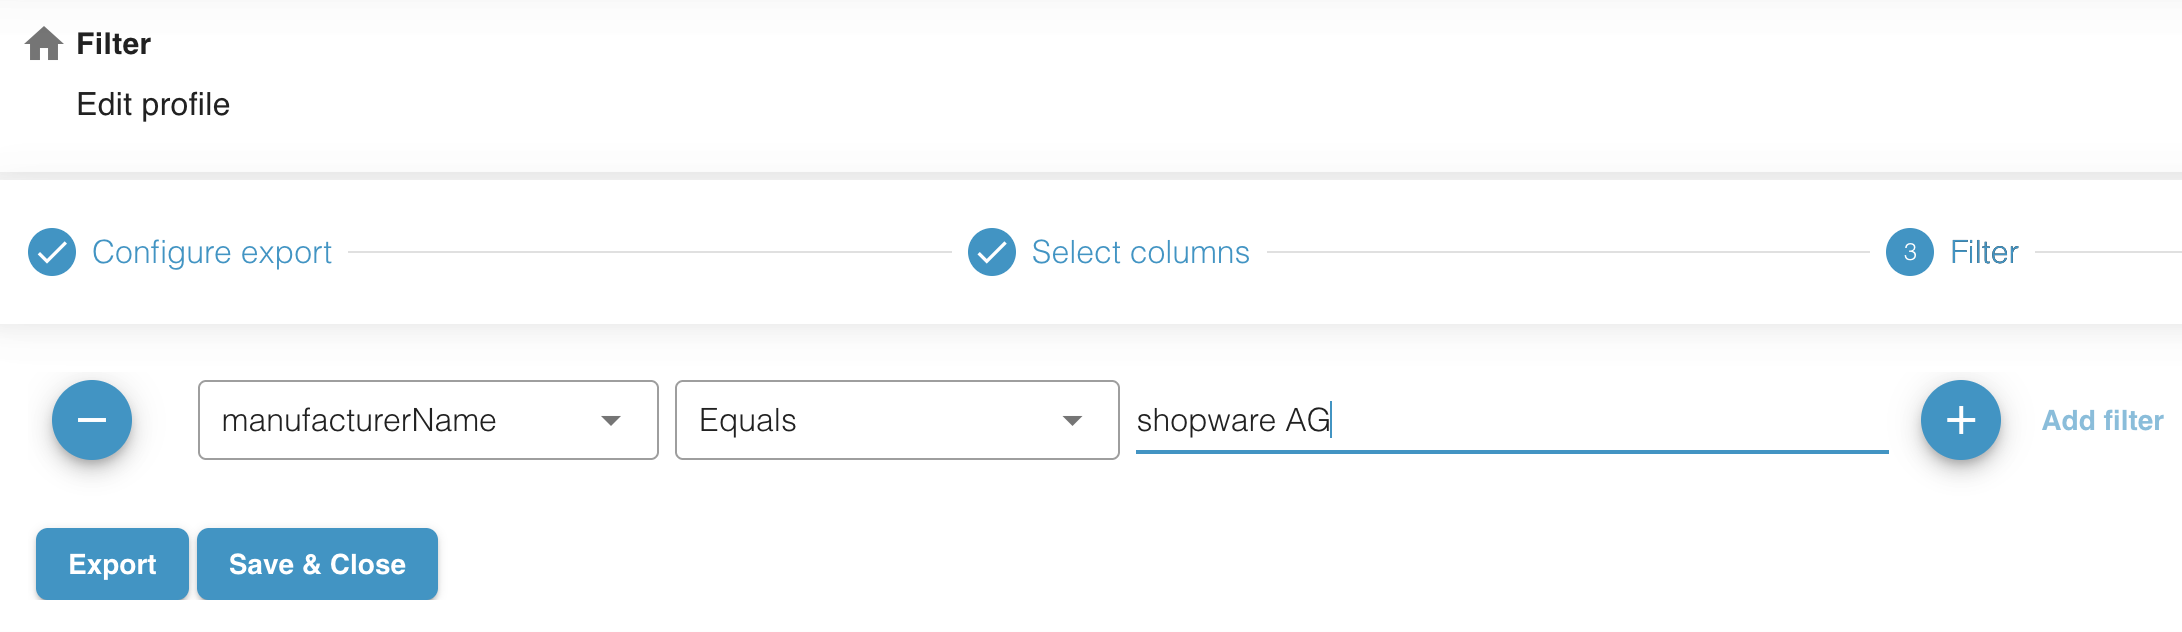
Manufacturer Filter for Advanced Prices Export
The Manufacturer Filter allows you to export Advanced Prices only for products belonging to a specific manufacturer. This helps you generate more targeted export files, reduce data volume, and streamline integrations with external systems.
What This Feature Does
A new filter option — manufacturerName — has been added to the Advanced Prices export. When used, the export job will include only products associated with the specified manufacturer.
This is especially useful when:
- A supplier requests price data only for their products
- You manage multiple brands and need separate pricing files
- External systems import prices per manufacturer
- You want to reduce export size during testing
How It Works
The filter accepts one manufacturer name as the filter value.
The name must match the manufacturer defined in your Shopware catalog.
Example
If you enter:
manufacturerName: “Nike”
The export will include only Advanced Prices for products whose manufacturer is set to Nike in Shopware.
If you leave the filter empty, the export includes all manufacturers.
Where to Configure
You can use the filter in any Shopware Advanced Prices export job:
Export Job → Filters → Advanced Prices → manufacturerName
Enter the manufacturer name exactly as it appears in your Shopware admin.
Limitations
- The filter currently supports one manufacturer value per export job.
- Multiple manufacturers (e.g., Nike, Adidas) are not supported yet.
- If the name does not match any manufacturer, the export will return an empty dataset.
Benefits
- More precise control over Advanced Prices export
- Smaller, cleaner export files
- Simplified integration with vendor-specific pricing workflows
- Less post-processing required when working with multi-brand catalogs
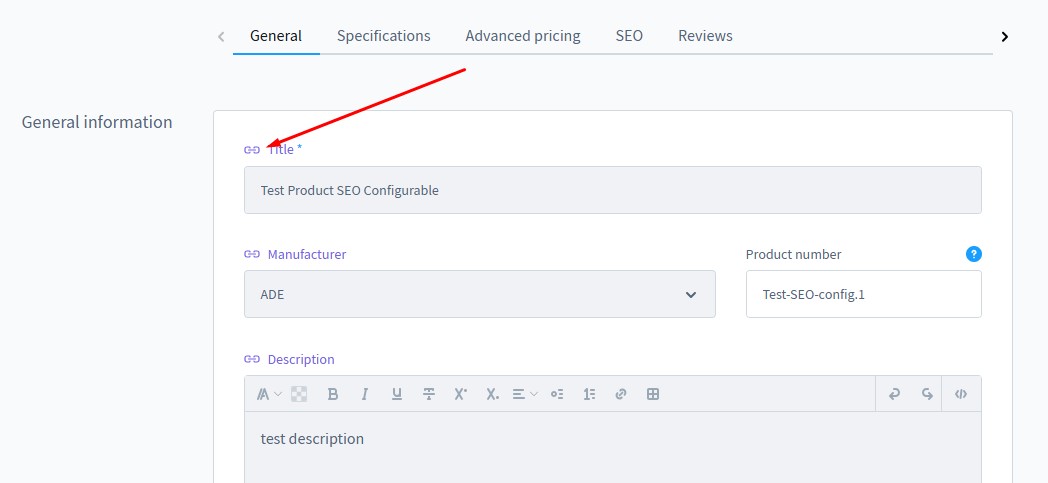
Inherited Fields and the “Preserve Empty Values” Option
In Shopware 6, variant products can inherit certain values from their parent product. When a field is in an inherited state, the variant does not store its own value — instead, it automatically uses the value defined on the parent product.
In the admin interface, such fields are marked with a link icon, indicating that inheritance is active.
The “Preserve empty values” option in the import configuration allows you to control this inheritance behavior during import.
![]()
When this option is enabled, you can explicitly set a product field to inherited for a variant by marking it as empty in the import file.
As a result, the variant will take its value from the parent product instead of storing its own value.
How it works during import
To make a variant field inherited from a parent product via Shopware 6 import, follow these steps:
- Enable the “Preserve empty values” option in the import profile.
- In the import file, set the target field value to __EMPTY__VALUE__.
- During import, our app will interpret this as:
- The field should remain empty on the variant.
- The inherited state stays active.
- The value will be taken from the parent product.
This behavior mirrors clicking the link (inheritance) icon in the Shopware admin manually.
Important limitations
This mechanism works only for basic product fields, such as:
- Name
- Description
- Manufacturer
- Other core product attributes
It does not apply to associations.
If the “Preserve empty values” option is disabled, empty values in the import file may overwrite existing data instead of preserving inheritance.
Practical use case
This feature is especially useful when importing or updating variants where:
- The parent product contains the canonical data.
- Variants should not override those values.
- You want to restore or maintain inheritance automatically via import, without manual edits in the admin UI.
By combining “Preserve empty values” with the __EMPTY__VALUE__ placeholder, you can precisely control whether a variant uses its own value or inherits data from its parent product — fully aligned with Shopware 6’s native inheritance model.
Customer Filter By Sales Channel
Customer export lets you filter customers during export by a specific sales channel, similar to product filters. You can do that as follows:
- Go to Export Jobs → create or edit a profile.
- Select Customer as the entity.
- Open Filters.
- Create a Sales Channel filter → choose saleChannelId and select one or multiple sales channels.

Only customers assigned to the selected sales channel(s) will be included in the export.
A possible use case is exporting B2B customers from a specific storefront.
FTP/SFTP Filename Pattern Support
Import jobs can now detect files using filename patterns, not just exact names.
Workflow
- Configure FTP/SFTP as the data source.
- Set the import directory path, for example:
/fullupdate/ - Define a filename pattern using *, for example:
shopware_6_import_file_*.csv
How it works
- All files matching the pattern are detected.
- If multiple files match, only the most recently modified file is processed.
Result
Timestamped files like shopware_6_import_file_2026-01-07–11-53-00.csv are handled automatically without manual renaming.
Automated Post-Processing Of Import Files
After successful processing of an import file via FTP/SFTP, the file is automatically moved, deleted, or marked according to defined rules.
Workflow
- Edit an Import Profile.
- Open File Post-Processing Settings.
- Choose one action:
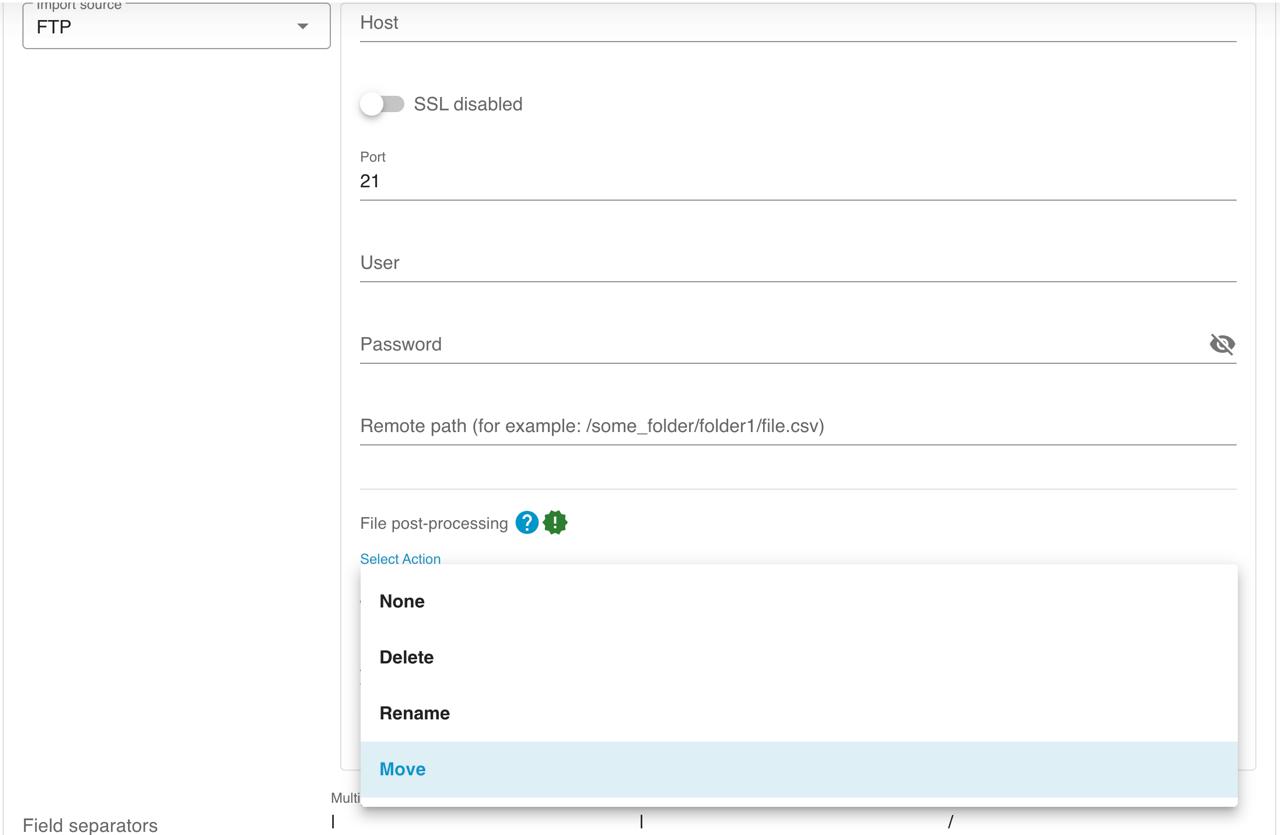
- Move file to archive/success directory;
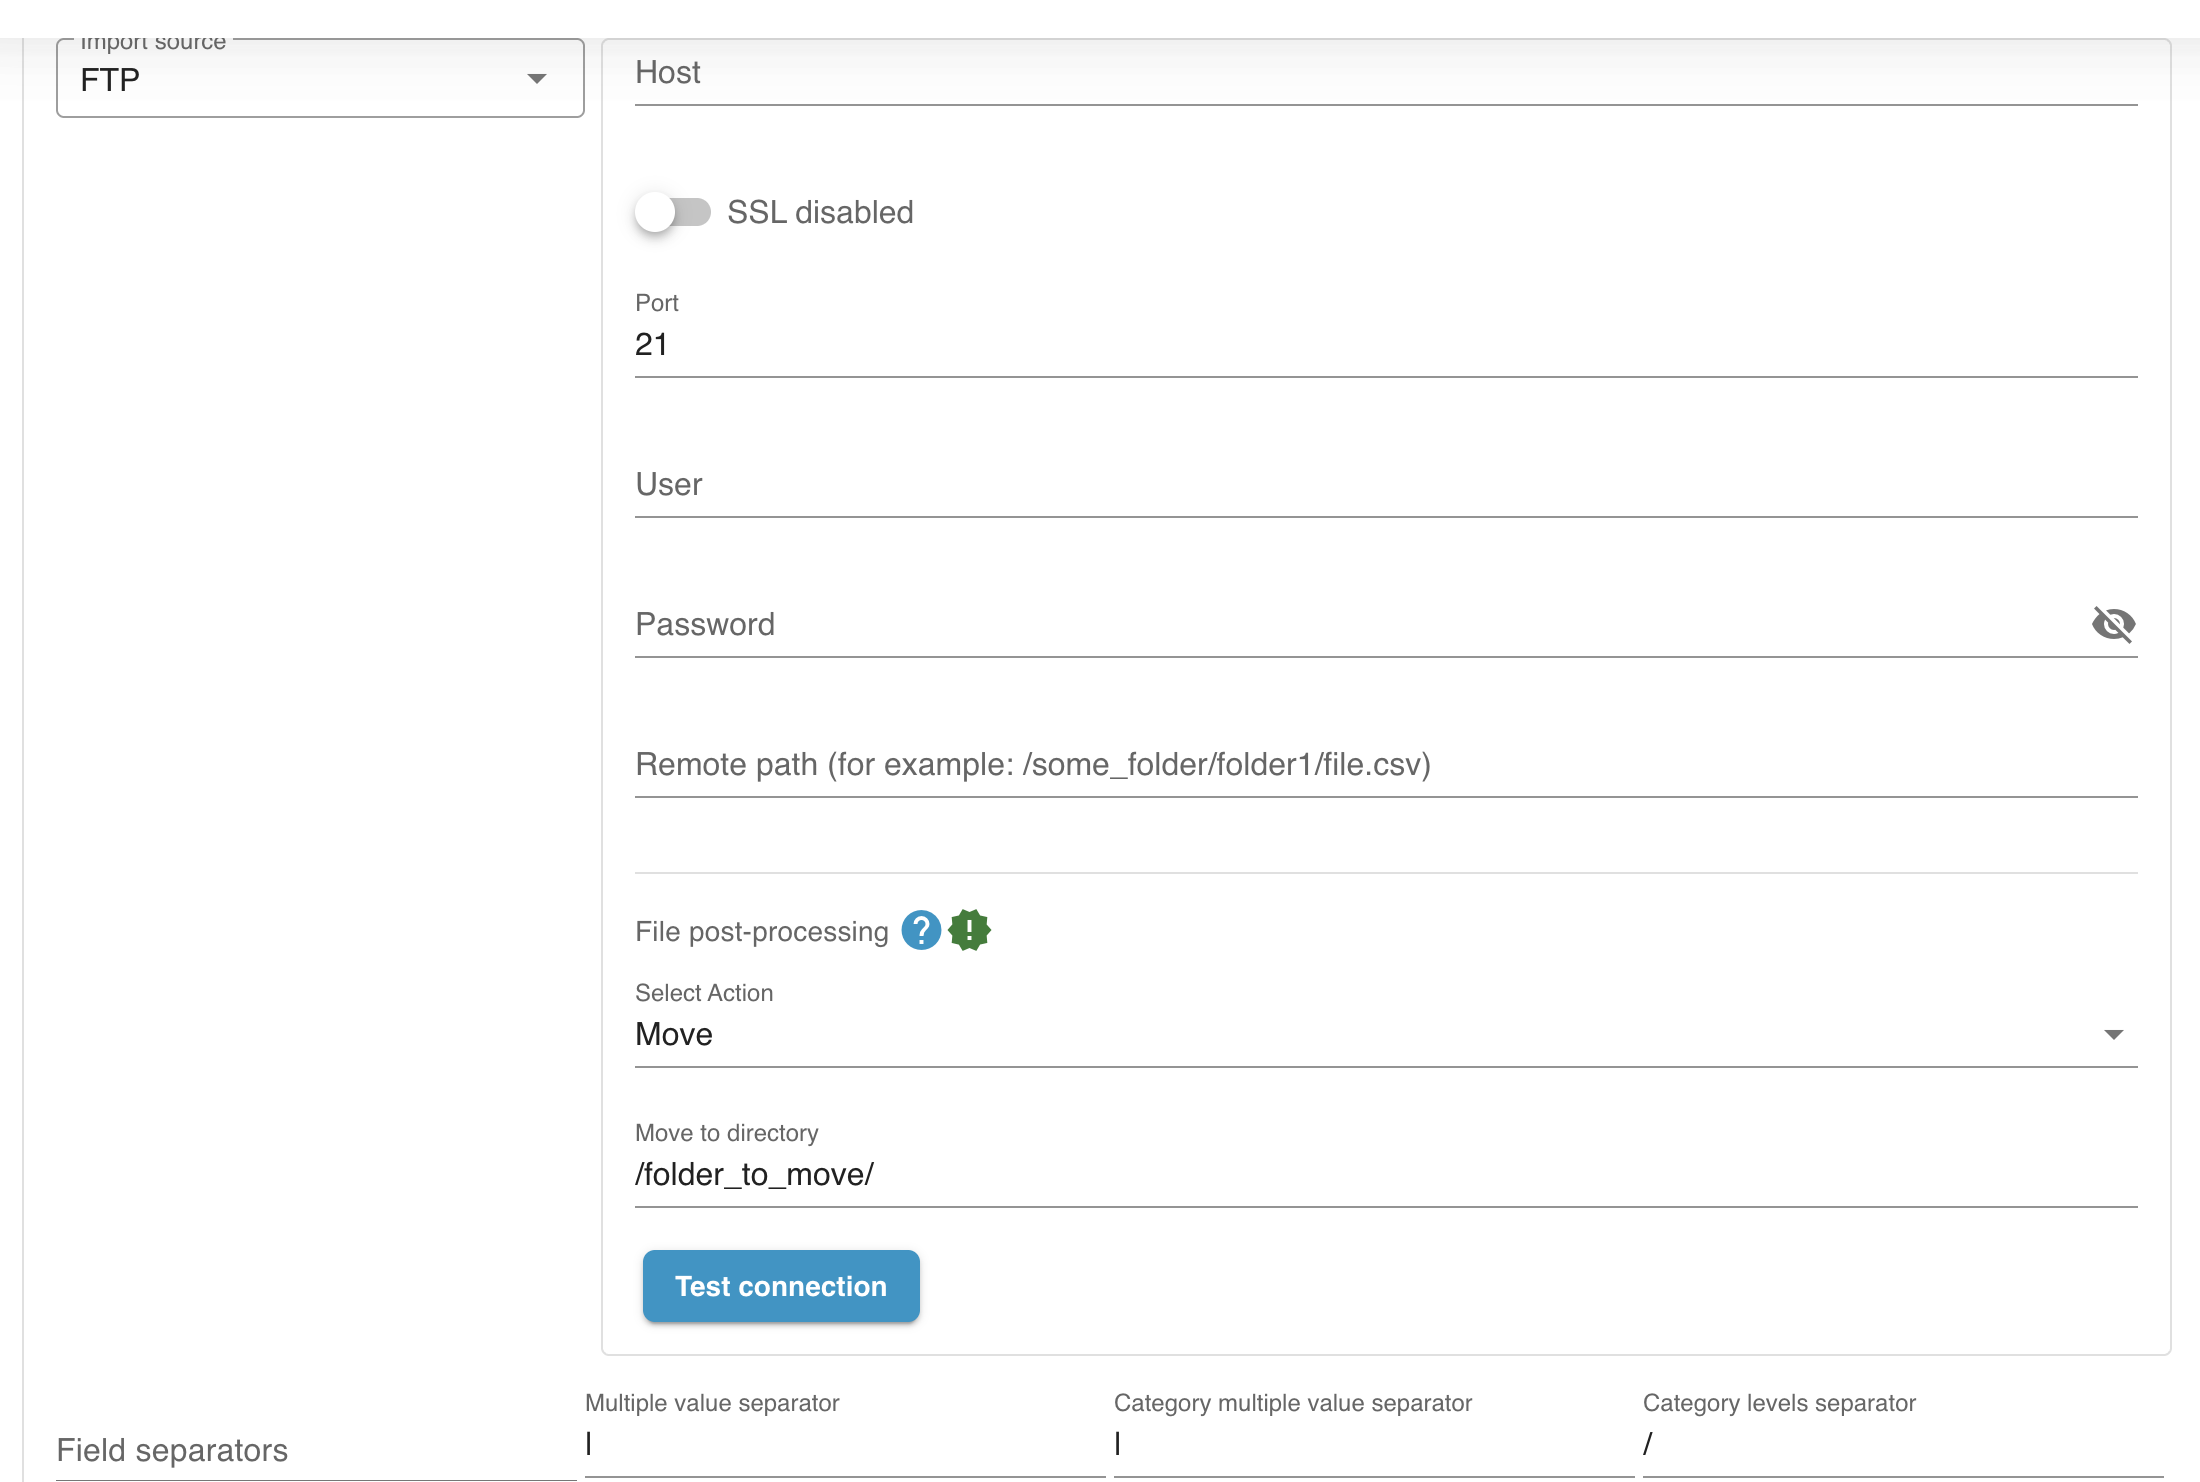
- Delete the file after successful import;
- Rename file (e.g. add _processed);
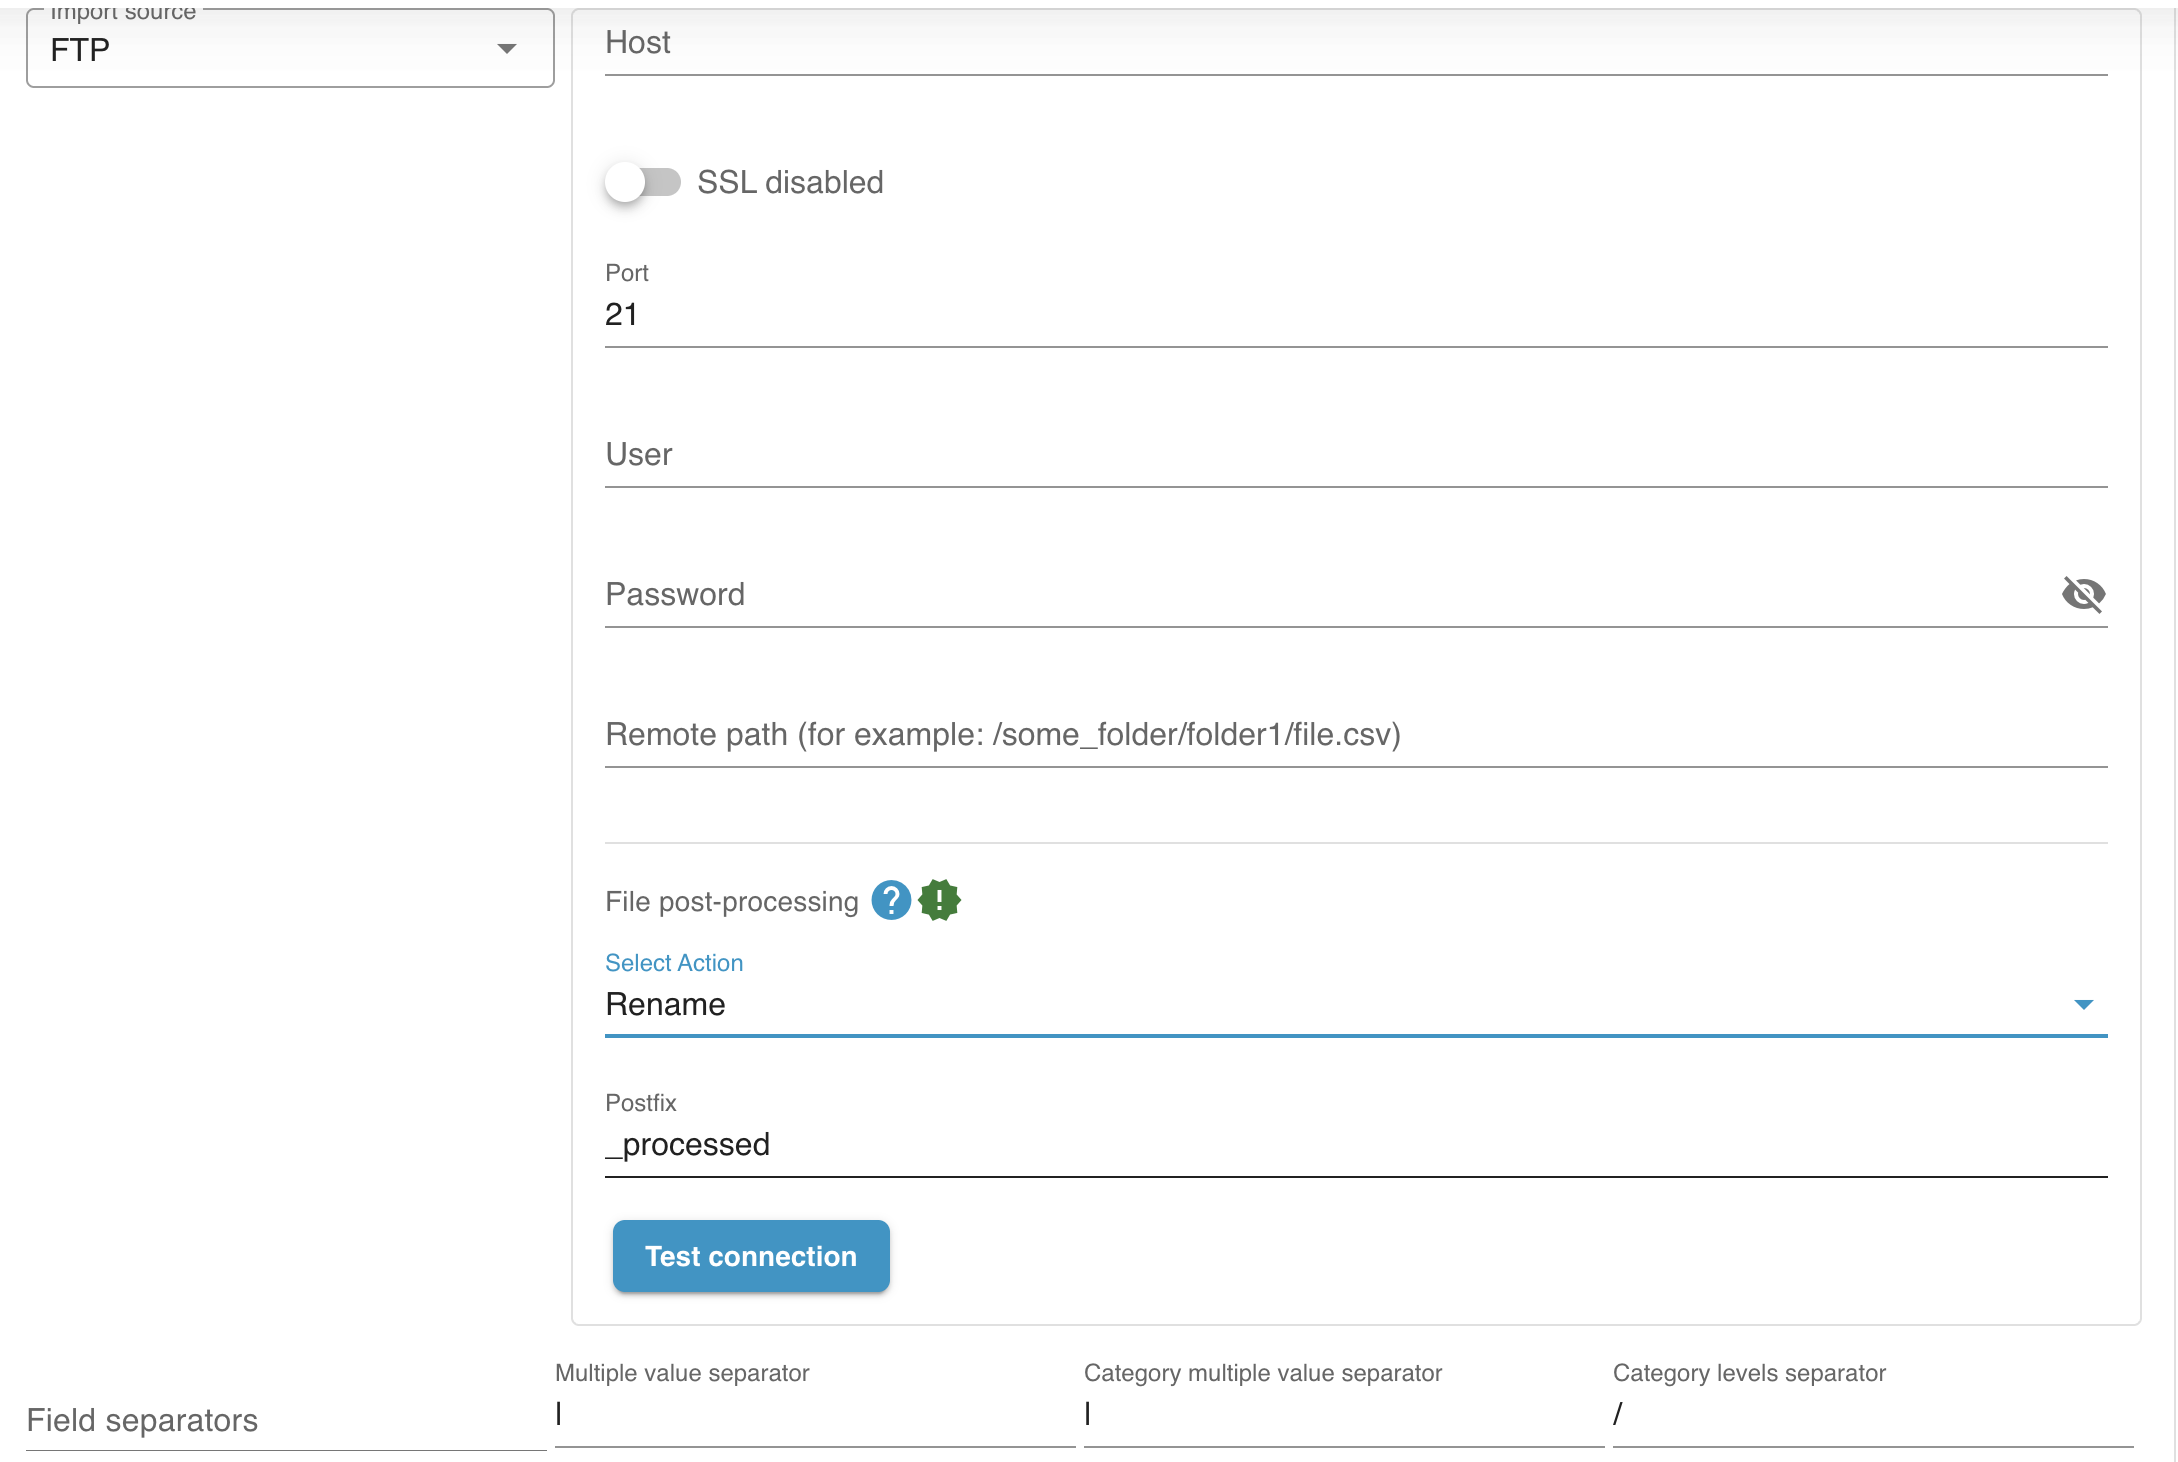
- Move file to archive/success directory;
Result
- The import directory always contains only unprocessed files.
- Duplicate imports are prevented.
- Imports run in a controlled, sequential order.
Organize Product Media By Manufacturer Folders
Imported product images can now be stored in manufacturer-based subfolders.
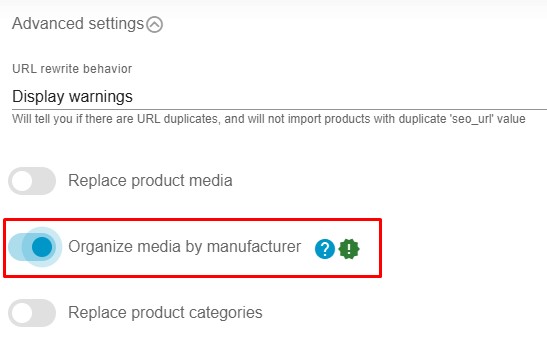
Workflow
- Edit a Product Import Profile.
- Enable Organize media by manufacturer.
- Run the import.
How it works
- Subfolders are created automatically inside the default product media folder.
- These subfolders are named after Manufacturer names.
- Product media are imported into the appropriate manufacturer’s media folder based on the product manufacturer value.
- If manufacturer data is missing, media is stored in the default folder.
Notes
- The feature is disabled by default.
- Uses caching and batch processing for performance.
- Import time impact is below 5%.
Trigger Export Profiles Via Shopware Flows
Export profiles can now be executed automatically using Shopware 6 Flow Builder.
Workflow
- Go to Settings -> Flow builder and add a new flow.
- On the Flow tab, select Order Placed Event (Order – Payment Method – Placed)
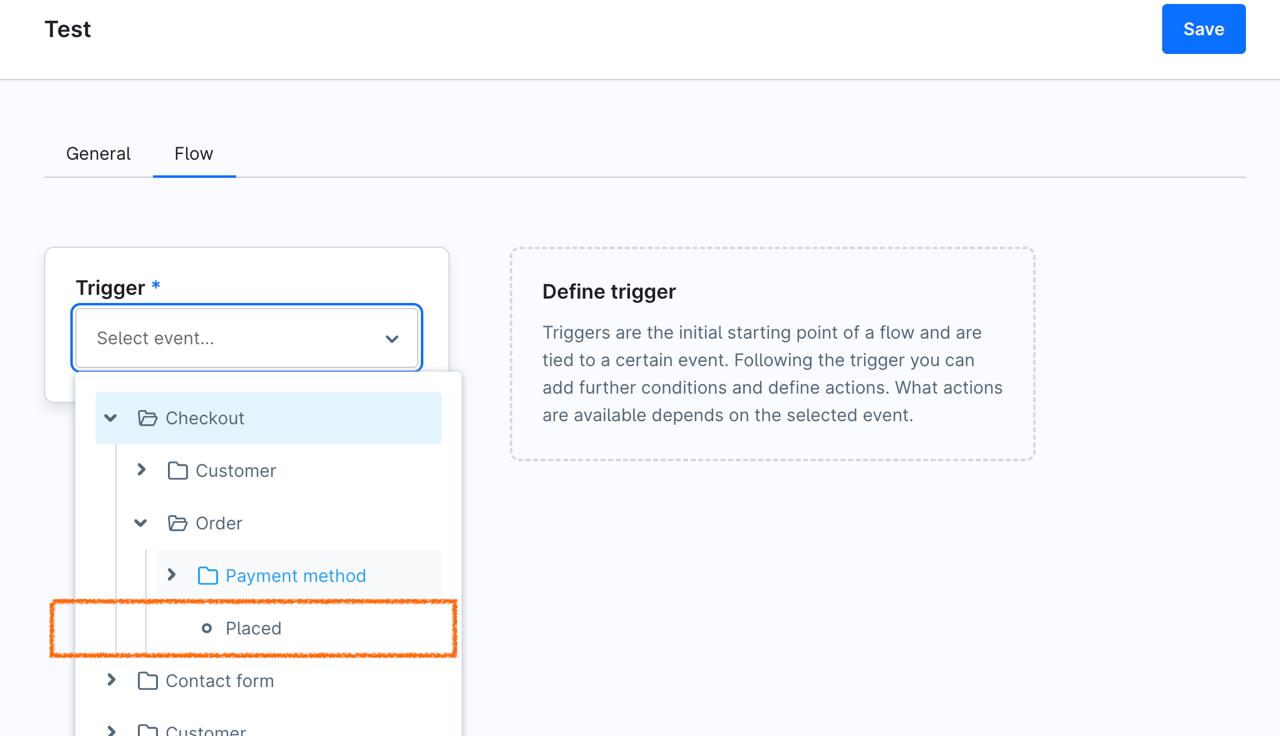
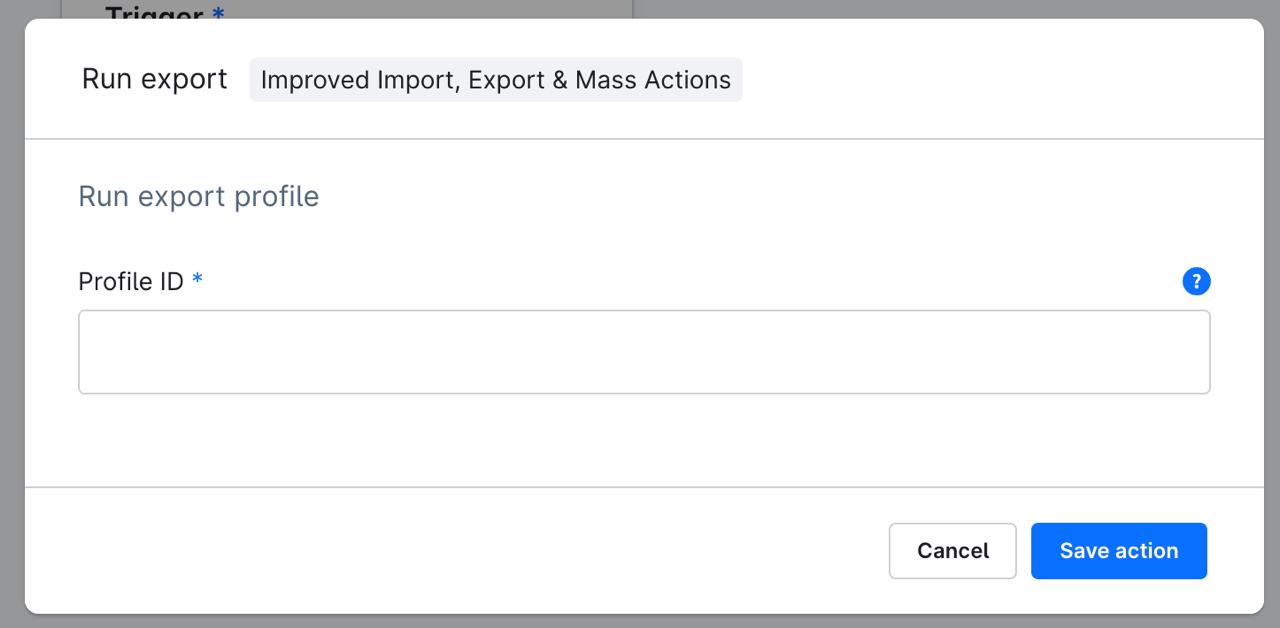
- Add a new Action and select Run Export.
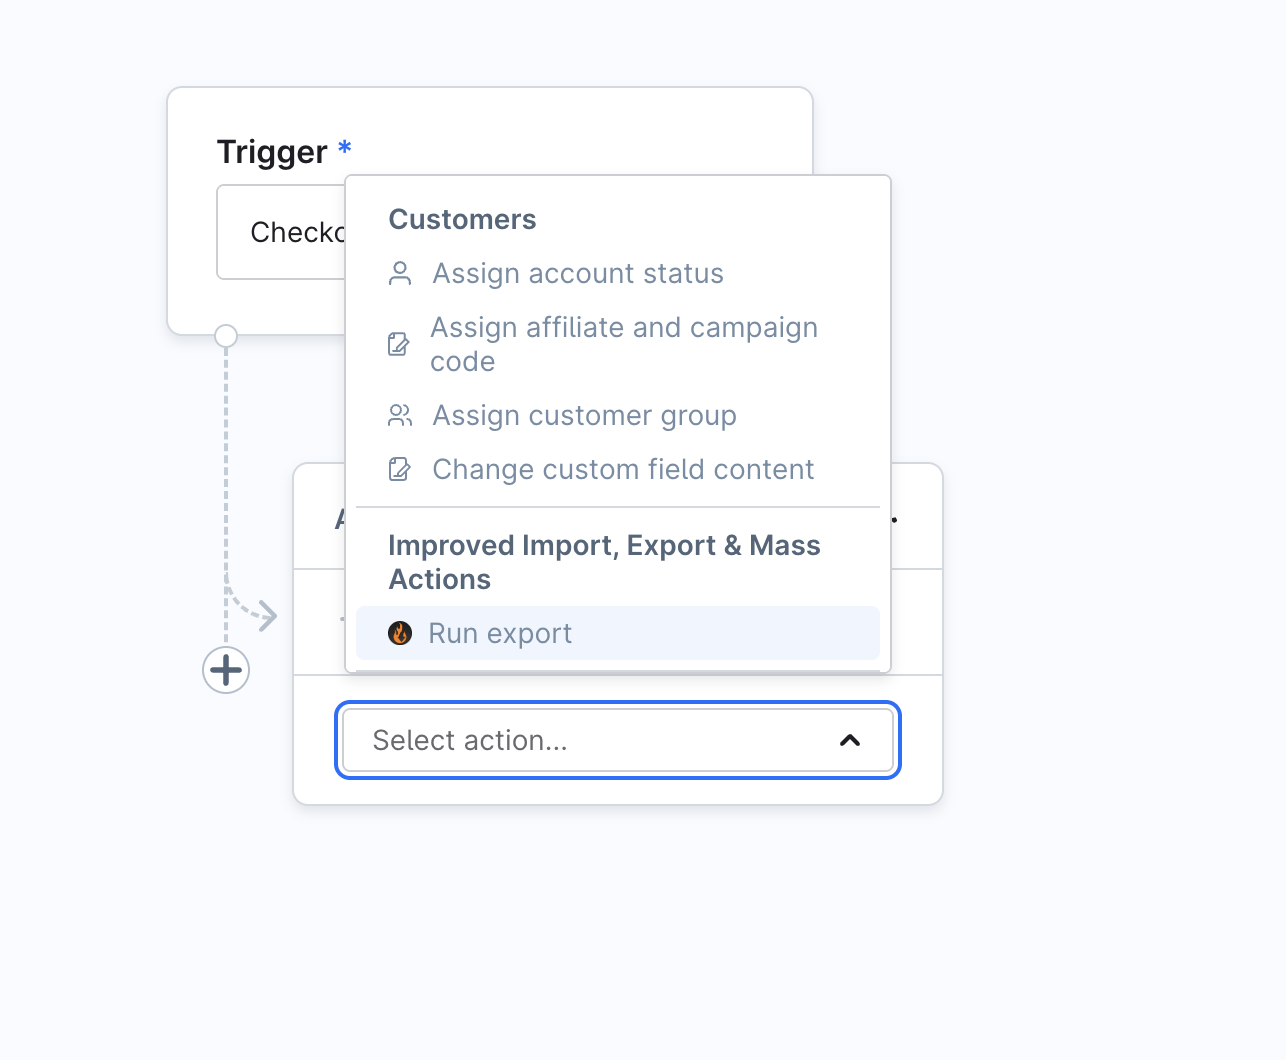
- After that, you will need to specify the export profile ID.
- Next time an order is placed in the store, this profile will be run automatically.
Note that you can configure the export profile to export delta changes only to transfer only newly placed orders.
Salutation Support For Customer And Address Import
Customer and address imports now support salutations.
Supported fields
- salutationId — UUID value
- salutation — text value (e.g. Mr., Ms.)
Workflow
- Add one of the fields to your import file.
- Map the field during profile configuration.
- Run the import.
Behavior
- If salutationId is provided, it is used directly.
- If salutation text is provided, the system resolves it automatically.
- Works for:
- Customers
- Billing addresses
- Shipping addresses
Address field names are: addresses.salutation and addresses.salutationId. for reference.
Product Export Filters By created_at and updated_at
Product exports now support date-based filters.
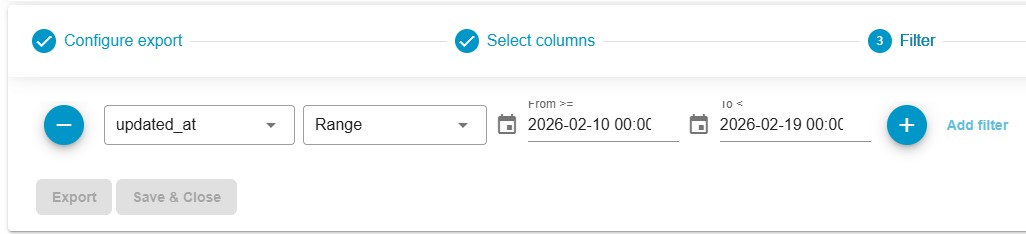
Workflow
- Create or edit a Product Export Profile.
- Open Filters.
- Select:
- created_at, or
- updated_at
- Choose Equals to select a specific date or choose Range to specify a range.
- A calendar date picker appears.
- Define the date or date range.
- Run the export.
Result
Only products created or updated within the selected period are exported.
Use case
Incremental exports, catalog synchronization, and change-based integrations.
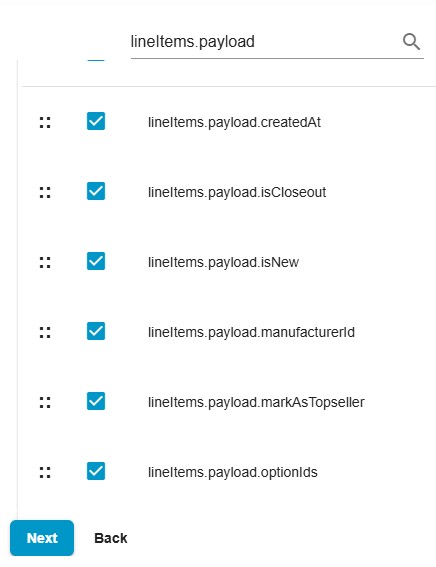
Export Order Line Item Payload Fields
This feature allows you to export product information from Shopware orders stored in dynamic line item payload fields.
Although products are stored inside the order’s line item payload, by default, this data is not visible in exports. You can now include it.
Export Order Line Item Payload Fields Workflow
- Open or create an Order Export Profile.
- Go to Step 2 – Mapping.
- The app loads one random order from Shopware.
- All top-level payload fields from order line items are automatically detected.
New dynamic fields appear using this pattern:
lineItems.payload.FIELD_NAME
Example:
lineItems.payload.productNumber - Select or deselect the payload fields you want to export.
- Save and run the export.
Important Notes
- Only top-level scalar payload fields are added automatically:
- string
- number
- boolean
- null
- Nested objects and arrays are not added.
Exported column names keep the exact format:
lineItems.payload.FIELD_NAME - The scope applies to the Shopware export only.
- No changes for Shopify or import logic.
Refunded product information stored inside order line item payload becomes available in the export file for reporting and analysis.
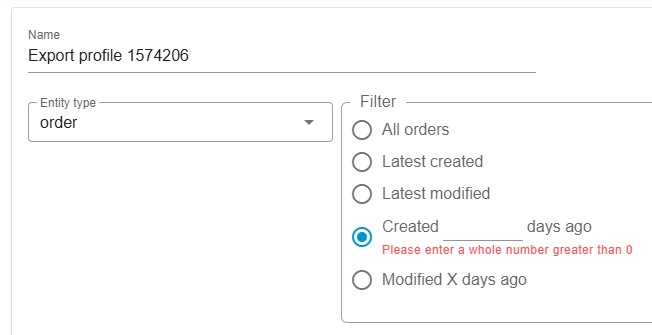
Export Last X Days Orders
You can now export orders created or modified within the last X days, where X is defined by the user.
This extends the existing delta export functionality.
Export Last X Days Orders Workflow
To export orders created or modified X days ago, follow these steps:
- Open an Export Profile.
- Set Entity → Orders.
- In the Filter section, select:
- Created X days ago — exports orders created in the last X days.
- Modified X days ago — exports orders modified in the last X days.
The X placeholder becomes a small numeric input field.
- Enter an integer value greater than 0.
- Configure other parameters, save and run the export.
Filtering Behavior
If X is provided:
- The app ignores the previous export run date.
The filter is calculated as:
current profile run datetime – X days - A new relative time window is calculated for each run.
Validation and Fallback Logic
- The input accepts whole numbers greater than 0.
- If the selected X-days option has no valid value:
- A validation message is shown.
- The system falls back to existing behavior:
- Latest created
- Latest modified
Restrictions
The X-days options follow the same delta export restriction as existing latest-created/latest-modified filters (orders_delta_export feature).
Example
- Today: Feb 17, 15:00
- X = 7
- Filter: Modified X days ago
Export includes orders updated after Feb 10, 15:00
Export Customer Comment for Shopware Orders
The Shopware order field customerComment is now available for export and filtering.
Workflow
- Open or create an Order Export Profile.
- Go to Mapping.
- Find and select: customerComment

- Optionally use it in Export Filters.

- Run the export.
Result
- customerComment is included in Shopware order export files.
- The field can be used in filters.
- Existing export behavior remains unchanged for other fields.
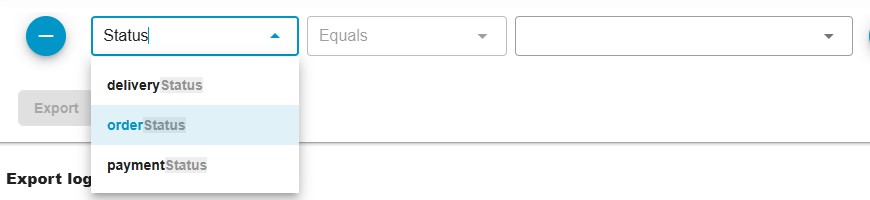
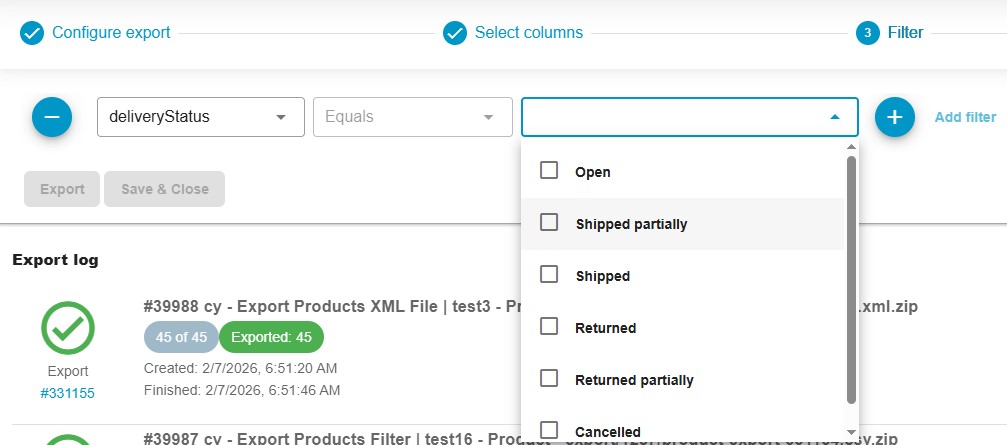
Order Export Filters for Order, Delivery, and Payment Statuses
Starting from version 1.0.57, the order export functionality has been enhanced with dedicated status-based filters. These filters allow you to precisely control which orders are included in the export based on:
- Order status (order.state)
- Delivery status (order_delivery.state)
- Payment status (order_transaction.state)
The new filters are implemented as hardcoded dropdown lists in the export profile configuration, ensuring consistency with Shopware’s internal state machine values.
How It Works
When configuring an Order Export job on the Filter tab, you will now find three separate dropdown filters:
- orderStatus
- deliveryStatus
- paymentStatus
Each filter provides a fixed list of available states retrieved from Shopware’s state machine configuration.
This guarantees that the export criteria rely on stable technical identifiers rather than translated labels.
Technical Details
- Filters are based on Shopware’s State Machine.
- The system uses technicalName values for filtering to ensure reliability across languages and environments.
- The dropdown lists are fixed to prevent invalid state selection.
- Filtering applies before export generation, reducing unnecessary processing and improving performance.
Practical Use Cases
You can now export:
- Only completed orders
- Orders with shipped deliveries
- Orders with paid transactions
- Any combination of order, delivery, and payment states
This allows for more precise integrations with ERP, accounting systems, fulfillment providers, or reporting tools.
Products Delta Export (“Last X Days” Support)
Version 1.0.57 introduces delta export support for products, mirroring the previously available delta logic for orders.
You can now export only products that were:
- Created within the last X days
- Modified within the last X days
This enables incremental synchronization instead of full product exports.
How It Works
When configuring a Product Export job, you can now:
- Enable the delta filter.
- Specify a relative time range (e.g., last 3, 7, or 30 days).
- Choose whether to filter by:
- Creation date
- Modification date
The system uses the following Shopware fields:
- createdAt
- updatedAt
These fields determine whether a product qualifies for inclusion in the export.
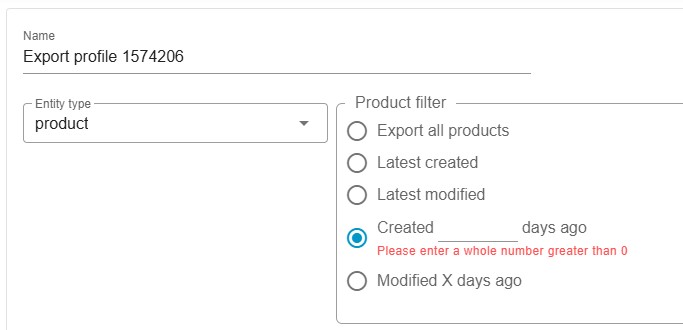
“Latest Created/Updated” Behavior
If you use the “latest created/updated” export mode:
- After each export execution,
- The product entity filter is automatically updated,
- So that the next export only includes newly created or modified products.
This ensures consistent delta behavior without manual intervention.
Consistency with Orders Delta Export
The implementation follows the same logic and structure as the existing orders delta export, including:
- Relative date filtering
- Post-export filter update logic
- Scheduled job compatibility
- Consistent UI behavior
This guarantees predictable behavior across entities.
Benefits
With Products Delta Export, you can:
- Reduce export file size
- Minimize system load
- Speed up external synchronization
- Avoid duplicate processing in third-party systems
- Maintain near real-time product updates
Important Notes
- Date filtering relies strictly on createdAt and updatedAt.
- Behavior is fully aligned with the orders delta export logic.
- All new filters include proper i18n labels for multilingual environments.
Product Import Field Reference
In this section, you’ll find a comprehensive reference table that details the key fields involved in importing product data into Shopware 6. Each row in the table provides essential information, including the field name as it appears in the Shopware interface, the corresponding system field name, a brief description of the field’s purpose, and an example value to guide your data formatting. This table is designed to help you accurately map and configure your product import files, ensuring a smooth and error-free import process.
| Field Name | System Field Name | Description | Value Example |
| General information | |||
| Name | name | Title of the product.
Can contain any characters and spaces. |
Bluetooth Speaker |
| Manufacturer | manufacturer_id | ID of the Manufacturer found in your store database.
Should be composed of exactly 32 symbols with numerals 0-9 and letters a-f. If no Manufacturer ID is specified, it will be associated or created using the ‘manufacturer_name’ attribute value |
018ee103cded7015994e5f9aac551847 |
| Manufacturer | manufacturer_name | Manufacturer of the product.
Can contain any characters and spaces. |
EchoWave |
| Product UUID | id | Unique ID of the product inside the Shopware 6 database.
Cannot be found inside the administrator area. Used to identify the product along with the product_number, however not required. Should be composed of exactly 32 symbols with numerals 0-9 and letters a-f. |
018e3856658271228f10807956b7e3f9 |
| Parent product UUID | parent_id | ID of the parent product.
This property is only used for product variations to identify the parent product it belongs to. Should be composed of exactly 32 symbols with numerals 0-9 and letters a-f |
018e38561e2d72ea81f49d3fc8a2b141 |
| Product number | product_number | Unique product code – SKU.
This property is required for creating a product Can contain any characters and spaces |
FB10001 |
| Parent product number | parent_sku | Product number of the parent product.
This property is only used for product variations to identify the parent product it belongs to. Can contain any characters and spaces. |
FB10002 |
| Variant properties | options | Options of product variants.
Value: {{Property1}}:{{Value}}|{{Property2}}:{{Value}} |
Colour:Green|Size:L |
| Stock | stock | Product Stock quantity.
Any numeric value without decimals. |
17 |
| Active | active | Active property defines if the product is enabled.
|
0 |
| Clearance sale | is_closeout | Clearance sale – defines if the product is on sale.
|
1 |
| Restock time in days | restockTime | Restock time in days.
Must be a whole number without decimals. |
4 |
| Free shipping | shipping_free | Defines if free shipping is enabled.
|
0 |
| Min. order quantity | minPurchase | The minimum amount of the given product per a single order.
Must be a whole number without decimals. |
3 |
| Purchase steps | purchaseSteps | Scales in which the item is to be offered.
For example, a scale of 2 means that your customers can purchase 2, 4, 6 products, etc., but not 1, 3, or 5. Must be a whole number without decimals. |
2 |
| Max. order quantity | maxPurchase | The maximum amount of the given product per a single order.
Must be a whole number without decimals. |
3 |
| Description | description | Description of the product
Can contain any characters and spaces |
Сompact and powerful audio device that delivers crystal-clear sound and deep bass. |
| Price (net) | price_net | The price of the product excluding tax.
Must be a numeric value using a period (.) or (,) for decimals |
14.85 |
| Price (gross) | price_gross | The price of the product including tax.
Must be a numeric value using a period (.) or (,) for decimals |
16 |
| List price (net) | list_prices_net | MSRP, RRP, or SRP of a product excluding tax. It is the price at which a manufacturer recommends that a retailer sell the product.
Must be a numeric value using a period (.) or (,) for decimals. |
11,45 |
| List price (gross) | list_prices_gross | MSRP, RRP, or SRP of a product including tax.
Must be a numeric value using a period (.) or (,) for decimals |
12 |
| Purchase price (net) | purchase_prices_net | The monetary cost a business pays to acquire a good or service excluding tax.
Must be a numeric value using a period (.) or (,) for decimals. |
11.45 |
| Purchase price (gross) | purchase_prices_gross | The monetary cost a business pays to acquire a good or service including tax.
Must be a numeric value using a period (.) or (,) for decimals. |
12 |
| Cheapest price (last 30 days, net) | cheapest_price_net | Cheapest price (last 30 days, net) refers to the lowest price at which a product was sold within the last 30 days, excluding taxes.
Must be a numeric value using a period (.) or (,) for decimals |
11.45 |
| Cheapest price (last 30 days, gross) | cheapest_price_gross | Cheapest price (last 30 days, gross) refers to the lowest price at which a product was sold within the last 30 days, including taxes.
Must be a numeric value using a period (.) or (,) for decimals |
12 |
| Tax rate | tax_id | ID of the Tax Rate found in your store database.
Should be composed of exactly 32 symbols with numerals 0-9 and letters a-f If no Tax ID is specified, it will be associated or created using the “tax_name” and “tax_rate” attribute values |
018ad59442067a2fa941a2c69908442e |
| Tax rate | tax_name | The name of the Tax Rate.
Can contain any characters and spaces. |
Reduced rate |
| Media Cover | cover_media_url | Cover Image of the product.
A single URL of an image. |
https://firebearstudio.com/skin/frontend/firebear/default/images/logo.png |
| Search keywords | keywords | SEO keywords.
Multiple keywords separated by a comma (,). |
Portable,Bluetooth,Speaker |
| Meta title | meta_title | SEO meta title.
Can contain any characters and spaces. |
Bluetooth Speaker |
| Meta description | meta_description | SEO meta description.
Can contain any characters and spaces. |
Compact and powerful audio device that delivers crystal-clear sound and deep bass. With its sleek design and long-lasting battery. |
| Media | media | Product Image(s).
Multiple image URLs separated with a pipe symbol (|). |
https://firebearstudio.com/skin/frontend/firebear/default/images/logo.png| https://firebearstudio.com/blog/wp-content/uploads/2017/02/ improved_mport_export_magento_2_.png |
| Categories | categories_all_paths | Categories the product belongs to.
Can contain any characters and spaces. Multiple category paths separated with a pipe symbol (|). Must include full paths to the end category starting with parents. If the categories you import don’t already exist in the store, they will be automatically created. |
Catalog #1/Electronics/Audio & Sound Systems/Bluetooth Speakers |
| Sales Channels | sales_channel | ID of the Sales Channel found in your store database.
Should be composed of exactly 32 symbols with numerals 0-9 and letters a-f. |
98432def39fc4624b33213a56b8c944d|1d51345c01af4236aba1b71ffa95453f |
| Sales Channels | sales_channel_names | Name of the Sales Channel the product belongs to.
Can contain any characters and spaces. Multiple values separated with a pipe symbol (|). |
Headless|Storefront |
| Width | width | Width of the product.
Must be a numeric value using a period (.) for decimals; commas are not allowed for decimals. |
12 |
| Height | height | Height of the product.
Must be a numeric value using a period (.) for decimals; commas are not allowed for decimals. |
13 |
| Length | length | Length of the product.
Must be a numeric value using a period (.) for decimals; commas are not allowed for decimals. |
14 |
| Weight | weight | Weight of the product.
Must be a numeric value using a period (.) for decimals; commas are not allowed for decimals. |
2 |
| Sales unit | purchaseUnit | Number of individual items that a company sells.
Required to calculate the product’s unit price. The value depends on the selected scale unit. Must be a numeric value. |
500 |
| Basic unit | basicUnit | Reference specification.
Required to calculate the product’s unit price. The base value depends on the selected scale unit. Must be a numeric value. |
1 |
| Packaging unit | packUnit | Indicates how the product is delivered, e.g. in a carton or bottle. This information appears in the quantity selection field of the product. | bottle |
| Packaging unit plural | packUnitPlural | If the plural form of the packaging unit differs from the singular, you can enter it here. For example, if the singular unit is “bottle,” you would enter “bottles” as the plural. This information will be displayed in the quantity selection field when the quantity exceeds 1. | bottles |
| Scale unit | unit_name | Unit of measurement used to define the relationship between a product’s selling unit and its base unit. | centimeter |
| Scale Unit Shorthand | unit_shortCode | Shorthand of the scale unit. | cm |
| GTIN/EAN | ean | Unique identifier used for products globally.
Can contain any characters and spaces. |
6291047583921 |
| Release date | releaseDate | When a product can be purchased in the shop.
If the time you have set is not yet reached, a corresponding message will be displayed on the product detail page to inform the customer when the product can be purchased. |
2023-10-20T12:00:00.000+00:00 |
| Delivery time Name | delivery_time_name | Label assigned to a specific delivery time option.
Can contain any characters and spaces. |
1-3 Tage |
| Delivery time Minimum | delivery_time_min | Delivery time minimum period.
Numeric value without decimals. |
1 |
| Delivery time Maximum | delivery_time_max | Delivery time maximum period.
Numeric value without decimals. |
3 |
| Delivery time Unit | delivery_time_unit | Unit of measurement for the delivery time, such as days, weeks, or months. | day |
| Delivery time UUID | delivery_time_id | Unique identifier assigned to a specific delivery time configuration within the system. This UUID distinguishes each delivery time option, ensuring that it can be accurately referenced and managed in the database, especially during imports, exports, or when configuring delivery times for products.
Should be composed of exactly 32 symbols with numerals 0-9 and letters a-f. |
018e1d6d1397727d81a53aac935b7fbe |
| Manufacturer product number | manufacturerNumber | Unique identifier or SKU assigned to a product by its manufacturer. This number helps distinguish the product within the manufacturer’s catalog and is often used for inventory management, ordering, and referencing the product in various systems.
Can contain any characters and spaces |
SWB-2024-X1 |
| Tags | tags | Labels or keywords that you can assign to products, categories, customers, and other entities to organize and categorize them. Tags help in filtering, searching, and managing items within the system, making it easier to group related items or apply specific actions across multiple entities.
Separate multiple values with a pipe symbol (|). |
WirelessAudio|PortableSpeaker|BluetoothSound|HighQualityAudio |
| Layout | cms_page_id | Unique ID of the layout assigned to a product inside the Shopware 6 database.
Cannot be found inside the administrator area. Should be composed of exactly 32 symbols with numerals 0-9 and letters a-f. |
7a6d253a67204037966f42b0119704d5 |
| Advanced pricing | advanced_prices | Advanced prices of the product. Contains complex values:
Advanced prices attributes are separated by a comma (,). Advanced Prices Rules are separated by a pipe (|).’ . |
ruleId:4a3ec3a7eace4f5c8f7d734754ef7f24,currencyId: b7d2554b0ce847cd82f3ac9bd1c0dfca,priceNet:100.88, priceGross:120.88,quantityStart:1,quantityEnd:9| ruleId:4a3ec3a7eace4f5c8f7d734754ef7f24,currencyId: b7d2554b0ce847cd82f3ac9bd1c0dfca,priceNet:99.88, priceGross:110.88,quantityStart:10,quantityEnd:20 |
| Custom fields | cf_<technical_name> | All custom field names must begin with “cf_”. Following this prefix, include the technical name of the custom field. E.g. cf_custom_test_text_field |
Test text |
| Properties | Geschlecht#68b8e43ccb1c454aa0647bbc4a0c6e0d | Product custom properties. Use this column title format to create column names:
[property_name]#[property_id] Use this this value format: |
Women#0e6ecc99f5e84d48b8550bb37690c1a2 |
| Material#a67cdd9627cb488bb4cd91f3e8d66e32 | Women#0e6ecc99f5e84d48b8550bb37690c1a2 | ||
| Translations | When importing translations to Shopware, the CSV file should include specific column headers that indicate the language and type of translation. Use this column title format:
translations.[language code].[original column title] |
Einfaches Firebear-Produkt #1 | |
| translations.de_DE.description | Dies ist ein Testprodukt, das vom Firebear Studio-Team erstellt wurde. | ||
| translations.de_DE.metaTitle | meta_title-test-de | ||
| translations.de_DE.metaDescription | meta_description-test-de | ||
| translations.de_DE.packUnit | Packungseinheit | ||
| translations.de_DE.packUnitPlural | Verpackungseinheit Plural | ||
| translations.de_DE.keywords | eins,zwei,drei | ||
| Translations (Custom fields) | translations.de_DE.cf_<technical_name> | To import translations for your custom fields, use this column title format:
translations.[language code].cf_[custom_field_technical_name] |
test DE |
| Translations (Properties) | de-DE.Material#a67cdd9627cb488bb4cd91f3e8d66e32 | To add translations to your custom properties, use this column title format:
[language code].[property_name#property_id] Use this value format: [property_value#property_value_id] |
Damen#0e6ecc99f5e84d48b8550bb37690c1a2 |
| de-DE.Geschlecht#68b8e43ccb1c454aa0647bbc4a0c6e0d | |||
| Variants storefront presentation | display_single_product_as_main_product | This column corresponds to the “Display Single Product as Main Product” checkbox. 1 – enabled;0 – disabled.Also, it depends on other parameters. |
0 |
| display_single_product_as_variant | This column represents the “Display Single Product as Variant” checkbox and the selected variant in the dropdown. The value consists of the variant ID. | 018e1d6d1397727d81a53aac935b7fbe | |
| display_as_expand_product | This column corresponds to the “Expand Property Values in Product Listings” checkbox. The value consists of the name and ID of the selected properties. Multiple values separated with a pipe symbol (|). |
Colour#269c7e40a54a462e884edb004c5f7bc8 |
Customer Import Field Reference
This section includes a detailed reference table outlining the fields required to import customer data into Shopware 6. The table lists each field name as it appears in the Shopware interface, along with the corresponding system field name, a description of its function, and an example value to help you correctly format your data. This resource is designed to assist you in accurately mapping and configuring your customer import files, ensuring that your customer data is imported smoothly and efficiently.
| Field Name | System Field Name | Description | Value Example |
| Line Item Type | linetype | Defines whether the row is for a customer or a customer address. | customer, addresses |
| Customer Number | customerNumber | Unique customer code.
Can contain any characters and spaces. |
SWDEMO10000 |
| Email Address | Customer’s email.
Make sure to properly paste the email address with the domain |
test@mail.com | |
| First Name | firstName | Customer’s first name
Any characters are allowed. |
Veronica |
| Last Name | lastName | Customer’s last name
Any characters are allowed. |
Costello |
| Customer Group | group | Customer’s customer group. | Standard customer group |
| Default Payment Method | defaultPaymentMethod | Customer’s default payment method. | Cash on delivery |
| Active Status | active | Defines if the customer is enabled:
1 – customer is enabled; 0 or EMPTY – customer is disabled. |
1 |
| Language | language | Customer’s language. | English |
| Affiliate Code | affiliateCode | Used to track and identify customers who were referred to your store through an affiliate program. When customers enter your store via an affiliate link, this code is recorded and associated with the customer. The affiliateCode helps in tracking which affiliates are responsible for bringing in specific customers, enabling you to attribute sales or sign-ups to the correct affiliate partner. | 3465 |
| Campaign Code | campaignCode | Refers to a code associated with a marketing or promotional campaign. This code can be used to track which campaign or promotion led to the customer’s registration or purchase. When importing customer data, the campaignCode allows you to assign a specific campaign to a customer, helping you analyze the effectiveness of your marketing efforts by linking customers to particular campaigns. | 8973 |
| Sales Channel | salesChannel | Name of the Sales Channel the customer belongs to.
Can contain any characters and spaces |
Storefront |
| Date of Birth | birthday | Customer’s day of birth. | 1996-09-09T00:00:00.000+00:00 |
| Default Billing Address | defaultBillingAddressId | Unique ID of the default Billing Address inside the Shopware 6 database.
Cannot be found inside the administrator area. Should be composed of exactly 32 symbols with numerals 0-9 and letters a-f. Required attribute for UPDATE. |
069d109b9b484f9d992ec5f478f9c2a1 |
| Default Shipping Address | defaultShippingAddressId | Unique ID of the default Shipping Address inside the Shopware 6 database.
Cannot be found inside the administrator area. Should be composed of exactly 32 symbols with numerals 0-9 and letters a-f. Required attribute for UPDATE. |
069d109b9b484f9d992ec5f478f9c2a1 |
| Address ID | addresses.id | Unique ID of the Address inside the Shopware 6 database.
Cannot be found inside the administrator area. Should be composed of exactly 32 symbols with numerals 0-9 and letters a-f. Required attribute for UPDATE. |
069d109b9b484f9d992ec5f478f9c2a1 |
| Address First Name | addresses.firstName | Customer’s first name specified in the address. | Veronica |
| Address Last Name | addresses.lastName | Customer’s last name specified in the address. | Costello |
| Zip/Postal Code | addresses.zipcode | Postal code associated with a customer’s address. | 12345 |
| Country | addresses.country | Country associated with a customer’s address. | Germany |
| City | addresses.city | City associated with a customer’s address. | Berlin |
| Company | addresses.company | Company associated with a customer’s address. | Firebear |
| Street | addresses.street | Street associated with a customer’s address. | street1 |
| Department | addresses.department | Department associated with a customer’s address. | Marketing |
| Title | addresses.title | Manager | |
| Phone Number | addresses.phoneNumber | Phone number associated with a customer’s address. | 495819739180 |
| Address Created At | addresses.createdAt | Date and time when the address was initially added to the customer’s profile. | 2023-05-05T09:21:45.707+00:00 |
| Address Updated At | addresses.updatedAt | Date and time when the address was updated in the customer’s profile. | 2023-08-03T12:21:10.953+00:00 |
How to export data
Exporting data is straightforward and efficient. To begin, you’ll select the entity you want to export, choose the output file type, and specify the export destination. From there, you can configure the mapping to ensure the data is structured correctly and apply any necessary filters. Once everything is set, simply hit the ‘Export’ button to complete the process. This streamlined approach makes managing your Shopware 6 data hassle-free.
Step 1: Configure your export profile
Go to Extensions -> Improved Import, Export & Mass Actions -> Product Export and click the “New Profile” button. The “Configure export“ screen displays:
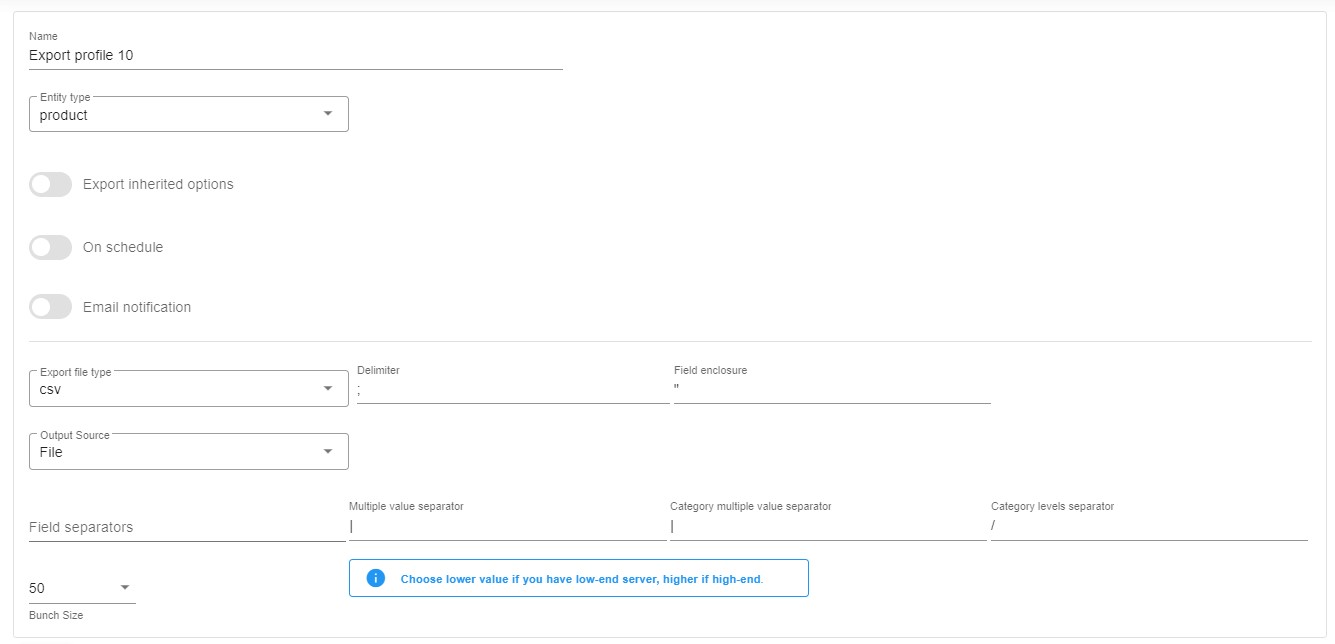
- Type your profile’s name;
- Select an entity you want to export – Products, Customers, or Orders;
In the case of Orders, you can export the latest modified or the latest created orders by selecting the corresponding option.
 Follow this link for more information: How to export latest orders from Shopware 6.
 - Enable/disable the export of inherited options. If a variant has a value, it will be exported; otherwise, the parent value will be used.
- Configure a schedule of updates;
- Configure email notifications;
- Select your file format. The app lets you export CSV, XML, and XLSX files or Google Sheets spreadsheets;
- Next, choose your output source: FTP, Google Drive, Google Sheets, or file download;
- Specify separators;
- Choose a batch size for your file export: a lower value is required for a low-end server.
Step 2: Configure mapping
Click “Continue” to proceed to the export mapping screen. If you plan to share your output with a third party, you can replace the default Shopware column titles with the names your partner requires. Simply enter the new values in place of the defaults, and the Improved Import, Export & Mass Actions app will automatically apply the necessary changes.
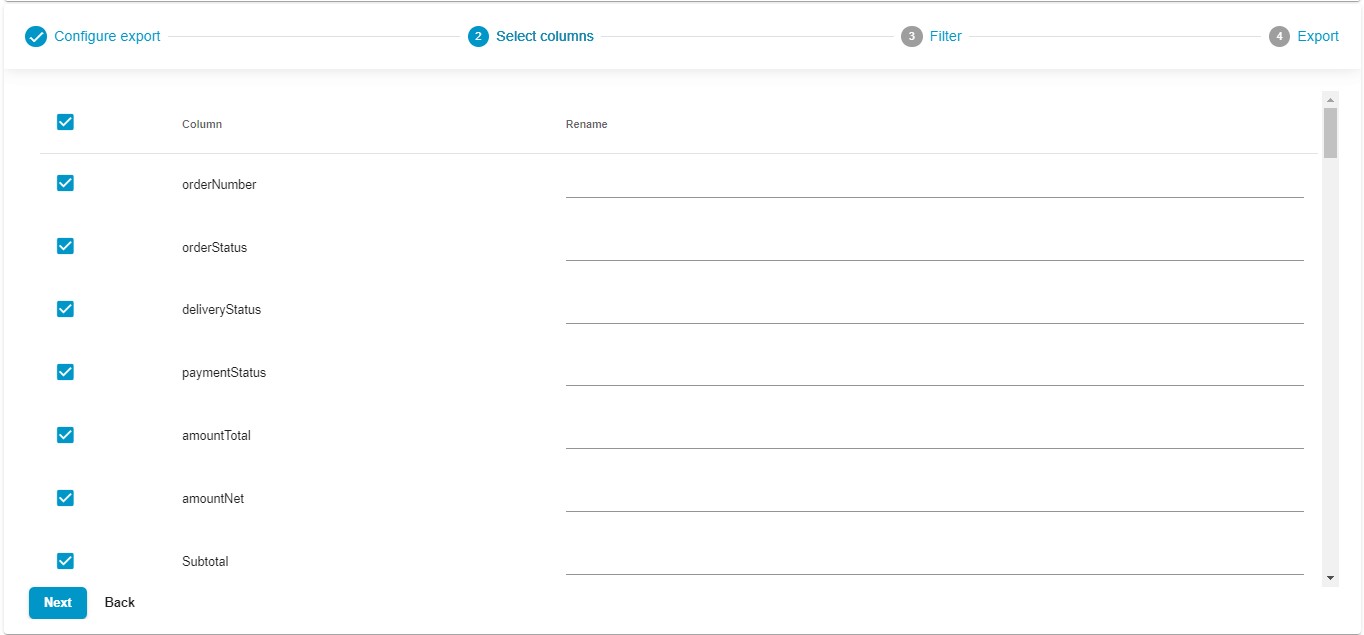
Keep in mind that you can export only the columns you need by unchecking those that aren’t necessary for your output.
It is also possible to export custom fields separately, with each custom field getting its own column. This feature applies to both products and orders. Previously, all custom fields were exported in a single column, but now you can find each custom field listed as a separate field on the mapping screen. If you have a saved export profile for orders and later create new custom fields, add values, and save the order, these new custom fields won’t be included in the export using the existing profile. To include the newly created custom fields, you’ll need to create a new profile, ensuring that everything is exported successfully.
Additionally, the latest version of our application allows you to rearrange the order of columns and add default values as needed:
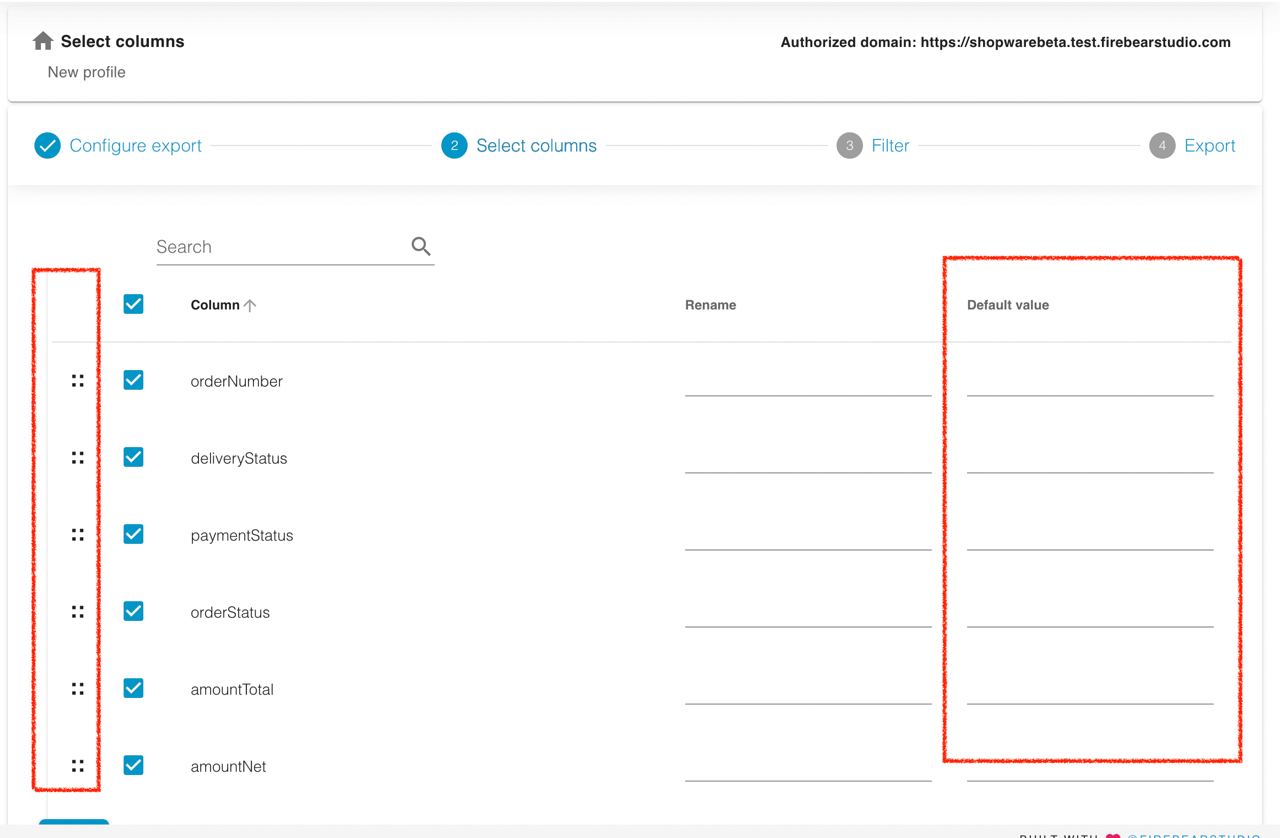
- Column Sorting: Now, during export, you can easily sort columns, arranging them in the desired order within the export file. This feature provides you with greater control over the layout of your data.
- Default Values: You can also include default values when exporting. This means that if a specific attribute has no value, the export file will automatically include the designated default value in its place. This simplifies data management and ensures consistency in your exports.
Column sorting is achieved through a simple drag-and-drop interface, and these enhancements apply to all entities, including products, orders, and customers. It’s all about making your data management in Shopware more efficient and user-friendly. For more information, follow our Guide to Shopware Mapping.
Default Values
The latest version of our app allows you to apply default values to the data you export. A default value is automatically assigned if an attribute in your export file has no value specified. For example, if you set a default value of “99” for the weight attribute, this value will be applied to any products that do not have a weight specified after the export.
.
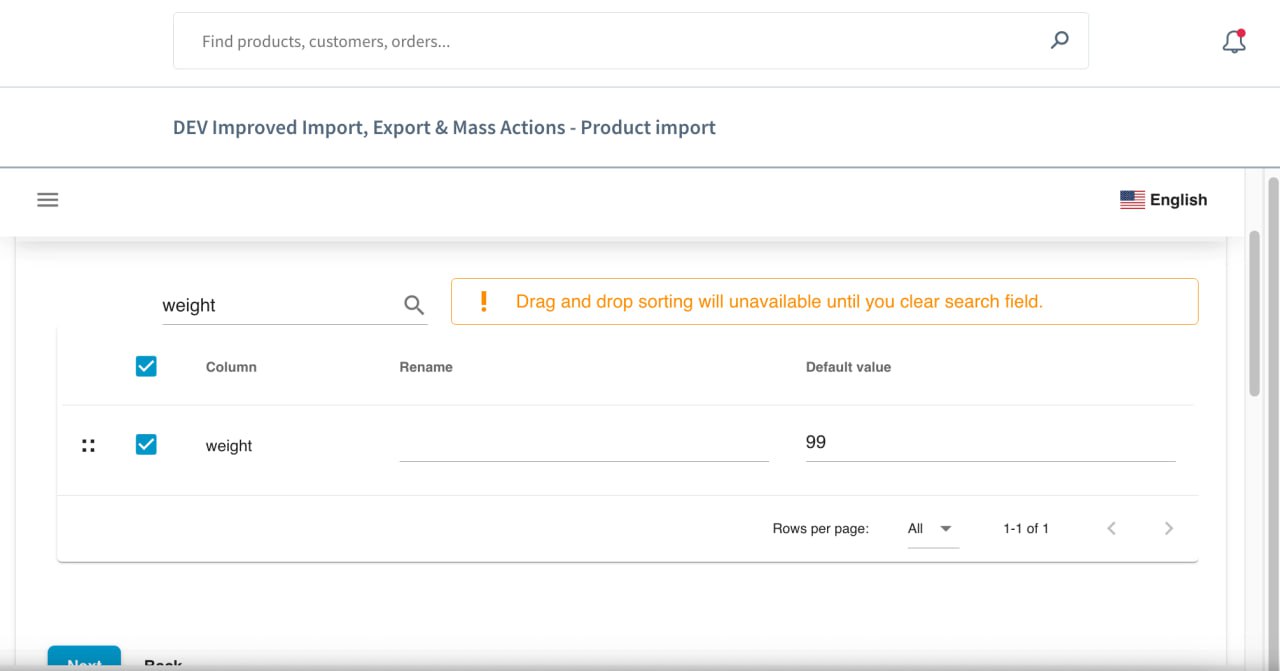
Products with a specified value for the weight attribute in the admin will retain that value – the default value will be ignored in such cases.

Step 3: Add filters
If you don’t want to export all records, you can create filters on the “Filter” screen:
- Press the “+” button.
- Select a product property to filter by. For example, you can choose orderDate to filter orders by their creation date.
- Choose an operator. For instance, Range allows you to export records within a specific time interval.
- Specify a value. If you’re exporting orders and have selected orderDate and Range, you can filter to export orders from today, yesterday, last week, last month, etc.

You can create multiple filters by clicking the “Add Filter” button. This allows you to refine your export even further by applying additional criteria.
Final step: Export
Click the “Save & Close” button to save your Shopware 6 export profile for future use. The app will automatically execute the profile according to the scheduled time. If you click the “Export” button, the app will transfer the data from Shopware 6 immediately.
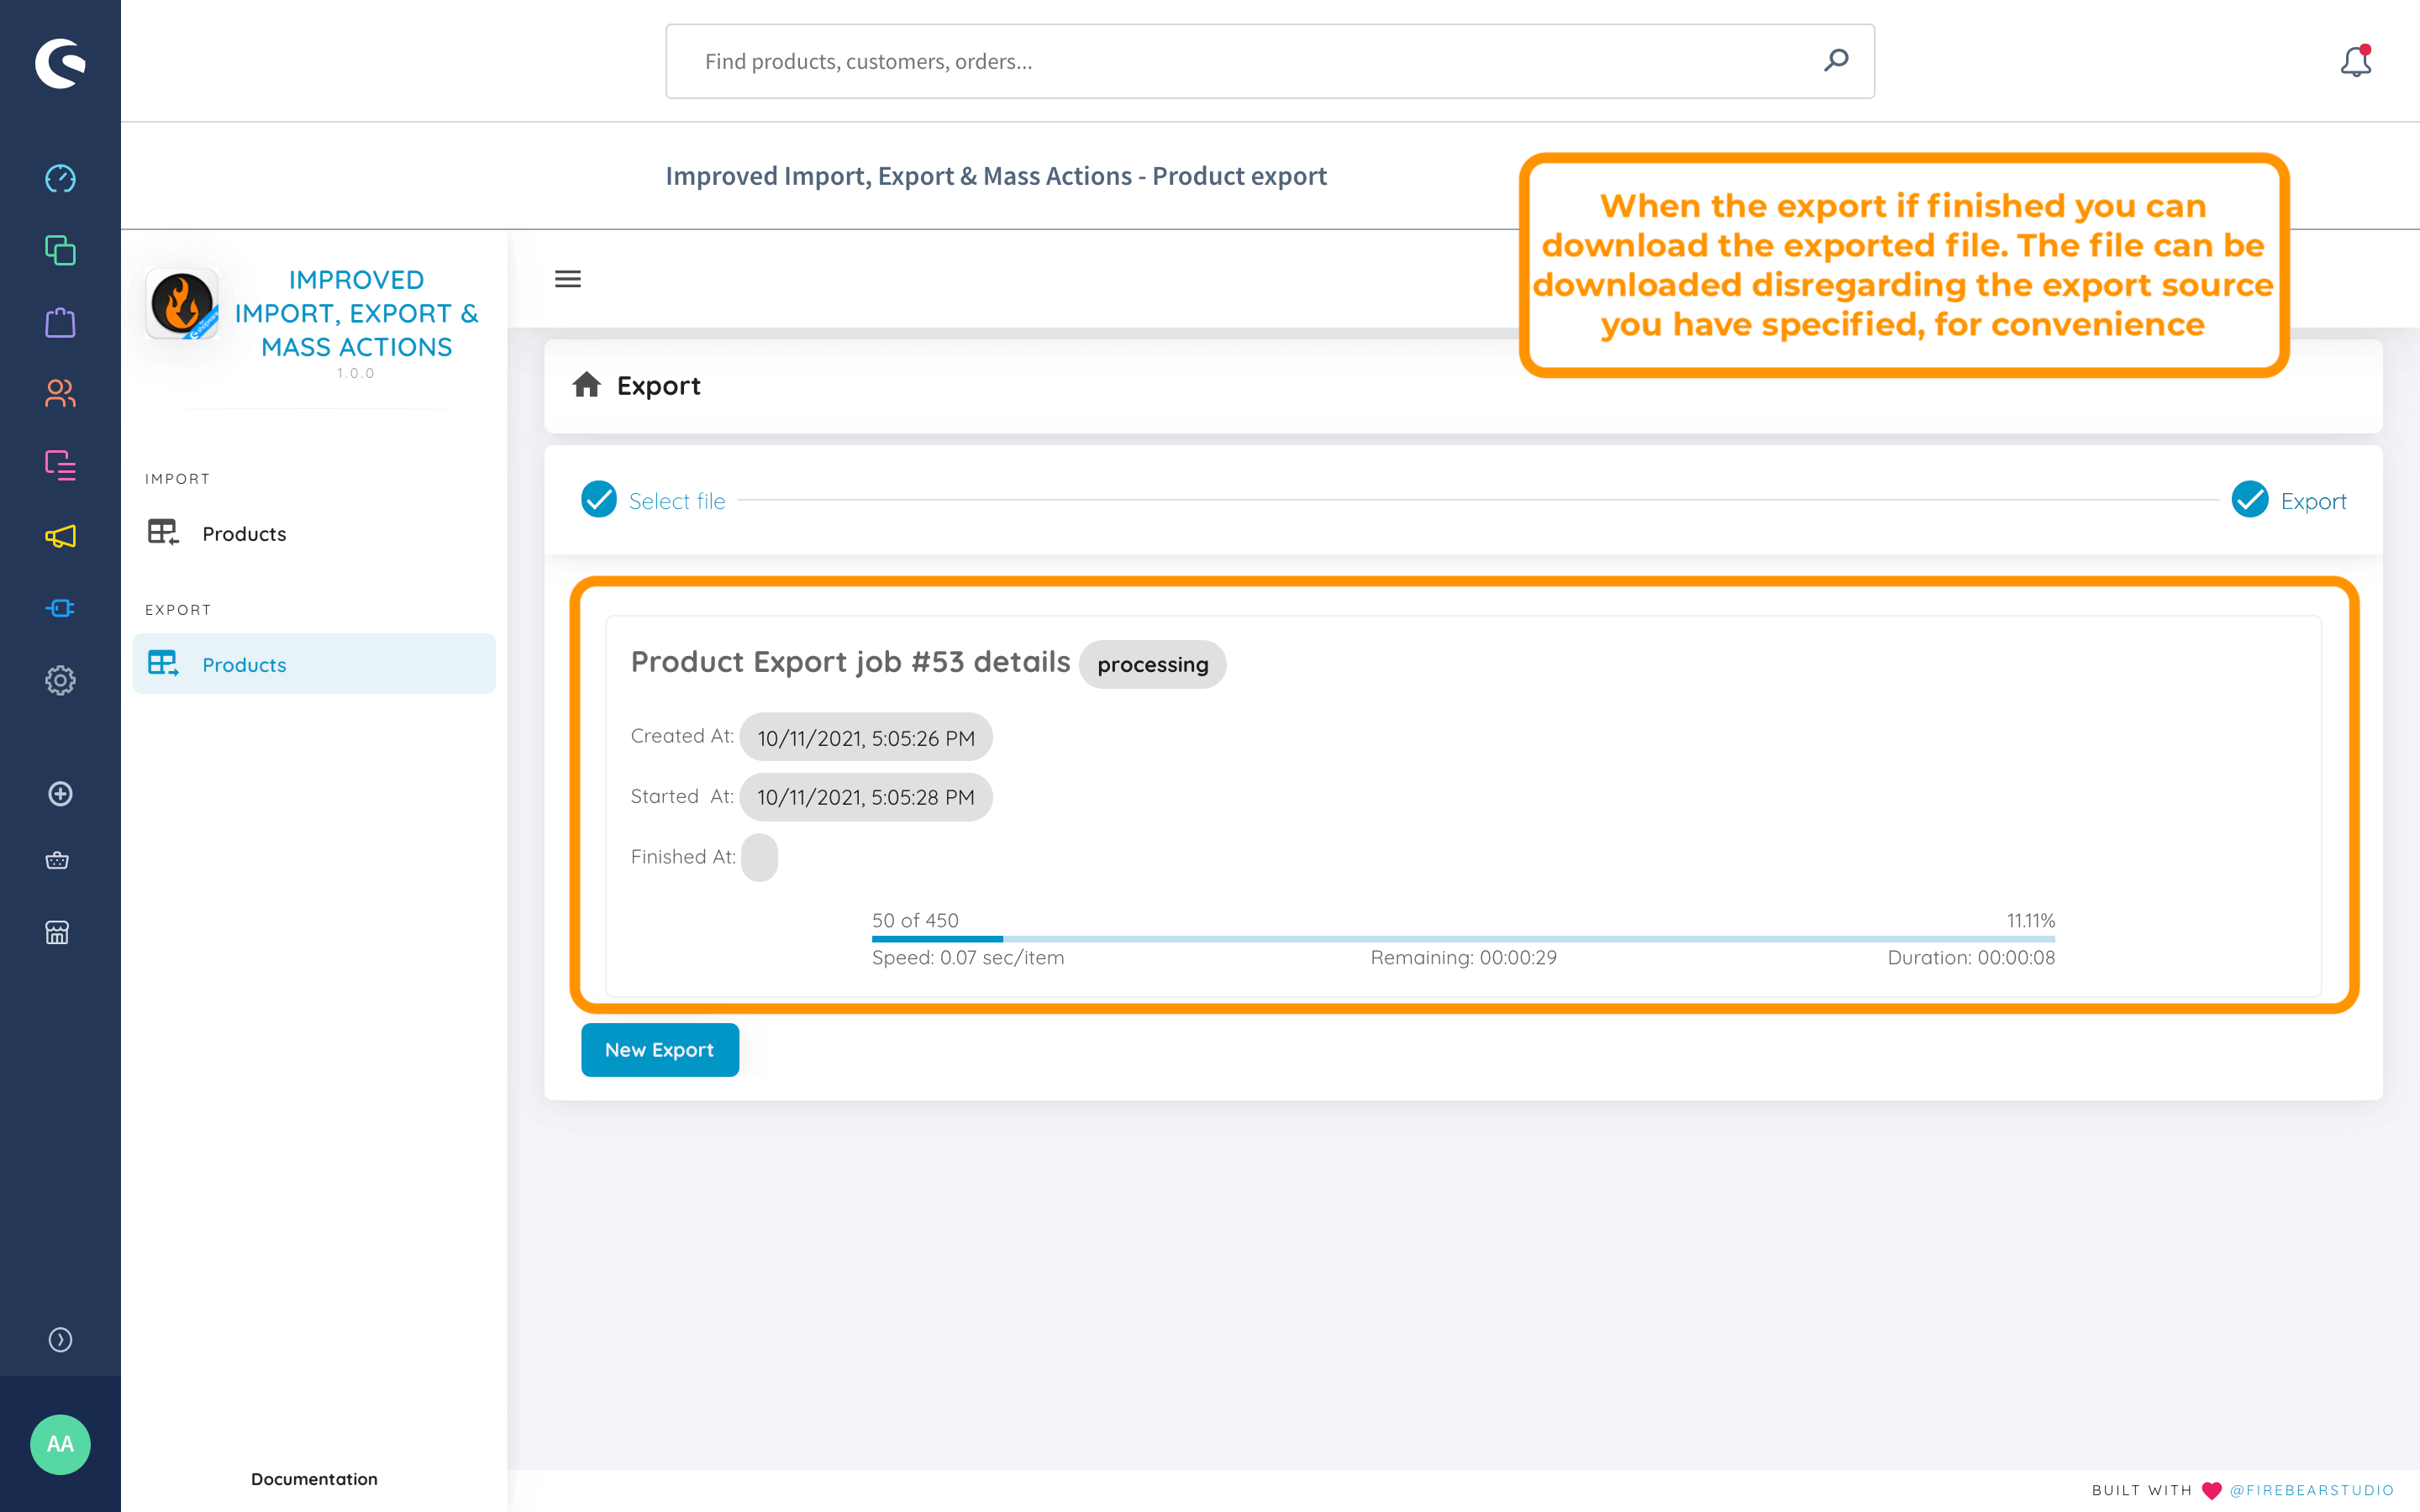
If you selected File as your export destination, you can download it by clicking the Download button at the bottom of the export process recap.
How to export orders
Our app exports each order’s data across multiple rows. Row with linetype = order represents the order data. Rows with linetype = lineItems represent the order items.
By default, line item rows do not contain order-related data in the order columns:
| linetype | orderNumber | orderStatus | paymentStatus | amountTotal | Subtotal | Total excluding VAT |
|---|---|---|---|---|---|---|
| order | 10002 | open | open | 122.4 | 110.4 | 102.85 |
| lineItems | 10002 | |||||
| lineItems | 10003 |
To fill line item rows with order data, select the export option Fill all order line with order data in export profile settings.
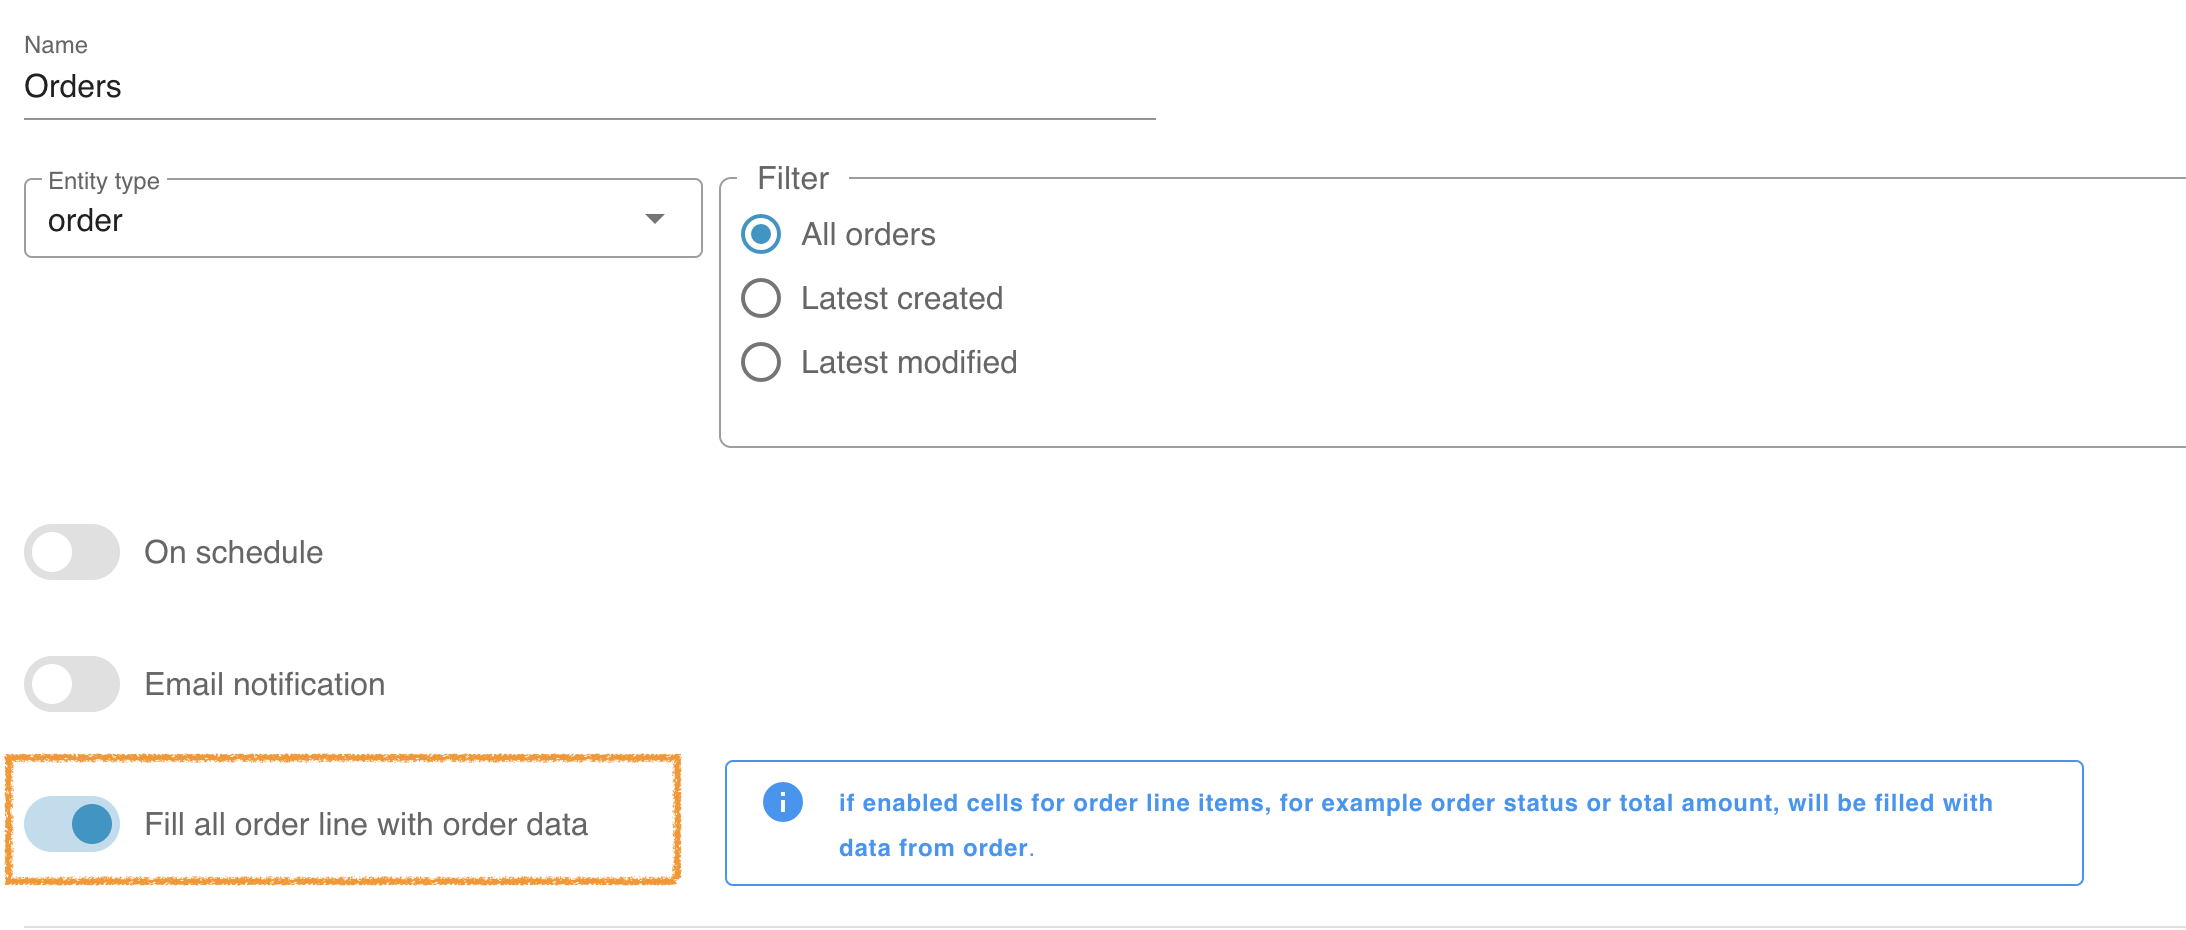
When this option is enabled, all rows will contain the data from their related order.
| linetype | orderNumber | orderStatus | paymentStatus | amountTotal | Subtotal | Total excluding VAT |
|---|---|---|---|---|---|---|
| order | 10002 | open | open | 122.4 | 110.4 | 102.85 |
| lineItems | 10002 | open | open | 122.4 | 110.4 | 102.85 |
| lineItems | 10003 | open | open | 122.4 | 110.4 | 102.85 |
How to Export Cross-Selling Data
Export Fields
When exporting cross-selling data, your file will include these fields:
- Basic cross-selling information: ID, name, position, type, active status, and limit
- Sorting settings: sortBy and sortDirection
- Associated product information: productId and productNumber
- Product stream information (for productStream type): productStreamId and productStreamName
- Assigned products (for productList type): product numbers in a comma-separated list
Field Reference Table for Cross-Selling Export
| Field Name | System Field Name | Description | Value Example | Filterable |
|---|---|---|---|---|
| ID | id | Unique identifier for the cross-selling entry | 11a12b13c14d15e16f17g18h19i20j | No |
| Name | name | Name of the cross-selling section | “Recommended Products” | Yes |
| Product ID | productId | ID of the product to which the cross-selling is attached | 22a23b24c25d26e27f28g29h30i31j | Yes |
| Product Number | productNumber | Product number of the product to which the cross-selling is attached | “SW10001” | Yes |
| Position | position | Display order of this cross-selling section | 1 | No |
| Sort By | sortBy | How the cross-selling products are sorted | “name” | No |
| Sort Direction | sortDirection | Direction used to sort the cross-selling products | “ASC” | No |
| Type | type | Type of cross-selling | “productList” | Yes |
| Active | active | Whether the cross-selling is active | true | Yes |
| Limit | limit | Maximum number of products displayed | 4 | No |
| Product Stream ID | productStreamId | ID of the product stream (if type is “productStream”) | 33a34b35c36d37e38f39g40h41i42j | Yes |
| Product Stream Name | productStreamName | Name of the product stream (if type is “productStream”) | “New Products” | Yes |
| Assigned Products | assignedProducts | Product numbers of manually assigned products (if type is “productList”) | “SW10002,SW10003,SW10004” | No |
Export Filters
When exporting cross-selling data, you can use filters to narrow down the results. The following fields support filtering:
name: Filter cross-selling entries by nameproductId: Filter by the ID of the product to which the cross-selling is attachedproductNumber: Filter by the product number to which the cross-selling is attachedtype: Filter by cross-selling type (productList or productStream)active: Filter by active status (true/false)productStreamID: Filter by the ID of the product streamproductStreamName: Filter by the name of the product stream
You can use these filters in the export profile to export only specific cross-selling entries that match your criteria.
How to Import & Export Product Properties in Shopware
By default, Shopware 6 does not export custom properties that you’ve added to your products, such as ‘Size’ or ‘Color.’ This means that when you export products, any custom attributes you’ve created won’t be included in the export file.
To address this, you can export custom product properties as a separate entity. However, this approach comes with a limitation: the exported file won’t include references to the products these properties are associated with. As a result, re-importing the products with their corresponding custom properties becomes impossible, since the connection between the products and their custom attributes is lost in the process. This makes it challenging to maintain the integrity of your product data when re-importing into Shopware 6.

With the Improved Import, Export & Mass Actions app, you can export custom properties along with your products in a convenient format. This format includes both the database ID of the custom property and the name as displayed in the store’s backend, making it easy to reference and manage.
The exported file might look like the screenshot below:

The columns highlighted in green represent custom product properties and follow this format:
color#0bde8db993684f8b92a713913aa3d9c3
Where:
- color is the name of the property as it appears in the Shopware 6 backend.
- #0bde8db993684f8b92a713913aa3d9c3 is the ID of the property as stored in the database.
When importing products along with these properties, you can import them using three different formats for the column names:
- property_name#property_id: This is the default format you receive in the export file.
- property_name: You can also import the property by naming the column as it is labeled in the Shopware 6 admin panel.
- #property_id: Alternatively, you can use just the property ID, starting with the “#” symbol.
During the mapping step of the import procedure, you’ll need to assign all custom properties from your file as follows:
- Locate the custom property, such as “color.”
- In the dropdown menu under store properties, select “propertiesSources“.
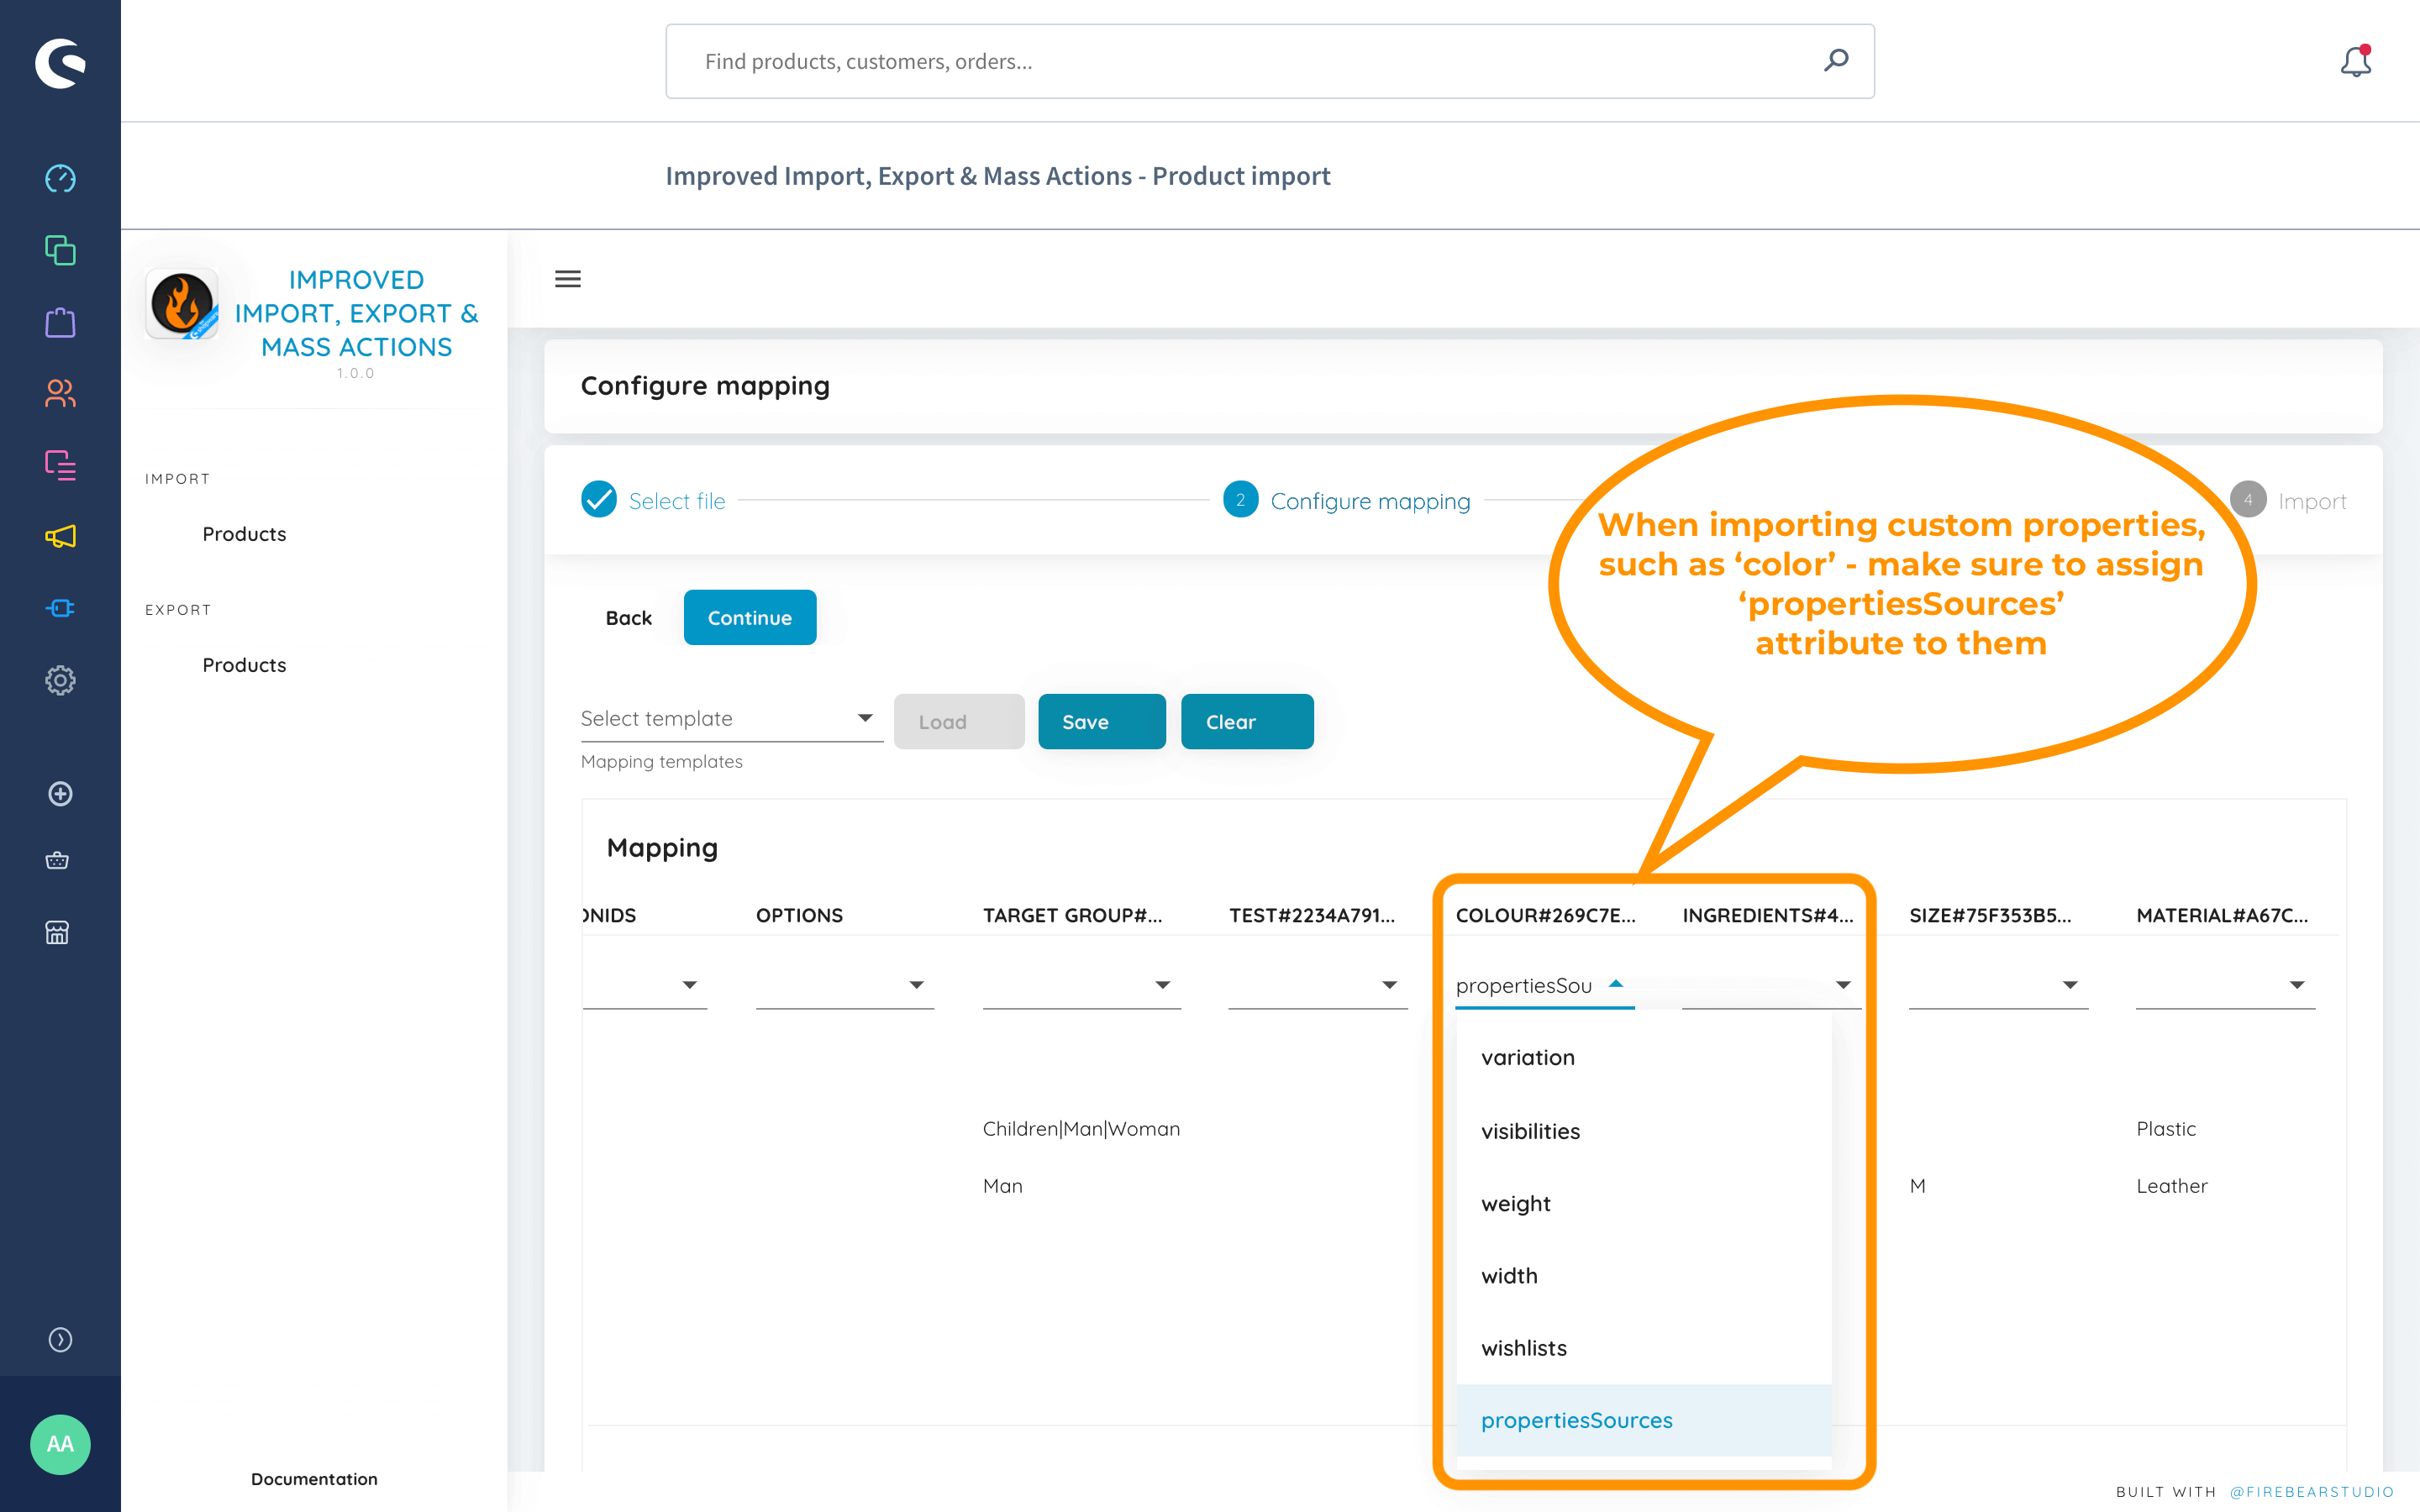
Assign “propertiesSources” to all the custom properties you are importing. This ensures that Shopware correctly interprets and applies them, regardless of the order or format you use.
We also recommend using both the property name and ID as your import format.
In the Shopware 6 backend, you can create multiple custom properties with the same name. Therefore, if you have several properties with identical names, you’ll need a way to distinguish them. This is where the property ID comes in, such as “#0bde8db993684f8b92a713913aa3d9c3”. The property ID is always unique and ensures that each property is correctly identified and applied without confusion.
How to Import & Export Configurable Products in Shopware
Here’s a guide on how to use the import and export features for configurable products to adjust their frontend display in Shopware 6.
Import
You can use the import feature to control how configurable products with variants are displayed in product listings. Let’s explore how this feature works in Shopware versions 6.5 and 6.4.
Shopware 6.5
The import of configurable products can lead to different frontend displays depending on the values specified in your CSV table. Let’s explore 4 different cases:
Case №1
If the Display Single Product as Main Product column is set to “1” (true) and Display Single Product as Variant and Display as Expand Product are empty as shown below:

The Shopware configurable product import will display the selected Main product with an empty dropdown, meaning no variant is pre-selected.
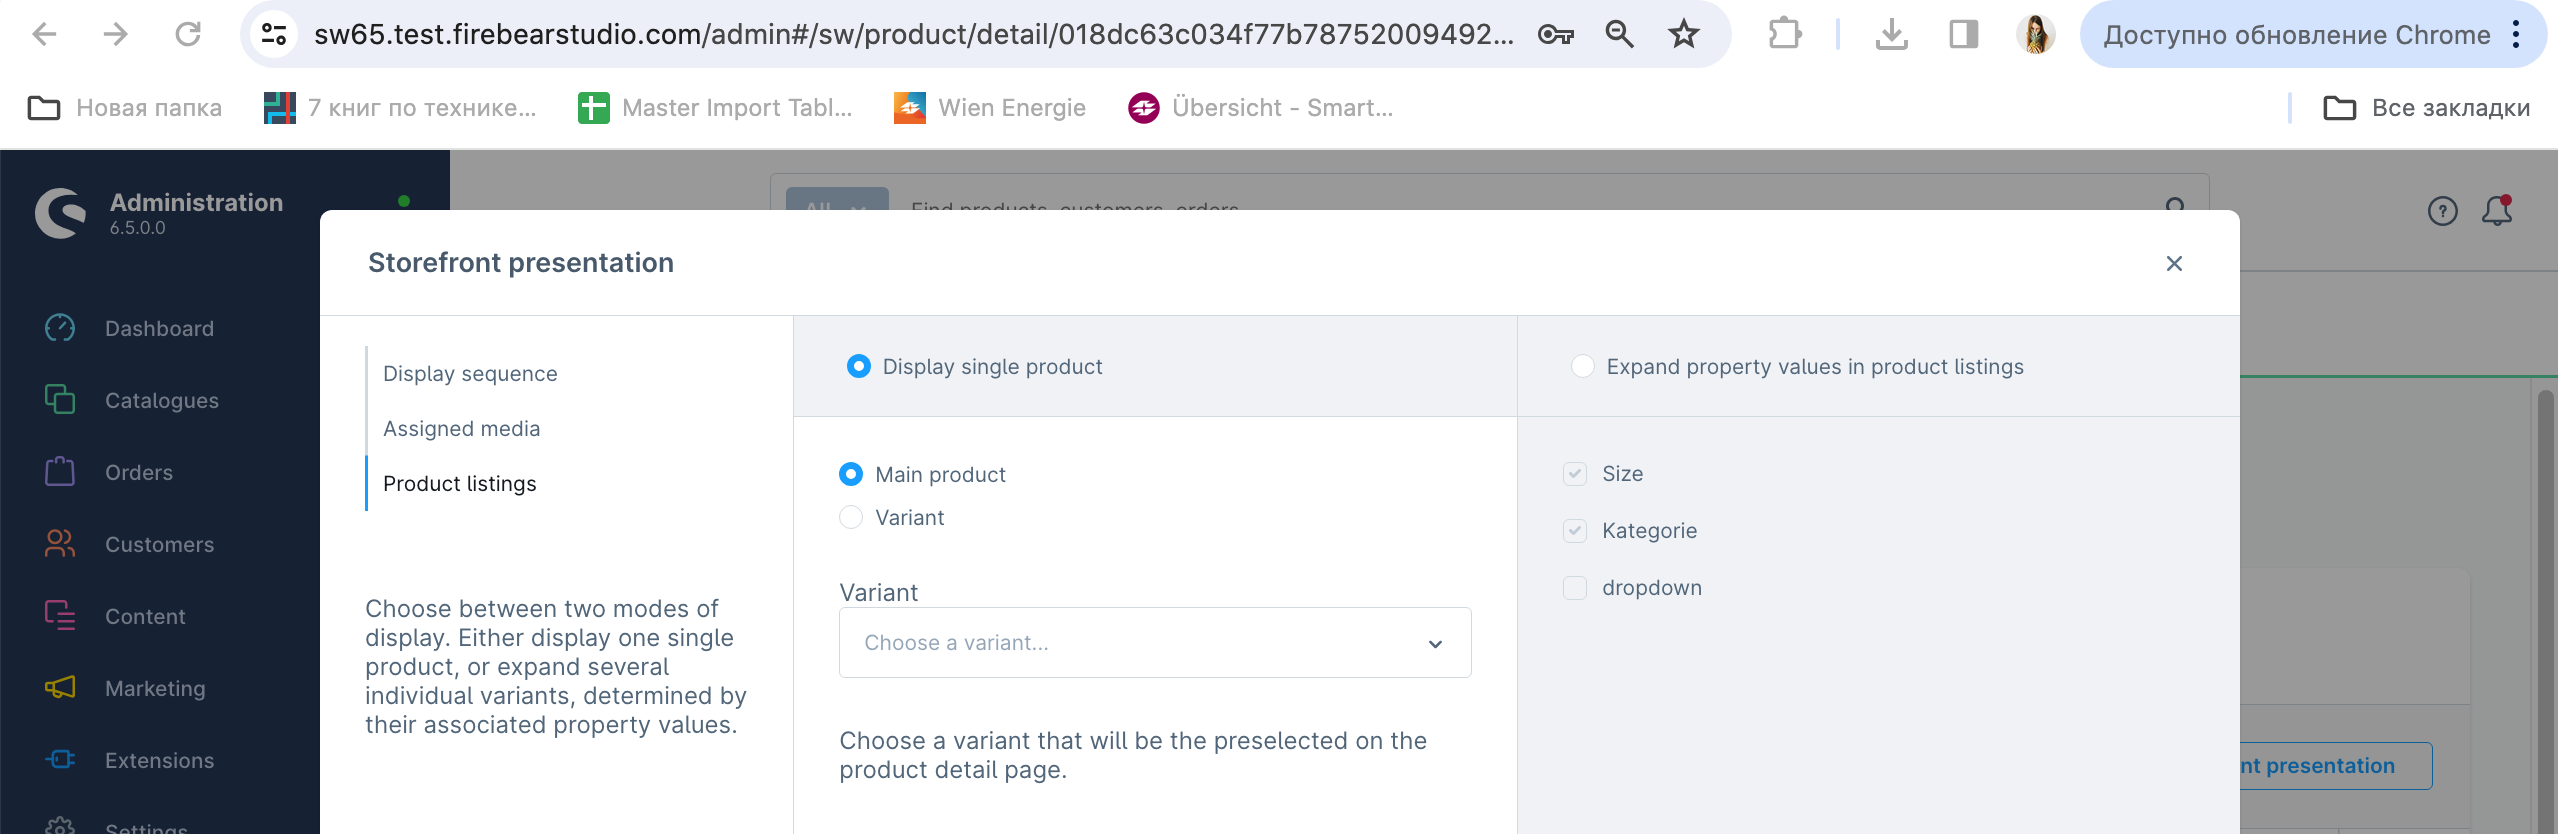
Case №2
If the Display Single Product as Main Product column is set to “1”, the Display Single Product as Variant column contains an ID of one of the configurable product variants, and Display as Expand Product is empty:

The Shopware configurable product import will display the selected Main product with an empty dropdown, meaning no variant is pre-selected.

Case №3
If the Display Single Product as Main Product column is set to “0” (false) or is empty, the Display Single Product as Variant column contains an ID of one of the configurable product variants, and Display as Expand Product is empty:

The Shopware configurable product import will display the selected Variant in the Display Single Product section, with the variant being the product with the ID specified in the CSV.
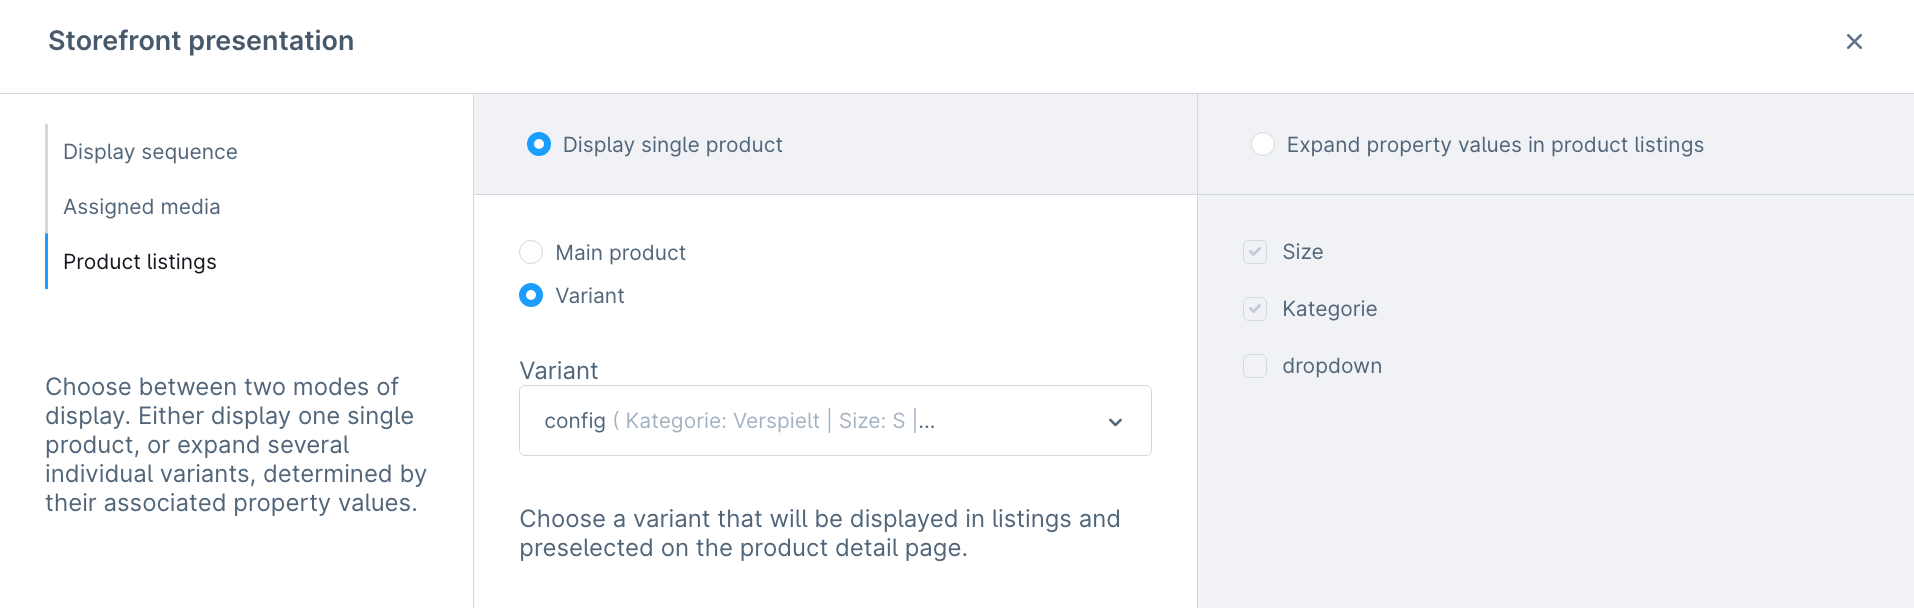
Case №4
If the Display Single Product as Main Product column is set to “0” (false) or is empty, the Display Single Product as Variant column is empty, and the Display as Expand Product column contains the Available Property Name (Colour|Size)+ID combination (several values should be separated with “|”:

The Shopware configurable product import results in the selected Main product option in the Display single product section and the selected properties specified in the Expand property values in product listings section.
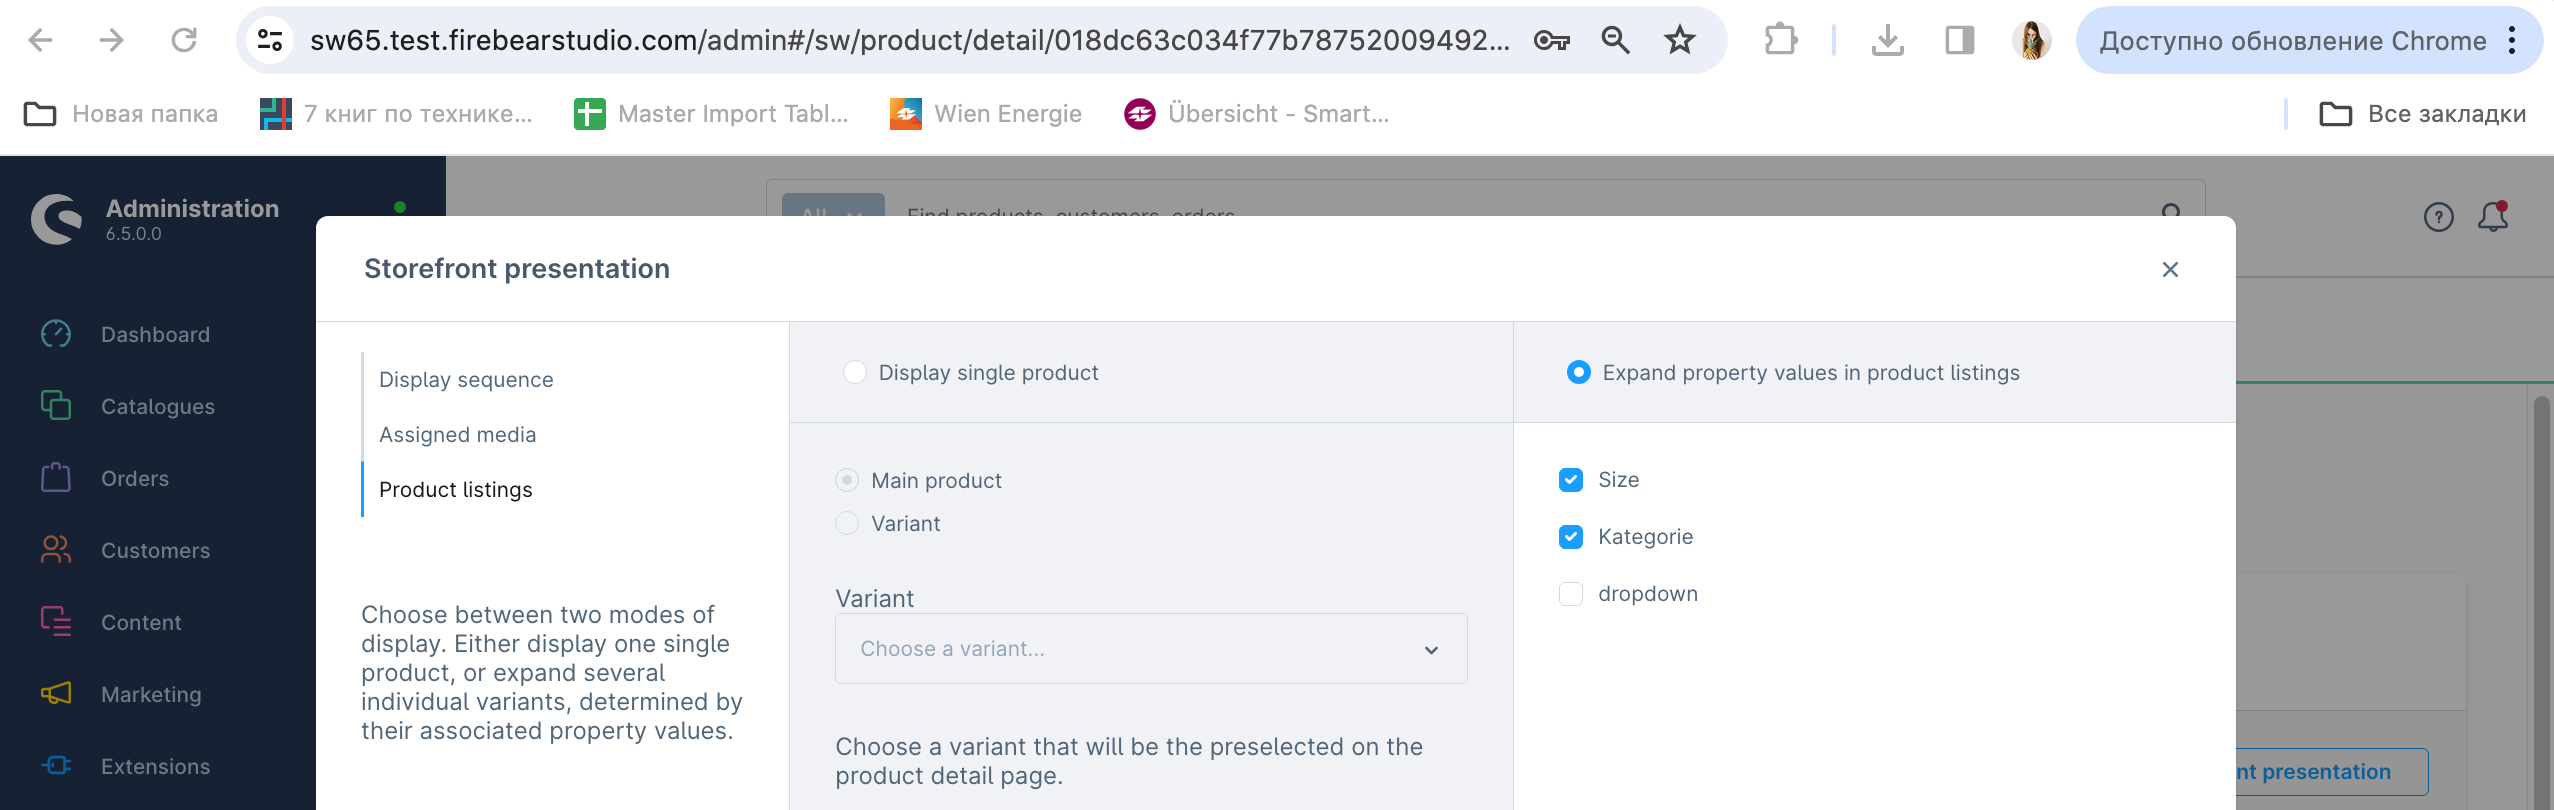
Shopware 6.4
The Display Single Product as Variant functionality is not available in Shopware 6.4. Therefore, you cannot use import to control the Display as Expand Product feature. In the cases below, the corresponding column is empty.
Case №1
If the Display Single Product as Main Product column is set to “1” and Display Single Product as Variant and Display as Expand Product are empty as shown below:

The Main product is selected, and the variant in the dropdown remains unchanged.
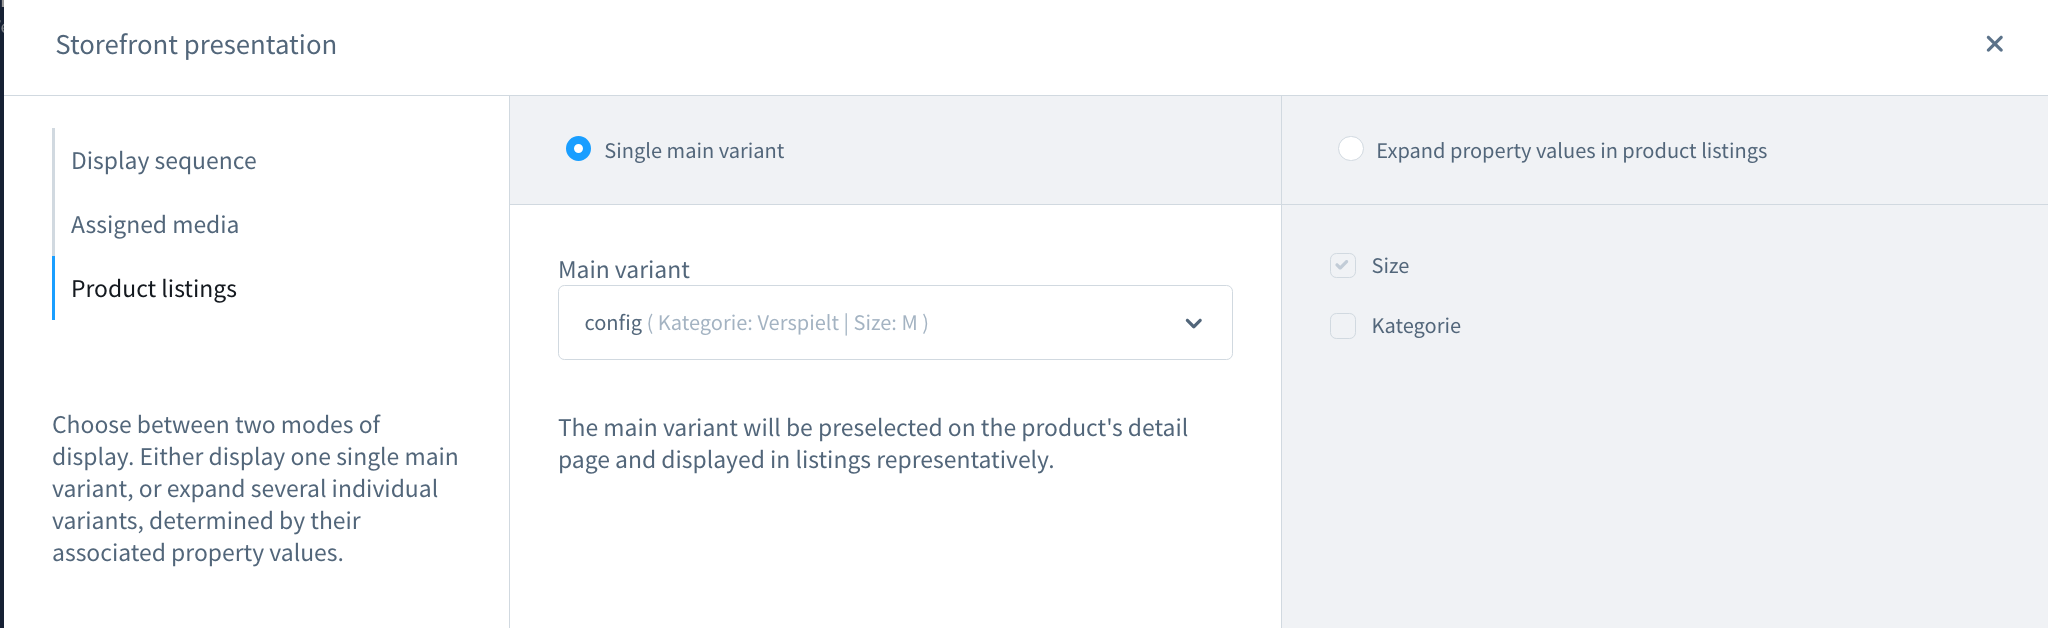
Case №2
If the Display Single Product as Main Product column is set to “1”, the Display Single Product as Variant column contains an ID of one of the configurable product variants, and Display as Expand Product is empty:

The checkmark is active on the Main product, and the variant in the dropdown is selected based on the ID provided in the import file.

Case №3
If the Display Single Product as Main Product column is set to “0” or is empty, the Display Single Product as Variant column contains an ID of one of the configurable product variants, and Display as Expand Product is empty:

The checkmark is active on the Main product, and the variant in the dropdown is selected based on the ID provided in the import file.

Export
When you export configurable products from Shopware, the output format differs between versions 6.5 and 6.4.
Shopware 6.5
In Shopware 6.5, the export includes the following three columns:
- display_single_product_as_main_product: This column corresponds to the “Display Single Product as Main Product” checkbox. It contains “1” if the checkbox is selected and is empty if it is not.
- display_single_product_as_variant: This column represents the “Display Single Product as Variant” checkbox and the selected variant in the dropdown. The exported CSV will contain the variant ID.
- display_as_expand_product: This column corresponds to the “Expand Property Values in Product Listings” checkbox. The value consists of the name and ID of the selected properties.
Shopware 6.4
In Shopware 6.4, the export includes the same three columns:
- display_single_product_as_main_product and display_single_product_as_variant: These columns correspond to the “Single Main Variant” checkbox and the Variant dropdown, respectively.
- display_as_expand_product: This column is exported empty. Even if you manually select values to expand, they will not be included in the export file in this version. Additionally, importing content into this column is not possible. However, this does not affect imports – if you have selected “Expand Property Values in Product Listings,” these settings will not be overwritten during the import/export process.
FAQ & Troubleshooting
1. I get an error message “cURL error 6: Could not resolve host”
- Make sure your store is accessible by the external URL. Local installation of Shopware 6 is not supported by the app.
- Possible solution:
Change the APP_URL in the .env file from “local_store_url” to “external_store_url”. Make sure you have specified actual HTTP or HTTPS - Uninstall and install the app again. Switching the app on and off will not address the issue
- Clear browser cache, or use the incognito window.
2. I get an error message “Write access to entity “acl_role” are not allowed in scope “user”
- Make sure to change the APP_URL in the .env file from “local_store_url” to “external_store_url”. Make sure you have specified actual HTTP or HTTPS
- Uninstall and install the app again. Switching the app on and off will not address the issue
- Clear browser cache, or use the incognito window.