How to Turn On Notifications For Shopware 6 Import

In the following article, you will learn how to be always notified of the results of your import processes. While you cannot be aware of each data transfer by default, there is a reliable solution that supports email notifications for Shopware 6 import. Meet the Improved Import, Export, and Mass Actions app. Below, we explain what kinds of reminders are at your disposal and how to turn on notifications for Shopware 6 import. Also, don’t forget to check Shopware Cookbook for more helpful suggestions.

Shopware 6 Import Notifications
The Improved Import, Export, and Mass Actions app for Shopware 6 lets you use three types of notifications for your import processes. You can get real-time information about successful imports, filed data transfers, or both. Just choose one of the following options: Succeed jobs, Failed jobs, or Succeed and Faild jobs.

How to Get Notifications On Shopware 6 Import Processes
Now, let’s see how to create an import profile and configure notifications. Firstly, click the New Profile button under Extensions -> Improved Import, Export & Mass Actions -> Product Import.

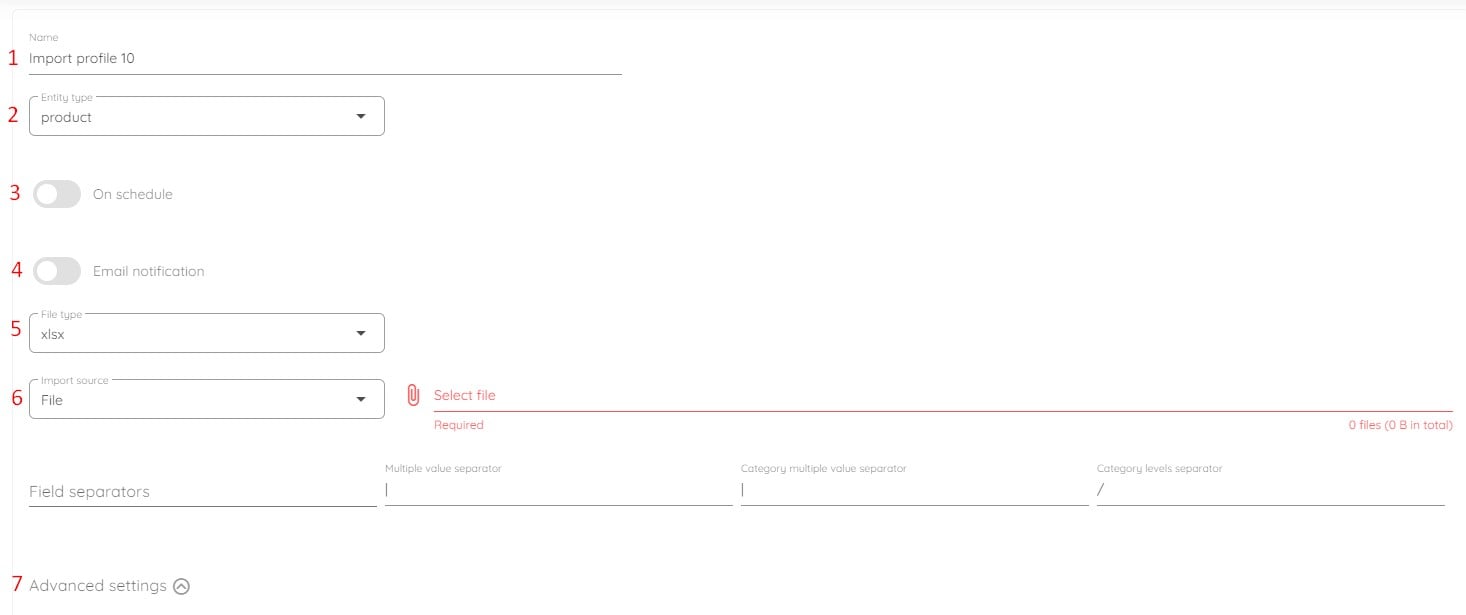
The Select file screen displays. It is where you can enable import notifications for Shopware 6. Follow these steps to implement Shopeare 6 import notifications:

- Specify your profile’s title;
- Select an entity you want to import (e.g., products or customers);
- Create a schedule of updates if applicable;
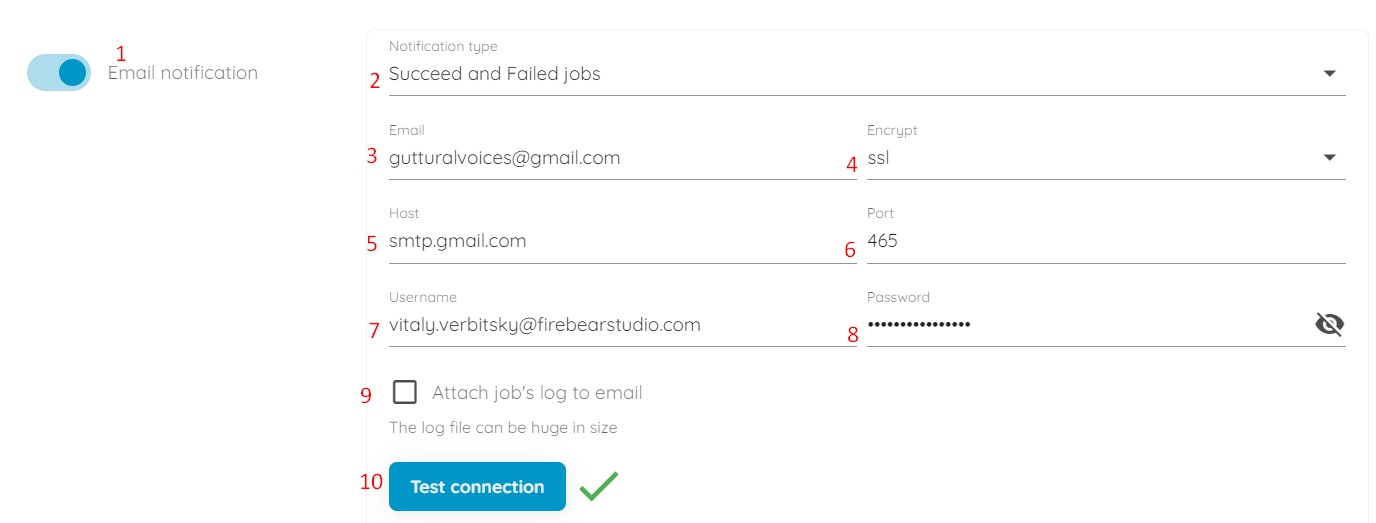
- Configure email notifications:

- Turn on the notification toggle.
- Choose the Shopware 6 import notification type: Succeed jobs, failed jobs, or Succeed and failed jobs.
- Specify an email address to send notifications to.
- Select the encryption type.
- Specify the host for your email address.
- Specify the corresponding port.
- Provide a sender’s username (an email address).
- Add the corresponding password.
- Note that it is possible to attach job logs to the notification emails. However, they may be huge in size.
- Click the Test Connection button. If Shopware 6 import notifications have been configured successfully, you will see a notification message in the provided mailbox.
- Select your file format (XLSX, XML, or CSV);
- Choose your import source (e.g., file, URL, FTP, Google Drive, or Google Sheets);
- Configure advanced settings: URL rewrite behavior, media replacement behavior, and stock increment strategy.
Next, you can continue configuring your import job on the mapping screen. Here, you can specify which columns from the imported file match the properties of the products from your Shopware 6 store.
The Improved Import, Export, and Mass Actions app lets you preview how products look after import.
Finally, you can click on the Import button at the bottom of the Preview result page to start the import process. When it finishes, you will get the corresponding notification depending on the selected notification type and import results.
You can read more about the enhanced Shopware 6 import in our Improved Import, Export & Mass Actions Manual.
Other Features
With the Improved Import, Export & Mass Actions app, you can address the most common Shopware 6 data transfer issues. When it comes to export processes, it is product bulk editing. While Shopware 6 cannot import all the necessary product information via a single file, the Improved Import, Export & Mass Actions app provides such an opportunity. As a result, you can easily manage your catalog. Some other core features and benefits are:
- Full product import and export with custom attributes (properties);
- Customer import and export with addresses;
- Orders export;
- Full support for product variants with a full set of attributes;
- Product properties mapping with mapping presets;
- Import and export schedules;
- Import and export of CSV, XLSX, and XLSX files;
- Direct file uploads;
- FTP/FTPS uploads.
You can find more information about the Improved Import, Export & Mass Actions app here:
- Improved Import, Export & Mass Actions application for Shopware 6
- Improved Import, Export & Mass Actions Manual

