
Shopware 6 Import From URL: New Way to Update Your Products & Customers

What takes precedence over data management in your Shopware 6 store? While many aspects are crucial, effective data management remains pivotal, particularly in a dynamic e-commerce environment that encounters frequent changes. How to deal with that if the conventional approach of manual imports is not only time-consuming but also limited in terms of update sources? You can entirely revamp the default data transfer procedures of Shopware 6. Meet the Firebear Improved Import, Export & Mass Actions App – a game-changer for e-commerce businesses. In this comprehensive guide, we dive deep into the world of Shopware 6 file imports from URLs, shedding light on how this potent strategy can not only save you valuable time but also enhance the overall efficiency of your online store. We’ll explore the advantages of Shopware 6 URL imports and guide you through the process of importing customers and products to Shopware 6 from a URL. For additional valuable insights, be sure to explore our Shopware 6 Cookbook.

Table of contents
Standard Shopware 6 Import
Let’s delve into the standard Shopware 6 import procedure first. The default process includes the following steps:
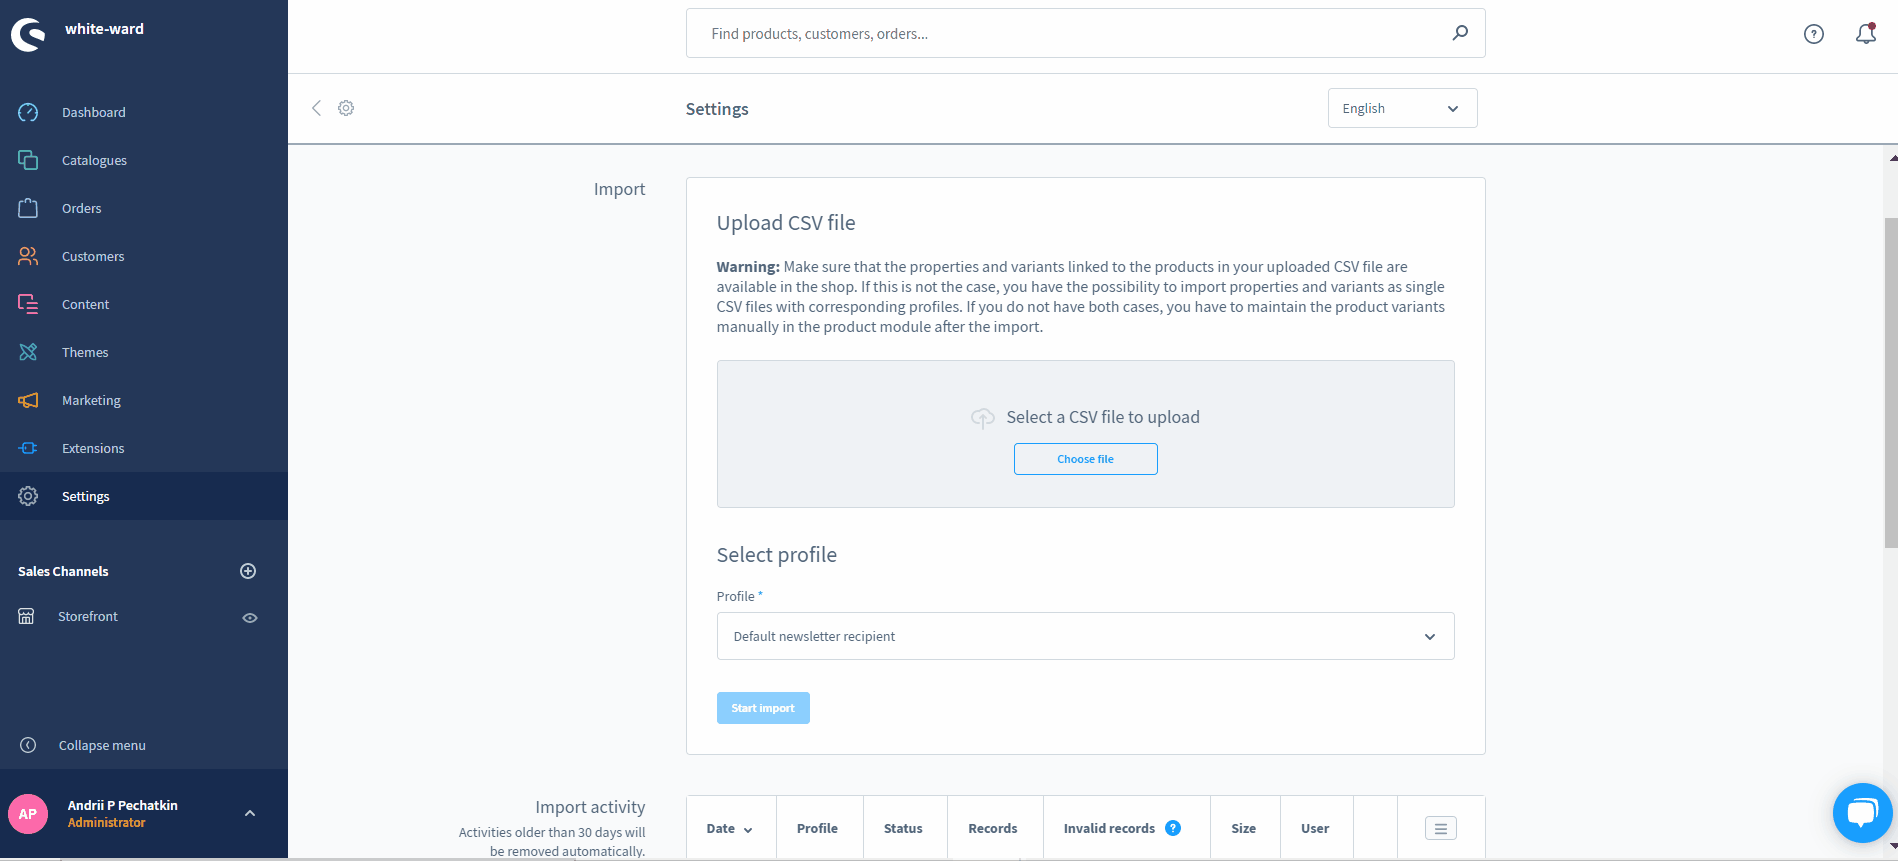
- Access Your Shopware 6 Admin: Log in to your Shopware 6 admin panel to get started.
- Navigate to the Import/Export Section: Within the Shopware 6 admin, locate the “Import/Export” section, featuring the “Import” subsection.
- Select Your Data File: Choose the data file you want to import. Ensure it meets Shopware 6’s requirements.
- Choose Import Profile. Select an import profile that suits your update.
- Complete the Update: After manually selecting the file, initiate the upload by clicking the “Import” button.
While the standard Shopware 6 import process offers a straightforward means of managing e-commerce data, it doesn’t support URL imports. For more advanced features and efficiency, consider an alternative approach involving the Firebear Improved Import, Export & Mass Actions app. Before diving into that, let’s explore the advantages of Shopware 6 URL imports over manual file uploads.
Advantages of URL Imports in Shopware 6
Below, you can see a few key advantages of Shopware 6 imports from URL:
- Efficiency Boost: Importing products from a remote URL proves more efficient than manual uploads, particularly when you automate the process using schedules.
- Real-time Updates: Depending on the implementation, importing from a remote URL can offer automated real-time updates, ensuring that your product information remains consistently current. The use of schedules in the Improved Import, Export & Mass Actions app facilitates seamless automation.
- Centralized Management & Multi-Channel Selling: Importing from remote URLs enables centralized management, especially beneficial if your products are listed across different platforms or supplier websites. Changes from suppliers or sources automatically reflect in your Shopware 6 store without requiring manual intervention.
- Integration with ERPs & Other Systems: For businesses employing Enterprise Resource Planning (ERP) systems and other business instruments, incorporating URL imports becomes a vital component of a comprehensive integration strategy. This ensures smooth communication between your e-commerce platform and the business processes that take place outside.
- Effortless Expansion: Simplify the onboarding process when expanding your product catalog or collaborating with new suppliers by leveraging the capability to import from remote URLs. This approach not only enhances efficiency but also reduces labor-intensive tasks.
How to Import Products & Customers to Shopware 6 from URL
Let’s dive into the process of importing products and customers into Shopware 6 from a URL. It is divided into a few intuitive steps:
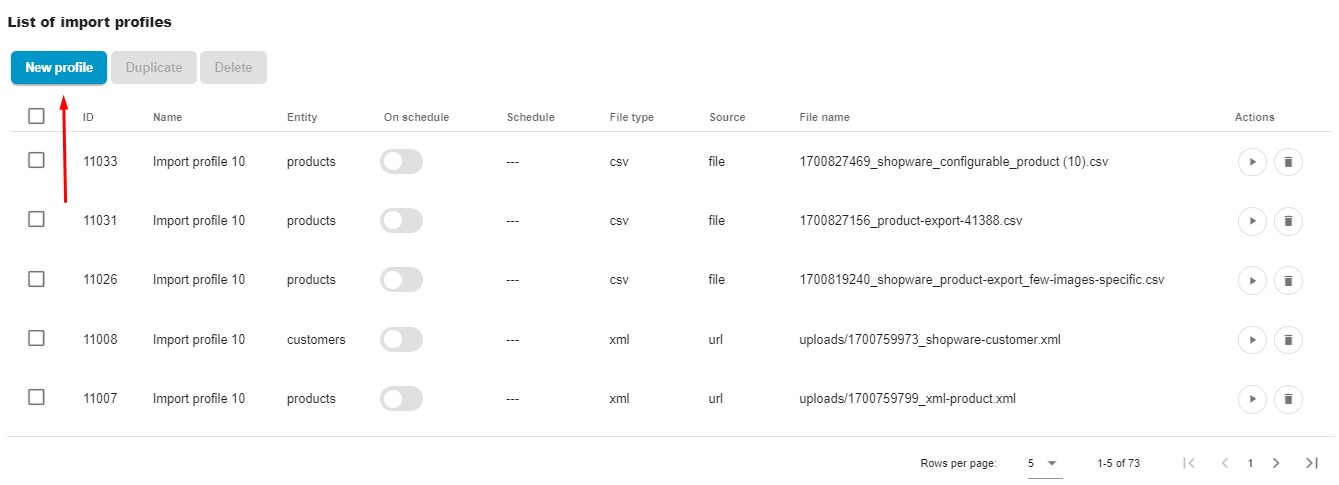
Step 1: Create a New Import Profile
It’s a breeze to get started. Just click the“New Profile” button available under “Extensions” and then “Improved Import, Export & Mass Actions,” followed by “Product import.”
Step 2: Configure Basic Import Settings
Now, you’ll find yourself on the first screen of your brand-new import profile, titled “Select File.” Here’s your roadmap to configuring a Shopware 6 URL import procedure:
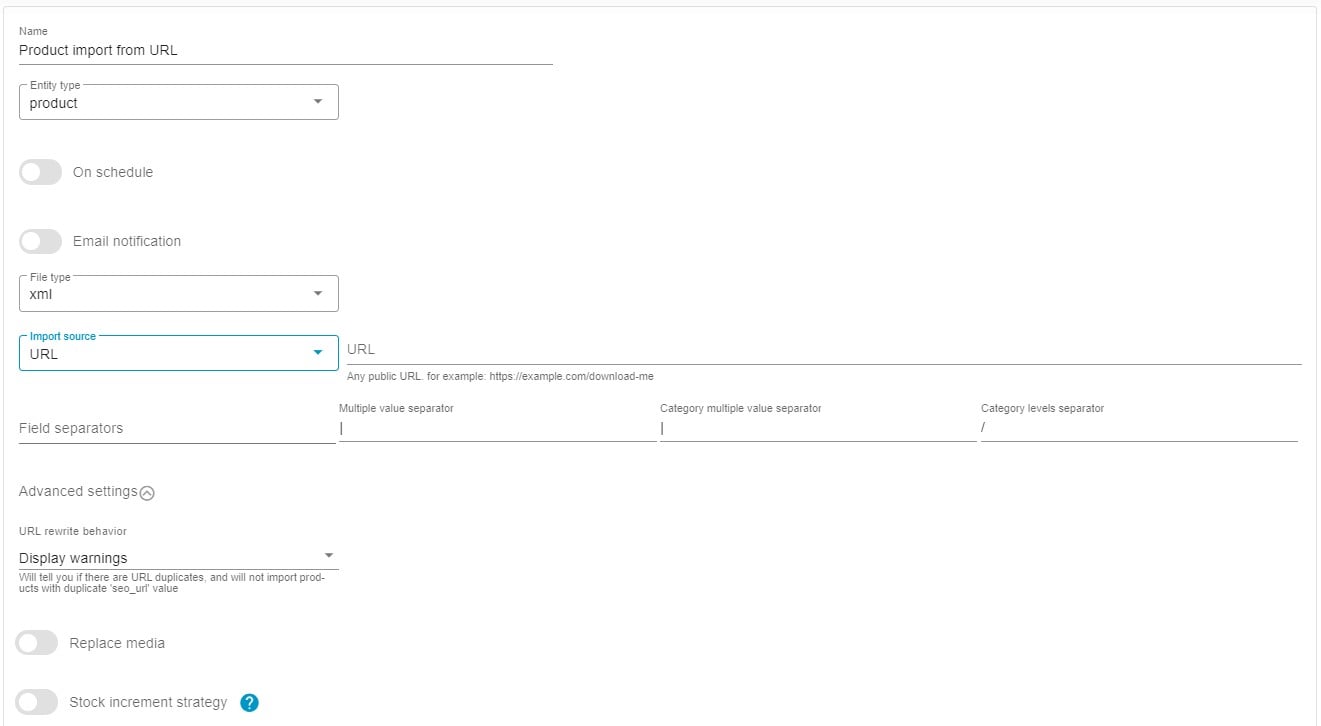
- First of all, you need to name your profile.
- Next, choose the entity you want to import from a URL to your Shopware 6 website, such as products or customers. Support for orders and other entities is coming soon.
- If you need to schedule your URL updates, go ahead and do so. You can automate the URL imports according to the provided plan.
- Configure email notifications to stay in the loop about import results.
- Now, it’s time to pick your preferred file format: XLSX, XML, CSV, or even Google Sheets.
- Select “URL” as the import source. It could also be a manual file upload, FTP import, Google Sheets transfer, or Google Drive import. Now, specify any public URL, for example https://example.com/download-me.
- Configure the Advanced Settings: URL rewrite behavior, Replace media, and Stock increment strategy.
When you input a URL for importing, it’s essential to consider the file type associated with that address, as the application has limitations in handling all file formats. For instance, trying to use an image URL for CSV import from a URL will result in an error.
To prevent such issues, the application examines the file’s MIME type and refrains from downloading it if the MIME type is incompatible.
MIME type, an abbreviation for Multipurpose Internet Mail Extension, is a standard indicating the file format. It serves as a fundamental characteristic of a digital resource, affecting its accessibility and usability over time.
Here’s a current list of MIME types supported by the application:
|
1 2 3 4 5 6 7 8 9 10 11 12 13 14 15 16 17 18 19 20 |
"csv" => [ "text/html", "text/csv", "text/comma-separated-values", "text/x-comma-separated-values", "text/tab-separated-values", "application/x-csv", "application/csv", "text/plain", "application/octet-stream" ], "xml" => [ "text/html", "application/xml", "text/xml" ], "xlsx" => [ "application/vnd.ms-excel", "application/vnd.openxmlformats-officedocument.spreadsheetml.sheet" ] |
If you import an unsupported file, the app displays the following error:
Failed! Bad url. mime/type mismatch or max size exceed
Step 3: Configure Mapping
Armed with these fundamental import settings, it’s time to refine your mappings. On the next screen, you can precisely define which columns in your imported file correspond to the properties of your products or customers on your Shopware 6 site.
Ensuring the alignment between columns in your imported file and the product properties in Shopware 6 is essential. If the table structure in your import doesn’t perfectly align with Shopware 6’s criteria, no worries – easily substitute unsupported column names with the correct ones.
You can save these mappings to ensure that our extension works automatically applying the same matching scheme to all further URL imports.
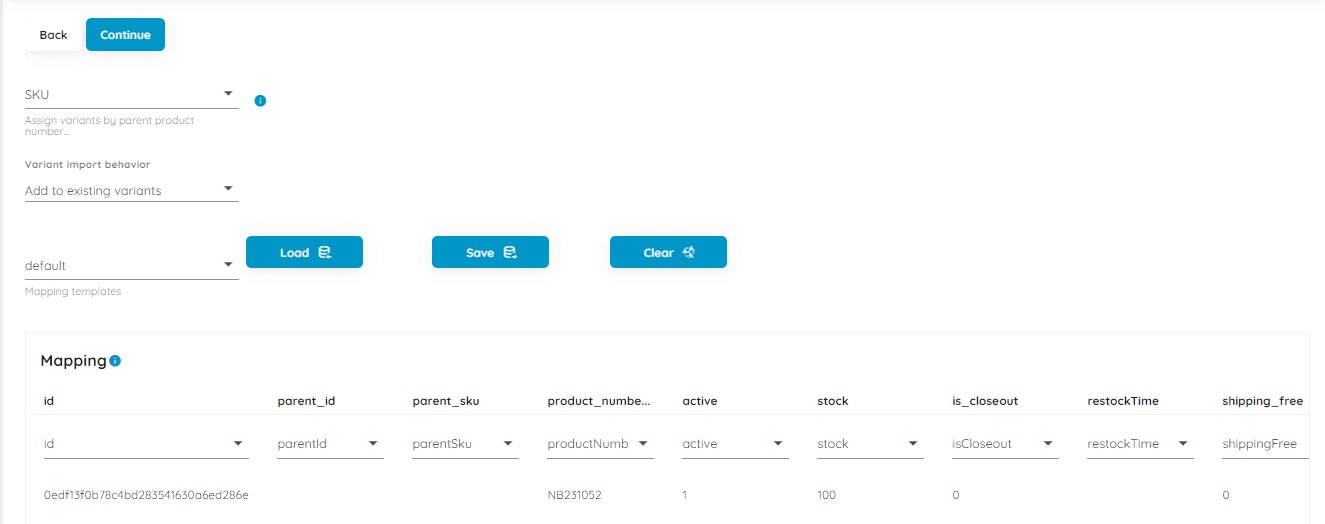
Also, you get extra flexibility when updating product variants. Make decisions such as whether to use the parent product’s SKU or ID for assignment. Also, choose whether to seamlessly add the new variants to existing ones or replace the old variants entirely.
Step 4: Preview Import Results
With the Improved Import, Export & Mass Actions app, you get a sneak peek of how your products will look after the import.
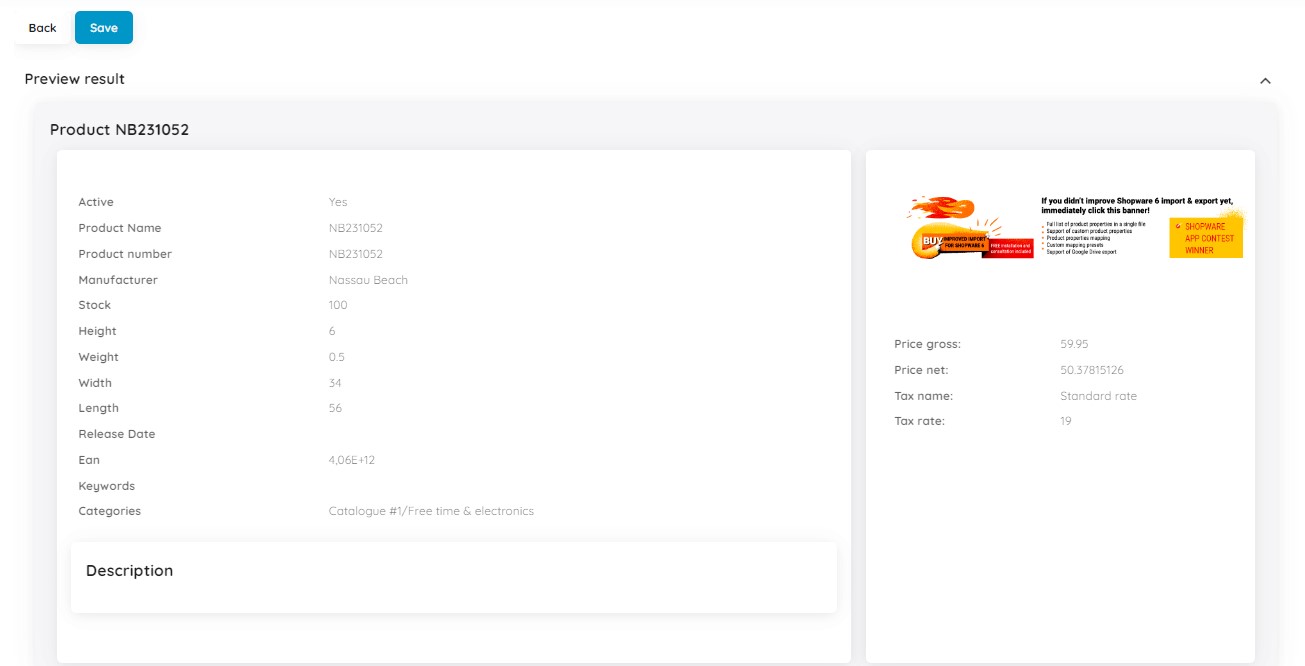
If something looks inappropriate, return to the previous step and address the issues.
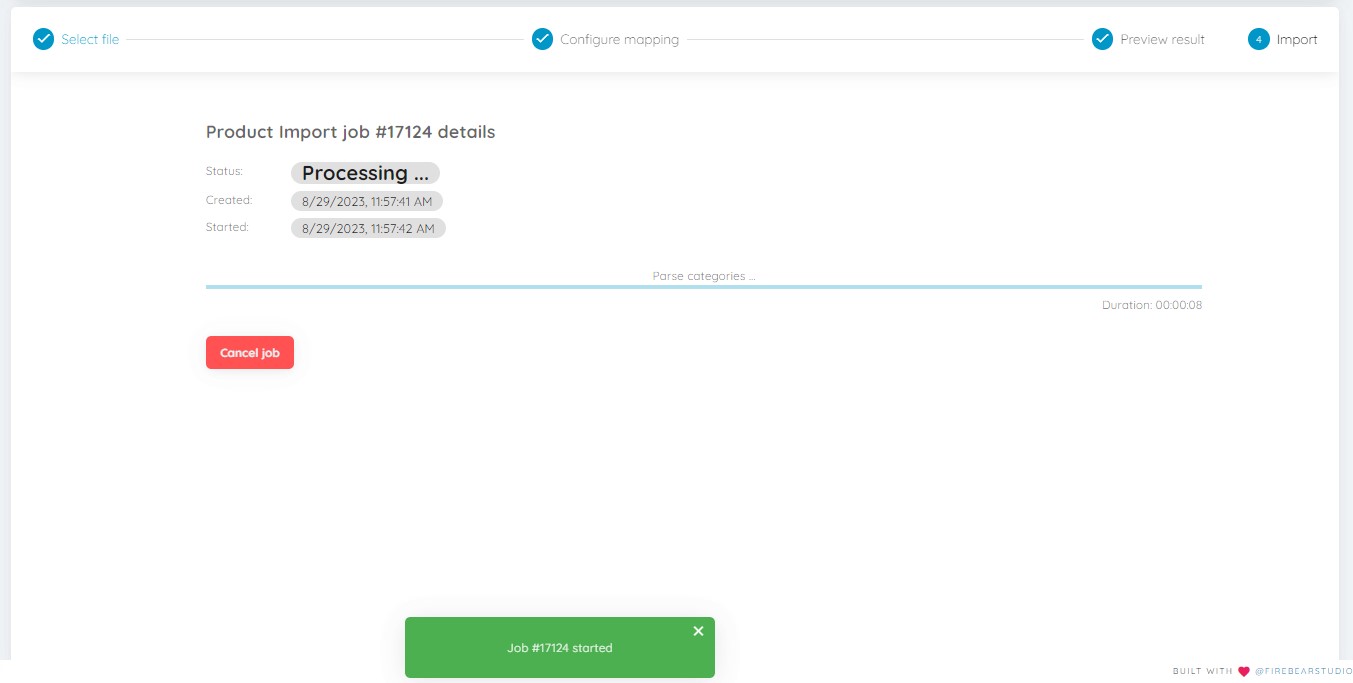
Step 5: Start Import
Now, click “Save” to store your new import profile. If you’ve scheduled updates, the app will take care of the import process automatically. Give the “Import” button a click to launch your Shopware 6 customer or product import from the URL.
You can find more information in our Firebear Improved Import, Export & Mass Actions App for Shopware 6 User Manual.
Other Features
Managing data in Shopware 6 has always been challenging. With the Firebear Improved Import, Export & Mass Actions app, you face completely new opportunities. It’s more than just simplifying imports and exports; it’s about providing you with tools and features that surpass the capabilities of the standard Shopware 6 setup. Let’s delve into how it transforms the game:
- Effortless Product Management: Keeping your product information up-to-date is a breeze. Manage product data and custom properties with unparalleled ease.
- Smooth Customer Data Handling: No more juggling customer details. Importing and exporting customer info is as easy as pie, making customer relationship management a breeze.
- Order Insights: Exporting order data is a snap. Gain valuable insights to understand transactions and delve into detailed sales analytics effortlessly.
- Precision Data Mapping: Craft precise data connections for seamless data flow between your Shopware 6 store and other systems.
- Customizable Schedules: Tired of manual data updates? Customize your import and export schedules, letting the tool take care of the heavy lifting.
- File Format Flexibility: No file format restrictions here. This tool plays well with different formats like CSV, XML, and XLSX, ensuring silky-smooth data transitions.
- Google Sheets Collaboration: Collaborative data management is a breeze with seamless integration between Shopware 6 and Google Sheets. Working together on data has never been easier.
- Effortless File Uploads: Ditch the complications. Importing and exporting data is as straightforward as direct file uploads, making your data management hassle-free.
- Enhanced Security: Concerned about data security? Rest easy. The tool supports secure FTP/SFTP protocols, providing extra peace of mind during data transfers.
- Google Drive Integration: Google Drive integration adds a layer of convenience and accessibility to the entire process.
The Improved Import, Export & Mass Actions app redefines how Shopware 6 store owners handle their data transfer operations. Whether it’s maintaining your product catalog, managing customer data, or handling orders, this app simplifies complex tasks, ultimately supercharging your online store’s efficiency. Ready to learn more? Dive deeper into this fantastic tool by visiting: