How to Boost Sales with Shopware 6 Cross Selling: The Ultimate 2025 Guide
Want to increase your average order value and improve customer experience? Shopware 6 cross selling helps you recommend complementary products, encouraging shoppers to add more to their carts. Whether it’s suggesting accessories for electronics, complete outfits in fashion, or must-have add-ons for home appliances, cross-selling is a proven way to drive revenue.
In this guide, we’ll walk you through everything you need to know — how to set up, import, and export cross-selling data in Shopware 6 — so you can automate recommendations and streamline your product strategy. Learn how to create dynamic product display, optimize manual assignments, and leverage bulk import/export to save time while boosting sales. Ready to make cross-selling work for your store? Let’s dive in!

Table of contents
- What is Shopware 6 Cross Selling?
- Benefits of Cross-Selling in Shopware 6
- How Cross Sells Work in Shopware 6
- How to Set Up Shopware 6 Cross Selling
- How to Import Shopware 6 Cross-Selling Data
- How to Export Shopware 6 Cross-Selling Data
- Final Words: Unlock the Full Potential of Shopware 6 Cross Selling
- FAQ: Everything You Need to Know About Shopware 6 Cross Selling
What is Shopware 6 Cross Selling?
In essence, it’s Shopware’s way of enabling cross selling – a sales technique where you encourage shoppers to add additional items that complement the product they’re interested in. In Shopware 6, cross selling is a built-in feature that allows you to recommend related or complementary products to your customers on product pages.
Suppose a customer is viewing a camera. As a store manager, you can configure Shopware 6 cross-selling feature to automatically suggest a camera bag or tripod that goes well with that camera or several USB cables of different length for a printer:
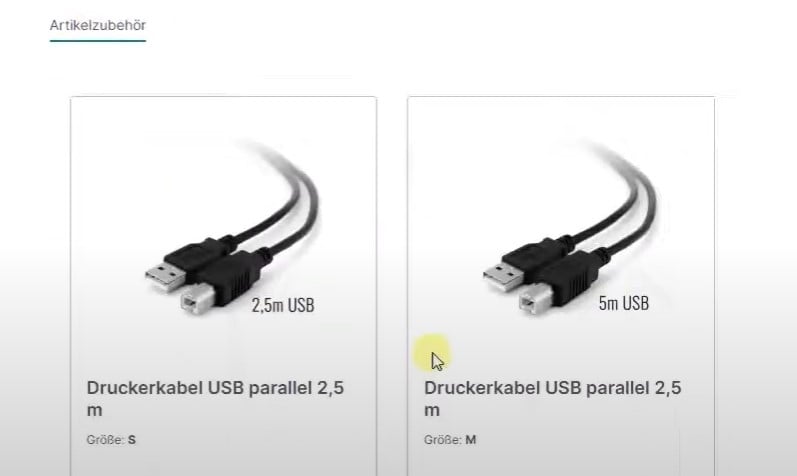
However, don’t mistake Shopware cross-selling for upselling. While upselling encourages customers to upgrade to a higher-end product, cross-selling promotes complementary items that enhance or go along with the original purchase.
By using Shopware 6’s cross-selling feature, you can display these “you might also like” or “often bought together” suggestions directly on the product detail page, making it easy for customers to discover and add related products to their cart.
Benefits of Cross-Selling in Shopware 6
Implementing cross-selling in Shopware 6 comes with several advantages for your online store:
- Higher Average Order Value (AOV): Recommending complementary products often leads customers to buy more in a single order, naturally increasing the average order value. Shoppers already interested in one item are likely to add a related item if it fits their needs, which means each customer transaction can grow larger with effective cross-sells.
- Increased Sales, Profit Margins, & Customer Lifetime Value: Every additional item added to the cart means more revenue per customer. Many retailers find that accessories or add-ons can carry higher profit margins than the primary product. By highlighting these items, you not only boost sales figures but can also improve profitability on each order. (In fact, cross-selling done right is so powerful that an estimated 35% of Amazon’s sales come from product recommendations like cross-sells!)
- Improved Customer Satisfaction & Loyalty: Cross-selling enhances the shopping experience by conveniently showing shoppers items they may need or find useful, without the customer having to search for them. This adds value for the customer – they feel understood and catered to when they see relevant product pairings. Over time, this can foster greater customer satisfaction and loyalty. By fulfilling more of a customer’s needs in one go, you increase the chances they’ll return (raising their lifetime value to your business).
How Cross Sells Work in Shopware 6
Shopware 6 makes it straightforward to set up cross-selling for your products. In the Shopware admin dashboard, you can configure cross-selling on a per-product basis by adding a cross-selling section to a product’s detail settings.
Shopware lets you choose between two methods for filling this cross-selling section:
- Manual Assignment: This method lets you hand-pick specific products to recommend alongside the main product. For instance, if you’re editing a laptop product, you could manually assign a particular laptop case or mouse to show up as cross-sell items. In Shopware 6’s admin, you’d select “Manual assignment” and then choose one or more products from your catalog to link as cross-sells. Those selected items will be displayed on the product page as suggestions.
- Dynamic Product Groups: This method automatically pulls in a list of recommended products based on predefined rules or criteria (what Shopware calls dynamic product groups). Instead of choosing products one by one, you select a dynamic group – for example, a group that includes all products in the same category or with the same manufacturer. Shopware will then display items from that group as cross-sell recommendations. This is useful if you want the cross-sell section to update automatically when your catalog changes (like always showing the latest products in a related category). You can also set sorting (by name, price, etc.) and limit how many products to show in this section
It’s possible to add multiple cross-selling groups to a single product. For example, a product page could have an “Accessories” tab and a “Similar Products” tab if you configure two cross-selling groups for different purposes. Shopware allows you to order these sections by assigning a position number to each cross-selling group (so you control which appears first, second, and so on).
On the storefront, if only one cross-selling is added, it will simply display on the product page; if multiple are active, they’ll appear as separate tabs or sections under the product details for the customer to browse.
Once activated, the cross-sell items show up immediately on the product’s page, usually below the main product information, labeled with the title you provided (e.g. “Accessories”) so customers can easily spot them.
How to Set Up Shopware 6 Cross Selling
To create Shopware 6 cross-sells, you need to add a new cross-selling product in your admin panel. Go to Catalogues > Products> Select Product > Cross Selling and follow these simple steps:
1. General Cross-Selling Settings
When setting up cross-selling for a product, you’ll first need to configure the following options:
- Name: Enter the title for the cross-selling section, which will appear in the storefront (e.g., “Recommended Accessories” or “Customers Also Bought”).
- Active: Toggle this option to enable or disable the cross-selling feature for the selected product.
- Type: Choose between Dynamic Product Group or Manual Assignment to determine how products will be selected for cross-selling.
Since each method has a different configuration process, let’s explore both options below.
2. Setting Up Cross-Selling with Dynamic Product Groups
The Dynamic Product Group option automatically selects related products based on predefined conditions. To configure it:
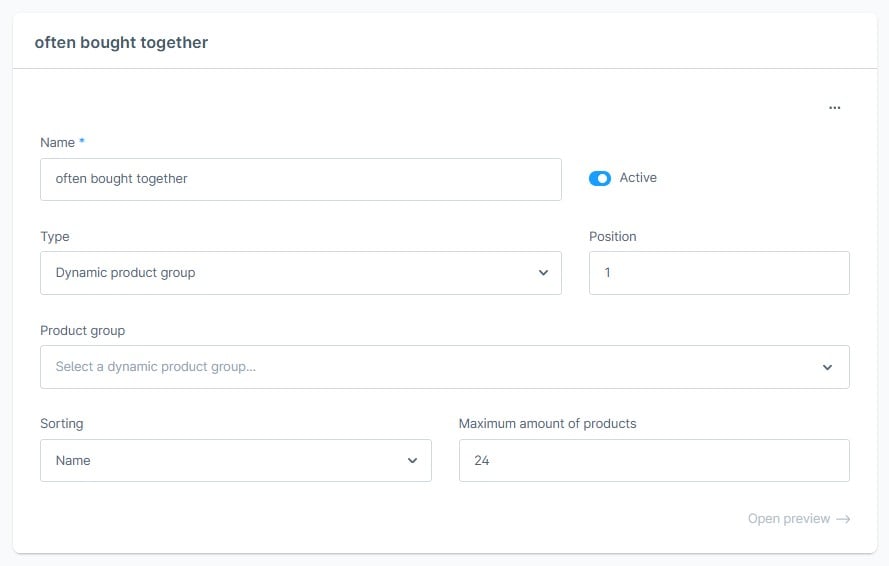
- Activate Cross-Selling: Use the Active toggle to enable or disable cross-selling for this product.
- Set the Display Order: Assign a numerical value (e.g., 1, 2, 3) to define the order in which cross-selling tabs appear in the storefront. Multiple cross-selling groups will be displayed as separate tabs if more than one is activated.
- Select a Product Group: Choose a predefined product group from your Shopware admin panel to determine which products will be displayed as cross-sell recommendations.
- Sort the Display: Click on Sorting to define how products appear — by name, price, or publication date (ascending/descending).
- Limit the Number of Displayed Products: Specify the maximum number of products shown in the cross-selling section on the product detail page.
- Preview the Selection: Click Open Preview to see a live preview of the recommended products before finalizing.
3. Setting Up Cross-Selling with Manual Assignment
With Manual Assignment, you can hand-pick specific products for cross-selling. The setup differs slightly from the Dynamic Product Group method:
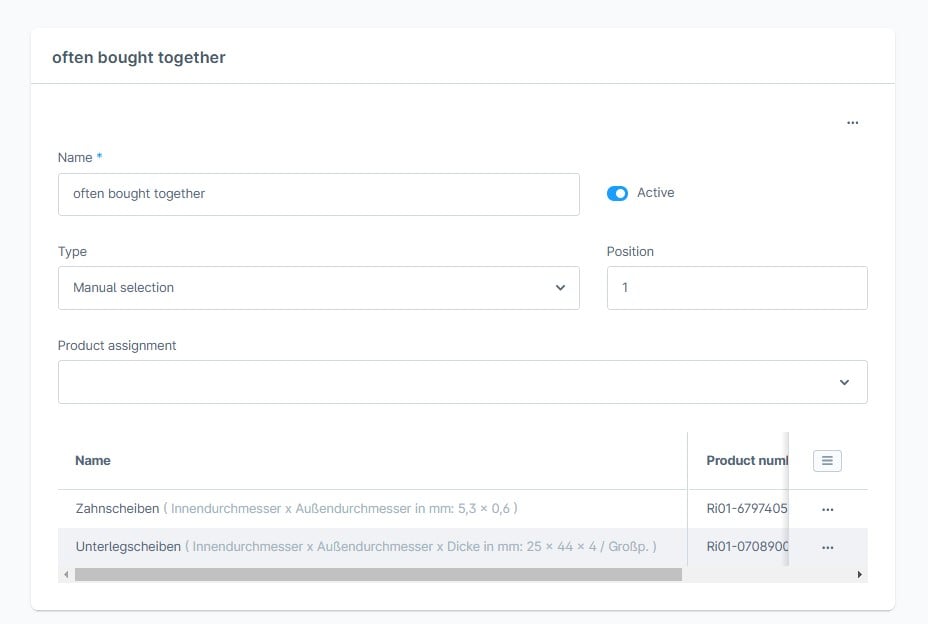
- The options for Name, Active, and Position remain the same.
- Sorting, Maximum Number of Products, and Open Preview options are not available in this mode.
- Product Assignment: Instead of selecting a product group, you manually choose one or more specific products from your store’s catalog. These selected products will then appear in the cross-selling section.
- Once at least one product is assigned, it will be displayed in the preview area below.
Real-World Examples of Shopware 6 Cross-Selling in Action
Shopware 6 cross-selling isn’t just a fancy feature — it’s a smart way to boost sales while making shopping easier for customers. Let’s look at how it works in different industries:
- Electronics: A customer checking out a smartphone might see suggestions for a protective case, screen protector, and wireless earbuds. With Shopware 6 cross-selling, these recommendations can appear in an “Accessories” section on the product page, making it easy for shoppers to grab everything they need in one go. The result? A better shopping experience for them and a higher order value for your store.
- Fashion & Apparel: Cross-selling works great for styling outfits. Imagine someone browsing a dress — Shopware 6 can automatically suggest matching heels, a clutch, or jewelry to complete the look. With a “Complete the Outfit” section, shoppers get inspiration without having to hunt for coordinating items, and retailers sell more in a single transaction.
- Home & Living: Someone buying a coffee machine is likely to need coffee filters, pods, or a grinder. Shopware 6 cross-selling can display these extras right on the product page or even at checkout, so customers don’t forget essential add-ons. It’s not just a sales boost — it’s good customer service that makes shopping more convenient.
- Marketplaces & Large Stores: Even e-commerce giants rely on cross-selling. Think about Amazon’s famous “Customers who bought this also bought…” section. It’s one of their biggest revenue drivers, accounting for about 35% of their sales. Implementing a similar strategy in your Shopware 6 store — whether through dynamic product groups or manually assigned recommendations — can drive more multi-product purchases and increase average order value.
With Shopware 6, setting up cross-selling is simple, and the benefits are huge. Customers get helpful recommendations without extra effort, and your store sees more sales per transaction. It’s a win-win — a better shopping experience for buyers and a revenue boost for you.
By pairing each product with relevant accessories or complementary items, you make shopping more intuitive while increasing your store’s overall performance. All it takes is a smart cross-selling strategy, and you’re on your way to bigger baskets and happier customers!
But what if you want to skip the manual work and manage cross-selling items across multiple stores more efficiently — by importing and exporting them instead?
How to Import Shopware 6 Cross-Selling Data
Managing Shopware 6 cross selling manually for a large catalog can be time-consuming. Instead of setting up each cross-sell manually, you can import cross-selling data in bulk, streamlining the process and ensuring consistency across your store. Whether you’re running a single storefront or multiple sales channels, importing cross-selling data helps automate product recommendations efficiently.
However, Shopware 6 doesn’t support cross-sell imports by default. To import cross-selling data, you’ll need to install the app.
1. Preparing for Cross-Selling Data Import
Before you start importing cross-selling data to Shopware 6, make sure you have everything set up correctly. This will prevent errors and ensure a smooth import process.
✅ Products are created: Cross-selling works by linking existing products, so ensure that all products involved in cross-selling are already in your catalog.
✅ Dynamic product groups are configured: If you’re using dynamic product groups (instead of manually assigned products), make sure they are already set up in Shopware 6.
✅ Import file is ready: Your import file should include all required fields, formatted correctly in CSV, XML, or Google Sheets. This ensures that Shopware 6 can correctly map and apply the cross-sell data.
2. Importing Cross-Selling Data in Shopware 6
To import cross-selling relationships into Shopware 6, follow these steps:
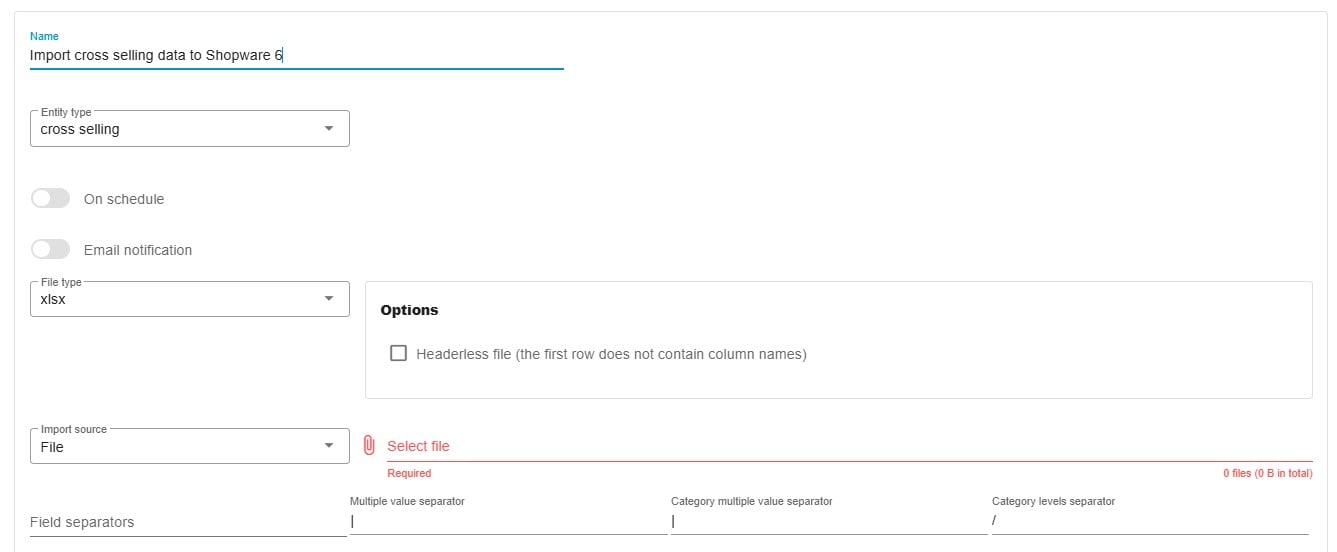
- Navigate to the Import Module: Go to Extensions > Improved Import, Export & Mass Actions > Import and create a new import profile.
- Select the Correct Import Type: Choose “cross selling” as the import entity type to ensure your file is processed correctly.
- Choose an Import Source: Upload your file from CSV, XML, Google Sheets, or another supported source.
- Map Fields to Shopware: Ensure that your import file fields match the required Shopware cross-selling fields.
- Run the Import: Start the import process, and Shopware 6 will apply the cross-sell relationships to your products.
A successful import will automatically link the selected products for cross-selling, making it easier to manage recommendations without manual setup.
3. Key Fields for Cross-Selling Import
When importing Shopware 6 cross selling data, each field plays a crucial role in defining how products are linked and displayed in the storefront. Below is a summary of key fields and their functions:
| Field Name | System Field Name | Description | Value Example |
| ID | id | Unique identifier for the cross-selling entry. Optional for new entries, can be used for updating existing ones. | 11a12b13c14d15e16f17g18h19i20j |
| Name | name | Name of the cross-selling section. Required when creating new entries. | “Recommended Products” |
| Product ID | productId | ID of the product to which the cross-selling will be attached | 22a23b24c25d26e27f28g29h30i31j |
| Product Number | productNumber | Product number of the product to which the cross-selling will be attached. Can be used instead of productId. | “SW10001” |
| Position | position | Display order of this cross-selling section. Lower numbers appear first. | 1 |
| Sort By | sortBy | How to sort the displayed cross-selling products. | “name”, “price”, “releaseDate”, or “productNumber” |
| Sort Direction | sortDirection | Direction to sort the cross-selling products. | “ASC” or “DESC” |
| Type | type | Type of cross-selling. Required when creating new entries. | “productList” or “productStream” |
| Active | active | Whether the cross-selling is active. | true or false, 1 or 0 |
| Limit | limit | Maximum number of products to display. | 4 |
| Product Stream ID | productStreamId | ID of the dynamic product group to use. Required when type is “productStream”. | 33a34b35c36d37e38f39g40h41i42j |
| Product Stream Name | productStreamName | Name of the dynamic product group. Can be used instead of productStreamId. | “New Products” |
| Assigned Products | assignedProducts | Product numbers of manually assigned products, separated by |
. Required when type is “productList”. |
For a complete breakdown of required fields, check the.
4. Import Rules and Requirements
Updating Cross-Selling Entries
When updating existing cross-selling data, you must provide either:
✔ The id field (if updating a specific cross-selling entry)
✔ Both productId (or productNumber) and name to identify and modify an entry
Type-Specific Import Requirements
- For productList type (manual assignment):
✅ The assignedProducts field is required.
✅ Products must already exist in the catalog.
✅ Product numbers should be separated by “|” (configurable in Import Profile settings). - For productStream type (dynamic product groups):
✅ Either productStreamId or productStreamName is required.
✅ The product stream must exist in the system—Shopware does not automatically create it.
Field Validations
- sortBy accepts: “name”, “price”, “releaseDate”, “productNumber”.
- sortDirection accepts: “ASC” or “DESC”.
- position and limit must be numeric values.
- active accepts boolean values (true/false, 1/0).
Additional Features
✅ Existing cross-selling entries are fully replaced when updated – previous products linked to the entry will be removed.
✅ Shopware 6 automatically links productId from productNumber if needed.
✅ If productStreamName is provided, Shopware will automatically resolve productStreamId.
These rules help prevent conflicts and ensure that your cross-selling relationships are accurately imported.
5. Why Importing Shopware 6 Cross-Selling Data is a Game-Changer
Manually configuring cross-selling for every product can take hours, especially for stores with large inventories. By importing cross-selling data, you can:
✔ Automate cross-sell recommendations across multiple stores and sales channels.
✔ Update product relationships in bulk instead of modifying them one by one.
✔ Enhance product discovery by dynamically assigning relevant items to each product.
With a structured import file and Shopware’s import system, Shopware 6 cross selling becomes seamless, scalable, and incredibly efficient. Whether you’re looking to implement AI-powered recommendations, dynamic bundles, or manually curated product pairings, the import tool ensures you can maximize sales opportunities without extra effort.
How to Export Shopware 6 Cross-Selling Data
Exporting Shopware 6 cross selling data allows you to back up, analyze, or migrate your cross-selling configurations. Whether you need to transfer data between stores, make bulk edits, or generate reports, the export process ensures you have all the necessary details structured in a single file.
1. Export Fields in Shopware 6 Cross Selling
When you export cross-selling data in Shopware 6, the generated file includes key details about each cross-sell entry. These fields provide a complete view of how cross-sells are structured within your store:
Basic Cross-Selling Information
These fields define the core properties of each cross-selling entry:
- ID: A unique identifier for each cross-sell entry.
- Name: The title of the cross-selling section as displayed in the storefront (e.g., “Recommended Products”).
- Position: The order in which the cross-sell section appears in relation to others.
- Type: Determines whether the cross-sell uses manually assigned products (productList) or a dynamic product group (productStream).
- Active Status: Indicates whether the cross-sell entry is currently enabled.
- Limit: Specifies the maximum number of products shown in the cross-sell section.
Sorting Settings
These fields determine how cross-selling products appear in the storefront:
- Sort By: Defines the sorting criteria for cross-sell products (e.g., name, price, releaseDate, productNumber).
- Sort Direction: Specifies whether the sorting is ascending (ASC) or descending (DESC).
Associated Product Information
These fields identify the primary product to which the cross-sell applies:
- Product ID: The unique identifier of the main product.
- Product Number: The SKU or product number assigned to the main product.
Product Stream Information (For productStream Type)
If the cross-sell entry is based on a dynamic product group, these fields define its configuration:
- Product Stream ID: The unique identifier of the dynamic product group.
- Product Stream Name: The name of the assigned product stream.
Assigned Products (For productList Type)
For manually assigned cross-sells (productList type), the exported data includes:
- Assigned Products: A comma-separated list of product numbers that are manually linked to the cross-sell entry.
2. Exporting Cross-Selling Data in Shopware 6
Exporting Shopware 6 cross selling data is essential for managing large product catalogs, migrating data, or analyzing cross-selling performance. Whether you need to update multiple cross-selling relationships or transfer them to another system, the export process ensures you have all the necessary data in an organized format.
To export cross-selling relationships from Shopware 6 cross selling, follow these steps:
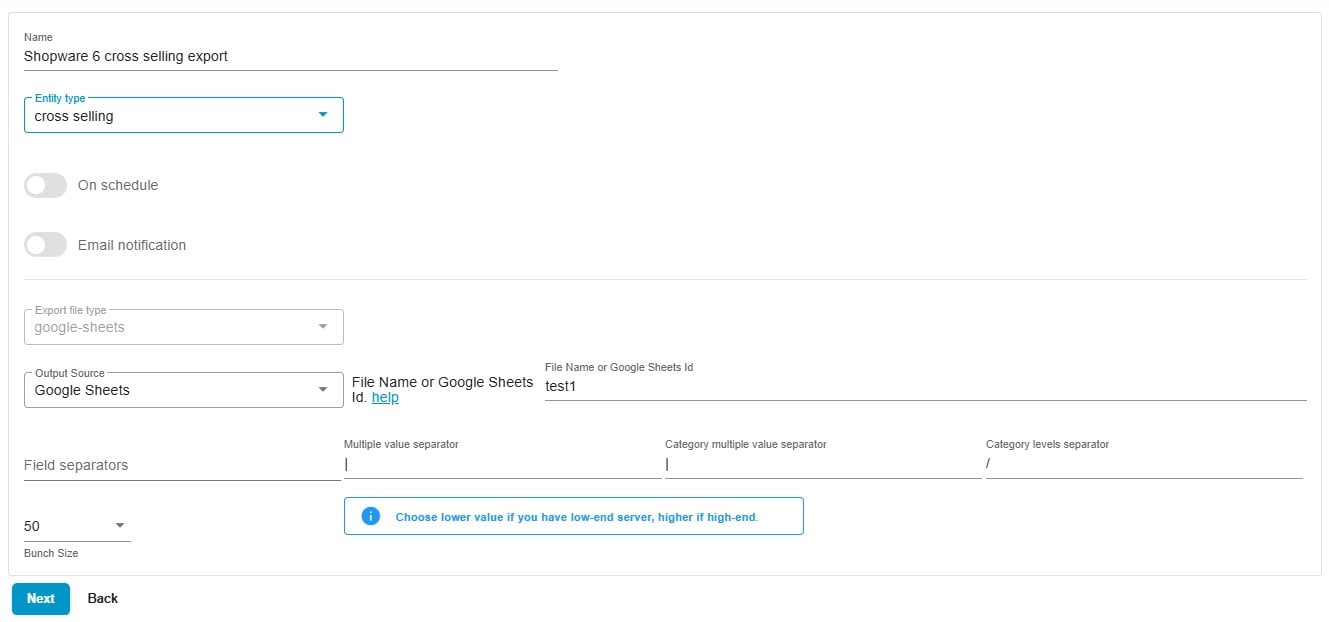
- Navigate to the Export Module: Go to Extensions > Improved Import, Export & Mass Actions > Export and create a new export profile.
- Select the Correct Export Type: Choose “cross selling” as the export entity type to ensure the system retrieves the relevant data.
- Configure Other Export Parameter: Select the desired file format and source. Automate export processes if necessary.
- Apply Filters (Optional): Use filters to export only specific cross-selling data, such as entries for a particular product or active cross-sell sections.
- Run the Export: Start the export process, and Shopware 6 will generate a file containing all relevant cross-selling data.
A successful export provides a structured file with all cross-selling configurations, allowing you to analyze, modify, or re-import the data as needed.
3. Field Reference Table for Cross-Selling Export
The table below provides a structured overview of the fields included in the Shopware 6 cross selling export file:
| Field Name | System Field Name | Description | Example Value | Filterable |
| ID | id | Unique identifier for the cross-selling entry. | 11a12b13c14d15e16f17g18h19i20j | No |
| Name | name | Name of the cross-selling section. | “Recommended Products” | Yes |
| Product ID | productId | ID of the product where cross-selling is applied. | 22a23b24c25d26e27f28g29h30i31j | Yes |
| Product Number | productNumber | SKU or identifier of the primary product. | “SW10001” | Yes |
| Position | position | Order in which the cross-selling section appears. | 1 | No |
| Sort By | sortBy | Defines how cross-sell products are sorted. | “name” | No |
| Sort Direction | sortDirection | Sorting order of cross-selling products. | “ASC” | No |
| Type | type | Defines if cross-selling is manual (productList) or dynamic (productStream). | “productList” | Yes |
| Active | active | Indicates whether the cross-selling entry is enabled. | true | Yes |
| Limit | limit | Maximum number of products displayed in cross-selling. | 4 | No |
| Product Stream ID | productStreamId | ID of the dynamic product group (for productStream type). | 33a34b35c36d37e38f39g40h41i42j | Yes |
| Product Stream Name | productStreamName | Name of the dynamic product group (for productStream type). | “New Products” | Yes |
| Assigned Products | assignedProducts | List of manually assigned products (for productList type). | “SW10002,SW10003,SW10004” | No |
This field mapping ensures that exported data is structured for easy analysis, re-importing, or migration.
3. Export Filters in Shopware 6 Cross Selling
To refine the export data, Shopware 6 allows you to apply filters, helping you extract only the cross-selling information relevant to your needs.
Available Filters
You can filter exported cross-selling entries based on the following fields:
- Name: Export only cross-selling entries that match a specific section name.
- Product ID: Extract cross-selling data linked to a specific product by its unique ID.
- Product Number: Export entries associated with a specific product number (SKU).
- Type: Filter data by cross-selling type (productList for manual assignments or productStream for dynamic product groups).
- Active Status: Export only active (true) or inactive (false) cross-selling entries.
- Product Stream ID: Narrow down results to entries linked to a specific dynamic product group.
- Product Stream Name: Export only entries associated with a particular product stream.
How to Use Export Filters
These filters can be applied directly in the export profile settings when generating an export file. For example:

- If you only want to export active cross-selling sections, set the filter for active = true.
- If you need cross-selling data for a specific product category, filter by productNumber.
- To extract only manually assigned cross-sells, filter by type = productList.
By leveraging filters, you can export targeted cross-selling data instead of exporting the entire database.
4. Why Exporting Shopware 6 Cross-Selling Data is Useful
Exporting Shopware 6 cross selling data isn’t just about backups — it enables better product management, bulk updates, and store migrations. Here’s why it matters:
✔ Effortless Data Migration: If you’re moving to another store, exporting cross-sell data allows you to easily transfer recommendations.
✔ Bulk Editing Made Easy: Export cross-selling configurations, modify them in bulk using a spreadsheet, and re-import them to update multiple products at once.
✔ Data Analysis & Reporting: Use exported data to analyze cross-sell performance, optimize recommendations, and increase conversions.
✔ Multi-Store Management: If you run multiple storefronts, exporting allows you to replicate successful cross-selling strategies across different stores.
By utilizing Shopware 6 cross selling export capabilities, you can fine-tune your store’s product recommendations, increase average order value, and create a more personalized shopping experience — all with minimal effort.
Final Words: Unlock the Full Potential of Shopware 6 Cross Selling
Effective Shopware 6 cross selling is more than just a sales tactic — it’s a powerful strategy to enhance customer experience, boost order values, and maximize store performance. Whether you’re manually assigning cross-sell items or leveraging dynamic product groups, the right setup can significantly impact your revenue and customer satisfaction.
By importing Shopware 6 cross-selling data, you can automate product recommendations across multiple storefronts, saving hours of manual work while ensuring consistency. On the other hand, exporting Shopware 6 cross-selling data allows for in-depth analysis, bulk updates, and seamless store migrations. Together, these processes give you full control over how related products are presented to your customers.
If you haven’t yet optimized Shopware 6 cross selling, now is the perfect time. Take advantage of imports to scale your product relationships efficiently, use exports to refine your strategy, and watch your sales grow with smart product recommendations. Contact us now for further information on how the Import, Export & Mass Actions app can enhance your daily workflows.
FAQ: Everything You Need to Know About Shopware 6 Cross Selling
What is Shopware 6 cross selling?
Shopware 6 cross selling is a feature that allows store owners to display related or complementary products on a product page, encouraging customers to purchase additional items.
How does cross selling differ from upselling in Shopware 6?
Cross selling suggests additional products that complement the main purchase (e.g., a phone case for a smartphone), while upselling promotes higher-end versions of the same product.
How do I enable cross selling in Shopware 6?
You can enable cross selling by navigating to Products > Cross Selling in the Shopware 6 admin panel. From there, you can manually assign products or use dynamic product groups.
Can I import cross-selling data into Shopware 6?
By default, Shopware 6 does not support importing cross-selling data, but you can use the Import, Export & Mass Action app to bulk-import cross-sell relationships.
How do I export cross-selling data in Shopware 6?
To export cross-selling data, go to Extensions > Improved Import, Export > Export, select “cross selling” as the entity type, and choose your preferred format (CSV, XML, or Google Sheets).
What’s the difference between manual cross selling and dynamic product groups?
Manual cross selling: You select specific products to display as recommendations.
Dynamic product groups: Shopware automatically assigns related products based on predefined conditions.
How can I optimize cross selling to increase sales?
Use personalized recommendations, bundle frequently bought items, and position cross-sell sections strategically on product pages and checkout screens to maximize conversions.
Can I apply filters when exporting cross-selling data?
Yes! You can filter by product name, product ID, product number, type (manual or dynamic), active status, and product stream name to refine your export results.
How does cross selling impact my store’s revenue?
Cross selling boosts average order value (AOV) by encouraging customers to add complementary products to their carts, increasing total revenue without extra marketing costs.
Does Shopware 6 allow multiple cross-selling sections per product?
Yes, you can create multiple cross-selling sections for a single product, such as “Accessories” and “Similar Products”, to enhance the shopping experience.


