
Supercharging Your Shopware 6 Store with Improved Data Mapping: Import & Export Guide

In the ever-evolving e-commerce landscape, data is undeniably the lifeblood of any successful online storefront. Accurate, well-organized product information not only creates the foundation for your Shopware 6 website but also shapes the customer experiences within it. This brings us to a critical aspect of operating an online enterprise – data mapping.
Welcome to our guide on “Supercharging Your Shopware 6 Store with Improved Data Mapping.” This post will go into the realm of data mapping inside Shopware 6 and how it may become a game changer for your e-commerce ventures. We’ll go through the underlying ideas, emphasize the indisputable benefits, and give practical advice on how to use Shopware 6 data mapping to improve the management and efficiency of your e-commerce activities.
Whether you’re a hard-boiled Shopware 6 merchant looking to refine your data management strategy or a newcomer seeking to grasp the importance of data mapping, you are at the right place. Prepare to unlock the full potential of your online store as we embark on this journey into the world of precision, organization, and efficiency through improved Shopware 6 data mapping. And don’t miss our Shopware Cookbook – it contains multiple tips to enhance your e-commerce operations.

Table of contents
Understanding Data Mapping in Shopware 6
Let’s start with the fundamentals. Data mapping may sound a little bit complex, but it’s essentially the same as developing a plan for your e-commerce import and export operations. Let’s suppose you’re planning a cross-country tour. You’ll need a map to see which routes to take to reach your destination. Data mapping works in the same way, except instead of freeways, you’re navigating a sea of information.
In Shopware 6, data mapping is the process of connecting and arranging data from diverse sources so that your online shop can comprehend it. Consider a mapping interface and a translator, ensuring that everyone behind your e-commerce website speaks the same language. Without it, your store’s product listings, customer information, and order data may be disordered and impossible to operate.
Thus, data mapping provides your Shopware 6 store with the ability to understand where to find specific pieces of information, how to understand them, and how to apply them to your website. It connects the dots between your product database and the external sources. This secret sauce behind those seamless online shopping experiences your customers love may incorporate various tools both native and third-party.
In this article, we’ll break down the nitty-gritty of data mapping in Shopware 6. You will learn why it matters, how it works, and how it can transform your store into a well-oiled e-commerce machine. So, let’s dive right in.
Shopware 6 Import & Export Mapping Made Easy
In Shopware 6, mapping is bound to import and export profiles. It’s a part of your data transfer routine. Thus, you need to create a new profile or open an existing one to configure mapping in Shopware 6.
Note that a mapping profile can be used for import, export, or both depending on the selected option.
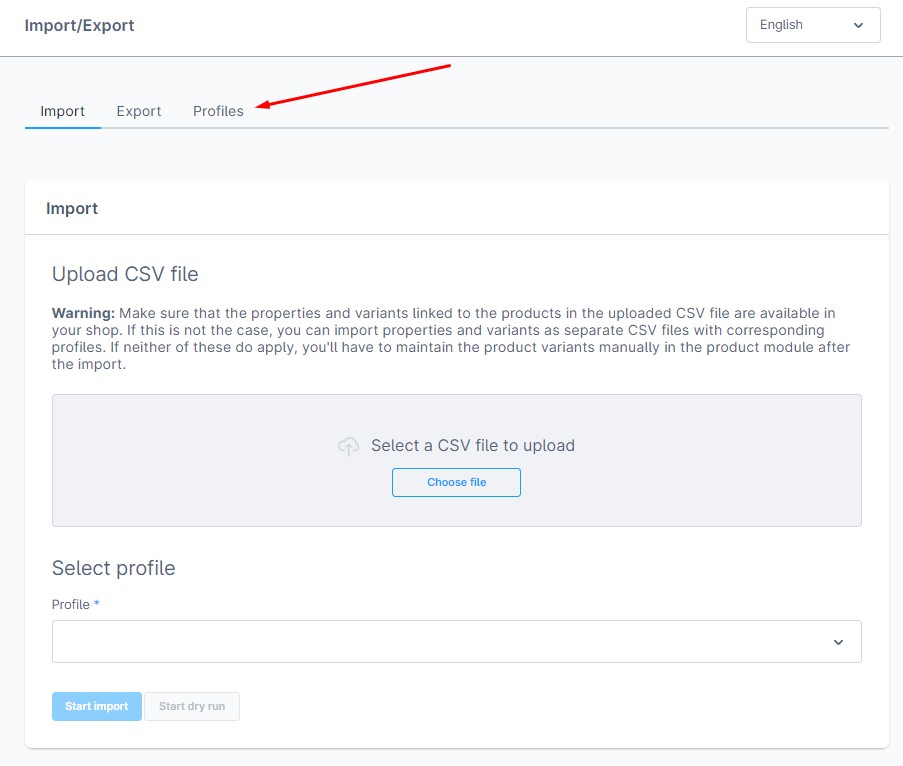
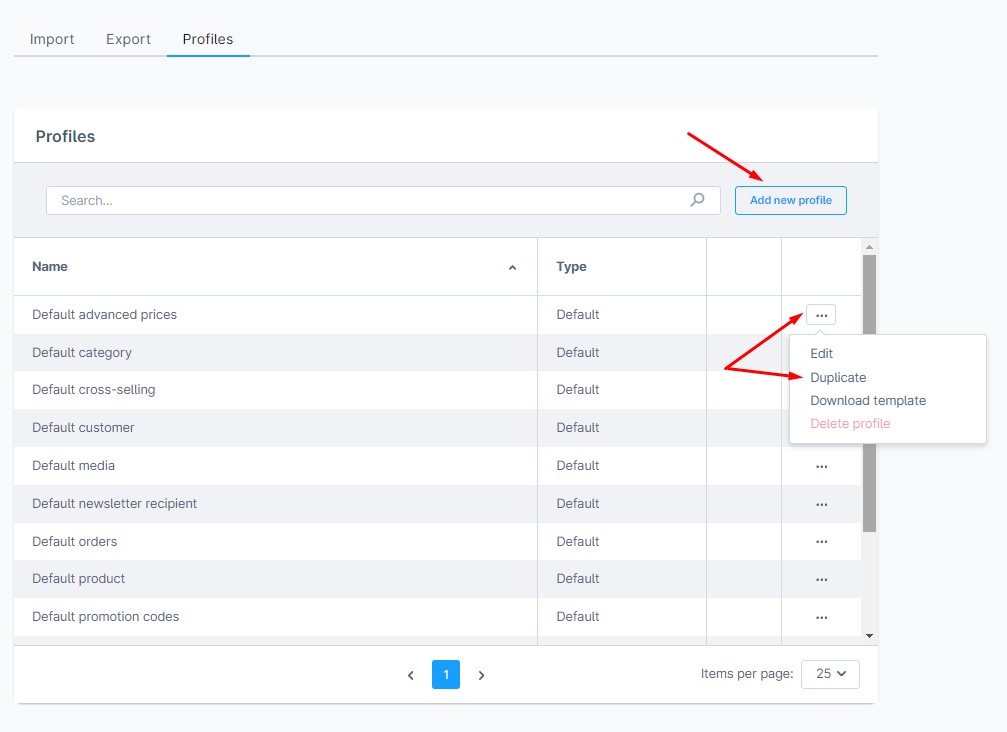
Proceed to Settings -> Import/Export and choose one of the following two ways of creating a new profile:
- Hit the Add new profile button while on the Profiles tab;
- Use the context menu to duplicate an existing profile and apply changes to it.
Below, we focus on the mapping part of the deal. You can find more information about import configurations in our Shopware 6 Import Guide.
General Tab
Now, let’s take a peek at the General tab. First things first, you’ve got the power to name your profile. Make it catchy, informative, or quirky – whatever floats your e-commerce boat.
Now, let’s talk about the object type. This is where it gets interesting. Object type determines the mode for importing data. Why does it matter? Because it shapes the way your data will be handled and limits the mapping options to match your chosen mode.
But here’s the catch: Once you’ve picked an object type and started playing around with your mapping options, there’s no turning back. You can’t switch to a different object type later on. So, choose wisely.
Other settings include Usage – it’s where you decide to create a universal profile or link it to import or export processes only. After that, configure separators and a couple of other options.
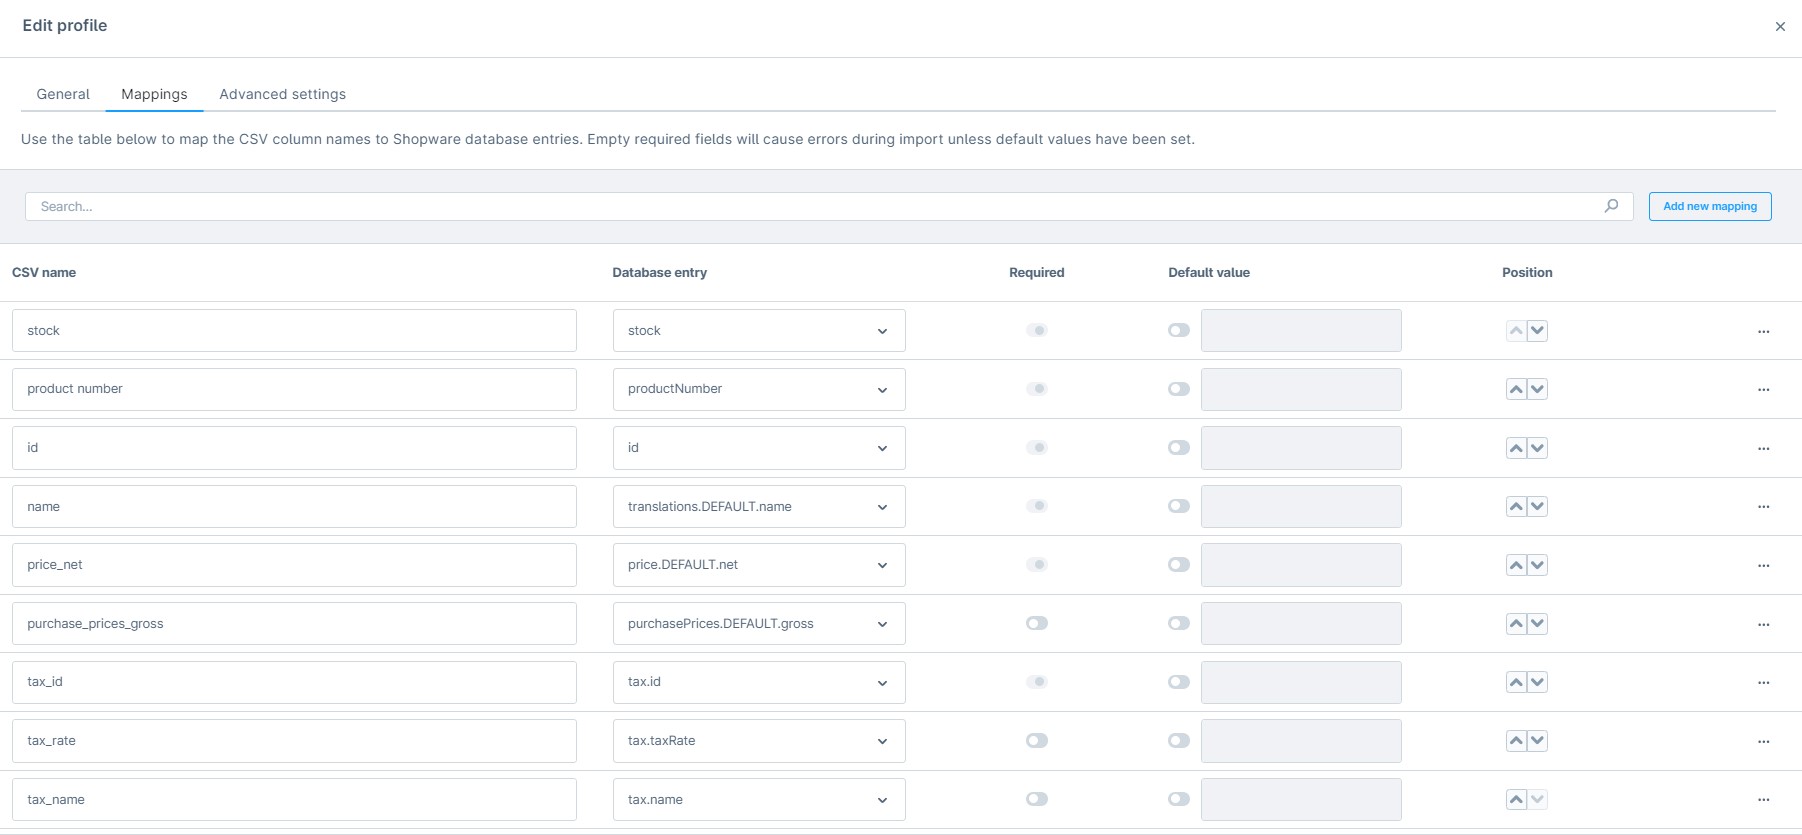
Next up, is the mapping table. It’s your playground for matching CSV fields with their counterparts in your database. This is where the magic happens – connecting the dots between your data sources and your Shopware 6 store.
Just remember, when you’re in the mapping zone, the object type you’ve chosen will guide your mapping options. So, make sure your selection aligns with your import profile’s mission, and you’ll be on your way to data mapping greatness.
Mappings
Let’s see how to create a mapping scheme for your Shopware 6 import and export profiles. It might sound a bit technical, but we promise it’s not rocket science.
- Add New Mapping. To get started, click that shiny “Add new mapping” button. A new line will appear in your mapping section, ready for action. Here, you’ll match a CSV entry with a database record. Make sure to use the name of the corresponding column from your CSV file because that’s what’s going to work. Add as many new mappings as your profile requires. Note that Shopware will only map the columns specified here for your import processes. As for exports, the system will only include the columns added to the mapping screen of your profile to the output.
- Specify What’s Required. Next up, is the “Required” toggle. This little guy lets you decide if a field is a must-have. Activate the toggle, and it becomes a required field. That means the corresponding spot in your import file must be filled. Forget to fill it, and you’ll get an import error. So, it’s like your safety net for data accuracy.
- Set Default Values. Shopware 6 is all about making life easier. That’s why it lets you specify default values. If a field is empty in your import file, these default values come to the rescue during the import. It’s like having a backup plan, just in case.
- Decide Where It Belongs. Now, let’s talk about the field position. This column helps you define where the corresponding field might pop up in your CSV file. It’s all about organization and making sure everything’s in the right place.
- Out with the Old. Lastly, if you ever want to tidy up your mapping scheme and get rid of unnecessary fields, use the context menu on the right. Click on it and choose the “Delete” option. It’s like spring cleaning for your mapping setup.
So, there you have it – mapping made easy in Shopware 6. It might seem like a lot, but once you get the hang of it, you’ll be mapping like an expert.
Strategies for Effective Data Mapping
In this section, we delve into strategies to ensure your data is seamlessly integrated into your Shopware 6 store. Whether you’re importing product data, customer information, or order details, our expert tips will empower you to create and manage data mappings like a pro.
Understand Your Data
The first and foremost thing about data mapping is understanding the attributes you work with. Before mapping, you need to get a crystal-clear sense of your data. Identify the essential fields, their relationships, and how they’ll be used in Shopware 6. This clarity guides your mapping efforts. The best thing to achieve this goal is to export a sample data file and explore it. Check our Ultimate Guide To Shopware 6 Export to learn where to take the sample data and how to understand it.

Use Consistent Naming
You need to maintain uniform naming conventions for your data fields. It ensures consistency and simplifies the mapping process. For example, if “Stock” is used in third-party CSVs to indicate the available stock for a product. Ensure it’s always “stock_available” mapped to Shopware’s “availableStock”. If your partner changes “stock_available” to “qtyaAvailable” or even “available_stock” your current mapping scheme won’t help Shopware 6 understand this attribute.

Leverage Existing Tools
Shopware 6 provides mapping tools and templates. Utilize them. They streamline the process and reduce manual work so that you can maintain data integrity and accuracy. However, you can always use more powerful alternatively. We will focus on one reliable replacement for the default Shopware 6 mapping tools soon.

Prioritize Data
Not all data fields are created equal. Prioritize the most critical information as described in the previous section. If you’re importing product data, focus on essential attributes like SKU, price, and stock level first. You can use the default Shopware 6 tools to cancel imports of files that lack the missing data.

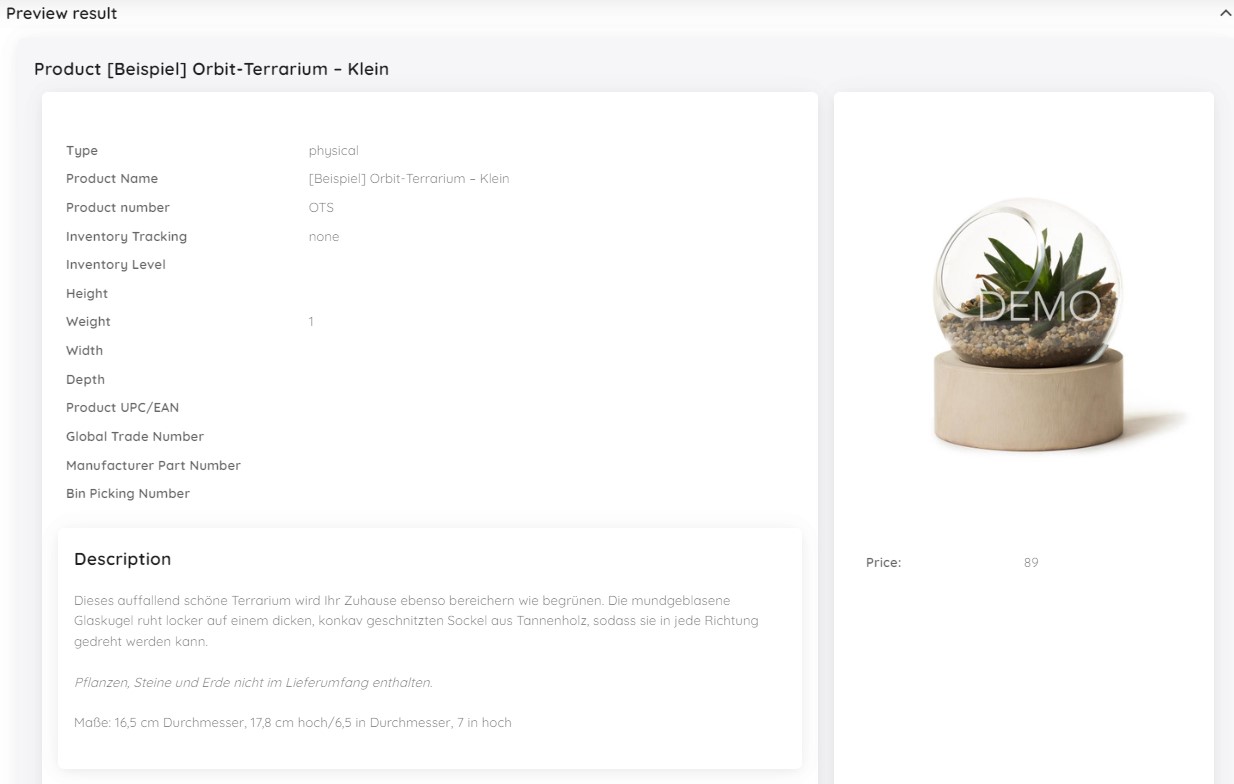
Test and Validate
Always test your data mappings with sample data before a full-scale import. This allows you to catch and correct errors, ensuring a smooth import process. Some third-party tools even offer a preview functionality that lets you inspect how your imported entities will look alike after import.
Save Your Templates
It is a good idea to save your mapping templates for further use to avoid repetitive manual work. Note that this strategy works only if your updates follow consistent naming. Both native and third-party tools let you save mapping templates for further use.
Document Your Mappings
It is even better to create documentation that outlines your data mapping strategy. Include field descriptions and mapping rules. It not only serves as a reference for future imports and helps onboard new team members but also provides the ability to swiftly customize the existing templates following the changing import and export conditions.
Stay Updated
Regularly review and update your data mappings. As your business evolves or new data sources are added, your mapping strategy may need adjustments to stay efficient. Keep in mind that mapping templates save time and effort only if your partners use consistent naming.
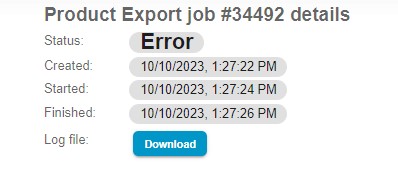
Run Error Handling
Implement error-checking mechanisms to identify and rectify mapping issues promptly. If you don’t do that, your time-savers turn into a void that consumes your most precise resource. Note that some instruments provide a detailed error log which is quite useful for error handling.
Stay Scalable
Consider the scalability of your mapping strategy. Will it accommodate future growth and data volume increases? Ensure your mapping solution is flexible and can evolve with your business. Although the default import and export tools of Shopware 6 provide decent mapping instruments, they lack flexibility in other areas. What replacement to use? We focus on that below.
Seek Expertise
If you’re dealing with complex data structures or extensive data migrations, it is always a good idea to ask an expert to help. Bear in mind that our team can provide invaluable insights and solutions for your data transfer strategies. Contact us to discuss your Shopware 6 mapping case.

Effective data mapping is the backbone of successful data transfers in Shopware 6. Following these strategies ensures that your mapping process is efficient, reliable, and scalable, ultimately helping you maintain accurate and up-to-date data in your store. In return, you will receive a number of significant benefits.
Key Benefits of Shopware 6 Data Mapping
So, why should you care about precise data mapping in Shopware 6? Well, let’s break it down:
- Rapid Scaling 🚀. Imagine your e-commerce business is booming, and you need to add hundreds of new products to your Shopware 6 store. Efficient data transfers make this a breeze. You can seamlessly import large volumes of data from any external source with the help of data mapping, helping your business grow without a hitch.
- Comprehensive Analytics 📊. The default Shopware 6 instruments are not enough to provide comprehensive reports. That’s why you are bound to precise data exports. However, you need to transfer accurate information to third-party systems to analyze it. You can gain deeper insights into your sales trends, customer behaviors, and inventory turnover after mapping Shopware 6 data to the requirements of your additional analytics tools.
- Better Supplier Relationships 🤝. If you’re working with suppliers, efficient data exports with precise mapping are also a must. Thus, you can provide your partners with accurate and up-to-date product information. On the other hand, it is possible to map any external product information to your local requirements, becoming the reliable partner your suppliers always wanted. It can lead to smoother collaborations and potentially better deals.
- Compliance and Reporting 📝. Some industries have strict regulations. Mapping helps you ensure your data exports meet compliance requirements effortlessly. Plus, you can generate detailed reports for auditing purposes without breaking a sweat.
- Reduced Data Entry Errors ❌. Manual data entry is error-prone, and errors can cost you time and money. So is a manual mapping that takes place straight in your CSV file. Efficient imports and exports that involve mapping profiles minimize these risks by automating the process, so your data transfers are much more reliable.
- Competitive Edge ⚡. In the fast-paced e-commerce world, speed means everything. Efficient data transfers give you the edge to respond quickly to market changes, new trends, or customer demands, helping you stay ahead of the competition. Mapping can help you implement advantages instead of spending time on manual data editing.
- Data Backup and Recovery 💾. Data is precious, and accidents happen. Efficient exports also serve as a form of backup. In case of data loss, you can swiftly recover your critical information.
These benefits are a testament to the profound impact that well-managed data transfers can have on your Shopware 6 store, from boosting efficiency to improving customer satisfaction and ultimately driving growth. And don’t forget that they incorporate mapping as an inevitable part of your data transfer strategies. But can dramatically enhance the corresponding out-of-the-box experience with a third-party solution.
Leveraging Improved Import, Export & Mass Actions Application
In this section, we introduce you to a game-changing tool that will take your data mapping endeavors in Shopware 6 to the next level – the Improved Import, Export & Mass Actions application. This powerful application serves as a Swiss Army knife for e-commerce data management, offering a range of features designed to simplify, enhance, and supercharge your data mapping efforts.
You will learn how this application streamlines Shopware 6 data mapping for both import and export processes, making them more efficient and user-friendly. We unveil a robust set of features it offers to not only support more precise data mapping but enhance other data transfer sides, whether you’re working with product data, customer details, or order information.
The principal difference between the Improved Import, Export & Mass Actions application and the default Shopware import/export is that the former keeps import and export profiles separate and unrelated while in Shopware 6 you can create universal profiles used for both import and export processes. Therefore, we explore import and export mapping screens separately.
Import Mapping
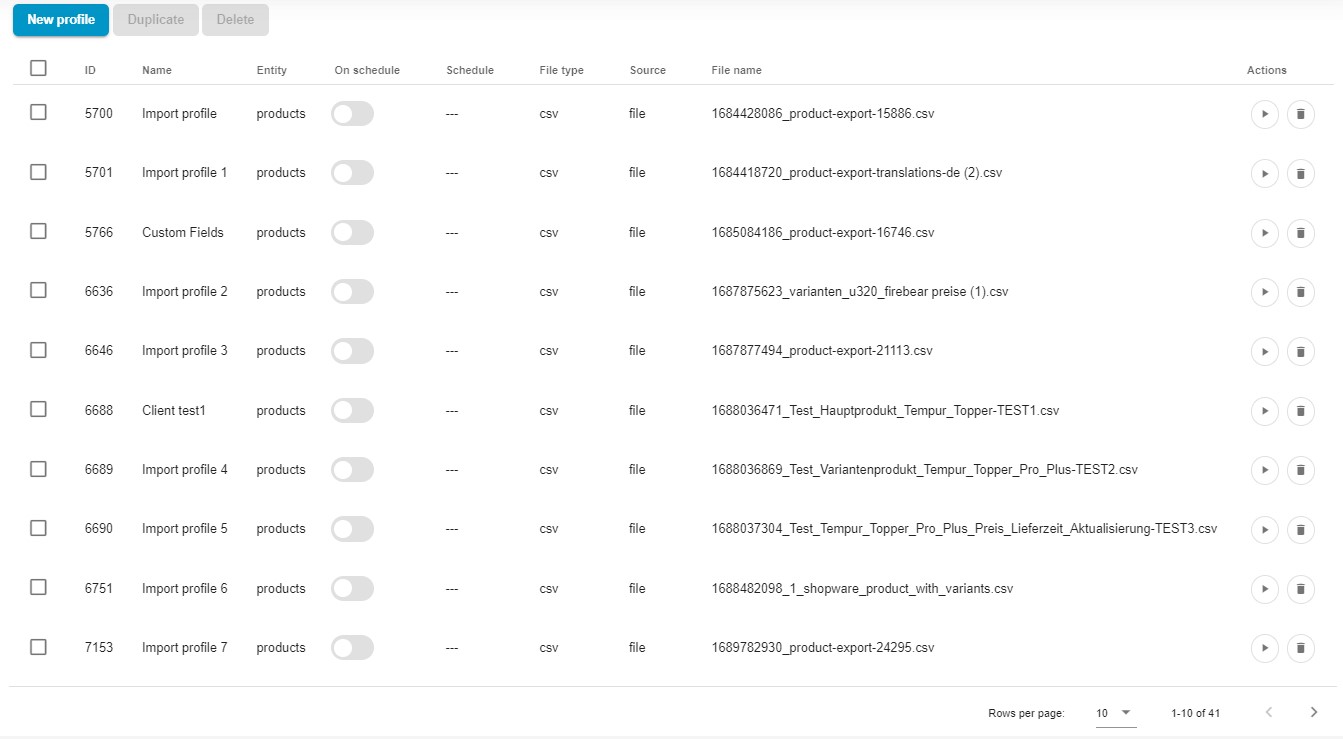
Like in the case of the default Shopware import, it’s a breeze to get started. Just click the “New Profile” button under Settings -> Improved Import, Export & Mass Actions -> Import.
You are on the Select file screen. It’s a place where basic import settings are situated. You can learn about this section in our Manual for Improved Import, Export & Mass Actions.
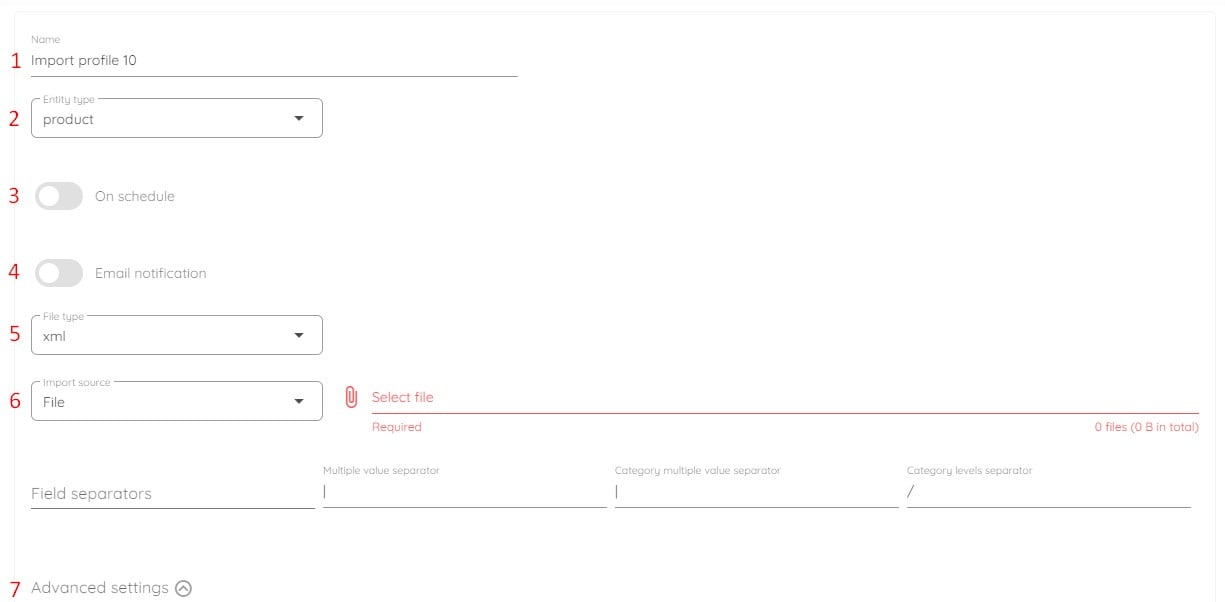
With the basic configurations in the bag, it’s time to fine-tune your mappings. The next screen lets you specify which columns in your imported file match the properties of your products on your Shopware site.
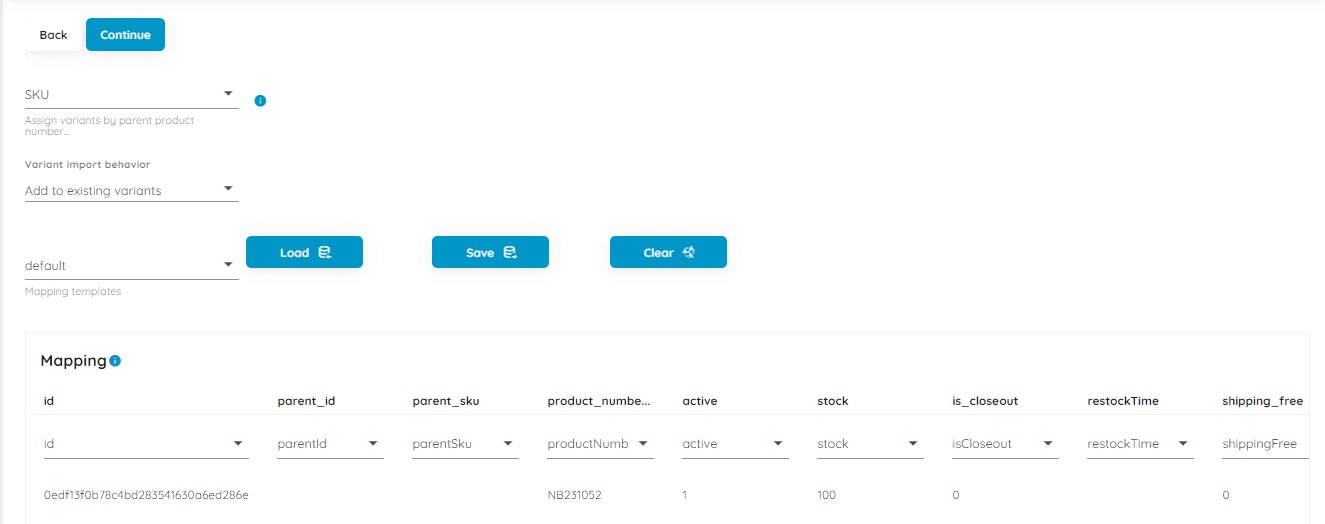
You’ll want to pinpoint which columns in your imported file match up with your product properties in Shopware. If the table you’re importing doesn’t quite match the default criteria, fear not – you can easily swap out unsupported column names with the correct ones.

Also, if your updates involve product variants, the mapping screen is a place where you’ve got some decisions to make. You can opt to use either the parent product’s SKU or ID for their assignment. Plus, you have the choice of either adding the new variants to your existing ones or completely replacing the old variants. It’s all about flexibility, tailored to your unique needs and how you prefer to manage your products.
As you can see, the product variants section is the only notable benefit of Improved Import, Export & Mass Actions over the default mapping. Furthermore, at the very first glance, it may look like the Firebear’s mapping section lacks the default flexibility since it doesn’t let you add column names to map them manually.
However, if you focus on the details, this disadvantage becomes the application’s robust benefit over the native tool: You no longer need to cast spells to find out which columns should be mapped when creating a new import profile. Instead, the Improved Import, Export & Mass Actions extension automates this process and does everything for you. The app analyzes the update table and automatically adds the column names from your import file to the mapping table. Next, you match them to the default namings.
You no longer need to guess which columns should be added to the profile. It is only necessary to map column names correctly. And there are many more advantages covered below. But before going any further, let’s explore how the mapping section is implemented for export processes.
Export Mapping
You can start a new export profile under Settings -> Improved Import, Export & Mass Actions -> Export. Hit the New Profile button to get to the Configure export screen. It’s a place where you can work with basic export settings. You can learn about this section in our Manual for Improved Import, Export & Mass Actions.
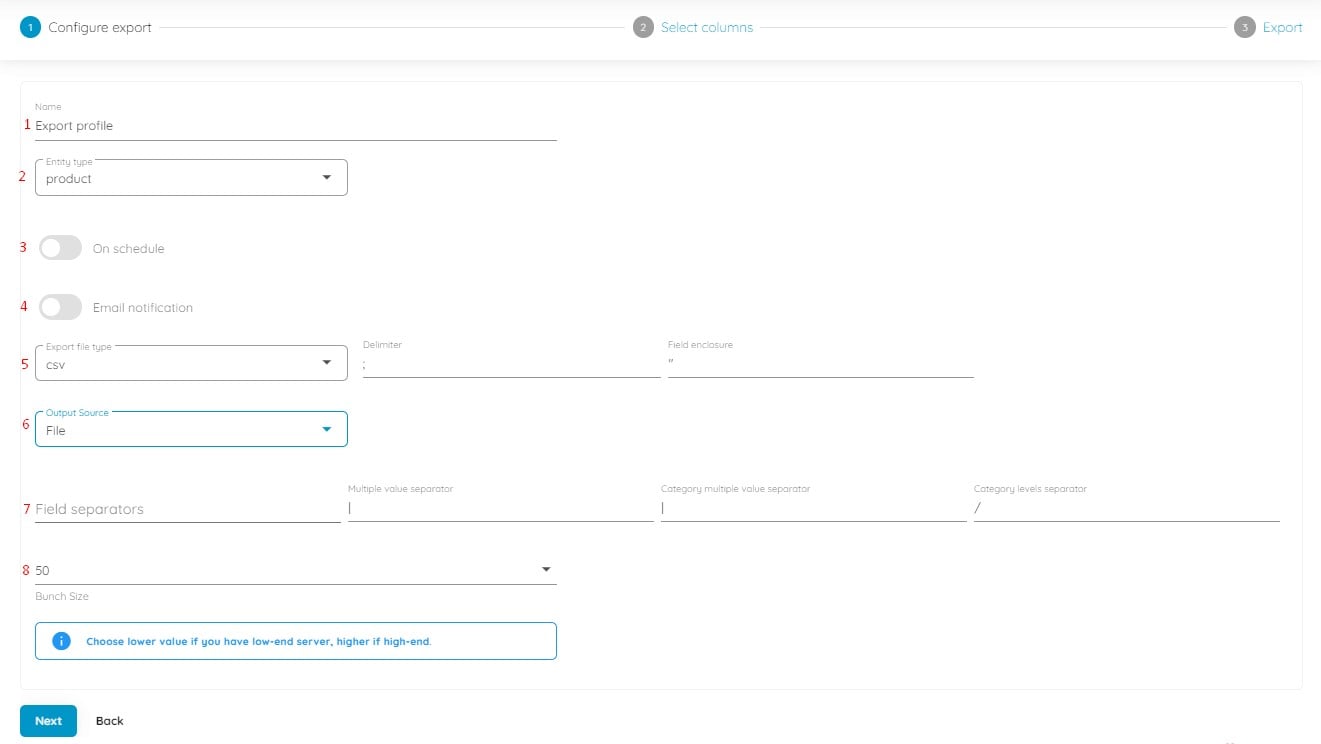
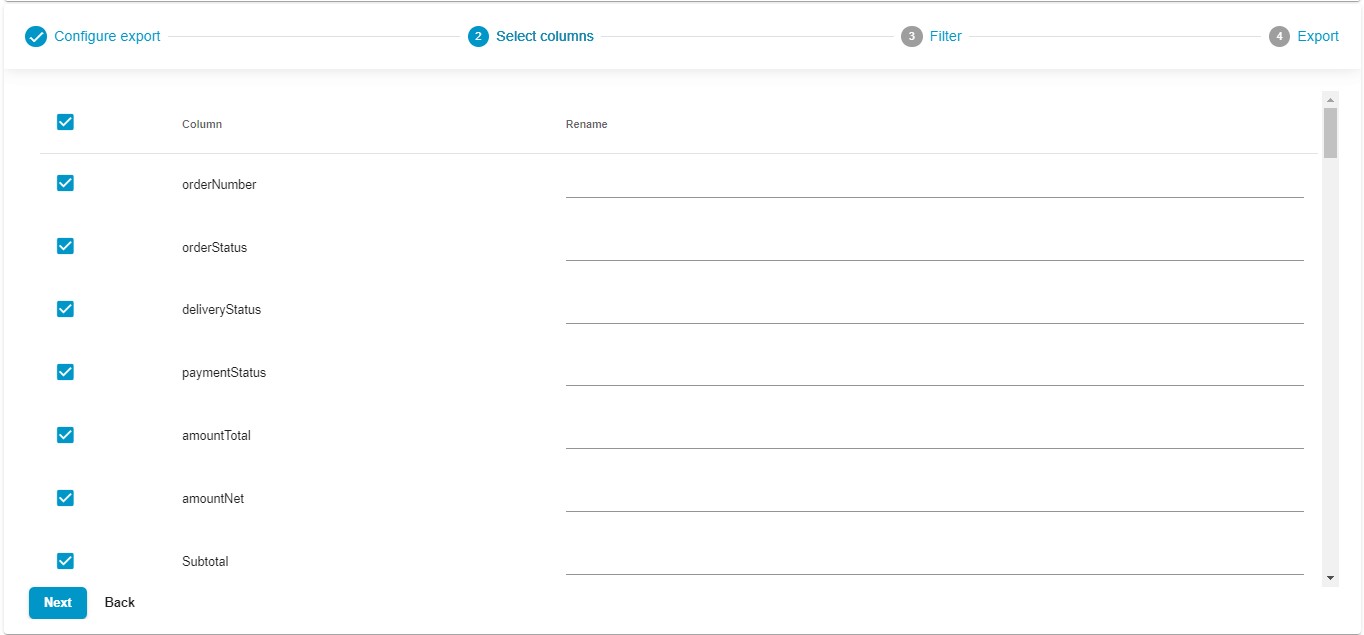
When you are ready with the first part of your export profile, click Continue to proceed to the Select columns screen, where Shopware export mapping takes place. You can customize the column titles to meet your partner’s specific requirements.
Rename default column titles by adding a new name (Rename) after the existing column name (Column). Additionally, you have the flexibility to uncheck any columns you prefer not to include in the export.
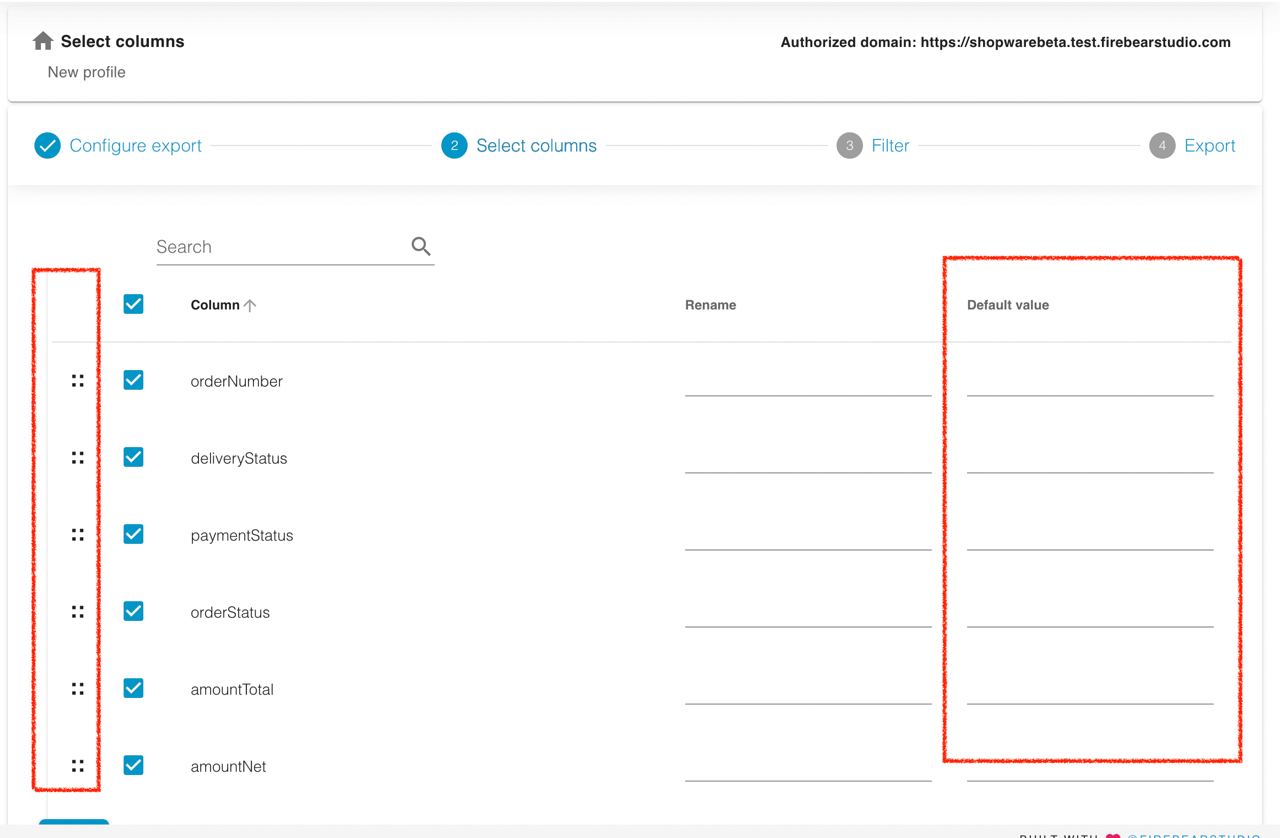
In this latest release, we’ve introduced two valuable features:
- Column Sorting: Now, during export, you can sort columns, arranging them in the desired order within the export file. This feature provides you with greater control over the layout of your data.
- Default Values: You can also include default values when exporting. If a specific attribute has no value, the export file will automatically include the designated default value in its place. This simplifies data management and ensures consistency in your exports.
Column sorting is achieved through a simple drag-and-drop interface, and these enhancements are applicable to all entities, including products, orders, and customers.
In this instance, we’re utilizing Shopware’s default method for mapping profiles. You have the flexibility to choose which columns to include in your export file and easily adjust their names to align with any third-party specifications.
Now, when it comes to import mapping, Improved Import, Export & Mass Actions takes the reins and streamlines the column selection process, making it a seamless experience. But don’t worry; if you prefer a more hands-on approach for exports, you can still manually configure your mappings to ensure they meet your specific needs.
Let’s delve into some other remarkable benefits of this application.
Key Benefits Over Shopware
So, why should one prefer Improved Import, Export & Mass Actions to the default Shopware import and export?
This universal data transfer solution not only streamlines the import and export processes but also bridges the gaps left by the default Shopware 6 setup. This application redefines data management in numerous impactful ways.
For instance, when Shopware 6 exports products, it doesn’t include the custom properties you’ve created for them. In simpler terms, those carefully crafted ‘Size’ or ‘Color’ custom properties won’t make the export journey with the products.
Now, you might think, “I’ll just export custom product properties as a separate entity.” Well, you can certainly do that, but there’s a catch. When you export them in a standalone file, you lose the connection to the products they’re supposed to be associated with. In other words, it becomes a puzzle without the pieces, making it nearly impossible to import products back with the correct values assigned.
But fear not! With the Improved Import, Export & Mass Actions app, exporting custom properties becomes a breeze. You get a neatly organized format that includes not only the database ID of the custom property but also the name displayed in the store’s backend for quick and easy reference. Say goodbye to data disarray and hello to streamlined exporting of custom properties along with your products.
Along with that, Improved Import, Export & Mass Actions introduces flexible scheduling to let you truly automate your import and export processes. Just define the update period (daily, weekly, monthly, etc.) and specify the exact transfer time to let the application implement your custom mappings and transfer the selected data automatically.
In addition to that, you can enable notifications to get real-time alerts on failed, successful, or both kinds of import and export processes.
Due to the extended file format compatibility, you no longer need to convert provided files to CSV or create other formats out of the standard output. The application lets you work with XML and XLSX files for both import and export processes.
You can even transfer data between Shopware 6 and Google Sheets. Just specify the ID of a spreadsheet you want to import, and the module will easily run the transfer. If your partner asks for a Google Sheet table with product, customer, or order data, it’s no longer a problem: the Improved Import, Export & Mass Actions app lets you freely export the corresponding entities to the popular online spreadsheet editor.
In addition to direct file uploads, represented in Shopware by default, our application also lets you implement your mapping strategies along with data imports and exports over FTP/SFTP or between your store and Google Drive.
Final Words
Mapping provides a solid foundation for transferring data between Shopware 6 and other systems. Think of it as a GPS for your data, making sure it smoothly moves from one place to another. When you master data mapping and use tools like the Improved Import, Export & Mass Actions app, you’re in control of your e-commerce tasks. It simplifies your work, making your store run more efficiently.
Let the Improved Import, Export & Mass Actions app transform your e-commerce operations. Whether you’re managing your product catalog, handling customer data, or processing orders, this tool simplifies complex tasks, making your online store management more efficient.
Learn more about our app here:
- Firebear Improved Import, Export & Mass Actions for Shopware 6
- Firebear Improved Import, Export & Mass Actions Manual
- Contact us