Banggood Shopify Integration: Your Easiest Way To Dropshipping
![]()
Dropshipping is a great way to run an e-commerce website without having to manage stock. Focus on marketing and let specialists handle logistics, while your Shopify website thrives. Dropshipping with Banggood on Shopify provides you with access to more than 250,000 amazing products at competitive prices, 10 warehouses, and a very well-organized logistic infrastructure. Below, we explain how to implement the Banggood Shopify integration from the perspective of data exchanges. You will learn how to link Banggood to Shopify by importing a product feed to your website and exporting orders back. If you are new to dropshipping or want to expand your e-commerce business, you’ve come to the right place.
Table of contents
Banggood Shopify Integration Advantages
If you still need to see if linking your Shopify website to Banggood is worth your attention, we prepared a list of general advantages that motivate businesses to integrate their Shopify stores with the popular dropshipping platform. Here we go, meet the top 4 Banggood Shopify integration advantages that make a difference:
- Product Variety: 250,000 amazing products is what makes a difference. Banggood is known for offering a wide range of products. You can provide your store with access to this diverse catalog, dramatically extending the selection of items you offer.
- Automated Order Processing: You don’t need to fulfill orders, and that’s what makes a difference. Dropshipping with Banggood on Shopify automates the order fulfillment process. When a customer places an order on your Shopify website, you just need to forward it to Banggood, saving time and effort.
- Inventory Management: You no longer need to turn your apartment into a warehouse or rent one, and that’s what makes a difference. All the items you sell on your Shopify storefront are stored on the Banggood side.
- Customer Service and Returns: Customer service and returns are no longer your headache, and that’s what makes a difference. With the Shopify Banggood integration, this huge part of every e-commerce routine is handled by your dropshipper.
As you can see, connecting Shopify to Banggod eliminates the need for you to handle and store inventory, process orders, and directly communicate with customers. As a result, you can save the time and costs required to run your e-commerce storefront. But what are the hidden shortcomings?
Well, the most common issue associated with any dropshipping model is the integration between the two systems. If it is flawless and automated, you get all the benefits described above and live your best life.
If your integration, on the other hand, is not flawless, you will need to spend additional time on the chores that cannot be automated. Therefore, a user-friendly Banggood Shopify integration is a must, and below we explain how to achieve it within two steps:
- Firstly, you need to import products from Banggood to Shopify.
- Next, you need to provide the dropshipper with orders placed on your website.
That’s it. Let’s focus on the details now.
How To Import Banggood Products to Shopify
Before importing any update to Shopify, you need to generate it on the Banggood side. However, it is not something that everyone can do. Here is a brief tutorial for you.
Export Banggood products
You can get a CSV file with product details for your Banggood Shopify Integration from the dropshipper after reaching out to Banggood’s support. First of all, you need to acquire dropshipper status. Then, get the ability to export products from the platform.
Note that support specialists may guide how to do that. Ask them to help you download Shopify template files.
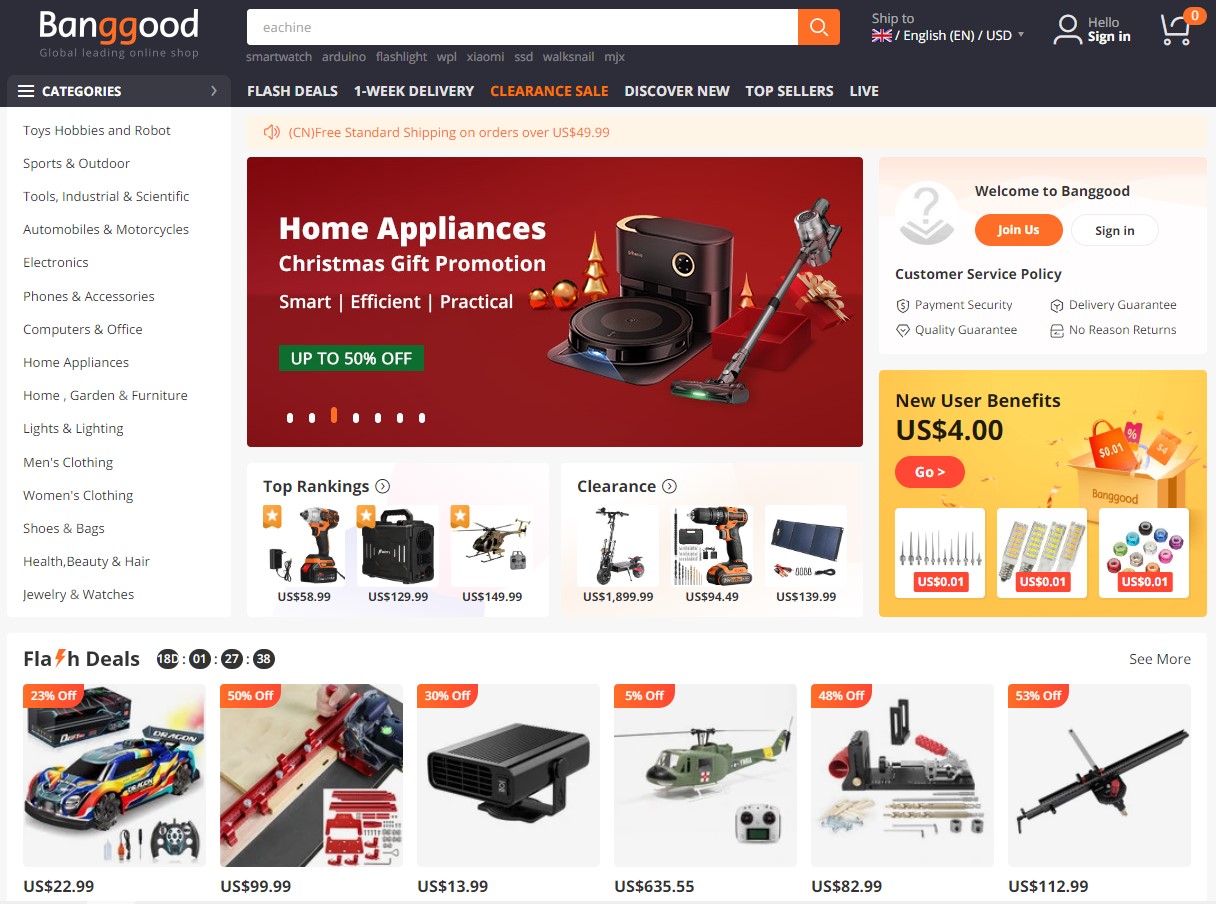
Choose the products you want to showcase on your storefront and download them. You are one step closer to dropshipping with Banggood on Shopify.
Import Banggood Products to Shopify
Now, it’s time to import the Banggood product CSV created in the previous step to your Shopify storefront. You will need the . Install the extension and follow these steps:
Step 1: Access The Import Profile
First things first, start by creating a new import profile. Go to Apps -> Firebear Import & Export Tool -> Import and hit the New Profile button.
Step 2: Configure Basic Import Settings
The app displays the Select File screen, follow these steps and you will learn how to import Banggood products to Shopify:
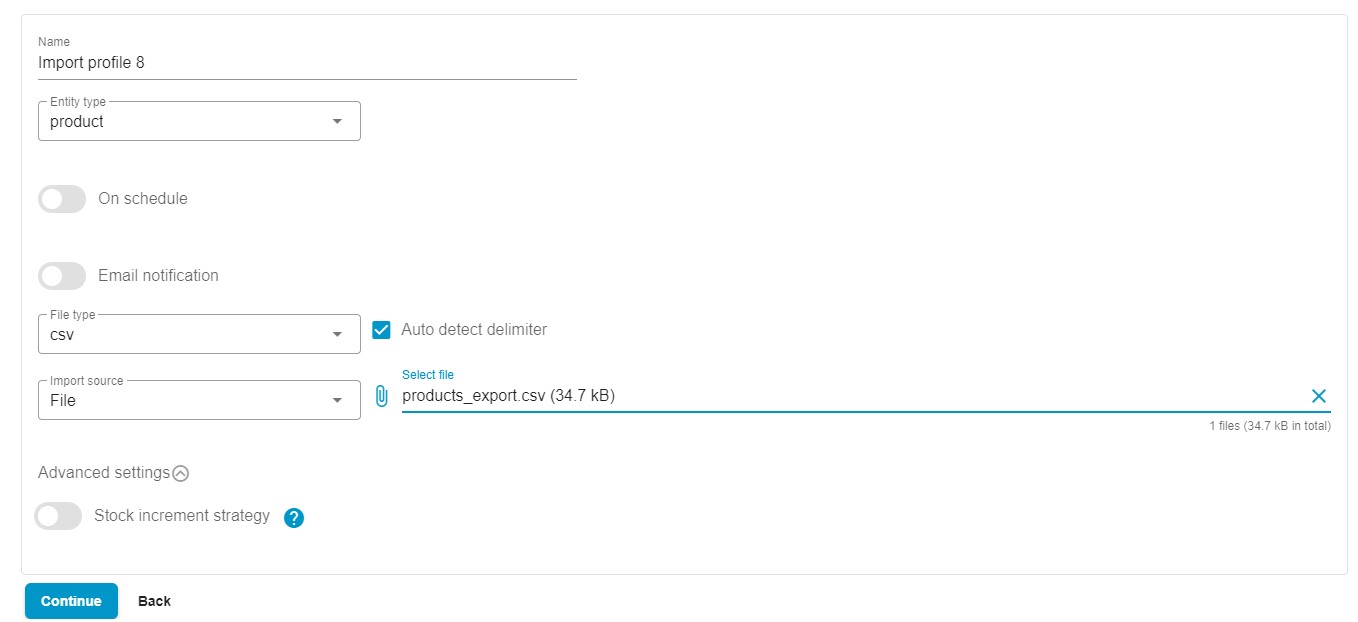
- Name your new import profile, for instance, Banggood Product Import.
- Choose the entity to import. It is Products.
- Next, you can enable Shopify import automation. However, importing products from Banggood to Shopify is not a regular process, so keep the On Schedule toggle disabled.
- You can also enable Shopify import notifications for your data transfer. Since it is not a repetitive process, you don’t need to be notified about the outcome. Check everything in your admin instead.
- Now, it’s time to select a file format. Your data update is available as a CSV file, so choose it. In addition to it, our app supports XLSX, XML, and Google Sheets spreadsheets.
- Also, don’t forget to activate the Auto detect delimiter feature to let the app identify delimiters in your CSV automatically. Alternatively, it is possible to provide them manually
- Choose your import source. Your data file is probably stored in the Downloads folder on your computer, so choose File from the Import source dropdown, click on the paperclip icon, navigate to your file, and select it. Note that you can also import Banggood products to Shopify via FTP or from Google Drive, Google Sheets, or URL.
- Skip the advanced settings section. The Stock Increment Strategy toggle should be disabled, Thus, you will import the quantity provided in your update file.
Step 3: Work on Your Mappings
The mapping screen is very useful when you import third-party data, and Banggood Shopify integration is not an exception. It lets you take the column name from your import table and specify to which Shopify attributes they are related. But don’t worry! If your Banggood product selection was exported as a Shopify template file, you will easily import it as it is. If not, you may need to detect third-party attributes and specify the corresponding names Shopify uses.
Below, you can see a standard mapping screen of the Import & Export Tool where there is a row with column names from your Banggood product CSV and multiple dropdown lists below each column name. Each list contains Shopify attributes to map third-party values to.
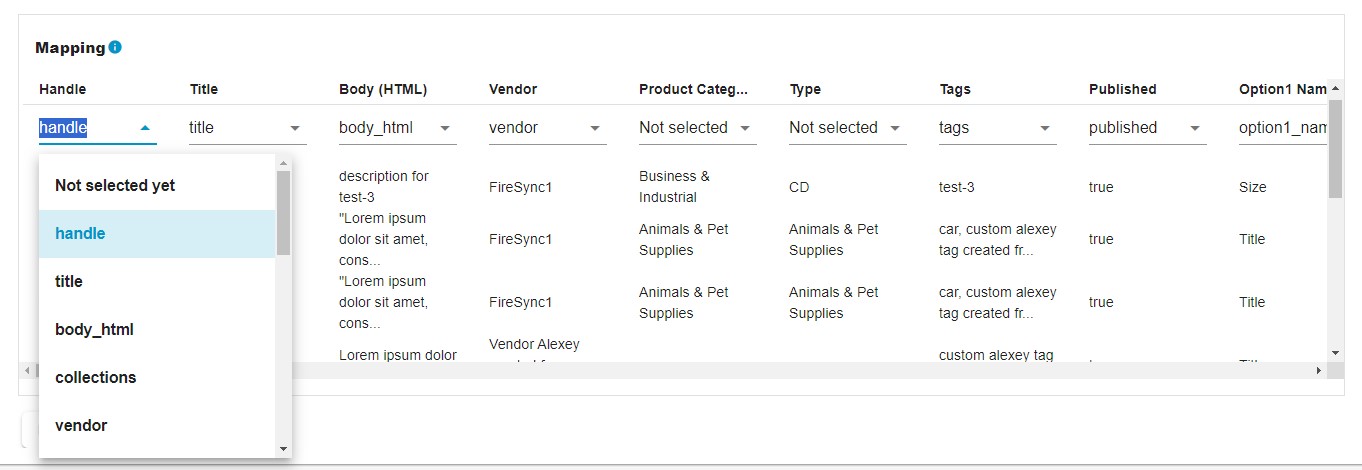
Match attributes if necessary and save the newly created mapping scheme for further product imports from Banggood. Click “Continue” to proceed to the next section.
Step 4: Preview Results
With the Import & Export Tool, you can preview how Banggood products will look on your Shopify website after you import them. Thus, you can spot mistakes, return to the previous steps, and fix them.
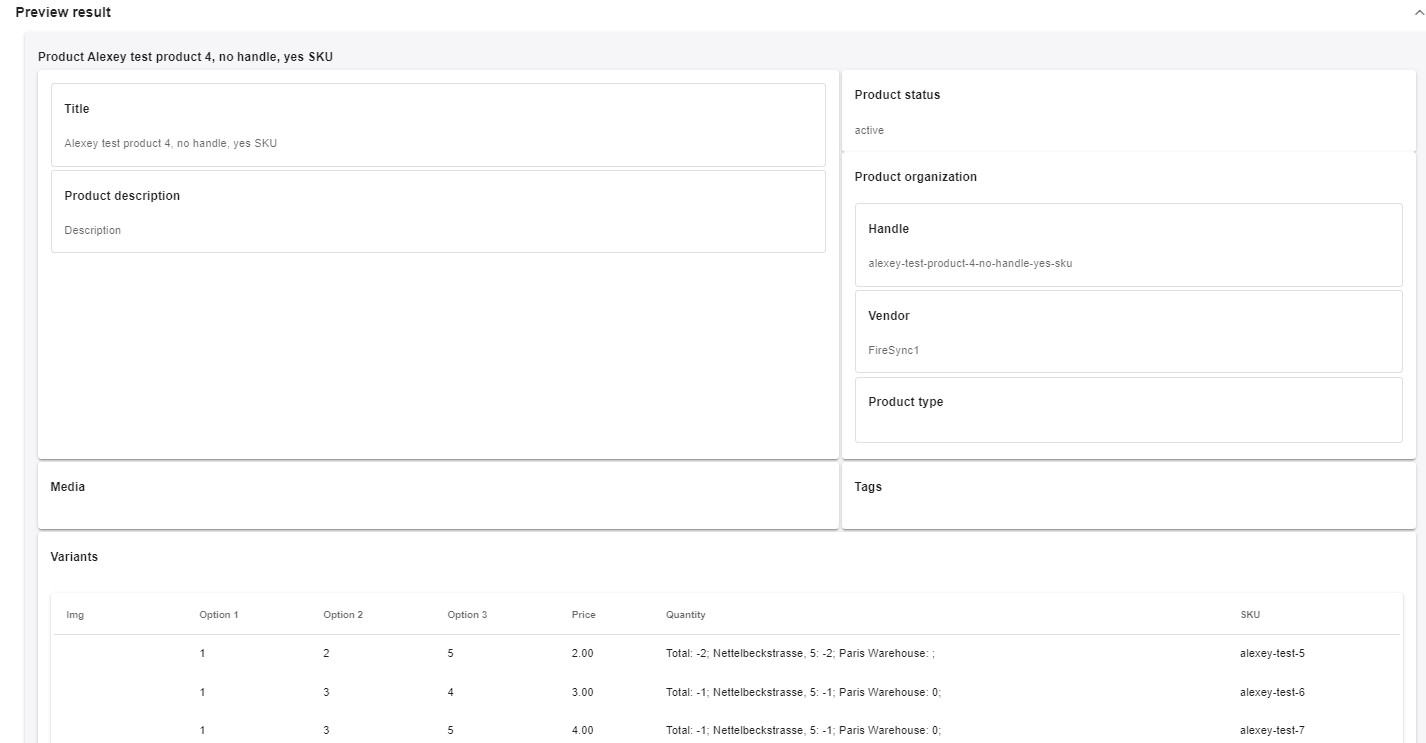
Step 5: Import Banggood Products
Click the “Save” button to save your import profile. Next, click the “Import” button to transfer Banggood products to your website.

Step 6: Inspect The Results
Go to your Admin -> Products to apply final changes. You may need to set retail prices, edit descriptions, or apply other changes.
Next, visit your storefront to see how the imported products look from the customer’s perspective. If anything looks wrong, return to the admin, navigate to the product in question, and edit it.
That’s it! Now, you know how to import Banggood products to Shopify. It was the first part of linking your store with the dropshipping platform. Now, you need to get your first sales. After the first order is placed, consider providing the corresponding information to your Banggood – it’s the second part of your integration. You will find the easiest way to do so below.
How To Export Shopify Orders to Banggood
Providing orders to the dropshipper is the second half of the duties associated with Banggood Shopify integration. It also consists of two steps. First of all, you need to export orders from Shopify. Next, you need to import them to Banggood. Let’s explore the two processes.
Export Shopify Orders
Since you are going to provide your Shopify order data to Banggood regularly, it is necessary to set up automated exports. Another requirement is that you need to provide the latest order data only. Here is how to achieve it:
Step 1: Create New Export Profile
You can create a new export profile to link Banggood to Shopify under your Shopify Admin -> Apps -> Firebear Import & Export Tool -> Export. Click the “New Profile” button.
Step 2: Configure Basic Export Settings
You are on the “Configure export” screen. It’s a part of your export profile where you configure automation and specify the transfer of the latest orders. Follow these steps to prepare the update:
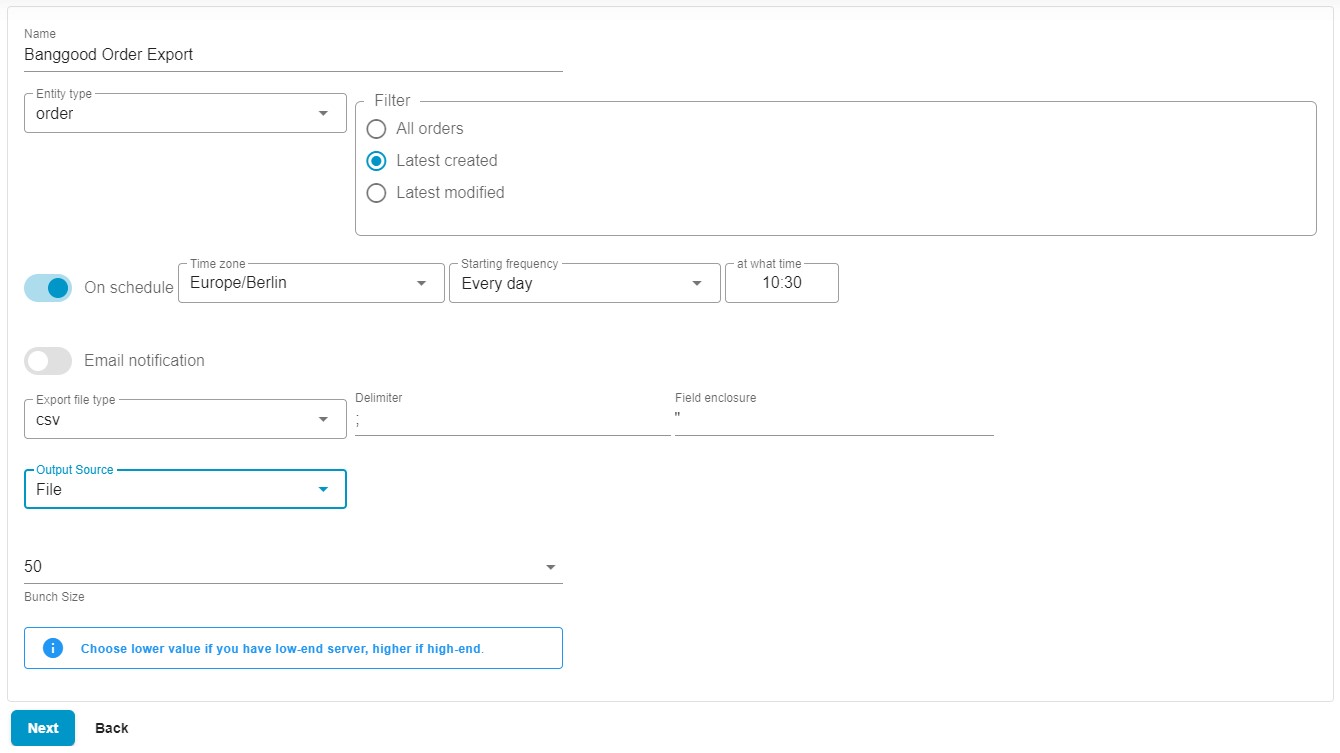
- Specify a name for your profile, for instance, Banggood Order Export.
- Choose an export entity – Orders.
- Select Latest created. This option transfers only the latest created orders. When you create your order export profile for the first time, it exports all orders. When you launch this profile for the next time, the application exports orders created after the previous profile launch. And that’s exactly what you need for dropshipping with Banggood on Shopify.
- Now, let’s automate your order export. Enable the On Schedule toggle to create a schedule of updates and specify your time zone. Next, select a starting frequency. You can export new orders to Banggood every hour, day, week, or month. Configure the exact time to provide the update.
- Configure email notifications for your order exports to stay informed on the results of every transfer.
- Now, you need to select your preferred file format. Choose CSV because your dropshipper works with it. You can also customize your delimiter and field enclosure.
Note that our app lets you export data as XML, XLSX, and Google Sheets spreadsheets. - Choose File as your export source. After the export is complete, you will be able to download your CSV with order data to your computer and then provide it to Banggood.
Also, our app lets you rely on FTP transfers, Google Drive exports, and direct uploads to a Google Sheets spreadsheet. - If you have a server with limited resources, you can choose a lower bunch size to reduce the load.
- Click “Continue” to proceed to the mapping screen.
Step 3: Configure Mapping
You can configure mappings to simplify the way you export Shopify orders to Banggood. At this stage, it is possible to replace the default column names with the ones Banggood understands.
Furthermore, it is possible to deselect any columns that should be excluded from Banggood Shopify integration.
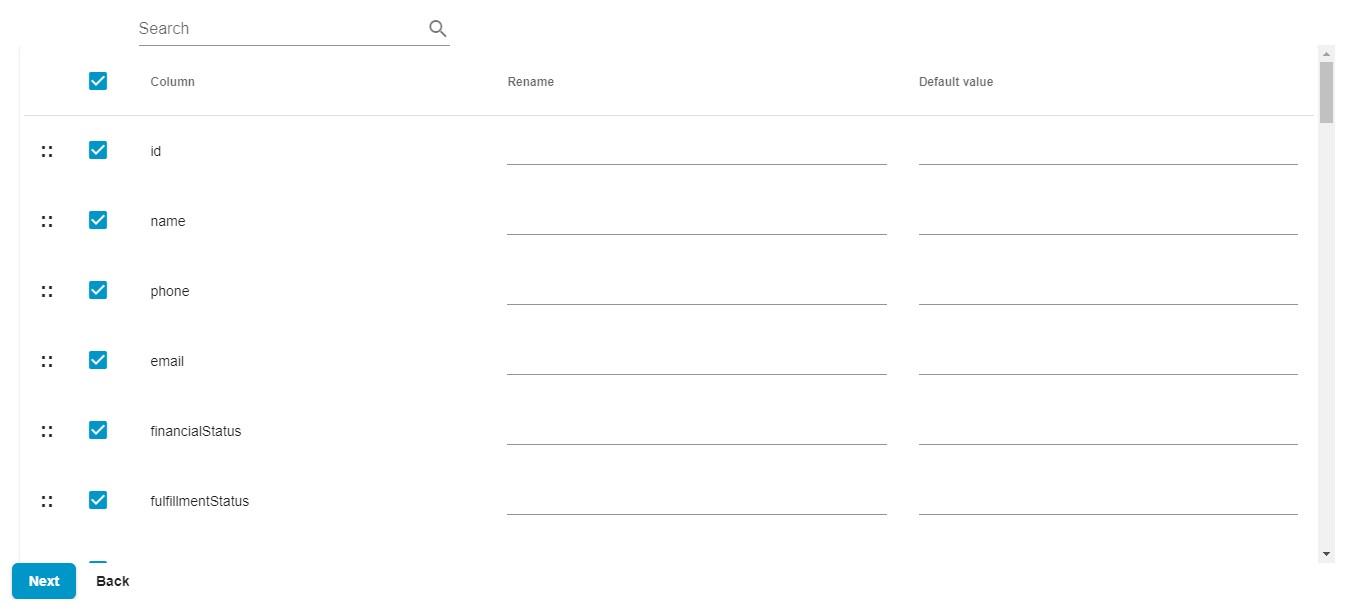
Don’t forget to save these parameters for further exports so that the app can use them automatically.
Step 4: Create Filters
Now, it is very important to create a filter based on the order’s financial status. Banggood requires you to send only paid orders. You can filter out them as follows:

- Click the “+” button to add a filter.
- Choose financialStatus as your filter criteria.
- Select Paid from the value dropdown.
Step 5: Save Your Profile & Export Data
Now, you only need to click the Save & Close button to save your Shopify export profile. It will be launched automatically according to the predefined schedule or run it immediately. You will be able to download your order CSV when the export procedure is complete. Click the Download button.
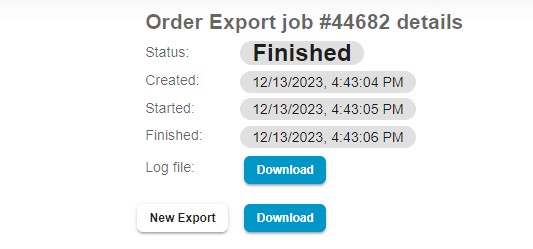
Import Shopify Orders to Banggood
Now, use your dropshipper status to provide order data to Banggood. You need to regularly import your Shopify orders to the platform. If something goes wrong, contact the platform’s support to get help with your Banggood Shopify integration.
Final Words
Of course, it is still manageable to provide a CSV once a month. Even daily updates are not very exhausting. But what if you need to do that every day? Instead of uploading order data manually, try API automation. Contact us regarding this opportunity and leverage the full potential of dropshipping with Banggood on Shopify. We can help you automate the Shopify Banggood integration.
With the Import & Export Tool, you will forever forget about the difficulties of manual data exchanges. Link Banggood to Shopify seamlessly whether it is importing products to your storefront or moving order data back to the dropshipper. Refer to the Improved Import & Export Tool manual for more information.

