
Magento 2 Backend Exploration: Dynamic Blocks
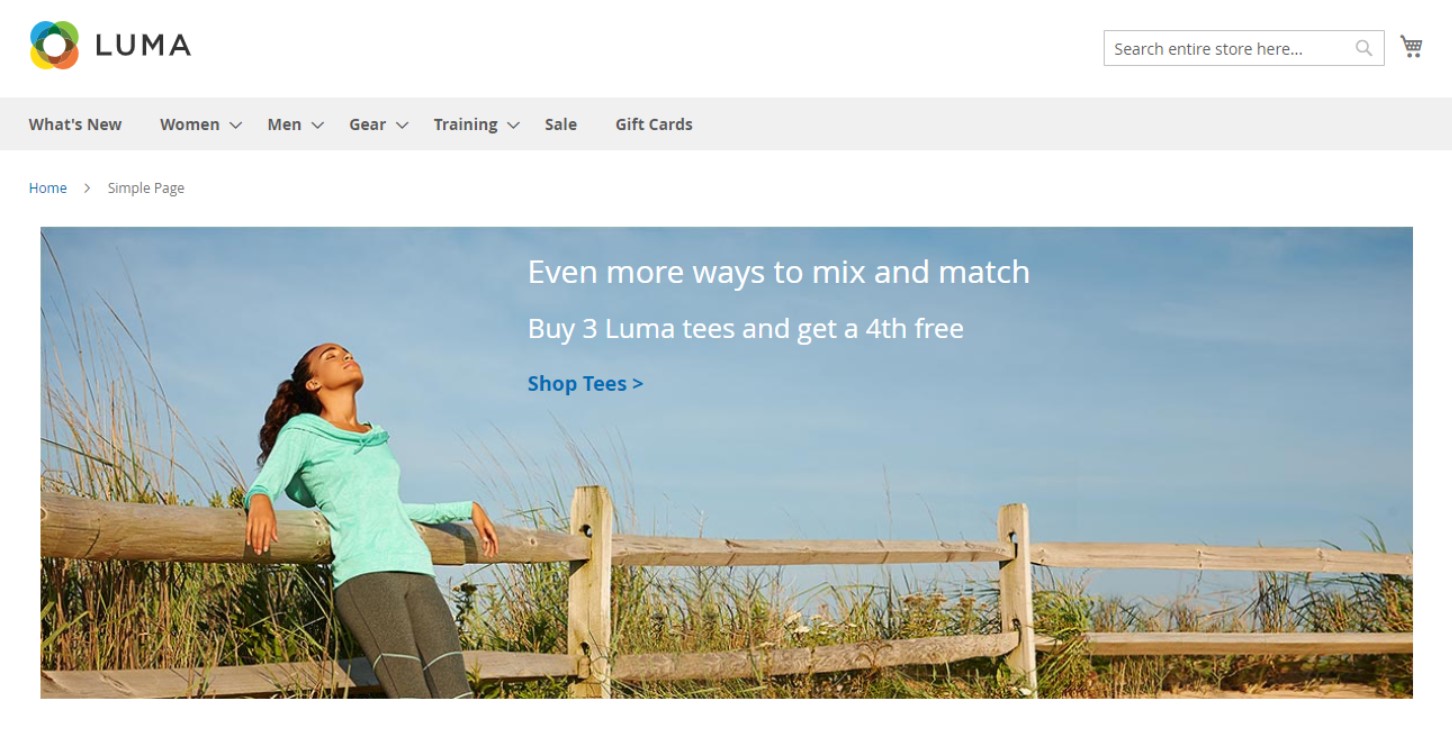
Page Builder introduced a new content type for Magento 2 called Banner. However, it is unrelated to the banner functionality everyone got used to. What was previously called “Banner” in the Content menu now became “Dynamic Block.” While we’ve already explored simple blocks, also called CMS or static blocks, it is time to delve into the nature of their more sophisticated counterparts. Let’s see what Magento 2 dynamic blocks are and how to manage them.

Table of contents
Magento 2 Dynamic Block Definition
At the first blush, dynamic blocks are similar to standard banners. However, they address the rising demand for the individual shopping experience and more precise interactions with customers.
Magento 2 dynamic blocks represent a particular content type that adds a slight touch of personalization to your marketing campaigns. The key benefit is that they contain logic for specifying where, when, and to whom to display your message. Let’s see how to manage a dynamic block in Magento 2.
Magento 2 Dynamic Block Management
First of all, we’d like to teach you how to create a Magento 2 dynamic block from scratch.
How to create a dynamic block in Magento 2
Your journey begins under Content -> Elements -> Dynamic Blocks of your Admin section. You can find the following grid there:
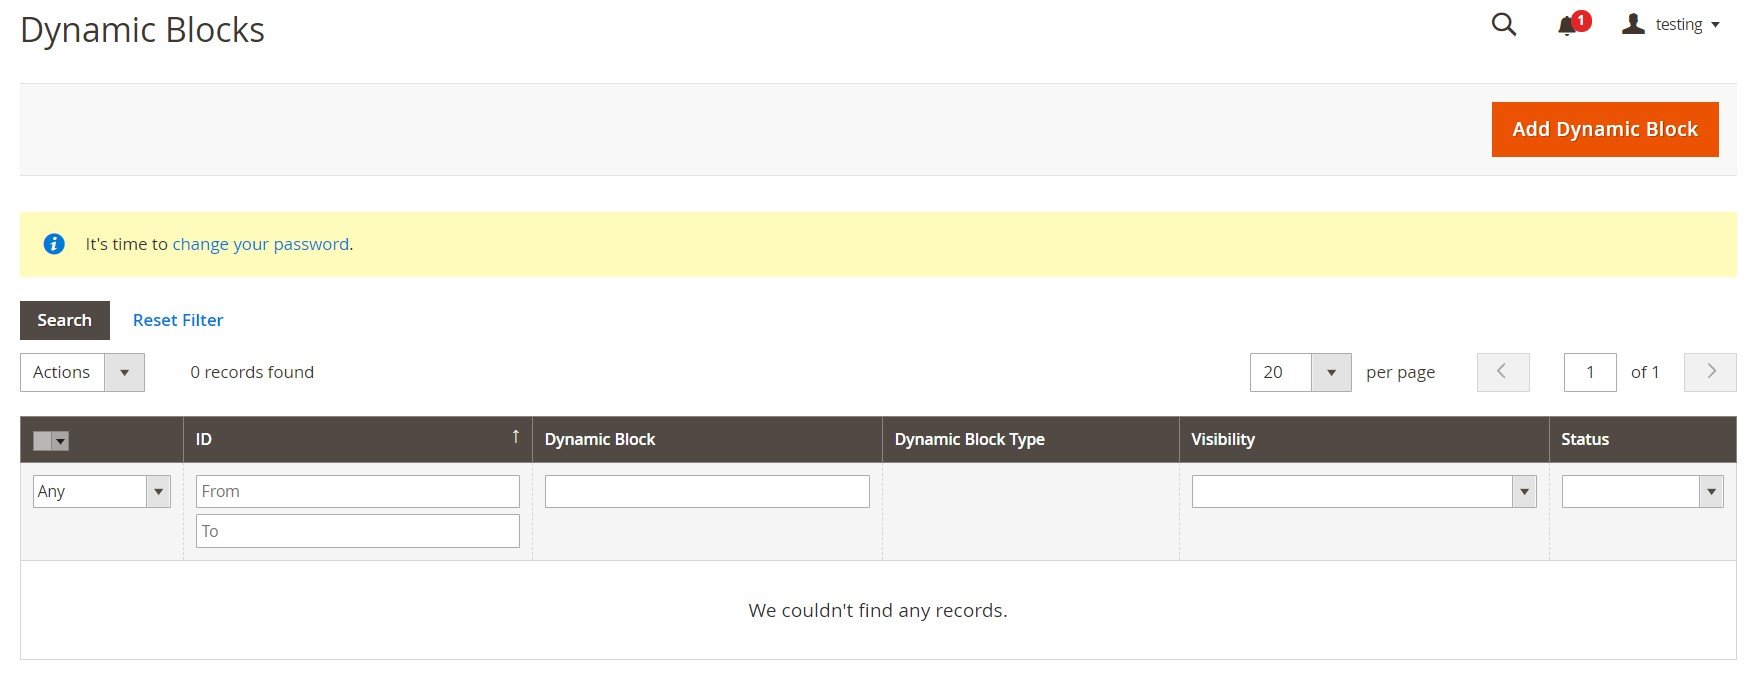
Take a look at the Add Dynamic Block button in the upper-right corner of the screen. Click it to create a new block. Do the following:
- Choose a Store View to display the dynamic block.
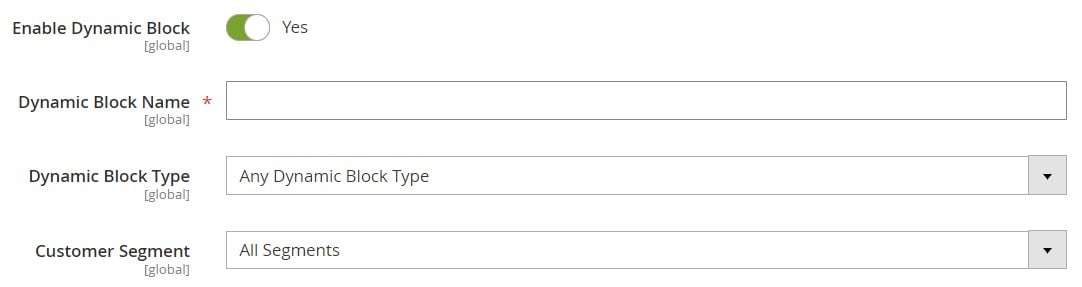
- Set Enable Dynamic Block to Yes, activating the block.
- Specify a Dynamic Block Name for internal reference.
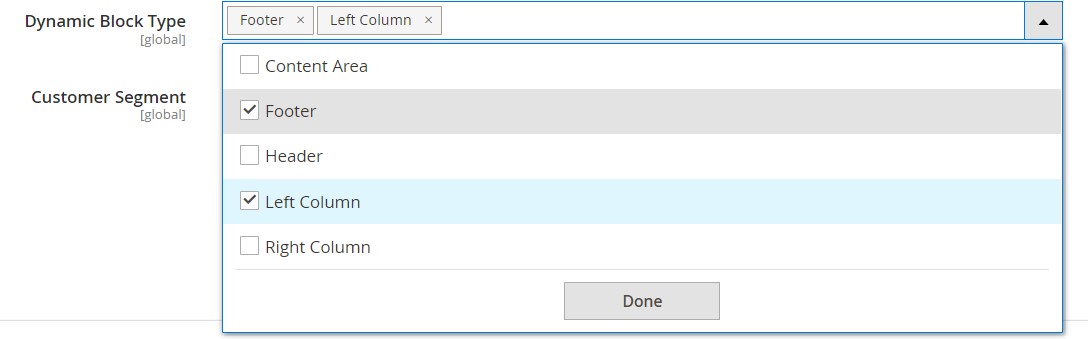
- Choose a Dynamic Block Type – the page area to display the block.
- Select segments to display the dynamic block.

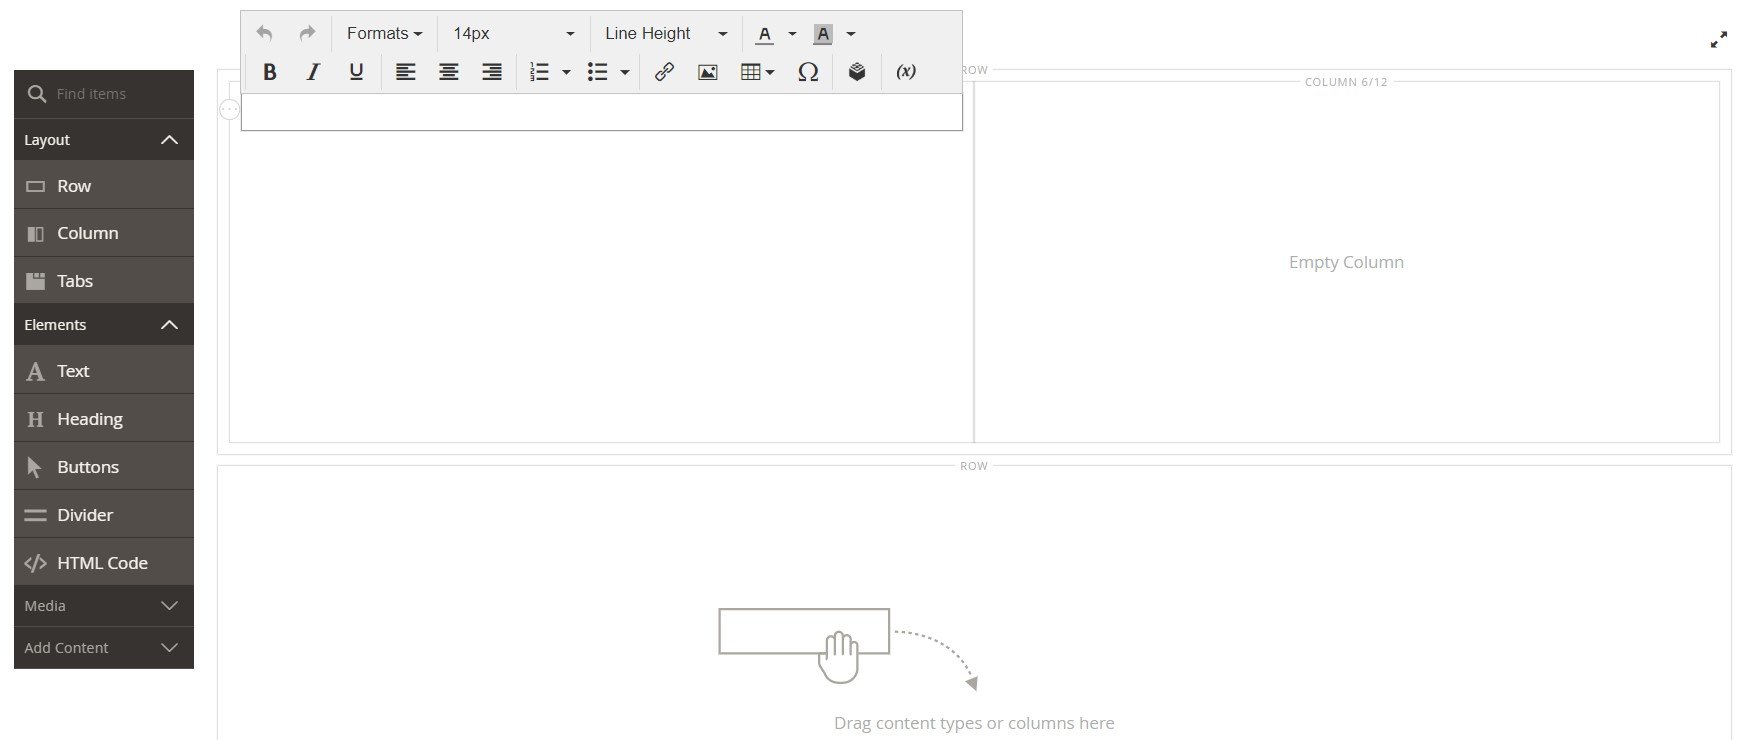
Now, Magento 2 lets you dive deep into the realm of Page Builder. Use its workspace to complete the configuration of your new dynamic block, adding the content.
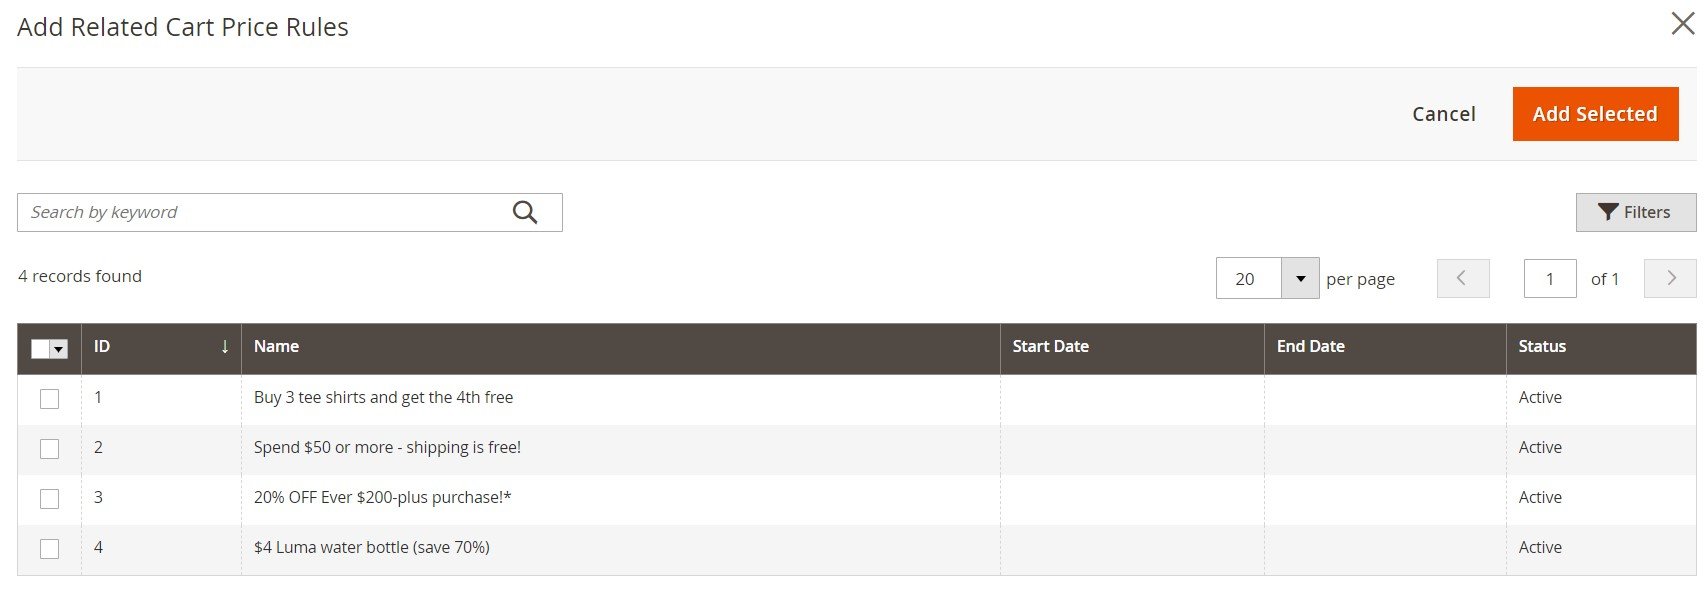
After that, you can choose a related promotion in the Related Promotions section.

Expand it and select one of the following:
- Add Cart Price Rules;
- Add Catalog Price Rules.
You should select the checkbox of each rule you want to add, no matter what rule option is selected. Don’t forget to click Add Selected and save the block when finished.
Finally, you can place the Magento 2 dynamic block to a specific page of your choice using the Add Dynamic Block content type.
How to rotate dynamic blocks
Magento 2 lets you combine several dynamic blocks in a rotator. You can provide customers with a slide show, displaying interactive content more precisely. Utilize the Widget tool, available under Content -> Elements -> Widgets, to place the rotator at a specific place(s) throughout your store. In the admin, the corresponding widget setting looks as follows:
You can add a dynamic block to a rotator widget here. Click Add Widget and follow these steps:
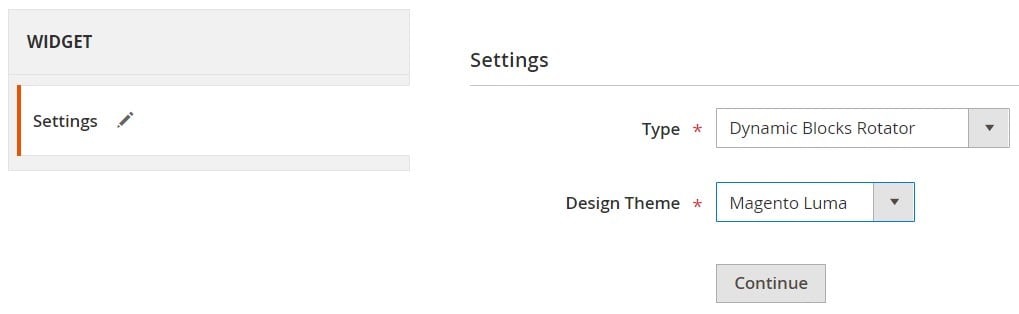
- Under the Settings tab, choose Dynamic Blocks Rotator as a type of your widget and select your current Design Theme. Proceed to the next screen by clicking Continue.
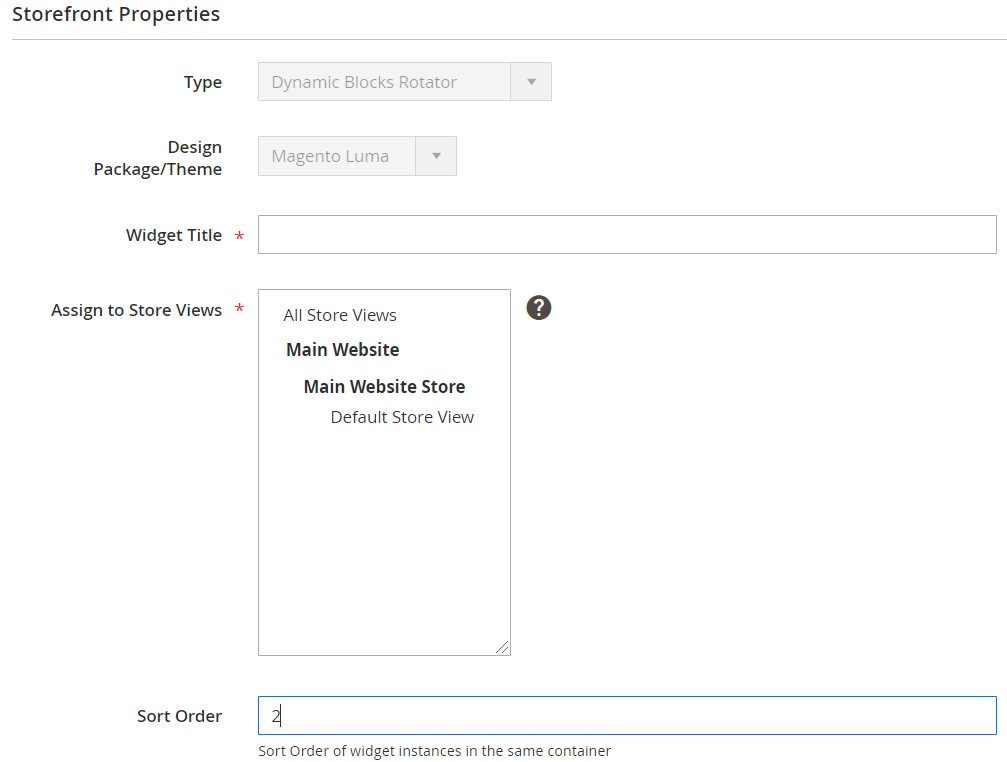
- Under the Storefront Properties tab, specify the rotator’s title, assign it to a store view, and add a sort order, if applicable.
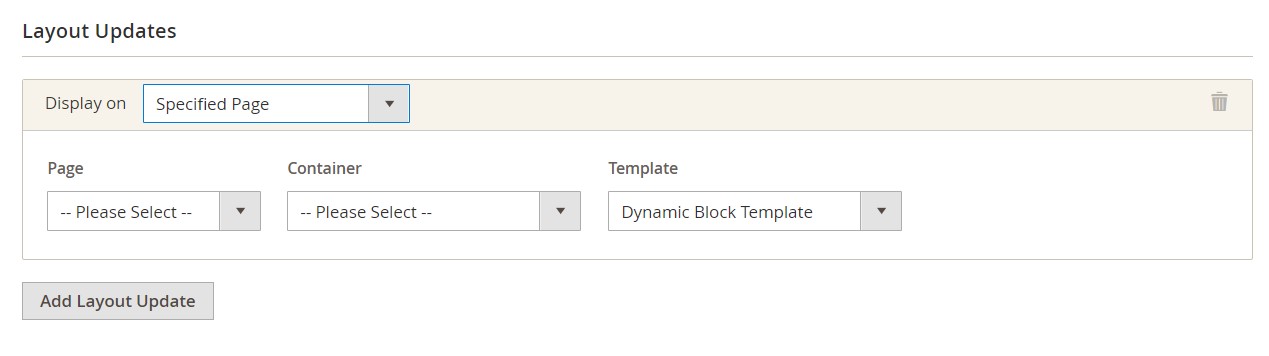
- The Layout Options tab lets you configure the update settings. Hit Add Layout Update and do the following:
-
- Choose an option from the Display on dropdown. Note that it impacts the other settings of the section, changing the way it looks.
- Select a page and a page layout part to display the rotator. Specify a template of the rotator.
- Click Save and Continue Edit to proceed to the final screen.
- The Widget Options tab lets you accept Specified Dynamic Blocks (Dynamic Blocks to Display), Restrict the Dynamic Block Types, as well as set the Rotation Mode: Display all instead of rotating or One at a time, Random/Series/Shuffle.
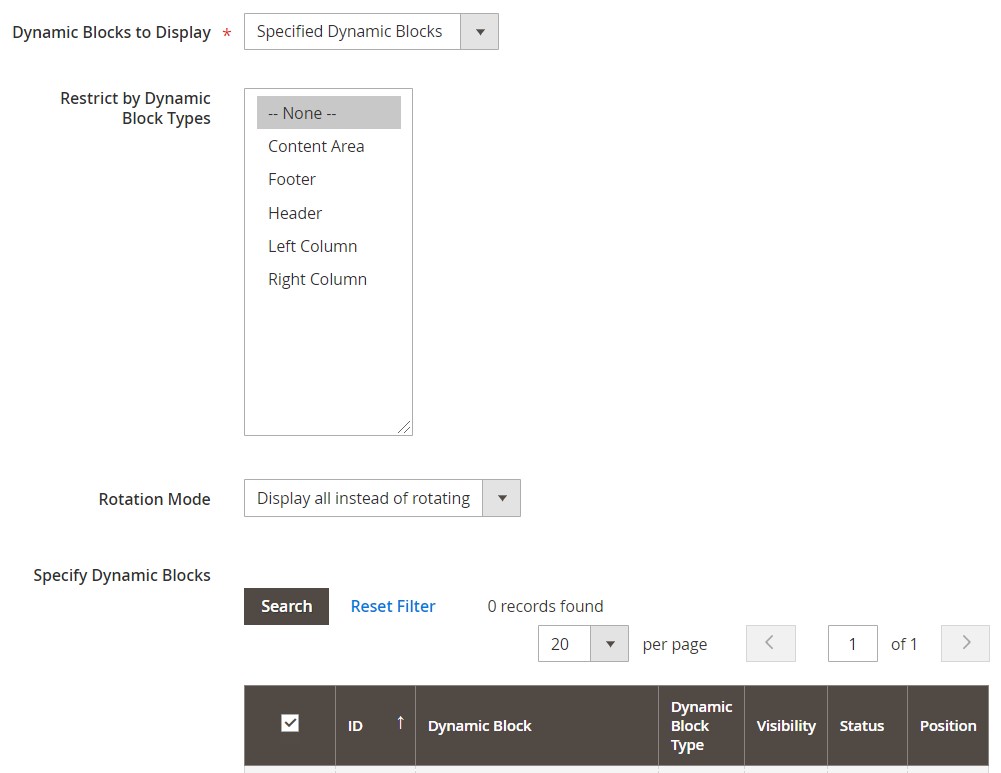
Now, you can include each dynamic block in the rotator in the Specify Dynamic Blocks grid. Don’t forget to save the changes.
How to associate a dynamic block with a price rule in Magento 2
You can associate any with promotion by choosing a catalog or cart price rule. The association disables the block display for all situations except when the corresponding rule fires. It means that when the promotion is targeted to a particular segment, the block is displayed to it and nobody else. If it is deactivated, the block doesn’t appear on the frontend.
You can associate a dynamic block with a price rule under Marketing -> Promotions. Choose either Catalog Price Rules or Cart Price Rules. Open the rule that you want to associate in edit mode and scroll down to the Related Dynamic Blocks section.
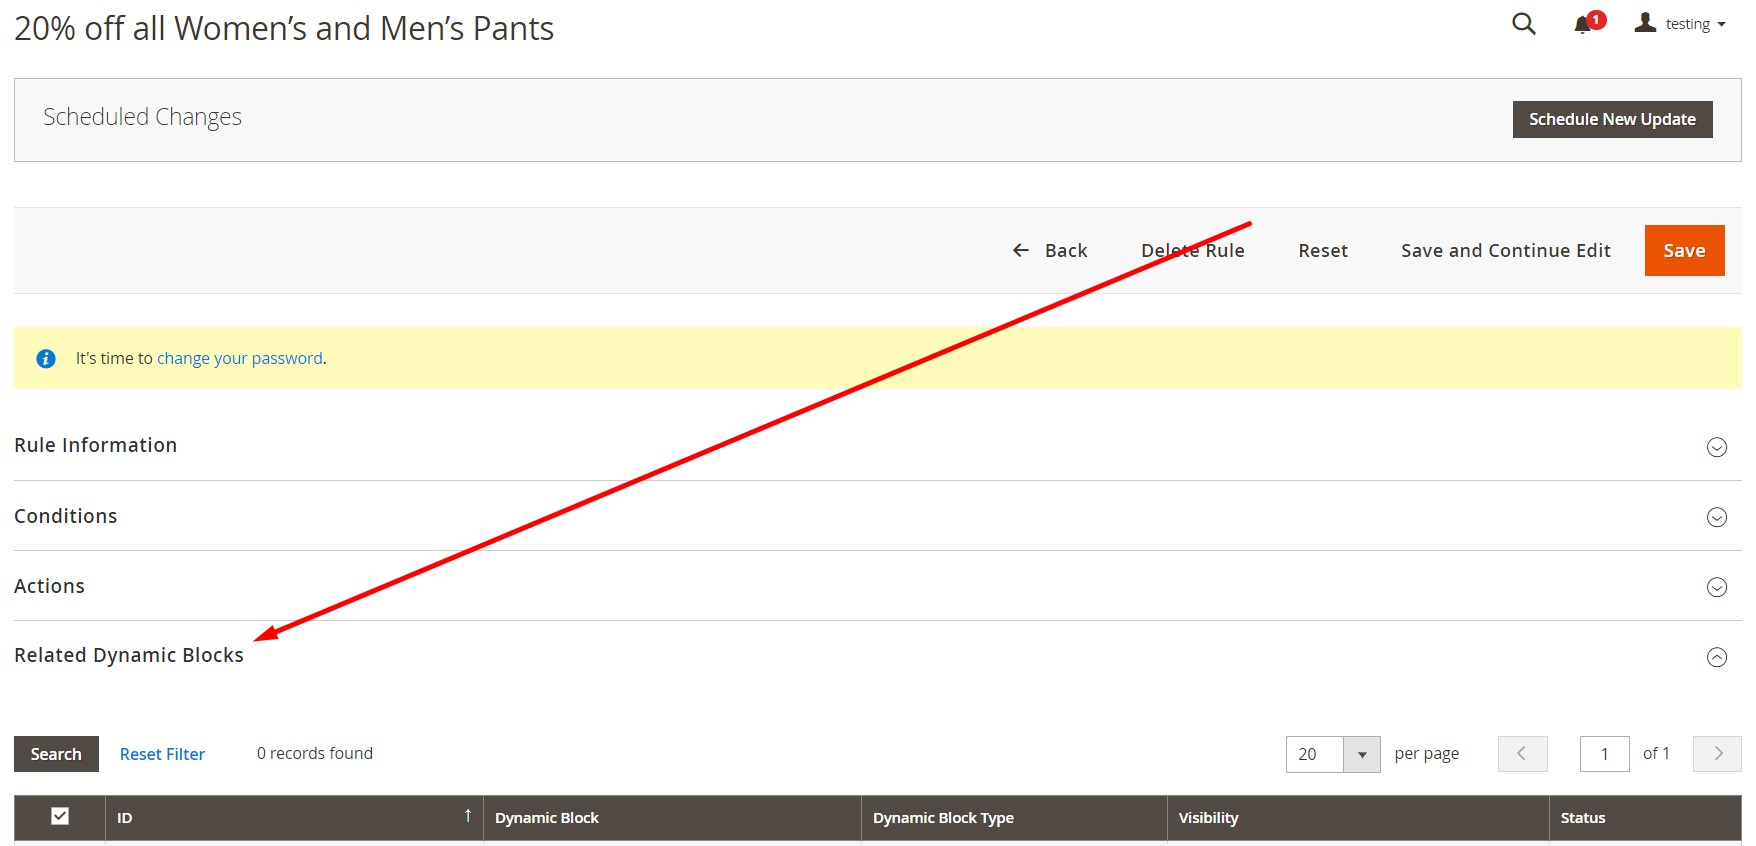
You will see the filter in the first column. Choose Any and Reset Filter. Now, choose Magento 2 dynamic blocks that you want to associate with the rule.
Don’t forget to save changes.
At the same time, you can get to the same point from the opposite direction. Let’s see how to associate a price rule with a dynamic block in Magento 2.
This time, you have to go straight to Content -> Elements -> Dynamic Blocks. Here, you need to select a block and open it for further editing. Scroll down to the Related Promotions section and edit the block’s associations.
It is possible to Add Cart Price Rules or Add Catalog Price Rules. You can see the corresponding buttons on the image below.
Select the rules in the grid and click Add Selected.
That’s it! Don’t forget to click Save. Now, your Magento 2 dynamic block is associated with rules.
How to import & export Magento 2 dynamic blocks
Unfortunately, it is impossible to import/export dynamic blocks in Magento 2. However, you can rely on the Improved Import & Export Magento 2 extension to move CMS blocks to and from your e-commerce website. The module also lets you transfer other content types available in your admin. Let’s see what functionality it already provides. As soon as we cover all Magento 2 entities, the plugin will enable import and export processes for Magento 2 dynamic blocks.
Improved Import & Export Features
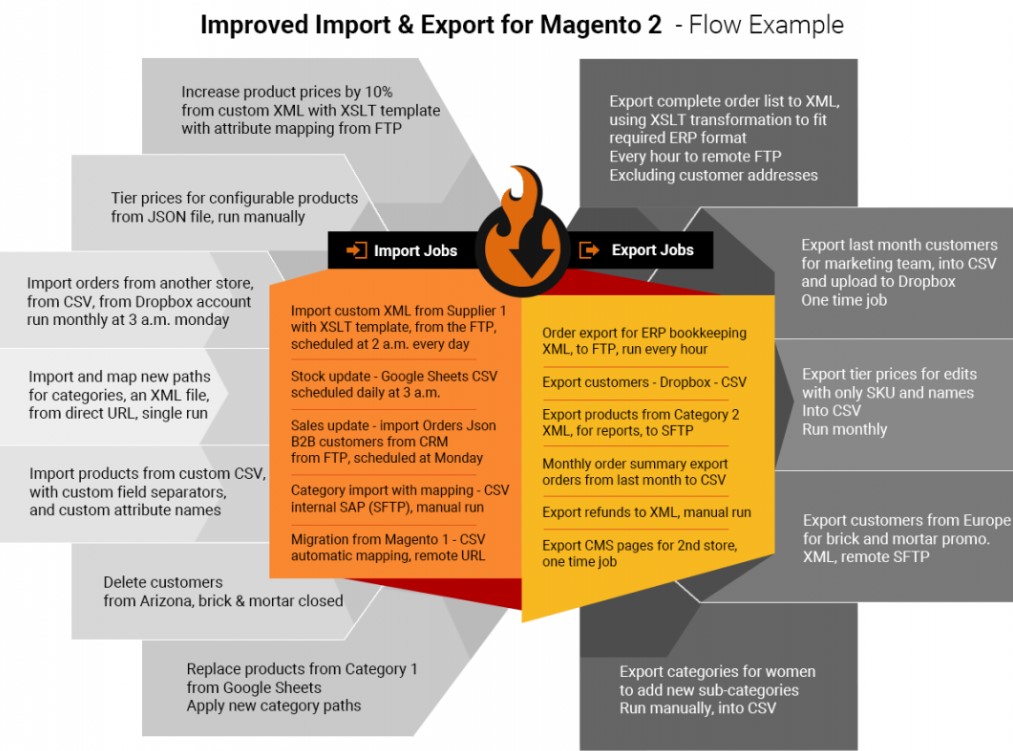
The Improved Import & Export extension was first issued as a small data transfer solution aimed at the rapid import of products and several other entities. Within almost a decade in the ecosystem, it received more than a hundred features, improving the daily routine of merchants across the globe. Now, the Improved Import & Export extension offers much more extensive opportunities than any third-party import/export tool, not to mention the default Magento 2 solutions. Let’s take a look at its most notable improvements.
Automated Data Transfers
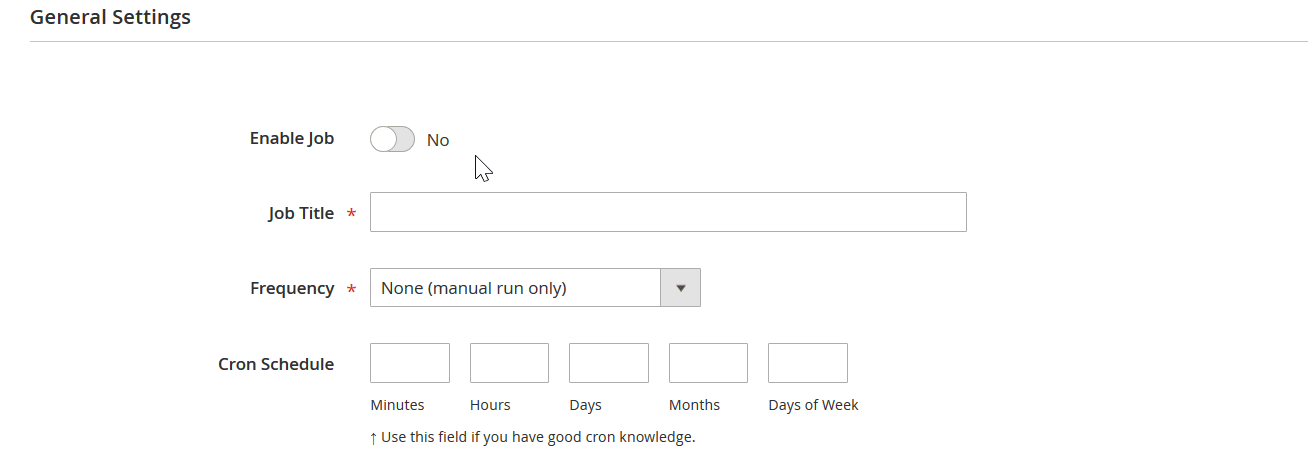
With the Improved Import & Export Magento 2 extension, you get two ways to automate data transfers. Firstly, cron-based schedules are under your disposal. Secondly, you can leverage the system of triggers and rules to launch import and export processes. Since schedules utilize the default cron syntax, you can create any custom interval to initiate the job. At the same time, the module provides several predefined options, which, in their turn, are fully customizable as well.
As for triggers and connected import and export processes, things are a little bit more complicated here. You need to create rules to provide the extension with the conditions to launch data transfers. For instance, it is possible to configure our tool to export customer data right after new registration. You can check a more detailed description of this process here: How to Run Magento 2 Import or Export After Specific System Event or Process.
Advanced Mapping Features
The Improved Import & Export extension also addresses the problem of different data storing standards. Since Magento 2 has its unique system of attributes, you cannot freely transfer information to your store even if its origin is Magento 1, not to mention other systems and platforms. Since automated import and export processes are not enough to complete the synchronization, avoiding most manual interactions, our extension provides a bunch of mapping improvements:
- Mapping Presets. Improved Import & Export offers predefined schemes that replace third-party attributes with ones used internally in a fully automated manner. You just need to choose a preset suitable for your integration. The feature covers both import and export processes.
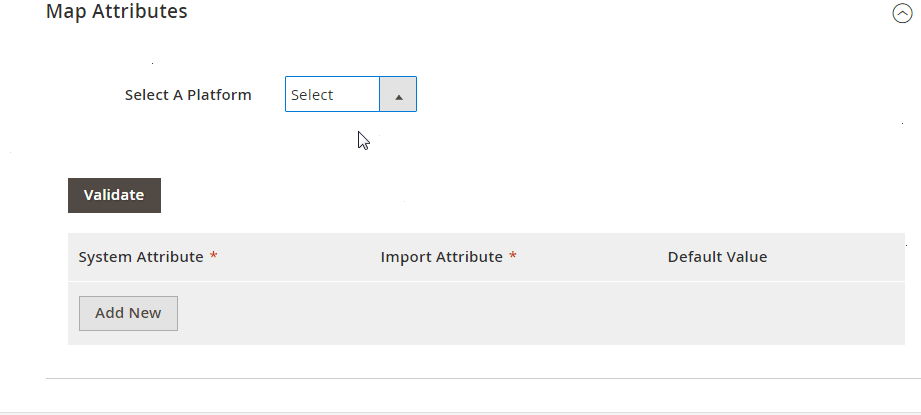
- Matching Interface. Alternatively, you can create a mapping scheme manually in your Magento admin. The extension offers a corresponding interface where you can specify third-party attributes and their replacements.
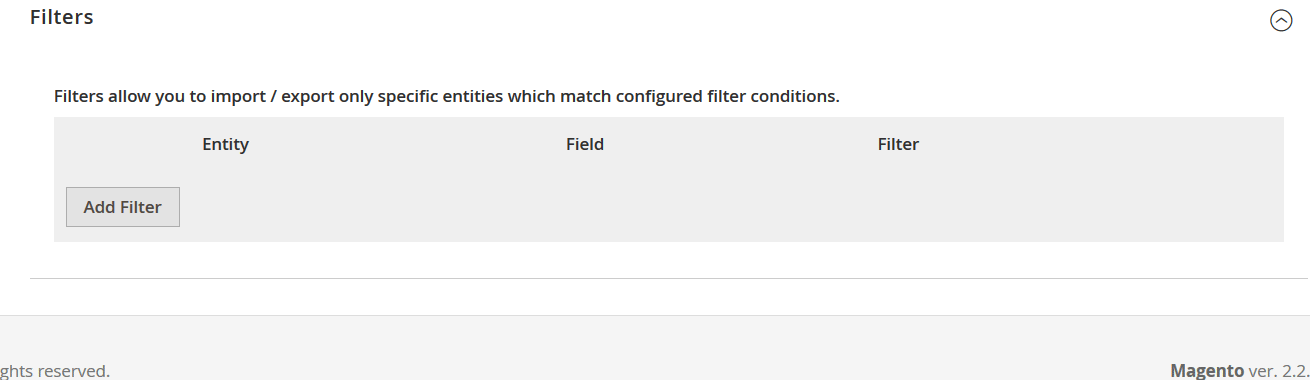
- Filters. The Improved Import & Export module provides the ability to narrow down the selection of exported data with filters. Choose what exact items to transfer by specifying an entity, its fields, and field parameters.
- Attribute Values. Besides, our module lets you map attribute values when you transfer data. The process is described here: Attribute Values Mapping. The extension also enables you to edit them. You can add a prefix/suffix to multiple attribute values as well as split or merge them. These processes are described in this article: How to Modify Attribute Values During Import and Export in Magento 2.
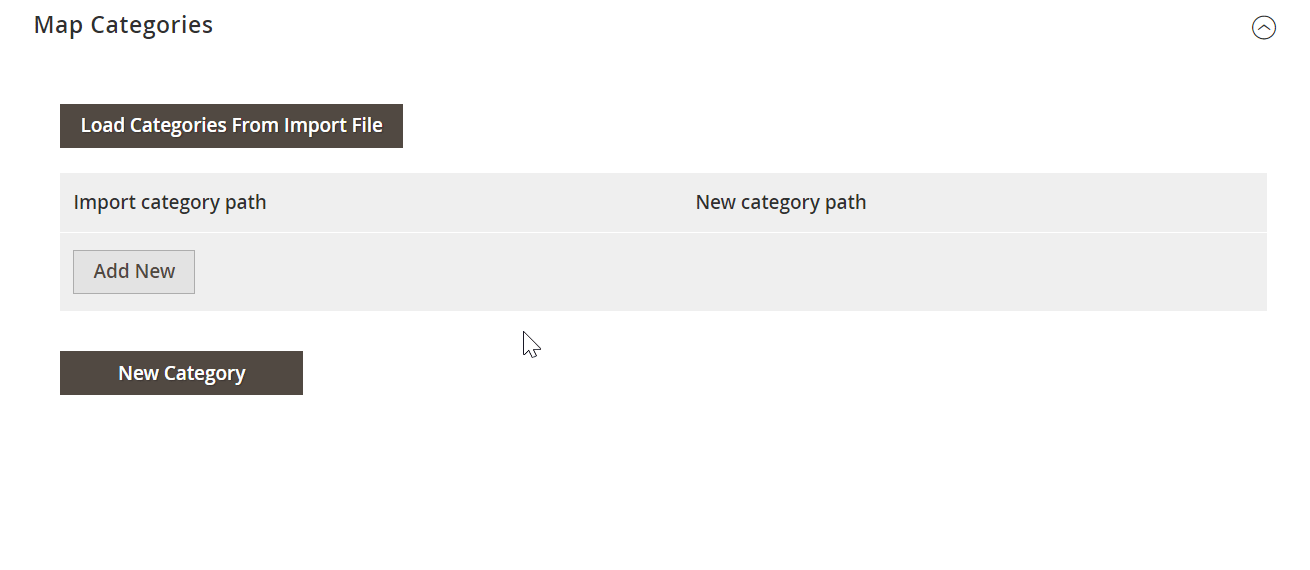
- Category Mapping. When it comes to product transfers, it is also possible to match external categories to ones used in your catalog. The Improved Import & Export extension provides the ability to pave the way to the existing catalog sections. At the same time, you can create new ones right during the configuration.
- Attributes On The Fly. Use this feature to generate missing attributes during a file transfer. Specify several parameters to enable the module to create new values. The procedure is described here: Product attributes import.
Extended Connectivity Options
To let you work with any external systems, Improved Import & Export introduces a bunch of new connectivity options.
Firstly, it extends the list of supported file formats from CSV to XML, JSON, ODS, and Excel. You can also provide the plugin with compressed data since it can unpack it automatically.
Secondly, the Improved Import & Export Magento 2 extension introduces the ability to streamline several file sources: FTP/SFTP, Dropbox and other cloud storage, direct URL uploads, etc.
Thirdly, you can rely on Google Sheets and APIs to enable data transfers. The extension supports direct REST API connections and also works with SOAP and GraphQL standards.

Final Words
Dynamic Blocks of Magento 2 introduce a new content type that provides more precise interactions with each customer. You can leverage this feature to target different prospects with different offers, depending on the met conditions. As you can see, it is quite simple to create and manage dynamic blocks. Although you cannot freely transfer them, it is already possible to import/export other design elements, using the Improved Import & Export extension. For further information about the opportunities built into our plugin, follow the link below:
Get Improved Import & Export Magento 2 Extension
Related posts
 Adobe Journey Optimizer: Unlock True, Real-Time Personalization
 Adobe Real-Time CDP: Unleashing the Power of Customer Data in Real Time
 Amasty ChatGPT AI Content Generator for Magento 2
 Magento 2 Release Notes
 How to generate order increment IDs automatically during Magento 2 import
- How to update products that are not listed in a product table during Magento 2 import
- How to Import Customers & Customer Addresses to Magento 2
 CopyAI Review 2023