
Exploring Shopware: Event Logs in Shopware 6
![]()
All things that happen within your Shopware 6 administration never fly under the radar. Shopware carefully records all actions that take place in the backend. Thus, you can carefully monitor all these processes and find out the reason for any outcome. As you’ve probably guessed already, we explore Shopware 6 event logs today. It is a separate screen in settings that displays all actions associated with backend activities. However, the feature is exclusively available to users of self-hosted stores. If you run a website in a Shopware 6 Cloud environment, skip this article. If you use the self-hosted version of Shopware 6, you’ve come to the right place. Let’s see what Shopware 6 event logs are, where to find them, and how to manage the corresponding section of settings. We explore the Shopware 6 event logs screen including event log details.

Note that we provide Shopware integration with external platforms. Contact our support for further information or try our Improved Import & Export Extension for Shopware.
Table of contents
- 1 Shopware 6 Event Logs Explained
- 2 How To Find Shopware 6 Event Logs
- 3 Shopware 6 Event Logs Screen
- 4 Shopware 6 Event Log Details
- 5 How to Import Data from External Platforms to Shopware 6
- 6 Shopware 6 Essentials FAQ
- 6.1 How to create a Shopware ID?
- 6.2 How to create a Shopware account?
- 6.3 What is Shopware master data?
- 6.4 How to add a shop in Shopware?
- 6.5 How to add a payment method to your Shopware account?
- 6.6 How to create a deposit in Shopware?
- 6.7 How to purchase Shopware extensions?
- 6.8 How to get support in Shopware?
- 6.9 How to migrate to Shopware 6?
- 6.10 How to automate import and export processes in Shopware 6?
- 6.11 How to integrate Shopware 6 with external systems?
Shopware 6 Event Logs Explained
Event logs provide you with an overview of the events that take place in your system, such as orders placed or emails sent. Thus, you can always monitor all changes that occur on your website. Depending on the type of log entry, different information is attached to it.
Before going any further, let’s see where Shopware 6 event logs are situated.
How To Find Shopware 6 Event Logs
Shopware 6 event logs are situated in your admin under Settings -> System -> Event Logs.
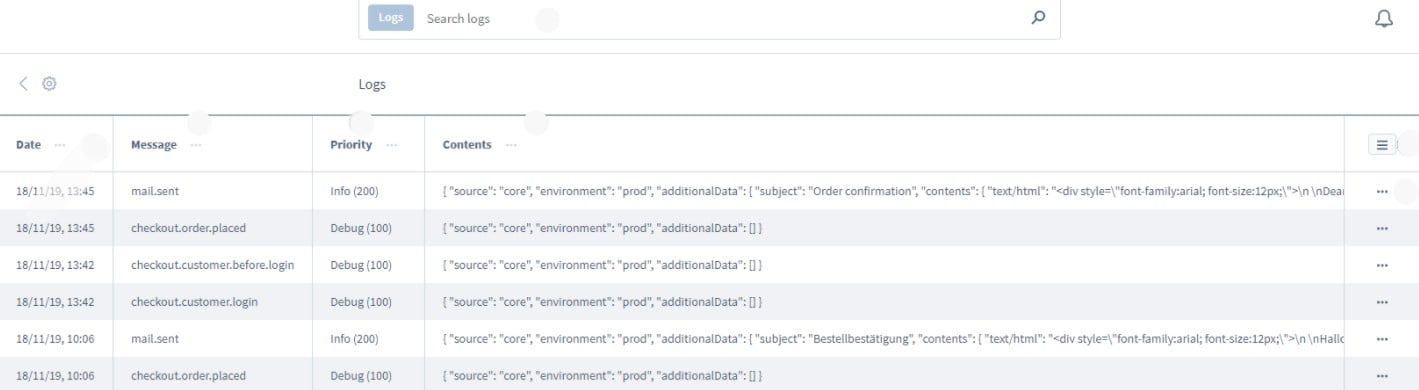
Shopware 6 Event Logs Screen
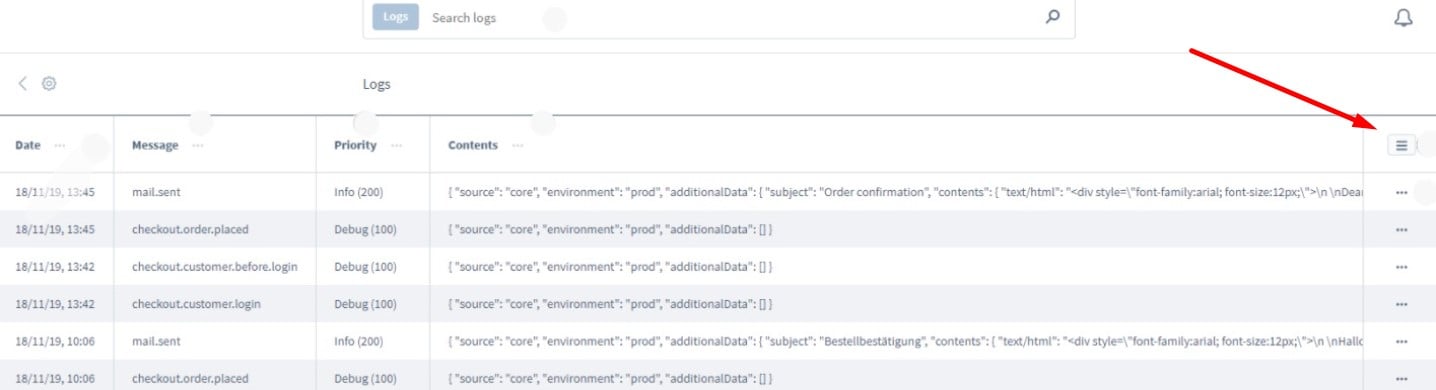
The Shopware 6 Event Logs screen contains a grid divided into different columns. Hit the symbol with 3 dashes in the top hat to show/hide columns and change their order.
If you need to find a specific log, Shopware 6 provides a search bar above the grid.

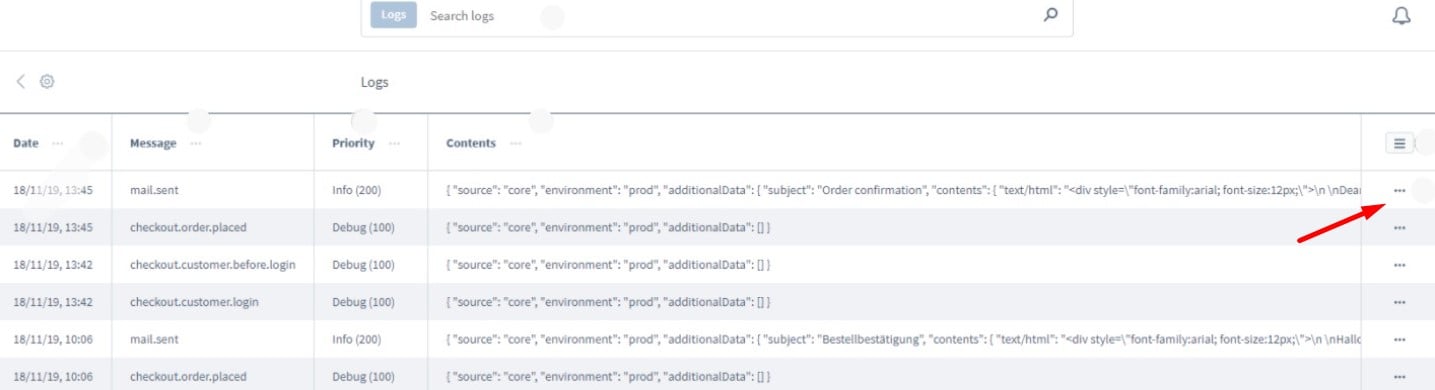
Also, you can view the details of an individual log entry. Firstly, you can click directly on the content in the row. Secondly, it is possible to use the context menu – the “…” symbol.
As for the columns in the Shopware 6 Event Logs grid, they include:
- Date – the time and date the action took place;
- Message – the area from which the log entry originates, such as checkout or mail;
- Priority – the importance of the entry:
- Debug (100) – the entry is important for debugging;
- Info (200) – the entry contains a simple system message;
- Error (300) – the entry contains an error message that should be checked;
- Critical (400) – the entry contains a serious error message – check it immediately.
- Content – the actual message content. Hit the content of this column to open the detailed message view.
Shopware 6 Event Log Details
Shopware 6 displays the details of the log entry in a separate window:
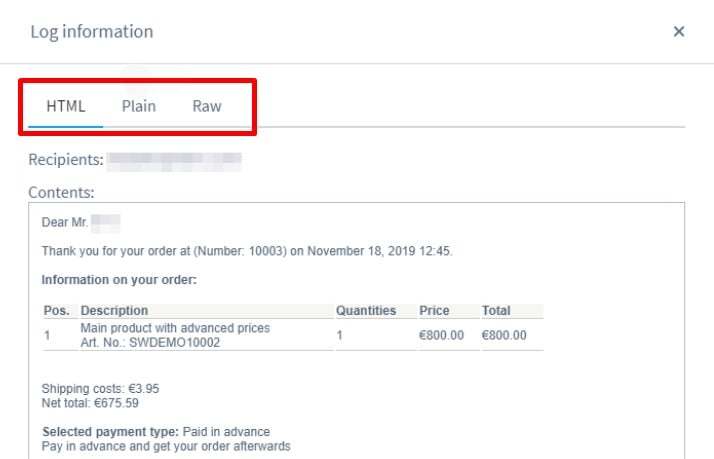
However, the information shown in this window depends on the type of log entry. For instance, mail logs display the corresponding mail in different views while debug entries are only visible in the source code format.
How to Import Data from External Platforms to Shopware 6
If you need to import data to Shopware 6 to get your website up and running, our team lets you simplify and automate various processes associated with data transfers to Shopware 6. Contact our support for more details and try our . You can use it to import any entity to Shopware 6 from any external platform. The extension provides the ability to automate data transfers with the help of cron-based schedules. Besides, you can adopt all external outputs to the Shopware requirements with mapping schemes. Please, consult our specialists before using the module to get the most out of it. Note that it also has a unique event log, recording import and export processes there.
Shopware 6 Essentials FAQ
How to create a Shopware ID?
Creating a ShopwareID is a straightforward task that requires no additional effort. You receive it upon the creation of a Shopware account.
How to create a Shopware account?
Go to a registration page to create a new Shopware account. Hit the Register Now link and move to the registration form. When the form is filled in, proceed to your email and follow the instructions from a confirmation message.
What is Shopware master data?
Shopware master data combines all the information you provide while creating a Shopware account, such as an address, phone, email, name, and other company details.
How to add a shop in Shopware?
Proceed to your merchant area where you can launch a new Shopware 6 shop. Hit the link situated on the start screen’s right part and continue with the selection of a shop type. Choose between a cloud storefront or an on-premise installation. Provide all the information required for the selected shop type.
How to add a payment method to your Shopware account?
You need to add a payment method for internal Shopware purposes. The corresponding functionality is available under Basic Information -> Accounting. Here, you need to select a method that is more suitable for your company: PayPal, credit card, or direct debit.
How to create a deposit in Shopware?
With a payment method enabled, you can create a deposit for your Shopware 6. Go to Merchant Area -> Shops, choose a shop to provide funds to, click Open Account Details, and start the transaction.
How to purchase Shopware extensions?
If you want to buy an extension or theme add a deposit the can cover its costs and go to the Shopware Marketplace or the Plugin Manager. Choose a solution you want to buy and complete the purchase.
How to get support in Shopware?
Contact Shopware at info@shopware.com or +49 2555 9288 50 to get support regarding your account or license. Use these mail and phone number financial.services@shopware.com and +49 2555 9288 510 if you need consultancy regarding accounting and financial services.
How to migrate to Shopware 6?
Due to the complexity of an average e-commerce migration, we recommend using a third-party extension to complete it successfully. For instance, you may leverage the Improved Import & Export extension since it offers way more powerful instruments than the default tools of Shopware 6. With our module, you can move core entities to your new website from any external platform. Besides, it is possible to transfer any data from Shopware’s previous versions. We also offer export solutions for other e-commerce systems so that you can migrate from Magento, Shopify, and others more efficiently. Contact us for further information.
How to automate import and export processes in Shopware 6?
You can easily automate regular data updates with the help of the Improved Import & Export extension. It provides the ability to run recurring import and export processes with no interaction at the admin level. Create a schedule of updates per each data transfer and let the module do all the work for you. The extension will launch the corresponding data transfer according to the specified time frames.
How to integrate Shopware 6 with external systems?
Due to the powerful features, Improved Import & Export also offers integrations with various external platforms and systems. You can utilize the module to connect your store to ERPs, CRMs, accounting tools, etc. As we’ve mentioned above, it automates repetitive import and export processes with the help of cron-based schedules. Besides, it modifies data according to the requirements of your Shopware store upon import with the help of mapping presets. The same mechanism is used upon export. Thus, it is a perfect combination for regular data exchanges between the two systems.
Related posts
 Shopware 6 Advanced Pricing Guide + Import Tutorial
 A Complete Guide to Shopify Customer Import
 Adobe (Magento 2) Commerce and Cloud (Enterprise Edition) Specific Features
 How to Import Customers & Customer Addresses to Magento 2
 Magento 2 B2B Company Guide: Revealing Company Structure & Import
 How To Bulk Import Products In Shopify: CSV Description & Step-By-Step Guide
 Amasty ChatGPT AI Content Generator for Magento 2
 Magento Open Source and Adobe Commerce 2.4.7 Release Notes