
Exploring Shopware: Mailer in Shopware 6 Settings
![]()
Today, we focus on another topic aimed at users of self-hosted stores. In the following article, you will find the description of the Shopware 6 Mailer. The tool lets you send outgoing emails, creating better communication with prospects. The material below sheds light on where the Shopware 6 Mailer is situated, what Mailer settings are available, how to manage a local email agent and an SMTP server, as well as how to configure the entire environment for sending emails in Shopware 6. Note that users of the Shopware 6 Cloud environment don’t have the corresponding section of settings.

Note that we provide Shopware integration with external platforms. Contact our support for further information or try our Improved Import & Export Extension for Shopware.
Table of contents
- 1 How to Find Shopware 6 Mailer
- 2 Shopware 6 Mailer Settings
- 3 How to Import Data from External Platforms to Shopware 6
- 4 Shopware 6 Essentials FAQ
- 4.1 How to create a Shopware ID?
- 4.2 How to create a Shopware account?
- 4.3 What is Shopware master data?
- 4.4 How to add a shop in Shopware?
- 4.5 How to add a payment method to your Shopware account?
- 4.6 How to create a deposit in Shopware?
- 4.7 How to purchase Shopware extensions?
- 4.8 How to get support in Shopware?
- 4.9 How to migrate to Shopware 6?
- 4.10 How to automate import and export processes in Shopware 6?
- 4.11 How to integrate Shopware 6 with external systems?
How to Find Shopware 6 Mailer
Shopware 6 provides the ability to choose the local email agent. As a result, the system utilizes the server’s default mailer for sending outgoing emails.
You can leverage a corresponding section of settings in your administration to leverage the Shopware 6 mailer, which is available under Settings -> System -> Mailer.
Shopware 6 Mailer Settings
Below, we shed light upon the core settings of the Shopware 6 Mailer.
Local email agent
As we’ve just mentioned above, when you select the local email agent as your primary communication mechanism, the server’s default mailer is used for outgoing emails. On your part, you need to ensure that the sendmail service is available in your hosting environment. After that, you need to set it up correctly – discuss it with your hosting partner.
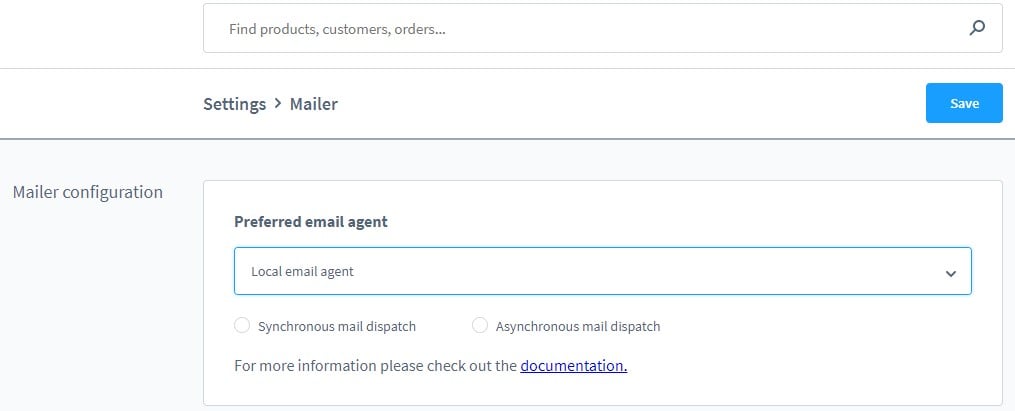
Besides, the Shopware 6 Mailer settings let you specify whether the mails should be sent synchronously or asynchronously. In the first case, use -bs as your sendmail parameter; in the second – use -t if you specify them beyond the settings.
Note that each one depends on the current server configuration. Although it is recommended to discuss the required option with your provider, the official Shopware documentation recommends using synchronous sending (-bs). It insists on this approach since it lets you check the status of your mail and receive error notifications. It is not possible when you rely on asynchronous sending.
SMTP server
In addition to the local email agent, Shopware 6 provides the ability to connect your e-commerce website to an external mail provider. The following options are at your disposal:
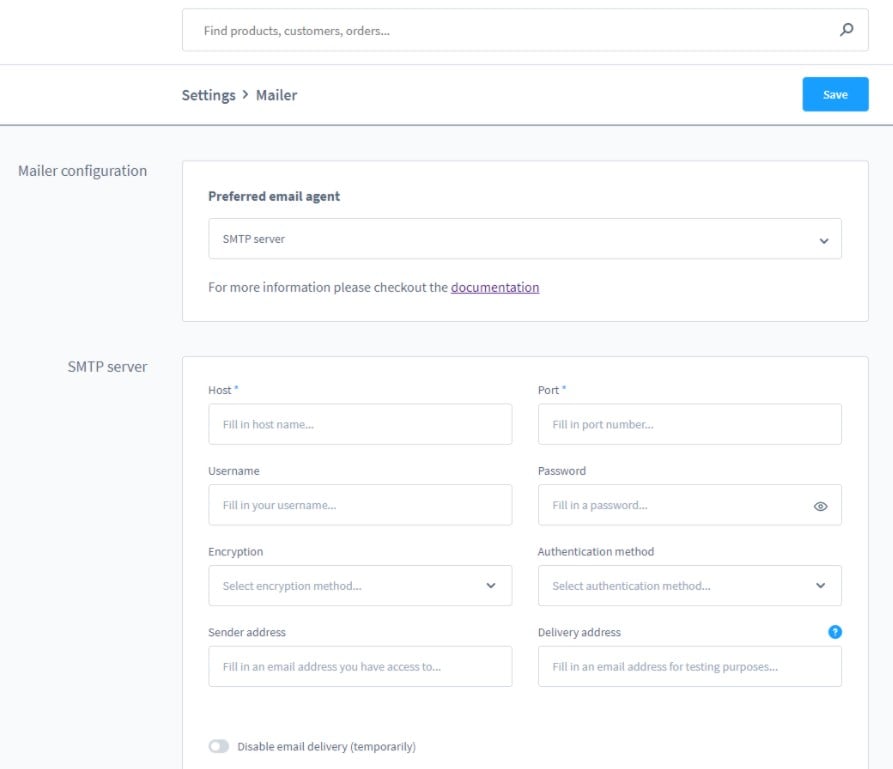
- Host – type the hostname of your provider here;
- Port – specify the server port here: Although Port 25 is used for SMTP transmission, AOL or Gmail require another port, e.g. 587;
- Username/Password – set your SMTP credentials from setting up your email program in this field;
- Encryption method – you should choose between SSL and TLS, depending on your configuration. Alternatively, it is possible to send emails without encryption;
- Authentication method – it is recommended to use the (RFC 2195) encryption method if your email provider supports it;
- Sender address – enter the email address here that will be specified as the sender address. Also, you may need to enter the email address in the basic information for each sales channel to display it correctly;
- Recipient address – use this field for test purposes: Shopware 6 will send a copy of all outgoing mails here.
How to configure SMTP server settings in Shopware 6
Below, we provide several examples of how to configure SMTP server settings for different platforms:
- 1und1:
- Host – smtp.ionos.de
- Port – 465
- Username and password – your email account address and password
- Encryption method – SSL
- Authentication method – Plain
- Google Mail:
- Host – smtp.gmail.com
- Port – 25
- Username and Password – your GMail address and password
- Encryption method – SSL
- Authentication method – Login
- Hosteurope:
- Host – your SMTP-Server from Hosteurope
- Port – you can choose between 25, 587, and 465
- Username and password – your SMTP account username and password
- Encryption method – unencrypted for port 25 or 587), TLS encrypted for port 25, or SSL encrypted for port 465
- Authentication method – Login
- Timme Hosting:
- Host – your SMTP-Server from Timme
- Port – 465 or 587
- Username and password – SMTP account username and password
- Encryption method – SSL or TLS
- Authentication method – Login
- AIXPRO:
- Host – use one from your welcome email
- Port – 587
- Username and password – SMTP account username and password
- Encryption method – STARTTLS
- Authentication method – Login
Environment configuration
Along with a local email agent and an SMTP server, Shopware 6 lets you leverage the Symfony mailer function.
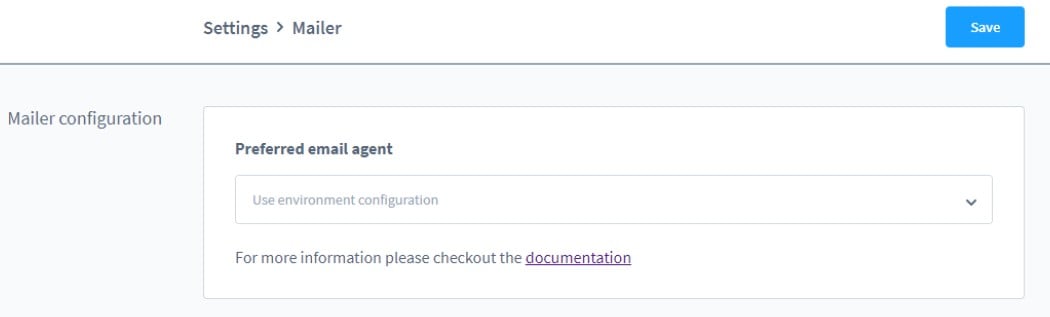
Specify Use environment configuration in Preferred email agent and leverage the .env file stored in the Shopware root directory to provide the connection data to the system:
- Find the following line:
1MAILER_URL=null://localhost - Specify the access data following the pattern below:
1MAILER_URL=smtp://mailserveraddress:port?username=username&password=Password
Proceed to the to get more information on how to configure the Symfony mailer.
How to Import Data from External Platforms to Shopware 6
If you need to import data, including emails and email templates, to Shopware 6, our team lets you simplify and automate various processes associated with data transfers to your e-commerce store. You can leverage our to achieve this goal. You can use the module to import any entity to Shopware 6 from any external platform. It provides the ability to implement cron-based schedules to run transfers automatically. Besides, you can create mapping schemes, matching all the external data to the corresponding Shopware designations. Please, contact our support for more details. Also, get our consultancy before using the extension for transferring emails and email templates to achieve the highest efficiency.
Shopware 6 Essentials FAQ
How to create a Shopware ID?
You don’t need to worry about a ShopwareID since the system provides it while you create a Shopware account.
How to create a Shopware account?
You can create a Shopware account on a registration page. Hit the Register Now link and fill in the registration form. Follow the instructions provided in a confirmation email.
What is Shopware master data?
All the information provided for a Shopware account is titled master data. For instance, it includes address, phone, email, name, and other company details.
How to add a shop in Shopware?
A new Shopware shop can be added in your merchant area. Hit the link situated on the start screen’s right part and go to the shop type selection. Choose between a cloud storefront or an on-premise installation. Specify the required information and save changes.
How to add a payment method to your Shopware account?
You can add a payment method for internal Shopware purposes as follows. Go to Basic Information -> Accounting and choose a method that is more suitable for your business: PayPal, credit card, or direct debit. That’s it!
How to create a deposit in Shopware?
Now, with an active payment method, you can create a deposit for your Shopware 6 shop. Go to Merchant Area -> Shops, select a shop to provide funds to, hit Open Account Details, and begin the transaction.
How to purchase Shopware extensions?
You can purchase extensions and themes in Shopware 6 with the help of either the Shopware Marketplace or the Plugin Manager. Create a deposit, choose a software solution you want to buy, and complete the purchase.
How to get support in Shopware?
Write to info@shopware.com or call +49 2555 9288 50 if you need support regarding your account or license. And contact Shopware support at financial.services@shopware.com and +49 2555 9288 510 if you need help regarding accounting and financial services.
How to migrate to Shopware 6?
You need a third-party tool to migrate to Shopware 6 without losing any data. Pay attention to the Improved Import & Export extension since it offers lots of benefits over the default tools. With our module, you will move core entities to your new website from any external platform. Besides, it is possible to transfer any data from Shopware’s previous versions. Since we also offer export solutions for other e-commerce platforms, you can easily move from Magento, Shopify, and other systems. Contact our team for more information.
How to automate import and export processes in Shopware 6?
The Improved Import & Export extension also simplifies regular data updates. You can create a schedule of updates per each data transfer and let the extension launch the corresponding data transfer according to the specified time frames.
How to integrate Shopware 6 with external systems?
The Improved Import & Export extension also delivers integrations with various external platforms and systems. You can use the module to connect your store to ERPs, CRMs, accounting tools, and other similar solutions. It automates repetitive import and export processes using cron-based schedules. Besides, the plugin modifies data according to the requirements of your Shopware store upon import with the help of presets. You can also map data upon export using the same technology. Thus, you deal with a perfect combination that suits regular data exchanges between the two systems.
Related posts
 Shopware 6 Advanced Pricing Guide + Import Tutorial
 How To Bulk Import Products In Shopify: CSV Description & Step-By-Step Guide
 Magento 2 B2B Company Guide: Revealing Company Structure & Import
 How to Import Customers & Customer Addresses to Magento 2
 Amasty ChatGPT AI Content Generator for Magento 2
 Reputon Amazon Importer Review: How to Connect Shopify to Amazon in a Few Clicks
 A Complete Guide to Shopify Customer Import
 CopyAI Review 2023