
Exploring Magento 2 Backend: Scheduled Import/Export

Magento 2 ostensibly lets you run scheduled imports and exports. However, you need a large budget to be able to leverage this feature. Although it is added for free and available by default, the problem is that you can only harness it with the Commerce edition, which is extremely expensive. How to automate daily import/export chores if you are a Magento 2 Open Source merchant? You will find the answer below. Besides, we provide several arguments in favor of using a third-party data transfer solution on Magento 2 Commerce. Let’s continue our exploration of the Magento 2 backend. This time, our attention is captured by the Scheduled Imports/Exports screen.

Table of contents
Magento 2 Scheduled Import/Export Basics
So, what are the basic features behind the scheduled import/export of Magento 2?
- You can run automated data transfers on a daily, weekly, or monthly basis.
- Update files can be located on a local Magento server or a remote FTP server.
- All operations incorporate the Cron job scheduler.
- No additional configurations are required.
It seems that the feature should be user-oriented in all its aspects, is it really so?
How to Access Scheduled Import/Export in Magento 2
Go to your Magento 2 backend and tap System. Find the Data Transfer section and proceed to the Scheduled Imports/Exports screen. You will see the following interface:
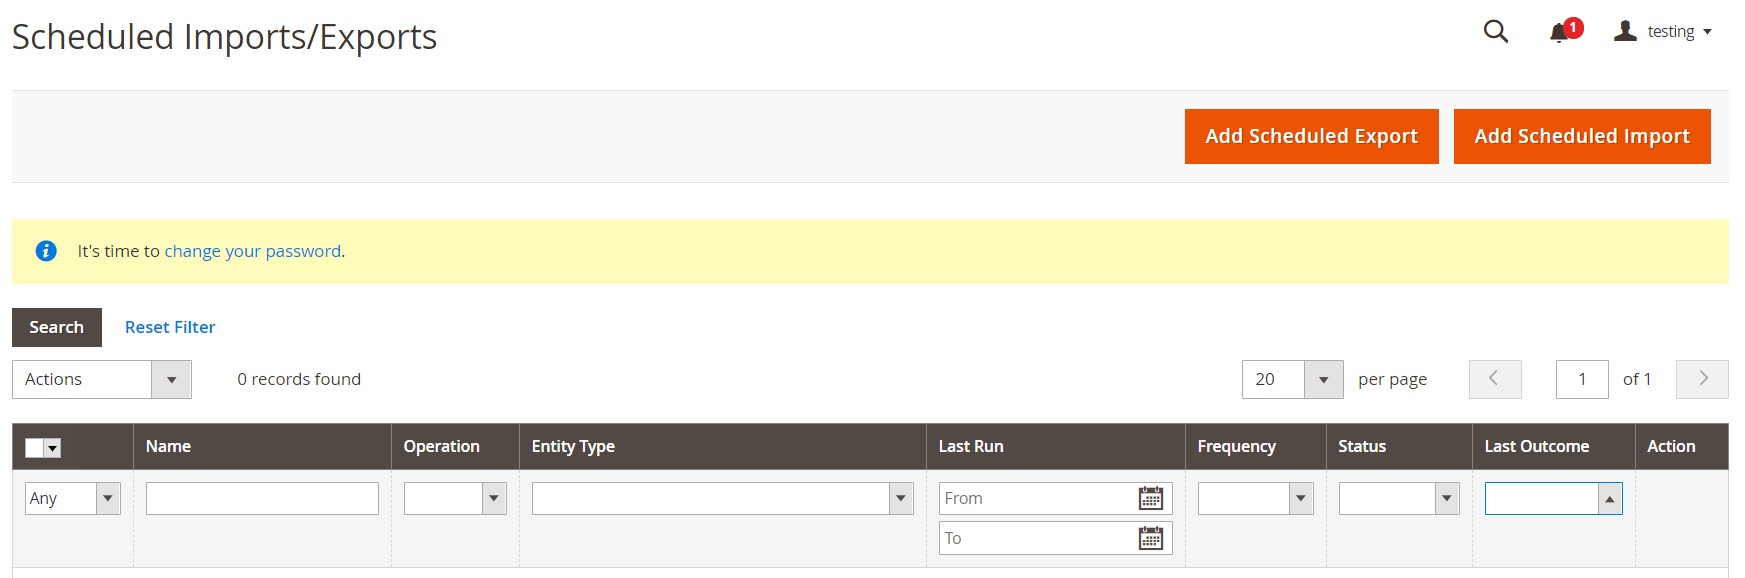
You can see a conventional grid that displays the following characteristics:
- Name – a name of an import or export process;
- Operation – Import or Export;
- Entity Type – Advanced Pricing, Products, Customer Finances, Customers and Addresses, Customers Main File, Customer Addresses, Stock Sources;
- Last Run – time of the latest import/export;
- Frequency – Daily, Weekly, Monthly;
- Status – Enabled, Disabled;
- Last Outcome – Failed, Successful, Pending.
Every time you save a new record, the job appears here. When a scheduled task is complete, you can find a copy of the file in the var/log/import_export directory of your Magento local server. However, Magento 2 doesn’t have a register with operation details. If a data transfer procedure fails, and an error occurs, the system sends a notification with an error description.
Before going any further, we can already declare that there is a better way to automate data transfers. The default Scheduled Import/Export tool is quite awkward since it lets you exchange files only via a local or remote server. However, you can dramatically extend the list of supported services with cloud storage options, Google Sheet support, and API integrations. We will return to them later.
Another drawback is the absence of a log with all the information that fully describes import and export processes. Luckily, you can quickly get one even on an Open Source website.
How to Schedule Import in Magento 2
Magento 2 Commerce lets you schedule an import process if you follow several requirements. Firstly, you should use the CSV files only. If somebody provides you with an ODS file, you have to convert it. However, you can avoid this procedure. You will find the clue below.
Secondly, you should import product and customer data only. What about other vital entities, such as orders, coupons, gift cards, and others? Although none of them is supported by default in Scheduled/Import/Export of Magento 2, you still have a chance to import/export any entity to/from Magento 2. But let’s return to our mutton.
The good news is that you don’t need to reindex after each scheduled import job since it is performed automatically. Most changes are reflected on the frontend right after the updated data appears in the database. Updated prices appear on product pages only after the reindex operation.
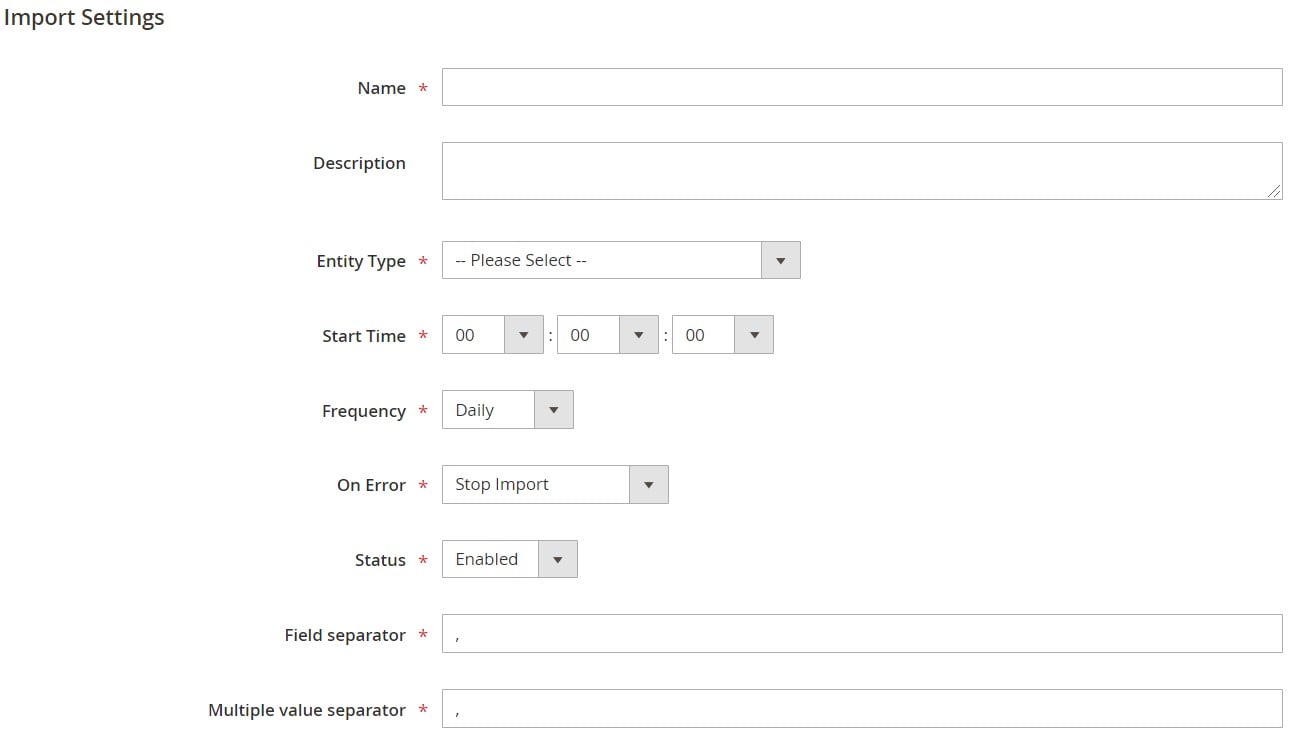
Go to your Magento 2 backend’s Scheduled Import/Export screen to automate an import procedure. Click Add Scheduled Import and specify the following parameters:
- Name — a name of your scheduled import;
- Description — its brief description;
- Entity Type — Products or Customers
- Import Behavior — Append Complex Data (add new data), Replace Existing Complex Data (write over existing data), Delete Entities (deletes existing database entries);
- Start Time — hour, minute, and second to launch import;
- Frequency — Daily, Weekly, or Monthly
- Field Separator — a character that separates fields in the import file;
- Multiple Value Separator — a character that separates numerous values within a field;
- Status — enable the job here.
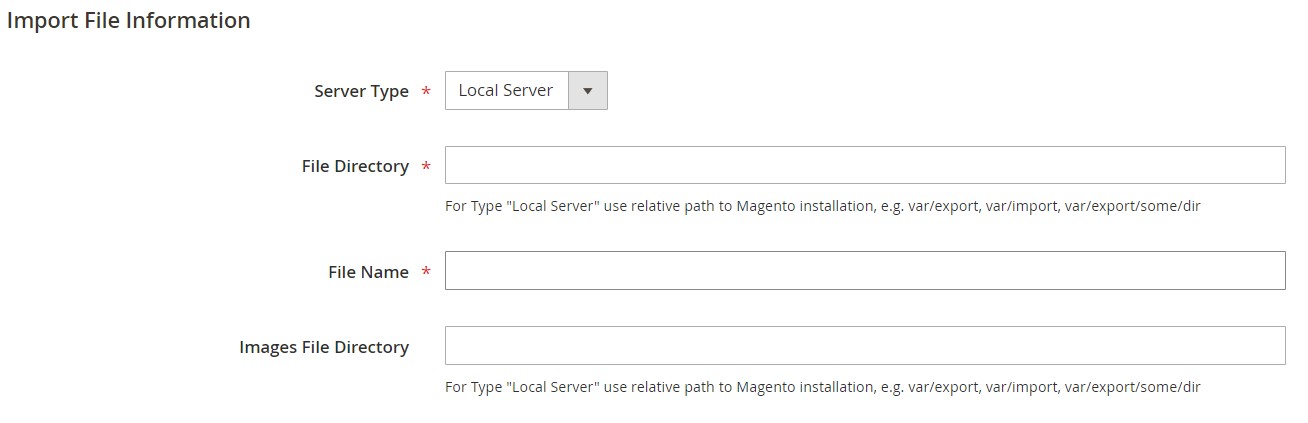
Now, you can set your Server Type. Bear in mind that it can be only a Local Server or Remote FTP. Next, specify the File Directory where the import file originates. For a local server, it is a relative path in your Magento installation, such as var/import. For a remote FTP server, it is a full URL and path to the remote server.
After that, you can specify a File Name to be imported and a path to the directory with product images.
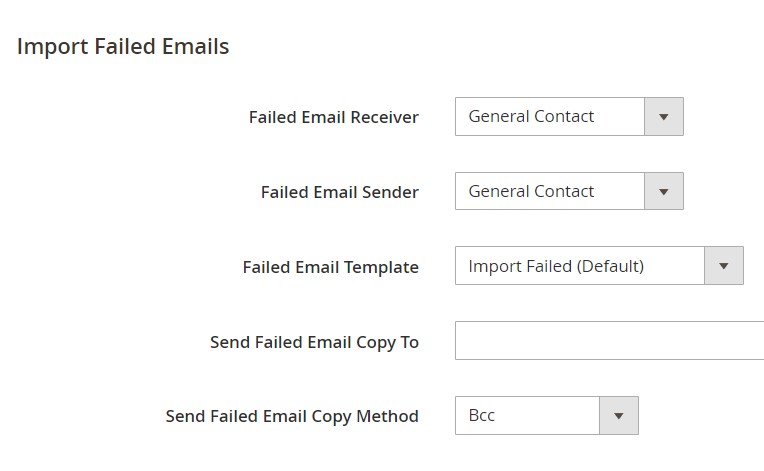
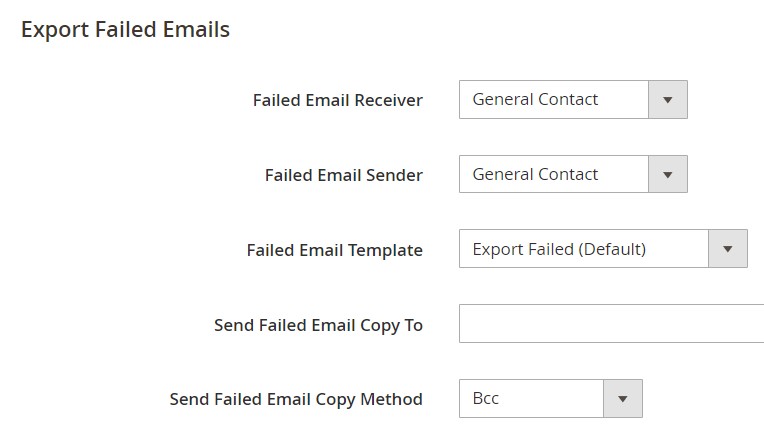
Provide data necessary for sending failed email notifications. Magento 2 asks to set Failed Email Receiver, Failed Email Sender, Failed Email Template, Send Failed Email Copy To, and Failed Email Copy Method.
Congratulations! Now, your scheduled import is successfully created. You can find it in the grid on the Scheduled Import/Export page. Magento 2 lets you run it immediately for testing.
How to Schedule Export in Magento 2
Scheduling an export procedure in Magento 2 is very similar to import. They share the same approach and limitations.
Go to the Scheduled Import/Export screen and hit the Add Scheduled Export button in the upper-right corner. Specify a name for the scheduled export, add a description, choose an entity type, and specify start time and frequency. Enable the export profile and choose SCV as its default file format.
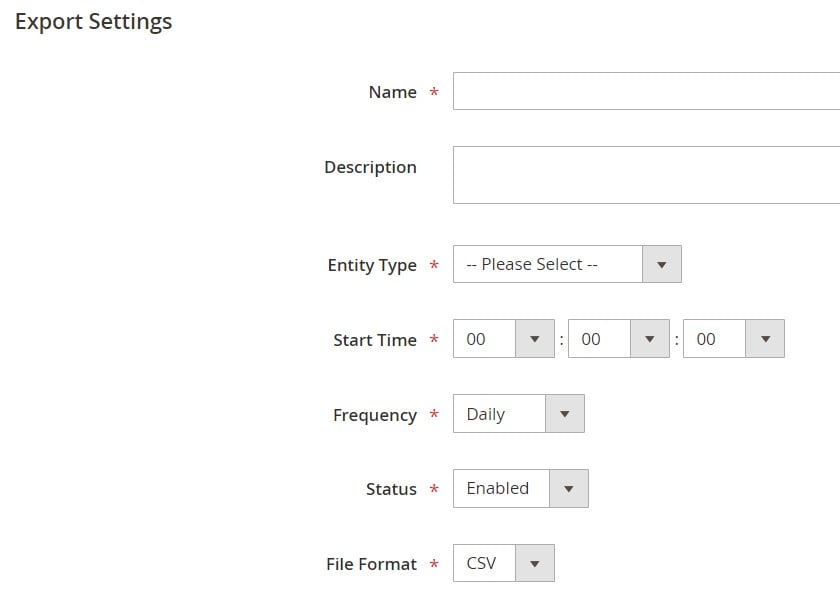
Next, you can set a server type (Local Server or Remote FTP) and provide a path to a file directory to save the exported file.

Configure failed export notifications.
It is only left to choose the entity attributes – ones that include in the export data. Magento 2 provides the ability to filter export data by entering attribute values in the Filter column. At the same time, you can exclude products or customers with specific attribute values. To implement this strategy, it is necessary to enter the values of the attributes that you want to eliminate and activate the checkbox in the Skip column.
That’s it! Save your new export job and launch it for testing.
Scheduled Import & Export for Magento 2 Open Source
As you can see, Magento 2 provides the ability to create schedules only if you use the Commerce edition. However, its functionality is limited. Merchants on Open Source don’t have anything similar built into the platform. Luckily, it is always possible to switch to various third-party alternatives, such as Improved Import & Export. Let’s examine its critical advantages over the default Scheduled Import/Export of Magento 2
Automated Data Transfers
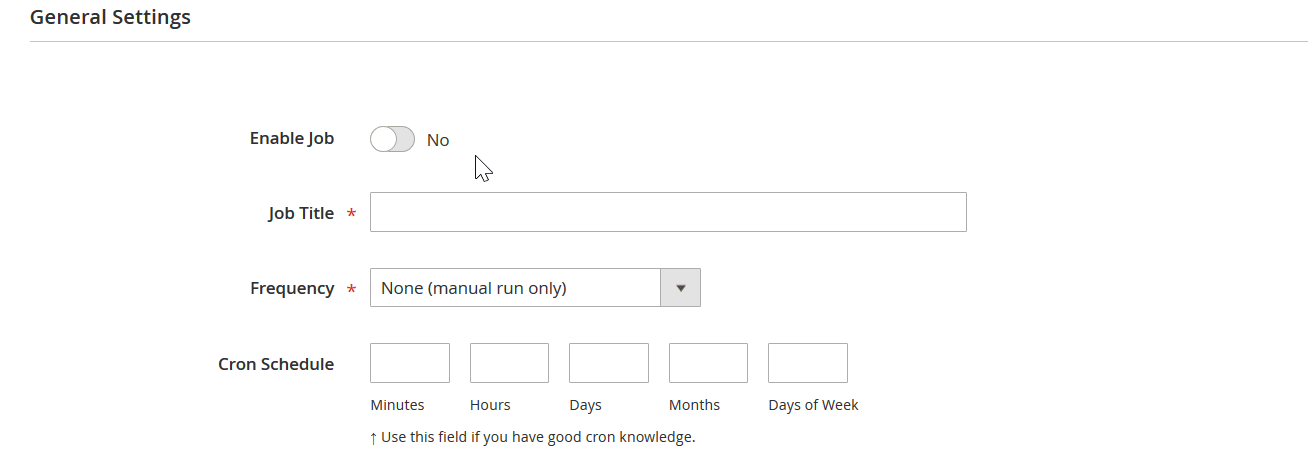
Unlike the default solution behind Magento 2, the Improved Import & Export extension offers two different kinds of automated transfers. The module incorporates cron-based schedules. Our solution is more flexible because you can select a predefined interval or specify any custom timespan. The image below shows how simple this procedure is:
An alternative way of automation is represented by the system of triggers. You define rules and conditions. When these conditions are met, the extension initiates the import/export processes.
Mapping
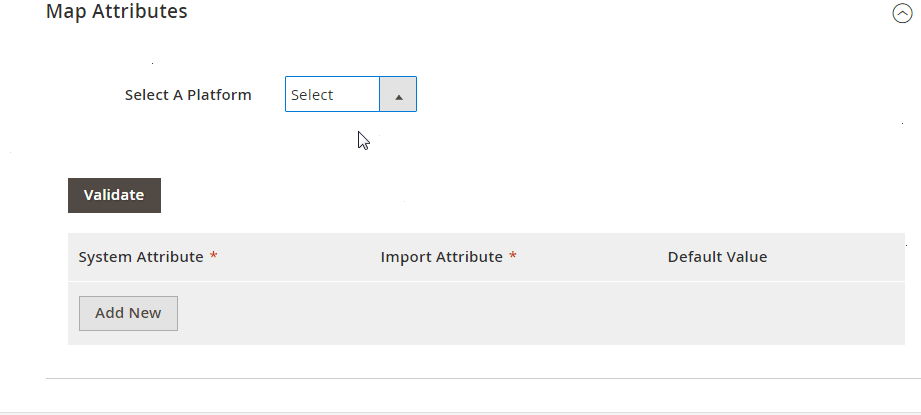
Another essential benefit of our tool is a selection of various mapping features. Scheduled Import/Export doesn’t have anything similar, so you always have to edit a CSV file to follow the Magento 2 requirements. As for the Improved Import & Export Magento 2 extension, it helps you address various such issues with the following features:
- Presets – a set of predefined schemes developed to map attributes automatically;
- Manual Matching – an interface within the Magento 2 backend where you can apply changes;
- Attribute Values Mapping – a similar section for attribute values;
- Attribute Values Editing – bulk editing of attribute values;
- Filters – only this feature is represented in the default solution;
- Category Mapping – more efficient product import to the categories that already exist in your catalog;
- Attributes On The Fly – a bandaid for missing attributes;
Below, you can see how to apply presets to enable automated mapping:
Extended Connectivity Options
Scheduled Import/Export of Magento 2 is bound to CSV files. To avoid conversion to other standards, you can also rely on Improved Import & Export. The extension works with CSV files and supports transfers based on XML, ODS, JSON, and Excel. Furthermore, they can be imported in a compressed state since the plugin knows several archive types.
Another level of freedom is represented by a wide range of file sources. The Improved Import & Export module supports both local and remote servers. Alternatively, you can streamline cloud storage.
For more complex connections, Improved Import & Export enables API connections. As a result, you avoid conventional file transfers.
Direct file URL downloads are possible too. Just paste a link to a file in the import profile. Alternatively, you can get data from Google Sheet as follows:

Last but not least, the Improved Import and Export extension has numerous add-ons that simplify data transfers, making them even more intuitive and straightforward. You can peruse the detailed description of our module and discover more advantaged over the default Scheduled Import/Export here:
Get Improved Import & Export Magento 2 Extension
Related posts
 Magento 2 B2B Company Guide: Revealing Company Structure & Import
 How to update products that are not listed in a product table during Magento 2 import
 Shopware 6 Advanced Pricing Guide + Import Tutorial
 Adobe (Magento 2) Commerce and Cloud (Enterprise Edition) Specific Features
 A Complete Guide to Shopify Customer Import
- How to Import Customers & Customer Addresses to Magento 2
 Magento Open Source and Adobe Commerce 2.4.7 Release Notes
 Magento 2 Release Notes