
Exploring Magento 2 Backend: Extensions -> Integrations

Magento 2 provides the ability to call its web APIs to enable third-party integrations. Although this process is quite sophisticated, it allows much broader possibilities than the platform delivers out of the box. By default, the Magento APIs currently work with accounting, ERP, CRM, PIM, and marketing automation systems. However, you need to be experienced in PHP and understand what’s going on under the hood of Magento. The knowledge of REST and SOAP web APIs, web API authentication, and OAuth-based authentication is mandatory. In the following article, we expand the understanding of how to create an integration in Magento 2, describe the System -> Extensions -> Integrations section of the Magento 2 backend, and provide a more user-friendly solution for synchronizing your Magento 2 website with any external platform.

Table of contents
How to Create Integration in Magento 2
Below, you will find the critical steps of creating a new integration in Magento 2. We provide a brief overview of the process described in the official guide. You will find links for further reading below this section.
Creating a skeletal module
Start your new Magento 2 integration with a skeletal module. You can develop it as follows:
Create the file structure of the module. Although you can place the integration module anywhere under the Magento root directory, the official guide insists on using <magento_base_dir>/vendor/<vendor_name>/module-<module_name> as its home. Besides, it is necessary to create etc, etc/integration, and Setup subdirectories under module-<module_name>. Below, you can see an example:
|
1 2 3 |
cd <magento_base_dir> mkdir -p vendor/<vendor_name>/module-<module_name>/etc/integration mkdir -p vendor/<vendor_name>/module-<module_name>/Setup |
Define a configuration file of your module. The etc/module.xml file contains basic data that describes the module. You should replace directories with the etc directory as well as create the module.xml file. Set values for these attributes:
- name – a string to identify the module in a unique way;
- setup_version – The Magento version the component utilizes.
You can examine an example of an etc/module.xml file below:
|
1 2 3 4 5 6 7 8 9 10 11 12 13 14 |
<?xml version="1.0"?> <!-- /** * Copyright © Magento, Inc. All rights reserved. * See COPYING.txt for license details. */ --> <config xmlns:xsi="http://www.w3.org/2001/XMLSchema-instance" xsi:noNamespaceSchemaLocation="urn:magento:framework:Module/etc/module.xsd"> <module name="Vendor1_Module1" setup_version="2.0.0"> <sequence> <module name="Magento_Integration"/> </sequence> </module> </config> |
The Magento_Integration module is loaded first since it is added to “sequence” so that you avoid the issue associated with a malfunction.
Add a composer.json file for your module. Create a composer.json file for your module to enable Composer to install and update the libraries your module utilizes. Note that the composer.json file should be situated in the module-<module_name> directory. An example of a composer.json file is waiting for you below:
|
1 2 3 4 5 6 7 8 9 10 11 12 13 14 15 16 17 |
{ "name": "Vendor1_Module1", "description": "create integration from config", "require": { "php": "~7.2.0|~7.3.0", "magento/framework": "2.0.0", "magento/module-integration": "2.0.0" }, "type": "magento2-module", "version": "1.0", "autoload": { "files": [ "registration.php" ], "psr-4": { "Vendor1\\Module1\\": "" } } } |
Create a registration.php file for your integration module. Now, you need to create the registration.php file that registers your module within the Magento 2 system. Place it in the module’s root directory. Take a look at such an example:
|
1 2 3 4 5 6 7 8 9 10 11 |
<?php /** * Copyright © Magento, Inc. All rights reserved. * See COPYING.txt for license details. */ \Magento\Framework\Component\ComponentRegistrar::register( \Magento\Framework\Component\ComponentRegistrar::MODULE, 'Vendor1_Module1', __DIR__ ); |
Create an install class for your integration module. Now, you should change directories to the Setup directory of your Magento 2. The official guide recommends creating an InstallData.php file. Its role is to provide the integration configuration data to the Magento integration table. See the example below:
|
1 2 3 4 5 6 7 8 9 10 11 12 13 14 15 16 17 18 19 20 21 22 23 24 25 26 27 28 29 30 31 32 33 34 |
<?php namespace Vendor1\Module1\Setup; use Magento\Framework\Setup\ModuleContextInterface; use Magento\Framework\Setup\ModuleDataSetupInterface; use Magento\Integration\Model\ConfigBasedIntegrationManager; use Magento\Framework\Setup\InstallDataInterface; class InstallData implements InstallDataInterface { /** * @var ConfigBasedIntegrationManager */ private $integrationManager; /** * @param ConfigBasedIntegrationManager $integrationManager */ public function __construct(ConfigBasedIntegrationManager $integrationManager) { $this->integrationManager = $integrationManager; } /** * {@inheritdoc} */ public function install(ModuleDataSetupInterface $setup, ModuleContextInterface $context) { $this->integrationManager->processIntegrationConfig(['testIntegration']); } } |
Note that you should refer to your etc/integration/config.xml file in testIntegration from the following line:
|
1 |
$this->integrationManager->processIntegrationConfig(['testIntegration']); |
Besides, the integration name value must be the same.
You can peruse a minimal config.xml file below:
|
1 2 3 4 5 6 7 |
<integrations> <integration name="TestIntegration"> <email>someone@example.com</email> <endpoint_url>https://example.com</endpoint_url> <identity_link_url>https://example.com/identity_link_url</identity_link_url> </integration> </integrations> |
Change the path after namespace to suit your vendor and module names.
Create integration files
With Magento 2, you get the Integration module designed to simplify the definition of your integration. It automates such functions as third-party accounts management, OAuth authorizations and user data maintenance, and security tokens and requests management.
By default, Magento 2 lets you customize your module with the help of multiple XML files. It is also necessary to read through other files, specifying what resources the existing Magento modules have access to.
Define the required resources
Use the etc/integration/api.xml file to define API resources related to the integration. You can figure out Mandatory integrations from the permissions set in each module’s etc/acl.xml file.
The example below incorporates a test integration that relies on the following resources in the Sales module:
|
1 2 3 4 5 6 7 8 9 10 11 12 13 14 15 |
<integrations> <integration name="testIntegration"> <resources> <!-- To grant permission to Magento_Log::online, its parent Magento_Customer::customer needs to be declared as well--> <resource name="Magento_Customer::customer" /> <resource name="Magento_Log::online" /> <!-- To grant permission to Magento_Sales::reorder, all its parent resources need to be declared--> <resource name="Magento_Sales::sales" /> <resource name="Magento_Sales::sales_operation" /> <resource name="Magento_Sales::sales_order" /> <resource name="Magento_Sales::actions" /> <resource name="Magento_Sales::reorder" /> </resources> </integration> </integrations> |
Preconfigure the integration
Since your module can optionally provide values through config.xml, it is possible to preconfigure the integration automatically using default values. This feature becomes available after updating the config.xml file in the etc/integration directory. This action disables further editing from the admin panel since API resources the integration has access to are already specified. See the example below:
|
1 2 3 4 5 6 7 |
<integrations> <integration name="TestIntegration"> <email></email> <endpoint_url></endpoint_url> <identity_link_url></identity_link_url> </integration> </integrations> |
Where:
- integrations specifies one or more integration definitions;
- integration name=”” defines a particular integration;
- email specifies an email associated with this integration;
- endpoint_url contains the URL where OAuth credentials can be sent when leveraging OAuth token exchange (optional);
- identity_link_url contains the URL to redirect users to link their third-party accounts with this Magento 2 integration (optional).
Installing the module
You can install your integration module in Magento 2 as follows:
- Update the Magento 2 database schema and data with the help of the following command:
1in/magento setup:upgrade</code> - Generate the new code:
1bin/magento setup:di:compile - Clear the cache:
1bin/magento cache:clean
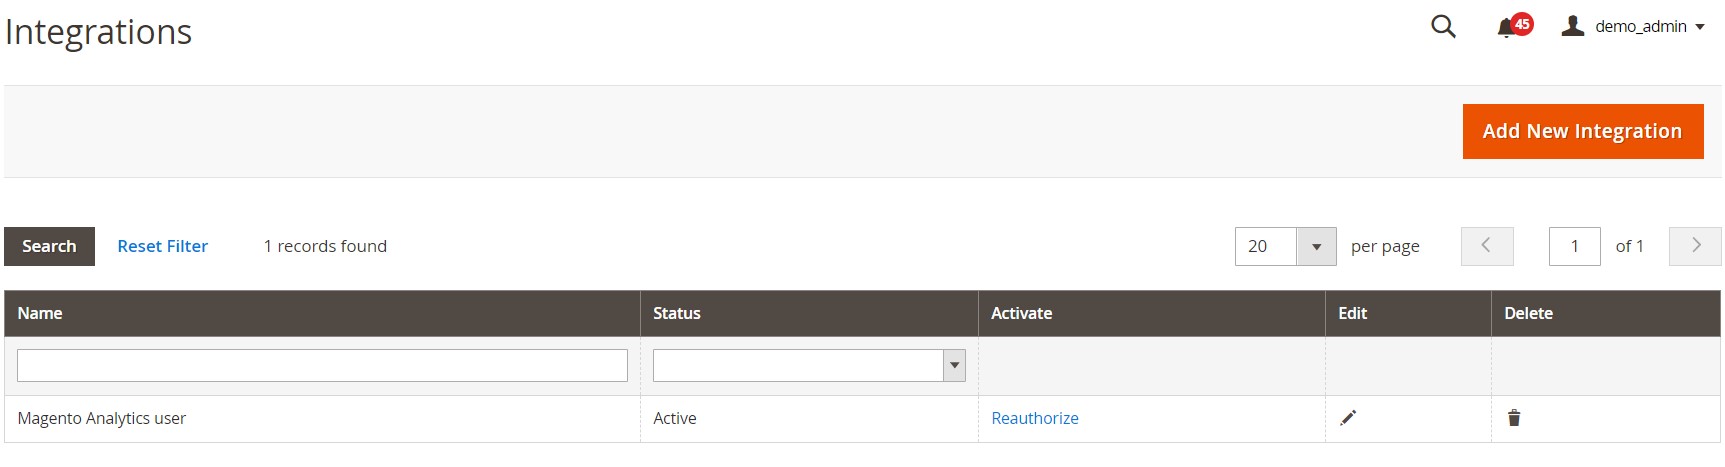
Inspect your integration
Now, let’s focus on the Magento 2 backend section, where your new integration is situated. Navigate to System -> Extensions -> Integrations. You will see a grid that contains your integration. It also displays the integration’s name and status. You can activate, edit, or delete the record.
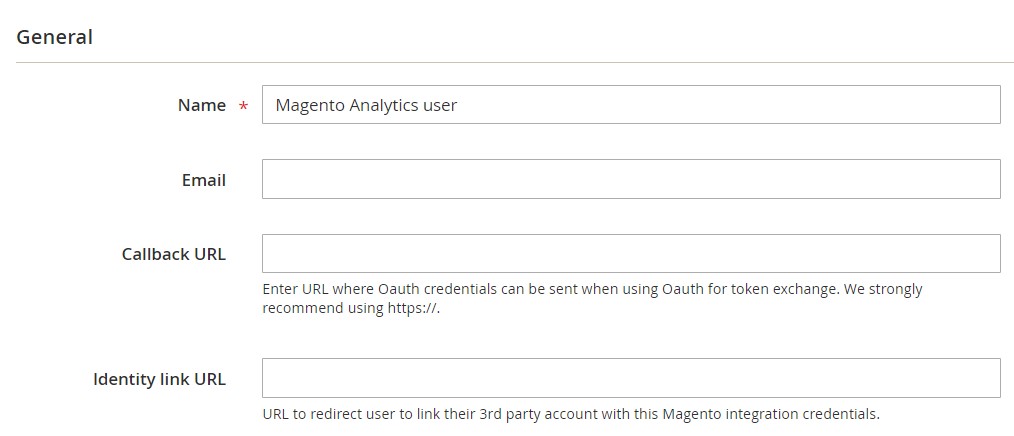
While editing an existing integration, Magento 2 lets you change its name, email, as well as callback and identity link URLs.
Current User Identity Verification requires your password.

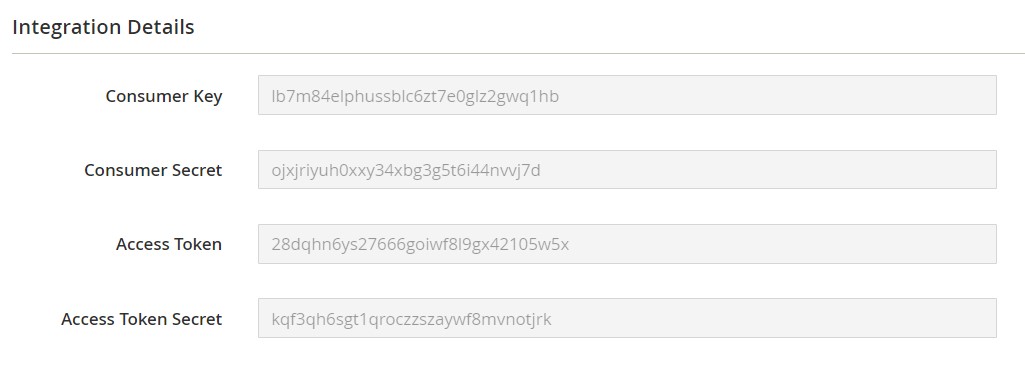
As for the Integration Details section, it contains Consumer Key, Consumer Secret, Access Token, and Access Token Secret.
Besides, there is a tree with available APIs. You can add them manually here.

Integrate with your application
It is only possible to activate your integration in Magento after creating two pages on your application for handling OAuth communications.
- Set a location in the identity_link_url parameter to point to a page suitable for handling login requests.
- Set a location in the endpoint_url parameter to process OAuth token exchanges.
In the first case, it initiates a pop-up login page for the third-party application upon clicking the Activate button in the Magento 2 admin. The latter sends values for oauth_consumer_key and success_call_back parameters. Therefore, your app must store values associated with oauth_consumer_key to tie it to the login ID. You should utilize the success_call_back setting to return control to your e-commerce website.
As for the callback page, it should be able to perform such tasks as:
- Receiving initial HTTPS POST;
- Asking for a request token;
- Parsing the request token response;
- Asking for an access token;
- Parsing the access token response;
- Saving both the access token and OAuth parameters.
Still, have some questions regarding how to create a new integration in Magento 2? Peruse the following materials or proceed to the next chapter, where we explain how to create any Magento 2 integration within a few clicks.
Further Reading
How to Create a Magento 2 Integration in a Few Clicks
As you can see, Magento 2 provides the ability to create integrations with external systems, but you should be experienced in various aspects of coding. Since this method suits only a small selection of Magento users, we’ve prepared something more intuitive and straightforward. Meet the Improved Import & Export extension. It lets you create any integration within just a few clicks. The module has preconfigured add-ons that should be installed on top of it. As a result, you integrate your e-commerce store with an external system within just a few minutes. These are some core integrations available at the moment:
- WooCommerce Migration Add-on – create a data flow between WordPress and Magento 2: import WooCommerce products, customers, orders, and other data to Magento 2;
- MS Dynamics Integration Add-on – integrate MS Dynamics Business Central ERP/CRM with your Magento 2 storefront: sync products, customers, orders, shipping, and invoices;
- NetSuite Integration Add-on – connect your Magento 2 storefront with Oracle NetSuite ERP to effortlessly transfer products, customers, orders, and other vital data between the two systems.
- Banggood Dropshipping Add-on – incorporate the dropshipping module connecting your Magento 2 website with Banggood, syncing products, exporting orders, and importing shipping details.
You can find more add-ons here: Magento 2 Integrations with Improved Import & Export. Note that all these tools work on top of the extension, so they share the same feature set. Below, we explore the module’s key characteristics, describing the opportunities it provides in respect of integrations.
Automated Data Transfers
You can automate any integration between Magento 2 and external systems since the Improved Import & Export extension provides two different kinds of automated data transfers. Firstly, it offers cron-based schedules: you can select a predefined interval or specify any custom timespan. The process looks as follows:
Secondly, there is an alternative way of automation. Improved Import and Export delivers a system of triggers. The extension lets you define rules and conditions and initiates data synchronization processes when they are met.
Mapping
The extension’s mapping functionality represents another set of features that simplify any integration. Improved Import & Export helps to address numerous headaches caused by different data storing standards with the following features:
- Presets – predefined schemes that let you map attributes automatically, seamlessly connecting two systems;
- Manual Matching – you can also tailor any connection within the Magento 2 backend;
- Attribute Values Mapping – the same opportunity is available for attribute values;
- Attribute Values Editing – you can edit them in bulk as well;
- Filters – filter out the selection of data to export only the necessary information;
- Category Mapping – import products right to the categories that already exist in your catalog or create new ones;
- Attributes On The Fly – fix blind spots in a data file by creating missing attributes.
Every feature is intuitive and user-friendly. For instance, you can apply presets to enable automated mapping as follows:
Extended Connectivity Options
The Improved Import & Export extension works with CSV, XML, ODS, JSON, and Excel files, while Magento offers support for the first standard only. Therefore, you may face additional difficulties connecting your e-commerce website with external systems. For instance, the conversion of files to CSV may be required prior to every data synchronization. Our extension addresses this issue. Furthermore, it also supports several archive types.
A wide range of file sources is another notable benefit you get with Improved Import & Export. The module supports both local and remote servers, cloud storage, API connections for more complex integrations, direct file URL downloads, and Google Sheet import.

All these and other features make integration of any complexity possible. For further information, follow this link:
Get Improved Import & Export Magento 2 Extension