
Exploring Magento 2 B2B Features: Company Accounts

This article is dedicated to the Company Accounts B2B feature of Magento 2. Below, we explore its functionality and provided opportunities. You will find out how to manage Magento 2 company accounts. Besides, we also describe how to import and export companies between your e-commerce store and other systems. Let’s see how this B2B functionality is implemented in the Magento 2 backend.

Table of contents
- 1 Companies Grid
- 2 How to Create a Company Account in Magento 2
- 3 How to Change a Company Admin
- 4 How to Assign a Sales Representative to a Company Account
- 5 How to Approve a Company Account
- 6 Magento 2 B2B Company Structure
- 7 Magento 2 Company Users
- 8 Magento Company Roles & Permissions
- 9 Manage Company Accounts from Magento 2 Backend
- 10 How to Import Magento 2 Companies
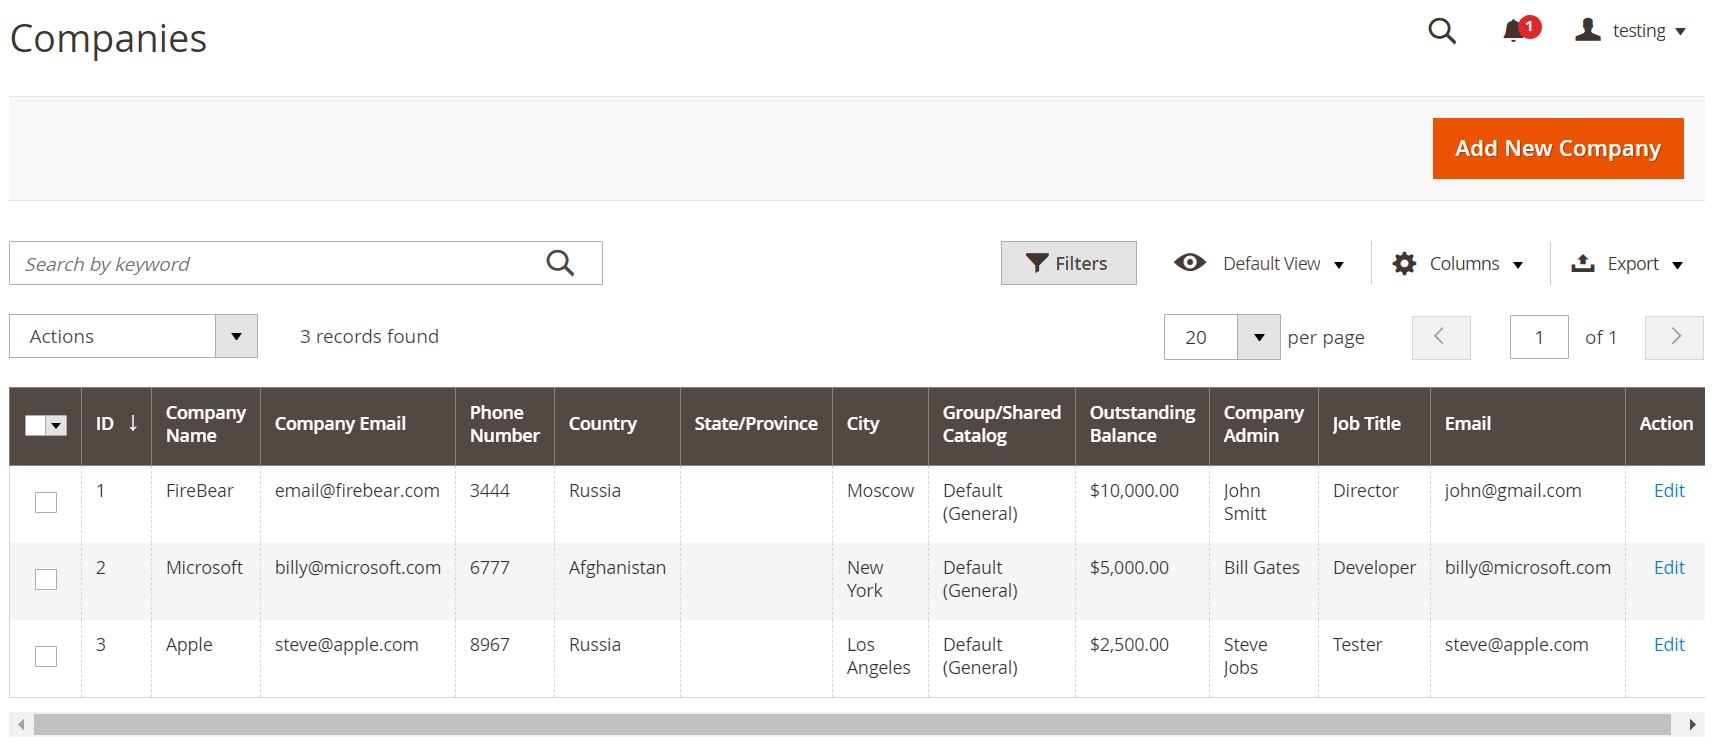
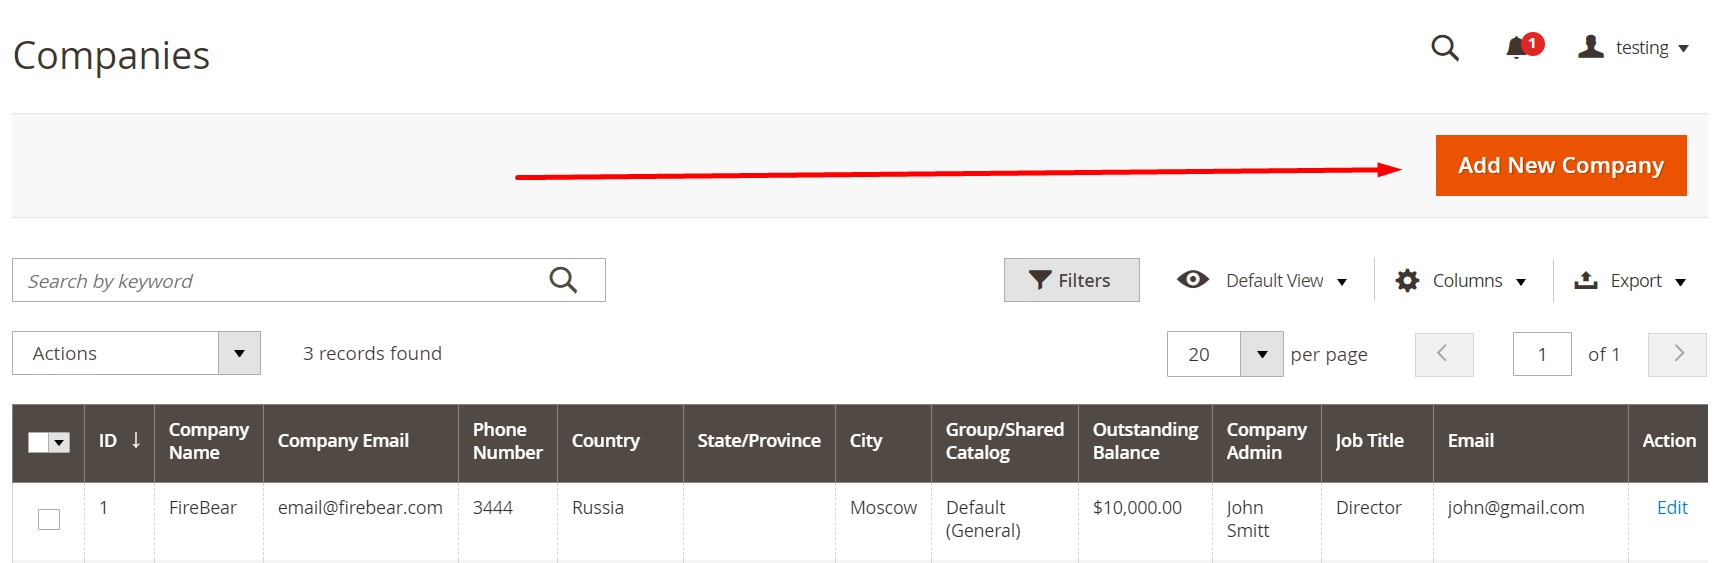
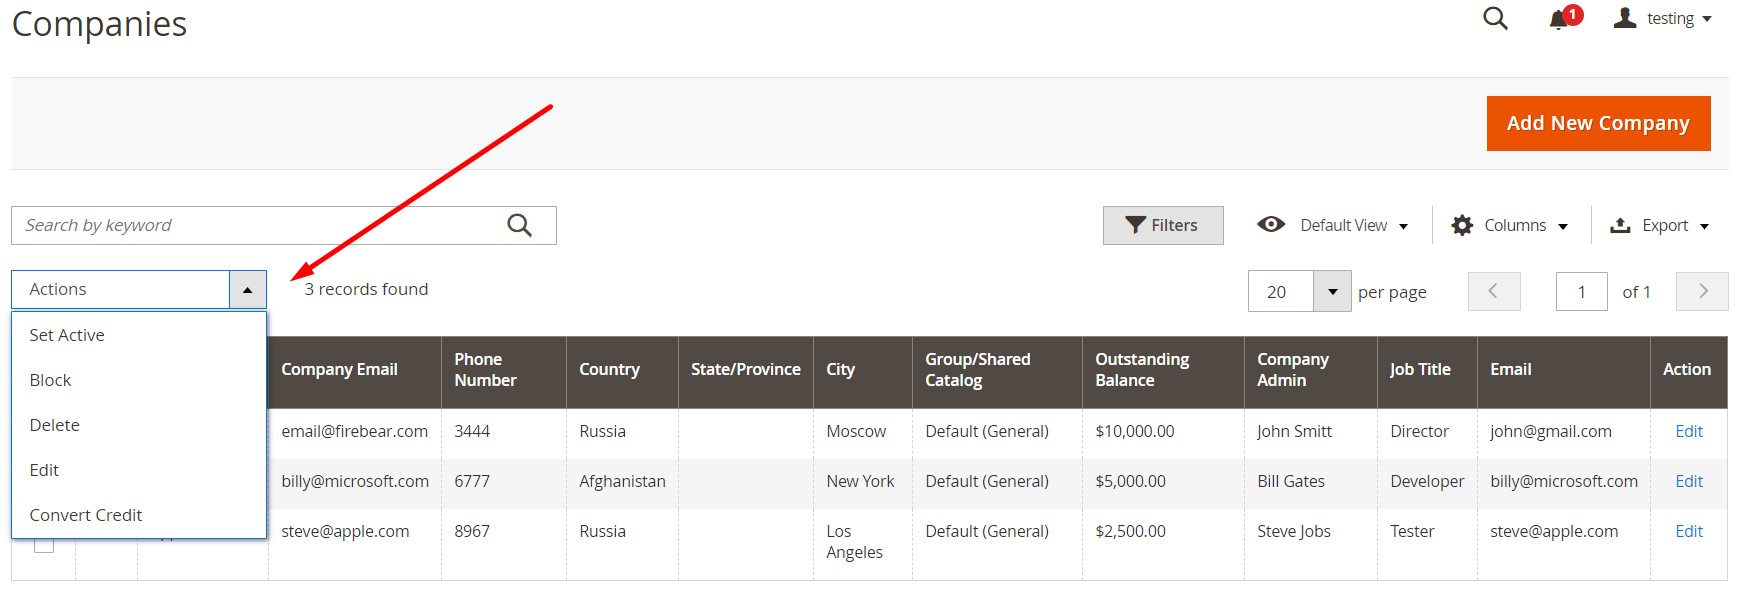
Companies Grid
You can find all active company accounts as well as pending requests in the Companies grid (Customers-> Companies) no matter what the status setting is. Besides, there is a selection of tools available there. You can use them to create and manage company accounts. For instance, the default grid controls allow you to filter the list of companies as well as and adjust the grid layout that consists of the following columns:
- Checkbox – select the box to apply mass actions or edit a single company;
- ID – a numeric identifier assigned to a company when the request is submitted;
- Company Name – a shortened version of a full legal name;
- Company Email – an email associated with a company account;
- Phone Number – a corresponding phone number;
- Country – a country of registration;
- State Province – a state/province of registration;
- City – a city of registration;
- Group/Shared Catalog – this column shows either a customer group or a shared catalog depending on settings;
- Outstanding Balance – a balance on the company account: blank if there is no credit history, a credit limit is zero;
- Company Admin – a company administrator’s first/last name;
- Job Title – a company administrator’s job title;
- Email – a company administrator’s email address;
- Action – edit a company account here.
You can also add the following additional columns if necessary:
- Company Legal Name – this column displays the full legal name of a company;
- Street Address – an address where the company is registered;
- ZIP – a corresponding ZIP or postal code;
- Reseller ID – a company’s resale number used for tax reporting purposes;
- VAT/TAX ID – a company’s value-added tax number;
- Credit Limit – a company’s credit limit on your website;
- Credit Currency – a currency accepted for purchases on company credit;
- Status – company state: Active, Pending Approval, Rejected, or Blocked;
- Gender – a company administrator’s gender;
- Comment – additional notes visible from the admin area only.
How to Create a Company Account in Magento 2
There are two ways to create a company account in Magento 2. First of all, you can do that as a Magento 2 administrator from the backend section of your storefront. Secondly, it is possible to create a request from a customer account on a frontend. However, all requests pass the procedure of approval in the admin. After that, they are either rejected or become active.
If you sent a request and set up a company account from the storefront, you get the role of a company administrator. After your request is approved, you can set an account password and log in to the account (as a company administrator).
Create a new company from a frontend
You need to enable Company Accounts under Stores-> Settings-> Configuration-> General-> B2B Features. Next, follow these steps to register a new company account from a storefront:
- Click Create an Account in the header and select Create New Company Account.

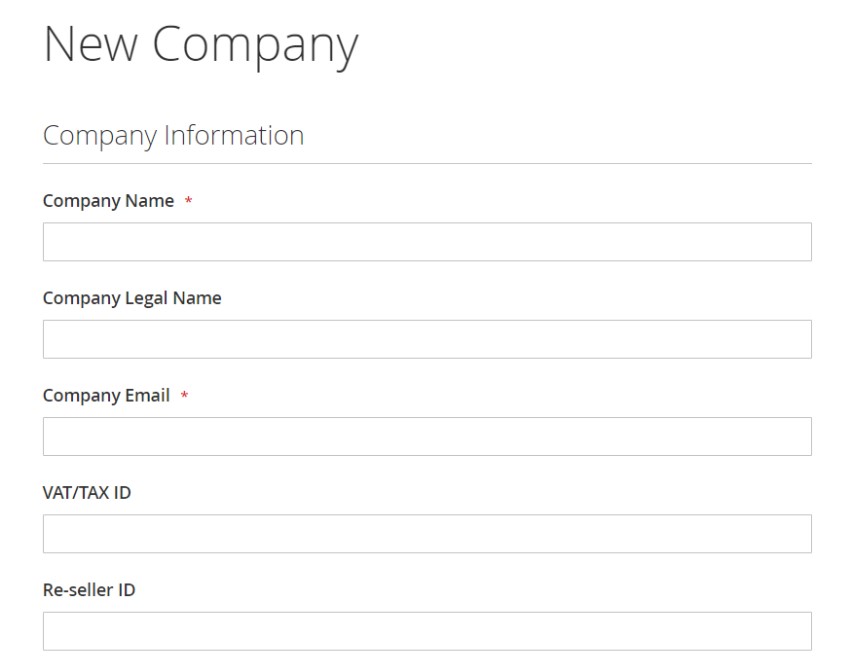
- Complete both the required (Company Name, Company Email) and remaining fields (Company Legal Name, VAT/TAX ID, Re-seller ID).
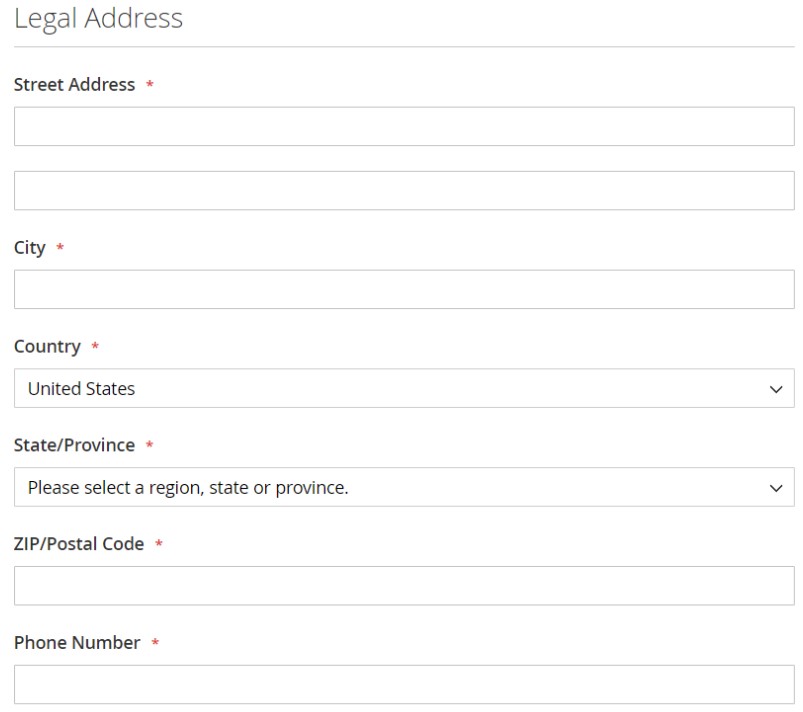
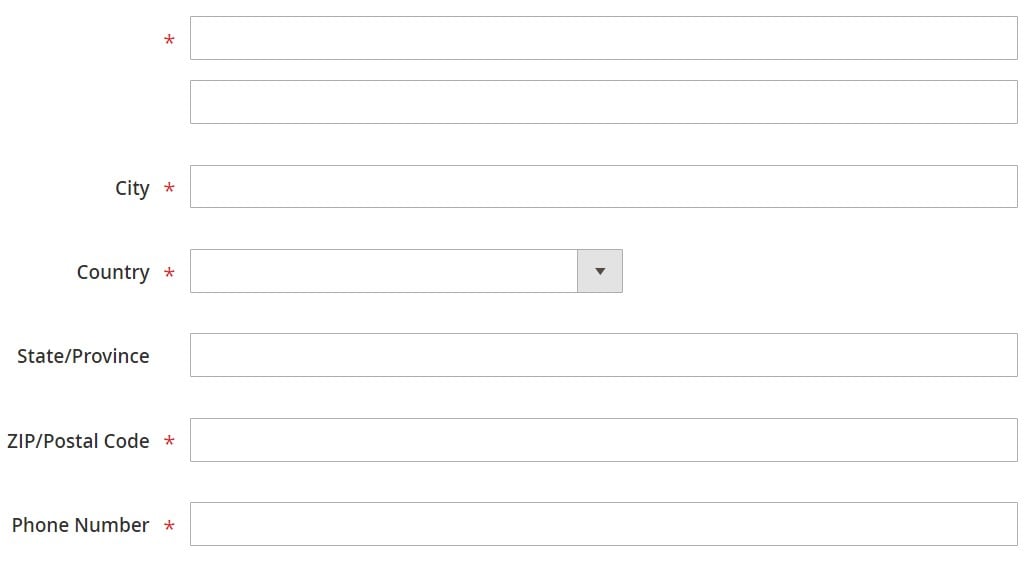
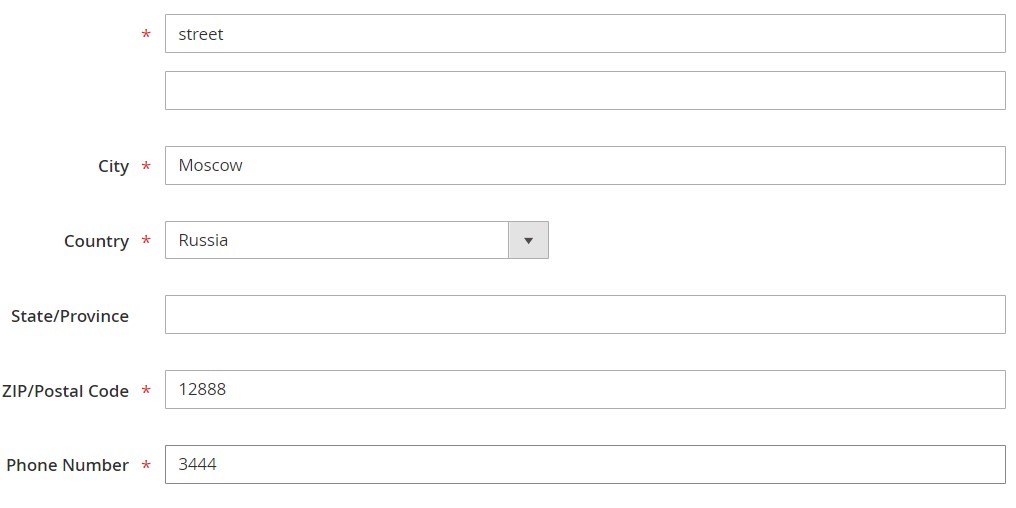
- Next, complete the Legal Address section.
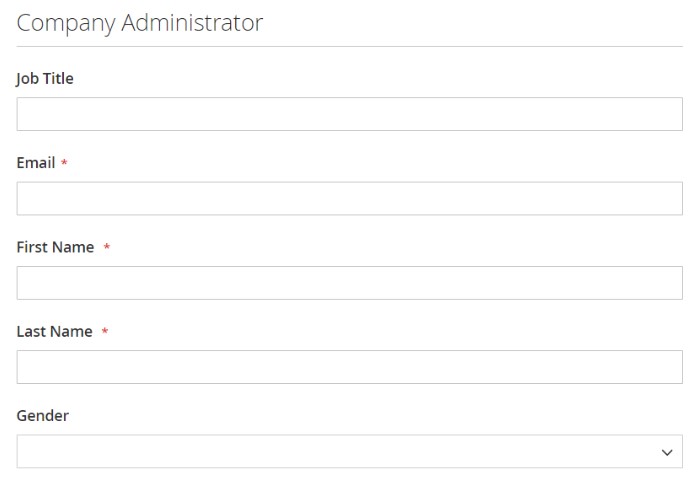
- After that, you can provide data for the Company Administrator section. Note that for different email addresses for the company admin and the company email, the system creates a company user account in addition to the company admin account.
- Now, you can submit your request to create a new company account form a storefront.
When a merchant approves the request, you get an email notification with instructions to set an account password. Follow them to be able to sign in to the account.
Create a new company from an admin
As a Magento 2 administrator, you can create a new company account on behalf of your clients. The process looks almost similar to the one we’ve described above, except there are some additional fields.
To create a new company account from the backend, go to Customers > Companies, hit Add New Company, and do the following:
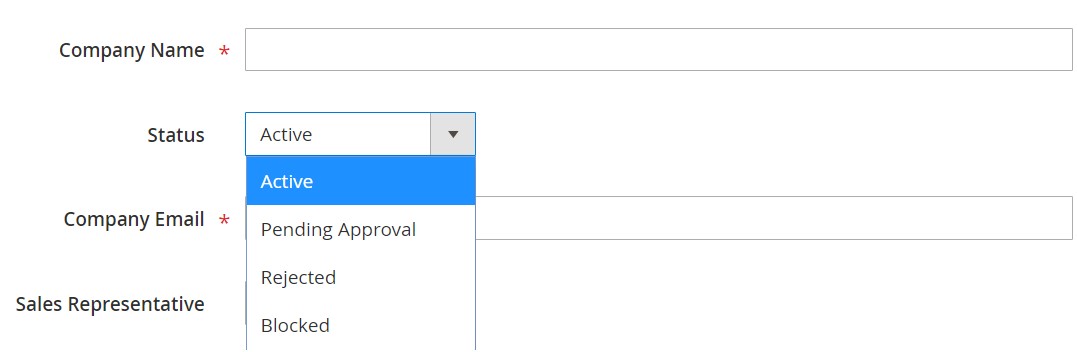
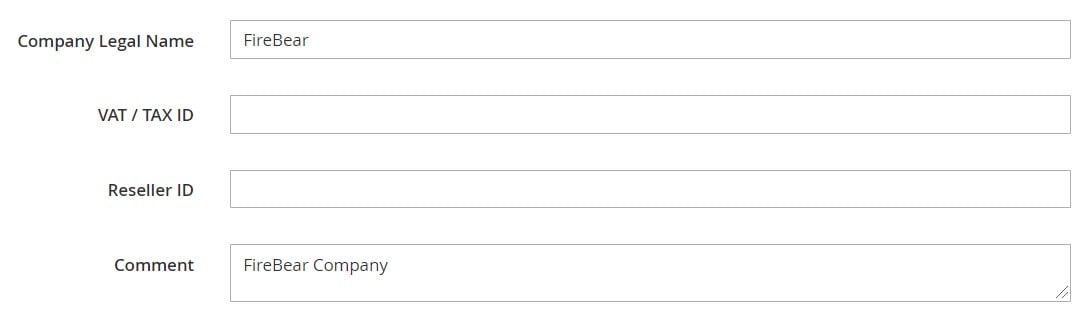
- Complete required fields (Company Name, Company Email) and choose a company status (it is Active by default, but you can set it to “Pending Approval”). You can also select an admin account of the Sales Representative.
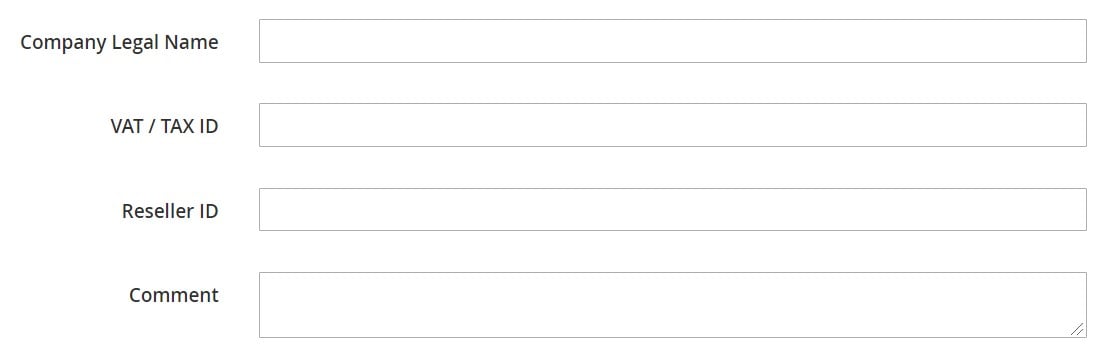
- Next, proceed to the Account Information section. Complete the following fields: Company Legal Name, VAT/TAX ID, Reseller ID. Add comments if necessary. Note that they are visible in the admin only.
- Complete the Legal Address section.
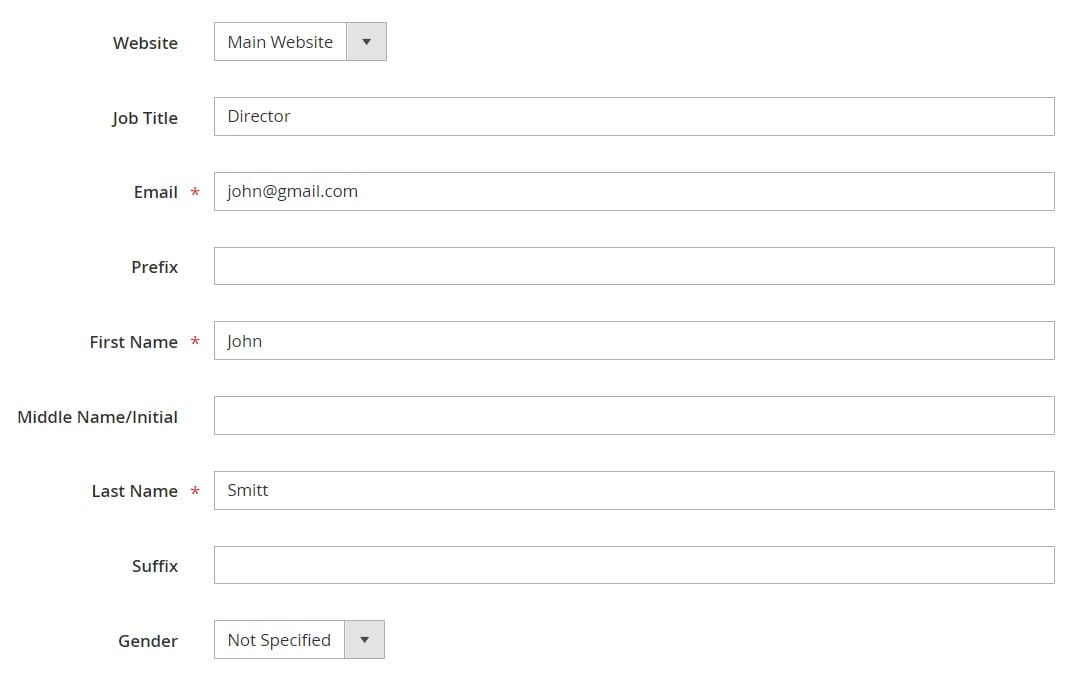
- Complete the Company Admin section.
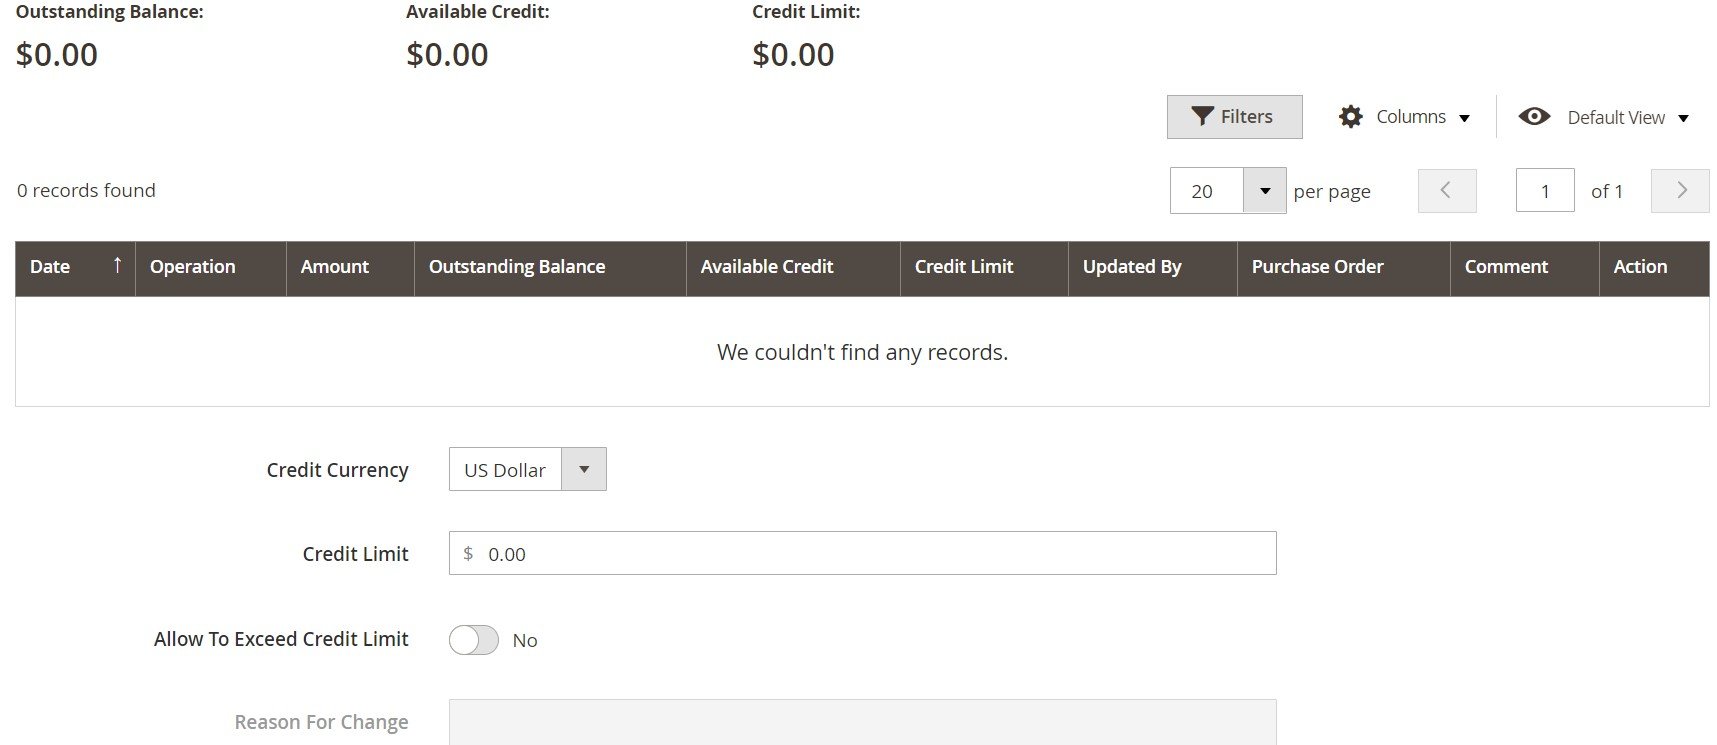
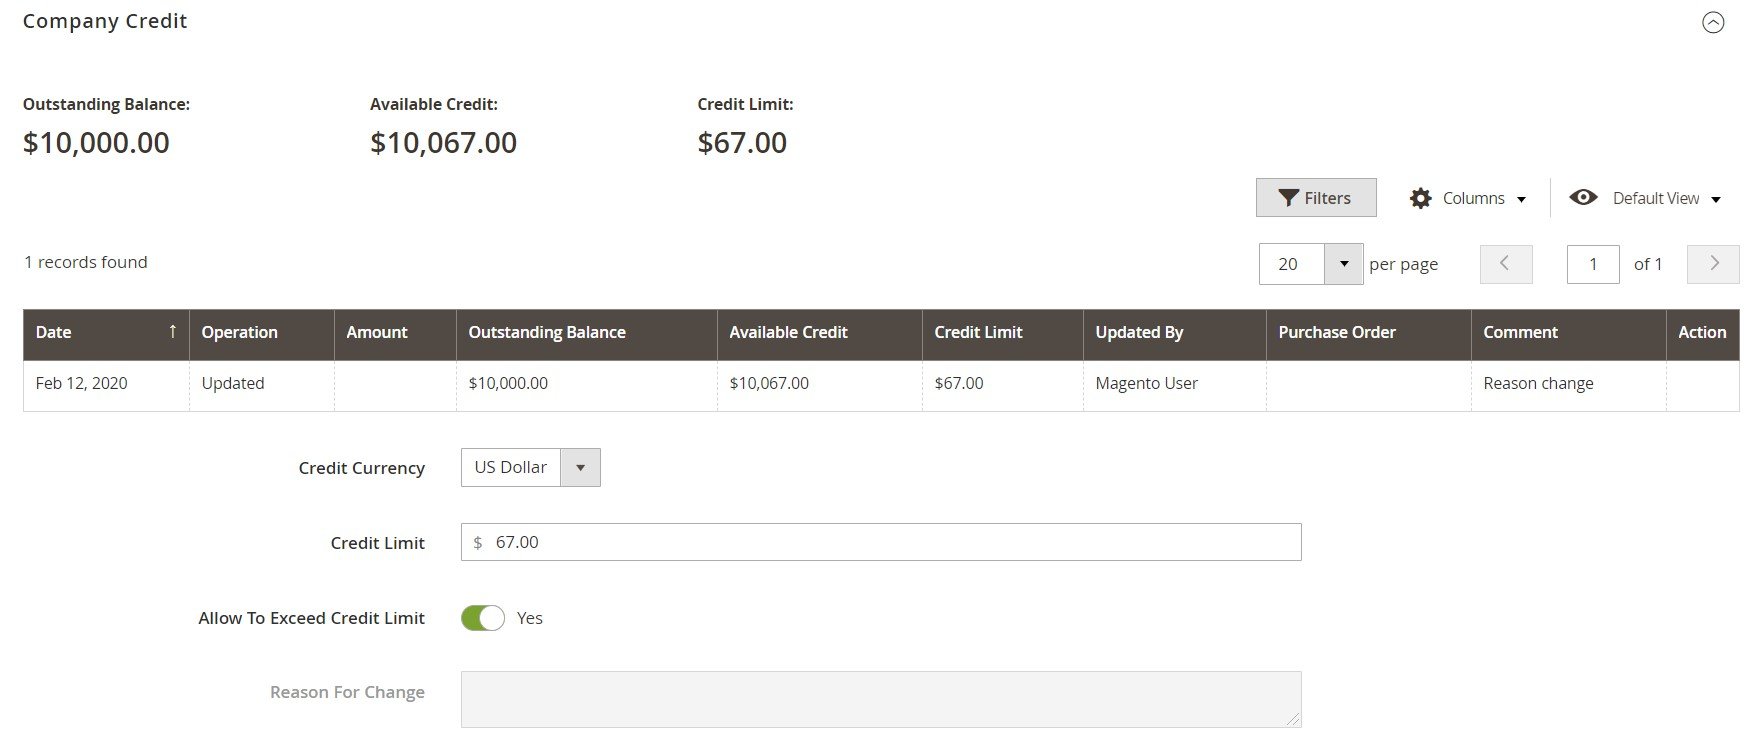
- Now, you can configure the Company Credit section. By default, it displays a summary of the customer’s credit activity. However, the corresponding grid is empty since it is a new company. But you can complete fields from the lower part of the section: Credit Currency, Credit Limit, Allow to Exceed Credit Limit, Reason for Change.
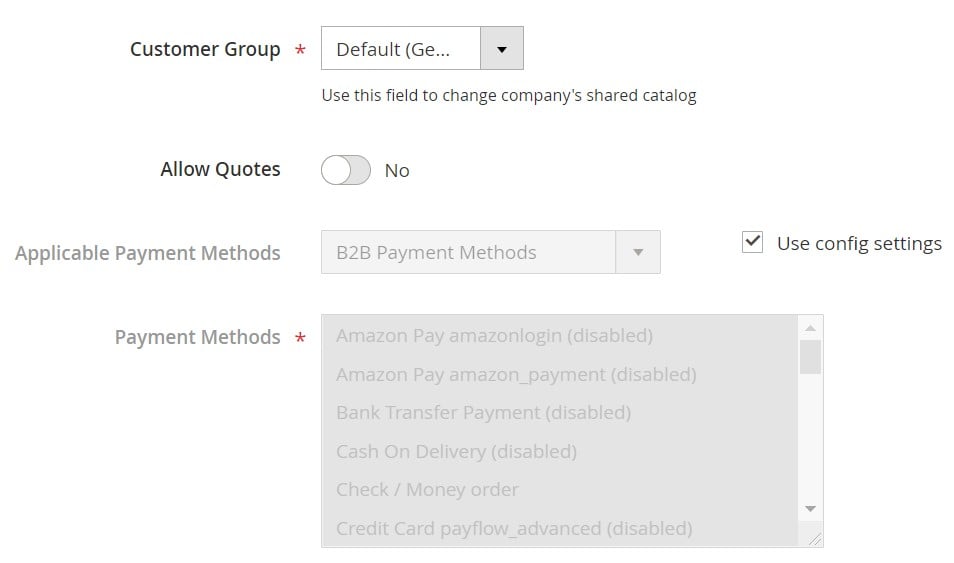
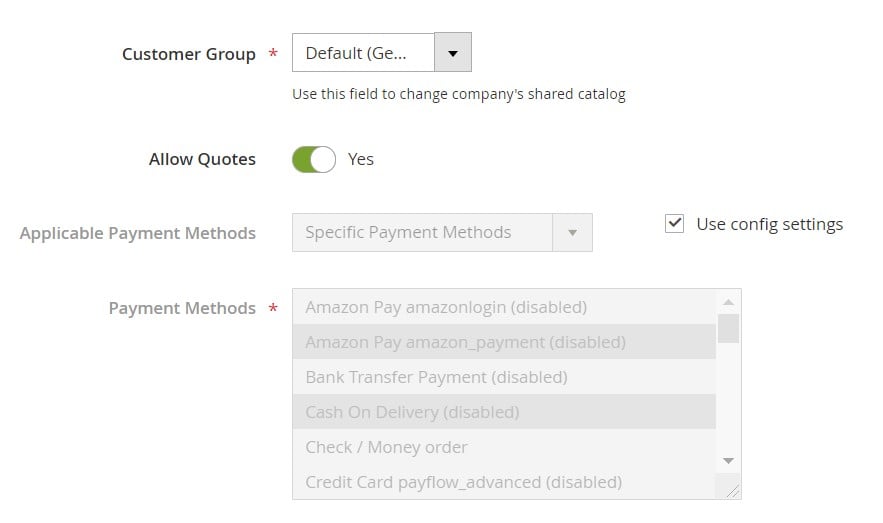
- After that, proceed to the Advanced Settings section. Here, you can assign a customer group, determining which shared catalog is displayed to the company and its employees. You can also enable company employees to generate quotes from their account (Allow Quotes) and choose payment methods available to the company (clear the Use config settings checkbox).
- Don’t forget to save your new company account.
Note that a company administrator receives the same message as in the case of the previous creation method. When the password is set, they get the ability to sign in to the account.
How to Change a Company Admin
As you can see, you can assign a company administrator when creating a company account for the very first time. However, you can later modify it as a store administrator from the admin. Go to Customers-> Companies. Find a company in the grid and proceed to the Edit mode from the Action column.

Now, find the Company Admin section, expand it, and apply changes.
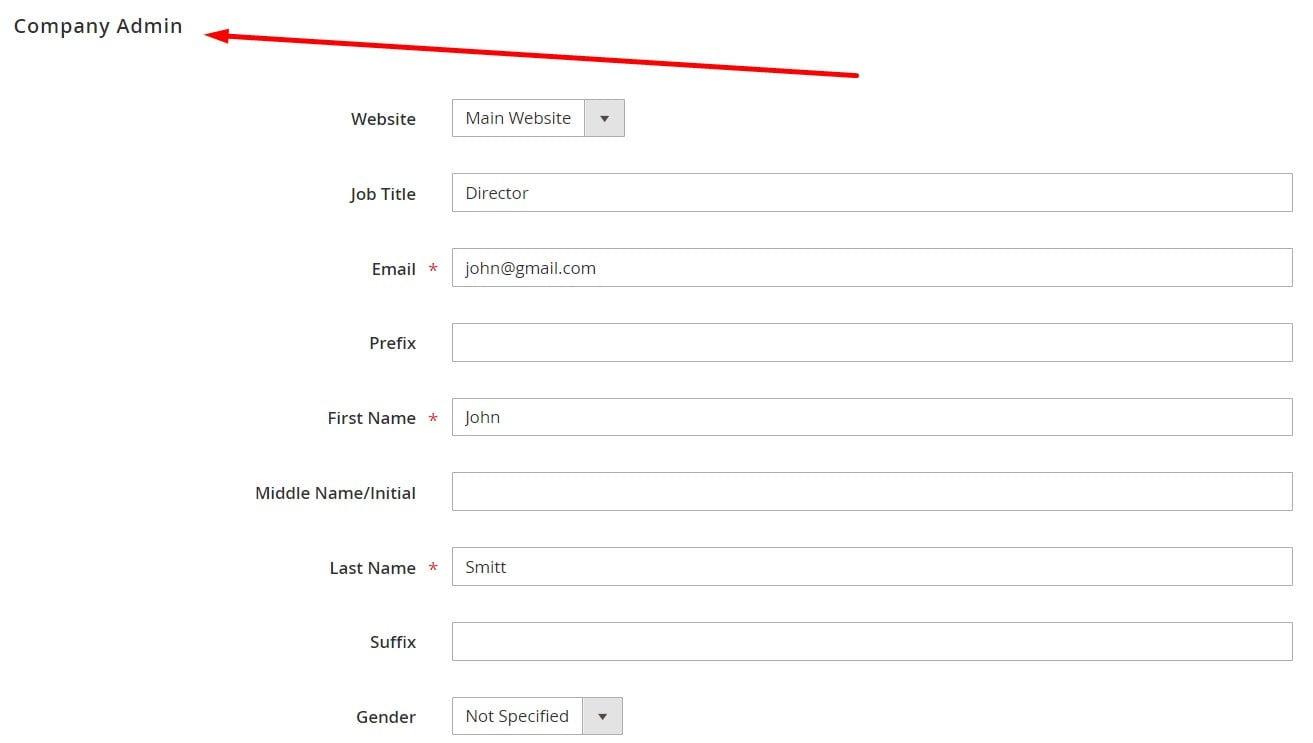
You can enter a Job Title of the new administrator as well as specify a new Email address. Next, the system looks for the email address in the database and asks you to confirm you attempt to replace the company admin. By clicking Proceed, you clear the entire form, so it is necessary to complete the First Name and Last Name fields once again.
Note that for a non-existing account, the system creates a new one. Its type is Company Admin. If the account already exists, the system moves it to the Company Admin position.
Complete other fields and save changes.
As for the previous company admin account, it remains in the system. However, it is an active individual user account with the default user role. Both new and former company administrators get notifications.
How to Assign a Sales Representative to a Company Account
Under a sales representative, we assume an admin user assigned as a point of contact for a company account. Magento 2 lets you set only one sales representative per company account. The system utilizes the default admin account, but you can change this. Also, note that a single sales representative can manage multiple company accounts.
Company members can see the name and email address of the assigned sales representative in a company account or on a quotes page. To attach a sales representative to a company account in Magento 2, follow these steps:
- Go to Customers-> Companies and find a company you want to edit (Actions-> Edit).
- Choose a new admin user as a Sales Representative you want to assign to the company.
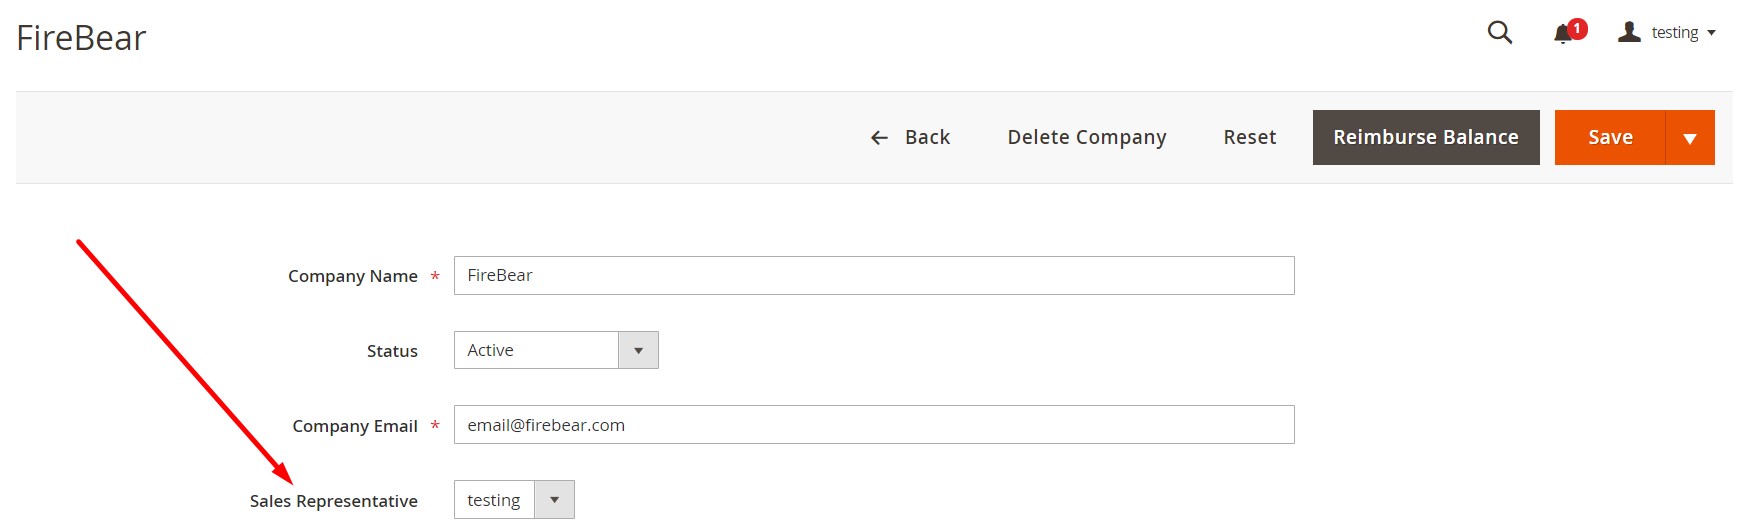
After you save the changes, your admin gets an email notification.
How to Approve a Company Account
As we’ve already mentioned, a company account may have one of the following four statuses:
- Active
- Pending Approval
- Rejected
- Blocked
When a company creation request is received from the storefront, the status is “Pending Approval.” Next, the store administrator reviews the company and either approves or rejects it. In the first case, the status is “Active;” in the second – “Rejected.” A company can be blocked any time after its activation.
To accelerate your daily duties related to the account approval, Magento 2 lets you leverage bulk actions. Note that new company requests always appear at the top of the Companies grid under Customers-> Companies.
To approve a pending request for a new company account, click Edit in the Action column and set Company Status to Active. Save changes by clicking Change status when prompted to confirm. Magento 2 will send an email notification to the company admin.

Magento 2 B2B Company Structure
Magento 2 provides the ability to set a custom company structure that reflects the structure of the business itself or suits its requirements. Although the basic company structure consists of a single company admin, it is possible to expand it to teams of users.
Magento 2 offers two ways to create a company structure. First of all, you can associate users with different teams. Secondly, it is possible to organize them within a hierarchy of divisions and subdivisions.
In the company admin’s dashboard (customer account), the company structure is displayed as a tree. As we’ve mentioned above, it consists of only the company admin themselves.
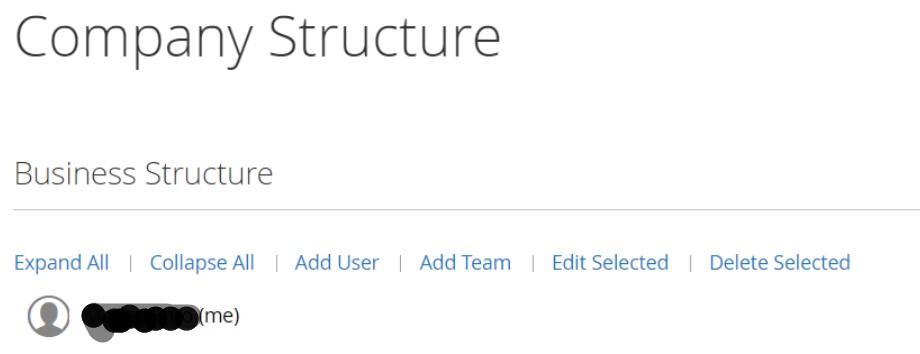
Note that a company administrator can have multiple roles within a company. It is possible to enter a separate email address for the company administrator on the stage of account creation. As a result, the initial company structure differs from the one we’ve described above. It consists of both the company admin and an individual user account assigned to the company admin. Thus, the company administrator gets the ability to choose whether to sign in as the company user or an individual.
You can see the full company structure in the Companies and Customers grids.
Now, let’s see how to create company teams in Magento 2 to reflect a more complex business structure. We assume that the corresponding functionality is enabled. Thus, a company administrator can easily create a new structure right after the company account is approved. From the perspective of your B2B clients, the company structure is represented in the company account as a tree. The admin account is at the top. Note that you can configure several different structures.
How to add company teams
To set up a company team in Magento 2, you have to be logged in as the company administrator. Follow these steps:
- Choose Company Structure on the left panel.
- Go to Business Structure and choose Add Team:
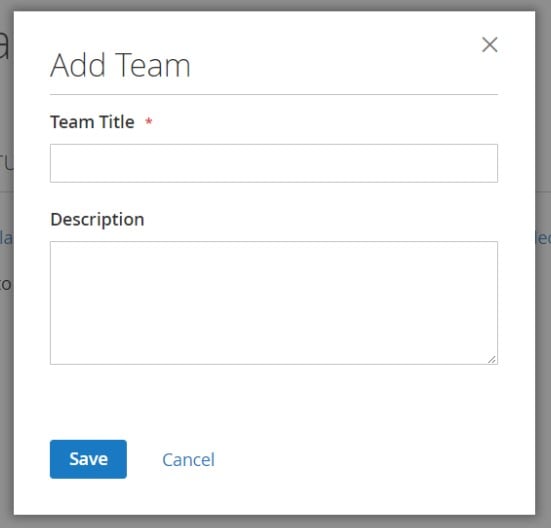
- Specify the Team Title and Description.
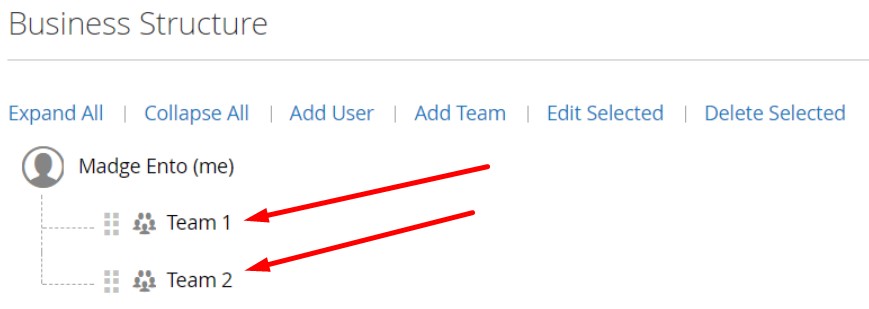
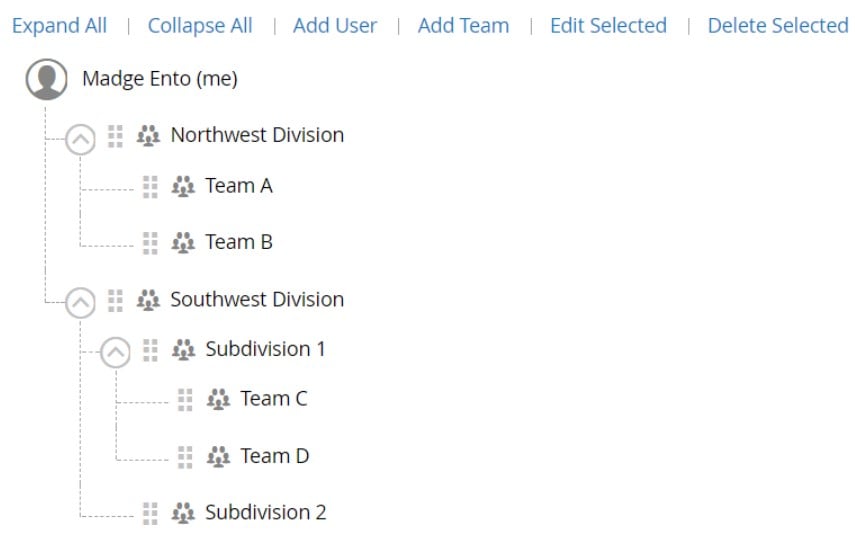
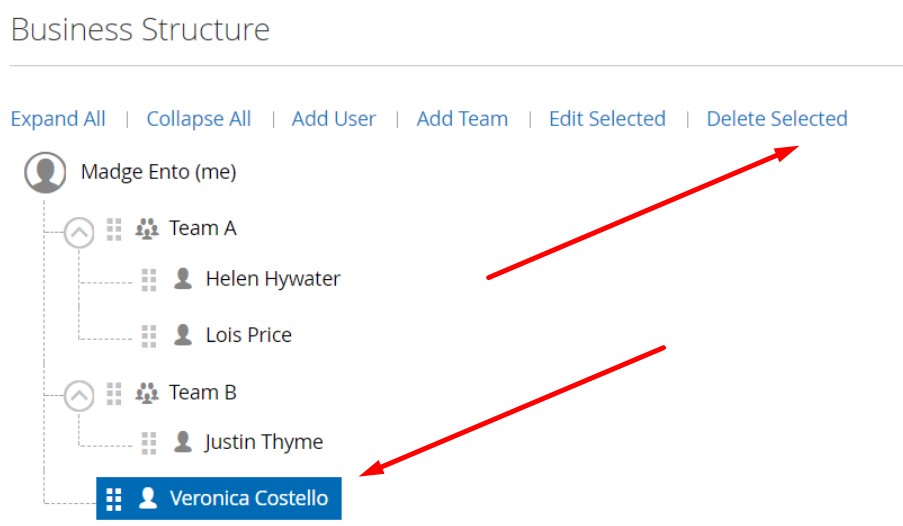
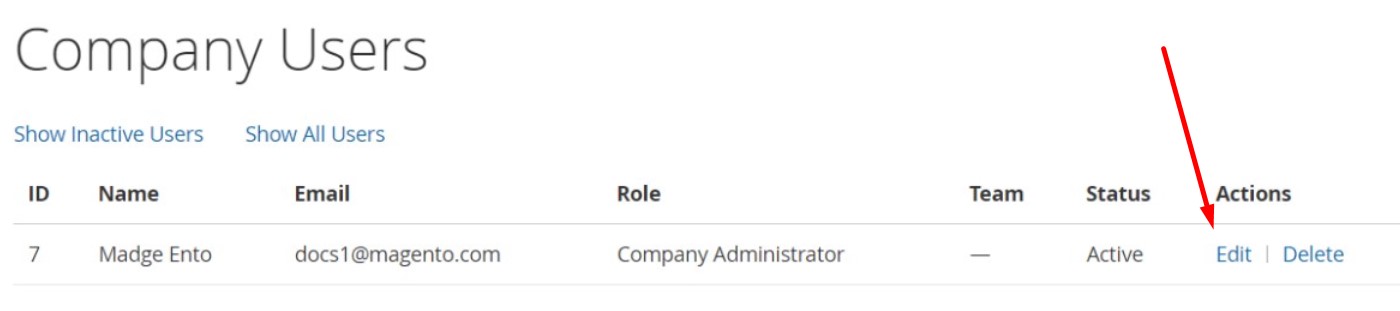
Save your new team. Note that you can create multiple groups – as many as you need, following the same algorithm. On the picture below, you can see a company structure that consists of two teams managed by an administrator (Madge Ento).
When multiple teams are available in your company structure, you can configure a hierarchy. Magento 2 lets you drag teams or divisions to other locations in the company tree.
Besides, it is possible to select the parent team, click Add Team, specify the Team Title and Description. You can create as many divisions and subdivisions as you need.
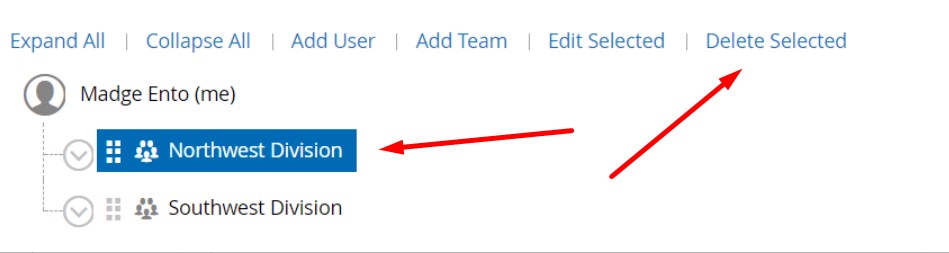
How to delete a team in Magento 2
Before going any further, we should draw your attention to the fact that you cannot restore eliminated teams in Magento 2. Therefore, make sure that the correct unit is selected before deleting it.
To get rid of a team in a company account, select it and click Delete Selected. Confirm your action. That’s it!
Magento 2 Company Users
You can find all company users in the Customers grid. They have the same customer type – “Company User.” Since such users have varying levels of permission, they access different store services and resources.
The company administrator can assign company users after company teams are created. Next, it is necessary to define roles/permissions. After that, the company admin can assign users to them. Let’s see how to complete each task.
How to add company users
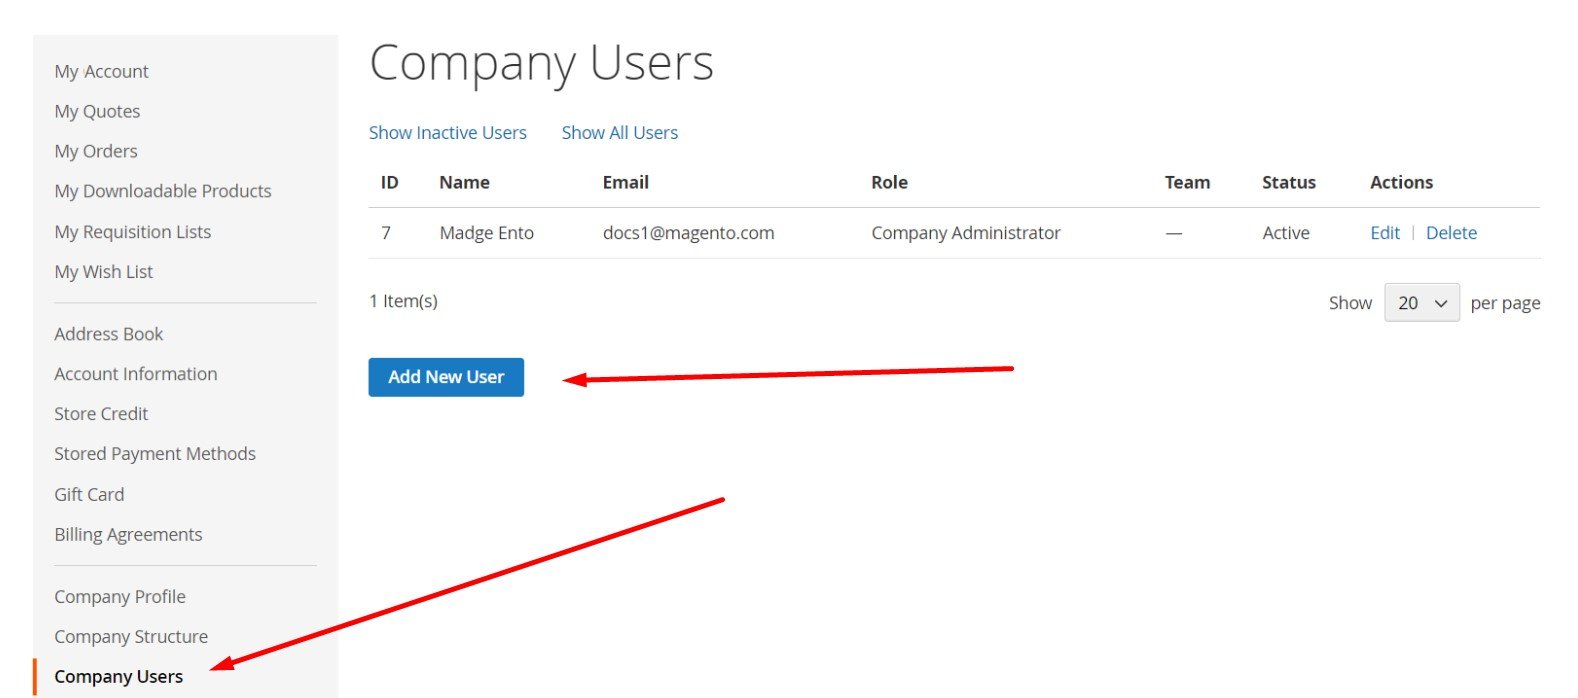
You have to be logged in as the company administrator to add company users in Magento 2. Go to a customer account and select the Company Users tab from the left panel.
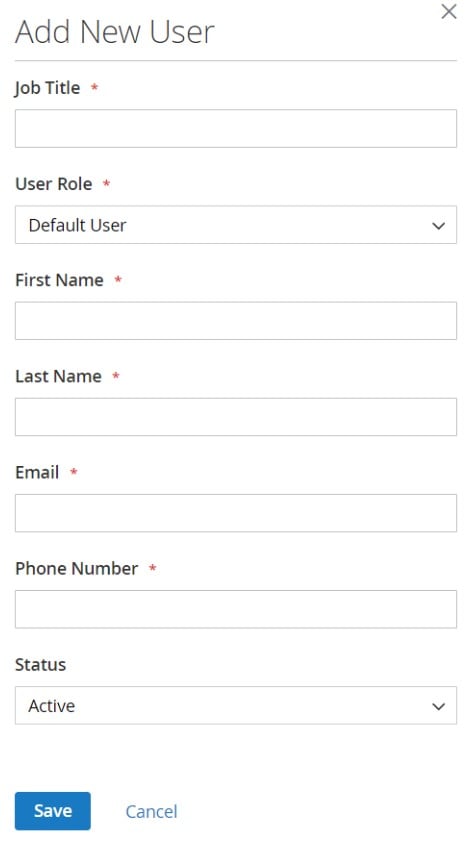
Click the Add New User button. The system will redirect you to a new screen where you can:
- Specify the user’s Job Title.
- Choose the appropriate User Role. You can do that if the roles and permissions are defined. We describe how to configure them below. Note that it is possible to return later to assign the role.
- Specify First Name, Last Name, Email, and Phone Number.
- Note that the default status of the user account is Active. You can change it if necessary.
- Save your new user. Repeat these steps to create more user accounts associated with your company.
As a company administrator, you can find new users in your account under the Company Users tab mentioned earlier in this chapter.
Company users can add the default company billing and shipping address to their address book.
How to remove company users
As a company administrator, you can remove company users. Note that this action cannot be reversed, so you have to recreate deleted company users. To remove a company user in Magento 2, you have to select them in the company structure and click Delete Selected. Confirm your action.
From the perspective of a Magento 2 backend administrator, the deleted company user is listed in the Customers grid. However, its status is Inactive.
How to assign a customer to a company
It is possible to assign a customer to a company in two ways. Firstly, a company admin can do that. Secondly, a Magento backend administrator can apply changes.
Note that it is not recommended to assign the person’s individual account to the company. You have to create a new company user with a company email address instead.
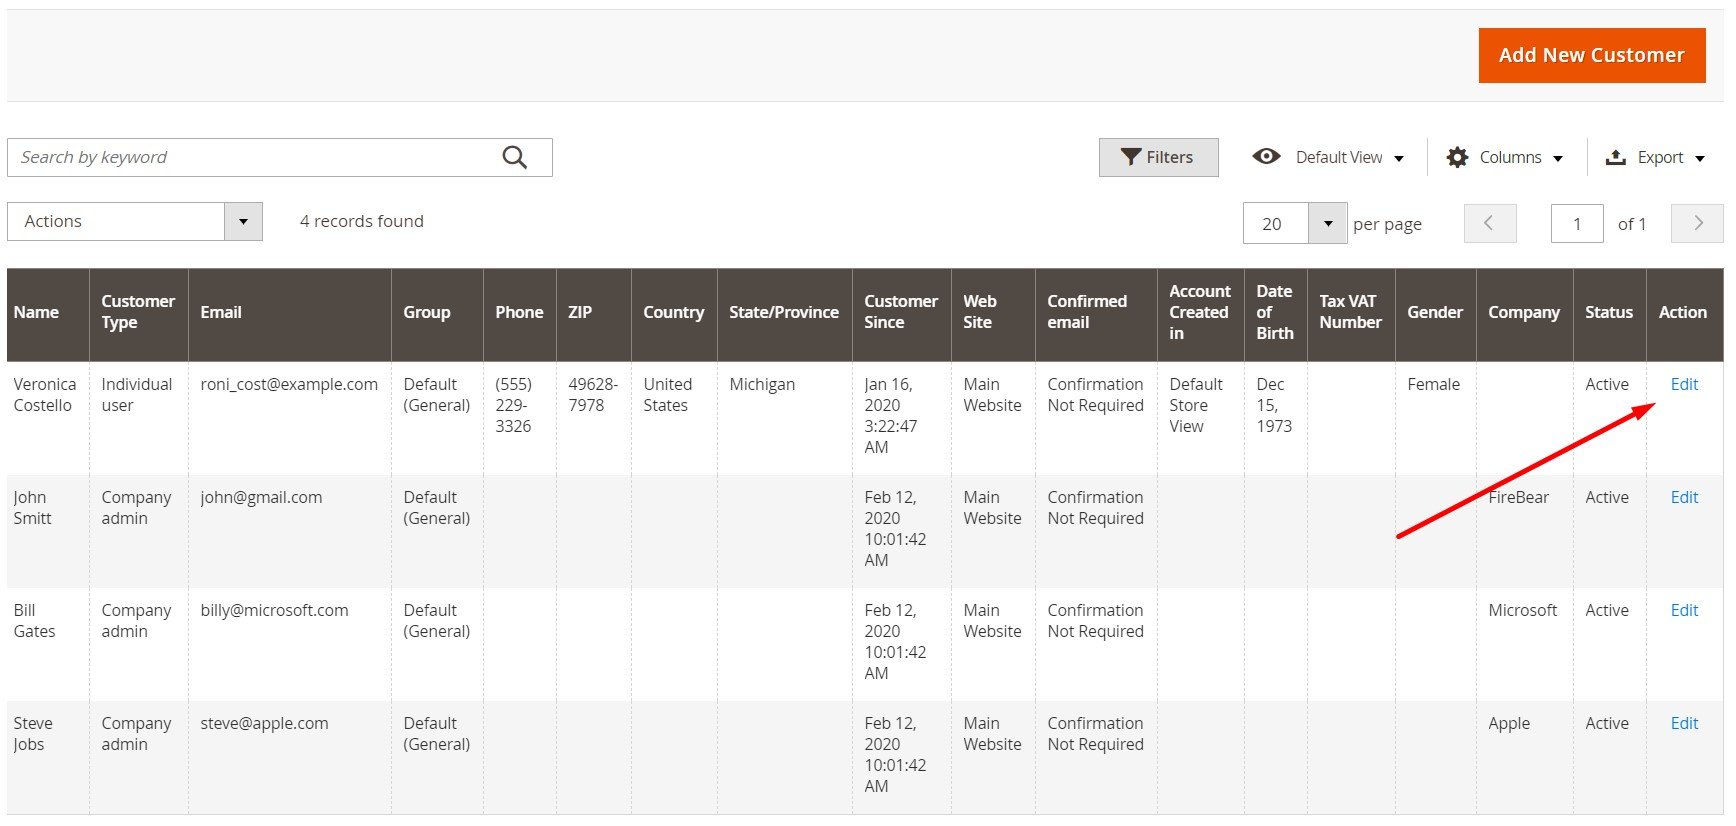
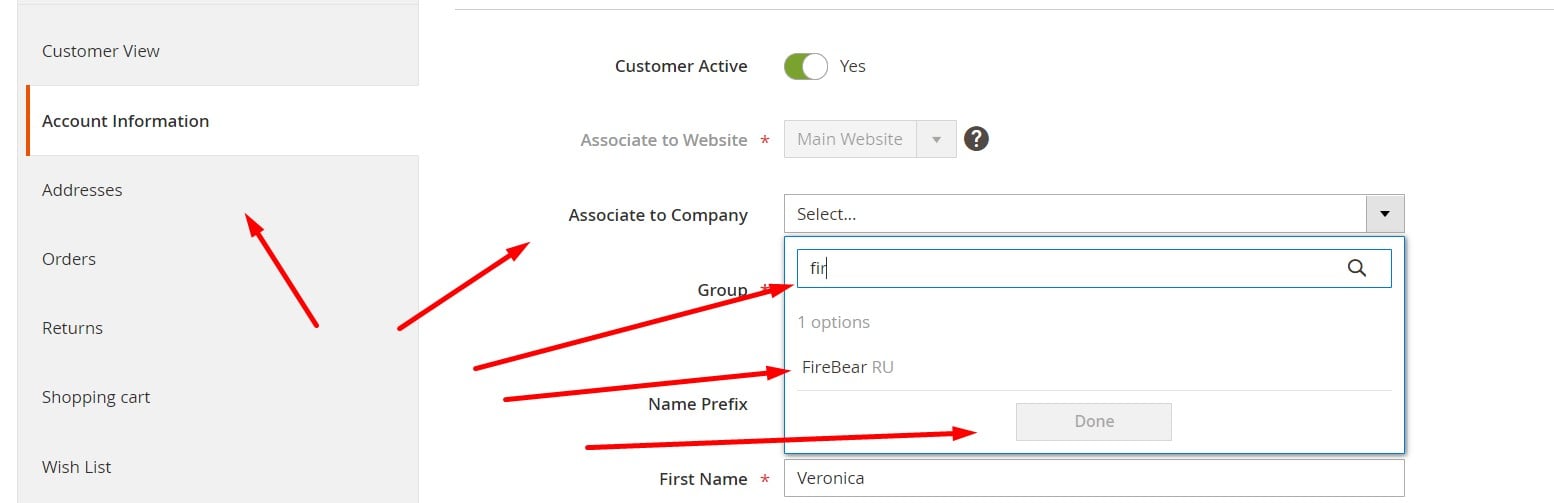
As a Magento administrator, you can assign a customer to a company under Customers-> All Customers via the Edit link in the Action column. While editing a customer page in the Magento 2 admin, proceed to the Account Information tab in the left panel.
Next, scroll down to the Associate to Company option and type the first letters of the company name. Choose a company from a list of all possible matches.
Click Done. Note that by choosing a new company, you also reassign the customer to a customer group (and shared catalog) specified in a company configuration.
Also, don’t forget to click Save Customer after all. You will see the following changes in the Customers grid:
- The Group column displays the new customer group (or shared catalog);
- The Company column shows the new company.
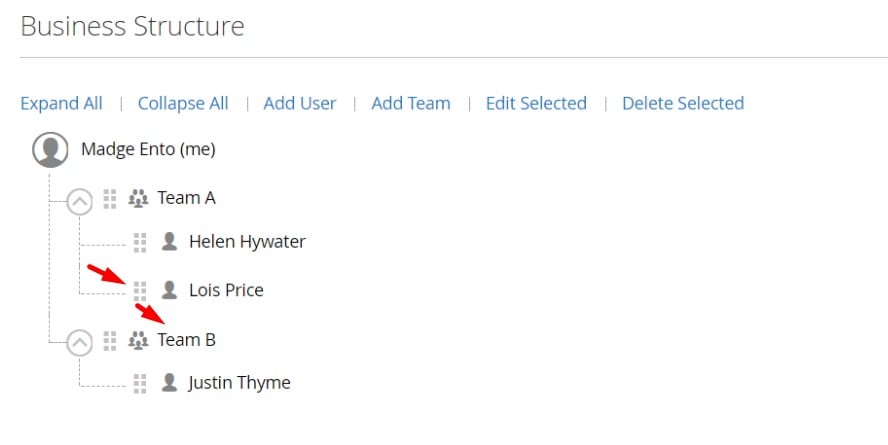
How to assign users to teams
Both users and teams appear at the same level when they are first added.
However, you can effortlessly customize the default structure. Log in as a company administrator and switch to the Company Structure tab in your account. Now, drag a user to a team you want to assign them to. Thus, you can easily create a new structure:
Magento Company Roles & Permissions
To provide different access levels to sales information and resources, you can set up roles for company users. As a company admin, you have superuser rights and can implement various levels of permission.
The system offers the Default User role. You can customize it or use it in its initial state. Magento 2 lets you create as many roles as necessary. Several roles that suit different companies:
- Default User — full access to all activities related to sales and quotes; view-only access to company profile and credit data.
- Senior Buyer — full access to all Sales and Quotes resources; view-only access to the following areas:
- Company Profile,
- User and Teams,
- Payment Information,
- Company Credit.
- Assistant Buyer — permission to place an order using Checkout with Quote; view access to orders, quotes, and company information.
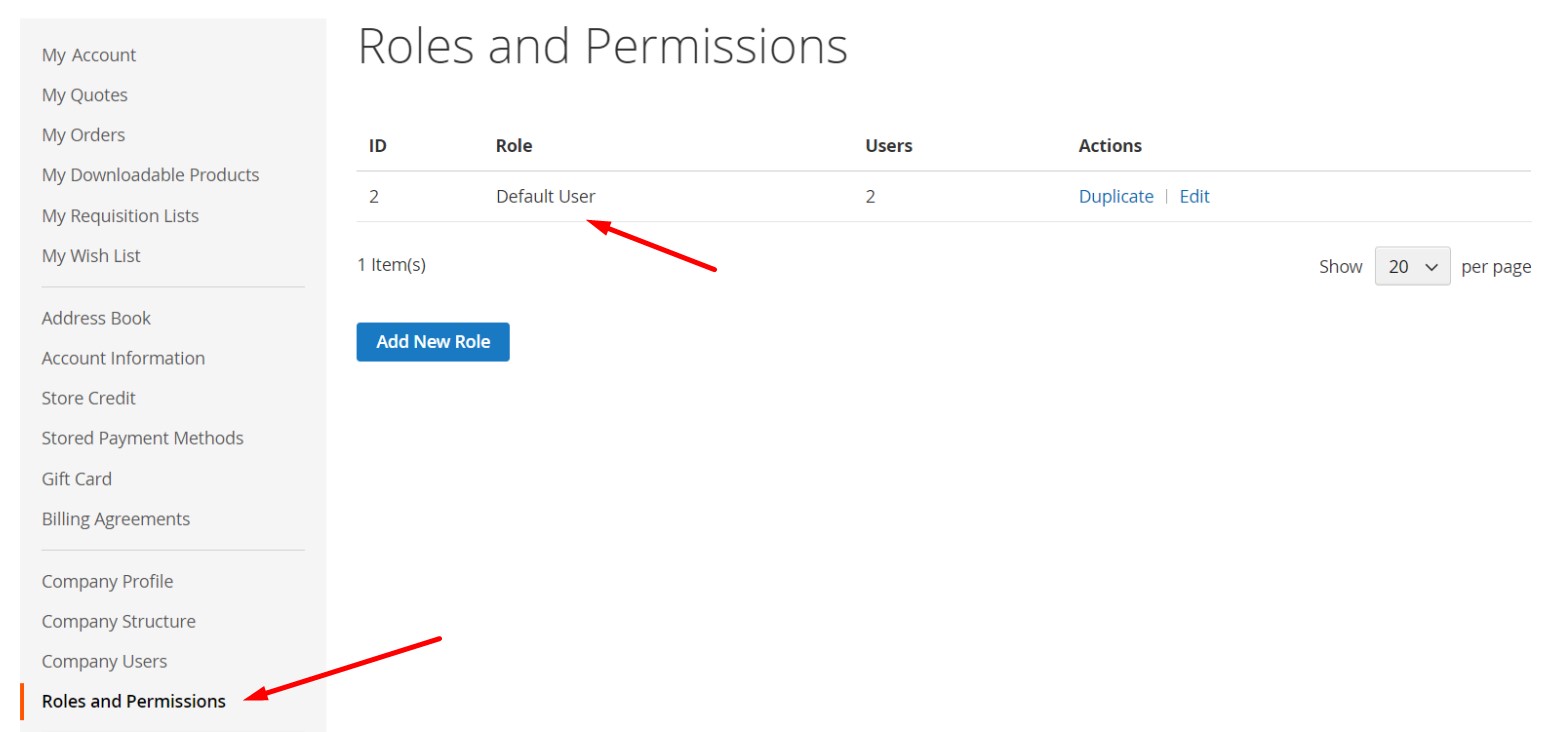
You can manage company roles and permissions under the Roles and Permissions tab in your company administrator account.
How to create a role
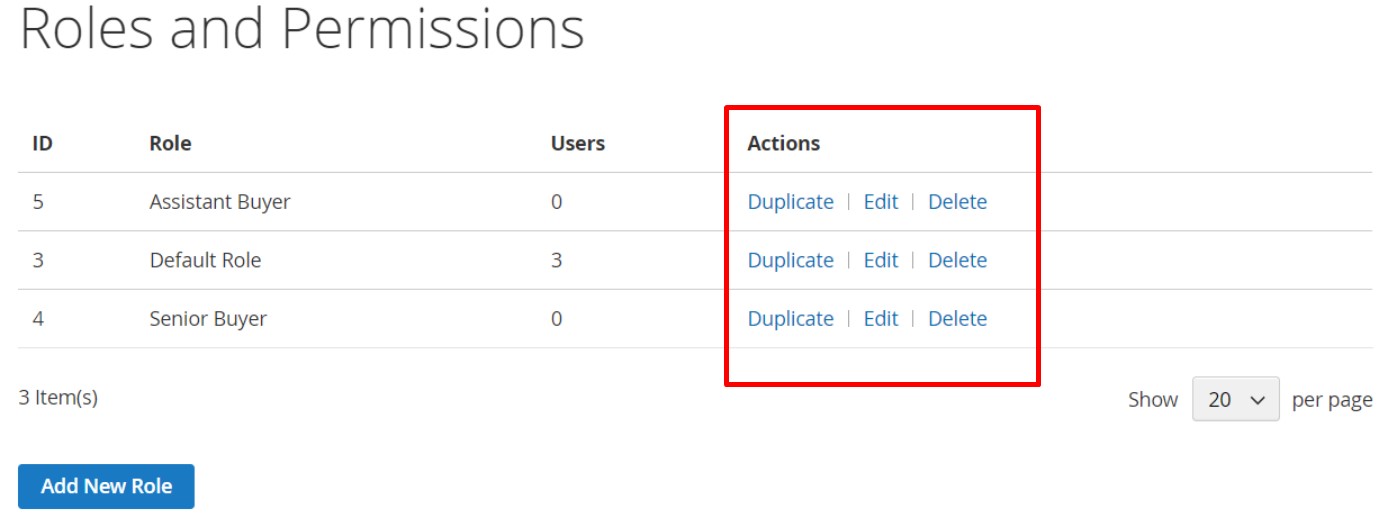
To create a new role, you can use the Add New Role button (see picture above). Click it, and the system will redirect you to a new screen.
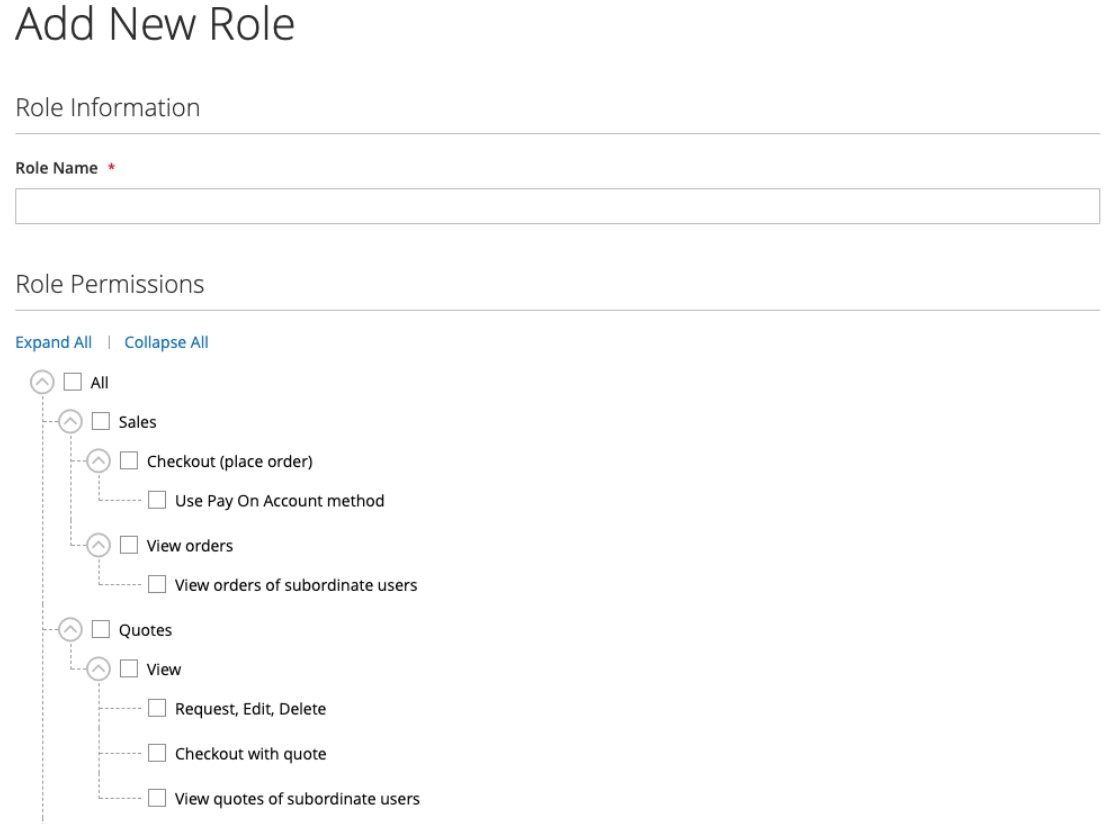
Here, you can enter a new role name and specify each resource that users assigned the role can access. Alternatively, you can select all activities (All checkbox) and clear the box of each resource that users won’t have permission to access.
Don’t forget to save the new role. You can create as many roles as your company requires.
How to modify a role
It is also possible to alter a role using the algorithm described above. Click Edit in the Actions column and apply changes to the name and customize permission settings. You have to save the role to keep the changes.
How to duplicate a role
You can create a new role by copying an existing one. Choose a role and click Duplicate in the Actions column (see picture above). Apply changes and save the new role.
How to delete a role
Note that you can delete roles that don’t have assigned users. The necessary option – Delete – is available in the Actions column (see picture above).
How to assign a role to a company user
Open the Company Users tab in your company account. Find a user you want to edit. Click Edit and choose the appropriate User Role for the user. Save changes. That’s it.
Manage Company Accounts from Magento 2 Backend
As we’ve already mentioned, you can find all current company accounts (no matter what their status is) under Customers-> Companies.
You can apply the following actions to either single or multiple grid records. Select the checkbox of each record you want to update and follow the instructions below:
How to activate company accounts
Only two steps divide you from activating company accounts. You need to set the Actions control to Set Active and click OK to confirm the action. Now, accounts with the Pending Approval status become Active.
How to block company accounts
By blocking a company account, you prevent users associated with a blocked company from accessing the account or placing orders from the store. To achieve this goal, set the Actions control to Block and confirm your intent.
How to delete company accounts
To delete a company account in Magento 2, set the Actions control to Delete and confirm the action. Note that deleted company accounts cannot be restored. All user accounts associated with the company get a new status – Inactive. The corresponding company ID is removed. However, Magento 2 saves information about company activity and transactions.
How to convert the credit currency of a company account
The Actions control offers the Convert Currency option. Select a company you want to modify, choose the corresponding action, confirm your intent, choose a new credit currency, and complete the configuration.
The system recalculates the actual amounts according to the current conversion rates. If they are not available, it is possible to enter custom conversion rates manually.
How to update a company profile
You can edit company information right in the grid. Choose Edit in the Actions dropdown. Now, you can apply changes to a company name, email, and phone number.
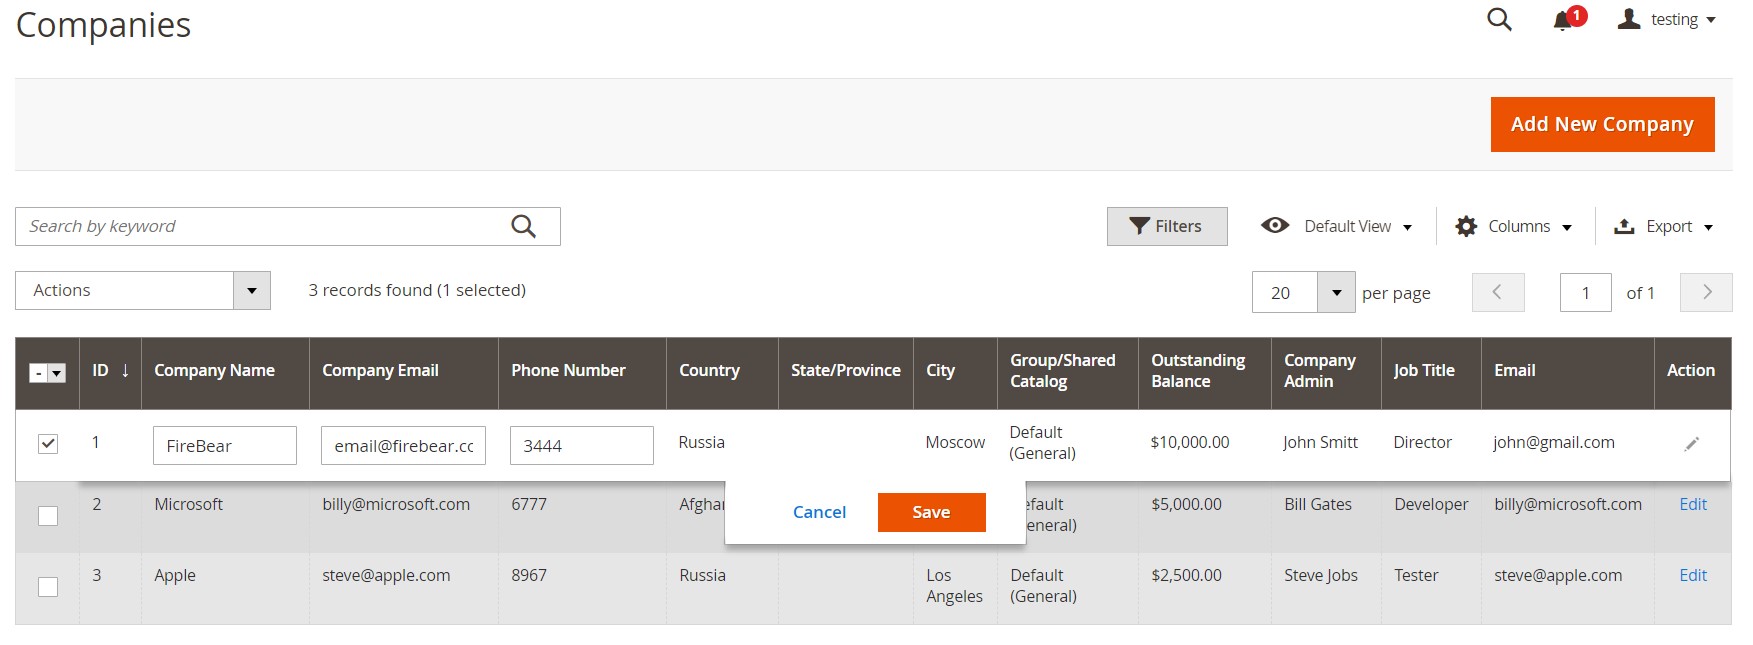
At the same time, you can change more options. Choose a company and select Edit in the Actions column.
The system lets you edit a company name and email, change its status, and choose a new sales representative.
In the Account Information section, you can change a legal company name, VAT/TAX ID, or Reseller ID as well as add/edit comments.
The Legal Address is also under your disposal:
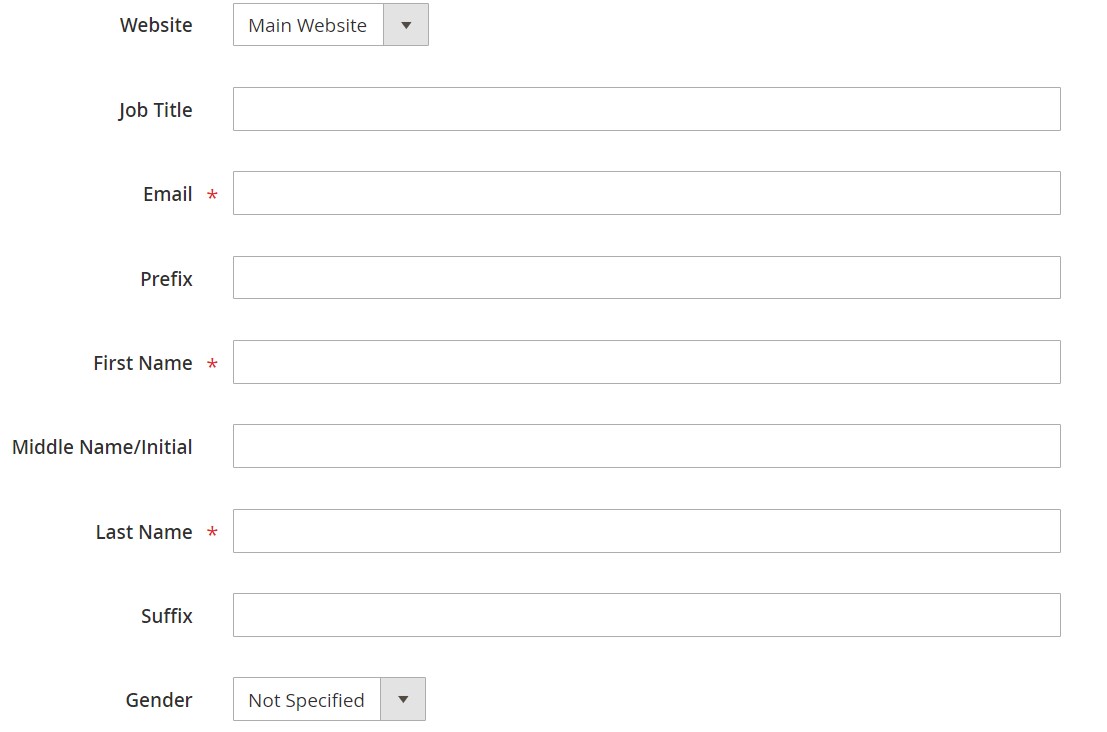
Under the Company Admin section, Magento 2 lets you choose another website, edit a job title of a company admin, set another email address, edit Prefix, First Name, Middle Name/Initial, Last Name, Suffix, or change gender.
The Company Credit section provides options to change credit currency, edit credit limit, and allow exceeding the limit.
In Advanced Settings, you can change a company’s customer group (and shared catalog), enable/disable quotes for a company, and change payment methods available for the company.
How to Import Magento 2 Companies
Now, let’s see how to import and export Magento 2 companies. Since the default data transfer tools of Magento 2, don’t let you do that, you need to use a third-party module that extends the capabilities of the system. You need the Improved Import & Export Magento 2 extension and its B2B Add-on to transfer Companies, including the full company structure with customer roles and company administrator account.
The module acts as the basis of the add-on. It provides the ability to automate transfers of all the core Magento 2 entities. The add-on lets you work not only with company accounts but also with other B2B objects: shared catalogs, requisition lists, and negotiable quotes.
The combination of both tools lets you use numerous file formats and sources to create any connection. And since they support API integrations, it is possible to connect Magento 2 to any external system. For further information on how to import and export Magento 2 companies, follow this link: How to Import and Export Companies in Magento 2.
Also, check our extension and its add-on:
Get Improved Import & Export Magento 2 Extension
Get B2B import and export add-on for Magento 2
Related posts
 Magento 2 B2B Company Guide: Revealing Company Structure & Import
 Adobe (Magento 2) Commerce and Cloud (Enterprise Edition) Specific Features
 How to Import Customers & Customer Addresses to Magento 2
 Amasty ChatGPT AI Content Generator for Magento 2
 Magento 2 Release Notes
 Reputon Amazon Importer Review: How to Connect Shopify to Amazon in a Few Clicks
 Magento Open Source and Adobe Commerce 2.4.7 Release Notes
 Shopware 6 Advanced Pricing Guide + Import Tutorial