
The Extensive Guide to Magento 2 Troubleshooting

In the following article, we gathered all the most common issues associated with Magento 2 as well as their resolutions. More similar materials are listed in our Developer’s Cookbook.

Table of contents
- 1 How to troubleshoot cron in Magento 2
- 2 How to fix conflicting component dependencies in Magento 2
- 3 How to fix backup issues in Magento 2
- 4 How to address search engine issues in Magento 2
- 5 How to roll back Magento 2 after failed update
- 6 How to change your Admin URL in Magento 2
- 7 How to create 301 redirects in Magento 2
- 8 How to activate several shopping cart rules for one coupon in Magento 2
- 9 Other Magento 2 Issues & Solutions
- 9.1 How to solve the “One or more indexes are fully invalid” issue in Magento 2
- 9.2 How to address Magento 2 issues related to PHP extensions
- 9.3 How to configure Magento 2 with a new domain
- 9.4 How to address security and performance issues caused by outdated Magento software
- 9.5 How to troubleshoot CSS cache issues in Magento 2
- 9.6 How to redirect Magento 2 to open through www
- 10 Magento 2 Commerce Cloud Troubleshooting
- 10.1 How to troubleshoot Magento 2 deployment
- 10.2 How to fix incorrect credentials issues in Magento 2
- 10.3 How to address issues with a new Magento 2 project
- 10.4 How to fix the component deployment failure in Magento 2
- 10.5 How to resolve issues with the encryption key in Magento 2
- 10.6 How to address HTML minification issues in Magento 2
- 10.7 How to resolve Magento 2 Google Analytics issues that occur during deployment
- 10.8 How to troubleshoot site availability issues in Magento 2
- 10.9 How to address sitemap and search engine robots issues in Magento 2
- 10.10 How to troubleshoot themes in Magento 2
- 11 Magento 2 Tips to Solve Some Common Issues
- 11.1 How to install sample data after the Magento 2 setup
- 11.2 How to clear theme/CSS cache in Magento 2
- 11.3 How to re-index in Magento 2
- 11.4 How to remove a block from a layout in Magento 2
- 11.5 How to setting developer mode in Magento 2
- 11.6 How to get Magento 2 base URL
- 11.7 How to check module installation in Magento 2
- 11.8 How to set backend session timeout in Magento 2
- 11.9 How to manage symlinks for static resources in Magento 2
- 12 Magento 2 Extension-Related Issues
- 13 Magento 2 Issues Non-Programmers Can Cope With
- 13.1 How to troubleshoot installation issues in Magento 2
- 13.2 How to troubleshoot Magento 2 migration issues
- 13.3 How to install extensions in Magento 2
- 13.4 How to troubleshoot bad extensions in Magento 2
- 13.5 How to restore forgotten passwords in Magento 2
- 13.6 How to troubleshoot customer issues in Magento 2
- 13.7 How to prevent incompatibility issues in Magento 2
- 13.8 How to troubleshoot cache-related issues in Magento 2
- 13.9 How to fix the “One or more indexes are fully invalid” issue in Magento 2
- 13.10 How to troubleshoot admin session issues in Magento 2
- 13.11 How to troubleshoot Magento 2 performance issues
- 13.12 How to avoid bad URLs in Magento 2
- 13.13 How to increase the Magento 2 brand awareness
- 14 How To Investigate Technical Problems in Magento 2
How to troubleshoot cron in Magento 2
The following chapter discusses Magento 2 cron troubleshooting. Various issues may occur preventing the correct functionality of this service.
Issues
If you face the following conditions while working with the Magento 2 installation, it means that you deal with cron issues:
- Firstly, you try to run an update or upgrade, but it stays in a pending state.
- You see an error message regarding the setting $HTTP_RAW_POST_DATA. Setting it properly doesn’t help.
- The cron readiness check leads to a failure
- The PHP readiness check displays no PHP.
- Your Magento admin reports about invalid indexers.
Investigation
So, you need to find out whether cron is currently running and set up properly. Follow these steps:
- Log in to your Magento server as the file system owner.
- Look for the following file:
1ls -al <magento_root>/var/.setup_cronjob_status
If it exists, it means that there was at least one successful cron run in the past. If the file does not exist, cron isn’t running. Or Magento is not installed.
To get more detail about cron, log in as a user with root privileges and use the following command:
|
1 |
crontab -u <Magento file system owner name> -l |
If no crontab for the user exists, you will see the following message:
|
1 |
no crontab for magento_user |
If there is one, you can discover the following facts necessary for further Magento 2 cron troubleshooting:
-
- Your PHP binary;
- Your Magento cron scripts and paths to them;
- The location of your cron logs.
This information will help you to solve the existing issues. We describe how to address Magento 2 cron problems below.
Solutions
Let’s take a look at the solution for crontab not being set up first. We can only recommend you to follow the official instructions regarding the Magento 2 cron configuration. If everything is done right and your installation complies with the requirements of the platform, you won’t face any difficulties. Follow this link to find the corresponding guide: .
If your Magento 2 cron runs from an incorrect PHP binary. What do we mean by “incorrect”? It is a PHP binary that differs from the one related to the web server plug-in. It usually leads to various PHP settings errors.
The resolution is very straightforward. You have to set the same PHP settings for both your PHP command line and PHP web server plug-in. The corresponding guide on how to set up PHP is available here: .
Solutions for cron running with errors vary a lot. You have to run each command manually to see error messages that may be helpful in diagnosing the issue. Refer to this guide once again: .
Also, note that it is necessary to run cron at least twice per job. Firstly, you queue it. Secondly, you execute it.
How to fix conflicting component dependencies in Magento 2
Conflicting component dependencies are another common Magento 2 issue. Below, we describe the problem as well as offer a compact troubleshooting guide. If you see the “We found conflicting component dependencies” error message, you’ve come to the right place.
Issue
The corresponding error message usually looks as follows:
|
1 2 3 4 |
We found conflicting component dependencies. You are trying to update package(s) magento/module-sample-data to 1.0.0-beta We've detected conflicts with the following packages: - magento/sample-data version 0.74.0-beta15. Please try to update it to one of the following package versions: 0.74.0-beta16, 0.74.0-beta14, 0.74.0-beta13, 0.74.0-beta12, 0.74.0-beta11, 0.74.0-beta10, 0.74.0-beta9, 0.74.0-beta8, 0.74.0-beta7 |
It may vary a little bit depending on various conditions. As for the reason for the problem, you face the error message mentioned above only when Composer doesn’t understand which components to install or update.
Solution
Since there are two scenarios that may cause the conflict, determine the one that fits your situation to choose the correct Magento 2 troubleshooting.
Upgrading Magento
Users who upgrade Magento Commerce Cloud, resolve conflicting component dependencies in Magento 2 by checking the keys used for the procedure. They should be generated from the correct email account to run the upgrade successfully. You should also check the permissions regarding their correspondence to the Magento upgrade requirements. Review this material for more information: .
Incompatibility with third-party extensions
Third-party modules may also lead to conflicting component dependencies in Magento 2. The issue occurs if plugins depend on earlier Magento components than the ones you have installed.
You may try to find the supported versions your modules rely on to run the upgrade. The required versions are available in that JSON file in the require or require-dev property of the object.
Try a readiness check and if it fails, see the failure message for further reference.
You may also contact the extension vendor for further assistance. At the same time, various community forums are under your disposal.
How to fix backup issues in Magento 2
Below, you will find possible solutions for the most common backup creation issues that occur in Magento 2.
Backup disabled
So, your backup tool may not work since it is disabled. You will be notified as follows:
|
1 |
Backup functionality is disabled. |
Backup functionality is currently disabled. Please use other means for backups.
To enable the backup functionality in Magento 2, enter the following CLI command:
|
1 |
bin/magento config:set system/backup/functionality_enabled 1 |
All the necessary information on backups is listed in this official document: .
Disk space
A backup may fail due to the lack of disk space. Free it up to troubleshoot the backup issue that occurs in your Magento 2 installation. You can transfer some files to another storage.
Operating system errors
Lots of operating systems have been reported within the entire timespan Magento 2 backups are used. Unfortunately, this topic is too complex to contain it within the boundaries of a blog post. However, you can contact your sysadmin or ask for help on public forums Opening a may also help you resolve the problem.
Backup failure
If either backups or backup tests fail, it may be a sign that you as a Magento file system owner don’t have sufficient privileges in the file system. If you deal with read-only files or another user has possession over them, you won’t be able to back up the system.
Therefore, file system permissions and ownership of the <magento_root>/var directory and subdirectories matter a lot. You can find answers to your questions here: .
How to address search engine issues in Magento 2
When the Magento version you are upgrading from uses a catalog search engine unsupported in the platform’s version you are upgrading to, you will see the following error:
|
1 |
Your current search engine, <Engine Name>, is not supported. You must install a supported search engine before upgrading. See the System Upgrade Guide for more information. |
Your search engine may be set to either MySQL or a version of Elasticsearch that is no longer supported in Magento 2. Therefore, we recommend you to find out the software utilized. Use this command:
|
1 |
bin/magento config:show catalog/search/engine |
It will help you check the current search engine and its version.
Receiving this error means that Magento is in an inconsistent state and the Admin is unaccessible. You need to revert to your previous Magento 2 version to start addressing the issue. Start with one of the following commands:
|
1 2 |
composer require magento/product-enterprise-edition=<version> composer require magento/product-community-edition=<version> |
Replace <version> with the version of your installation used prior to the upgrade. It should contain three digits separated with dots: 2.2.3.
MySQL search engine
MySQL used to be the default catalog search engine of Magento. However, everything changed in 2.4.0: it is no longer supported. Now, Elasticsearch is required as your search engine, You should install and configure it before upgrading to 2.4. Use the official documentation for further information: .
Elasticsearch search engine
If you already use Elasticsearch but its version is outdated, you will face the error. Update it before upgrading to Magento 2.4. Use Elasticsearch 7.x and refer to the official guide: . After the update, you need to configure Elasticsearch and reindex. Only then it is possible to upgrade to Magento 2.4.
How to roll back Magento 2 after failed update
Let’s imagine a situation when you try to upgrade Magento 2 components, but the update fails. The system notifies you in the following way via the Console Log:
|
1 2 3 4 5 |
[2015-08-14 12:12:02 CDT] Job "update {"components":[{"name":"example/module","version":"1.1.0"}]}" has been started [2015-08-14 12:12:02 CDT] Starting composer update... [2015-08-14 12:12:02 CDT] An error occurred while executing job "update {"components": [{"name":"example/module","version":"1.1.0"}]}": Could not complete update {"components": [{"name":"example/module","version":"1.1.0"}]} successfully: Cannot find component to update |
The preceding example illustrates a case when there is no component version to roll back. You have to discuss this issue with the component vendor. You may also choose to resolve the issue yourself or return to a previous backing. Clicking Rollback to let Magento recover your data even if it wasn’t backed up previously.
For further reference, use the official troubleshooting guide of Magento 2: .
How to change your Admin URL in Magento 2
One of the most important and at the same time easy to implement security improvement for Magento 2 is a custom admin URL. To change the address of your backend, you need to modify the ‘app/etc/local.xml‘ file located under admin/routers/adminhtml section. Use the following snippet to change your admin URL in Magento 2:
|
1 2 3 4 5 6 7 8 9 |
<admin> <routers> <adminhtml> <args> <frontName><![CDATA[your-secure-location]]></frontName> </args> </adminhtml> </routers> </admin> |
According to some specialists, changing your default admin URL via the native interface is not a good idea. Another recommendation is to use a hard-to-guess name for the backend location. Apply changes, clear cache, check the new URL, and make sure that a 404 error page is displayed instead of the old one.
How to create 301 redirects in Magento 2
You can create 301 redirects for your Magento 2 website under Backend – Catalog – URL Rewrite Management:
- Click Add URL Rewrite;
- Open the Create URL Rewrite menu and choose Custom;
- Fill in the URL Rewrite Information form:
- ID Path – enter the old URL;
- Request Path – specify it once again;
- Target Path – enter the new URL here.
- Select Permanent (301) for redirects.
- Save changes.
You can examine whether the redirect is working or not by going to the old page.
How to activate several shopping cart rules for one coupon in Magento 2
With the default settings of Magento 2, you cannot activate several shopping cart rules for one coupon. However, you can address the issues with the help of a database request:
|
1 |
DROP INDEX `UNQ_SALESRULE_COUPON_CODE` ON `salesrule_coupon` |
Open ‘/app/code/core/Mage/SalesRule/Model/Resource/Coupon.php‘. You have to find lines 43-46 and comment them out as follows:
|
1 2 3 4 |
/*$this->addUniqueField(array( 'field' => 'code', 'title' => Mage::helper('salesrule')->__('Coupon with the same code') )); */ |
Other Magento 2 Issues & Solutions
How to solve the “One or more indexes are fully invalid” issue in Magento 2
If you see the following system message, it is not a cause for concern: “One or more indexes are fully invalid.” It only means that you need to reindex your Magento 2 website. And it is a pretty simple procedure that requires little to no technical knowledge. It is either possible to launch a cron job or run the following command in your Magento 2 installation’s root directory:
|
1 |
php bin/Magento indexer:reindex |
If you are a non-technical user, ask somebody else to do that. However, you may try to re-configure the php.ini settings on your own responsibility.
How to configure Magento 2 with a new domain
You may need to change a domain name quite frequently depending on the needs of your e-commerce business. Even a non-programmer can do that, following these steps:
- Go to your Magento 2 admin and visit Stores -> Configuration -> General tab -> Web.
- Unfold the Base URLs section.
- Here, you can specify your new domain address.
- Also, unfold the Base URLs Secure section.
- Specify your new domain address in the Secure Base URL field.
- Save the new changes (“Save Config” in the upper right corner).
How to address security and performance issues caused by outdated Magento software
Note that only the latest Magento 2 version offers the best performance metrics and the most secure environment. Therefore, it is crucial to update your e-commerce website. Otherwise, you will face numerous inconveniences and get into troubles. So, how to address security and performance issues caused by outdated Magento software?
You can use Composer to get the latest software. Don’t forget to create a backup before going any further.Follow these steps to run the update:
- You should connect to your web server via SSH using any SSH client of your choice.
- Log in to your Magento 2 server as a user with full file system ownership.
- Create the SSH connection and go to your Magento 2 root directory.
- Use this command:
1composer require magento/product-community-edition 2.x.x --no-update
Replace 2.x.x with the latest version. - Enter your magento.repo authentication keys if prompted.
- Clear your cache when the update is complete.
- You can verify that the update was successful in the Magento 2 Admin. You will find the current software version in the bottom right corner.
Check the official guide for further information: .
How to troubleshoot CSS cache issues in Magento 2
Updating CSS on your e-commerce website not always leads to the desired result. Your changes might not be displayed if you don’t clear the cache properly. The following commands may help you troubleshoot the CSS cache issues in Magento:
|
1 2 3 4 |
rm -rf var/di/* var/generation/* var/cache/* var/log/* var/page_cache/* var/session/*var/view_preprocessed/* pub/static/* php bin/magento setup:static-content:deploy php bin/magento cache:clean php bin/magento cache:flush |
Check the official documentation for more information: .
How to redirect Magento 2 to open through www
You can redirect your website to open through “www.” You can apply the necessary changes to the .htaccess file located in your Magento 2 root directory. Find the “RewriteEngine on” snippet and paste this code:
|
1 2 |
RewriteCond %{HTTP_HOST} ^yourdomain.com$ [NC] RewriteRule ^(.*)$ http://www.yourdomain.com/$1 [R=301,L] |
Go to Store -> Configuration -> General -> Web and unfold the Base URL section. Now, you can replace your domain with http://www.domain.com. Don’t forget to save changes (“Save Config” in the top right corner).
Magento 2 Commerce Cloud Troubleshooting
Below, we discuss different troubleshooting topics related to Magento Commerce Cloud. Although you can always submit a ticket to get support while using this version of our favorite e-commerce platform, specialists recommend checking the following:
- Verify credentials;
- Review log files;
- Check an error message reference for ece-tools;
- Use New Relic Logs to view and analyze log data aggregated for Pro Staging and Production environments.
You can also look for possible solutions in the Magento Commerce Cloud documentation or in articles like this one. If technical support is still required, create a ticket:
- Go to the Project Web Interface.
- Log in to the Magento Help Center.
- Click Submit a Ticket in the upper right corner.
- Fill out the support ticket and submit it.
That’s it! Now, let’s explore several specific cases of Magento 2 Commerce Cloud troubleshooting.
How to troubleshoot Magento 2 deployment
In the following chapter, we discuss how to recover after deploying the Magento application with the incorrect authentication keys – keys for another account or ones you use for Magento Open Source.
Using the incorrect keys leads to failed deployment. However, it is not a catch-22 situation. You can recover by cloning the project, adding the correct keys to auth.json, and pushing the change to the master branch.
Let’s assume that you have only a master branch in your project – the default one that you get when creating a project for the first time. You can redeploy with the correct authentication keys as follows:
-
- Log in to the machine with your Magento Commerce Cloud SSH keys and then to your project. Use the following command:
1magento-cloud login - Now, you have to create a new branch to update code with the name auth:
1magento-cloud environment:branch auth master - Go to the project root directory.
- Find the auth.json file and open it in a text editor.
12345678{"http-basic": {"repo.magento.com": {"username": "<your public key>","password": "<your private key>"}}} - Now, you can specify the correct authentication keys.
- Save changes and close the editor.
- Now, you can commit and merge changes:
123git add -Agit commit -m "<description of change>"git push origin master - Now, you have to wait until the deployment procedure is finished.
- Log in to the machine with your Magento Commerce Cloud SSH keys and then to your project. Use the following command:
Follow system messages since they indicate whether the deployment was successful.
How to fix incorrect credentials issues in Magento 2
Let’s continue the previous topic and say a few more words about resolving issues associated with incorrect credentials in the auth.json file.
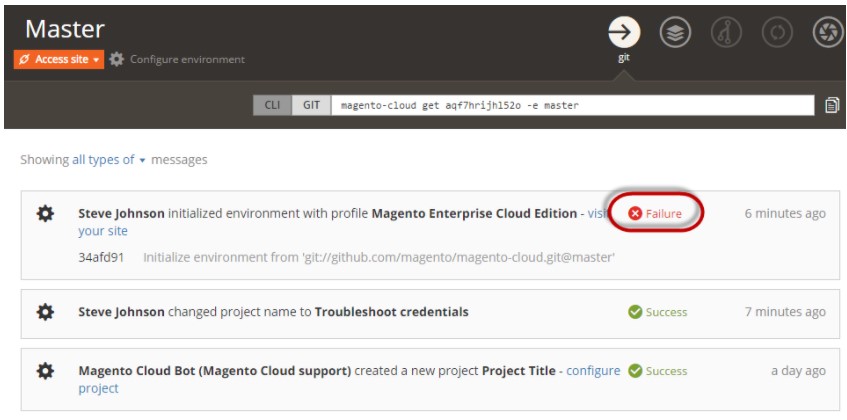
As we’ve just illustrated, a failed deployment is the most common symptom of incorrect credentials. It usually leads to the following error:
|
1 |
The 'https://repo.magento.com/archives/magento/magento-cloud-configuration/magento-magento-cloud-configuration-1.0.3.0.zip' URL could not be accessed: HTTP/1.1 403 Forbidden |
You can see errors in a log. Log in to your project and click Failure.
You can resolve this issue by cloning your project locally and updating the auth.json file with the correct authorization keys. After that, it is necessary to run composer update to refresh the project dependencies. All these procedures, if performed successfully, let you deploy the project and get started with development.
Bear in mind that it is vital to use your own keys – not shared account keys.
So, let’s get started. Log in to your machine where your SSH keys are located. Now, you can log in to your project, just like in the previous chapter:
|
1 |
magento-cloud login |
Now, it is necessary to list your projects:
|
1 |
magento-cloud project:list |
Cloning a project is another option. Do that if applicable:
|
1 |
magento-cloud project:get <project ID> |
Now, change to a project directory to update auth.json and redeploy the environment:
- Open the auth.json file in a text editor.
- Change username and password values of your Magento Commerce public and private keys respectively.
- Save changes and leave the editor.
- Update project dependencies:
1composer update - Now, you can add, commit, and push changes:
123git add -Agit commit -m "<message>"git push origin master
The project is deploying. It may take some time to complete the process. The following message indicates a successful deployment:
|
1 2 3 4 5 6 7 8 9 10 11 12 13 14 15 16 17 18 19 20 21 22 23 24 25 26 27 28 29 30 31 32 33 34 35 36 37 38 39 40 41 42 43 44 45 46 47 48 49 50 51 52 53 54 55 56 57 58 59 60 61 62 63 64 65 66 67 68 69 70 71 72 73 74 75 76 77 78 79 80 81 82 83 84 85 86 87 88 89 90 91 92 93 94 95 96 97 98 99 100 101 102 103 |
Building application 'mymagento' (runtime type: php:7.0, tree: e8450f9) Generating runtime configuration. Moving the application to the output directory Prewarming composer cache. Pre-downloaded 3 packages referenced in `composer.lock` Found a `composer.json`, installing dependencies. Executing post-build hook... [2016-05-31 14:36:58] Start build. [2016-05-31 14:36:58] Patching Magento. [2016-05-31 14:36:58] Command:/usr/bin/php /app/vendor/magento/magento-cloud-configuration/src/Magento/MagentoCloud/../../../patch.php [2016-05-31 14:36:59] Status:0 [2016-05-31 14:36:59] Output:array ( ... more ... [2016-05-31 14:36:59] Command:cd bin/; /usr/bin/php ./magento setup:di:compile [2016-05-31 14:38:27] Status:0 [2016-05-31 14:38:27] Output:array ( 0 => 'Compilation was started.', 1 => '%message% 0/7 [>---------------------------] 0% 1 sec 42.0 MiB%message% 0/7 [>---------------------------] 0% 1 sec 42.0 MiBProxies code generation... 0/7 [>---------------------------] 0% 1 sec 42.0 MiB', 2 => 'Proxies code generation... 1/7 [====>-----------------------] 14% 1 sec 48.0 MiB', 3 => 'Repositories code generation... 1/7 [====>-----------------------] 14% 1 sec 48.0 MiB', 4 => 'Repositories code generation... 2/7 [========>-------------------] 28% 12 secs 60.0 MiB', 5 => 'Service data attributes generation... 2/7 [========>-------------------] 28% 12 secs 60.0 MiB', 6 => 'Service data attributes generation... 3/7 [============>---------------] 42% 12 secs 60.0 MiB', 7 => 'Application code generator... 3/7 [============>---------------] 42% 12 secs 60.0 MiB', 8 => 'Application code generator... 4/7 [================>-----------] 57% 34 secs 174.0 MiB', 9 => 'Interceptors generation... 4/7 [================>-----------] 57% 34 secs 174.0 MiB', 10 => 'Interceptors generation... 5/7 [====================>-------] 71% 53 secs 180.0 MiB', 11 => 'Area configuration aggregation... 5/7 [====================>-------] 71% 53 secs 180.0 MiB', 12 => 'Area configuration aggregation... 6/7 [========================>---] 85% 2 mins 180.0 MiB', 13 => 'Interception cache generation... 6/7 [========================>---] 85% 2 mins 180.0 MiB', 14 => 'Interception cache generation... 7/7 [============================] 100% 2 mins 180.0 MiB', 15 => 'Generated code and dependency injection configuration successfully.', ) [2016-05-31 14:38:27] Clearing temporary directory. [2016-05-31 14:38:27] Command:rm -rf ../init/* [2016-05-31 14:38:27] Status:0 [2016-05-31 14:38:27] Output:array ( ... more ... Executing pre-flight checks... Compressing application. Beaming package to its final destination. Creating environment aqf7hrijhl52o-master. Environment configuration: mymagento (type: php:7.0, size: S, disk: 2048) mysql (type: mysql:10.0, size: S, disk: 2048) redis (type: redis:3.0, size: S) solr (type: solr:4.10, size: S, disk: 1024) Environment routes: http://master-aqf7hrijhl52o.us.magentosite.cloud/ is served by application `mymagento` https://master-aqf7hrijhl52o.us.magentosite.cloud/ is served by application `mymagento` To aqf7hrijhl52o@git.us.magento.cloud:aqf7hrijhl52o.git 34afd91..98c2166 master -> master |
Now, let’s verify the deployment. You can check whether it was successful or not by entering one of the URLs displayed under Environment routes: in your web browser. If everything works correctly, you’ve just troubleshot the incorrect credentials issue.
How to address issues with a new Magento 2 project
The most common issue with a new Magento 2 project is that it has no code. You might not push it since the setup wizard didn’t complete all the processes. In this case, the following notification occurs:
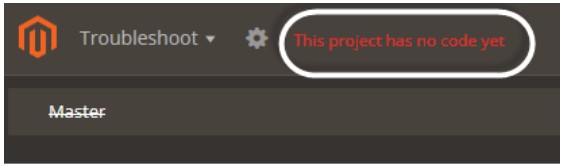
You have to click the red link to restart the Wizard and rerun the installation, following the .
How to fix the component deployment failure in Magento 2
In the chapter below, we shed light upon how to recover from a failed component deployment in Magento 2. Components that have dependencies unsuitable with your environment, such as incompatible PHP versions, cause errors.
A cure for a failed deployment exists in two forms. You can either or get rid of the unsound component from the composer.json file and redeploy the entire environment.
Let’s see how to clean up from the previous deployment. It is necessary to log in to the remote environment and clear the contents of the var directory. After that, it is possible to remove the component from the composer.json file. Next, it is possible to redeploy troubleshooting the component deployment failure in Magento 2.
Let’s see how to clean the var directories. Proceed to your local workstation and change to the Cloud project root directory:
- Use the following SSH command to log in to the remote environment:
1magento-cloud environment:ssh - Next, clear the var directories with the help of this command:
1rm -rf var/*
Remove the component contains the following steps:
- Change to the Cloud project root directory on your local workstation.
- Clear the cache using this command:
1composer clear-cache - Get rid of the unwanted component:
1composer remove <component-name>:<version> - If the procedure was successful, you will see the following message:
1Package "<name>:<version>" listed for update is not installed. Ignoring
You do not need to do anything else. - It usually takes some time for the dependencies to get the update.
- Now, it is possible to add, commit, and push changes.
123git add -Agit commit -m "<message>"git push origin <environment-ID>
How to resolve issues with the encryption key in Magento 2
In the following chapter, we explore solutions to typical issues Magento users experience with encryption keys. When it comes to a new Starter project, the Magento encryption key comes into your master branch Production environment. Every time you branch to other environments, it migrates with the code and database.
As for a new Pro project associated with a “blank site” template, the encryption key appears on the Integration master branch and environment. This lasts until you initially deploy across all environments. When it comes to importing data from an existing Magento installation, it is necessary to create the key copy and deploy it to the environments.
If the encryption key is not available in all environments. Otherwise, your store will encounter authentication and authorization errors. You won’t be able to process payments, returns, shipping, etc.
So, you can troubleshoot this kind of issue by verifying and updating the encryption key environment variable. Follow these steps to achieve your goal:
- SSH to each of the Cloud environments. You usually deal with three of them: Integration, Staging, and Production. Use this command
1magento-cloud environment:ssh - Next, you have to edit the app/etc/env.php file. Open it in a text editor.
- Now, it is necessary to verify the existing key value for crypt. It should be your Magento Commerce key. Look here:
123456return array ('crypt' =>array ('key' => '<your encryption key>',),); - In the case of an incorrect value, add the proper one and save the changes to the env.php file.
You have to apply similar changes to each environment. And don’t forget to test store actions in all of them to verify whether the new values are correct. That’s how you troubleshoot Magento 2 encryption key issues.
How to address HTML minification issues in Magento 2
HTML minification may also cause problems in Magento 2. Below, we describe how to troubleshoot the corresponding issues.
Let’s assume that you use the following command to generate config.local.php:
|
1 |
php bin/magento magento-cloud:scd-dump |
However, your Magento 2 website encounters errors after you build and deploy. All attempts to access the site cause the following error:
|
1 |
“failed to open stream: No such file or directory” for a series of files. |
Complete the following to troubleshoot the problem:
- Firstly, you have to copy the app/etc/config.local.php file and paste it to your local.
- Next, it is necessary to edit and remove the minify section from the config.local.php file:
12345'template' =>array ('allow_symlink' => '0','minify_html' => '1',), - You should Modify the minification settings using the following command:
1```shell update core_config_data set value=0 where path =’dev/template/minify_html’ - Now, you need to flush all caches.
1php bin/magento cache:flush
1redis-cli -h <> -p <> flushall - Go to your config.local.php file and remove all base_url related items.
After saving the changes, you can proceed to the full deployment of the config.local.php file. Push it to the Git branch and build/deploy across environments. That’s how you troubleshoot Magento 2 HTML minification issues.
How to resolve Magento 2 Google Analytics issues that occur during deployment
If you find your Magento 2 Google Analytics integration disabled after deployment, you’ve come to the right place. Let’s take a look at what usually happens in similar situations.
Let’s assume that you deploy your code across environments. The build and deploy scripts, in their turn, verify that the master branch is deployed to keep Google Analytics enabled. However, when you perform the same actions to develop or child branches, the corresponding script disables Google Analytics. Why does it happen, you will ask?
Consider it a preventive measure that doesn’t let developer data and interactions get to Google Analytics and impact your business insights. The deploy script checks the MAGENTO_CLOUD_ENVIRONMENT variable for the string branch name of the master (note that it is a case sensitive comparison) specified for GIT_MASTER_BRANCH. You cannot modify such variables. Thus, when the script verifies the deployed branch is Master, it doesn’t disable Google Analytics. But when you deploy a different branch, the script turns off the service. So, how to troubleshoot this Google Analytics issues that occur during deployment in Magento 2?
Always deploy from the Master branch. Thus, you ensure Google Analytics is always enabled in Production.
How to troubleshoot site availability issues in Magento 2
To address site availability issues in Magento 2, visit your deployment logs. They contain information necessary for identifying the problem.
For instance, you may find out that the CredisException error prevents your e-commerce store from operating normally. It originates in Magento’s nature and the way it handles simultaneous connections to Redis during static content deployment:
|
1 2 3 4 5 |
[2018-01-30 18:56:52] Generating static content for locales: en_US [2018-01-30 18:56:52] Command:php ./bin/magento setup:static-content:deploy --jobs=3 en_US [CredisException] read error on connection |
The example above shows a situation when the default number of processing jobs during static content deployment is set to 3. However, the recommended number of processing jobs is 1.
At the same time, it is recommended to perform static content deployment in the build phase instead of the deployed one. It doesn’t have access to Redis, so you won’t face the issue. At the same time, you will reduce downtime.
So, what are the symptoms of the problem?
There are two cases. Firstly, your e-commerce storefront may not function at all. You will face HTTP requests resulting in 50x errors. Secondly, a normally functioning website may fail to refresh static assets. It is also a sign of the problem.
You can troubleshoot this Magento 2 issue by modifying the deploy phase. Use the SCD_THREADS environment variable to redeploy your site:
- Open a terminal and log in to your project with the help of this command:
1magento-cloud login - Now, it’s time to set the variable. Use the following trick:
1magento-cloud variable:set SCD_THREADS '1' -e <environment>
You can find more tips in this guide: .
How to address sitemap and search engine robots issues in Magento 2
Sometimes, generating and writing the sitemap.xml file to the root directory causes the following message:
|
1 |
Please make sure that "/" is writable by the web-server. |
Magento Commerce Cloud lets you write to specific directories only. For instance, var, pub/media, pub/static, and app/etc are under your disposal. As a result, it is necessary to set the /media/ path while generating the sitemap.xml file from your admin.
With Magento 2 Commerce Cloud, there is no need to generate a robots.txt file since it creates the corresponding content on-demand, storing it in the database. To view the content in your browser, use this link:
|
1 |
<domain.your.project>/robots.txt |
ECE-Tools version 2002.0.12 and later is required. It needs an updated .magento.app.yaml file. You can see more examples here: .
You can generate a sitemap.xml file in 2.2+, troubleshooting all associated issues as follows:
- Go to Admin -> Marketing -> SEO & Search -> Site Map.
- Click Add Sitemap.
- Specify Filename – sitemap.xml – and Path –/media/
- Click Save & Generate.
Now, your new site map is stored in the Site Map grid. You can click the path in the Link for Google column as well as apply other actions.
Now, let’s see how to add content to the robots.txt file in Magento 2 with no headaches.
- Go to Admin -> Content -> Design -> Configuration.
- Click Edit for the website in the Action column of the Design Configuration view.
- Go to the Main Website view and open Search Engine Robots.
- Modify the Edit custom instruction of robots.txt field.
- Save Configuration.
Now, you can use the link mentioned above to verify the file in your browser. If a 404 error occurs, .
However, the approach described above won’t satisfy your demands if you have different domains and you need separate sitemaps for them. In this situation, you can create a VCL to route to the proper sitemap. You need to generate the sitemap.xml file in the admin as we’ve just described and create a custom Fastly VCL snippet. The latter will help you manage the redirect.
It is possible to upload custom VCL snippets from the admin with the help of the Fastly API. Follow this link for additional details: .
Let’s focus on how to use a Fastly VCL snippet for redirection in Magento 2. You can rewrite the path for sitemap.xml to /media/sitemap.xml with the aid of the type and content key-value pairs:
|
1 2 3 4 5 6 7 |
{ "name": "sitemapxml_rewrite", "dynamic": "0", "type": "recv", "priority": "90", "content": "if ( req.url.path ~ \"^/?sitemap.xml$\" ) { set req.url = \"/media/sitemap.xml\"; }" } |
Let’s explore a little example for a better understanding of the approach. Let’s assume that you need to rewrite the path for robots.txt and sitemap.xml to /media/robots.txt and /media/sitemap.xml. You can do that as follows:
|
1 2 3 4 5 6 7 |
{ "name": "sitemaprobots_rewrite", "dynamic": "0", "type": "recv", "priority": "90", "content": "if ( req.url.path ~ \"^/?sitemap.xml$\" ) { set req.url = \"/media/sitemap.xml\"; } else if (req.url.path ~ \"^/?robots.txt$\") { set req.url = \"/media/robots.txt\";}" } |
At the same time, Magento 2 lets you use a Fastly VCL snippet for particular domain redirects. You can generate a pub/media/domain_robots.txt file (note that domain is domain.com) and streamline the following snippet:
|
1 2 3 4 5 6 7 |
{ "name": "domain_robots", "dynamic": "0", "type": "recv", "priority": "90", "content": "if ( req.url.path == \"/robots.txt\" ) { if ( req.http.host ~ \"(domain).com$\" ) { set req.url = \"/media/\" re.group.1 \"_robots.txt\"; }}" } |
The VCL snippet is used to route http://domain.com/robots.txt. Besides, it presents the pub/media/domain_robots.txt file.
A single snippet redirection requires creating both pub/media/domain_robots.txt and pub/media/domain_sitemap.xml files and using this code:
|
1 2 3 4 5 6 7 |
{ "name": "domain_sitemaprobots", "dynamic": "0", "type": "recv", "priority": "90", "content": "if ( req.url.path == \"/robots.txt\" ) { if ( req.http.host ~ \"(domain).com$\" ) { set req.url = \"/media/\" re.group.1 \"_robots.txt\"; }} else if ( req.url.path == \"/sitemap.xml\" ) { if ( req.http.host ~ \"(domain).com$\" ) { set req.url = \"/media/\" re.group.1 \"_sitemap.xml\"; }}" } |
Don’t forget to specify the location of the file using pub/media/ in the sitemap admin config. Don’t use “/”.
Next, it is necessary to configure indexing by search engines. Go to your project settings and enable the “Indexing by search engines is On for” option. It will activate the possibility to customize robots.txt.
How to troubleshoot themes in Magento 2
In this chapter, you will discover how to troubleshoot issues related to the themes added to your Magento Commerce Cloud website. For instance, you may lose images on deployment.
Themes that resize images may cause this issue. If product pictures don’t display or disappear from catalog pages when deployed, you need to regenerate the image cache. You may face the problem in all environments during any deployment.
Get the SSH information and store URL. Both are available through the Project Web Interface. Open a terminal app, check out a branch associated with the issue, and regenerate the cache with the help of this command:
|
1 |
php bin/magento catalog:images:resize |
Now, you can test the category pages by opening them in a web browser.
You may also need to locate blocks in themes when debugging templates. Bear in mind that some blocks make store pages uncacheable. You can locate these blocks with the help of the following command:
|
1 |
find ./app -type f -name "*.xml" | xargs grep -l cacheable | xargs grep -l false |
For further information, go to the official documentation: .
Magento 2 Tips to Solve Some Common Issues
Below, we run through the most common procedures Magento 2 merchants use to troubleshoot various issues.
How to install sample data after the Magento 2 setup
So, you’ve installed Magento 2 for the very first time but your store is clean. You need some sample data to explore the platform’s functionality. First, download it using the following command:
|
1 |
sudo php bin/magento sampledata:deploy |
Now, you can install sample data on your Magento 2 website:
|
1 |
sudo php bin/magento setup:upgrade |
That’s it!
How to clear theme/CSS cache in Magento 2
Let’s assume a situation that you’ve updated your CSS or added something new to a Magento 2 theme. However, the changes are not displayed. There is no reason for panic since one vital step is missed: you need to clear the cache for themes and CSS. The following commands will help you troubleshoot the issue and bring the desired changes to the frontend:
|
1 2 |
sudo php bin/magento cache:flush sudo php bin/magento cache:clean |
How to re-index in Magento 2
Keep the following solution in mind — it will help you troubleshoot a case described further in this article. For re-indexing your Magento 2 e-commerce storefront, run the following command in your CLI:
|
1 |
php bin\magento indexer:reindex |
Use this for particular commands:
|
1 |
php bin\magento indexer:reindex indexer_name |
Replace indexer_name with the name of a particular indexer. To display their full list, use this command:
|
1 |
php bin\magento indexer:info |
How to remove a block from a layout in Magento 2
You can use the following method to remove blocks in the latest Magento 2 versions:
|
1 |
<referenceBlock name=”block_name” remove=”true”/> |
How to setting developer mode in Magento 2
You may need to set the developer mode in Magento 2 to test some new functionalities and apply changes to the production version of your e-commerce website. Use the following command to switch from the normal regime:
|
1 |
bin/magento deploy:mode:set developer |
How to get Magento 2 base URL
You can get get a base URL in Magento 2 with the help of the following code:
|
1 |
$this->_storeManager->getStore()->getBaseUrl() |
The following snippet is also helpful:
|
1 2 3 |
$this->_objectManager->get(‘Magento\Store\Model\StoreManagerInterface’) ->getStore($storeId) ->getBaseUrl(); |
Besides, you can get a media base URL in Magento 2. Utilize this snippet:
|
1 |
$this->_storeManager->getStore()->getBaseUrl(\Magento\Framework\UrlInterface::URL_TYPE_MEDIA); |
How to check module installation in Magento 2
You can explore the enabled or disabled module list in Magento 2 with these commands:
|
1 2 |
magento module:enable [-c|–clear-static-content] [-f|–force] [–all] <module-list> magento module:disable [-c|–clear-static-content] [-f|–force] [–all] <module-list> |
How to set backend session timeout in Magento 2
Setting the backend session timeout for your admins is very important for the security reason. Thus, if an administrator forgets to log out and leaves a door to your store open, the system will close it automatically after a specified time span. You can set the timeout under Stores -> Settings -> Configuration -> Advanced -> Admin -> Security -> Admin Session Lifetime.
How to manage symlinks for static resources in Magento 2
Magento 2 creates symlinks for some static resources when you are not in the production mode. However, this behaviour is not always necessary. You can change it by modifying the app/etc/di.xml file:
- Find the virtualType name=”developerMaterialization” section.
- Scroll to the name=”view_preprocessed” item
- Delete or modify it.
You can modify it by changing the following snippet:
|
1 |
Magento\Framework\App\View\Asset\MaterializationStrategy\Symlink |
Replace Symlink with Copy.
You may also get rid of the files under pub/static. This will replace any existing symlinks. Note that you should not delete the .htaccess file.
Magento 2 Extension-Related Issues
Using Magento 2 extension is often associated with the following common issues and situations:
How to check the extension’s compatibility with the Magento versions
It is always a good idea to check whether the extension you are going to purchase is compatible with the Magento version you are currently using. Note that plugins developed for 2.3 won’t work for 2.0.
Also, don’t forget to download the latest version of the extension. You will receive all the new features and fixes.
How to clear static cache for Magento 2 extensions
Note that it is necessary to clear the static cache after installing Magento 2 extensions. The corresponding functionality is available under System -> Cache Management -> Flush Static Files Cache.
Also, don’t forget to clear static content cache after applying any changes in settings or the extension itself. Thus, you ensure the frontend is displayed accordingly.
How to avoid conflicts between Magento 2 extensions
Prior to downloading a module, not to mention installing it on your store, examine its functionalities carefully. Thus, you will avoid situations when the newly purchased extension clashes with the functionalities of the existing tools.
How to avoid problems in the installation of Magento 2 modules
Copy your extensions to the correct folders. Otherwise, they won’t work properly. Use this path:
|
1 |
app/code/VENDOR_NAME/MODULE_NAME |
Replace VENDOR_NAME and MODULE_NAME with the real names of the extension’s vendor and the product itself.
Before purchasing a Magento 2 module, make sure you follow all the system requirements.
Magento 2 Issues Non-Programmers Can Cope With
Magento 2 is a powerful e-commerce platform, and, as we all know, complex solutions require lots of specific skills for ongoing management purposes. Being complex means being sophisticated. However, Magento 2 offers several tricks that non-programmers can leverage for troubleshooting. While it may take weeks to set up an average e-commerce website (not to mention some insane custom projects that take months to come into production), addressing issues is usually not that time-consuming. But it often requires help from experienced programmers. Still, you can manage some basic inconveniences with no coding experience behind. Working with Magento 2 doesn’t mean you cannot solve your issue without an expert. So, let’s focus on some basic troubleshooting tricks for non-programmers.
How to troubleshoot installation issues in Magento 2
If you’ve never tried to instal Magento 2.0, it may be a daunting and extremely time-consuming task, especially if you have zero technical skills. You can follow the as your main guide to the entire process. However, the human touch may always enter the game and destroy all attempts. In this case, we recommend you to ask specialists to help you. So, how to troubleshoot installation issues in Magento 2 if you are not a programmer?
You need to find a certified Magento 2.0 solution specialist. Thus, you will delegate the sophisticated routine to people, who are well-experienced in it. And it is also a good idea to follow this advice before installing anything by yourself. Yes, development may be expensive, but it is absolutely worth its money.
How to troubleshoot Magento 2 migration issues
We have the same recommendation for addressing Magento 2 migration problems. Even if you move from Magento 1 to Magento 2, it is always better to ask professionals to transfer all entities between the two platforms. Moreover, you don’t need to worry about issues that occur during the procedure – it is no longer your headache. Thus, you may consider using the Improved Import & Export extension and our assistance in the Magento 2 migration.
How to install extensions in Magento 2
As a non-technical Magento 2 user, you can follow some basic recommendations to avoid various possible issues. Thus, if you don’t instal extensions over FTP, you won’t need to address the corresponding issues. But why is File Transfer Protocol not a good idea?
FTP is absolutely insecure. Since it has no encryption, passwords and other sensitive data is passed unprotected. Yes, people with the corresponding coding experience can easily get it. So, don’t let the simplest file transfer protocol fool you.
But when do Magento 2 merchants use FTP? They leverage this standard to install extensions. You can peruse the following guide to get a better understanding of how third-party modules become a part of an e-commerce website: How to Install Magento 2 Plugins. Also, we recommend you to ask extension providers to perform the installation and configuration of their products.
How to troubleshoot bad extensions in Magento 2
The best way to troubleshoot issues caused by bad third-party modules is to replace them with reliable alternatives. Therefore, it is strongly recommended to use only trust-worthy plugins. Wretched solutions may not only slow down your storefront but also break it or lead to data losses. In all such cases, you won’t be able to address the issues without the corresponding programming experience. Thus, use only good extensions from the or vendors the community trusts. We regularly survey the best solutions here: Magento 2 Extension Reviewed by Firebear.
How to restore forgotten passwords in Magento 2
If you no longer remember your admin password, there is no cause for alarm. Forgetting it is a common incident. Luckily, there is a relatively simple fix that resumes the normal course. However, some basic technical skills are required
You can restore your admin password with the help of . Open your Magento 2 database and navigate to the admin_user tab. Replace the existing password with a new one. Save changes.
How to troubleshoot customer issues in Magento 2
You need a tool to find out what issues your customers experience while interacting with your e-commerce website. The most obvious way is to add a contact form as a CMS page. However, it is far from being efficient since store visitors have to navigate to it every time they have an inquiry. At the same time, they cannot get an immediate response. Therefore, adding a chat to your e-commerce storefront is a better idea. But it doesn’t mean that you shouldn’t have a contact form. Having both solutions is a normal option. Check this article for further information: Live Chat Magento 2 Extensions. You can even streamline a chatbot.
How to prevent incompatibility issues in Magento 2
Everyone knows that Magento 2 and Magento 1 are completely different systems. It leads to the inability to use 1.x extensions on 2.x. As a result, you have to purchase new modules when migrating from Magento 1 to Magento 2. A less known fact is that some Magento 2 extensions may not support the latest platform’s version. Therefore, you always need to check this information to prevent incompatibility issues that may occur between the system and third-party plugins. All extensions you purchase should be compatible with the version of Magento you are using!
What are cache-related issues that commensurate with the abilities of non-technical users? Let’s explore a tiny case. You perform a Magento 2 update, and the front-end page does not show it. This is a quite common situation caused by the older cache version. How to troubleshoot this Magento 2 problem?
You need to refresh cache to let Magento use the latest settings. At the same time, you will improve the performance of your storefront since clearing cache accelerates the website.
How to fix the “One or more indexes are fully invalid” issue in Magento 2
The “One or more indexes are fully invalid” error originates in wrong settings. It occurs when both indexes are enabled and analyzed. Consequently, your content is being flagged as a duplicate content. To troubleshoot the “One or more indexes are fully invalid” problem, you need to index only the preferred content version while another one should be linked to it. You may also try to prevent duplicate content issues with the help of third-party modules, such as Amasty Unique Product URL Magento 2 Extension.
How to troubleshoot admin session issues in Magento 2
You may face lots of admin issues of any kind when working with Magento 2. However, there is one straightforward solution for al. You need to log out of Magento 2 and then re-login. This procedure often works as a reset button. And, like in the case of a normal reset, you have to wait for a while before getting back to the system.
It is the first step towards troubleshooting Magento 2 admin issues. If it doesn’t help, you need to ask specialists for help.
How to troubleshoot Magento 2 performance issues
Slow Magento 2 performance is something that should not be a part of the customer experience you provide. Therefore, it is always necessary to have a keen sense of the pulse of your e-commerce website. If it slows down — take immediate actions. Bear in mind that Magento 2 does not run slowly by default. If it happens, you can restore the initial performance.
Your server and system should be up to date and compatible with the official Magento 2 requirements. It is also a good idea to enable cache, optimize images, use trustworthy extensions, etc. Check this guide for more ideas and their implementation: The Magento 2 Performance Guide.
If you are looking for a shortlist of improvements, here it is:
- Always follow the of Magento 2.
- Run the most current version of the platform.
- Enable Varnish Cache under System -> Advanced -> Full Page Cache. Change the Caching Application field to Varnish Caching.
- Configure Memcached – a free, open-source memory object caching system designed to decrease the database load.
- Enable Flat Catalog under Store -> Configuration -> Catalog tab -> Catalog -> Storefront Section. Turn on “Use Flat Catalog Category” and “Use Flat Catalog Product.”
- Optimize JavaScript under Advanced -> Developer -> Javascript Settings. Turn on the following features: Merge JavaScript Files, Enable JavaScript Bundling, and Minify JavaScript Files.
- Optimize CSS under Advanced -> Developer -> CSS Settings. Turn on Merge CSS Files and Minify CSS Files features.
- Optimize images. Since an average store may have thousands of images, it is extremely important. Check this extension: Extendware Image Optimization Magento Extension.
- Use Content Delivery Network. You will not only increase the performance of your storefront but also make your e-commerce website more secure. Also, go to “Web” under the “General” tab and specify HTTPS URLs in the “Base URLS (Secure)” section.
- Use lightweight themes. This tiny trick will help your website load faster. However, it is not always a worthy solution especially when you need a feature-rich store.
How to avoid bad URLs in Magento 2
Alongside the store speed, you should also keep its SEO performance as high as possible. Search engine optimization is a key step towards showing your pages to customers. The better your rankings are, the more people can find your website.
As you might have already guessed, bad URLs prevent your pages for being seen by potential buyers. And while Magento 2 offers numerous SEO tricks by default (explore the backend and the ), you can also use third-party extensions. Read this material for more details: Magento 2 SEO. And don’t forget about the Amasty Unique Product URL Magento 2 module since it helps troubleshoot content duplication and other Magento 2 issues caused by bad URLs.
How to increase the Magento 2 brand awareness
In addition to performance, SEO, and customer experience improvements, it is highly recommended to create a blog associated with your Magento 2 website. Thus, you will improve the awareness of your brand and attract additional store visitors. Post only unique content associated with your e-commerce activities. It is also a good idea to create a content plan.
How to add a blog to Magento 2, you will ask? By default, there is no such functionality in Magento 2. However, you can rely on third-party modules to get the missing element of a successful e-commerce enterprise. A well-designed blog can bring customers to your website, troubleshooting the brand awareness issues all merchants face. Plugins developed to add a blog to your website are listed here: The Best Magento 2 Blog Extensions.
How To Investigate Technical Problems in Magento 2
The first source of information regarding technical issues is the ./var/log directory or your Magento 2 installation. All errors or exceptions are listed there.
In the case of the ‘There has been an error processing your request’ message, you can take the report ID and look for further information in the ./var/report directory. You will find a file that bears the same name.
If you face file permission problems, find out who is the owner of the files in the Magento 2 store directory. Also, check the corresponding permissions. You can update them with the help of the following UNIX commands correspondingly:
|
1 2 |
chown chmod |
Web server logs are also a source of additional data. Depending on your system, it can be /var/log/apache2, /var/log/httpd, or something else.
Now, let’s take a look at some basic tips that may help you solve the discovered issues. Firstly, you may try to clear Magento 2 cache files with the help of these commands:
|
1 2 3 |
./var/cache ./var/page_cache ./var/generation |
Secondly, switching to the developer mode may provide you with a more in-depth insight into the problem. Use the following CLI command:
|
1 |
php bin/magento deploy:mode:set developer |
Thirdly, it is possible to turn on PHP errors reporting in the ini file with the aid of these commands:
|
1 2 3 |
ini_set(‘display_startup_errors’,1); ini_set(‘display_errors’,1); error_reporting(-1); |
For various frontend issues, you may also investigate the browser console for errors. For instance, it is Developer tools / Console in Chrome.
It is also a good idea to turn on Magento 2 template page hints. The corresponding functionality is available in your admin panel under Stores -> Settings -> Configuration -> Advanced -> Developer -> Debug -> ‘Enabled Template Path Hints for Storefront’
As you can see, there are basically two ways to troubleshoot your Magento 2 installation. If you have enough skills, you can do that on your own. If not, you ask specialists for help. Asking questions in the top Magento 2 communities is also a good decision: , , , , etc.
Related posts
 How to Import Customers & Customer Addresses to Magento 2
 Magento 2 B2B Company Guide: Revealing Company Structure & Import
 Magento 2 Release Notes
 A Complete Guide to Shopify Customer Import
 How To Bulk Import Products In Shopify: CSV Description & Step-By-Step Guide
 Reputon Amazon Importer Review: How to Connect Shopify to Amazon in a Few Clicks
 Shopware 6 Advanced Pricing Guide + Import Tutorial
 Adobe (Magento 2) Commerce and Cloud (Enterprise Edition) Specific Features