
How To Design Homepage In Shopware 6
Shopware 6 provides numerous tools and layout options for creating stunning store pages. Today, we explore the platform’s most admin-friendly and intuitive solutions. As a store administrator, you can create a catchy homepage that easily converts store visitors into buyers. You will find out what options are at your service and what layouts to focus on. So, let’s see how to design a homepage in Shopware 6. You can find other materials related to the platform here: Shopware 6 Cookbook.

Note that we provide Shopware integration with external platforms. Contact our support for further information or try our Improved Import, Export & Mass Actions.
Table of contents
How to create a homepage layout in Shopware 6
You might have already read our article about shopping experiences or the corresponding official documentation. According to them, Shopware 6 offers the possibility of creating different layouts for your e-commerce store’s different pages. As for the following Shopware 6 tutorial, it sheds light upon how to make your shop diversified and interesting due to different category layouts. The general approach looks as follows:
- Create store categories;
- Create new layouts in Shopping Experiences;
- Assign your new layouts to store pages.
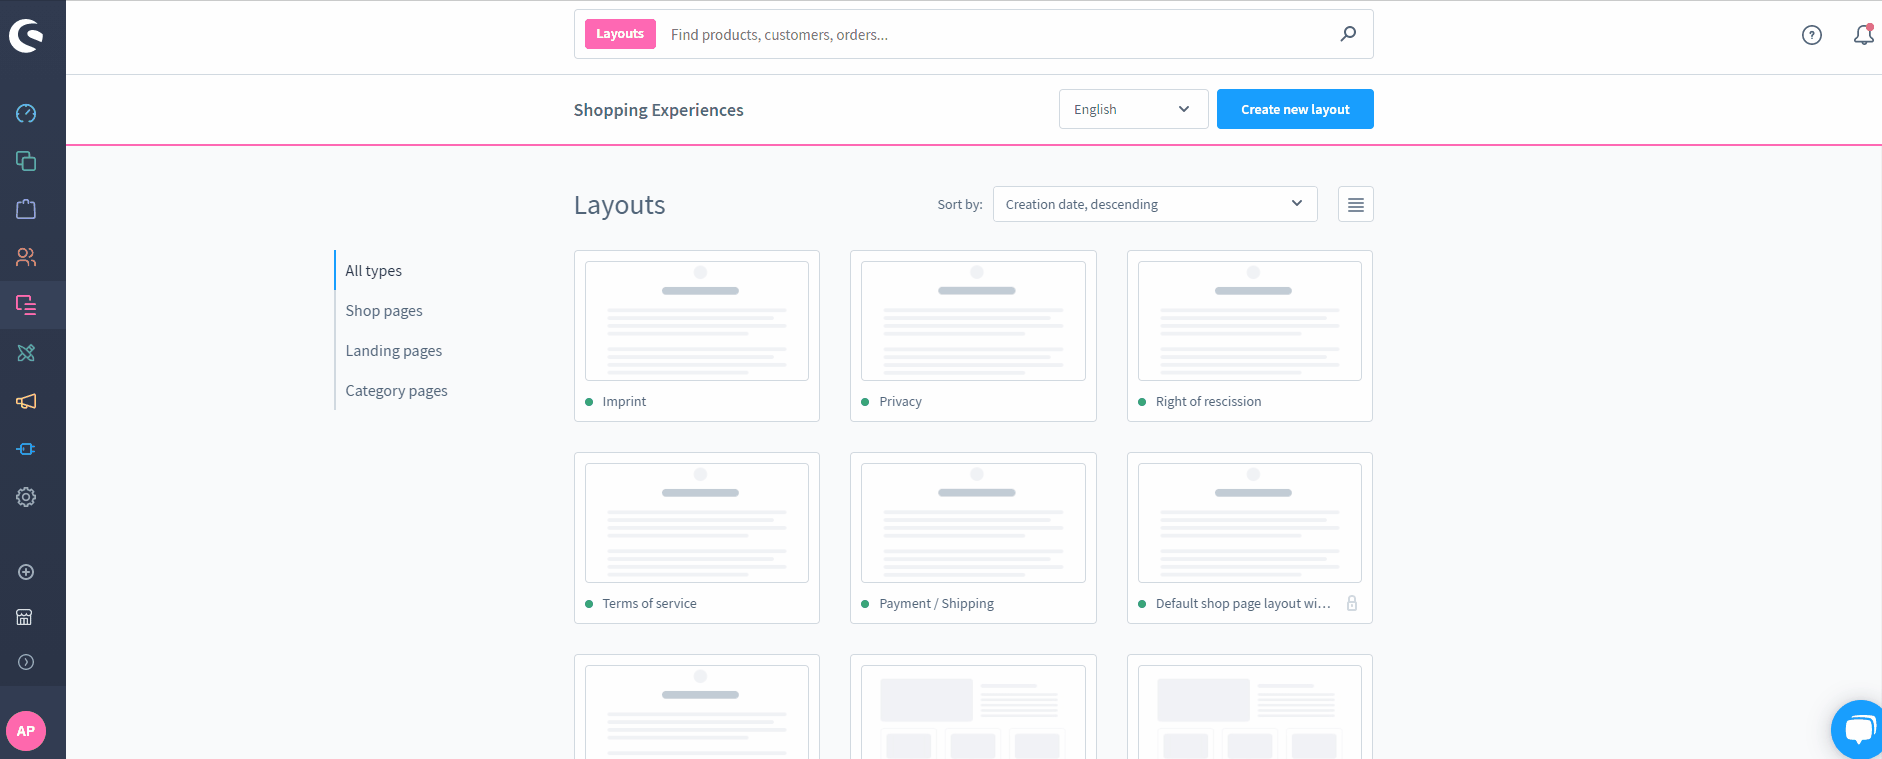
You can create homepage layouts in your Shopware 6 admin under Content -> Shopping Experiences.
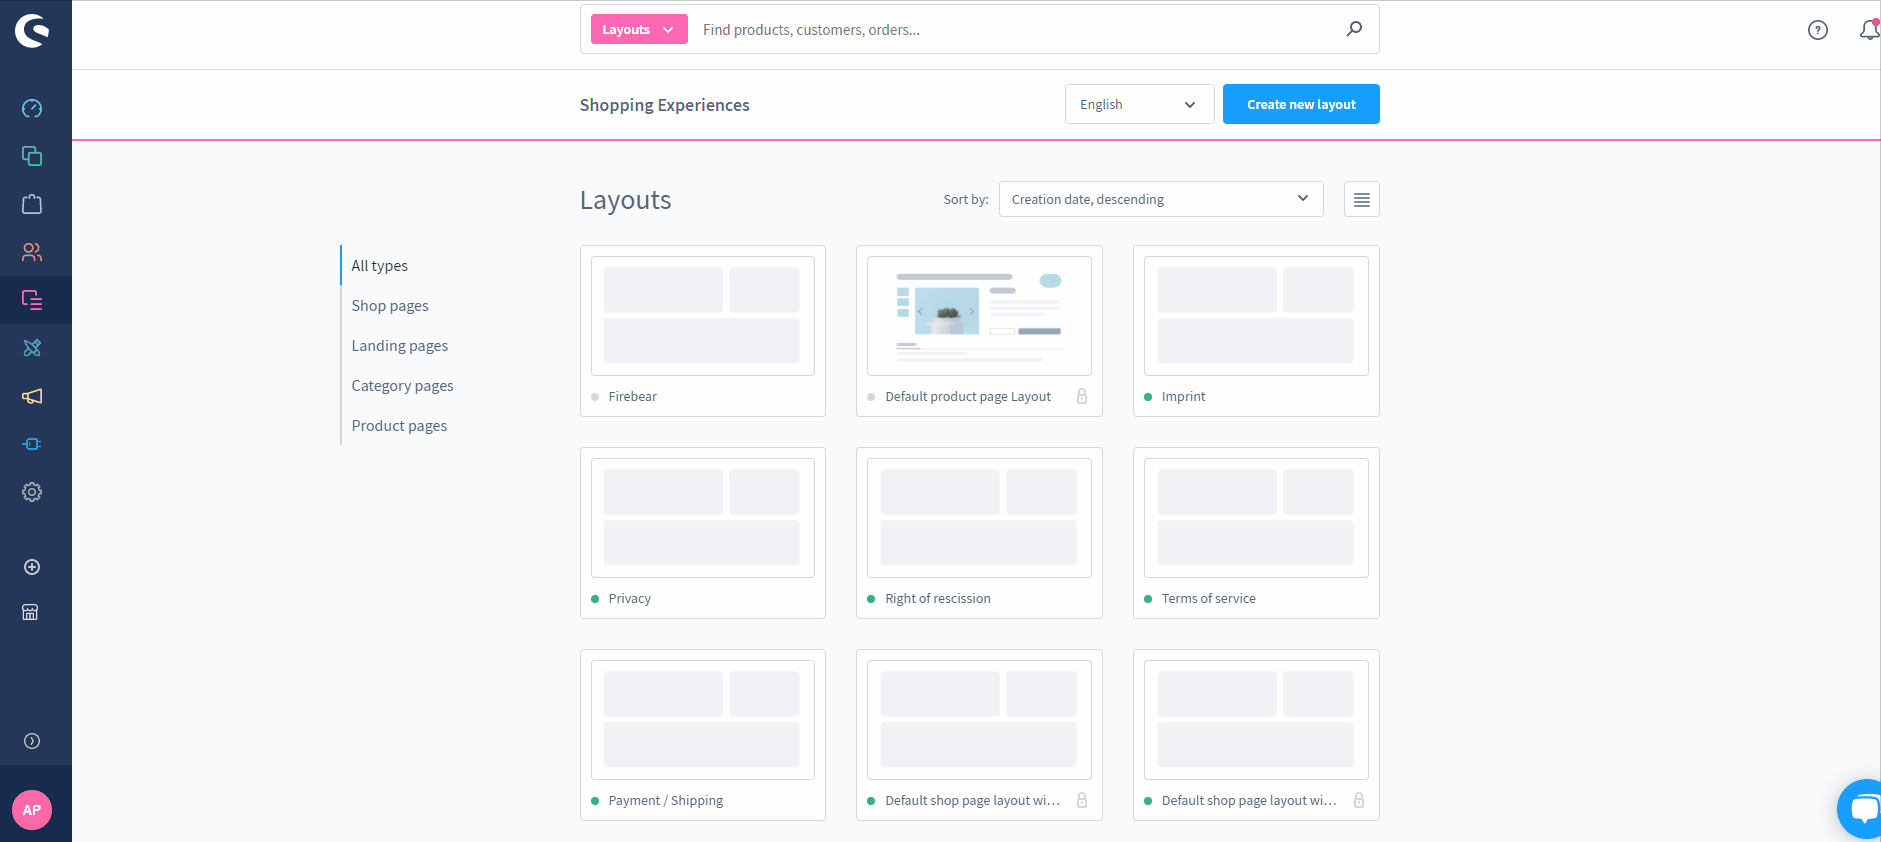
You can find the available options here or start creating a new layout by clicking on the Create new layout button. Click it, and the system will provide you with the following options:
- Shop page layout;
- Landing page layout;
- Listing page layout;
- Product page layout.
Choose a particular layout you want to create. In our case, it is a category/listing page layout.
Next, determine the structure of your future homepage. Note that you will be able to change it afterward.
As you can see, it is possible to create a home page with or without a sidebar. Depending on the selected option, design your Shopware 6 homepage layout. Hit the “+” button to add new elements.
We’ve decided to activate a sidebar for our homepage in our example. You can also select many other block categories and objects to enhance your e-commerce website with any elements that seem suitable. For instance, choose a product filter. Next, drag the selected block element to any free space in your layout.
Hit the Save button to finish with your homepage layout.
How to assign a layout to a homepage in Shopware 6
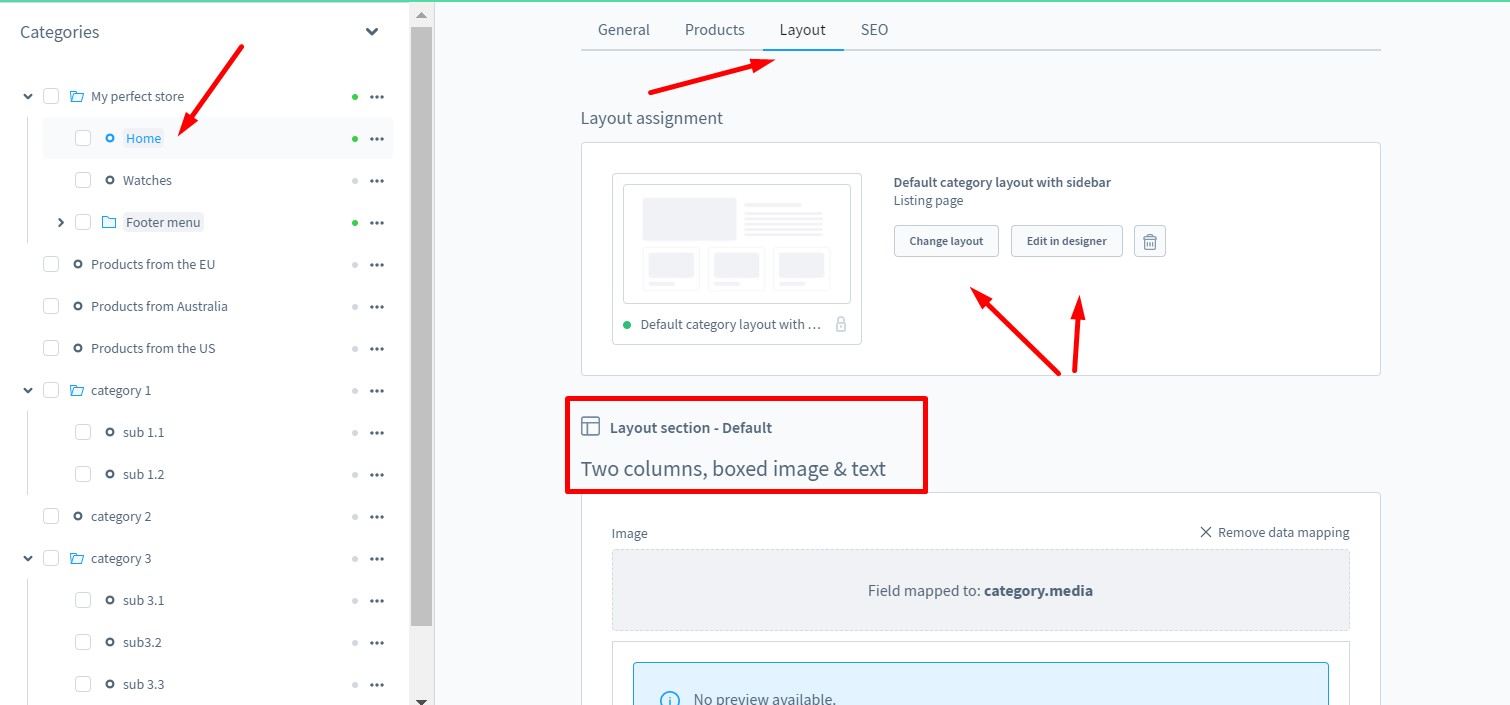
Go to Catalogues -> Categories to assign your new layout to a homepage. Choose your homepage in the category tree and go to its layout tab to assign the layout created in Shopping Experiences. Alternatively, you can click on the Create New Layout button and create a completely new layout right in the Shopping Experiences editor.
Select a layout to display all segments of the selected shopping experiences. Note that the content of the layout is displayed in the form of block groups by default. Although the type and number of blocks vary depending on the selected layout, you can apply changes right here without switching to the shopping experiences.
That’s how you design a homepage in Shopware 6. It is possible to apply the same algorithm to other store elements to adjust their frontend appearance.
Shopware 6 Essentials FAQ
How to create a Shopware account?
You won’t apply a new layout to your homepage if you don’t have a Shopware account. However, creating it is a matter of a few clicks. Visit the registration page, hit the Register Now link, and fill in the form to create a new account. After receiving a confirmation email, follow the instructions provided in it.
What about a Shopware ID?
You will receive a Shopware ID upon registration automatically. Next, you will need to create a Shopware store to configure its homepage.
What is Shopware master data?
All the information about your company and business, including physical addresses, phone numbers, and emails, is master data. The system requires it during the registration and configuration. However, it is not used on a homepage.
How to add a new Shopware shop?
You need to create a shop to work with a homepage. It is possible to add it to your merchant area. Click the corresponding link and choose the type of your new shop: a cloud storefront or an on-premise installation. Provide all the requested information.
How to add a payment method to your Shopware account?
You need to add a payment method to purchase themes and extensions. Note that a theme also impacts your homepage. You can add a payment method to purchase them under Basic Information -> Accounting. Select PayPal, credit card, or direct debit as a way to transfer funds to your account.
How to create a deposit in Shopware?
You need a deposit for purchasing commercial third-party extensions and themes associated with design changes. With a working payment method, go to your Merchant Area -> Shops, choose a shop to provide funds to, click Open Account Details, and transfer a deposit that covers the amount of your purchase.
How to purchase Shopware extensions?
It is possible to purchase extensions and themes to customize your homepage in two ways: on the Shopware Marketplace or within the Plugin Manager. Create a deposit in advance that equals the amount of your future purchase. Next, select a tool you want to buy and complete the checkout.
How to get support in Shopware?
You can get help regarding license inquiries via this email info@shopware.com or this phone number +49 2555 9288 50. Contact Shopware via financial.services@shopware.com and +49 2555 9288 510 to support accounting and financial issues.
How to automate import and export processes in Shopware 6?
If you need to manage recurring data transfers, pay attention to the Improved Import, Export & Mass Actions module. It lets you create schedules and automatically launches the corresponding import and export processes in the background afterward.
How to migrate to Shopware 6?
Use the Improved Import, Export & Mass Actions tool to simplify your migration to Shopware 6. The plugin can help you transfer data from your existing website based on another e-commerce platform or a previous Shopware version to Shopware 6. Note that we also offer export solutions for systems like Magento and Shopify so that you can simplify your data transfers between them and Shopware. for more information.
How to integrate Shopware 6 with external systems?
You can sync your Shopware 6 website with ERPs, CRMs, accounting tools, and other similar platforms with the Improved Import, Export & Mass Actions extension that can help you automate repetitive import and export processes using schedules. The extension also introduces mapping presets for modifying data according to the requirements of your Shopware store during import and the rules of the connected platform during export.
Related posts
 solution25: Your Trusted Shopware Agency in New York & Germany
 E-Commerce Impulse Buys Guide: Boost Your Sales with Effective Strategies and Smart Tools
 How to Import Products to Shopware 6 & Automatically Assign Them to Parent Categories: A Time-Saving Import Feature You Shouldn’t Miss
 How to Import & Export Shopware 6 Advanced Prices as Separate Entity
 New in Shopware 6 Product Import: Control Topseller Products with the markAsTopseller Field
 Take Full Control over Product Visibility in Shopware 6: Introducing the ‘Replace Product Sales Channels’ Feature for Import
 How to Boost Sales with Shopware 6 Cross Selling: The Ultimate 2025 Guide
 Shopify vs. Etsy: The Ultimate 2025 Showdown for Online Sellers + Checklist