
Exploring Shopware: Newsletter Recipients (Subscribers) in Shopware 6
![]()
Once again, we return to the Marketing section of the Shopware 6 administration. It contains not only promotions and discounts but also newsletter recipients or subscribers. In the following article, we explore the corresponding part of your admin and shed light on how to manage it. We explain where to find newsletter subscribers in the Shopware 6 administration. The overview of the corresponding section is at your disposal. Next, you will learn how to edit newsletter recipients in Shopware 6. And of course, we provide tips on how to preserve your current subscribers if you migrate from an old e-commerce storefront to Shopware 6. Let’s see how Shopware 6 newsletter recipients are represented within the system.

Note that we provide Shopware integration with external platforms. Contact our support for further information or try our Improved Import & Export Extension for Shopware.
Table of contents
- 1 Where to find newsletter recipients in Shopware 6
- 2 Newsletter Recipients Overview
- 3 How to Edit Newsletter Recipients in Shopware 6
- 4 How to Import Newsletter Recipients to Shopware 6
- 5 Shopware 6 Essentials FAQ
- 5.1 How to create a Shopware ID?
- 5.2 How to create a Shopware account?
- 5.3 What is Shopware master data?
- 5.4 How to add a shop in Shopware?
- 5.5 How to add a payment method to your Shopware account?
- 5.6 How to create a deposit in Shopware?
- 5.7 How to purchase Shopware extensions?
- 5.8 How to get support in Shopware?
- 5.9 How to migrate to Shopware 6?
- 5.10 How to automate import and export processes in Shopware 6?
- 5.11 How to integrate Shopware 6 with external systems?
You can find Shopware 6 newsletter subscribers as follows:
- Go to your Shopware 6 administration;
- Open its Marketing section;
- Proceed to Newsletter Recipients.
Newsletter Recipients Overview
The overview screen related to newsletter recipients contains a grid that lists all customers who subscribed for your newsletter. You can manage each record with the help of a context menu situated next to each entry. Shopware 6 lets you remove or edit newsletter recipients.

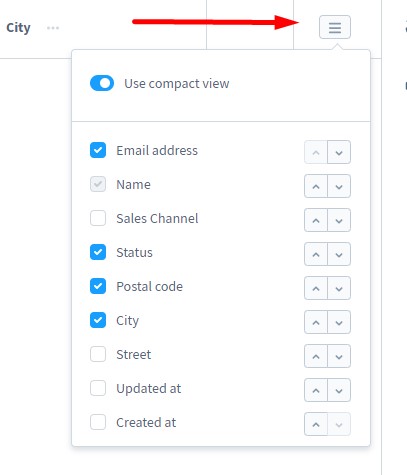
There is also the list settings button at your service. It lets you determine which information should be displayed in the grid and in what order.
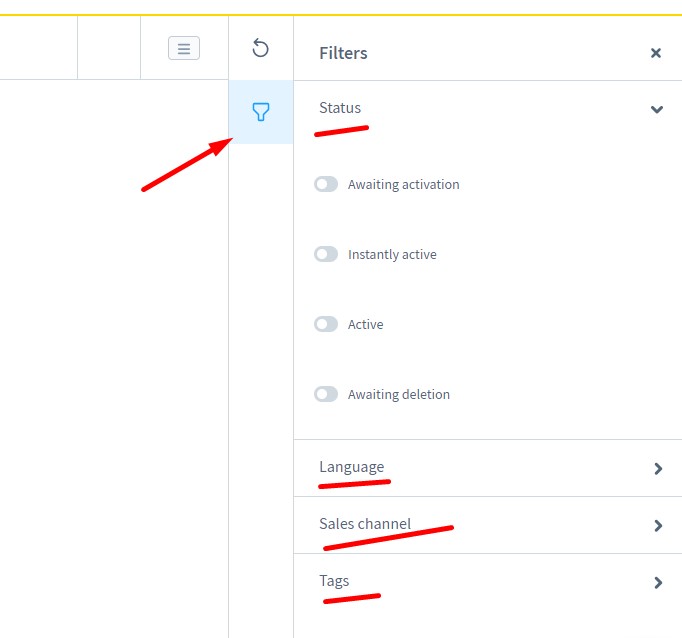
The filter section lets you limit the number of displayed entries according to the specified parameters.
How to Edit Newsletter Recipients in Shopware 6
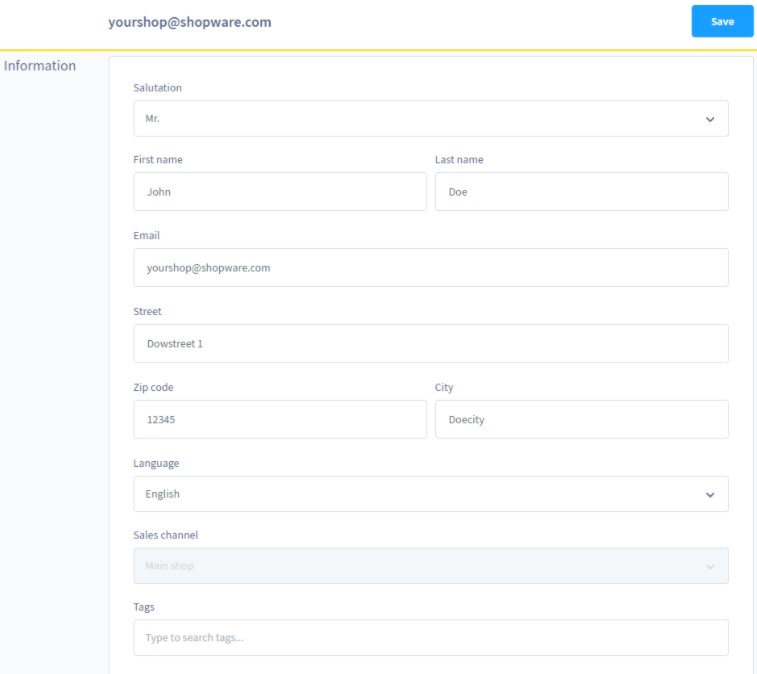
You can proceed to the editing screen of a newsletter subscriber via the context menu in the overview grid. The newly opened section lets you change such parameters as name, salutation, address, language, and email.
Besides, you can use the Tags entry field to store your own keywords to simplify the way you look for the particular subscriber in the admin: in the overview grid and while using the search function.
How to Import Newsletter Recipients to Shopware 6
With our team and the products we offer, you can simplify and automate various routine processes associated with Shopware 6 backend management. We let you replace various routine tasks with automated import and export processes. Contact our support for more details and try our . You can use it to import any entities to Shopware 6. The extension lets you create a cron-based schedule and assign it to any import and export job. As a result, all data transfers run in the background in a fully automated manner. Furthermore, if you work with external systems, Improved Import & Export offers an opportunity to create presets that map the external designations to ones used within your Shopware 6 database. These two features let you implement automated data transfers that eliminate various repetitive tasks. Please, consult our specialists before using the module for transferring newsletter recipients (subscribers) to Shopware 6.
Shopware 6 Essentials FAQ
How to create a Shopware ID?
You need to get a ShopwareID to start your e-commerce journey on the platform. The system provides it when you create your Shopware account. This process is described below.
How to create a Shopware account?
It is possible to create a Shopware account on a registration page via the Register Now link. Click it and provide the required data. Note that you will get a confirmation message via email.
What is Shopware master data?
Shopware master data is all the information you provide while creating a Shopware account. It combines company address, email, phone, name, etc.
How to add a shop in Shopware?
Go to your merchant area to launch a new shop in Shopware 6. The start screen’s right part contains a link that initiates this process. Click it and proceed to the next step where you need to choose between a cloud storefront or an on-premise installation. Specify information about your new shop and save changes.
How to add a payment method to your Shopware account?
Go to Basic Information -> Accounting to configure a payment method for internal Shopware purposes. You will need it to create deposits that enable you to purchase extensions and themes. The following three options are available: PayPal, credit card, direct debit.
How to create a deposit in Shopware?
An active payment method lets you create a deposit for purchasing themes and extensions. Go to your Merchant Area -> Shops, specify a shop to provide funds to, click Open Account Details, and transfer funds.
How to purchase Shopware extensions?
You can purchase extensions and themes on the Shopware Marketplace or in the Plugin Manager right after the deposit is created. Choose a tool your business requires and complete the purchase.
How to get support in Shopware?
Shopware lets you provide two types of inquiries. Questions regarding your account or license should be sent to info@shopware.com or +49 2555 9288 50. Questions about accounting and financial services should be sent to financial.services@shopware.com and +49 2555 9288 510.
How to migrate to Shopware 6?
Use the Improved Import & Export tool to migrate to Shopware 6. The module provides the ability to move core entities to your new website from any external platform or Shopware’s previous version. Furthermore, you can use the extension version for your current platform, to provide the corresponding exported data. The module automates and simplifies all the related synchronizations. Contact us for more information.
How to automate import and export processes in Shopware 6?
If you regularly provide data to partners of import information from external destinations, use the Improved Import & Export extension to automate these processes. It provides the ability to create a schedule per each data transfer. Consequently, the extension gets the ability to launch the corresponding import and export processes, following the time frames you set.
How to integrate Shopware 6 with external systems?
Integration with external platforms and tools is another cool thing the Improved Import & Export extension is responsible for. For example, you can integrate your store with ERPs, CRMs, accounting tools, etc. The module automates repetitive import and export processes and modifies data according to the requirements of your Shopware store upon import and the connected platforms upon export.
Related posts
 Shopware 6 Advanced Pricing Guide + Import Tutorial
 A Complete Guide to Shopify Customer Import
 Magento 2 B2B Company Guide: Revealing Company Structure & Import
 Reputon Amazon Importer Review: How to Connect Shopify to Amazon in a Few Clicks
 How To Bulk Import Products In Shopify: CSV Description & Step-By-Step Guide
 Adobe (Magento 2) Commerce and Cloud (Enterprise Edition) Specific Features
 How to Import Customers & Customer Addresses to Magento 2
 Amasty ChatGPT AI Content Generator for Magento 2