
Manual for NetSuite Integration Add-on for Magento 2 of Improved Import

This is an add-on of Improved Import and Export extension for Magento 2. With the NetSuite integration add-on, you can organize data exchange between your Magento 2 store and Oracle NetSuite ERP.

Table of contents
- 0.1 Installation and configuration
- 0.2 Installing Improved Import extension, NetSuite Add-on and PHP libraries for your Magento 2
- 1 User Guide
- 1.1 Import categories to Magento 2 store
- 1.2 Import product items to Magento 2 store
- 1.2.1 Configuring the Saved Search in the Netsuite System
- 1.2.2 Configuring the import job
- 1.2.3 ‘General Settings’ section of the job
- 1.2.4 ‘Import Settings’ section of the job
- 1.2.5 ‘Import Behavior’ section of the job
- 1.2.6 ‘Import Source’ section of the job
- 1.2.7 ‘Map Attributes’ section of the job
- 1.2.8 Tier price import
- 1.2.9 ‘Map categories’ section of the job
- 1.2.10 ‘Custom logic for creation of configurable products’ section of the job
- 1.2.11 Run import
- 1.3 Export simple products to NetSuite ERP
- 1.4 Import sales and orders to Magento 2 store
- 1.5 Export sales and orders to NetSuite ERP
- 1.5.1 Creating a new order in Magento
- 1.5.2 Configuring the Netsuite API Credentials
- 1.5.3 Configuring the export job
- 1.5.4 ‘General Settings’ section of the job
- 1.5.5 ‘Export Settings’ section of the job
- 1.5.6 Export Behavior section of the job
- 1.5.7 ‘Map Netsuite Custom Entity Fields’ section of the job
- 1.5.8 Export Source section of the job
- 1.5.9 Run export
- 1.6 Import customers to Magento 2 store
- 1.6.1 Configuring the Saved Search in the Netsuite System
- 1.6.2 Configuring the import job
- 1.6.3 ‘General Settings’ section of the job
- 1.6.4 ‘Import Settings’ section of the job
- 1.6.5 ‘Import Behavior’ section of the job
- 1.6.6 ‘Import Source’ section of the job
- 1.6.7 ‘Map Attributes’ section of the job
- 1.6.8 ‘Map Netsuite Customer Price Level’ section of the job
- 1.6.9 Run import
- 1.7 Export customers to Netsuite ERP
- 1.7.1 Configuring the Netsuite API Credentials
- 1.7.2 Configuring the export job
- 1.7.3 ‘General Settings’ section of the job
- 1.7.4 ‘Export Settings’ section of the job
- 1.7.5 ‘Export Behavior’ section of the job
- 1.7.6 ‘Export Source’ section of the job
- 1.7.7 ‘Map Netsuite Customer Price Level’ section of the job
- 1.7.8 ‘Map Netsuite Custom Entity Fields’ section of the job
- 1.7.9 Run export
- 1.8 Export customers to Netsuite ERP by Magento Queues for Magento 2.3 CE+
Installation and configuration
Creating the API credentials in the Netsuite system
It is necessary to create appropriate credentials in the NetSuite ERP system before importing entities to Magento. To start configuration, go to and follow these steps:
Create a New Role
- Go to Setup > Users/Roles > Manage Roles > New
- Specify the Role Name
- Set the following permissions for the Role:
| Type | Permissions |
| Transactions – Sales Order | Level Full |
| Transactions – Adjust Inventory | Level Full |
| Lists – Customers | Level Full |
| Lists – Documents and Files | Level Full |
| Lists – Item/Category Layouts | Level Full |
| Lists – Items | Level Full |
| Lists – Presentation Categories | Level Full |
| Setup – Login using Access Tokens | Level Full |
| Setup – Web Services | Level Full |
- Click the ‘Save’ button
Create a New Employee
- Go to Lists > Employees > Employees > New
- Specify the required Employee attributes
- Set the role you have created for this very Employee
Create a New Integration
- Go to Setup > Integration > Manage Integrations > New
- Specify the required Integration attributes
- Set Authentication to ‘Token-based Authentication’ option
- Remember consumerKey and consumerSecret parameters
Create a new Access Token
- Go to Setup > Users/Roles > Access Tokens > New
- Click ‘New Access Token’ button
- Specify the required attributes
- Remember token and tokenSecret parameters.
Installing Improved Import extension, NetSuite Add-on and PHP libraries for your Magento 2
Improved Import extension and NetSuite Add-on
- Backup your web directory and Magento 2 store database
- Download Improved Import and NetSuite Add-on installation packages from your Firebear Studio account ‘Downloads’ section
- Copy the contents of the packages into /app/code/Firebear/ImportExport and to /app/code/Firebear/PlatformNetsuite folders. Make sure to create folders if required
- Navigate to your store root folder in the SSH console of your server:
1cd path_to_the_store_root_folder - Run the setup upgrade command:
1php -f bin/magento setup:upgrade - Run the static content deploy command:
1php -f bin/magento setup:static-content:deploy - Run the cache clean command:
1php -f bin/magento cache:clean
Netsuite PHP library
- Navigate to your store root folder in the SSH console of your server:
1cd path_to_the_store_root_folder - Run the command:
1composer require firebear/netsuite-php
User Guide
Import categories to Magento 2 store
Configuring the import job
- Go to your Magento 2 store admin panel
- Go to System > Improved Import/Export > Import Jobs
- Click ‘Add New Job’ button
‘General Settings’ section of the job
- Go to the General Settings section of the import job
- Specify the ‘Job Title’
‘Import Settings’ section of the job
- Go to the Import Settings section
- Set ‘Use API’ option to ‘Yes’
- In the ‘Entity’ field select ‘Categories’
- In the ‘Select A Platform’ field select ‘NetSuite Categories’
‘Import Behavior’ section of the job
- Go to the Import Behavior section
- In the ‘Import Behavior’ field select ‘Add/Update’
- Set ‘Category Level separated by’ field to : (colon)
Import Source section of the job
- Go to the Import Source section
- Fill in the ‘Saved search id’ field. It is necessary to create a saved search with items in the Netsuite system. All saved search data will be available for the import.
- Fill in the ‘Start Import from Page’ field
- Fill in the ‘Stop Import on Page’ field
- Fill in the ‘Endpoint’ field
- Fill in the ‘Host’ field
- Fill in the ‘Netsuite Account id to the Account’ field
- Fill in the ‘Consumer Key’ field
- Fill in the ‘Consumer Secret’ field
- Fill in the ‘Token’ field
- Fill in the ‘Token Secret’ field
- Click the ‘Validate file’ button
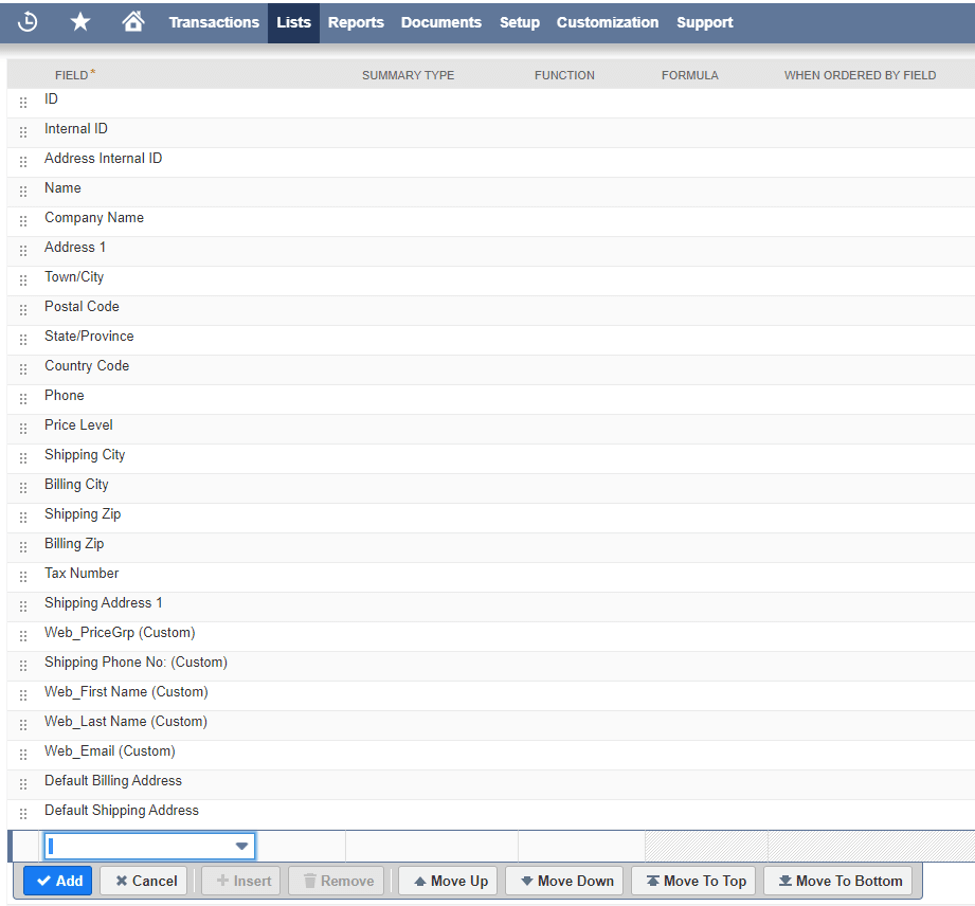
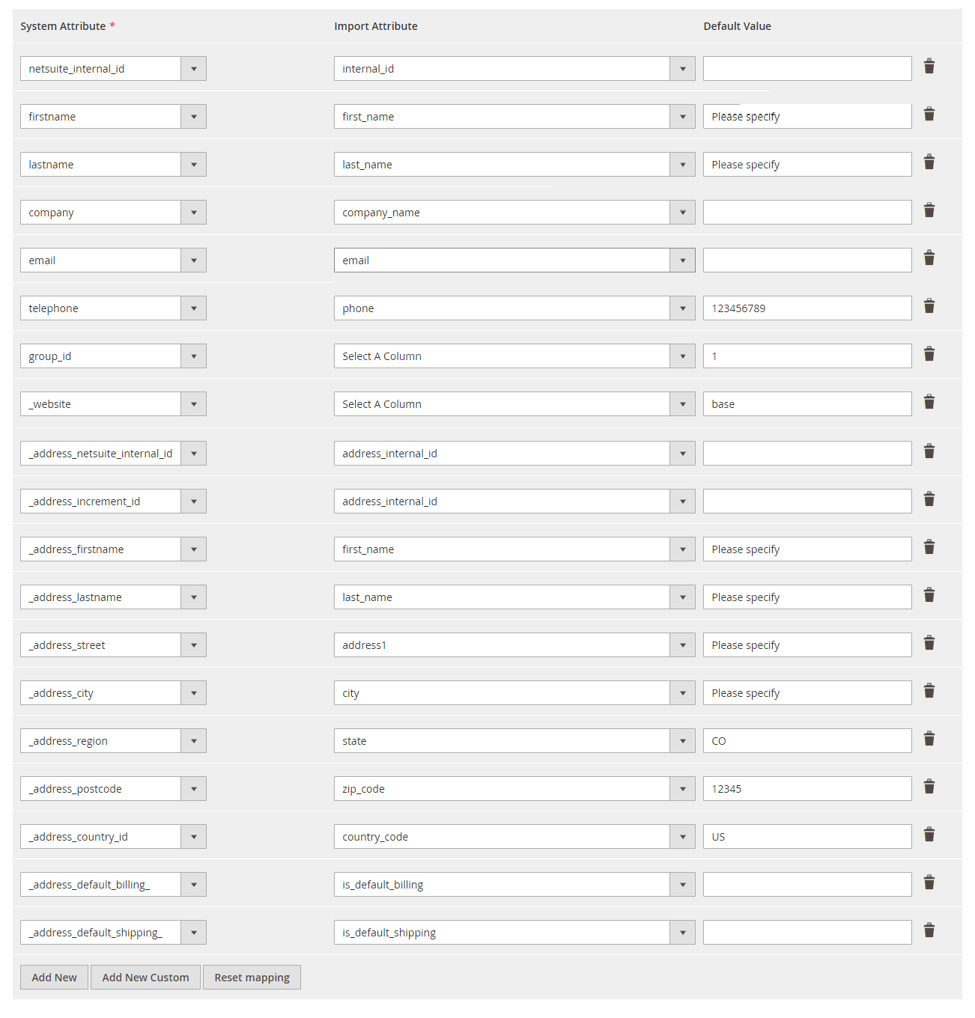
Map Attributes section of the job
- Go to the Map Attributes section
- Click the ‘Add New’ button and specify the attribute mapping
For example:

Run import
Click ‘Save & Run’ button to run the import procedure.
Import product items to Magento 2 store
Configuring the Saved Search in the Netsuite System
- Navigate into your NetSuite ERP and go to Lists > Search > Saved Searches
- Create a new search with the ‘Item search’ type
- In the search results tab, specify all the attributes which you will need imported to Magento 2
For example:
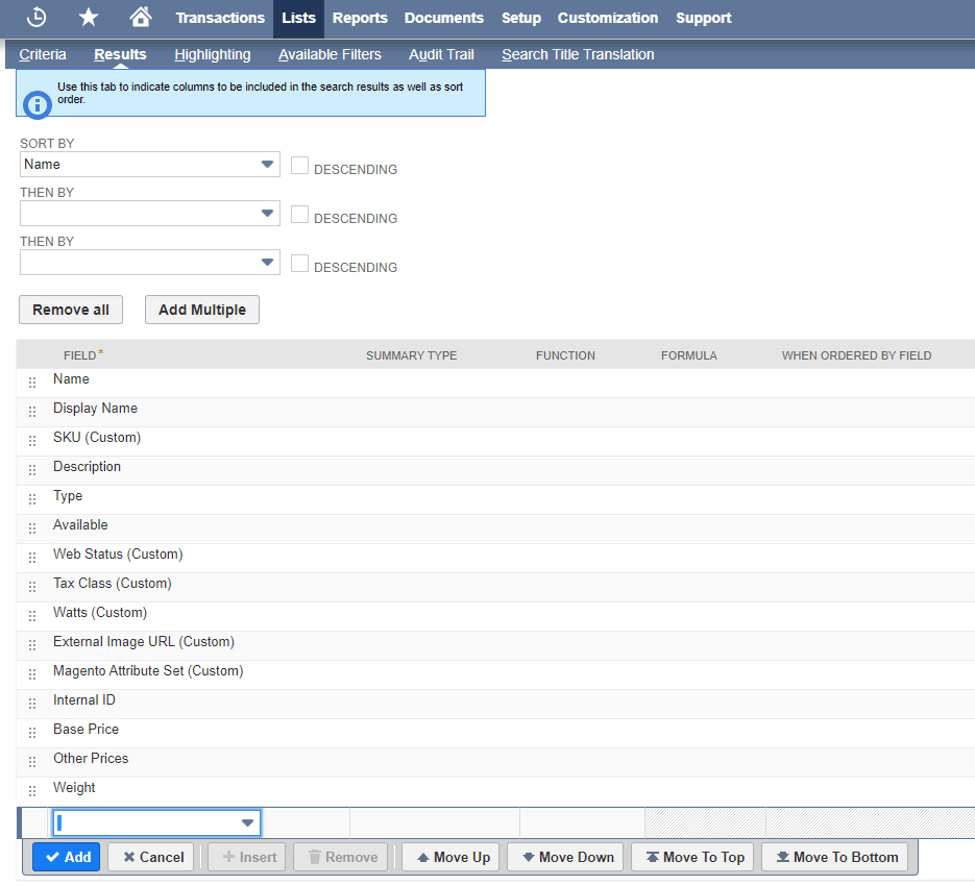
In the screenshot above you can see the fields which will be imported to Magento 2 as product attributes.
Configuring the import job
- Go to your Magento 2 store admin panel
- Go to System > Improved Import/Export > Import Jobs
- Click ‘Add New Job’ button
‘General Settings’ section of the job
- Go to the General Settings section of the import job
- Specify the ‘Job Title’
‘Import Settings’ section of the job
- Go to the Import Settings section
- Set ‘Use API’ option to ‘Yes’
- In the ‘Entity’ field select ‘Products’
- In the ‘Select A Platform’ field select ‘Netsuite Items’ option
‘Import Behavior’ section of the job
- Go to the Import Behavior section
- In the ‘Import Behavior’ field select ‘Add/Update’
- Set ‘Category Level separated by’ field to > (greater-than sign)
‘Import Source’ section of the job
- Go to the Import Source section
- Fill in the ‘Saved search id’ field. It is necessary to create a saved search with items in the Netsuite system. All saved search data will be available for the import.
- Fill in the ‘Start Import from Page’ field
- Fill in the ‘Stop Import on Page’ field
- Fill in the ‘Endpoint’ field
- Fill in the ‘Host’ field
- Fill in the ‘Netsuite Account id to the Account’ field
- Fill in the ‘Consumer Key’ field
- Fill in the ‘Consumer Secret’ field
- Fill in the ‘Token’ field
- Fill in the ‘Token Secret’ field
- Click the ‘Validate file’ button
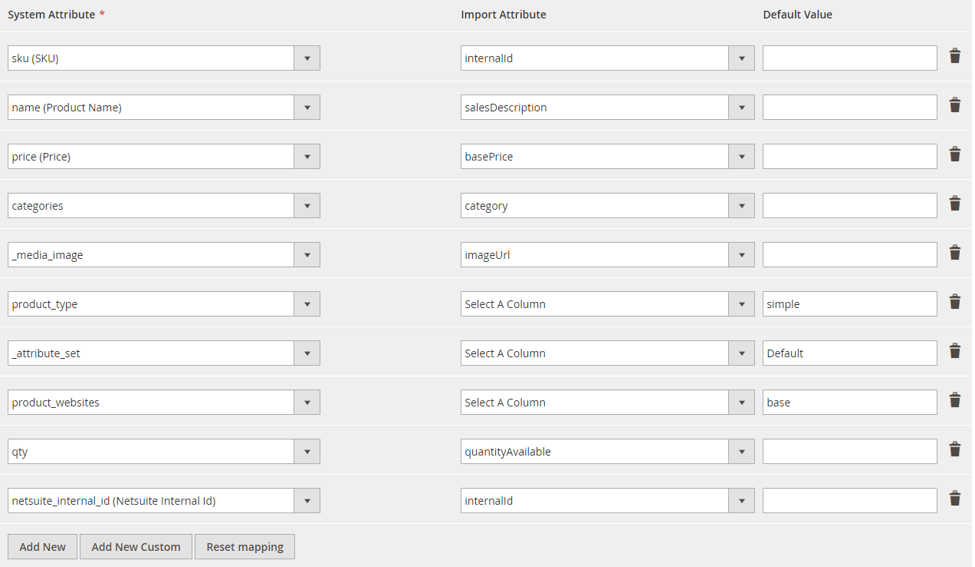
‘Map Attributes’ section of the job
- Go to the Map Attributes section
- Click the ‘Add New’ button and specify the attribute mapping
For example:
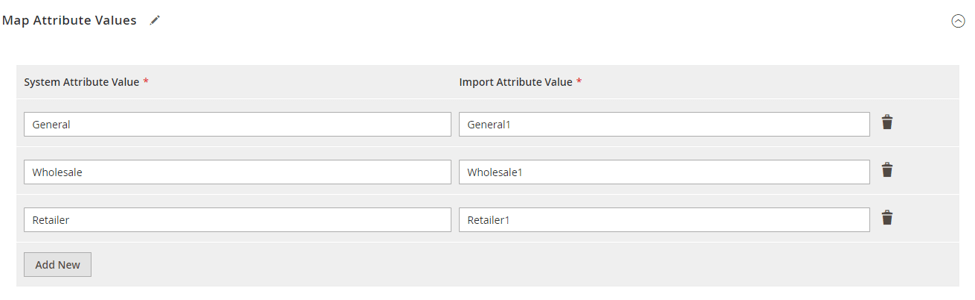
Tier price import
- Make sure the NetSuite saved search you have composed contains the attribute ‘Other Prices’ – this attribute is used to store tier prices
- Go to the Map attribute values section of the import job
- Specify the customer group mapping if needed
For example:
‘Map categories’ section of the job
- Go to the Map categories section
- Select a Root Category to which the product categories will be added
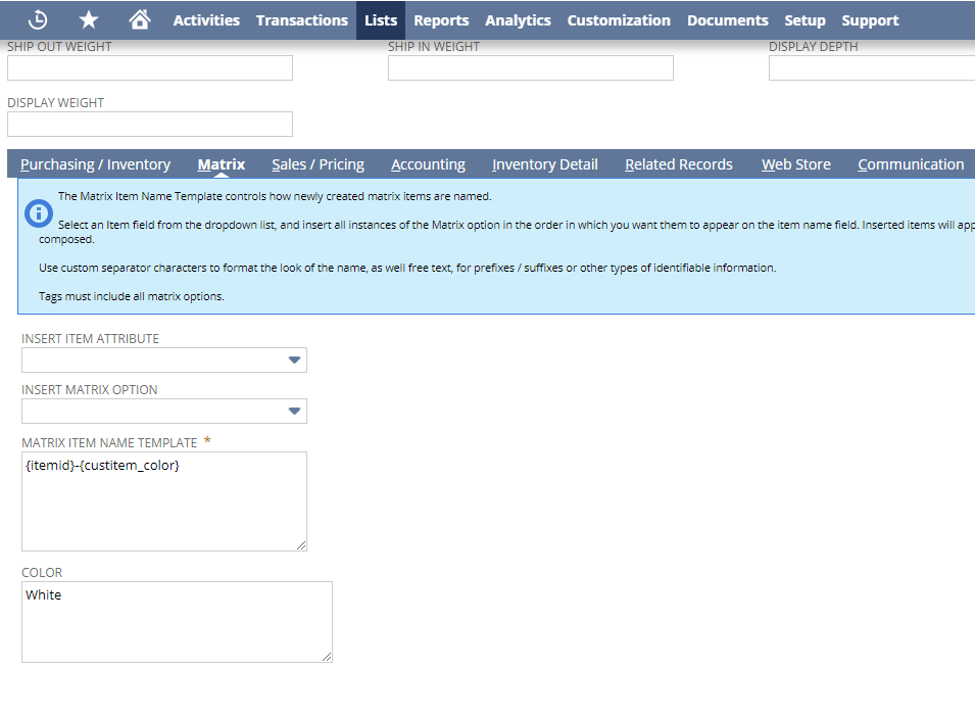
‘Custom logic for creation of configurable products’ section of the job
- Create a ‘Lot Numbered Assembly/Bill of Materials Items’ in the Netsuite system
- Specify matrix item name template option like as per the example below
{itemid}-{custitem_attribute}
For example:
- Go to the Map Attributes section of the import job and map the ‘Netsuite Matrix item attribute’ to the configurable product attribute you will be using to create configurable products inside your Magento 2 store
- Go to Custom logic for creation of configurable products section of the import job
- Set the section settings as per the example below
For example:

Run import
Click ‘Save & Run’ button to run the import procedure.
Export simple products to NetSuite ERP
Configuring the Netsuite API Credentials
- Go to the Magento 2 admin panel
- Go to Stores > Settings > Configuration
- Go to Firebear Studio > Import/Export > Netsuite Integration Details
- Fill in the ‘Endpoint’ field
- Fill in the ‘Host’ field
- Fill in the ‘Netsuite Account id to the Account’ field
- Fill in the ‘Consumer Key’ field
- Fill in the ‘Consumer Secret’ field
- Fill in the ‘Token’ field
- Fill in the ‘Token Secret’ field
- Click ‘Save Config’ button
- Go to System > Tools > Cache Management
- Refresh the ‘Configuration Cache’
Configuring the export job
- Go to the admin panel
- Go to System > Improved Import/Export > Export Jobs
- Click the ‘Add New Job’ button
‘General Settings’ section of the job
- Go to the General Settings section
- Specify the ‘Job Title’
‘Export Settings’ section of the job
- Go to the Export Settings section
- In the ‘Entity’ field select ‘Products’
‘Export Behavior’ section of the job
- Go to the Export Behavior section
- Set ‘File Format’ field to ‘Netsuite product’
- Specify ‘Netsuite Image Folder Internal Id’ to import export product images to a special folder. The folder must be created in the Netsuite system. To get the folder id, open the Netsuite system and go to Documents > Files > File Cabinet.
- Specify ‘Netsuite Location Internal Id’ to import product qty to a specific location. To create a location record open the Netsuite system and go to Setup > Company > Classifications > Locations > New.
- Specify ‘Netsuite Subsidiary Internal Id’. To manage a Subsidiary open the Netsuite system and go to Setup > Other Setup > Subsidiaries.
- Specify ‘Netsuite Tax Schedule Internal Id’. To manage a Tax Schedules open the Netsuite system and go to Financial > Lists > Tax Schedules.
- Specify ‘Netsuite Tax Code Internal Id’. To manage a Tax Codes open the Netsuite system and go to Setup > Accounting > Tax Codes.
- Specify ‘Net Currency Internal Id’. To manage currencies open the Netsuite system and go to Financial > Lists > Currencies.
- Specify ‘Export Product Images’ option to export product images to Netsuite.
‘Export Source’ section of the job
- Set ‘Export Source’ field to ‘File’
- Fill in the ‘File Path’ field
Run export
Click ‘Save & Run’ button to run the export procedure. Check results on the Netsuite after export has been finished.
Import sales and orders to Magento 2 store
The order status labels MUST MATCH on both Magento 2 and Netsuite systems. To create a custom Magento status go to Stores > Settings > Order Status.
Configuring the import job
- Go to your Magento 2 store admin panel
- Go to System > Improved Import/Export > Import Jobs
- Click ‘Add New Job’ button
‘General Settings’ section of the job
- Go to the General Settings section of the import job
- Specify the ‘Job Title’ field
‘Import Settings’ section of the job
- Go to the Import Settings section
- Set ‘Use API’ option to ‘Yes’
- In the ‘Entity’ field select ‘Orders’
- In the ‘Select A Platform attribute’ field select ‘Netsuite Orders’
‘Import Behavior’ section of the job
- Go to the Import Behavior section
- In the ‘Import Behavior’ field select ‘Add/Update’
‘Import Source’ section of the job
- Go to the Import Source section
- Fill in the ‘Endpoint’ field
- Fill in the ‘Host’ field
- Fill in the ‘Netsuite Account id to the Account’ field
- Fill in the ‘Consumer Key’ field
- Fill in the ‘Consumer Secret’ field
- Fill in the ‘Token’ field
- Fill in the ‘Token Secret’ field
- Click the ‘Validate file’ button
‘Map Attributes’ section of the job
- Go to the Map Attributes section
- Click the ‘Add New’ button and specify the attribute mapping
For example:

Run import
Click ‘Save & Run’ button to run the import procedure.
Export sales and orders to NetSuite ERP
Creating a new order in Magento
Go to the Magento 2 store admin panel or frontend and create a new order.
Configuring the Netsuite API Credentials
- Go to the Magento 2 admin panel
- Go to Stores > Settings > Configuration
- Go to Firebear Studio > Import/Export > Netsuite Integration Details
- Fill in the ‘Endpoint’ field
- Fill in the ‘Host’ field
- Fill in the ‘Netsuite Account id to the Account’ field
- Fill in the ‘Consumer Key’ field
- Fill in the ‘Consumer Secret’ field
- Fill in the ‘Token’ field
- Fill in the ‘Token Secret’ field
- Click ‘Save Config’ button
- Go to System > Tools > Cache Management
- Refresh the ‘Configuration Cache’
Configuring the export job
- Go to the admin panel
- Go to System > Improved Import/Export > Export Jobs
- Click the Add New Job button
‘General Settings’ section of the job
- Go to the General Settings section
- Specify the ‘Job Title’
‘Export Settings’ section of the job
- Go to the Import Settings section
- In the ‘Entity’ field select ‘Order’
Export Behavior section of the job
- Go to the Export Behavior section
- Set ‘File format’ field to ‘Netsuite order’
- Specify ‘Netsuite Subsidiary Internal Id’. To manage a Subsidiary open the Netsuite system and go to Setup > Other Setup > Subsidiaries.
- Specify ‘Netsuite Customers Sales Rep Internal Id’. To manage Employees open the Netsuite system and go to Lists > Employees.
- Specify ‘Netsuite Customers Category Internal Id’. To manage a Customer Categories open the Netsuite system and go to Setup > Accounting > Accounting Lists.
- Specify ‘Netsuite Customers Terms Internal Id’. To manage Customer Terms open the Netsuite system and go to Setup > Accounting > Accounting Lists.
- Specify ‘Default Netsuite Customers Price Level Internal Id’. To manage Customer Price Levels open the Netsuite system and go to Setup > Accounting > Accounting Lists.
- Specify ‘Netsuite Order Department Internal Id’. To manage a Departments open the Netsuite system and go to Setup > Company > Classifications > Departments.
- Specify ‘Netsuite Order Location Internal Id’. To manage a Locations open the Netsuite system and go to Setup > Company > Classifications > Locations.
- Specify ‘Default Netsuite Order Shipping Item Internal Id’. To manage a Shipping Items open the Netsuite system and go to Lists > Accounting > Shipping Items.
- Check ‘Order’, ‘Items of Order’, ‘Addresses options for the Order’ entities attribute
‘Map Netsuite Custom Entity Fields’ section of the job
The section allows you to map the Magento 2 order attributes with Netsuite Transaction Body Fields.
For example:

Export Source section of the job
- Set ‘Export Source’ field to ‘File’
- Fill in the ‘File Path’ field
Run export
Click ‘Save & Run’ button to run the export procedure. Check results on the Netsuite after export has been finished.
Import customers to Magento 2 store
Configuring the Saved Search in the Netsuite System
- Navigate into your NetSuite ERP and go to Lists > Search > Saved Searches
- Create a new search with the ‘Customer search’ type
- In the search results tab, specify all the attributes which you will need imported to Magento 2
For example:
Configuring the import job
- Go to your Magento 2 store admin panel
- Go to System > Improved Import/Export > Import Jobs
- Click ‘Add New Job’ button
‘General Settings’ section of the job
- Go to the General Settings section of the import job
- Specify the ‘Job Title’
‘Import Settings’ section of the job
- Go to the Import Settings section
- Set ‘Use API’ option to ‘Yes’
- In the ‘Entity’ field select ‘Customers And Addresses’
- In the ‘Select A Platform’ field select ‘Netsuite Customers’ option’
‘Import Behavior’ section of the job
- Go to the Import Behavior section
- In the ‘Import Behavior’ field select ‘Add/Update’
‘Import Source’ section of the job
- Go to the Import Source section
- Fill in the ‘Saved search id’ field. It is necessary to create a saved search with items in the Netsuite system. All saved search data will be available for the import.
- Fill in the ‘Start Import from Page’ field
- Fill in the ‘Stop Import on Page’ field
- Fill in the ‘Endpoint’ field
- Fill in the ‘Host’ field
- Fill in the ‘Netsuite Account id to the Account’ field
- Fill in the ‘Consumer Key’ field
- Fill in the ‘Consumer Secret’ field
- Fill in the ‘Token’ field
- Fill in the ‘Token Secret’ field
- Click the ‘Validate file’ button
‘Map Attributes’ section of the job
- Go to the Map Attributes section
- Click the ‘Add New’ button and specify the attribute mapping
For example:
‘Map Netsuite Customer Price Level’ section of the job
The section allows you to map the Magento 2 customer groups with Netsuite ‘Customer Price Level’ attribute.
For example:
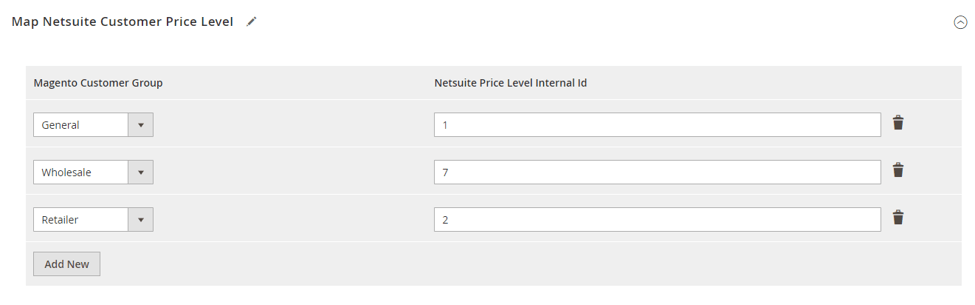
To manage a Customer Price Levels open the Netsuite system and go to Setup > Accounting > Accounting Lists.
Run import
Click ‘Save & Run’ button to run the import procedure.
Export customers to Netsuite ERP
Configuring the Netsuite API Credentials
- Go to the Magento 2 admin panel
- Go to Stores > Settings > Configuration
- Go to Firebear Studio > Import/Export > Netsuite Integration Details
- Fill in the ‘Endpoint’ field
- Fill in the ‘Host’ field
- Fill in the ‘Netsuite Account id to the Account’ field
- Fill in the ‘Consumer Key’ field
- Fill in the ‘Consumer Secret’ field
- Fill in the ‘Token’ field
- Fill in the ‘Token Secret’ field
- Click ‘Save Config’ button
- Go to System > Tools > Cache Management
- Refresh the ‘Configuration Cache’
Configuring the export job
- Go to the admin panel
- Go to System > Improved Import/Export > Export Jobs
- Click the ‘Add New Job’ button
‘General Settings’ section of the job
- Go to the General Settings section
- Specify the ‘Job Title’
‘Export Settings’ section of the job
- Go to the Export Settings section
- In the ‘Entity’ field select ‘Customer addresses’
‘Export Behavior’ section of the job
- Go to the Export Behavior section
- Set ‘File Format’ field to ‘Netsuite customer’
- Specify ‘Netsuite Subsidiary Internal Id’. To manage a Subsidiary open the Netsuite system and go to Setup > Other Setup > Subsidiaries.
- Specify ‘Netsuite Customers Sales Rep Internal Id’. To manage a Employees open the Netsuite system and go to Lists > Employees.
- Specify ‘Netsuite Customers Category Internal Id’. To manage a Customer Categories open the Netsuite system and go to Setup > Accounting > Accounting Lists.
- Specify ‘Netsuite Customers Terms Internal Id’. To manage a Customer Terms open the Netsuite system and go to Setup > Accounting > Accounting Lists.
- Specify ‘Default Netsuite Customers Price Level Internal Id’. To manage a Customer Price Levels open the Netsuite system and go to Setup > Accounting > Accounting Lists.
‘Export Source’ section of the job
- Set ‘Export Source’ field to ‘File’
- Fill in the ‘File Path’ field
‘Map Netsuite Customer Price Level’ section of the job
The section allows you to map the Magento 2 customer groupы with the Netsuite ‘Customer Price Level’ attribute.
For example:

To manage a ‘Customer Price Levels’ open the Netsuite system and go to Setup > Accounting > Accounting Lists.
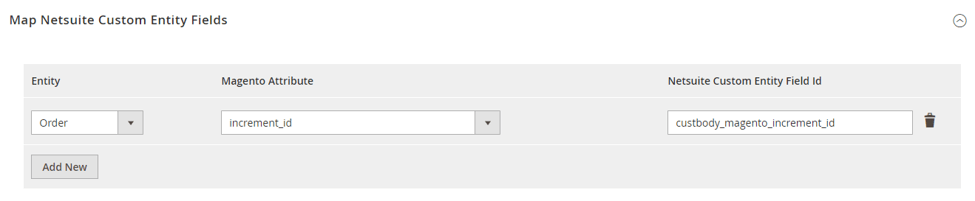
‘Map Netsuite Custom Entity Fields’ section of the job
The section allows you to map the Magento 2 order attributes with Netsuite ‘Transaction Body Fields’.
For example:
Run export
Click ‘Save & Run’ button to run the export procedure. Check results on the Netsuite after export has been finished.
Export customers to Netsuite ERP
by Magento Queues for Magento 2.3 CE+
Configuring the Netsuite API Credentials
- Go to the Magento 2 admin panel
- Go to Stores > Settings > Configuration
- Go to Firebear Studio > Import/Export > Netsuite Integration Details
- Set ‘Customers Export to the Netsuite’ option to ‘Yes’
- Fill in the ‘Endpoint’ field
- Fill in the ‘Host’ field
- Fill in the ‘Netsuite Account id to the Account’ field
- Fill in the ‘Consumer Key’ field
- Fill in the ‘Consumer Secret’ field
- Fill in the ‘Token’ field
- Fill in the ‘Token Secret’ field
- Click ‘Save Config’ button
- Go to System > Tools > Cache Management
- Refresh the ‘Configuration Cache’
Configuring Magento 2 cron
‘Customers and addresses’ data will be automatically imported to the Netsuite by Magento queues extension. To do this, you need to run Magento сron on the server.
More info:
Export customer data
- Register a new customer at your Magento 2 store
- Add a new address for the newly created customer either billing or shipping
- ‘Customers and addresses’ data will be automatically imported to Netsuite