
Exploring Shopware: Delivery Times in Shopware 6
![]()
It is always essential to inform your customers about all the nuances of their purchases, and the delivery date is not an exception. The more accurate it is, the more satisfied your customers are. In the following article, we describe the delivery times of Shopware 6. It is a separate section of settings available in the administration. The platform lets you notify your prospects about a period used to deliver the desired items. As a store administrator, you get the ability to add new delivery times for Shopware 6, edit and delete the existing intervals, or assign the created periods to products. It is even possible to configure the delivery date display in a shopping cart. In the following article, you will learn how to master all these aspects. So, let’s see what Shopware 6 delivery times are.

Note that we provide Shopware integration with external platforms. Contact our support for further information or try our Improved Import & Export Extension for Shopware.
Table of contents
Shopware 6 Delivery Times Explained
As we’ve just mentioned, Shopware 6 introduces the delivery times function to provide you with an instrument to inform customers about the expected delivery times of each particular product. The corresponding information usually displays on a product page.
Delivery Times in Shopware 6 Admin
The Delivery Times screen is situated in the primary settings section of your administration. You can find it as follows:
- Go to your Shopware 6 administration;
- Open its main menu;
- Proceed to the Settings section;
- Open the Shop subsection;
- Hit the Delivery Times button.
You will see the following screen:
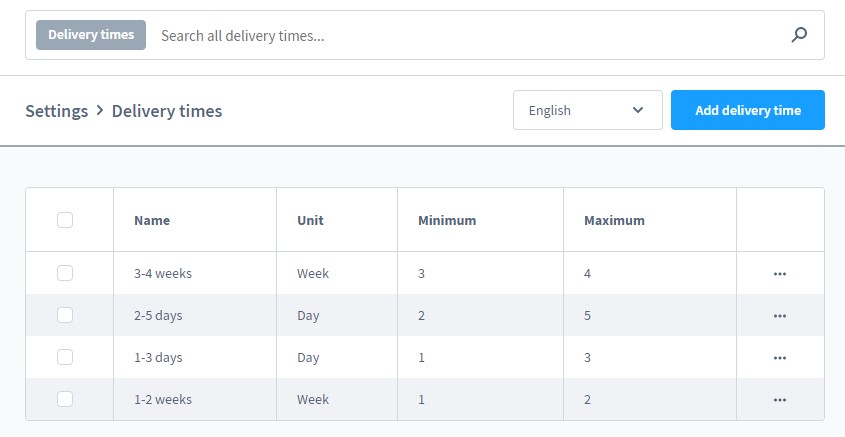
It lets you view the minimum/maximum delivery time in each interval. Besides, it is possible to edit or delete the existing transportation periods.
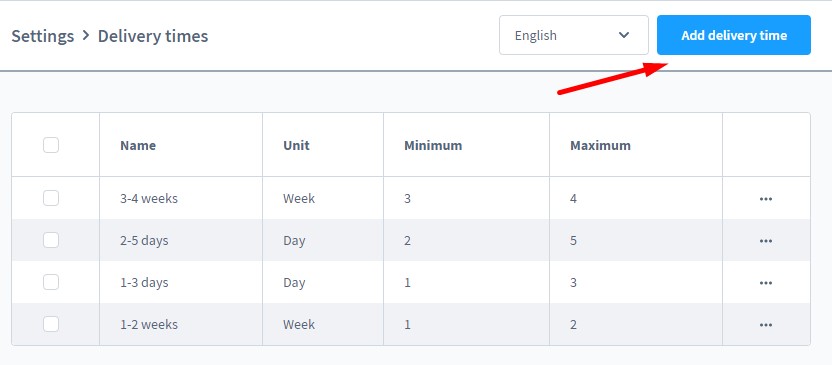
Creating Delivery Times in Shopware 6
To create new delivery times, go to Settings -> Shop -> Delivery times and hit the corresponding button.
The system will redirect you to a new screen, where you can specify the following information:
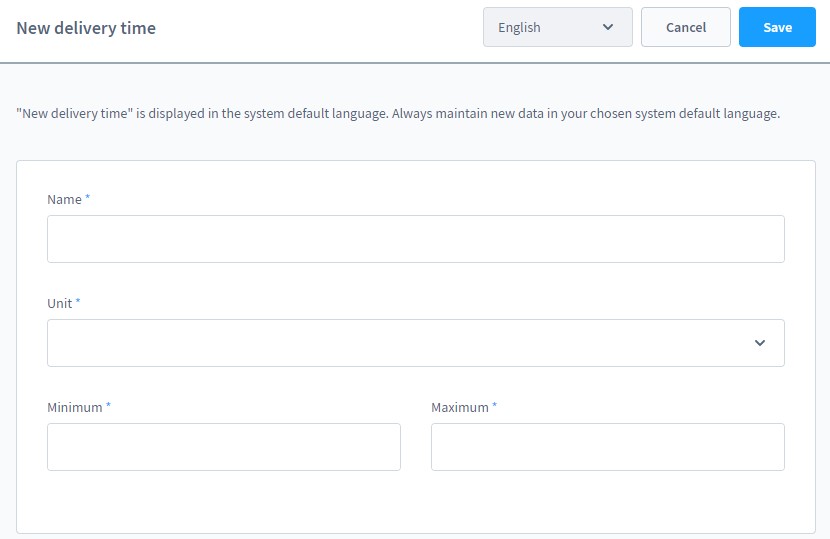
Provide the name of your new interval. Shopware 6 uses it to display the delivery time on the product details page. After that, you need to take care of dynamic calculations that take place in the shopping cart and checkout. Specify the information unit. The system lets you use days, weeks, months, or years. After that, you need to set up a minimum and maximum interval. Note that only integers are relevant. Shopware 6 relies on this information to determine delivery dates automatically.
Assigning a Delivery Time to a Product
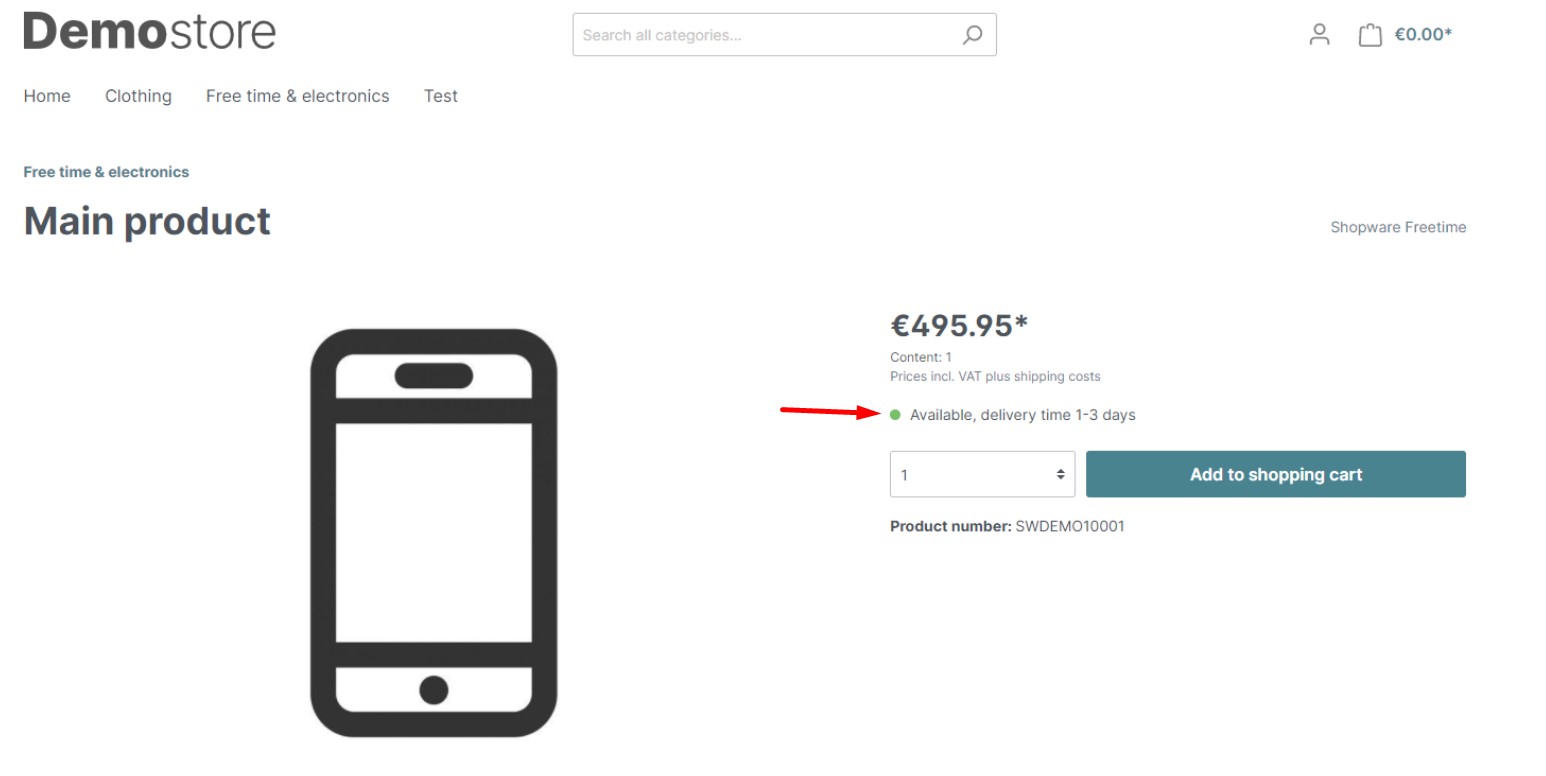
It is possible to assign a delivery interval to a product. Go to the Products screen, select a record you want to assign a delivery time to, proceed to the Deliverability section, and choose one of the delivery times. After that, the specified information is displayed on the product details page.
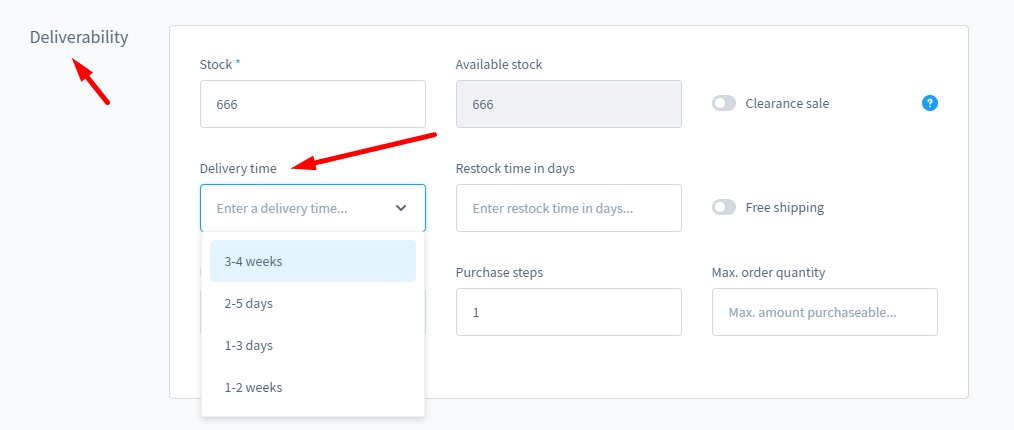
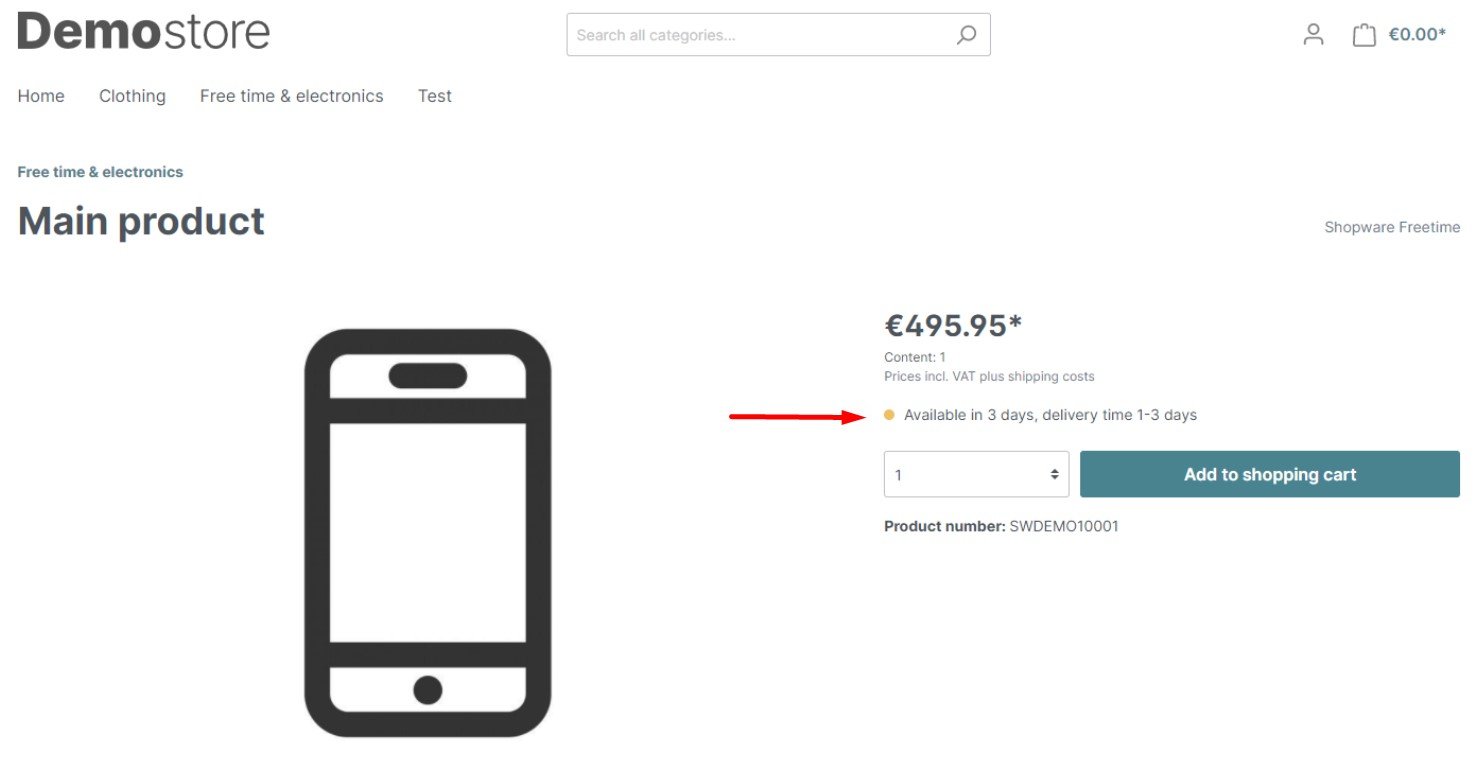
Note that delivery time information displays next to the availability information:
If there are no goods in stock, the message looks as follows:
Delivery Times in the Shopping Cart
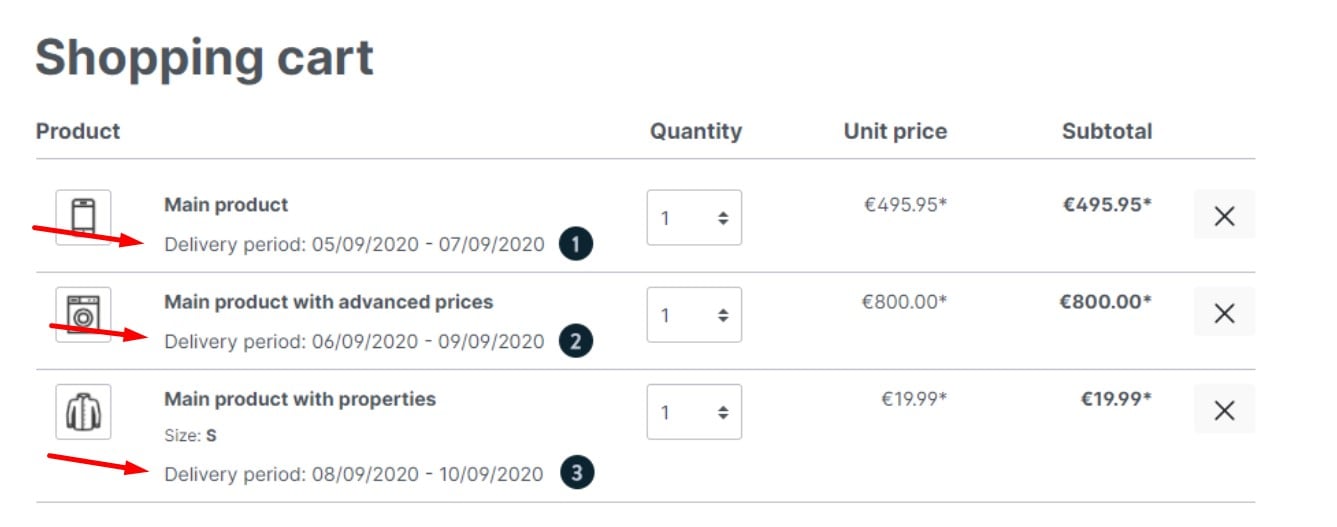
Now, let’s see how to show the delivery time in the shopping cart. This information displays dynamically, indicating a date range in which the delivery is expected. The period calculation incorporates the current date and the data provided in the delivery interval.
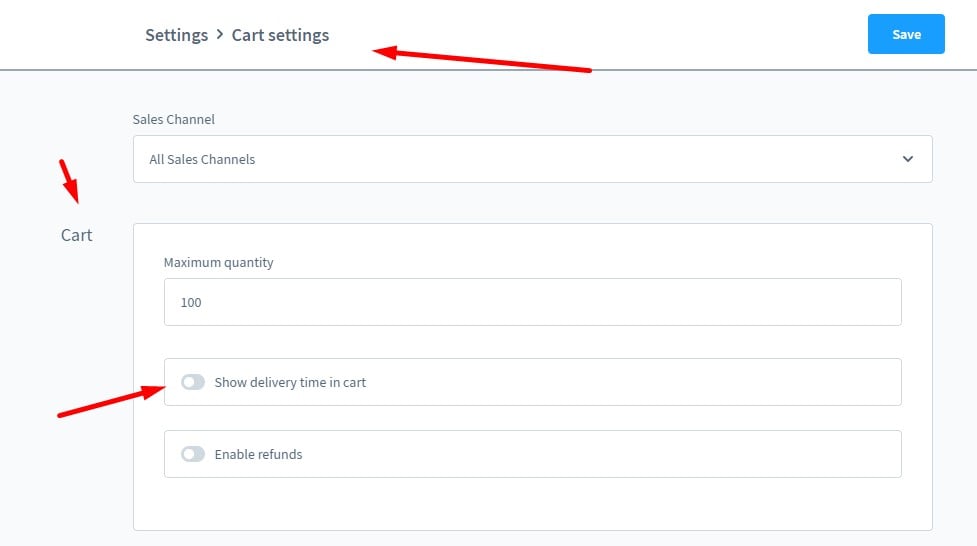
To enable the delivery times display in the shopping cart, go to Settings -> Shop -> Cart Settings and activate the corresponding toggle.
Another factor considered in the calculation is the restocking time. However, it is only applied to products without stock.
For instance, your current date is 01.01.2021. You have 10 products in stock. The product delivery time for the chosen item is 1-3 days. If a customer orders 10 or less items, the estimated delivery period is between 02.01.2021 and 04.01.2021.
However, if the ordered quantity is more than 10, the restocking time is incorporated. Let’s assume that it is 3 days. Thus, Shopware 6 adds this interval to the previous calculation. As a result, the estimated delivery period is between 05.01.2021 and 07.01.2021.
In the shopping cart, everything looks as follows:
The checkout page incorporates delivery times like this:
How to Import Delivery Times to Shopware 6
If you need to import data to your Shopware 6 website, our team can help you simplify and automate various processes associated with its transfers to your e-commerce website. Contact our support for more details and try our . You can use it to import any entity to Shopware 6. The module provides the ability to create schedules to automate data transfers. It launches corresponding import and export processes according to the specified periods. Also, you get the ability to match external data to the corresponding Shopware 6 designations. Create schemes and let the plugin apply changes automatically during each transfer. Please, consult our specialists regarding delivery times as an import entity.
Shopware 6 Delivery Times FAQ
How to find Delivery Times in Shopware 6?
You can find Shopware 6 delivery times under Settings -> Shop -> Delivery Times.
How to add new delivery intervals in Shopware 6?
Hit the Add delivery time button under Settings -> Shop -> Delivery Times to create a new interval in Shopware 6. Next, provide the necessary information as shown above.
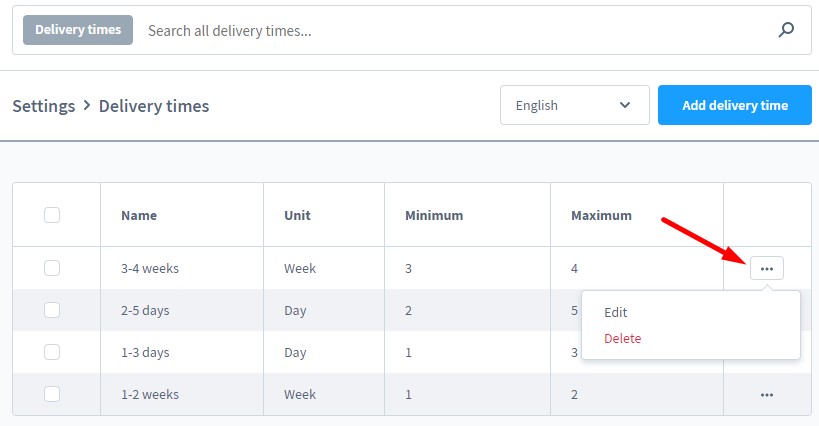
How to edit a delivery interval in Shopware 6?
Go to Settings -> Shop -> Delivery Times and use the context menu to edit an interval.
How to delete delivery times in Shopware 6?
Go to Settings -> Shop -> Delivery Times and use the context menu to delete an interval.
How to assign delivery intervals to products in Shopware 6?
You need to go to the product details page to assign delivery times to a product in Shopware 6. The corresponding option is available in the Deliverability section.
Shopware 6 Essentials FAQ
How to create a Shopware ID?
You create a Shopware ID automatically along with a Shopware account.
How to create a Shopware account?
Go to the registration page and click the Register Now link to create a Shopware account. Fill in the form and follow the instructions provided in a confirmation email.
What is Shopware master data?
All the information that your Shopware contains is called Shopware master data. It usually consists of various company details, such as physical addresses, phone numbers, email addresses, etc.
How to add a shop in Shopware?
Visit your merchant area to add a Shopware shop. Hit a link situated on the start screen’s right part and select a type of your new shop during the next step. It could be a cloud storefront or an on-premise installation. Provide additional information and save changes.
How to add a payment method to your Shopware account?
Go to Basic Information -> Accounting to add a payment method to your Shopware account. You can use PayPal, credit card, or direct debit to add a deposit to buy extensions and themes for your e-commerce website.
How to create a deposit in Shopware?
Go to Merchant Area -> Shops to add a deposit to your Shopware shop. Specify a shop to provide funds to and click Open Account Details. Add a deposit that will cover your future purchase.
How to purchase Shopware extensions?
You can buy Shopware extensions and themes on the Shopware Marketplace or within the Plugin Manager. Create a deposit that covers the purchase amount, choose all the necessary tools, and complete the procedure.
How to get support in Shopware?
You can contact Shopware regarding account or license issues at info@shopware.com and +49 2555 9288 50. Send inquiries regarding accounting and financial services to financial.services@shopware.com and +49 2555 9288 510.
How to migrate to Shopware 6?
You can use the Improved Import & Export module to run the migration to Shopware 6 since the extension provides lots of benefits over the default tools. For instance, it lets you leverage cron-based schedules and mapping schemes to transfer core entities from any external system or Shopware’s previous versions. Since we also offer export solutions for other e-commerce platforms, you can use them to transfer data from Magento, Shopify, and other systems to Shopware 6. Contact our team for more information.
How to automate import and export processes in Shopware 6?
You can utilize the Improved Import & Export extension for Shopware 6 for automating recurring data transfers. The plugin simplifies regular data updates with the help of schedules. You can launch the corresponding import and export processes according to the specified time frames, so no interaction on the admin side is necessary.
How to integrate Shopware 6 with external systems?
If you need to integrate Shopware 6 with ERPs, CRMs, accounting tools, and other external systems, the Improved Import & Export extension is also at your service. As we’ve just mentioned above, the module automates repetitive import and export processes with the help of cron-based schedules. Also, it modifies data with the help of mapping presets following the requirements of your Shopware store or the connected export destination.
Related posts
 solution25: Your Trusted Shopware Agency in New York & Germany
 How to Import Products to Shopware 6 & Automatically Assign Them to Parent Categories: A Time-Saving Import Feature You Shouldn’t Miss
 How to Import & Export Shopware 6 Advanced Prices as Separate Entity
 Shopify-EP Explained: Tracking Number, Package Origins, Common Concerns, and Why You May See It in 2025
 How to Boost Sales with Shopware 6 Cross Selling: The Ultimate 2025 Guide
 New in Shopware 6 Product Import: Control Topseller Products with the markAsTopseller Field
 Take Full Control over Product Visibility in Shopware 6: Introducing the ‘Replace Product Sales Channels’ Feature for Import
 E-Commerce Impulse Buys Guide: Boost Your Sales with Effective Strategies and Smart Tools