
Exploring Shopware: Business Events in Shopware 6 Settings
![]()
Below, we continue introducing you to the Shopware 6 administration. In this article, we explain the Business Events screen along with its core features. The article describes how to find the Business Events page in Shopware 6 and what its purpose is. Besides, we shed light on various options associated with this tool. You will also discover how to create business events in Shopware 6 and configure email recipients. Besides, this material provides a brief overview of data import to Shopware 6 that can help you with business events.

Note that we provide Shopware integration with external platforms. Contact our support for further information or try our Improved Import & Export Extension for Shopware.
Table of contents
How to Find Business Events in Shopware 6
The Business Events screen is situated in the main settings section of your administration. You can find Shopware 6 Business Events as follows:
- Go to your Shopware 6 administration;
- Open its main menu;
- Proceed to the Settings section;
- Open the Shop subsection;
- Hit the Business Events button.
The Purpose of Shopware 6 Business Events
Shopware lets you assign various business events, including customer account registration or order placement, to corresponding email templates. Furthermore, you can enhance events with the help of rules from the Rule Builder, controlling which email is to be sent under which conditions.
Business Events Screen Overview
The grid with business events looks as follows:
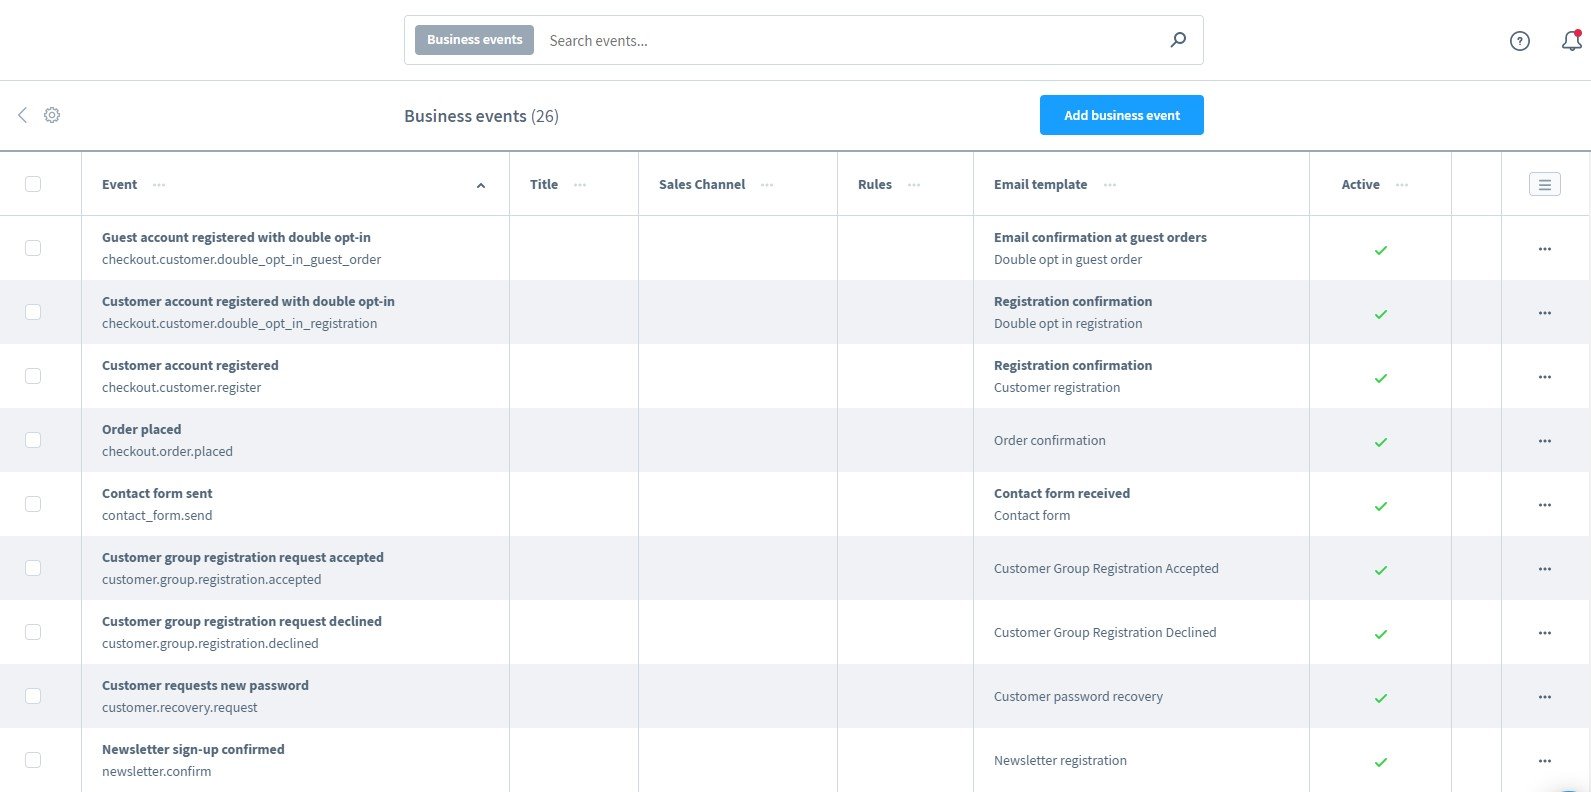
It consists of these columns:
- Event – the event that triggers the email;
- Title – can be assigned individually to better distinguish the business events;
- Sales Channel – a sales channel associated with the event; if no sales channel is assigned, the event applies to all sales channels;
- Rules – rules from the Rule Builder associated with the event;
- Email template – a template used to send the email;
- Active – this one shows enabled/disabled events;
- List settings – the header button lets you configure the grid layout while the context menu provides the ability to edit or delete Shopware 6 business events.
How to Add Business Events in Shopware 6
Hit the Add Business Event button above the grid to add new events. You will see the following form:

- Title – specify a title of your business event here;
- Active – enable/disable the event;
- Event – select an event to launch an automated mail;
- Email Template – choose an email template to be sent on the event;
- Sales Channel – specify a sales channel where this event can be used with;
- Rules – make your business rule more precise by applying rules from the .
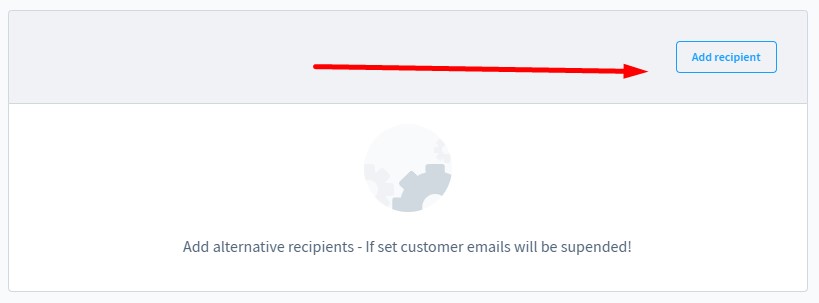
Email recipients
This section lets you enter internal email addresses to send the corresponding emails to administrators instead of customers. To send emails to both customers and internal users, it is necessary to create two separate events with the same settings except internal email recipients in one of them.
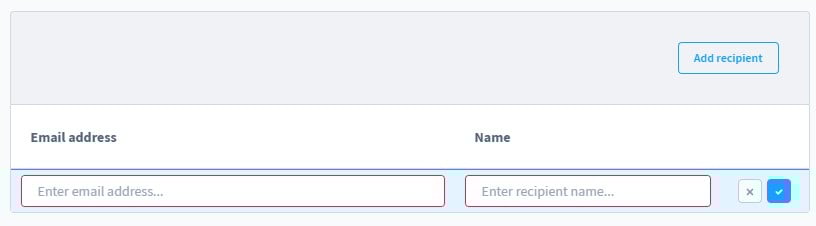
To add an email recipient, hit the corresponding button.
Next, specify an email address and name.
How to Import Business Events to Shopware 6
If you need to import any data to your Shopware 6 website, our team can help you simplify and automate various processes associated with data transfers to your e-commerce store. Try our to import any core entity to Shopware 6. The module not only uses cron to automate import and export processes but also offers presets that let you map unsupported attributes to the corresponding one that the system knows. Please, contact our support for more details and before working with business events during import.
Shopware 6 Essentials FAQ
How to create a Shopware ID?
You don’t have to worry about a ShopwareID since the system provides it automatically upon registration.
How to create a Shopware account?
You can create a Shopware account on a registration page. Click the Register Now link and fill in the form. Go to your email inbox and follow the instructions provided in a confirmation message.
What is Shopware master data?
Shopware master data combines all information that you provide while creating a Shopware account. It combines company addresses, phone numbers, emails, and other details.
How to add a shop in Shopware?
Visit your merchant area to add a new Shopware shop. You can use the corresponding link from the start screen’s right part to launch the registration. Specify the type of your new shop – a cloud storefront or an on-premise installation – and provide the information required during the next steps.
How to add a payment method to your Shopware account?
You can add a payment method under Basic Information -> Accounting. You need it to purchase various tools for your e-commerce website. Choose PayPal, credit card, or direct debit.
How to create a deposit in Shopware?
You can create a deposit for your Shopware 6 shop under Merchant Area -> Shops. Choose a shop to provide funds to and hit Open Account Details. The new screen lets you start the transaction.
How to purchase Shopware extensions?
Use either the Shopware Marketplace or Plugin Manager to purchase extensions for your Shopware 6 website. Create a deposit that covers the total purchase amount for one or multiple tools. Next, choose a software solution you want to buy, and complete the purchase.
How to get support in Shopware?
Write to info@shopware.com or call +49 2555 9288 50 regarding your account or license and to financial.services@shopware.com or +49 2555 9288 510 regarding accounting and financial services.
How to migrate to Shopware 6?
Due to the migration’s complexity, we recommend using a reliable third-party tool that offers more features than the default Shopware solutions to achieve the best results. Pay attention to the Improved Import & Export extension for Shopware 6 since it provides the ability to transfer all core entities to your new website from any external system or Shopware’s previous versions. We also offer export solutions for other e-commerce platforms to help you transfer data from Magento, Shopify, and other systems to Shopware 6. Contact us for more information.
How to automate import and export processes in Shopware 6?
If you need to simplify regular data updates provided by third parties and transfers from your e-commerce website, pay attention to the Improved Import & Export extension for Shopware 6. It lets you create a schedule of import and export processes per each data transfer and launch the corresponding procedures according to the specified time frames automatically.
How to integrate Shopware 6 with external systems?
With the Improved Import & Export extension, you can also maintain integrations with various external platforms and systems, such as ERPs, CRMs, accounting tools, etc. The module automates repetitive import and export processes with the help of cron-based schedules. Besides, it lets you create mapping schemes to modify data according to the requirements of your Shopware store on import automatically. You can also use these schemes to map data upon export with the help of the same technology.
Related posts
 solution25: Your Trusted Shopware Agency in New York & Germany
 How to Import Products to Shopware 6 & Automatically Assign Them to Parent Categories: A Time-Saving Import Feature You Shouldn’t Miss
 How to Import & Export Shopware 6 Advanced Prices as Separate Entity
 Take Full Control over Product Visibility in Shopware 6: Introducing the ‘Replace Product Sales Channels’ Feature for Import
 Introducing New Shopware 6 Feature: Data Transformation – Script Editor for Row Modification During Import
 New in Shopware 6 Product Import: Control Topseller Products with the markAsTopseller Field
 How to Boost Sales with Shopware 6 Cross Selling: The Ultimate 2025 Guide
 E-Commerce Impulse Buys Guide: Boost Your Sales with Effective Strategies and Smart Tools