Exploring Shopware: Cart Settings in Shopware 6

Our exploration of the Shopware 6 administration and its settings continues below. In this article, we shed light upon the platform’s Cart Settings screen. We explain the basic features and functionalities available in the corresponding section of settings. You will find out where the Cart Settings page is situated in Shopware 6. Also, we describe all the options available there so that you will be able to configure them effortlessly. For instance, you will learn how to configure sales channels, cart, checkout, and wishlist settings of Shopware 6. Besides, the following material provides a hint on cart data import to Shopware 6.

Note that we provide Shopware integration with external platforms. Contact our support for further information or try our Improved Import & Export Extension for Shopware.
Table of contents
How to Find Cart Settings in Shopware 6
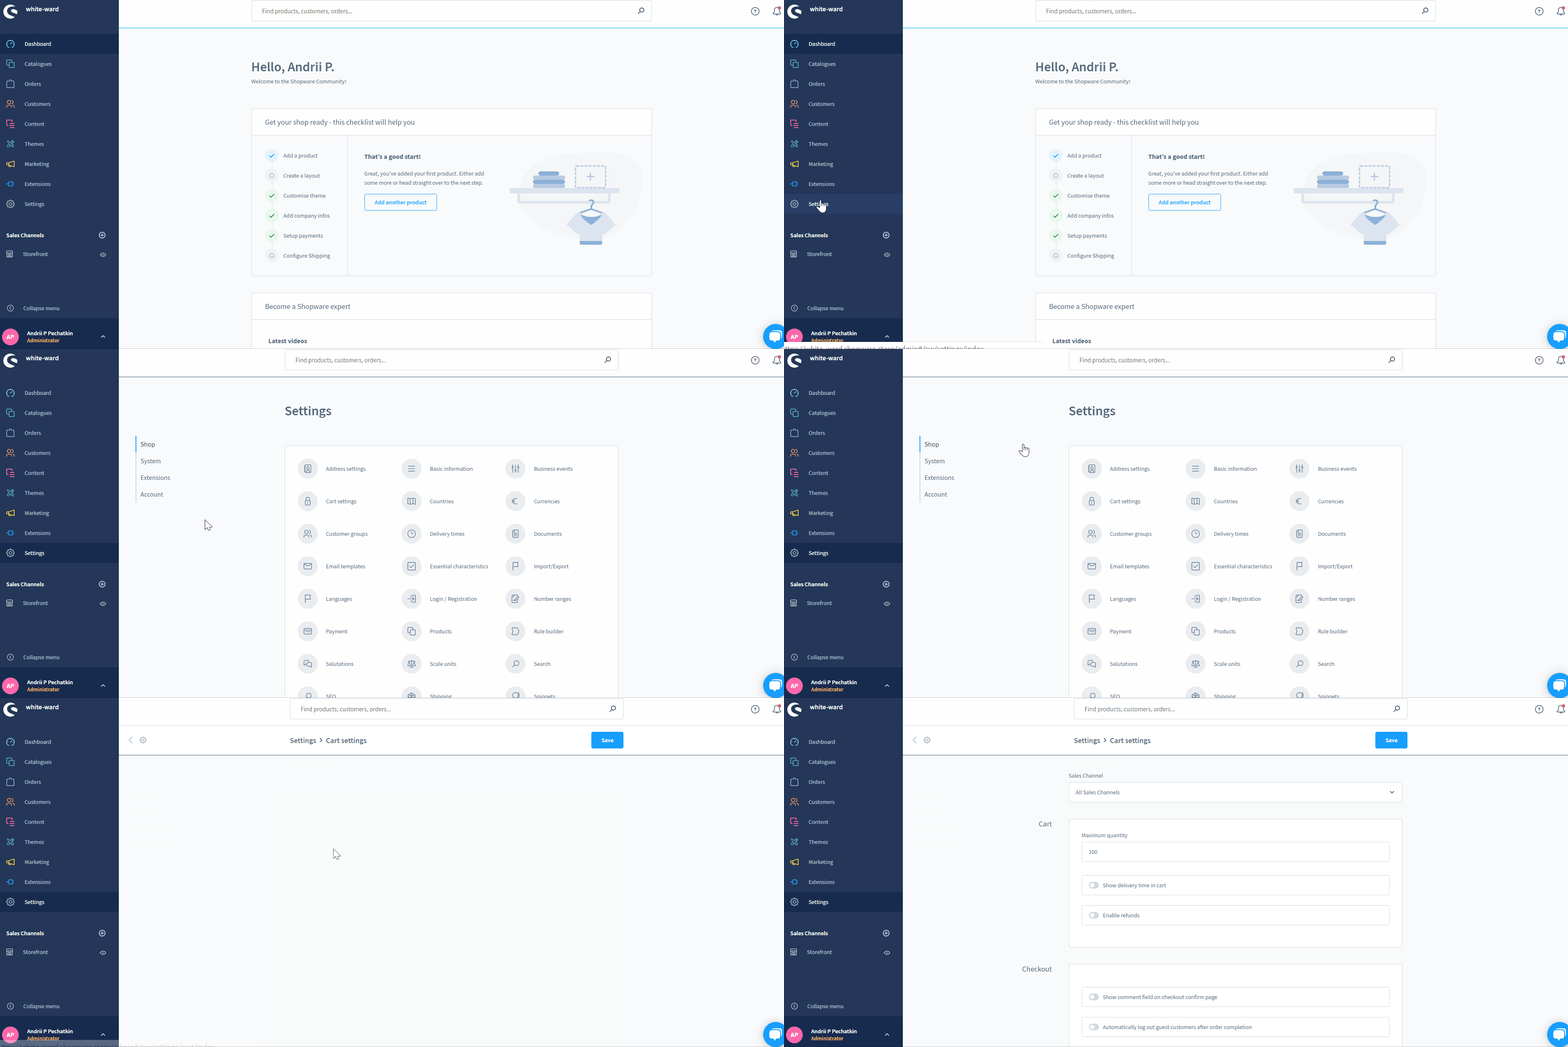
The Cart Settings screen is situated in the primary settings section of your administration. You can find Shopware 6 Cart Settings as follows:
- Go to your Shopware 6 administration;
- Open its main menu;
- Proceed to the Settings section;
- Open the Shop subsection;
- Hit the Cart Settings button.

Shopware 6 Cart Settings Overview
The Shopware 6 cart settings page lets you configure some basic shopping cart functions associated with the product detail page. As usual, you can apply changes globally or per sales channel. In the second case, the settings for an individual sales channel overwrite the ones applied globally.
The Shopware 6 cart settings page is divided into the following four sections:
- Sales Channel;
- Cart;
- Checkout;
- Wishlist.
Let’s explore each one individually.
Sales Channel
Here, you can decide whether to apply changes to cart settings globally or per particular sales channels. In the first case, select All Sales Channels – this value is also shown by default. In the second case, choose a sales channel you want to apply new configurations to.

Cart
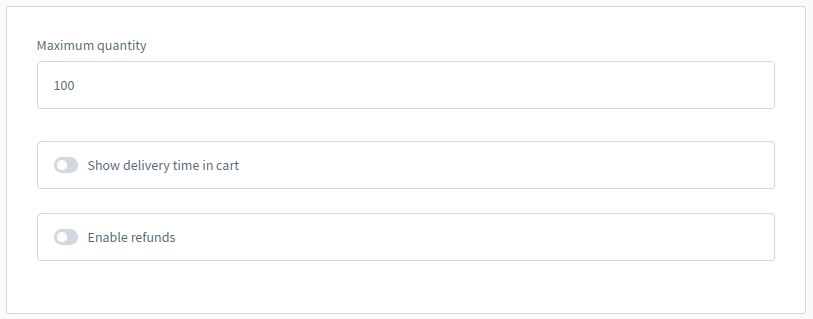
This section consists of the following three options:
- Maximum quantity;
- Show delivery time in the cart;
- Enable refunds.

In the maximum quantity row, you determine the number of products that can be selected in the dropdown on a product page or in the cart. At the same time, it is possible to set a different maximum order quantity for an individual product in its settings.
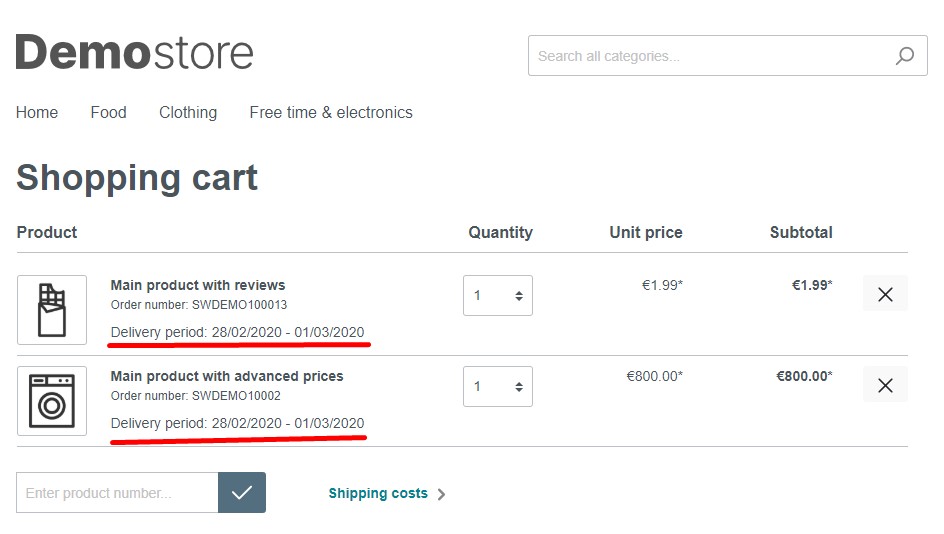
As for the Show delivery time in cart option, it displays the delivery time associated with a product for each individual item like shown below:

The Enable Refunds option lets your prospects cancel their orders in the customer account.
Checkout
The Checkout section consists of just two options:
- Show comment field on checkout confirm page;
- Automatically log out guest customers after order completion.

The first one lets your customers leave comments after completing the order. The provided information displays both in the customer account and in the administration.
If the second function is active, Shopware 6 logs out guest customers after completing their orders. Alternatively, the guest session remains active so that the guest customer can end the session via the account menu.
Wishlist
This section only lets you enable/disable the wishlist.

If it is enabled, your customers save products to a wishlist, which is available under the heart icon next to the account menu.

How to Import Cart Data to Shopware 6
If you need to import cart data to your Shopware 6 website, our team can help you simplify and automate various processes associated with data transfers to your e-commerce store. For instance, you have an existing e-commerce website with carts and orders. You need to move them to your new Shopware 6 website. You may use the to achieve this goal. You can also use it to import any entity to Shopware 6. The module will help you automate data transfers. At the same time, it provides the ability to create schemes to map external data to its corresponding destinations in Shopware 6. Please, contact our support for more details.
Shopware 6 Essentials FAQ
How to create a Shopware ID?
You don’t need to create a ShopwareID. The system provides it automatically while you create a Shopware account.
How to create a Shopware account?
You can create a Shopware account on a registration page. After clicking the Register Now link, you will need to fill in the form. Receive a confirmation email and complete the registration, providing additional information.
What is Shopware master data?
All the information provided to create a Shopware account is considered master data. It includes various company details, such as a physical address, phone number, email address, etc.
How to add a shop in Shopware?
You can create a new Shopware shop for your e-commerce website in your merchant area. Click the link situated on the start screen’s right part and select the type of your new shop: a cloud storefront or an on-premise installation. Provide the required information and save changes.
How to add a payment method to your Shopware account?
You can add a payment method that will be used for internal purposes under Basic Information -> Accounting. You can choose between PayPal, credit card, or direct debit. Under internal purposes, we assume placing a deposit necessary to purchase various tools for your e-commerce website.
How to create a deposit in Shopware?
You can place a deposit in your Merchant Area -> Shops. Select a shop to provide funds to and hit Open Account Details. Your deposit should cover the amount of your future purchase.
How to purchase Shopware extensions?
With a deposit that is big enough, you can visit the Shopware Marketplace or open the Plugin Manager to buy a software solution necessary for your business. Select a tool and complete the purchase.
How to get support in Shopware?
Connect Shopware support via info@shopware.com and +49 2555 9288 50 to discuss questions regarding your account or license. Use financial.services@shopware.com and +49 2555 9288 510 to solve issues associated with accounting and financial services.
How to migrate to Shopware 6?
You may use the Improved Import & Export extension to migrate to Shopware 6 since it offers lots of benefits over the default tools. For instance, cron-based schedules and mapping schemes are at your service. With our module, you can transfer core entities to your new website from any external system or Shopware’s previous versions. And with the export solutions for other e-commerce platforms, you can easily transfer data from Magento, Shopify, and other systems to Shopware 6. Contact our team for more information.
How to automate import and export processes in Shopware 6?
Use the Improved Import & Export extension for Shopware 6 to automate regular data transfers. The module lets you create a schedule of import and export processes per each data transfer and launch the corresponding procedure according to the specified time frames. No interaction on the admin side is required.
How to integrate Shopware 6 with external systems?
The Improved Import & Export extension is also a reliable solution for delivering integrations with various external platforms. For instance, you can use it to synchronize your e-commerce website with ERPs, CRMs, accounting tools, etc. The module automates repetitive import and export processes with the help of cron-based schedules. It also modifies data according to the requirements of your Shopware store with the help of mapping presets. You can also use them to edit data upon export.


