
Exploring Magento 2 Backend: Email Templates
The following article is a continuation of our series that deals with the Magento 2 backend. This time, we enter the Communication section of Marketing tools and features. Below, you will find all the necessary information and links that describe Email Templates and all the related screens.

Table of contents
Magento 2 Email Templates: Definition
It is hard to imagine e-commerce without automated messages sent from your website in bulk. As for Magento 2, it offers several powerful tools that simplify your daily duties in this area. Email templates are one of them. Used to define the layout, content, and formatting of such messages, they dramatically reduce the time necessary to create transactional emails, which are always associated with a specific type of transaction or event.
By default, you get a set of responsive email templates in the Magento 2 backend. Triggered by different events that take place on your website, they are utilized to create messages sent to your customers. Note that such templates are device-agnostic. It means that they are optimized for any screen size so that your customers can view them from the desktop or on tablets and smartphones. A variety of prepared email templates cover the following areas:
- Customer activities;
- Sales;
- Product alerts;
- Admin actions;
- System messages.
Another advantage of templates is that they are fully customizable. Thus, you can implement a design that suits your brand for 100%.
Logo
When it comes to customizations, the most important attribute that helps people recognize your brand is your logo. You can use a GIF or PNG image with a transparent background. However, standard JPG/JPEG files are also supported. You can find other requirements here: .
Email Clients
Although a wide range of email clients is available today, not all of them work with Magento 2 pretty well. You can find a list of compatible solutions here: .
Magento 2 Email Templates: Configuration
The primary email template configuration requires choosing a logo and header/footer templates.
Uploading your logo
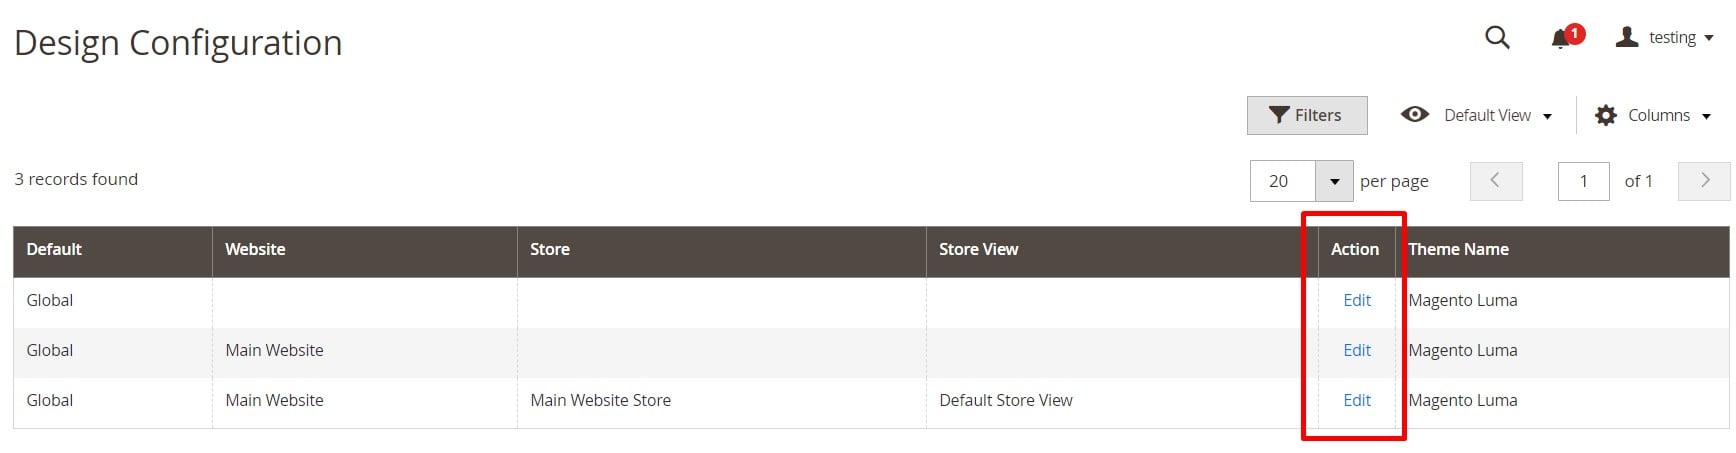
You should upload a logo with the aforementioned logo requirements in mind. The corresponding section is situated under Content->Design->Configuration. Here, you should choose a store view you want to configure. Proceed to the Action column and click Edit.
Scroll down to Other Settings and expand Transactional Emails. You will see the following section:
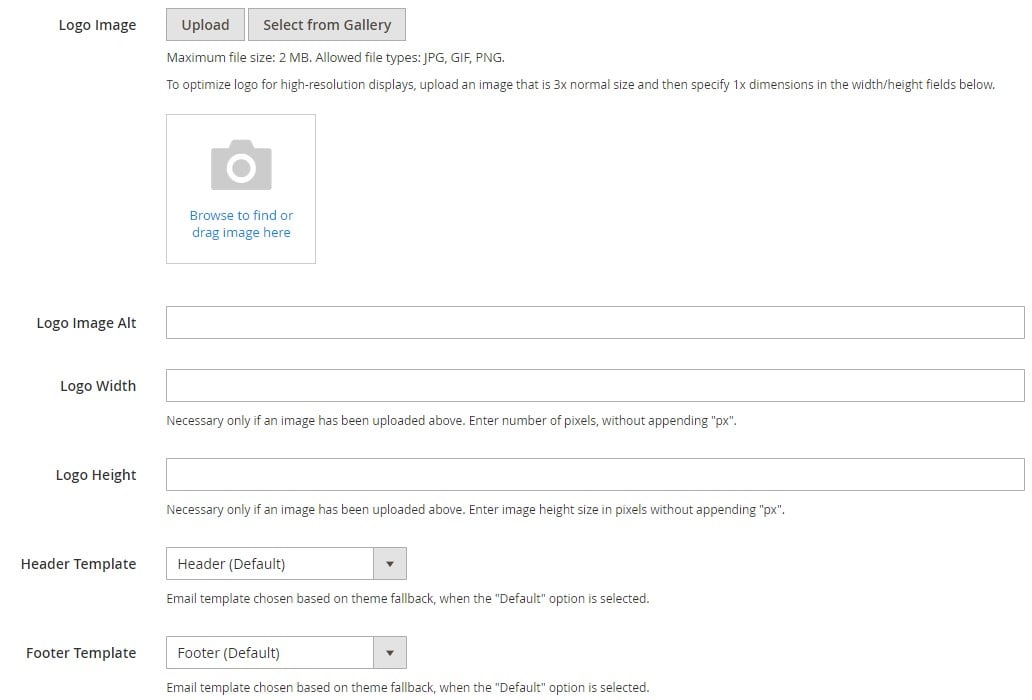
It is possible to upload your prepared Logo Image here as well as enter alternate text to identify it (Logo Image Alt). You can also specify the display dimensions of the logo via the logo width and height in pixels, but do not add the px abbreviation.
In the same section, you can specify custom header and footer (if necessary). Use them to make the design of your email templates more suitable for your brand. Alternatively, you can set a different header and footer for different store views. Don’t forget to click Save Config when complete.
Magento 2 Email Templates: Customization
Bu default, a message that is sent by the system in Magento 2 consists of the body section combined with the header and footer. You can use HTML and CSS to format the content. Furthermore, it is possible to add variables and widgets. Also, note that it is possible to customize email templates on the level of website, store, or store view.
While the default template includes your logo and brand information, you should make necessary changes before sending messages to customers. Below, we describe how to do that.
Header Template
After completing the basic configuration described above, the email header template already includes your logo. However, with a basic knowledge of HTML, you can customize it even more, adding store contact. Use predefined variables to do that.
Go to Marketing->Communications->Email Templates. Here, you can see a grid that contains the following columns:
- ID – an internal ID number of a template;
- Template – a name of a template;
- Added – time and date when it was added;
- Updated – time and date when it was updated;
- Subject – what a template is responsible for;
- Template Type – HTML or Text;
- Action – you can preview templates here.
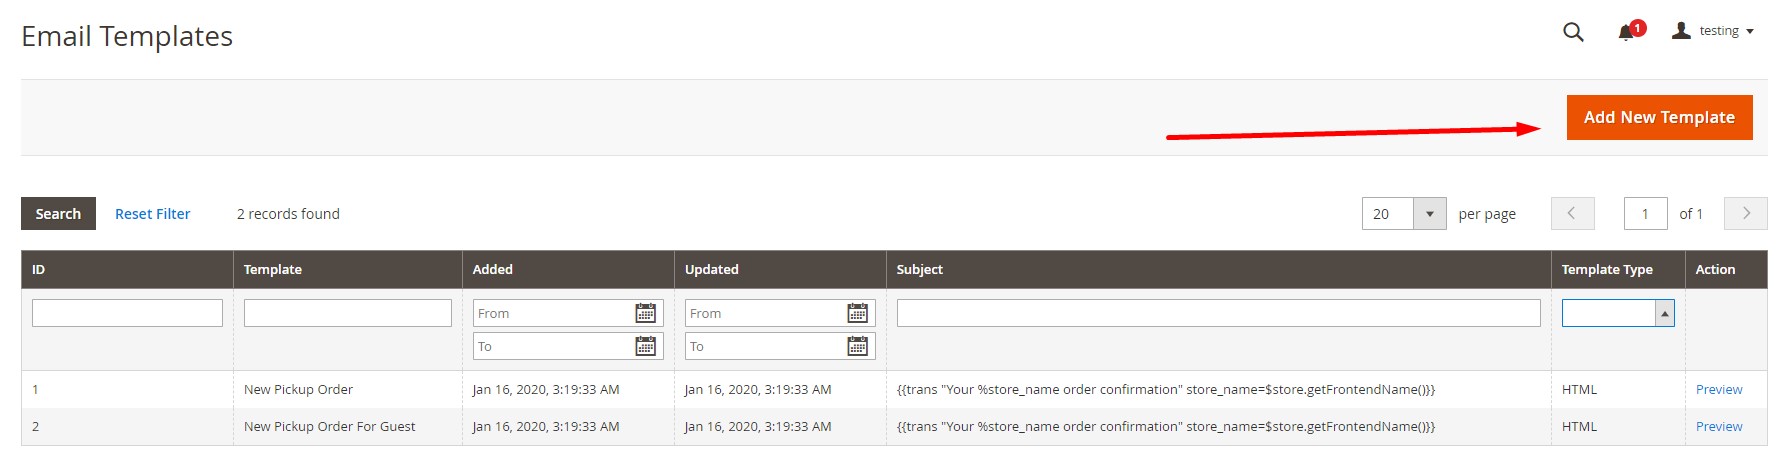
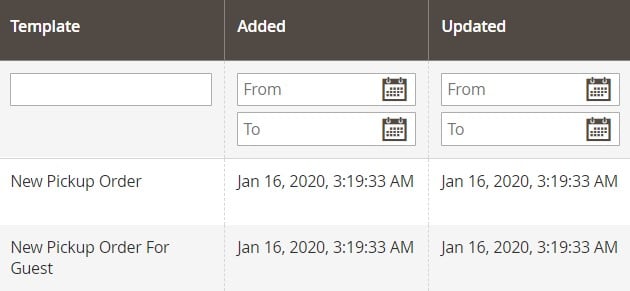
As you can see, our grid doesn’t include a header template, so click Add New Template to create a custom solution.
Choose Magento_Email > Header from the Template dropdown in the Load default template section. Click the Load Template button to add the HTML code and variables to the form below. You will see the following transformation:

Now, you can enter a template name and subject for your custom header to help organize templates in the grid.
Next, proceed to the Template Content box to modify HTML. Note that it is prohibited to overwrite anything enclosed in double braces. You can insert variables via the Insert Variable button. Use any system or custom records. To make any CSS declarations, use the Template Styles box. Just enter the styles there.
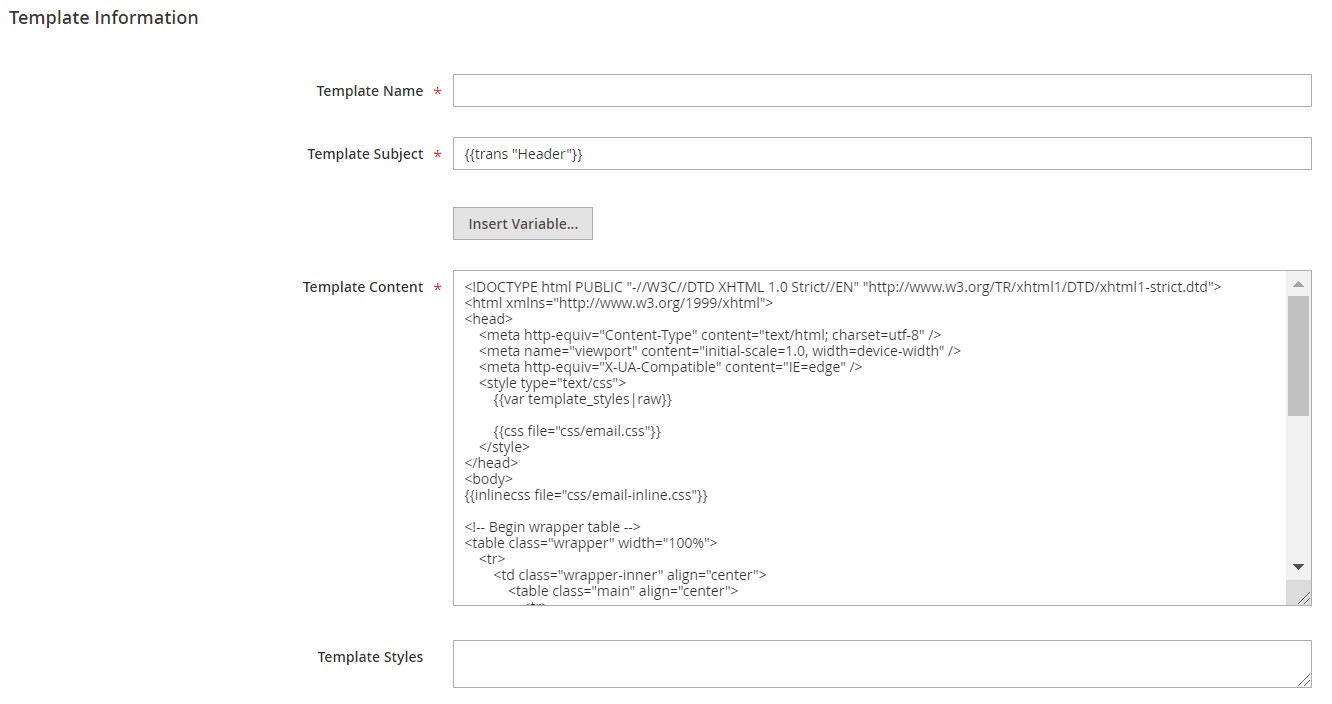
Click Preview Template to see how your new header template looks from the perspective of an email recipient. Make adjustments if necessary, and click Save Template when finished. Now, you can find your custom header in the list of available Email templates.
Now, you have to return to Content->Design->Configuration and edit a store view you want to configure. In the Transactional Emails section, choose your new custom header template and click Save Config. You can read more about header templates here: .
As for a footer template, it contains the closing and signature line of your email message. However, you can edit it as well as add more information. The customization process is similar to the one we’ve just described. Go to Marketing->Communications->Email Templates and add a new template there. This time, you have to select Magento_Email > Footer in the Load default template section.
After loading the template, add its name and subject, modify HTML, and insert variables. Make CSS declarations if necessary, and save the template.
Next, you can choose your new footer template in the Transactional Emails section among the available options. Follow this link for further information about footer templates: .
Message Template
Now, let’s take a look at the process of customizing the body of each message. You can create a custom message template in the same way as customizing the header or footer. However, there is a small difference: there is a different message template for each activity. While you can create only one custom header or footer, it is necessary to edit numerous body messages to make them suitable for your brand.
Go to the main Email Templates screen and create a new template there. Choose a default one that you want to customize under Load default template. Click the Load Template button and apply changes:
- Enter a template name;
- Specify a template subject (leave a default text or enter something more descriptive);
- Modify HTML tags, CSS directives, and variables;
- Add new variables.
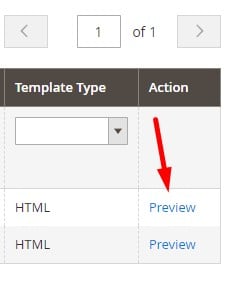
Don’t forget to save your new template. You can preview it on the main Email Templates screen via the Action column. Hit the Preview link to view how your recipients see the message.
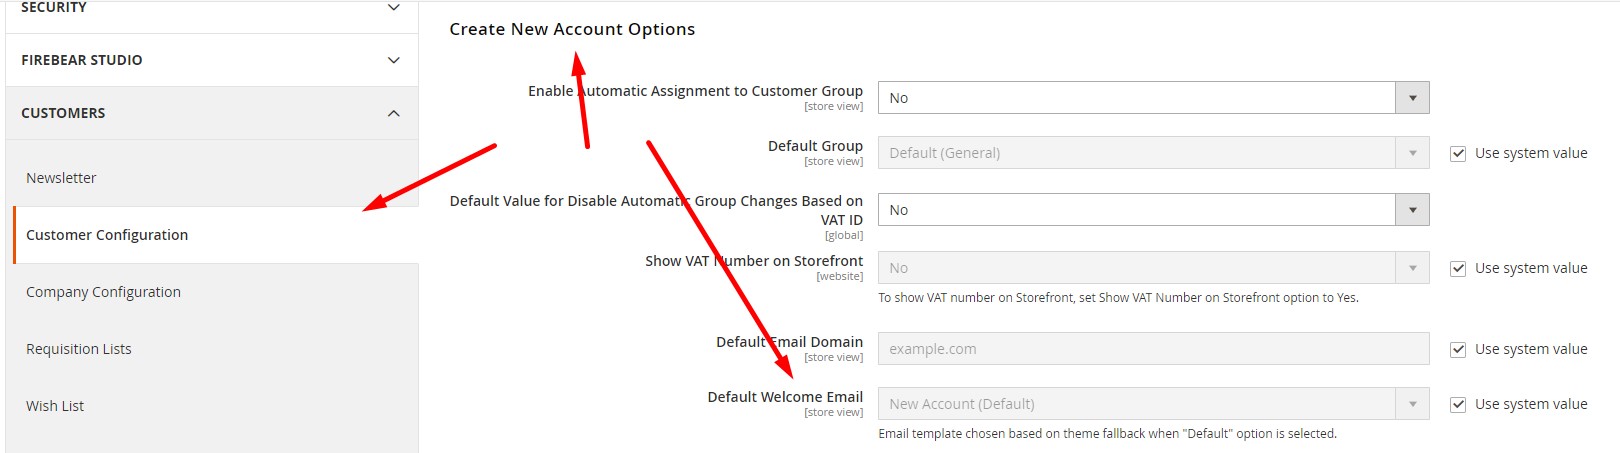
Also, note that the Currently Used For path from the configuration above shows where to apply your new template.
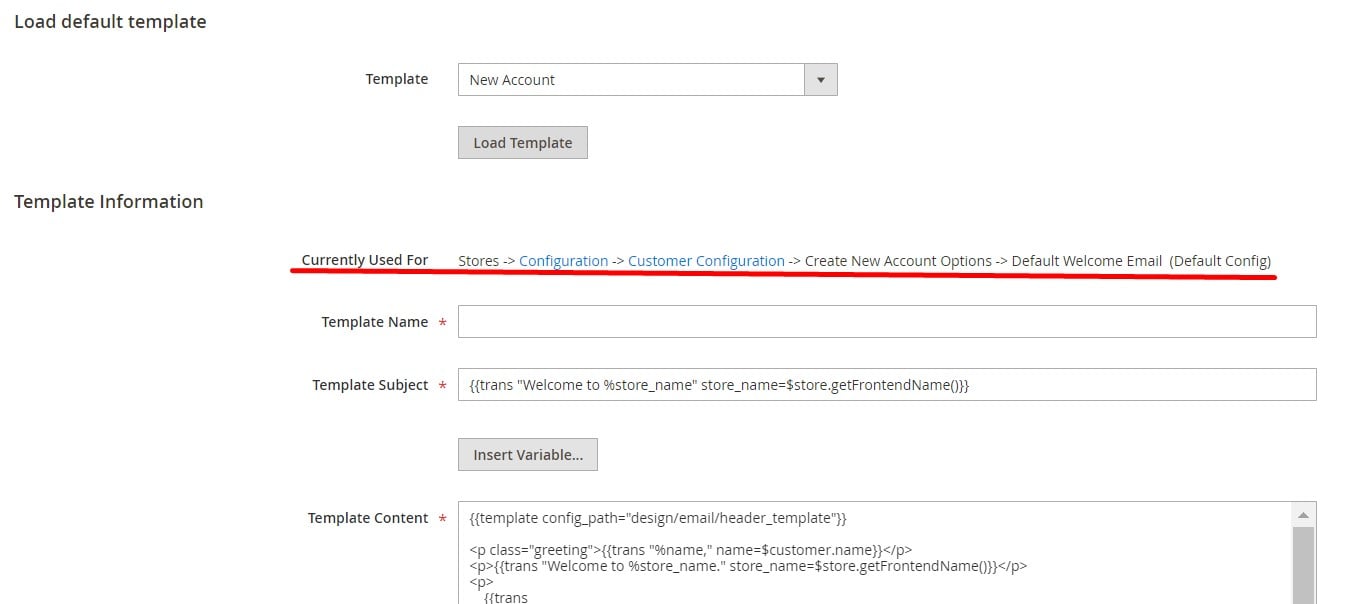
Our example shows that the template configuration is available under the Customer Configuration page -> the Create New Account Options section -> the Default Welcome Email field. You can use the link to proceed to the configuration page as fast as possible. Next, expand the Create New Account Options section and choose your new custom template in the Default Welcome Email field.
Follow this link to see more information: .
How to Import Email Templates to Magento 2
As you can see, creating custom email templates takes a lot of time. However, Magento 2 doesn’t let you import them by default. You either have to recreate everything manually or use a third-party solution. Meet the Free Magento 1 to Magento 2 Migration add-on.
The tool works on the basis of the Improved Import & Export Magento 2 extension – the best import-export solution on the market. Created by certified Magento 2 specialists, it lets you import newsletter templates to your new Magento 2 website in a few clicks.
You can leverage either an intuitive administrator panel user interface or simple CLI commands. Note that you have to deal with the selective migration of all Magento 1 entities to Magento 2. It means that there is no downtime. You only need to reindex when an object is transferred.
Also, note that Magento 2 to Magento 2 migration is possible as well. Thus, moving email templates from one store to another, or merging two stores is no longer a problem.
You can download the Free Migration add-on from your Firebear account after Improved Import and Export is purchased. If you already have our extension installed, you can get the download link for the add-on.
After installing both tools, visit the extension’s configuration page to specify the Magento 1 or Magento 2 database connection credentials. Next, go to the Data Migration section to specify the path to the root folder of your Magento 2 website and select email templates as an entity you want to import. Start the migration.
In addition to newsletter templates, you can also import such entities as
- Categories;
- Products + media (images and videos);
- Inventory;
- CMS blocks and pages;
- Customers with addresses;
- Product Attributes;
- URL rewrites;
- Orders and quotes for orders;
- Order shipping data;
- Store administrator accounts;
- Product reviews and ratings;
- Invoices and other documents;
- Catalog price rules and cart price rules;
- Customer groups;
- Taxes and order taxes aggregated;
- Customer wishlists;
- Newsletter subscribers.
For further information, follow these links:
Get Improved Import & Export Magento 2 Extension
Get Free Magento 1 to Magento 2 Migration Add-On
Related posts
 How to Import Customers & Customer Addresses to Magento 2
 How To Bulk Import Products In Shopify: CSV Description & Step-By-Step Guide
 A Complete Guide to Shopify Customer Import
 Magento 2 B2B Company Guide: Revealing Company Structure & Import
 Reputon Amazon Importer Review: How to Connect Shopify to Amazon in a Few Clicks
 Magento 2 Release Notes
 Adobe (Magento 2) Commerce and Cloud (Enterprise Edition) Specific Features
 Amasty ChatGPT AI Content Generator for Magento 2