Exploring Shopware: Login / Registration in Shopware 6 Settings

Shopware 6 is a relatively flexible platform. It lets you customize the appearance of various frontend elements, including the one where your customers start their e-commerce journey. As you’ve probably guessed already, we are talking about the Login / Registration section of the Shopware 6 settings. The platform enables you to configure the appearance of the corresponding screen on the frontend. Below, we shed light on how to edit the Login / Registration settings of Shopware 6. You will discover the meaning of every parameter situated on the corresponding page. Also, we provide recommendations on the related data-transfer processes as well as offer an FAQ section for those who want to explore the topic briefly.

Note that we provide Shopware integration with external platforms. Contact our support for further information or try our Improved Import & Export Extension for Shopware.
Table of contents
- 1 Login / Registration Screen in Shopware 6 Admin
- 2 How to Import Customers to Shopware 6
- 3 Shopware 6 Login / Registration FAQ
- 3.1 How to find Login / Registration settings in Shopware 6?
- 3.2 How to specify the minimum length for customer passwords in Shopware 6?
- 3.3 How to force customers to specify email addresses and passwords twice upon registration in Shopware 6?
- 3.4 How to add more address lines to the Shopware 6 registration form?
- 3.5 How to make the VAT ID field mandatory upon business account registration on a Shopware 6 website?
- 4 Shopware 6 Essentials FAQ
- 4.1 How to create a Shopware ID?
- 4.2 How to create a Shopware account?
- 4.3 What is Shopware master data?
- 4.4 How to add a shop in Shopware?
- 4.5 How to add a payment method to your Shopware account?
- 4.6 How to create a deposit in Shopware?
- 4.7 How to purchase Shopware extensions?
- 4.8 How to get support in Shopware?
- 4.9 How to migrate to Shopware 6?
- 4.10 How to automate import and export processes in Shopware 6?
- 4.11 How to integrate Shopware 6 with external systems?
Login / Registration Screen in Shopware 6 Admin
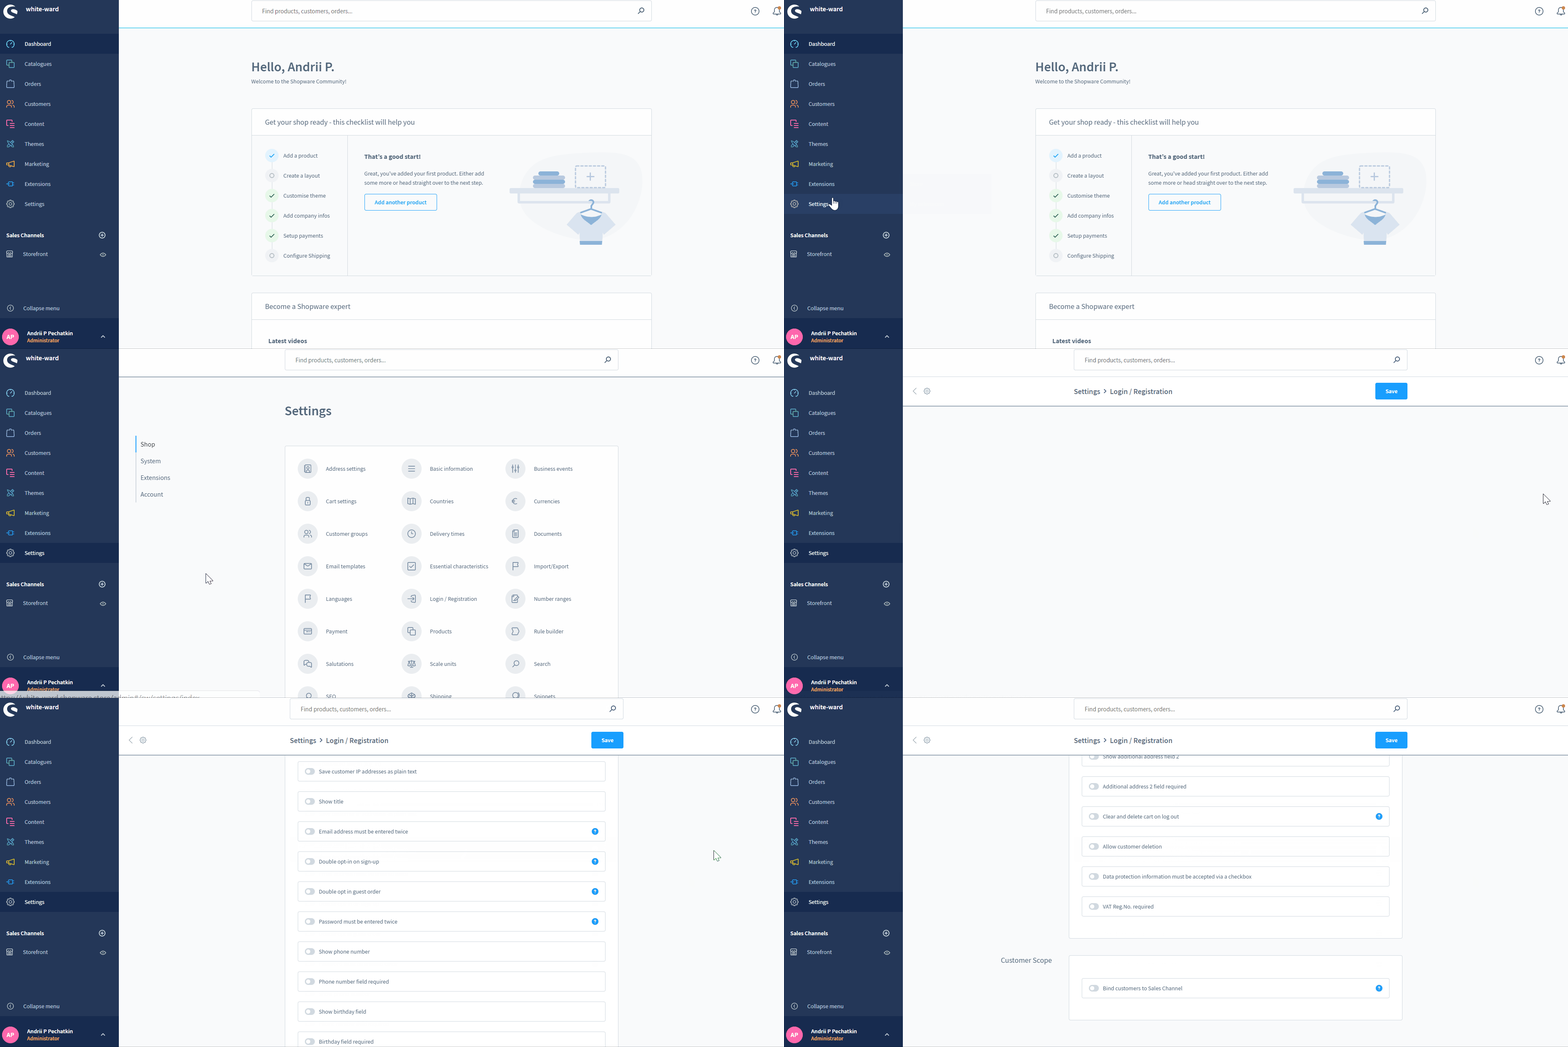
Let’s see how to find the Login / Registration screen in the Shopware 6 administration:
- Go to your Shopware 6 administration;
- Open its main menu;
- Proceed to the Settings section;
- Open the Shop subsection;
- Hit the Login / Registration button.

It lets you apply various configurations for the login / registration processes that your customers have to pass through. Shopware 6 lets you specify fields displayed in the registration. Besides, you can select ones that will be mandatory.
It is also worth mentioning that such fields as title, name, and address are mandatory by default within the system. Consequently, you cannot edit them. And the Login / Registration section doesn’t contain these fields at all.
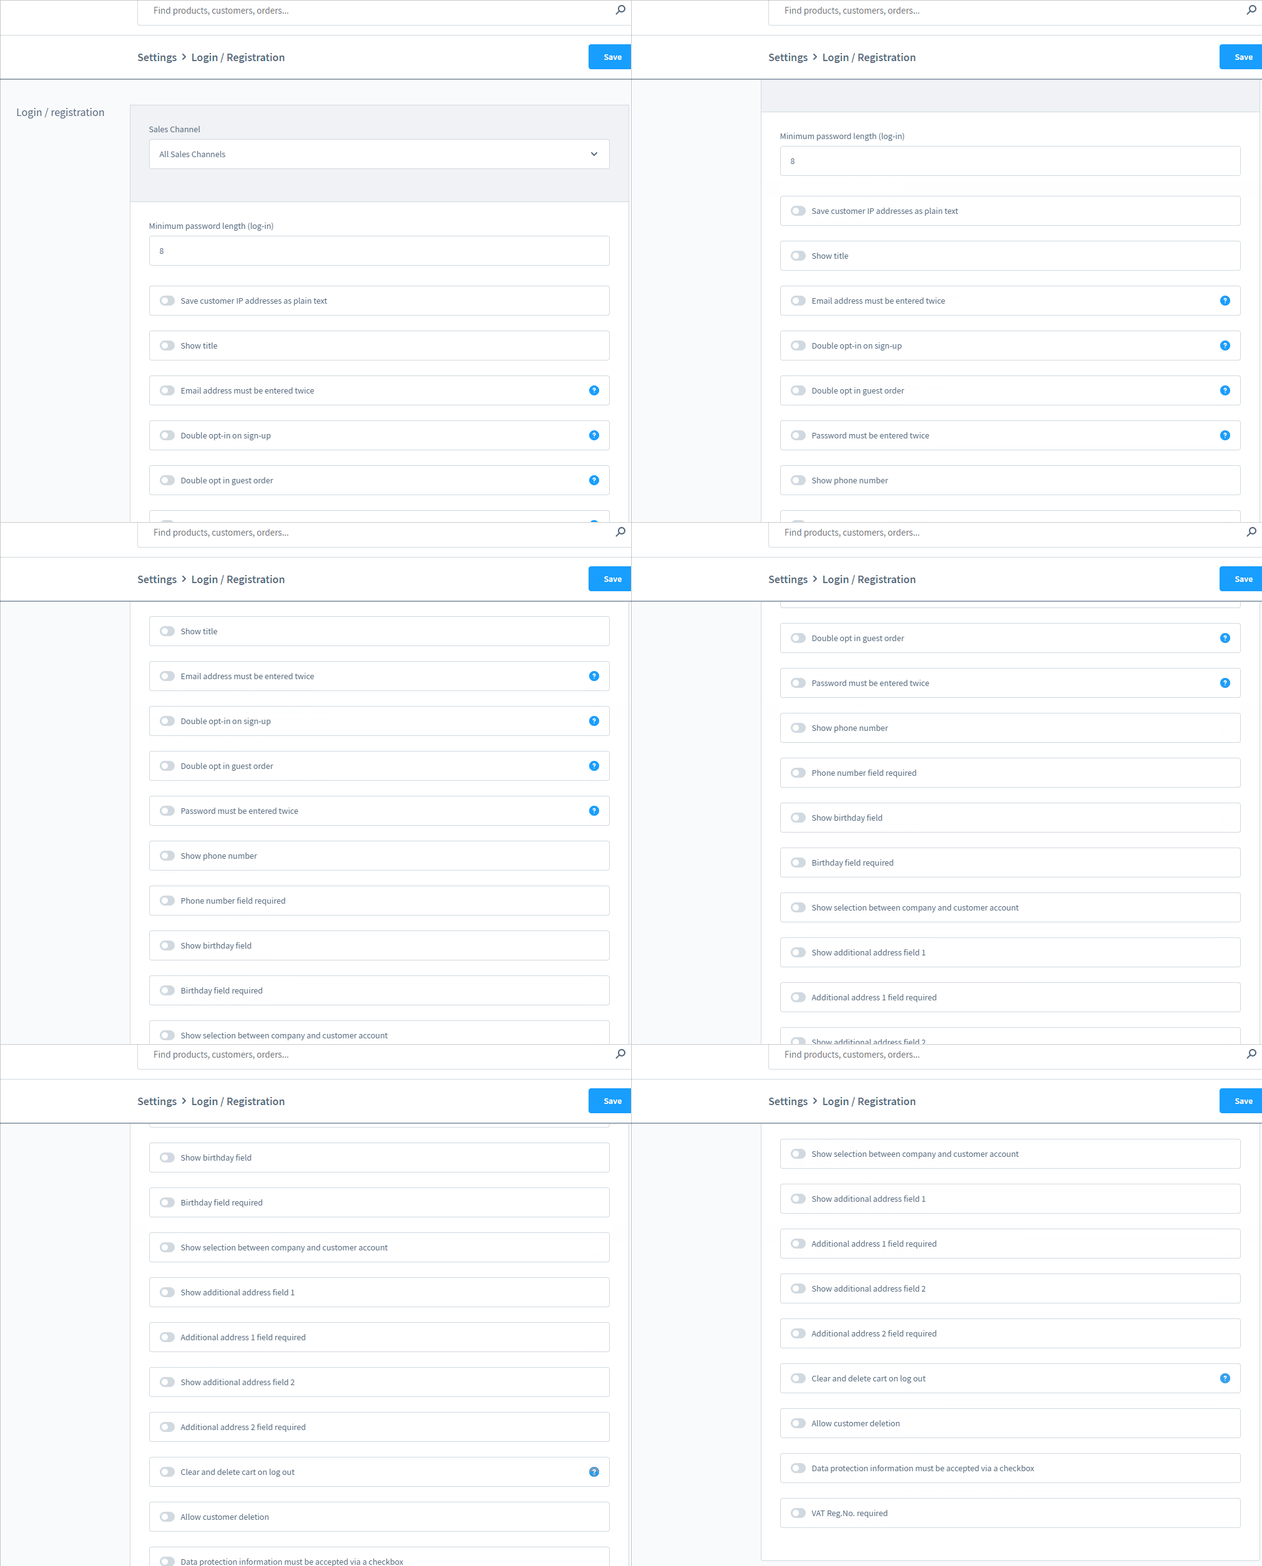
Login / Registration
Login / Registration is the first section available on the corresponding page. Here, you can choose whether to apply your new settings globally or per a sales channel.

Next, the following settings are at your disposal:
- Password minimum length – you can specify the minimum number of characters for a customer password;
- Save customer IP addresses in plain text – the option lets you save the complete IP address if activated. Otherwise, the system anonymizes the last segments of the IP address.
- Show title – here, you activate the field for entering a title, such as Sir;
- Email address must be entered twice – with the active option, customers have to enter the email address twice to complete the registration;
- Double opt-in for registrations – with the active option, Shopware 6 sends an email notification with a link to finally confirm the registration after a customer submits the registration form;
- Double opt-in for guest orders – with the active option, Shopware 6 sends an email notification with a link to confirm the order after a guest customer submits it;
- Password must be entered twice – with the active option, customers have to enter the password twice to complete the registration;
- Show phone number – activate this field if you want to collect phone numbers on registration;
- Treat telephone number as a mandatory field – this option lets you make the above field mandatory;
- Show birthday – this feature adds an additional field for entering the date of birth;
- Treat birthday as a mandatory field – this option lets you make the above field mandatory;
- Show selection between business and customer account – the activated option lets customers choose between a normal customer account or a business account (requires VAT ID and other parameters);
- Show additional address line 1 – an additional field for further address information;
- Treat additional address line 1 as a mandatory field – this option lets you make the above field mandatory;
- Show additional address line 2 – another additional field for further address information;
- Treat additional address line 2 as a mandatory field – this option lets you make the above field mandatory;
- Delete session data when logging out – activate this feature to delete the shopping cart content when a customer logs out;
- Allow deletion of the client – the active feature lets customers delete a customer account. The corresponding link displays in the account. However, not all the information is eliminated. Order and other information which is subject to legal retention periods is available to the shop operator;
- Treat VAT ID as a mandatory field – this feature makes the VAT ID field mandatory for registering a business account.

Customer assignment
The Customer Assignment section lets you bind customers to a sales channel. It is its only purpose.

How to Import Customers to Shopware 6
Importing login/registration settings doesn’t make any sense. However, you may need to transfer already registered customers to your Shopware 6 website. If you need to do that or move other entities to the storefront, you’ve come to the right place. With the help of our team, there is no need to recreate multiple entities manually. You can simplify and automate this process. Contact our support for more details and try our . You can use it to import any entity to Shopware 6. The extension lets you create a schedule of import and export processes. As a result, all data transfers are launched automatically according to the specified time frames. Furthermore, the plugin offers mapping presets – schemes that teach the system how to treat unsupported data and with what replacement to use. Please, ask our specialists how to move customers to Shopware 6.
Shopware 6 Login / Registration FAQ
How to find Login / Registration settings in Shopware 6?
You can find the Login / Registration settings under Settings -> Shop -> Login / Registration.
How to specify the minimum length for customer passwords in Shopware 6?
Use the Password minimum length option to specify the minimum length for customer passwords in Shopware 6.
How to force customers to specify email addresses and passwords twice upon registration in Shopware 6?
Activate the Email address must be entered twice & Password must be entered twice options.
How to add more address lines to the Shopware 6 registration form?
Activate the Show additional address line 1 & 2 options to add more address lines to the Shopware 6 registration form.
How to make the VAT ID field mandatory upon business account registration on a Shopware 6 website?
Activate the Treat VAT ID as a mandatory field option to force your business customers to provide their VAT IDs upon registration on your Shopware 6 website.
Shopware 6 Essentials FAQ
How to create a Shopware ID?
There is no need to create a Shopware ID. You get it automatically while creating a Shopware account.
How to create a Shopware account?
Go to the registration page and click the Register Now link to create a Shopware account. You will need to fill in the form, receive a confirmation email, and follow the provided instructions.
What is Shopware master data?
All the information about your company is called master data. In Shopware, it usually consists of such company details as physical and email addresses, phone numbers, etc.
How to add a shop in Shopware?
Adding a new shop in Shopware 6 is quite straightforward. Go to your merchant area and click the corresponding link situated on the start screen’s right part. After that, you need to specify the type of your new shop (a cloud storefront or an on-premise installation) and provide additional information.
How to add a payment method to your Shopware account?
Visit Basic Information -> Accounting to add a payment method in Shopware 6. On this page, specify PayPal, credit card, or direct debit as your preferred way to pay for extensions and themes.
How to create a deposit in Shopware?
Note that you can buy extensions and themes for your Shopware 6 website only if you have a deposit. Proceed to Merchant Area -> Shops to create it. Select a shop to provide funds to and click Open Account Details. Your deposit should cover the amount of your future purchase.
How to purchase Shopware extensions?
You can purchase extensions and themes for your e-commerce website on the Shopware Marketplace. Alternatively, it is possible to use the Plugin Manager. Create a deposit, choose the necessary tools, and proceed to checkout.
How to get support in Shopware?
If you have questions regarding accounting and financial services, try the following email and phone number: financial.services@shopware.com and +49 2555 9288 510. You can also contact Shopware regarding account or license issues at info@shopware.com and +49 2555 9288 50.
How to migrate to Shopware 6?
The Improved Import & Export module provides the ability to migrate from your existing e-commerce website to Shopware 6. Our module offers schedules and mapping schemes to simplify the transfer of core entities from external systems or Shopware’s previous versions. Since we offer export solutions for other e-commerce platforms, you can also migrate from Magento, Shopify, and other systems to Shopware 6 much faster. Contact us for more information.
How to automate import and export processes in Shopware 6?
The Improved Import & Export extension for Shopware 6 lets you automate recurring data transfers. You can use schedules to simplify regular data updates. This feature lets the module launch the corresponding import and export processes according to the specified time frames without interaction on the admin side.
How to integrate Shopware 6 with external systems?
The Improved Import & Export extension is also good at integrating Shopware 6 with ERPs, CRMs, accounting tools, and other external systems. The module automates repetitive import and export processes and modifies data with the help of mapping presets, following the requirements of your Shopware store during import or the rules of the connected platform during export.


